Cases have constantly evolved. What started out as a simple box to put your computer in has grown into a way to show off your computer. Today Tagan has given us this case to show that they have what it takes to be the case of your choice.
INTRODUCTION
It has been awhile since the first designer cases showed up on the market, but the battle for the best continues. Manufacturers have always tried to make a design that looks very attractive, while having unsurpassed performance. Today, Tagan has supplied us with the El Diablo A+ case, which hopes to exceed in both fields. This case combines some cool elements, like LED lights, with unsurpassed cooling. If its 360mm fan isn’t big enough for you, then I am afraid your thinking way too big. That is not the only thing that is big in this case, just about every other part of this case is simply huge.
Tagan has put a lot of pride in this case, even calling it their flagship case. This, being Tagan’s best case, should be a huge case. That is why Tagan has made this case a Super Tower, a case design that has showed up in the last couple of years in the call for larger towers. You simply can’t buy a bigger case from Tagan. If you are looking for the best Tagan case you can buy, look no further because this is the best of the best.
About Tagan
The spirit and philosophy of TAGAN´s birth: To carry out state-of-art technologies for the best quality power supplies and to offer them to all users.
Our simple reason to give TAGAN’s birth: We are a group of professional technical guys living in different countries –Germany, Japan and Silicon Valley (USA). All of us have had a couple of negative experience implementing Power Supply (PS) into systems. It is frustrating, time consuming and risky! By a very valuable opportunity, 2001 in Taipei’s Computex show, all of us met each other at a dinner party, we occasionally sat together and discussed about the power supply problems.
Based on our professional background and know-how, we suddenly all decided to study more about power supply and conduct some testing for finding out the best one. After almost a years teamwork in discussion, design, and developing, our team of international experts have designed some of the best and reliable power supplies for the PC as well as all the various systems. Consequently, all of us have become the founders of TAGAN. We are more than happy to share these products and experiences with you.
TAGAN´s strongest foundation – The best international professionals • The best power supply thermal-cooling and low -noise professional from Germany • The best power supply design professional from Japan • The best system-level power supply technical advisor from Silicon Valley (USA) • The best power supply manufactures from Taiwan and China TAGAN offers – The power supplies state-of-art technologies • Quiet enough! To make you sometime forget a power supply is working in your system • Cool enough! Not only cool the power supply itself also cool your system • Durable enough! So we can grant 36 month of warranty without problems • Efficient enough! To save your cost and energy • Low radiation emission! To protect your health and environment. • Value for your money! EMI Shield, PCI-Express socket capacitor, and many extras.
FEATURES
 |
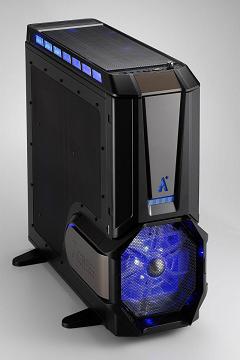
Dark Knight – Front panel
The Diablo “Dark Knight” outlook with steel material presents the enormous design. 250mm fan with blue illumination at front, covered with mesh to absorb the most cool air in. Removable bottom stand ready for any position.
|
|
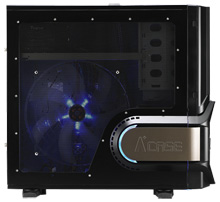
Diablo side panel World’s largest 360mm fan at side to obtain air in purely, the purpose of this huge is to drawl great amount of air w/o noise concern. Jet intake looking design with sectional blue LED light to perform best outlook. |
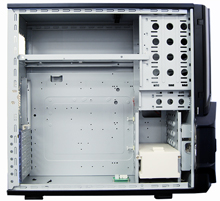 |
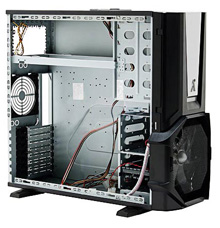
Huge internal space
Diablo provides great space for any kind of components, which supports the latest Motherboards (up to server size) and GPU as well.
|
|
Tool Less Installation
Backside with 7 expansion slots design as tool less clip system. The rounded edge to prevent injury while assembly.
|
|
 |
Featured PSU spaces ready
This Diablo case designed to be ready for any size of dimension of PSU, supports up to 12inches included cables.
|
SPECIFICATIONS
| Type | Super Tower |
| Color | Fully Black High Gloss Finish + Titanium bezel |
| Case Material | Chassis: 0.5mm SECC; Front Panel: 100% ABS Plastic + meshed grill |
| With Power Supply | No |
| Motherboard Compatibility | Micro ATX, Standard ATX, MP Dual CPU(12’x13′) |
| With Mesh Grill Side Panel | Yes |
| With E-SATA | No |
Expansion
| External 5.25″ Drive Bays | 5 |
| External 5.25″ Drive Bays | 1 |
| Internal 5.25″ Drive Bays | 7 (Removable HDD trays) |
| Expansion Slots | 7 |
Ports
| Ports | TOP: USB2.0*2 + IEEE 1394 firewire + Audio (AC97 + HD Audio) |
Cooling System
| Front Fan | 25cm*1 (400~800RPM, 36.85dBa at 800RPM & 18.42dBa at 400RPM) with VR fan speed control & ON/OFF switch |
| Rear Fan | 12cm*1 or 8cm*1 (Optional) |
| Side Fan | 33cm*1 (300~700RPM, 32.24dBa at 700RPM & 13.82dBa at 300RPM) with VR fan speed control & ON/OFF switch |
| Top Fan | N/A |
Physical
|
Gross Dimension
(L x W x H, mm) |
656 x 310 x 590 |
|
Net Dimension
(L x W x H, mm) |
570 x 205 x 541 |
|
Gross Weight (lb)
|
32.85 |
|
Net Weight (lb)
|
29.76 |
| RoHS | Yes |
| UPC code | 891881002029 |
| Accessories |
Tool-less Rail kit: 5.25″ CD/DVD ROM or Writer: 5 sets (10 PCS); 3.5″ FDD (Floppy Drive): 1 set (2 PCS); 3.5″ HDD (Hard Drive) Tray: 6 PCS Other Accessories: Motherboard standoff; Motherboard Screw (Phillips-Head); Installation screws pack; Cable Tie; Buzzer |
| Warranty | 1 Year |
PACKAGING
|
|
|


ACCESSORIES

OUTSIDE


While not as big as the humongous side fan, the front intake fan is still quite large. I like the fan design, the slow curves of the blades, and the silver center give this case a really nice visual effect in the front. The only issue I have with this fan is the case doesn’t have very much room for the air pushed by the fan to enter the case. I can feel quite a bit air entering the HDD bay though, so at least it serves its main purpose of keeping the HDD bay cool. If you look to the right or left you will see a button. The manual says that they are supposed to control the LED lights, but they did not do anything for me. I am a little disappointed at this, since the construction of the case was very good up to this point.

This slider controls the fan speed of either the front fan, or the side fan. There are two, one on each side. I noticed a difference in the fan speed, by watching the fan. These fans are impossible to hear over the top 180mm fans on full. I like that these are hidden a bit. It would really take away from the overall look of the case if these fan speed controllers were easily seen, and would hurt it more if they looked ugly.


This is a feature that I thought was very nice of Tagan to include. I am sure that one time or another we have all wanted to know what the temperature of our case was. Maybe it was to see if that extra fan helped, or maybe to see if another fan was needed. There will be no more guess work with this handy tool. The best part about it, is that you can move the probe around anywhere in your case. So if you wanted to see how hot your RAM heat sinks were getting, or if that drive bay is getting enough airflow, you can monitor the temps in real time. I use this feature quite often to monitor the air coming out of my PSU to ensure that it isn’t getting too hot.

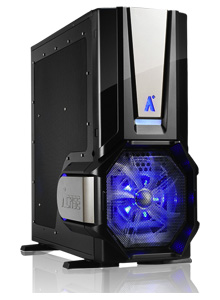
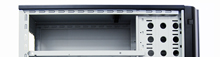
The front panel is an interesting design. It has a silver stripe in the middle, and an A+ near the bottom of the silver stripe. The A+, along with the area right below it, get lit up with blue LED’s. The A+ also doubles as an HDD activity light. I have never found much use for an HDD activity light, but sometimes it serves a purpose. I, at least, thank Tagan for having it cut out to show that the HDD is doing something. I like the effect the light has when it’s on, and if it was off most of the time I feel the case would be less visually appealing.

As you can see, here there are five disk drive bays, and one floppy disk drive bay. The included covers all line up at the seams nicely. This shows that Tagan has their quality control down pat. I chose to not use the very top disk drive bay because this blocks one of the top 180mm fans. Doing this will help airflow in the case dramatically, especially in the disk drive bays. The front door is kept closed by magnets. I like this system a lot. It is very easy to open, and leaves no ugly holes for plastic clips to clip together. Tagan even thought ahead, and included plastic bumpers so you don’t scratch up your door.

Tagan has really one upped themselves by including tool less drives. I very much love tool less drives. To me, those screws are a waste of time, and are especially a pain if you screw in both sides, thereby requiring you to take off both side panels. Using Tool less drives are much quicker and easier to get to if you have an issue, or are just performing a simple upgrade. The sliders attach in the screw holes of the drive via little metal probes. They surprisingly fit quite well, and hold, unlike some other systems that I have had to half insert the drive into the bay so the slider doesn’t fall out. The sliders also slid in very easily, without much effort on my part. A nice plus is the locking, which makes it fit nice and snug. Even if you accidentally hit the drive, it will not come out of place. This is very good construction on behalf of Tagan. Overall, the construction, and looks in this area of the case are far above standards.
INSIDE
The inside is where it all matters. You need to have enough space to put in all of your accessories, but some people don’t want so much space that they’re lost at where everything goes. Cable management also plays a key factor here. Pre-cut holes and ways to hide all of that cable clutter are definitely a plus to any case’s attributes.


This is the Fan/LED panel. This is where the LED and fans are controlled. It is a relatively simple circuit board, but for the job it does, there is no need for it to be anymore than it is. In the name of cable management, I have moved it from its terrible placement on the bottom of the case, to back behind the disk drive bay. Make sure to use something to insulate it from the metal if you decide to move it. I used two strips of thick double sided tape to insulate the other side. Pictured below is the original placement of the circuit board.


CONCLUSION
The Tagan El Diablo Advance has a lot going for it. The layout is very good. I only had a few complaints, and most of those lie with the back of the motherboard tray. I feel that if Tagan had made the back panel a little more cable management friendly it would have been a better case overall. This one issue certainly isn’t enough to mark the whole case down completely though, especially for the price.
The price is very low and I was completely surprised when I saw it. The case retails around $189 USD. This is a quite low amount considering the price for the other cases in this size range. The plastic shell is not of the best quality, but it is certainly not of the worst quality. The case also has a lot of features that I am quite surprised didn’t cost Tagan very much to implement.
The extra features in the El Diablo are simply amazing for a case of this price. The included temperature monitor is a very helpful tool, that I am sure many purchasers of this case will use very frequently. The fan controllers are also nice. I know of many people who hate to have a very loud computer. With the fan controllers in this case, you can choose to crank it when you go into a gaming session, or just have them on idle when you’re watching a nice relaxing movie.
Space is also another nice part of this case. There is plenty of room for the largest of graphics cards. Heck, why stop at just one graphics card when you can easily fit three dual slot cards in this case with no issues. There is only one place were space is an issue, and that is with the 360mm fan. It is just too thick to fit in a CPU tall cooler, but with the price range of this case that may not be a huge issue. I would like to seen Tagan make that big fan stick more on the outside of the case to maximize space inside the case for a taller CPU cooler.
Tagan also has great tech support. When my controller board, fried they provided a quick response and sent out a replacement right away. They have a pretty standard term of warranty. These include things that really don’t happen unless you’re not paying attention, or are just are too rough. Their year warranty is quite a nice inclusion to wrap up the whole package that is the Tagan El Diablo Advance. All together the Tagan El Diablo Advance case exceeded my expectations, excelling in almost everything, and being full of great features.
Pros:
+ Space
+ Quality build
+ High CFM fans
+ Fan controllers
+ Temp monitor
+ Biggest fan in a case
Cons:
– Behind mobo tray
– 360mm fan too thick
With a final score of 9 of 10 the Tagan El Diablo A+ receives the Bjorn3D Golden Bear Award.


