The IXG-80HA2 GPU cooler and the IXG-3F2 fans from SilenX are an evil combination. But does it have what it takes to cool our video cards?
INTRODUCTION
With video cards not only getting bigger and faster, they are requiring a lot more power to run them. And with them using more volts and having more capabilities, it is only natural for them to run hotter. Video card manufacturers usually only use the bare minimum on cooling solutions for the cards that they sell. For many of us, when we buy a new CPU, we normally purchase an after market cooler for them because we know that the standard cooler just does not cut it when it comes to cooling. With this being said, we can not expect a standard cooler to handle today’s video cards. It is also rare to find a GPU cooler that fits both Nvidia’s 2xxGTX’s and ATI’s HD48xx video cards. The folks at SilenX have made a GPU cooler that not only cools well, but fits both Nvidia’s 2xxGTX series of cards and ATI’s HD4870 GPU’s. So, let’s take a look at the IXG-80HA2 GPU cooler and the Tri fan IXG-3F2from SilenX.
About SilenX
How it all began
It begun as a hobby; a group of engineering students in search of silence. With computers running twenty-four hours a day, seven days a week, the noise was more than a nuisance. It was an absolute burden. But this was 1995 and your average mainstream computer processor was barely consuming 20 watts…under full load. Silent computing was still in its infancy, but of course, our guys were working to perfect it. What had originally begun as a hobby…turned into an obsession.
Airflow was measured, temperature gradients studied, simulations and testing ensued. The original designs were crude, but then again, even the greatest have to begin somewhere. With electronics getting hotter and hotter with each generation, someone had to step up to fight the noise. And that, we did. Our products made way into recording studios and sound labs around the world. Then came the inquiries from individuals wanting the same in their personal computers. Well…our next decision put smiles on their faces.
The road from here
SilenX has been a privately-owned and operated company based in southern California since 1995. There are several research and design facilities in addition to our primary warehouse facility and our renowned technical support and customer service center. Originally a high-end systems integrator for silent computers, SilenX shifted its focus to manufacturing silent PC components in 2002 and established factories in the United States, China, and Taiwan.
Our retail products are distributed in numerous countries around the world. We also have an OEM division that manufactures fans, thermal heatsink solutions and power supplies for various applications in computing, consumer electronics and other industrial uses. Our specialty is in low noise components as we have among the lowest noise cooling equipment in the industry.
Numerous awards have been won by our products in the consumer computing world for delivering a combination of the lowest noise levels without sacrificing high performance. Reviewers from around the world have praised our products for being on the forefront of the silent PC industry. Our commitment to the finest quality makes SilenX products both reliable and competitive.
SPECIFICATIONS
| Specifications | |
| SKU | IXG-80HA2 |
| Rated DBa | 0, 8-18 with optional fan kit |
| Dimensions | 228.4×113.2×33.2mm |
| Base Material | Copper Heatpipes, Aluminum Plates |
| Fin Material | Aluminum Fins |
| Fin Surface Area | 2800cm² |
| Weight | 365g |
| Rpm | 0, 1000-2500 with optional fan kit |
| Cfm | 0, 10-96 with optional fan kit |
| Current Draw | 0, 0.30-0.90A with optional fan kit |
| Power Consumption | 0, 3.60-9.60w with optional fan kit |
| Bearings | FDB, fluid dynamic bearings |
| Gpu Compatibility | Most Radeon and GeForce graphics cards with mounting holes SLi and Crossfire supported |
PACKAGING
The IXG-80HA2 iExtrema Pro GPU cooler
|
Let’s start off at the front of the box. You can’t help noticing the large cooler in the cutout window of this packaging, not to mention this GPU cooler is not exactly tiny. The packaging is red with a black band running across the top, giving us the name of the company, SilenX, to the left, and also informing us that this cooler is 0 dba. To the far right hand side we see Noiseless GPU cooler written here. |
|

|
Looking at the top of the packaging, we have the name, iXtrema Pro. It also tells us that this GPU cooler is noiseless. |
|

|
Some specifications of the GPU cooler and a cut out showing us the base of the GPU cooler. I will cover this a bit more in a later. |
|

|
How we get to the contents of the packaging is by opening the top portion of the box. Here we have a bag of screws, and a bag containing memory heatsinks. |
|

|
|
I removed the contents of the box and laid them all out. In the upper center, protected in a plastic covering is the GPU heatsink. To the bottom left hand side we have the 2xxGTX heat sinks that will be needed in order to use this GPU cooler on the 2xxGTX cards. To the right of these is the memory heatsinks. There are a total of eight. Then, there’s a bag of mounting screws we will need to mount on our video cards. Finally, there’s the instruction booklet. |

|
|
Before I start anything I check and make sure that the base of the cooler is smooth and has a good flat surface. As we can see, the SilenX Xtrema Pro GPU cooler has a nice flat and semi polished look to it. Also note that the heat pipes are contacting the GPU core directly. This design is getting popular, not only in CPU coolers, but now GPU coolers as well. |

|
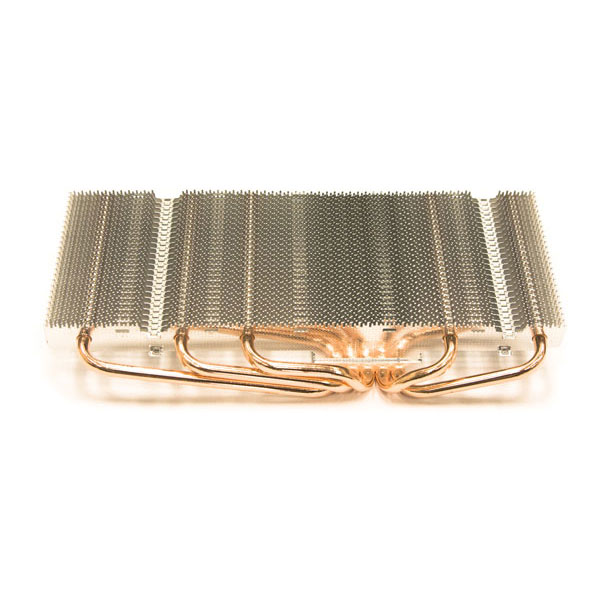
Looking at the side of the iXtrema Pro GPU cooler here and we see that this cooler as a slim profile to it. There should not be a problem running this GPU cooler in a SLi or Crossfire X confgiuration. We also see five copper heat pipes coming from the base to the aluminum fins. |
|

|
Looking through the fins of the GPU cooler, we see that SilenX did a good job on keeping these evenly spaced and uniformed. |
|

|
|
I flipped over to the other side of the GPU cooler. We see that the aluminum fins are serrated, and that the cooper heat pipes can be seen on the other side. |

|
|
Looking down at the heat pipes from the top. SilenX kept these pretty close to the fins as well. |

|
An up close shot of the serration of the aluminum fins is shown here. |
|

|
|
A closer shot looking between the fins. |

The IXG-3F2 Fans
|
As we can see, SilenX used the same red packaging colors as the IXG-80HA2. You can’t help noticing that there are three fans and all of them have a open design. |
|

|
Looking at the back of the fans’ packaging. |
|

|
|
The IXG-3F2 fans out side of the plastic packaging. These fans do not have a case that surrounds them. In fact, they are an open design (fingers beware). Inbetween the bottom two fans we see two extenders. These have a drop in resistor to control the voltage going to the fans. |

|
|
The bottom of one of the fans. These will clip right on to the IXG-80HA2 Xtrema Pro GPU cooler, right onto the fins themselves. Also, we see ROHS on a sticker. |

|
The top of the IXG-3F2 fan. Here we can see SilenX used a 80mm fan. |
|

INSTALLATION
The Victim
|
Well, we need a victim for our little test. I choose you, a Sapphire HD4870 1 gig video card. |
|

|
As always we need to rip apart the original heatsink from our victim. “Igor, locate all of the screws and remove them.” |
|

|
“Screws removed, Master”. |
|

|
|
Time for prepping. “Igor, prep the HD4870”. “Aye, Master.” |

|
|
“Igor, I thought I told you to prep, not to take a snap shot of the original cooler with our victim”. “Sorry, Master”. You just can’t find good help these days. |

|
Well here is what the IXG-80HA2 looks like up against the original cooler that Sapphire used. the IXG-80HA2 is slightly bigger, plus it contains five copper heat pipes to the three of the original heat sink. |
|

|
Actually I goofed here. I installed the Nvidia screws instead of the ones I needed for the ATI HD4870. “Igor, I swear if you say anything I will….” |
|

|
|
Close up shot of the Nvidia screws. Notice the base of the screw is slightly tall. |

|
|
Well, after I located the proper screws I needed, I installed them. See, the HD4870 screws are a lot shorter then the last ones. |

|
Thermal paste, time. Well, when I opened up the tube of thermal paste and tried to put a small drop of it on the core of my GPU I could not help noticing it looked more like dried up peanut butter. It spreads about the same too. |
|

|
|
Well, that did not leave a mark. Not exactly what I like to see. So off comes their thermal paste… |

|
…and on with mine. |
|

|
Test #2. Pretty simple really. I just used the weight of my finger to give the pressure that I needed for this test. |
|

|
|
Now, that’s more like it. If you look real closely, we can barely make out the separation between the heat pipes of the cooler. Good job SilenX. |

|
|
Always make sure what you have on the GPU core is what we got on the GPU cooler. |

|
Time for final test installation. SilenX, has these black sticker type washers that we need to put over the studs on the GPU cooler. |
|

|
Once we get The cooler installed we need to locate the red washers and place them over the studs on the back side of the GPU. When tightening the screws on any cooler, use a cross pattern to tighten. |
|

|
|
Final test fitting. Just showing that all the screws were tightened down properly. |

| Final test fitting again. Now this is what I like seeing. Again see the IXG-80HA2 Cooper heat pipes barly left a raised spot on my GPU core. |
|

| Always make sure what you have on the GPU core is what you get on the GPU heatsink’s base. Nice and thin, Perfect. |
|

|
|
The included memory base. It has a protector on it that has to be removed prior to installing it on the video card. |

|
|
Just not yet. I have to show you what they look like first. |

|
|
And there we have it. I removed the protective covering to exposed the sticky tape. |

| On the HD4870 video card you cannot put the heat sinks on the four memory chips near the edge of the card and expect the cooler to fit properly. |
|

| Another picture showing what happens when you do. |
|

| Up close picture. Notice the coolers base is hitting the memory heat sinks and not on the video cards core. |
|

|
|
Once I got the memory heat sinks removed (the ones that needed to be), I tightened up the IXG-80HA2 Cooler to my video card and took a snap shot of the side of the video card, showing that this cooler did not warp or bend the video card. |

|
|
Just before I installed the IXG-3F2 fans. Hmmm, now where did the fans go? The fans will be snapped onto the fins directly while using these little rectangle notches in the fins themselves. |

| The IXG-3F2 fans each have a three pin fan plug, The package did include a single to 3-way fan splitter so we can hook up all of these fans on one fan plug from a power soarce. In order to reduce the fans speed, you will need to use the extension cable with the drop in resistor to lower the overall voltage to the fans. |
|

| After I got the fans installed it was time to put the video card onto the motherboard. The 4870 is the primary video card in my Crossfire X set up. The card that is to the left is a water cooled HD4870X2 video card. If you have two PCI expansion ports between your video cards you can use this GPU cooler and fans. If you only have one expansion port then the fans cannot be used when in Crossfire X or SLi mode. |
|

|
|
The standard ATI Crossfire Bridge ribbon. It is a little short, but we can still use it to connect our video cards. If you have a longer ribbon it is best to use it. |

|
|
Final installation. Also, how this GPU cooler was tested in a worst case scenero. |

TESTING METHODOLOGY
| Test Setup &Testing Methodology | |
| CPU | Core i7 920 |
| Motherboard | MSI X58 Platinum |
| Case | Open Bench Testing Case |
| Memory | Crucial DDR3 1333 MHz |
| Video Card | Sapphire 4870×2/4870 |
| Hard Drives | 3 x 160 Gig Sata2 Western Digital, 2 in raid 0, 1 back up |
| Cdrom Drive | Lite On Sata1 Dvd Burner |
| Power Supply | Coolermaster U.C.P. 900watt 80+ Silver |
| Type Of Coolers Used | DD MC-TDX , Koolance VID-487X2 (Dual Loop), SilenX IXG-80HA2 |
| CPU Speeds Used | 2.66GHz, 3.8GHz, 3.990GHz |
| Operating System Used | Microsoft Windows Vista 64 bit Ultimate |
| Type of Software Used During Testing | 2 x 1 hour sessions of Crysis Warhead per GPU Clock Speed’s |
I decided that the best way to test a video card cooler was to actually game with it while on my video card. This particular testing session is not your average test. I did not run this video card in a single mode. I instead left this video card in a Dual GPU configuration (ATI Crossfire X) with the HD 4870 as my primary card (PCI-E #1) and placed the HD4870x2 as my secondary card (PCI-E #2). Even thought 4870×2 is water cooled it still puts off a good amount of heat on the back side of it. Also, I did not use any form of assistance in regards to air flow to the cards at all (this is an open bench test case, but even though it’s open that does not mean that I have airflow where it’s needed). At the time of testing my ambient temperature was 18.6°C. Also, this is my worst case scenario I could give you at this time. So, please keep in mind, your temperatures will very from my actual results on a case by case basis. I am not going to go through a bunch of different clock speeds. I am only going to give you the results of an idle state, and for which this to have happened, I defaulted RivaTuners clock generator to ensure power play was in place. Also, I allowed the video card to cool down for 30 minutes after 1 hour of gaming, and with the absolute maximum clock speeds I was able to achieve with both the stock cooler and the SlienX IXG-80HA2 GPU cooler with the matching fans (I do not and will run my video cards or CPU’s passively). I used RivaTuner to overclock the video card. I also try and keep my video cards below 70°C while at full load if at all possible. If the video card reached this temp I would stop testing immediately and note it as a failure.
Now, our Fearless leader (Boss man, actually) Scott suggested a while ago (when I brought you the koolance 487X2 water block review) that we should include a benchmark or game in our reviews to better show you the effectiveness of having a higher clock speed on our video cards. That’s kind of the point in buying a better GPU cooler, to overclock our video cards so we can gain more frames per second on our games. Well, I agree. So I will list a 3DMark Vantage run at default speeds, max original cooler speeds, and max IXG-80HA2 coolers speed. Keep in mind, actual results will vary greatly. Also, it takes a boat load of work to gain a small amount in Vantage. The only video card I overclocked was the 4870 and the 4870×2 was left at default speed of 750/900.
RESULTS
Idle Testing
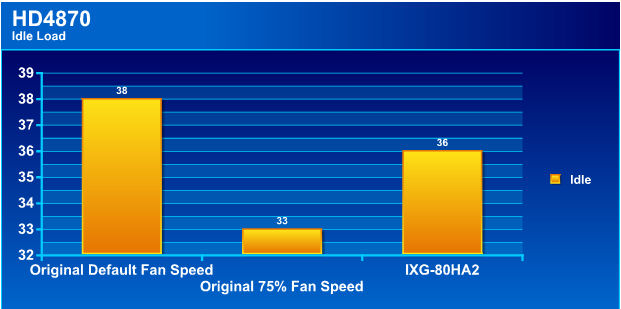
Here we see the original cooler (while having the fan speed at 75%) is the victor. But keep in mind this, the original heatsink has a bit more of a gap between the 4870×2 and the 4870. Also, once the fan was ramped up beyond 50%, it got loud. The IXG-80HA2 GPU cooler and its fans were barely audible during testing, and that’s three 80mm fans at full speed.
Full Load Testing

The clock speeds used are as follows for the full load testing. On the original default fan speed I did not budge the clock speed at all because the video card would have gone over my 70°C limitation, and thus ending this session of testing. The clock speeds used here were 750/900. Once I ramped up the fan speed to 75%, I was able to gain 58MHz on the GPU core and 51MHz (204 actual) on the memory before experiencing lockups. The final temperature I reached was 57°C. The clock speeds used were 808/951. The IXG-80HA2 GPU cooler and fan combo gave me an impressive overclock gain of 80MHz on the core from default and 51MHz from default on the memory (204 actual) while keeping the GPU core at 51°C. Final GPU clock speed used was 830/951. It’s not always about idle temperatures, but about how low the full load temperatures are.
3DMark Vantage
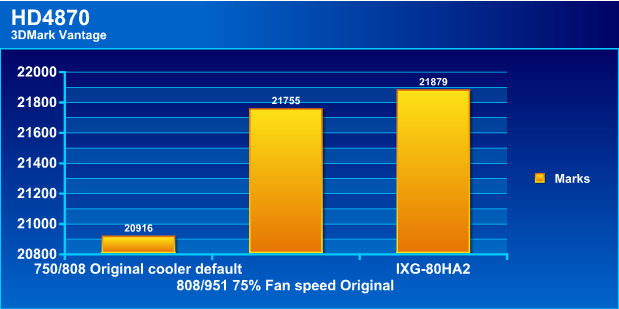
For the graphic testing I used 3DMark Vantage. Here we can see our results of having an overclocked video card and what it can do. These are not the most staggering numbers for a performance boost, but being able to keep the video card cooler allows us to gain a few more frames we may need. And that’s not to mention having that card being able to last longer because of the components running cooler.
CONCLUSIONS
The IXG-80HA2 and fan combo is an effective way on keeping video cards cooler, while maintaining a somewhat quiet computer case. I could barely hear the fans on this GPU cooler and I could not determine if the noise was from the 80CFM 120mm fans or the 40mm Northbridge fan that I was using. Installing this GPU cooler was easy. The instructions were clear on what goes where and what to do at that time. The only complaint I have is the design of the open case fans. Granted, we should not be poking our fingers where their not needed, but some of us still do that from time to time. Having the fans open like this will cause us to get our nosey fingers slapped by these blades, causing a little bit of pain or actually breaking one of the fan blades themselves.
At the time of writing this review I could not find a price for the IXG80HA2.
Bjorn3d is adding a new rating system for you readers to better understand on how we reviewers judge our products we review for you. This does not total up the final scoring of the product we are reviewing.
- Performance 10
- Value N/A
- Quality 9
- Warranty 9
- Features 9
- Innovation 9
Pros:
+Utilizing an open copper heat pipe design
+A somewhat low profile GPU cooler (without fans)
+Fans were barely audible while at maximum speed
+Ease of installation
Cons:
–Open style fans
Final score of 9 of 10. The IXG-80HA2 receives the Bjorn3D Golden Bear Award.


