Just when we thought that a good GPU cooler had to be large to perform well, Coolink shows us it’s not the size that counts, it’s how you use it. Let’s see if the GFXChilla can handle an HD 4870.
INTRODUCTION
Trying to find a air cooling heatsink for our video cards that not only cools well but is small enough to fit into our cases and on our motherboard without taking up 3+ slots, has become a complete nightmare. As video cards get bigger and faster, most think that the cooler that cools these cards should also be massive in size. Either it adds a lot of extra unneeded weight to our video cards or these coolers take up extra valuable PCI slots that we may need.
Coolink has introduced a GPU cooler that is short in height, and its overall length is surprisingly small when compared to other offerings. So, let’s take a peak at this GPU cooler and see if it can handle an HD4870, shall we?
About Coolink
Coolink is a brand of the Kolink International Corporation and stands for an effective conjunction of no-frills performance, excellent quality and attractive pricing. Coolink – the direct link to affordable high-end cooling!
 About Kolink
Kolink International Corporation is a cooling specialist established in 1996 and well known among industry insiders. Throughout the years, Kolink designed and manufactured many top-performing heat-sinks under various brand names that succeeded in international markets. An experienced R&D team and ultra-modern production plants in Taiwan ensure continuous progress, efficient manufacturing conditions and strict quality standards.
Kolink International Coporation
Keelung Rd. 155
TW 12F-10 Taipei
Tel: + 886- 2-27471800
Fax:+ 886- 2-27639716
[email protected]
About Coolink & Coolink-Europe
Kolink’s retail brand Coolink stands for an effective conjunction of no-frills performance, excellent quality and attractive pricing. While Coolink held a strong presence in the Asian market ever since the late 90ies, it was not until 2005 that the brand was introduced to the European market on a large scale. After the launch of Coolink-Europe.com in late 2005, Coolink quickly became a well recognized brand for high-quality cooling components in Europe too.
SPECIFICATIONS
| Specifications | |
| Height (without fan) | 20mm |
| Width (without fan) | 161mm |
| Depth (without fan) | 115mm |
| Height (with fan) | 30mm |
| Width (with fan) | 161mm |
| Depth (with fan) | 115mm |
| Weight (with fan) | 330g |
| Material | Copper (base and heat-pipes), aluminum (cooling fins) |
| Compatibility | See Compatibility list |
| Fan size | 2x 80x80x10mm |
| Rotational Speed (+/- 10%) | 2000rpm |
| Acoustical Noise | 18dB(A) |
| Scope of Delivery | RAM- & VR-heatsinks, 3:4-pin Adaptor, Thermal Paste, Installation Manual |
| Warranty | 3 Years |
As we look over the specifications of this GPU cooler, we quickly find out that it’s not much taller than a normal everyday fan we use in our computers. This should be a blessing for some of us that have multi GPU computers, as this should allow more room for those motherboards and cases with tight spaces.
PACKAGING

Here’s the front side of the GFX Chilla’s packaging. We see that the packaging shows us the two 80mm fans that are used on this GPU cooler. To the left side of the window we have some information about this particular cooler. To the upper left hand corner we have the company that built this GPU cooler, Coolink. Right below the window is the name of the GPU cooler, GFX Chilla.

Looking at the top of the box. I did notice that this GPU cooler is rather thin looking.

The side, showing us what else is included, as far as memory heat sinks.

Flipping the box 180° to the other side, Coolink lists general specifications of both fan and GPU cooler. Also, a compatibility chart with measurements is included.

Turning the box over onto the back, Coolink gives us the actual dimensions of the GPU cooler with fans. Also, we’re given the basic features.

Opening the box up and removing the GPU cooler in its packaging we see that Coolink made sure that this GPU cooler would be protected during shipping.

I flipped the plastic encasement over and I see that the included hardware and heatsinks are located right below the base of the GPU cooler. Even I wondered if the base was harmed. But, in fact, Coolink used another plastic insert over the top of the included hardware to protect the base of the GPU cooler.

As always, remove any plastic or film that may cover the base of any cooler, as the warning tells us to. A quick glance of the GPU cooler mounts and we can see that we can move these rails up or down to accommodate how we want them to be mounted on the video card.

All of the hardware is laid out here. In the upper right hand side is the GPU cooler, of course, and looking to the bottom left of the GPU cooler is the mounting screws and foam protectors. These will be used to help keep this GPU cooler from rocking and breaking a corner off of the GPU core. Moving right we have a 4-pin Molex to 3-pin fan adapter, and the included thermal paste. The thermal paste is thin, so be careful when applying this, as it can make a mess. To the far left of the GPU cooler, we have ten normal sized memory heat sinks, four low profile memory heatsinks and four VRM/power module heat sinks.

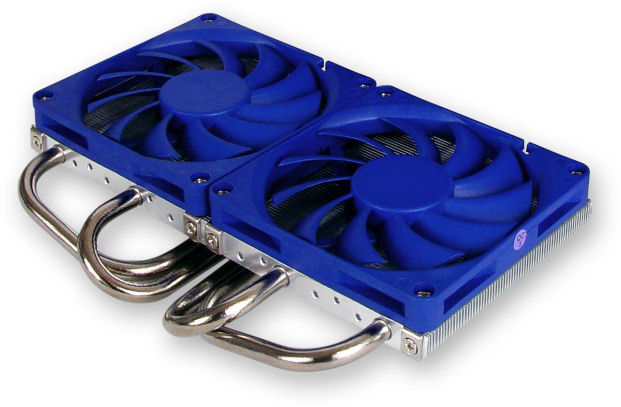
Close up view of the heatsink and fan of the GFX Chilla.

Side view of the GFX Chilla here and we notice one thing for sure, that the fins of this cooler are really short in height and that the total height is rather short.

Side view of the GFX Chilla.

The opposite side of the GFX Chilla. Well there are four heat pipes coming form the base of the GPU cooler to the fins of the heatsink. I should mention, the fins of this cooler do not contact the base. Now, that makes me wonder even if this little cooler is even capable of handling an ATI HD 4870 video card. A quick glance over at Coolink’s website verifies that it can but, they noted that we will need to use another type of heatsinks for the VRM’s and that the ones that are included will not contact the VRM’s properly. We will have to see about that.

I ripped apart yet another perfectly good stock standard GPU cooler that HIS used and used the heatsink as a comparison in size to this GFX Chilla cooler. In retrospect, the GFX Chill is not that much bigger, Now I am really starting to doubt the ability of this GPU cooler. But onwards we go. If the video card gets toasted it wouldn’t be the first one or the last one.

Doing a side by side comparison and, again, skepticism really starts to kick in here, mainly because the height of the GFX Chilla is not that much taller then the stock standard cooler. But, nonetheless, moving onwards.

Well, time for a reflection test. The base of this cooler is nice and flat as well as slightly polished.
INSTALLATION
Fear and Skepticism
After spending a hour or so looking over this GPU cooler, and checking Coolink’s website to make sure this GPU cooler would actually work on my HD4870 (re-verifing the verified), I decided to go ahead and proceed forward. If the video card gets torched, it gets torched. It won’t be the first one and it sure won’t be the last, muhahahahahahaha.

The candidate I chose for this task of torturing, is none other than a perfectly good HIS HD4870 ICEQ 4 1 gig video card.

Before we can go anywhere we need to remove all of the screws on the backside of the video card.

Screws removed.

As we can see I removed the cooler once before.

Before I do any final fittings, I make sure that the GPU cooler hits the video cards core properly. I am going to mention I missed a step on showing you the little stand offs that need to be screwed into the GPU coolers mounting.

With the GPU cooler on its back, I put the video card onto the cooler. Used my finger to put weight on the back of the card behind the core.

Well, upon removing the video card from the cooler I noticed that the coolers base wasn’t thoroughly hitting the GPU core. Hmmm, oh darn. The GPU cooler is actually shorter in height than the card’s PCI expansion covers.

Nonetheless, the cooler was hitting the GPU core, and the GPU core is hitting in the center of the heat sink’s base.

Second test fit shown here. This time, I lifted the video card and the GPU cooler together and then lightly squeezed the two together.

Now that’s a better test fit.

As always, check to make sure the base of the cooler matches what we have on the GPU core. Everything looks good for a third test fitting.

You will have four studs sticking out on the back side of the video card and you will need to find eight black plastic washers. Put one on each stud before you put the GPU cooler onto the video card and then place four more on the backside of the video card over each stud that is protruding through.

I have all eight plastic washers in place, four before the video card (not shown) and four more on the backside.

Then, use the four included nuts/springs and tighten these down in a criss cross pattern.

Looking at the side of the video card after a trial full installation. It is really hard to see this, but this cooler did warp my video card’s PCB a bit. After noticing this, I backed off the nuts a bit.

Again, it’s hard to tell, but the PCB is still just a tad bit tweaked or bowed. I do not like bowed or tweaked PCB’s and I am anal about this.

After removing of the GPU cooler I checked to make sure the cooler was fully hitting the GPU core, and it was. The thermal paste spread out nice and evenly like it’ supposed to.

Always check and make sure that you have on the GPU core is what you get on the GPU cooler’s base.

After scratching my head on how I could fix this bowing of the PCB so I could continue on with the installation, I came up with a perfect solution (I will get to that in a bit). But it’s time for the VRM’s heatsinks and the heatsinks to be placed on these and the memory. This is what the VRM’s look like on an HD 4870 (reference).

The other VRM’s on the HD 4870 video card (reference).

All of the VRM’s. If anything, I go nuts on pictures don’t I?

After carefully examining the VRM’s and the little heatsinks that Coolink provided (remember they said that a different heatsink has to be used) and after scratching my head and looking at this and that, I went ahead and used the included heatsinks for power modules and VRM’s (long and skinny ones). I put one on and secured it tightly, then removed it and looked and the thermal tape on the other side of the heatsink and saw that these did hit the VRM’s flatly. Do this at your own risk.

I placed the memory heatsinks on the card. You will need to use the low profile heatsinks on the edge memory chips.

That’s right, my solution to the bowing, was to use the original back plate that comes with the video card. I removed the screws from it and then put the retention plate over each stud from the GPU cooler and put a nut on that corner and proceeded to do the other three. The last stud was a bit of a pain to do but I managed to get it on there and tightened the nuts down snuggly. Now my video card’s PCB was not bowed or tweaked. I was happy now.

Close up shot of the heatpipe side of the GPU cooler.

The reason for the bowing I was getting on the PCB is shown here. As we look real close, we see that there’s a bit of a gap between the standoff and the GPU PCB.

Better shot showing this small gap. But, nonetheless, everything looks good and flat. Let’s get on with the testing.

The video card in the computer and turned on is shown here. My finger was on the power button and/or the reset button during this time for a just-in-case. No artifacting or funky things like that on start up or even during a quick 3DMark testing. So my paranoia was just that, UNWARRENTED.
Everything looks good to go, so let’s get on with the testing. Man, we reviewers are long winded folks, ain’t we?
TESTING METHODOLOGY
| Test Setup &Testing Methodology | |
| CPU | Lapped Core i7 920 |
| Motherboard | MSI X58 Platinum |
| Case | Coolermaster ATCS 840 |
| Memory | Corsair DDR3 1600 |
| Video Card’s | Sapphire 4870×2, HIS 4870 |
| Hard Drives | 3 x 160 Gig Sata2 Western Digital, 2 in raid 0, 1 back up |
| Cdrom Drive | Lite On Sata1 Dvd Burner |
| Power Supply | Coolermaster U.C.P. 900watt 80+ Silver |
| Type Of Coolers Used | DD MC-TDX , Koolance VID-487X2 (Dual Loop), GFX Chilla 4870 |
| CPU Speeds Used | 3990Mhz, 210 x 19 |
| Operating System Used | Microsoft Windows Vista 64 bit Ultimate |
| Type of Software Used During Testing | Various games |
To test the full capabilities of this GPU cooler I played various games for several hours and monitored the temperatures with RivaTuner. So I could hold the card that was being tested at a full load as long as possible, I left the 4870×2 in the bottom slot to simulate a dual video card configuration that some of you may have. I will be comparing this cooler with the Stock ICEQ 4+ cooler that the HIS 4870 video card comes with for referencing. The ambient temperatures were around 18°C. Your results will vary greatly from my results. I left the BIOS of the video card control the fan speed on the HIS ICEQ 4+ cooler that was used If the video card’s reach 70°C full load I would stop testing. I do not like my video cards reaching beyond this point.
TESTING
Stock Clock Speeds
| Idle Load | Idle |
| Coolink GFX Chilla 770/1000 |
32°C |
| HIS Standard ICEQ 4+ 770/1000 |
35°C |
The original cooler HIS provided with this video cards does actually quite well in handling the heat output of the GPU core while idling. The smaller GFX Chilla does even better by shaving off a few extra degrees during an idle state. Even though this GPU cooler is smaller, it sis till doing a lot better job of keeping this card cool. Let’s look at how this little cooler does during full load testing.
| Full Load | Full |
| Coolink GFX Chilla 770/1000 |
48°C |
| HIS Standard ICEQ 4+ 770/1000 |
62°C |
Once again, the original cooler HIS used does manage well. The smaller, more efficient GFX Chilla decimates the scene here. Not by a small 5°C temperature variance, but by a staggering 14°C cooler.
Overclocked
| Idle Load | Idle |
| Coolink GFX Chilla 845/1050 |
32°C |
| HIS Standard ICEQ 4+ 821/1050 |
35°C |
Idle state for both overclocked and standard clock speeds should not be different as the video cards uses the same exact idle speeds.
| Full Load | Full |
| Coolink GFX Chilla 845/1050 |
50°C |
| HIS Standard ICEQ 4+ 821/1050 |
67°C |
The original cooler HIS used managed to gain a +51 MHz on GPU core speed before topping out at 67°C. The Coolink GFX Chilla managed an extra 24MHz on top of that, and barely broke 50°C for full load testing. Not only did I gained a few extra GPU core speeds, I managed to keep the video card even cooler at that rated speed.
CONCLUSIONS
With the need for GPU coolers to cool our video cards better, we always think bigger is better. What happens with these larger GPU coolers we see or use, is that these types of coolers eat up precious slots that we may need the use of the PCI expansion’s slots that our motherboards provide. Even myself, as a hard core overclocker and gamer type, my first initial thoughts of this GPU cooler was, “You gots to be kidding me”, “You want me to do what, and on one of my video cards!”
I have to admit, even with my skepticism and all out fear of my first initial thoughts of this GPU cooler, it performed just as good, if not better than some of the other GPU coolers I have encountered. Coolink has a definite winner with the GFX-Chilla.
Coolink definitely has a winner with this GPU cooler. It not only dropped my temperatures down on my video card, it also was short enough to allow a multi GPU configuration with ease, which we should all consider when purchasing video cards and motherboards for our computers. Coolink makes choosing a whole lot easier and opens up even more possibilities for us when buying computer components. The only real complaint I have with this GPU cooler is the fact that it did slightly bow the PCB of my video card. Coolink could have included a retention plate and/or made the standoffs a tad bit longer to help keep this from happening.
Having a Price point of on or around $30 USD makes this the perfect candidate for those who want great cooling and quiet operation, while also allowing multi GPU configurations, or for even those who have just one video card who need a better cooling solution.
We are trying out a new addition to our scoring system to provide additional feedback beyond a flat score. Please note that the final score isn’t an aggregate average of the new rating system.
- Performance 9.5
- Value 9.5
- Quality 9.5
- Warranty 9
- Features 9
- Innovation 9.5
Pros:
+Excellent performance for such a small GPU cooler
+Quite operation
+Light weight compact design
+Ease of Installing
Cons:
–Bowing did occur on the PCB of my video card once I tightened the nuts down.
Final score of 9.5 out of 10 and receives the Bjorn3D Seal of Approval.


