Our last MSI board gave us the essentials and a few more toys. Their enthusiast board offers everything a hardcore enthusiast would want and a whole lot more.
Introduction
Our review of the 790GX-G65 left us with a nice taste in our mouth. Made us want the dessert of MSI motherboards. Well in this case, careful what you wish for because you just might get it! Today we are reviewing MSI’s latest in AMD motherboards; The MSI 790FX-GD70. There where a few things that snagged us from before and MSI fixed all these little problems in their enthusiast board and even added a whole lot more that we didn’t expect. From nice little knobs that overclock for you to extra voltage controls all the way to quad crossfire support, they give it all. When you open it you just expect great things. Well lets go take a look.
About Micro-Star International
Founded in August 1986, MSI has continued to uphold a business philosophy that stresses “Award-winning product quality and outstanding customer service.” MSI specializes in the design and manufacture of mainboards, graphics card, add-on cards, servers/workstations, iPC, barebones, communication devices, CE products, Notebooks, and car PC products.
“Quality Products Create Faithful Customers” is a motto that guides all that we do at MSI. For this reason, MSI goes all out to be the best of the best in research and development. Currently, 2,500 experienced engineers staff our research and development department. This talented team carries out its work with the latest research equipment, continuing to raise the bar on product quality and innovative product features.
At MSI, we put our motto — “Quality Products Create Faithful Customers”–into living practice. In 1995 and 1996, we received ISO-9002 and ISO-9001 product quality certification, respectively. In 1999, MSI received ISO-14001 environmental certification, affirming our commitment to the environment. Furthermore, MSI products undergo rigorous quality control testing, attaining a 99.6% quality rate, a level far higher than the industry standard. MSI’s superior product quality has garnered exceedingly favorable coverage from the global media, countless awards, and a very enthusiastic customer response.
In recent years, MSI has aggressively expanded into mainland China to meet the needs of our global customers. In the first quarter of 2001, the Baoan Plant in Shenzhen started production, vastly increasing MSI’s production output as well as revenue. Aside from the Baoan Plant in Shenzhen, MSI has also established production facilities and a research and development center in Kunshan, China in 2003. The mainboard annual production is expected to reach 20.8 million units and the annual graphics card production is expected to reach 11.8 million units. Combined with the production from Taiwan, MSI is now becoming one of the biggest mainboard and graphics card manufacturers in the world.
To keep abreast of the global market and offer our customers the best service, speediest product delivery, as well as sales and technical support, MSI has established subsidiaries in mainland China, Czech Republic, Hong Kong, Japan, Korea, India, Taiwan, the U.S.A., Canada, Brazil, Germany, France, Australia, the Netherlands, Turkey, U.K., Russia, Ukraine, Serbia, and Poland.
To broaden our global market and to build a good image, we keep striving on marketing promotions, for example, posting advertisement on some reputed media, releasing news information, improving product box design, holding many promotion activities and attending all important PC exhibitions in the world. Apart from developing the mainboard, graphics card, server/workstation, and barebone, MSI has also introduced the communication, CE, Notebook, iPC, and car PC products to bridge the transition to the post-PC world. MSI adopts a diversified business model, and is transforming itself into a leader in the Consumer Electronics age.
Together, we are entering a greatly-accelerated world. Let MSI be the first to welcome you into this exciting new Digital Universe!
Features
DrMOS
- DrMOS has integrated Driver IC, Top-MOSFET, Bottom-MOSFET GreenPower
- GreenPower Technology is the Best efficient power saving solution for end-users.
XpressCool
- DrMOS offers lower temperature when it is working. No More Noise!! No More High Speed Fan!!
RapidBoost
- DrMOS delivers the high quality power transfer to bring the “Stable Overclocking Environment”.
APS
- APS is Active Phase Switching, that is complete function to Control Power Demand With Switcing Dynamically, it’s for CPU, Memory and Chipset PWM.
140Watt Support
- Supports AMD high performance 140W CPUs
- Reserve the ability for future CPU upgrade
- To fully release the power of AMD CPUs
OC Dial
- Realtime FSB Tuning
- Unlimited Turning Segments
- Easy Use-Just Rotate the Knob!
M-Flash
- Faster and Flexible and Instant
- If BIOS crash, it still can boot from USB Drive
- Update BIOS from USB Drive by M-Flash Fucntion
All Solid Capacitors
- Longer lifespan than electrolytic capacitors
- Endurable to operation under higher frequency & temperature
- Avoid exploding capacitors to cause mainboards failure
All Sheilded Choke
- A choke is an inductor responsible for storing power and regulates the current.
- All shielded choke could reduce core power loss, lower EMI interference.
- Store energy longer at higher frequency, achieving higher efficiency.
Specifications
| MSI AM3 790FX-GD70 |
|
|
CPU
|
AM3 941 Socket for AMD Phenom II/Athlon Processor with HyperTransport 3.0 system bus
|
|
Chipset
|
AMD 790FX/SB750
|
|
System Bus
|
Up to 5200 MT/s HyperTransport™ 3.0 interface
|
|
Memory
|
Up to 16gig DDR3 800/1066/1333/1600(OC)/1800(OC)/2133(OC) Mhz
|
|
Expansion Slots
|
4x PCI Express 2.0 16x slots (Single card 16x/Dual card 8x/8x)
1x PCI Express 2.0 1x slots
2x PCI slots
|
|
Storage
|
SB750 Chipset
1 x UltraDMA 133/100/66 for up to 2 PATA devices 8 x SATA 3 Gb/s ports Support RAID 0,1,5,10 2 x eSATA 3.0/Gbps port
|
|
LAN
|
2 x 10/100/1000 Mbits/sec LAN Subsystem using the Realtek Ethernet LAN Controller
|
|
Audio
|
8-Channel (7.1) HD Audio with six analog audio outputs and S/PDIF digital audio Pin-Header
|
|
IEEE 1394
|
2 x IEEE-1394a Ports (1 external port, 1 internal header) |
|
USB
|
11 USB 2.0 ports (Rear x 7 / Front x 4) |
|
Overclocking Features
|
MSI’s OC Dial
Max FSB
OC Memory support up to DDR3 2133
|
|
Back Panel I/O Port
|
1 x External SATA
1 x Optical, 1 x Coaxial SPDIF Out 1 x IEEE 1394a 2 x RJ45 port 7 x USB 2.0/1.1 8 Channel Audio I/O 1 x PS/2 Keyboard (Purple) 1 x PS/2 Mouse (Green)
|
|
Internal I/O Connectors
|
2 x USB connectors (6 ports)
1 x Floppy disk drive connector 1 x IDE connector 8 x SATA connectors 1 x IEEE 1394a connector 1 x CPU Fan connector 3 x Chassis Fan connector 1 x S/PDIF Out connector CD audio in Front panel audio connector COM connector 24-pin ATX Power connector 4-pin ATX 12V Power connector |
|
Accessories
|
1 x UltraDMA 133/100/66 cable
4 x SATA cable 1 x M-Connector 2 x SATA to Molex power cables
1 x I/O Shield 1 x User’s manual (Package Contents may vary)
|
|
Support CD
|
Drivers
Live Update 3 Overclocking Center
Green Power Center
AMD OverDrive
Notron Internet security Adobe Acrobat Reader Esobi Manual |
|
Form Factor
|
ATX Form Factor
12 inch x 9.6 inch 30.5 cm x 24.5 cm ) |
Pictures & Impressions
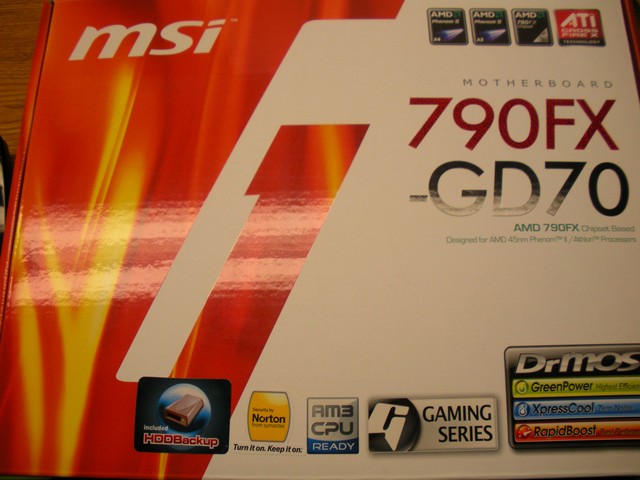
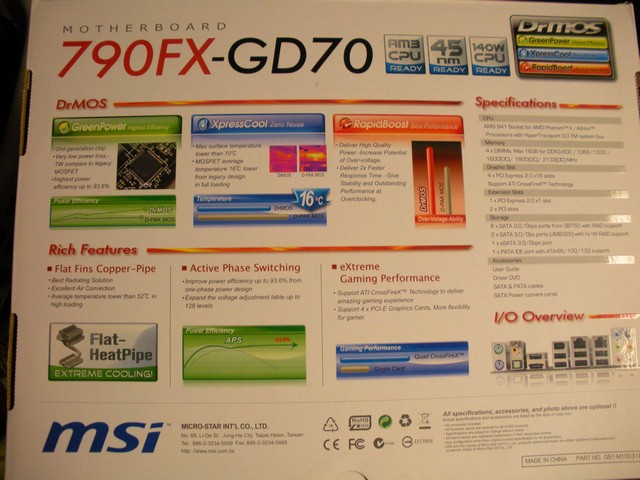

If you take a quick glance you could easily mistake the GD70 for the G65. That’s not a problem though because we know your more intelligent than that. As the same with the G65 the front has a few features, the name, and processor support. The back goes more into detail about the specifications of the motherboard as well as retaining the name in big letters. It also has a few pictures for those of you who enjoy that such of thing.
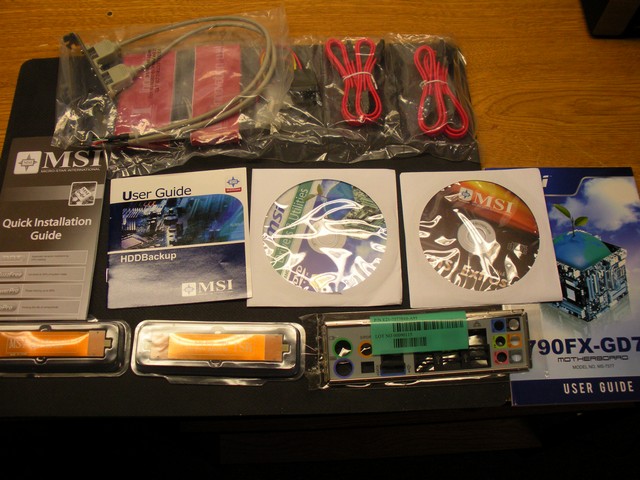
On the inside of the box we have our usual bundle of joy and the motherboard on the bottom separated by a cardboard layer. This is age old, and seems to protect everything quite nicely during transit. I’m like others, no point in changing something that simply works. This bundle is a bit bigger but only offers the bare necessity’s which of course we’re used to. For those who like lists I’ll gladly provide.
The particular bundle includes:
- 4 x SATA Cables
- 1 x PATA Cable
- 1 x Floppy Cable
- 1 x M-Connector
- Instruction Manual
- Driver CD
- MSI Extras CD
- 2 x Molex to SATA cables
- Setup Guide
- 2 x Crossfire Link Cable
I like to see 2 Crossfire link cables because it certainly helps at higher resolutions.
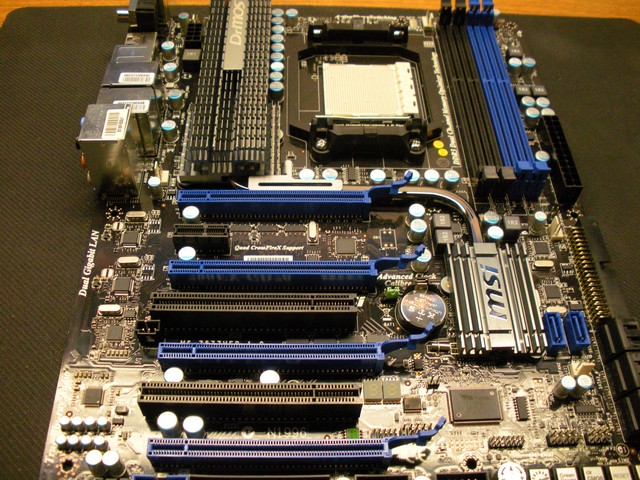
A top view of this gorgeous board. The layout seems extraordinary and the color scheme is just grand. I don’t know about you, but I happen to favor dark colors. Not what seems like the color scheme to the Care Bears.

Here is a side shot of the board. We can see that MSI used 180° SATA and IDE ports (If there are those still using the IDE). Which we know there are a few of you who still use this port. You also get a good shot of the low profile MSI heatpipe that doesn’t get in the way at all when trying to put an additional card in.
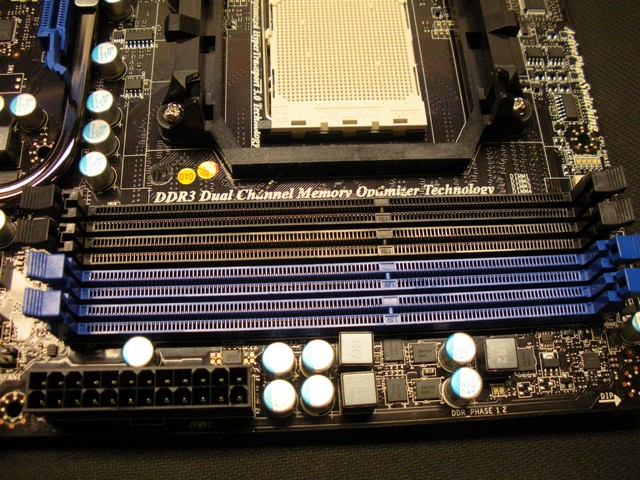
Quick shot of the solid capacitors and DDR3 Dimms. Seems my pet peeve of the slots being to close to the CPU slot is still around. Since the Dual Channel slots are put together though keeping 2 sticks in Dual Channel is still possible.
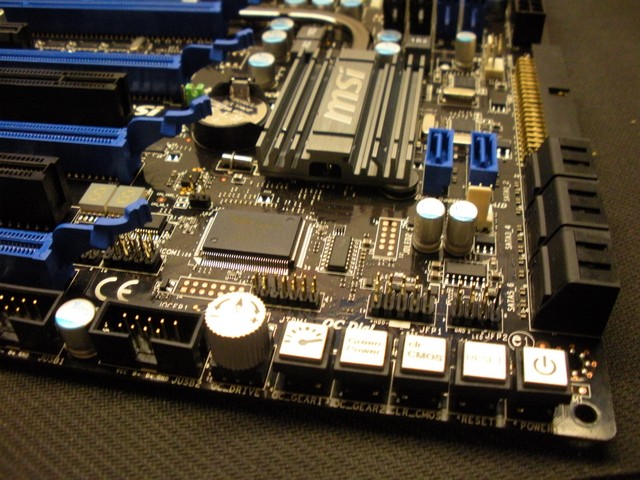
My favorite shot right here. It shows MSI gave us alot to play with in this corner. From our power/reset/clear CMOS buttons to a Green Power button and our new concept, the OC Dial. The latter is self explanatory and I’ll get to the OC Dial in the Overclocking page.


Here is a few more close up shots of this corner of the board.
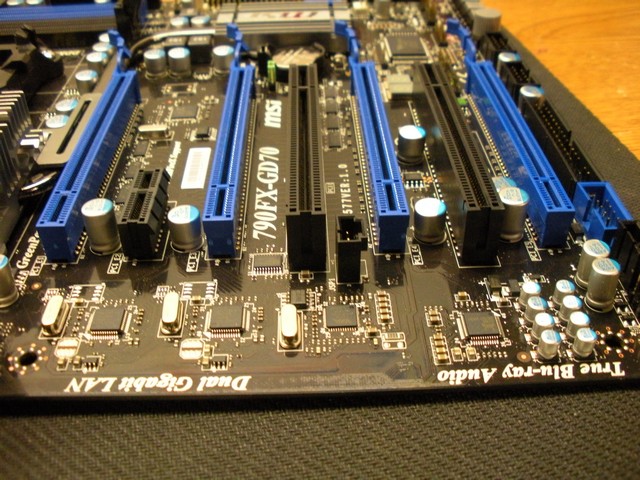
Here is a closeup of the slots. With the spacing at hand you can have 4 full size dual slot ATI video cards in Crossfire for ultimate gaming performance. Or if your more conservative you can have 2 cards and still have room for other things that might matter to you such as a high performance sound card.
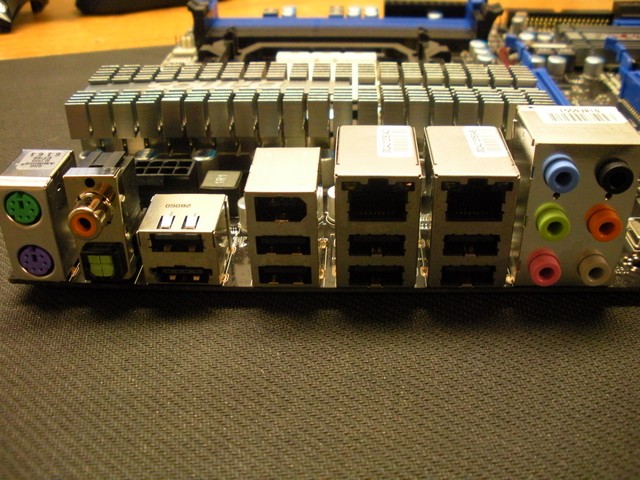
Here is the connector end of the board. Funny, I mention missing dual LAN ports and here they are! Not only that but 7 USB ports and even a powered eSATA port.
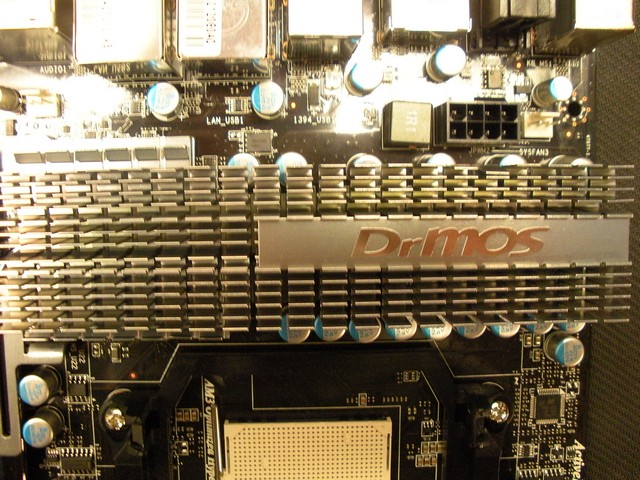
A full size heatsink covers our PWN area for maximum cooling during heavy overclocking. While cranking the volts to the chipset and processor this heatsink barely gets warm to the touch. Meaning it’s either not doing its job, or it’s doing its job exceptionally well. In this case, it’s exceptionally well.
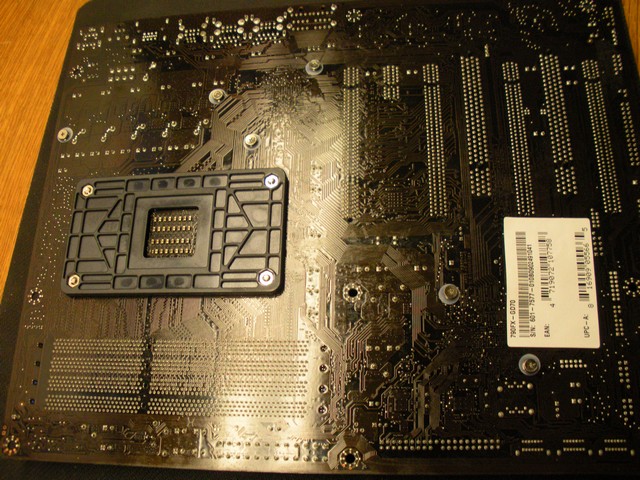
Here I picture the backside of the motherboard. One might find this odd, but there is a reason for this. Most motherboards come with a metal back plate. This particular one comes with a plastic one which is the only real bad part about this board. I suggest before using that monster air cooler of yours you might want to purchase an aftermarket back plate or use a spare. I noticed while using a TRUE 120 Black it does not support as well as a metal back plate. Not saying it doesn’t get the job done but I’m cautious of these kinda things.
Well enough with the board it self. Lets move on to the bios.
Bios Screenies
I only took a few shots of the bios because I feel if you’re buying this caliper of board you should already know your way around the bios. Not only that, but you should also be well informed of what each option does so you don’t wind up sending dead product back to be replaced. With some of the options in this boards bios you can seriously fry things quickly with no warning. With this being said, you have been fore warned.
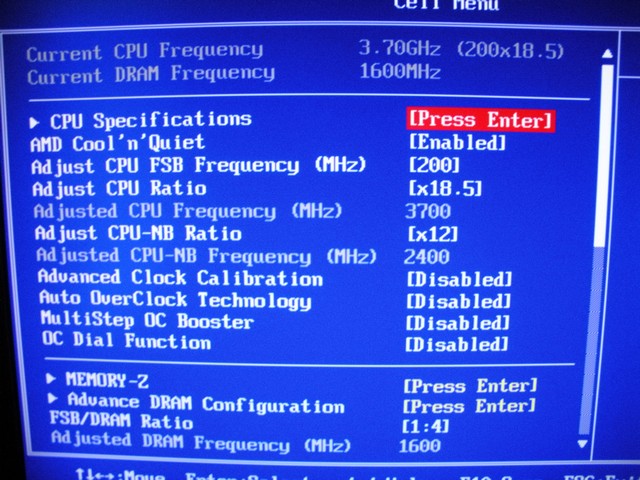
Here is the beginning of the Cell Menu which in lame terms is Overclocking Central. As you can see by the time I took these pictures I already had my poor 720BE cruising at a nice 3700 Megahertz. This board overclocking so easily that I felt it was almost cheating.
A few new additions I’ll explain are Memory-Z and OC Dial. Memory-Z as I explained in the G65 review is simply put a CPU-Z for your RAM built into the bios. The OC Dial is the option to turn on the knob thing on the board. With this enabled you can simply overclock within Windows in real time by turning the knob.
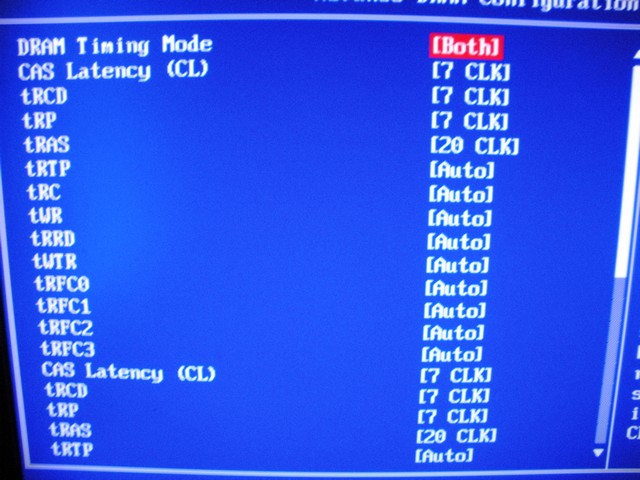
This is pretty self explanatory. This board as well as the G65 will allow you to separately fine tune the timings of your ram by each channel. Honestly, I have not tried running different timings on each but I’m sure it’s very possible. As you can see I had my DDR3 running timings of 7-7-7-20 which was easily attained because of the Phenom II’s low DDR3 speed tolerance.
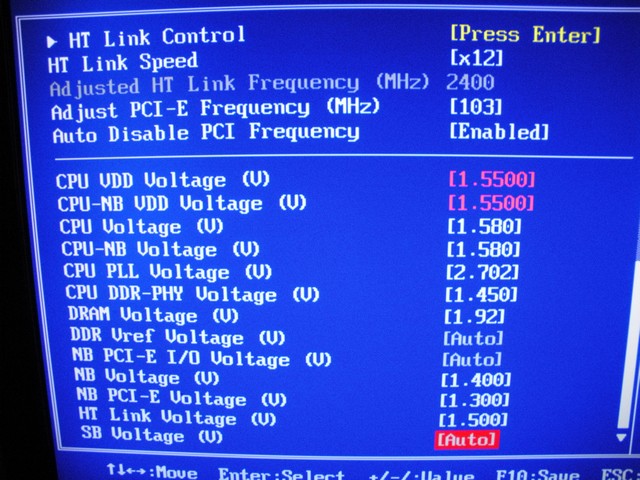
Finally the bottom of the Cell Menu which can really knicker your knockers. Or in other words make your room smelly of fried electronics. You can change a plethora of things including what I was asking previously, PCI-E Voltage. The extra voltage changes on the CPU adds to more stability for higher overclocking. If you’re on a water system 4Ghz is attainable a lot easier with such options. I can’t guarantee such speeds, even though I have reached these speeds on this board.
Testing & Methodology
Now a little more on to the part your waiting for. We use Acronis Clone to copy a fresh install of Vista X64 to each system before running benchmarks to get maximum performance from our drivers and hardware. Well lets take a look at some CPU-Z shots to show you exactly how I have this AMD setup configured.
CPU-Z
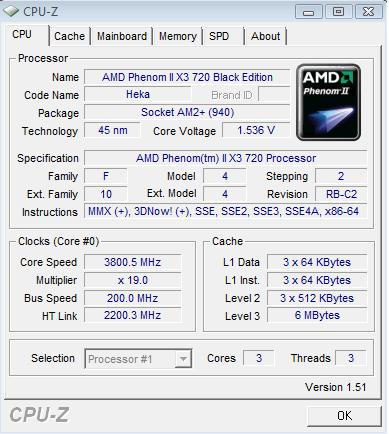
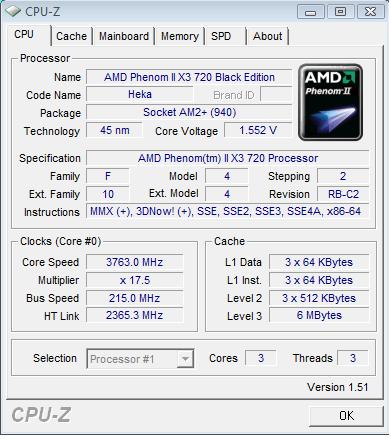
Here is a shot of my CPU that I’m using. Its an AMD Phenom II 720 Black Edition AM3. I have it clocked at 3.8Ghz but I keep it at 3.7Ghz for testing because that is where my 940 is kept at for testing purposes and for maximum stability.
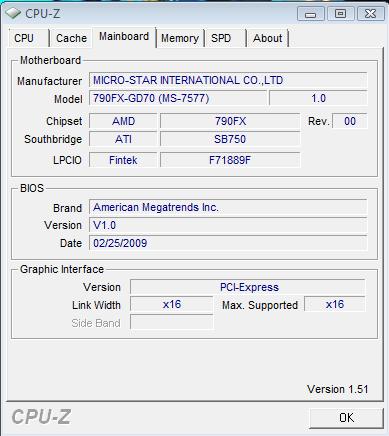
Here is a CPU-Z shot of the motherboard itself. Everything seems in order.
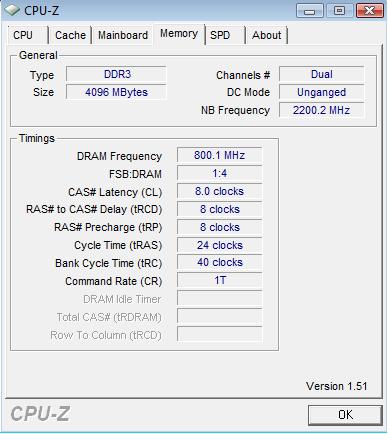
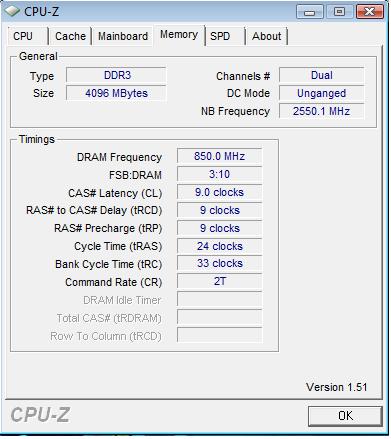
Here is a shot of the RAM. For testing purposes I keep the RAM at a rock solid stable setting of 1600Mhz and 8-8-8-24 timings.
Test Rig
| Test Rig “Univac” |
|
| CPU | AMD Phenom II X3 720BE @ 3.7ghz |
| Motherboard | MSI 790FX-GD70 |
| Ram | 2x2gig G.Skill DDR3 2000mhz |
| CPU Cooler | Dual Rad custom water cooling loop |
| Hard Drives |
Seagate 120gig SATA 2 (System) Western Digital 160gig Scorpio Black SATAII (enclosure) |
| GPU |
eVGA GTX280 Stock Clocks |
| PSU | Thermaltake Toughpower 1000 Watt Modular |
| OS |
Windows Vista Ultimate X64 SP1 |
|
This is my sweet little POS =) |
|
Test Suite
|
Synthetic Benchmarks |
|
3DMark Vantage |
|
3DMark06 |
|
Crysis V1.21 |
|
SiSoft SANDRA Business 2009 |
|
Everest Ultimate Edition v. 5.0 |
|
Cinebench R10 64 bit |
|
HD Tach |
| WinRar 3.71 |
3DMARK06 V. 1.1.0

3DMark06 developed by Futuremark, is a synthetic benchmark used for universal testing of all graphics solutions. 3DMark06 features HDR rendering, complex HDR post processing, dynamic soft shadows for all objects, water shader with HDR refraction, HDR reflection, depth fog and Gerstner wave functions, realistic sky model with cloud blending, and approximately 5.4 million triangles and 8.8 million vertices; to name just a few. The measurement unit “3DMark” is intended to give a normalized mean for comparing different GPU/VPUs. It has been accepted as both a standard and a mandatory benchmark throughout the gaming world for measuring performance.
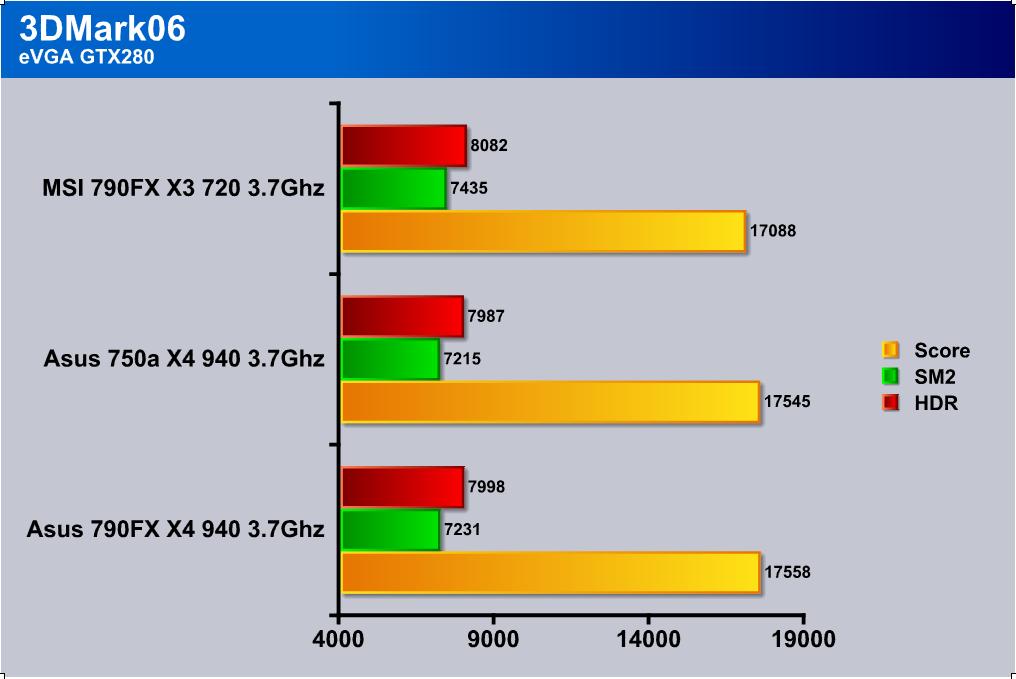
The MSI board shows an overall lower score but if you look closely the GPU scores are higher. In my opinion I’m led to believe that you would have better real world performance this way because your video card is getting more to it faster. During gameplay it seems this is true.
3DMark Vantage

The newest video benchmark from the gang at Futuremark. This utility is still a synthetic benchmark, but one that more closely reflects real world gaming performance. While it is not a perfect replacement for actual game benchmarks, it has its uses. We tested our cards at the ‘Performance’ setting.
Currently, there is a lot of controversy surrounding NVIDIA’s use of a PhysX driver for its 9800 GTX and GTX 200 series cards, thereby putting the ATI brand at a disadvantage. Whereby installing the PyhsX driver, 3DMark Vantage uses the GPU to perform PhysX calculations during a CPU test, and this is where things get a bit gray. If you look at the Driver Approval Policy for 3DMark Vantage it states; “Based on the specification and design of the CPU tests, GPU make, type or driver version may not have a significant effect on the results of either of the CPU tests as indicated in Section 7.3 of the 3DMark Vantage specification and white paper.” Did NVIDIA cheat by having the GPU handle the PhysX calculations or are they perfectly within their right since they own Ageia and all their IP? I think this point will quickly become moot once Futuremark releases an update to the test.
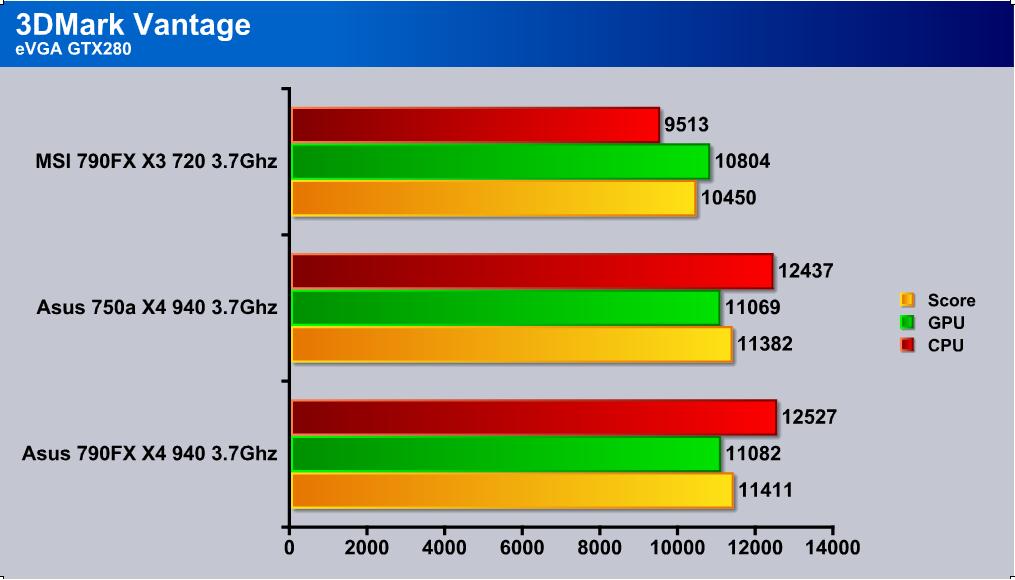
This board overall seems to lack in Vantage. This could be due to not enough tweaking or just the fact that synthetic benchmarks might not like the current hardware setup. As mentioned before though, real world gaming is gold on this board as well as its overclockability.
Crysis v. 1.21

Lets just start this section by saying that we don’t, and you shouldn’t expect to be able to play Crysis or Crysis Warhead with a performance class GPU without giving up some eye candy. Most enthusiast class GPU’s will fold in Crysis.
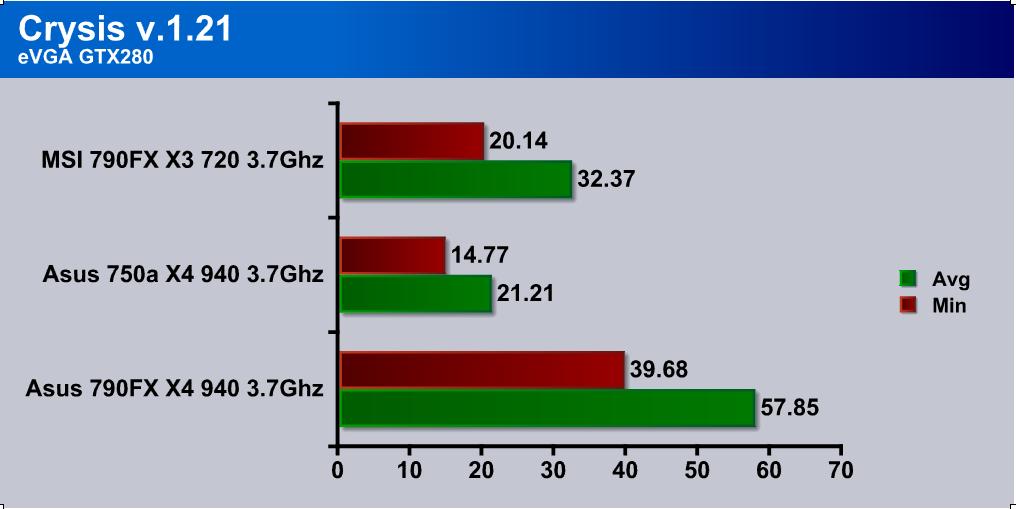
The 790FX Chipset seems to dominate in alot of tests over older Nvidia chipsets which is expected. It appears though that I had a 955 or equivalent quad core to combat the 940 the MSI GD70 would have taken the lead. Lack on myself, not the board.
Cinebench
“CINEBENCH is a real-world test suite that assesses your computer’s performance capabilities. MAXON CINEBENCH is based on MAXON’s award-winning animation software, CINEMA 4D, which is used extensively by studios and production houses worldwide for 3D content creation. MAXON software has been used in blockbuster movies such as Spider-Man, Star Wars, The Chronicles of Narnia and many more. MAXON CINEBENCH runs several tests on your computer to measure the performance of the main processor and the graphics card under real world circumstances. The benchmark application makes use of up to 16 CPUs or CPU cores and is available for Windows (32-bit and 64-Bit) and Macintosh (PPC and Intel-based). The resulting values among different operating systems are 100% comparable and therefore very useful with regard to purchasing decision-making. It can also be used as a marketing tool for hardware vendors or simply to compare hardware among colleagues or friends.”
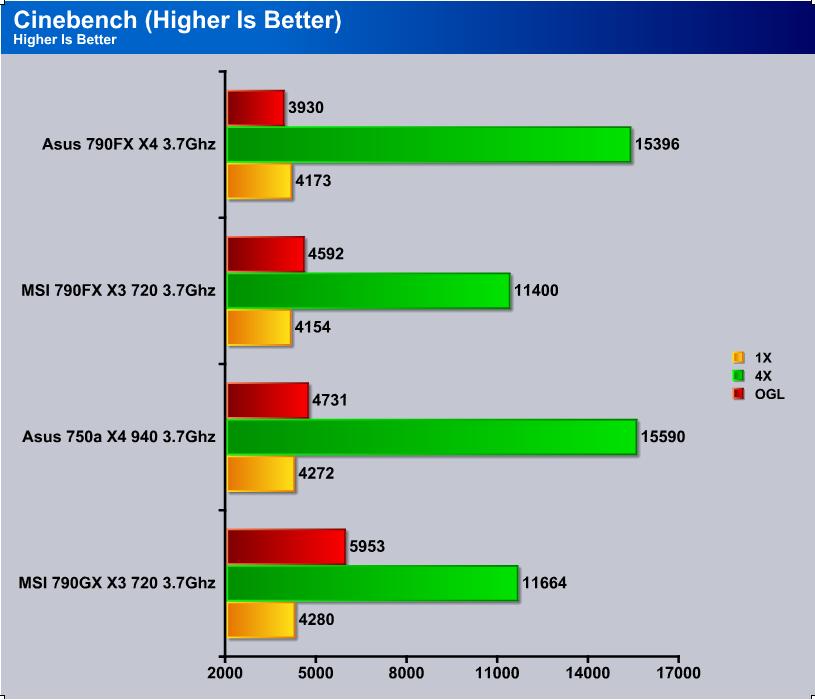
Again it seems that my Quadcore dominates. Oddly enough its followed closely by the 790GX board instead with the GD70 closely behind it.
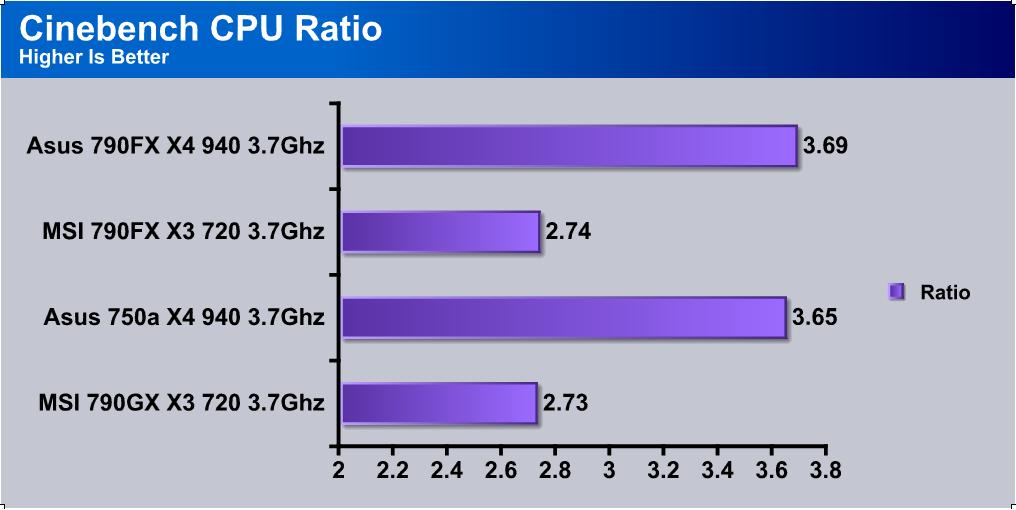
Here our MSI GD70 comes out on top of the two Tricore CPUs and the AMD chipset takes the complete lead with the Quadcore.
HD TACH
HD TACH performs sequential read and write tests on removable media and fixed disks. HD Tach is also capable of performing the sequential read and write tests on the entire disk instead of the small number of zones in the quick and long test. We opted to use the Short 8 (MB) and Long 32(MB) tests in the sequential read mode only, as sequential writes are covered by other benchmarks.
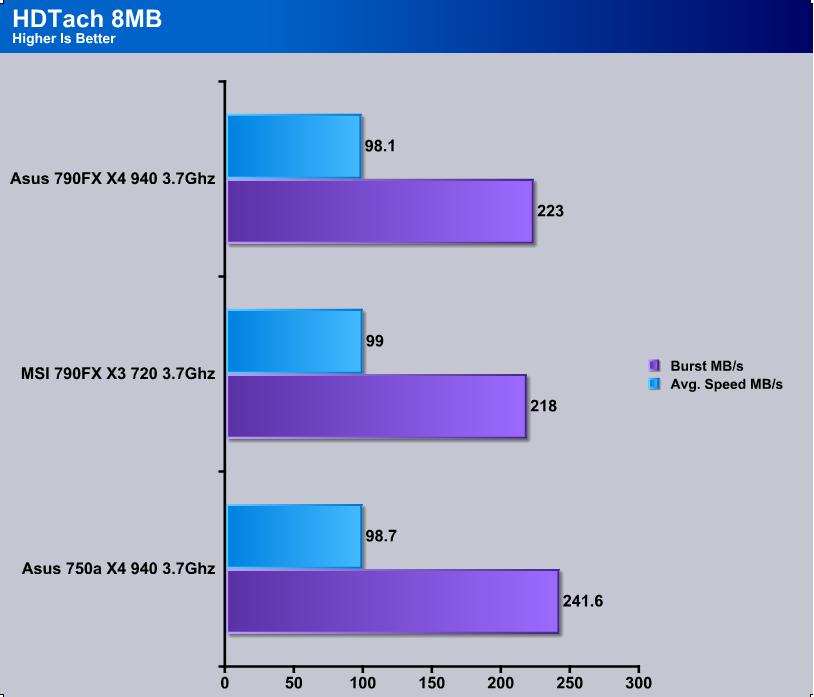
I/O Seems to be taken over by the Nvidia chipset followed closely by our Asus 790FX counterpart with the MSI as our bronze medalist.
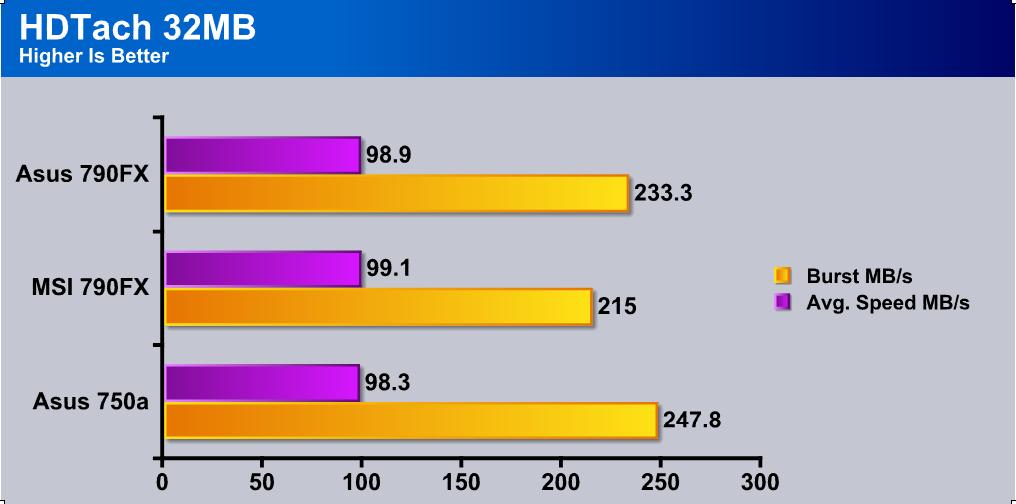
Repetition is where it’s at and our numbers show this. Same thing for this chart as well.
WinRar v. 3.71
This module in WinRar generates random data, which contains specially introduced redundancy, increasing the load to both the processor and memory. Data is the passed through RAR compression and decompression algorithms, and the output of the decompression algorithm is compared to the source data. If any differences are found, WinRAR then reports “Errors found – Yes” in the command window. WinRAR displays a size of processed data and compression speed, current and resulting, in kilobytes per second.
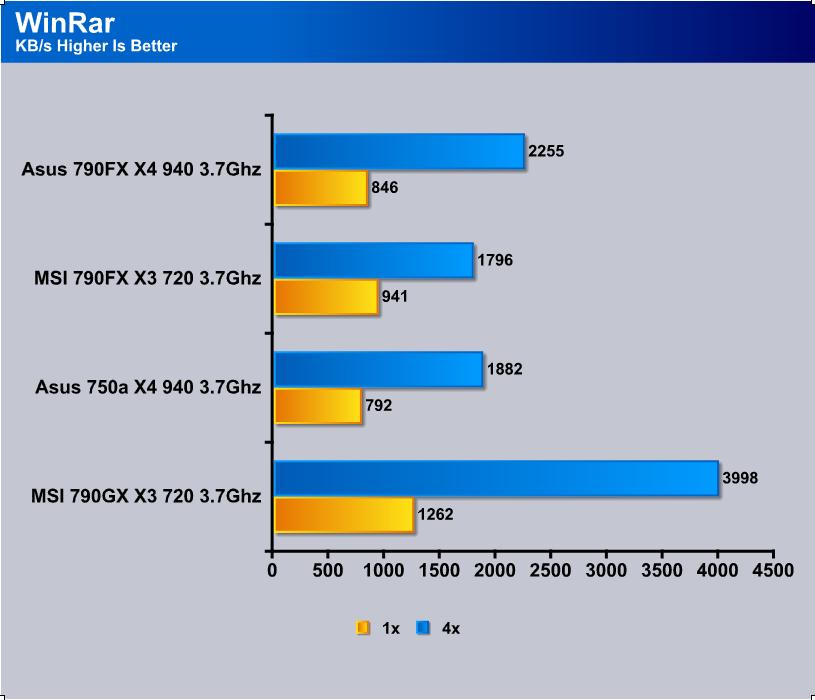
The MSI Mainstream board completely dominates over all for some reason with our Enthusiast board bringing up the rear. Quite stunning as it feels WinRar is faster on this board than anything else. Maybe it’s just me? Maybe it isn’t.
EVEREST ULTIMATE
“EVEREST Ultimate Edition is an industry leading system diagnostics and benchmarking solution for enthusiasts PC users, based on the award-winning EVEREST Technology. During system optimizations and tweaking it provides essential system and overclock information, advanced hardware monitoring and diagnostics capabilities to check the effects of the applied settings. CPU, FPU and memory benchmarks are available to measure the actual system performance and compare it to previous states or other systems. Furthermore, complete software, operating system and security information makes EVEREST Ultimate Edition a comprehensive system diagnostics tool that offers a total of 100 pages of information about your
CPU AES
This integer benchmark measures CPU performance using AES (a.k.a. Rijndael) data encryption. It utilizes Vincent Rijmen, Antoon Bosselaers and Paulo Barreto’s public domain C code in ECB mode.
CPU AES test uses only the basic x86 instructions, the test consumes 48 MB memory, and it is Hyper Threading, multi-processor (SMP) and multi-core (CMP) aware.
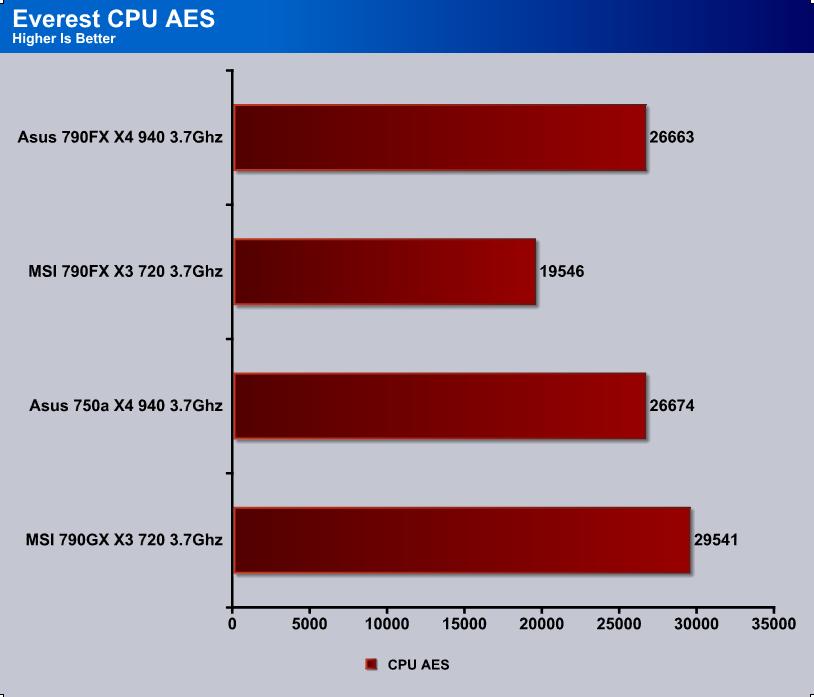
Again like WinRar the 790GX dominates over all and the GD70 brings the rear. Really shocking to me as I did the test over and over again to make sure it might not have been something I was doing.
CPU Queen
This simple integer benchmark focuses on the branch prediction capabilities and the misprediction penalties of the CPU. It finds the solutions for the classic “Queens problem” on a 10 by 10 sized chessboard.
CPU Queen test uses integer MMX, SSE2 and SSSE3 optimizations. It consumes less than 1 MB system memory and it is Hyper Threading, multi-processor (SMP) and multi-core (CMP) aware.
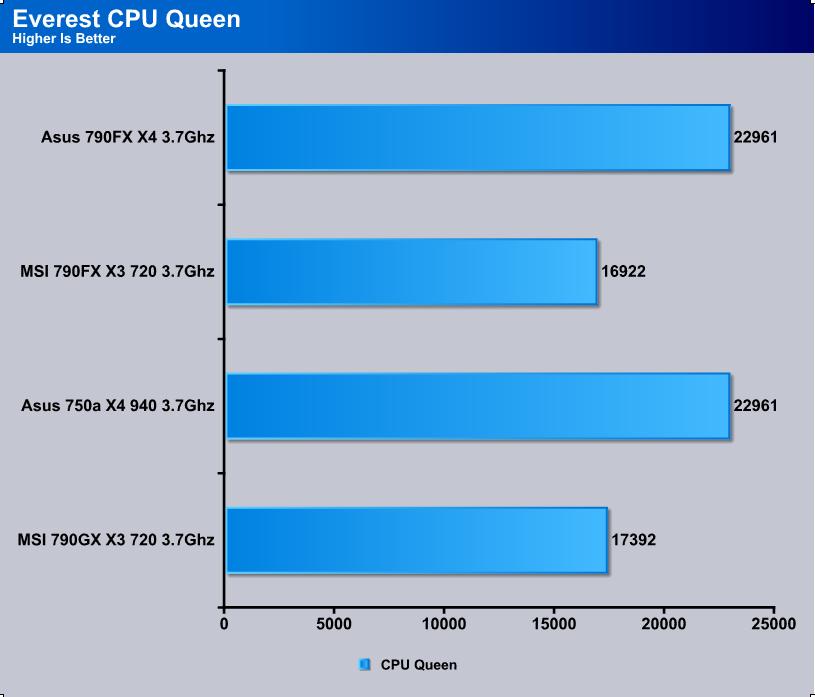
As an SMP benchmark it is obvious that our Quadcore will lead our chart. Still amazingly though the Enthusiast AM3 platform is falling behind.
CPU ZLib
This integer benchmark measures combined CPU and memory subsystem performance through the public ZLib compression library Version 1.2.3 (http://www.zlib.net).
CPU ZLib test uses only the basic x86 instructions, and it is Hyper Threading, multi-processor (SMP) and multi-core (CMP) aware.
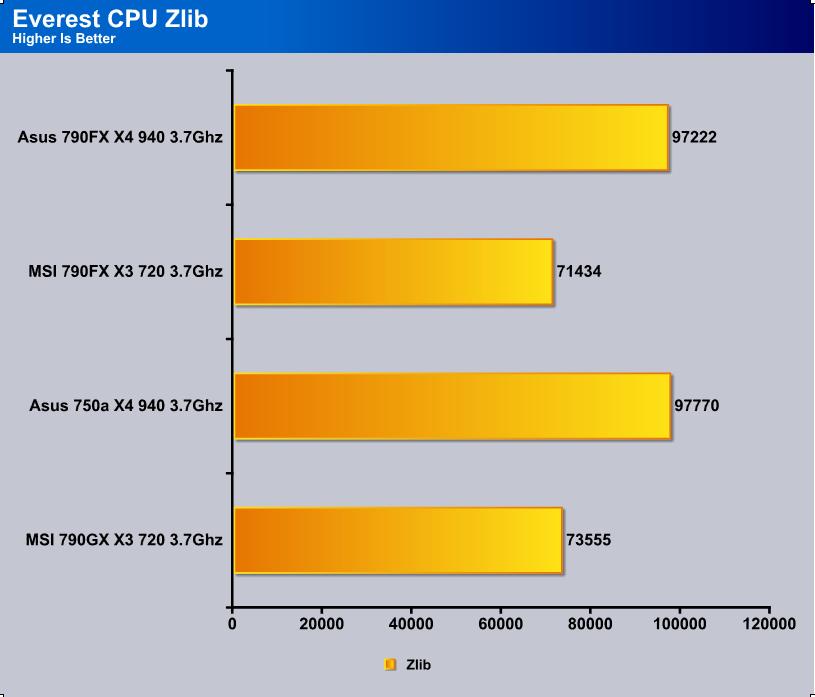
Are number are repetitious so far as the Enthusiast board falls behind the others. I will mention again that in everyday activities and regular gaming this is not the case. It goes to show that Synthetic benchmarks aren’t everything.
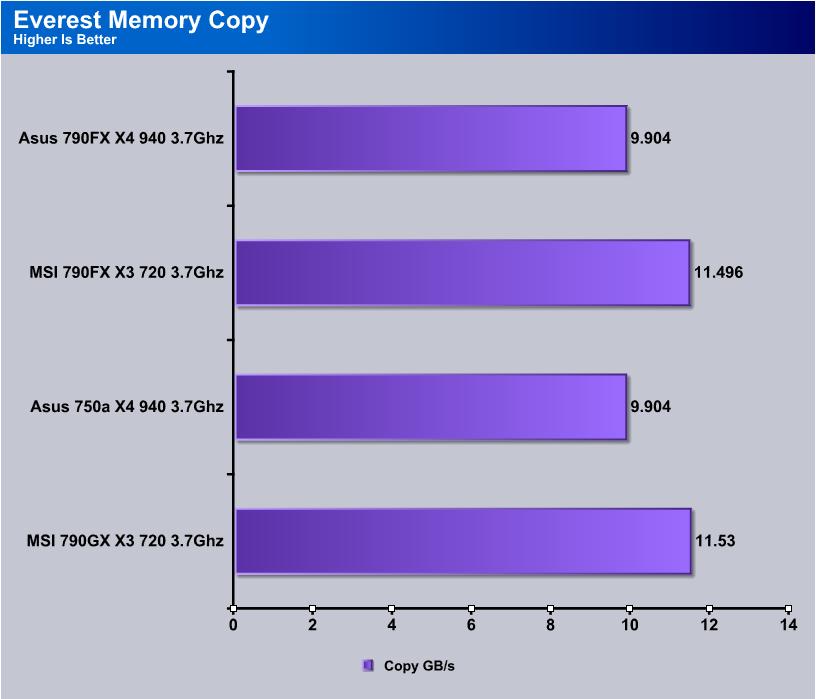
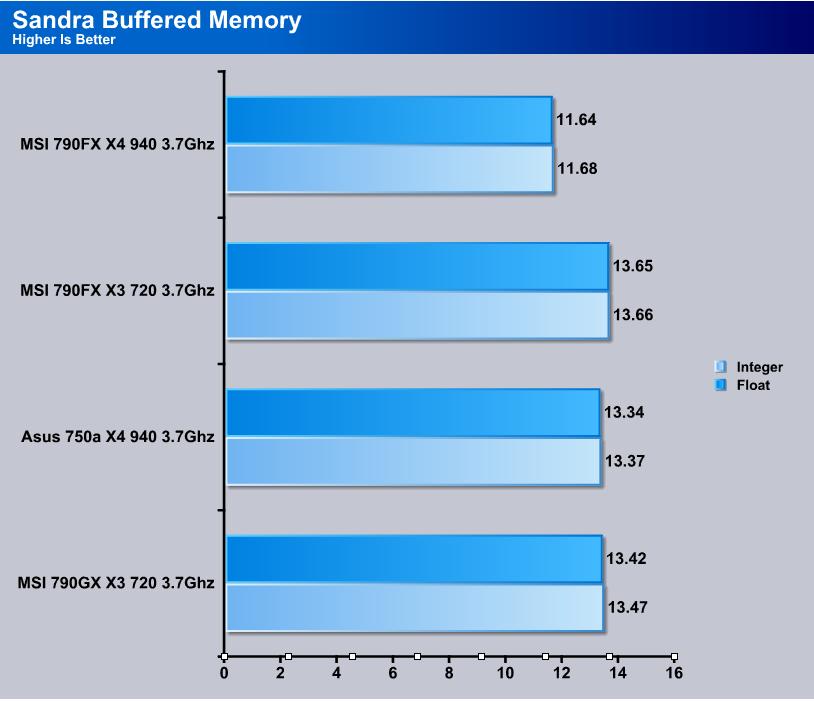
It’s easy to say that DDR3 will prevail in a memory benchmark. Oddly though at the same speeds and timings the 790GX prevails against the 790FX.
Finally we see our 790FX shine! In Synthetic benchmarks there is a clear winner between DDR2 and DDR3. But the difference in real world is almost minimal. I believe this to be a bandwidth cap of the Dual Channel bus.
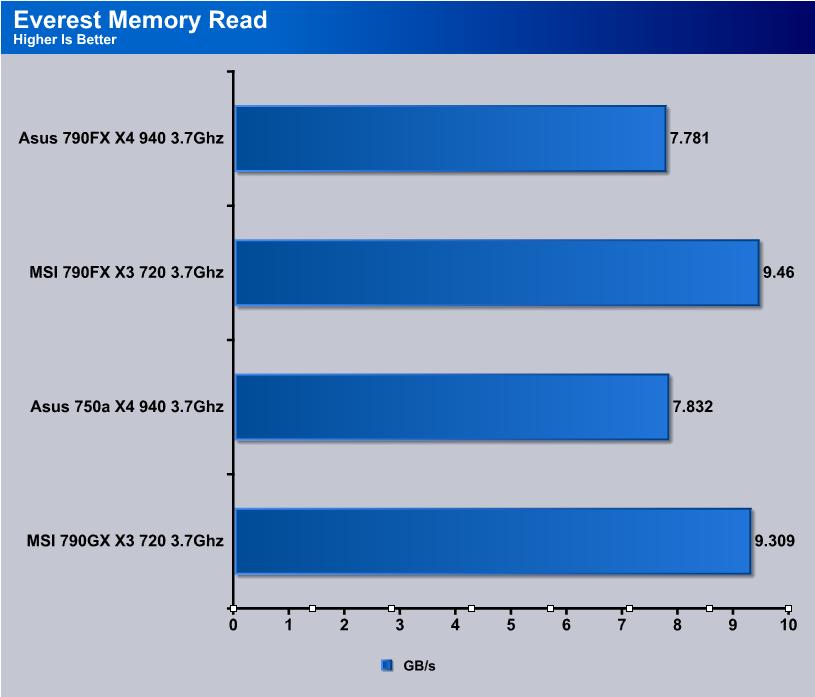
And here we go back to the norm of things. I’m not sure why this is occuring. The only way I could get the 790FX to score higher is by speeding the RAM up.
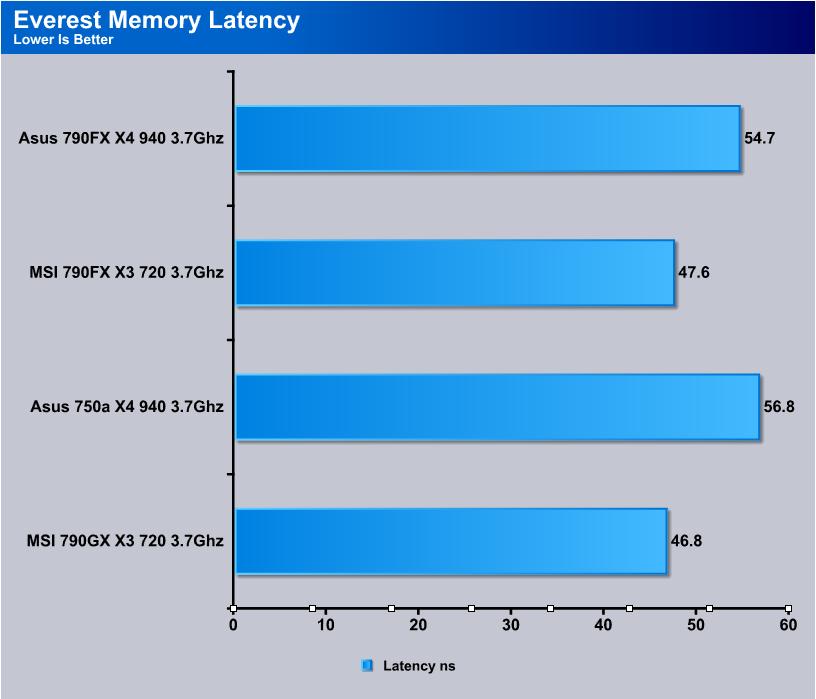
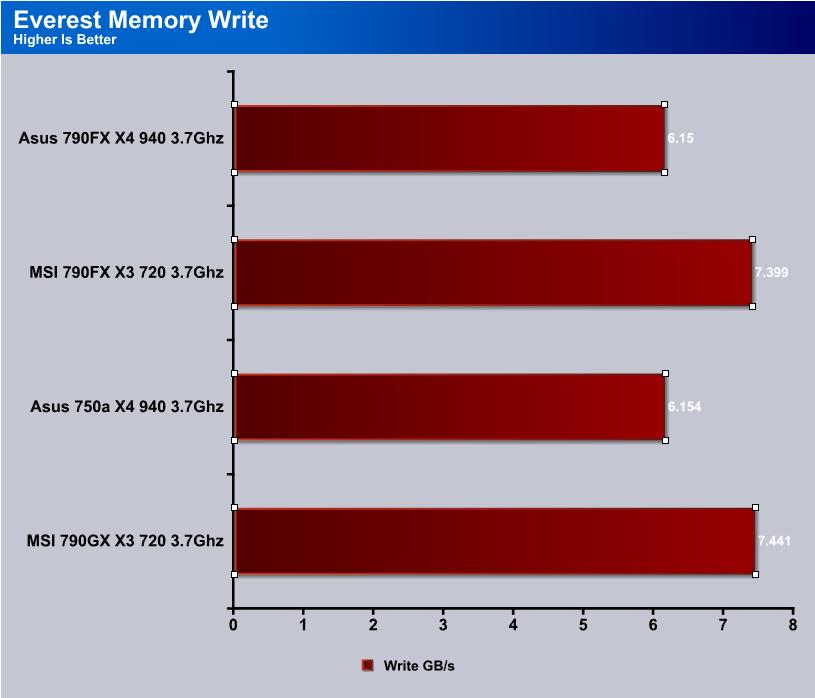
DDR3 prevails as well as the 790GX chipset. The numbers leave us scratching our heads I’ll tell you that.
SiSoft Sandra 2009
“SiSoftware Sandra (the System ANalyser, Diagnostic and Reporting Assistant) is an information & diagnostic utility. It should provide most of the information (including undocumented) you need to know about your hardware, software and other devices whether hardware or software. It works along the lines of other Windows utilities, however it tries to go beyond them and show you more of what’s really going on. Giving the user the ability to draw comparisons at both a high and low-level. You can get information about the CPU, chipset, video adapter, ports, printers, sound card, memory, network, Windows internals, AGP, PCI, PCI-X, PCIe (PCI Express), database, USB, USB2, 1394/Firewire, etc.”
We’ve tested so many Tri-Channel kits to date that our chart is getting a little long, so we highlighted the Viper kit and a Tracer kit that have identical speeds and timings so you can more easlily compare the Vipers to another 1600 MHz kit.
In Sandra our MSI 790FX picks up where it lacked before and the scores seem a bit more normal.
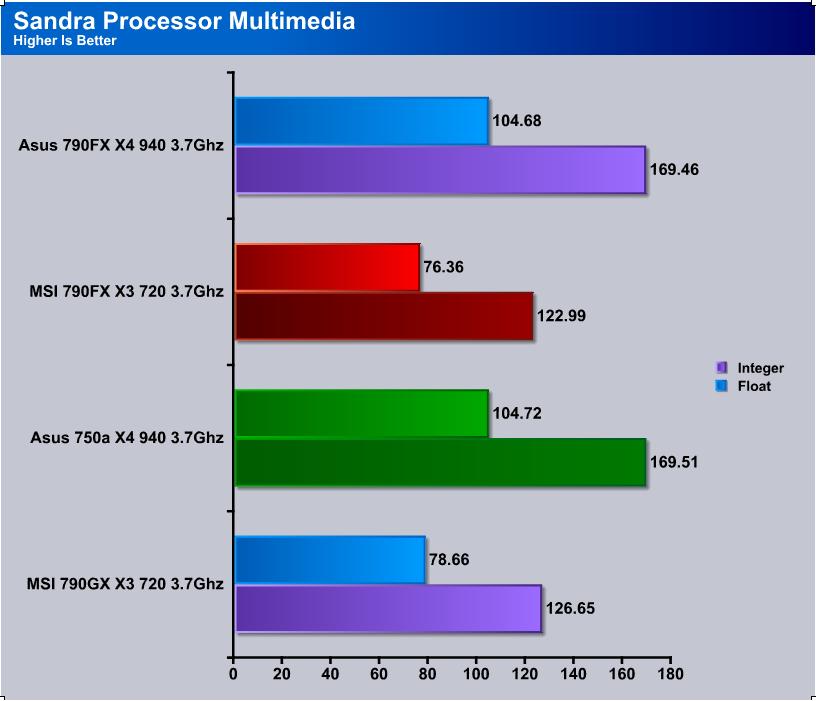
But then we turn around in the processor benchmark and fall behind again.
Overclocking Results
By now your probably wondering why this board got such a high rating. Well where I come from if it isn’t fast enough we just overclock it. Well when we overclock on this board things start looking up. Matter of fact it’s a steep slope upward. This is probably why this board is the Enthusiast and the other isn’t. Anyways enough ramble and I will show you some results.
CPU Multiplier Overclock
As I shown before the highest stable overclock on my 720 through raising the multiplier was a solid 3.8ghz. A whole 200Mhz over previous boards because this is completely stable. Not play a game for about an hour and crash stable.
CPU FSB Overclock

May not seem like much but when you take HT and Bus speeds into consideration it is actually quite high. Not to mention that the RAM speed is sitting high up there as well which I will show now.
RAM FSB
1700Mhz is the highest stable overclock I could get I’m guessing due to the limitations of DDR3 speed on the Phenom II’s. Sounds like it isn’t very fast compared to i7 but 1700Mhz is a whole lot faster than the 1066Mhz most people are chugging with on DDR2 systems.
CPU and RAM Final Stable
The final clocks I was able to achieve that where completely stable together.
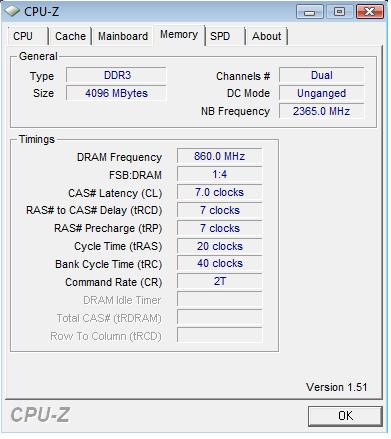
With a slight overclock on the FSB I was able to pick up a nice 3.763Ghz on the CPU, 1720Mhz on the RAM with timings of 7-7-7-20, and a NB Frequency and HT Speed of 2365. This is A LOT higher than I have managed on any other board I have toyed with here recently. With some more tweaking, some more heat in my room by increasing voltages I’m sure I can go a lot further. But with limited time you can only go so far until you have to type up the review.
OC Dial
I’m sure most of you are wondering how this thing works. Well it’s simple really. You turn the option on in the Bios like I mentioned before and while inside Windows you simply turn the knob and your FSB is raised. You can also control how high the FSB is raised by each notch of the dial. Because I couldn’t use any dividers or anything from inside the Bios I wasn’t able to achieve a real high overclock but the idea is a good one. I’m sure if I messed with more in Windows programs to control other things such as AMD OverDrive I could achieve better results. My final CPU was 3.5Ghz with stock multiplier with the OC Dial overclock option.
Conclusion and Final Thoughts
Well the numbers look bleak for this board to be honest but the innovation, different design ideas, price, color scheme, complete stability, complete set of push buttons, quad Crossfire support, powered eSATA, dual LAN ports, sideways SATA ports, and so on are what won it over for me. Sometimes it’s not all about numbers to make a great board. It has to be an all in one package and when you start to push voltages and clocks on this board it really shines like a well lapped heatsink. Since I typically use Nvidia I was left with a single GTX280 video card option and by using slick tricks I was able to do everything I wanted to out of this board and more.
Sitting inside your case it also looks really good and is what some of my buddies call “beast”. When putting my enthusiast knowledge to this board and the bios and overclocking beyond my set benchmarking numbers I made my other boards beg for mercy where as this one didn’t break a sweat. The MSI 790FX-GD70 sits at $169.99 currently on Newegg.com and that is a fair price for the type of board you are getting. I cannot stress enough how if you take this board beyond normal limits you WILL get numbers higher than the rest. Of course we at Bjorn3d.com are not afraid to do such things.
We are trying out a new addition to our scoring system to provide additional feedback beyond a flat score. Please note that the final score isn’t an aggregate average of the new rating system.
- Performance 9
- Value 10
- Quality 10
- Warranty 9
- Features 10
- Innovation 10
Pros:
+ Great Overclockability
+ Great BIOS Options For Enthusiasts
+ Price
+ Great Stability
+ Good Color Scheme
+ Reset, Power, Clear CMOS, Green Power, & OC Dial
Cons:
– Takes Some Drive and Overclocking To Get Exceptional Numbers
The MSI 790FX-GD70 requires some tweaking to get maximum performance but after putting some time into it, it beats the rest with ease.
Final Score: 9.5 out of 10 and the Bjorn3D Golden Bear Award.


