Cooler Master has always mixed looks with functionality. The Elite 310 chassis, is a perfect example of this mixure.
INTRODUCTION
Cases, chassis, enclosures, towers; there are so many names for the component that houses the rest of our computer components. There are also a lot of chassis out there to choose from. Some are small, some are big, some are medium sized. There are even oddly shaped chassis. With all of the chassis choices out there on the market, you have the option to pick and choose a chassis that fits you personality.
Back in January of 2009, Cooler Master had a chassis on display that had no information on it, with it, or for that matter near it. It quickly became known as the mystery chassis. Well now here in July, Cooler Master finally brings us the introduction of this “Mystery Chassis” the Elite 310.
Here at Bjorn3D, and down deep underground in the Dragons Lair we are going to give you ladies/gents a peek on this chassis. Lets see how this chassis handles my computer components. Mind you some (well actually most) of these components are fairly “Large”.
SPECIFICATIONS
| Feature/Specification | Elite 310 |
|---|---|
| Model |
RC-310-BWN1-GP |
| Color |
Black with blue front panel |
| Material |
Steel Body ; ABS plastic front bezel |
| Dimension (W / H / D) |
191 x 437 x 468 mm / 7.5 x 17.2 x 18.4 inches |
| Weight |
Net Weight: 5.8kg / 12.8 lb ; Gross Weight: 6.9 kg / 15.2 lb |
| Motherboards |
ATX /Micro-ATX |
| 5.25 Drive Bay | 4 Exposed |
| 3.5 Drive Bay | 6 Hidden 1 Exposed |
| I/O Panel | USB 2.0 x 2, Mic x 1, Audio x 1 (support HD audio), IEEE 1394a (optional) |
| Expansion Slots | 7 |
| Cooling System | Rear: 120 x 25mm fan x 1 / 1200 RPM / 17 dBA (pre-install) ; 80mm / 90mm (optional) Front: 120 x 25 mm fan x 1(optional) Side: 80 / 90 / 120 mm fan x 1 (optional) |
| Power Supply | Standard ATX PS2 (optional) |
| UPC Code | 884102005015 |
| Warranty | 1 year |
PACKAGING

Cooler Master is somewhat reserved on there packaging when it comes to their chassis. Nothing fancy or flashy just short, sweet, and to the point. I personally like it.

Cooler Master still using Styrofoam ends to help keep the chassis from from getting damaged during shipping.

Here is the Elite 310 removed from the box. Cooler Master also used a plastic bag to cover the chassis as well. Now where is that dog Sierra? Better make sure she not around. “Bark”, Oh no, it is she, the plastic bag shredder. (Runs away frantically)
OVERVIEW

After playing tug-a-war with Sierra with the plastic bag it is time to get on with the review. Cooler Master placed a plastic sticker over the entire front portion of the Elite 310 chassis, to keep this part from getting scratched during packaging. This has to be removed, in order for us to use the chassis. “No, Sierra, you cannot have it, “It is mine, mine I tell you, all mine.”

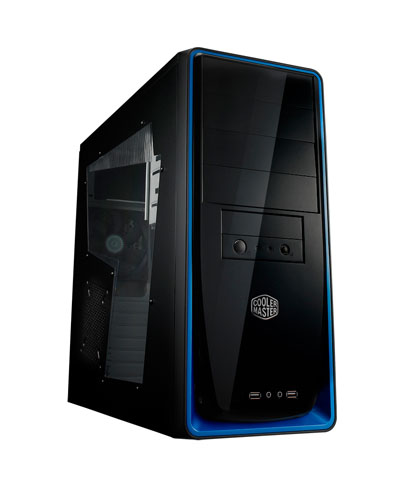
Oh shiny, boy the front of this chassis is begging for finger prints.

Just a picture of how shiny the Elite 310 chassis is.

The side left side panel also had a plastic film over it.

Looking at the left side top of the Elite 310 chassis, just a quick thought this chassis pretty much flows.

The left side panel can house a 120mm fan to help aide in cooling the video cards. Now this fan is placed in a decent position not towards the center, but towards the rear of the chassis where it will serve a good purpose.

If you have not already guessed the left side panel has a window. The shape of the window is rather unique.
 |
 |
 |
 |
If anything I am inconsistently, consistent. Looking at the rear of the Elite 310 Chassis I can’t help but wonder what was Cooler Master thinking? I mean the PSU mounting, I personally rather liked that Cooler Master was putting them on the bottom of the chassis, and now this curve ball, with the PSU mounted up top. Kinda retro, if you ask me. We can also place a rearward 120mm here.

The right side panal. Yep its there.
 |
 |
Looking at the inner side of the left side panel, Cooler master also placed a plastic film over the Plexiglas to keep it from getting scratched. This also needs to be removed.

Cooler Master had raised portions on the left side panal to give that unique touch to this chassis.

Lets start the interior of the chassis. Pretty standard layout as far as chassis goes.

The included screws we will need to install our computer components into this chassis.
 |
 |
 |
 |
 |
 |

No real need to go into great detail. The only thing really mentioning is the HDD bays, Cooler Master put raised push holders towards the front of the chassis, and screws on the back side of the HDD bays. So all we will need to use to secure our HDD’s is to bolt one side. Through-out on all of the bays, it almost looks like this chassis was designed to be toolless. Just a bit of thought.
 |
 |
 |
 |

Now the front bezel of the Elite 310, is removable. This way we can install a forward 120mm fan. Also looking up close at the bottom front of this chassis we can see a rather large mesh covered mesh vent. This will give that front fan plenty of airflow without restricting it. Now why do chassis manufactuerer’s even use them metal covers on the drive bays as they are such a pain to get out without shredding your fingers to bits?
Installation is next. I will be using my computer components to throw together this chassis.
INSTALLATION

Since the PSU is mounted up top of the chassis, we need to mount that first. Yes that is a 1200 WATT SilverStone Zeus PSU. This chassis is already getting cramped, and all I have in there is a PSU. The Elite 310 does manage to give me just enough room for the cables. These monster cables are going to be so much fun routing.

YIKES, throw in a motherboard and all of the components this chassis gets cramped. Also top heavy, I wonder why? Ohh I remember, because the PSU is a heavy thing. Again the Elite 310 manages to handle a moderate computer set up. I decided to play nice and not throw in the HIS HD4870, and the XFX HD4870X2 video cards.

Looking at the clearance between the PSU and the CPU cooler, we see that it is a little tight in this area. A bit more room would be better.

The Elite 310 chassis gives us about an 1/2 inch of room left between the front of the video card and the back side of the HDD bay.
 |
 |
Now for HDD installation time. The Elite 310 can handle a 3.5″ drive, but it cannot house the 2.5″ drive. This is going to get interesting.

Time for me to get creative. Here’s where I mounted the 2.5″ Seagate HDD’s I have. I ended up ghetto’n the mounting.

I am trying to get rather creative on my wiring, and also trying to hide the extra wire length’s to help keep the air flow at its max.

EEK, its a, its a, its a, its a, mouse.

 |
 |
Front fan installation.
 |
 |
Final installation, not bad at all. The Patriot Torqx SSD came with a adapter so I was able to mount that SSD into the HDD cage.

The money shot. This chassis does look good.
CONCLUSIONS
All in all the Cooler Master Elite 310 chassis is a good looking, fully functional chassis. Despite this chassis being a tad cramped with my components (I have rather large computer components), the performance of this chassis was what I expected from a mid sized tower.
The only real troubles I faced was managing my cables mainly because of the top PSU mounting. I still prefer to have my PSU ‘s mounted on the bottom of the chassis. The lack of 2.5″ HDD adapters did not help matters. These types of drives are becoming more and more popular with desktop users, because of there ability of using little power, cooler operation, and not to mention they are quiet.
Looking at Newegg.com, I see that this chassis goes for roughly 40 USD. Giving this chassis a perfect price point for those who need a good solid constructed chassis, with out sacrificing looks, and cooling capability.
- Performance 7
- Value 9
- Quality 9
- Warranty 8
- Features 6
- Innovation 5
Pros:
+Looks good on top of any computer desk.
+Ease of installation of computer components
+Can handle fairly large computer components
+Solid Construction
Cons:
–Psu mounted up top
I give the Elite 310 a:
7.5 out of 10 and the Bjorn3d Seal of Approval


I have this case and was wondering how I would mount 2.5 inch hdds, thanks for the image, real helpful!