We compare Gigabyte’s EX58-Extreme against the UD4P to see if the extra $70 is worth your money. Check it out before you go out and buy the board so you would not spend your hard earned money on something that you may not need.
INTRODUCTION
It is a common practice among many motherboard manufacturers to have a line of motherboards with different part numbers to indicate different features, performance and price point. Motherboard manufacturers often start with a top of the line board design and stripe or tweak a few components here and there to produce a cheaper derivative. It is a way to save some bucks when it comes to product design.
Core i7 is currently the most expensive platform one can purchase and along it is expensive motherboard that ranges from $150 to insanely $570. It raises some interesting question’s that just how much more “performance” would these more expensive boards offer. Does it makes sense to buy the more expensive board while the more budget or mainstream board that can offer similar performance. This is what we set to investigate today as we compare the top of the line Gigabyte EX58-Extreme to their mainstream board, the EX58-UD4P.
The UD4P is currently selling at Newegg for $259.99. It is no mean a cheap board but it’s Gigabyte’s third high-end motherboard for the Core i7 platform. The Extreme, on the other hand, represents the most expensive board at retail price of 328.99 from Gigabyte. The extra 70 dollars offers customer a pre-installed waterblock for those who wish to watercool their system, an enlarged NB cooler, and couple extra SATA ports. In addition, a very useful LED debug code is included. Other than these, two boards are virtually identical to each other, making them a prime candidate for doing a performance comparison.
FEATURES AND SPECIFICATION
We have previously reviewed the Gigabyte EX58-UD4P board so I will not go through the same information here. For more information, please check out our detailed review. We will take a closer look at the Extreme board instead.
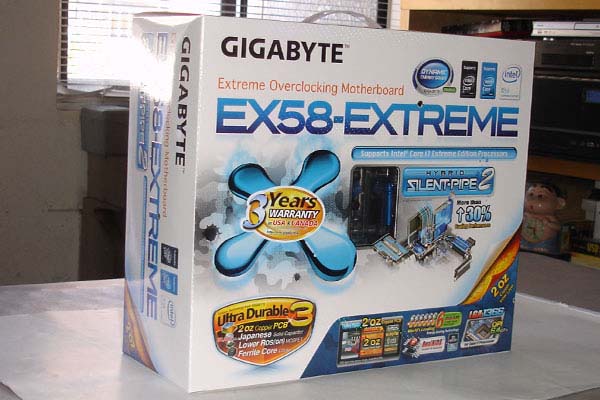
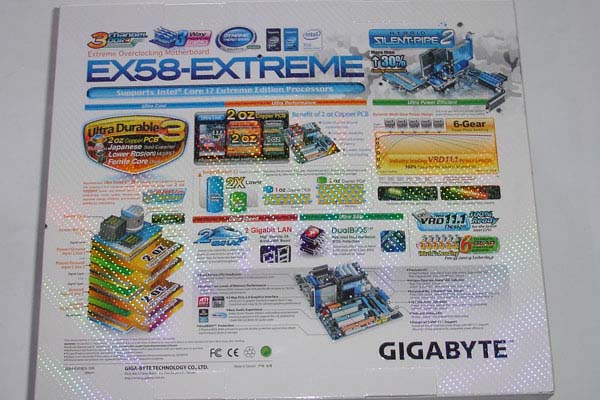
As expected, being the top of the line motherboard from Gigabyte, the EX58-Extreme comes in a very attractive box. Gigabyte even put a little handle on top to help carrying the product around.
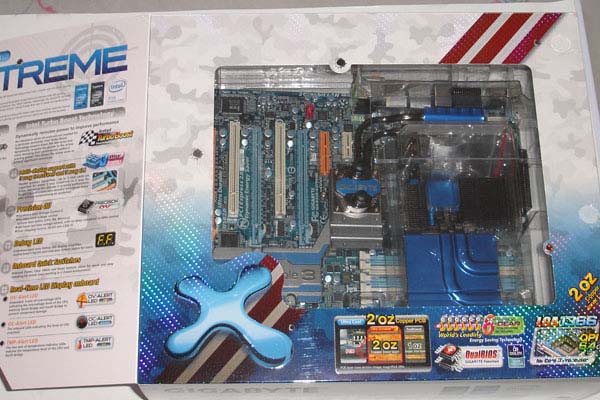
Flip over the fold out insert and you get a plan view of the motherboard. Also, you will find various features of the board.
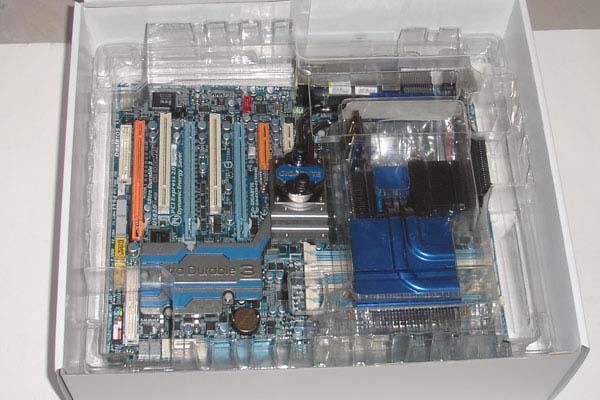
The motherboard is packaged very well inside of a plastic clamshell. We have seen such type of packaging from other manufacturers but this is the first time we have seen from Gigabyte. The clamshell type of packaging ensures no components can be broken during shipping so we are glad to see such packaging on the Extreme board.
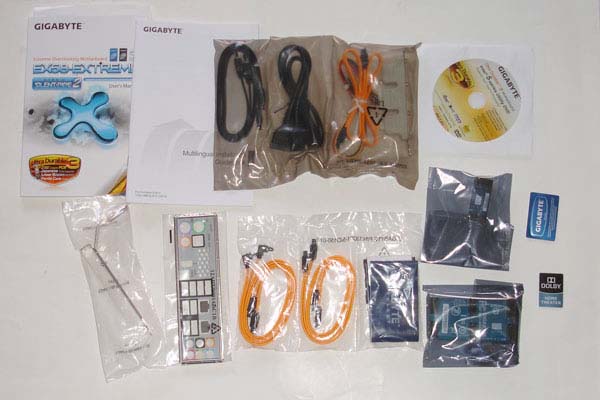
Accessories:
- Two way SLI bridge
- Three way SLI bridge
- Four SATA cable
- A floppy cable
- An eSATA adapter
- An IDE cable.
- Backplate
- Manual
- Quick installation guide
- Driver CD
Gigabyte includes the necessary connector for the two way and three way SLI as well as the CrossFire. Couple case stickers are also included which is nice. We were a bit surprised that the board only comes with four SATA cables. Considering the price of the board and the fact that it comes with 10 SATA ports, we would expect more cables to be included.
As usual a very nice and deatailed manual is included and the driver disk. Gigabyte also includes a metal bracket, which I am not sure what is it for,
Features
The EX58-Extrme is packed with features. Gigabyte has incorporate 2 ounces of copper in the board. This will ensure the motherboard to run cooler, which ensures longevity of the board. For enthusiasts, this means that higher overclocking potential is possible. We have seen other motherboard manufacturers are adopting such technology into their motherboards as well.
Gigabyte EX58 Extreme board supports Gigabyte’s Dual BIOS which offers a fail-proof in the event that a BIOS flash goes wrong. In Addition, users are able to flash the BIOS with the Q-Flash feature. I love this option as it allows customers to flash the BIOS with an USB stick. To do so, simply press F8 in the BIOS.
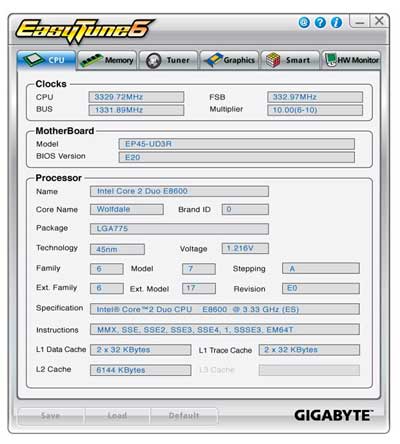
The EasyTune 6 software offers some neat features such as Quick Boost where users are able to overclock the system with three levels of CPU performance. EasyTune 6 also let users to overclock within Windows and monitor the different components temperature and voltages.

The board supports Gigabyte’s Dynamic Energy Saver to reduce power consumption with 6 gear power phase switching to allow optimized power efficiency depending on the system loads.
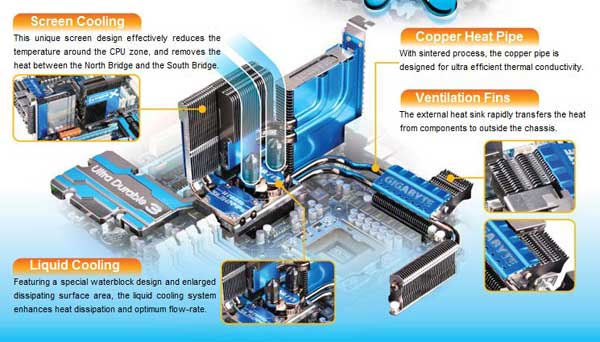
Hybrid Silent-Pipe 2 combines Air cooling and Liquid cooling so there is no need to install water blocks.
Other Features
- Ultra Durable 3 Technology with copper cooled quality for lower working temperature
- Supports the newest Intel® Core™ i7 processors in socket LGA1366 with QPI 6.4 GT/s
- Revolution energy saving design with DES Advanced featuring hardware based Dynamic 6-Gear switching
- Supports 3 channel DDR3 2100+ memory
- Scalable ability to both 3 way CrossFireX and 3 way SLI support for ultimate graphics performance
- Advanced 12+2+2 power phase design with VRD 11.1 support
- New Hybrid Silent-Pipe 2 design provides unequalled heat conductivity
- Unique hardware control IC to provide more precision voltage control
- 100% 50,000 hour lifespan Japanese solid capacitors design
- Onboard Debug LED display simplifies motherboard troubleshooting
- Patented DualBIOS with dual hardware BIOS protection
- 2 Gigabit Ethernet LAN with Teaming functionality
- Supports Dolby Home Theater audio to create a stunning surround sound listening experience
- Power/reset/Clr CMOS onboard button for easily operation on the workbench
- Blu-ray playback outputs supported by high quality 106dB SNR ALC889A HD audio
Specification
| Gigabyte EX58-Extreme Specifications | |
| Features |
|
| QPI |
|
| Chipset |
|
| Memory |
|
| Audio |
|
| LAN |
|
| Expansion Slots |
|
| Storage Interface |
South Bridge:
GIGABYTE SATA2 chip:
iTE IT8720 chip:
|
| IEEE 1394a |
|
| USB |
|
| Internal I/O Connectors |
|
| Back Panel Connectors |
|
| I/O Controller |
|
| H/W Monitoring |
|
| BIOS |
|
| Unique Features |
|
| Bundle Software |
|
| Operating System |
|
| Form Factor |
|
| Note |
|
PICTURES AND IMPRESSIONS
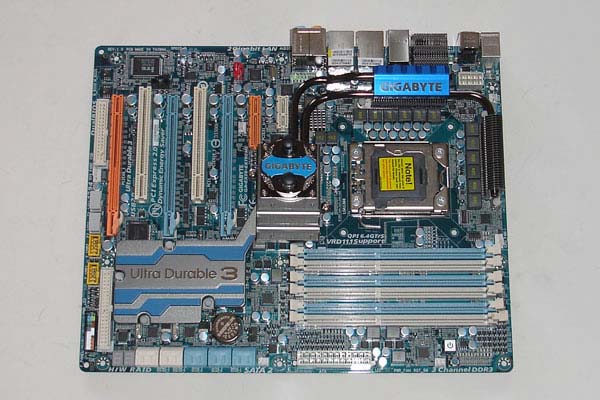
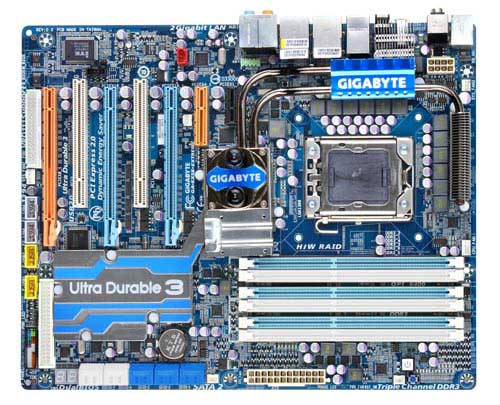
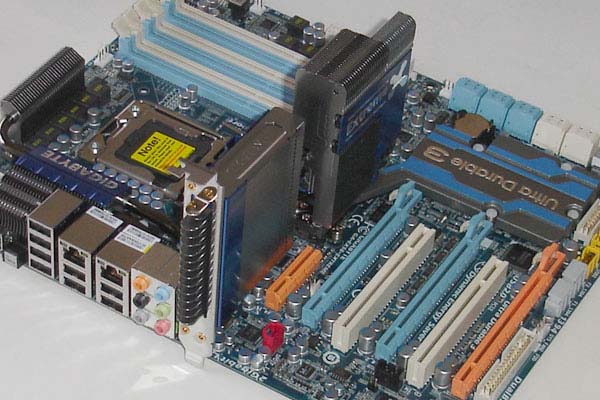
Here is the star of the show. Gigabyte continues with their tradition of color-coding the board with blue PCB and blue and white for the slots. The board is a 12-phase design, which should be more than plenty for even the most hardcore overclocker. The truth is that it really does not matter much number of phases but it is how they are designed to be able to deliver a clean power to the component. The Extreme sure does an excellent job here. As we can see, the motherboard is made with all Japanese solid capacitors, lower RDS MOSFETs, and Ferrite Core chokes. Two additional power phases are on the memory. All of the current Gigabyte motherboards come with 2 oz of copper, which according to Gigabyte will lower the impedance and CPU VRAM temperature. What this in mean for the enthusiasts are higher overclocking potential and longer lifespan.
Six DIMM slots support dual and triple channel DDR3 memory up to 2100+ MHz. Despite the fact that the Intel Core i7 officially supports DDR3 up to 1066MHz, we had no problem running memory at 1600MHz or higher. The 2oz copper that is used on the motherboard helps it to be able to support higher clockspeed DDR3 memory.
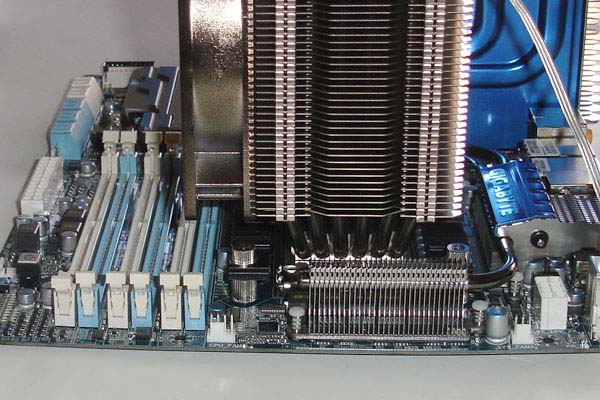
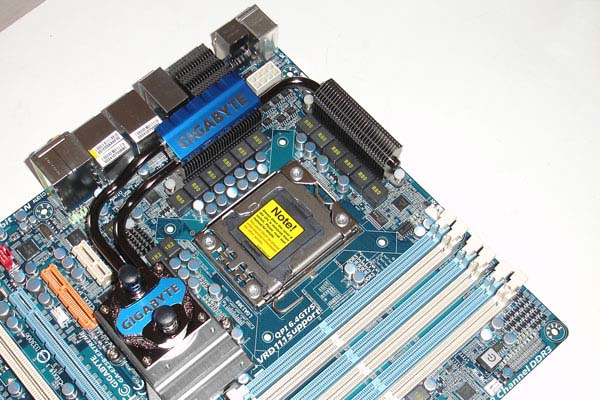
Just like what we have seen with the other X58 motherboards from Gigabyte, the first DIMM slot could be too close to the CPU for some larger heatsinks. We tested with the Prolimatech’s Megahalems heatsink and had a problem installing the memory after the fan has been installed. Luckily, a quick removal of the fan allows us to gain access to the DIMM slot.
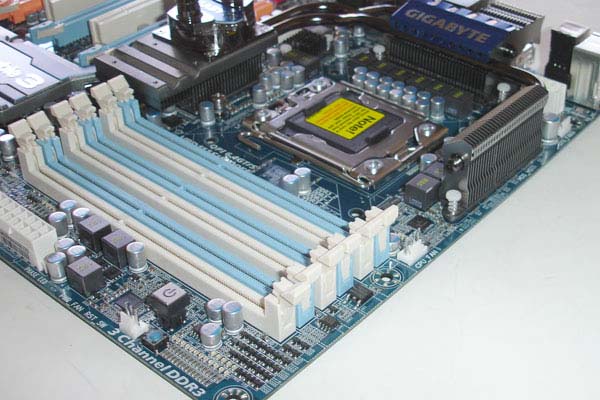

We find the 24pin power connector is placed toward the edge of the board and the eight pin auxiliary ATX power connector is behind the keyboard connector. There is enough space to connect the power cable even if the motherboard is installed inside the case. A handy power switch and rest button is placed next to the 24 pin CPU power, a very valuable tool for overclockers. Here you also find the CPU phase LED, Northbridge phase LED, and memory phase LED. The LED will light up different color depending on the system loads. The more LED means higher power usage.
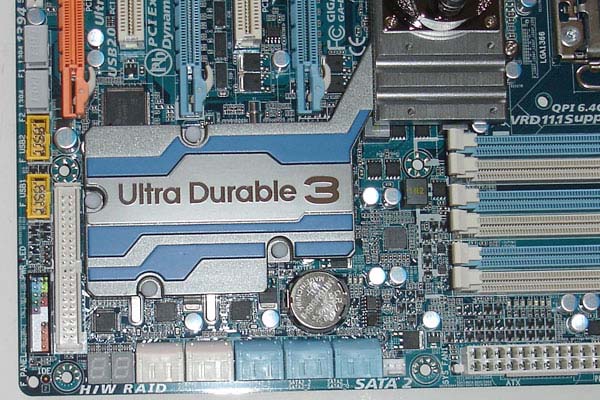
A total of 10 SATA II ports are included. Six of these ports are controlled by Intel’s ICH10R chipset that supports RAID 0, 1, 5, and 10. Additional four ports are controlled by Gigabyte SATA 2 chip, which is a JMicron JMB322 chip that supports RAID 0, 1, and JBOD. The chip is also in charge of the single IDE connector for up to two IDE devices. A floppy connector is also included for those who still use such ancient port. We would gladly to see this port disappear from this board. Truthfully, over the last few years, we have probably only used the floppy for like twice when we need to flash the motherboard BIOS. However, Gigabyte’s board has a feature called Q-Flash, which users can use an USB stick to flash BIOS so there is really no need for the floppy connector.
All SATA ports on the boards are angled at 90 degrees from the motherboard. Some people may hate the angled SATA connections because it offers very little space to plug the cable when the board is installed in a case. Gigabyte at least does not put the connectors near the edge of the board, so it offers more room to work. We are not too fond of the SATA port’s location as they will be blocked by the larger graphics cards.

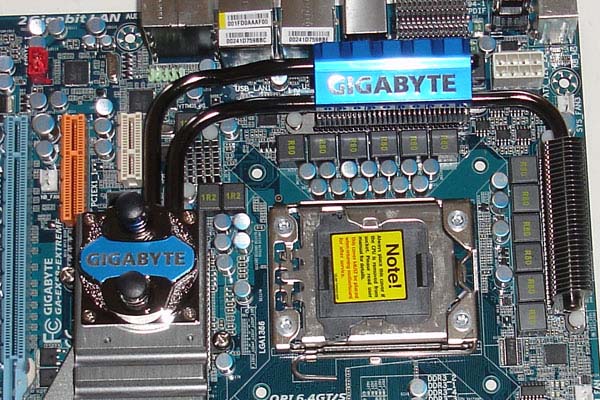
A very useful LED debug code is finally being incorporated into the Gigabyte’s motherboard. Almost all high-end motherboards have some sort of digital readouts but this is the first time we have seen it on Gigabyte’s board.
A total of 12 USB connectors (six internal and six external). Way toward the button left corner is the front panel connector. Next to it is where you will find the two USB headers, two FireWire headers, floppy connector, and an IDE connector. The board also comes with CD-IN and SPDIF internal header, and five fan headers. Three of these headers are for the system fan, one of them is for the power and the other one is for the Northbridge. Because the board’s cooling is fanless, the NB fan header can be used as system fan.
We can see a continuous heat pipe covering the MOSFET, Northbridge, and Southbridge. A big heat block is placed over the Southbridge and nearby chips. A tiny bit of the fins extends out through the backplate I/O. Short heatsinks are used near the CPU area so they won’t cause problem for large heatsinks. We tested both horizontal and vertical mounted heatsink and found no clearance issue. As the board is designed to work with watercool setup, Gigabyte has already attached the heat block to the Northbridge. All you have to do is screw in the tubes and you are ready to go.
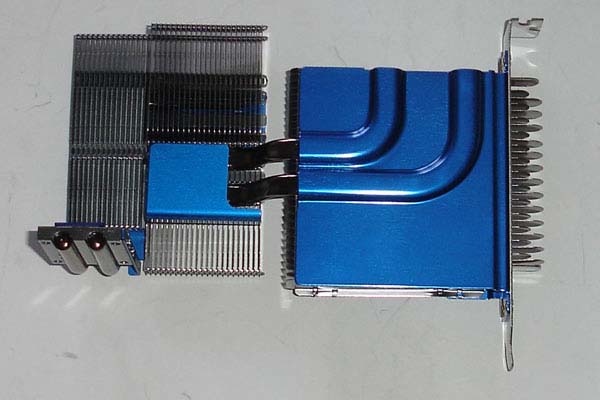
Gigabyte’s Hybrid Silent Pipe 2 technology allows those who do not wish to go with watercooling to cool the chipset with a large heatsink on top of the Northbridge heatsink. The heatsink can be installed easily by simply screw onto four screws.
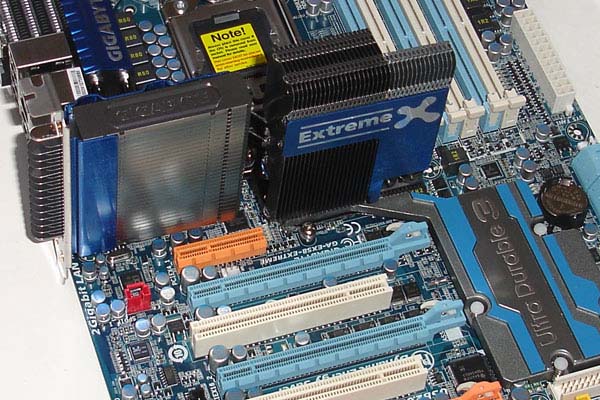
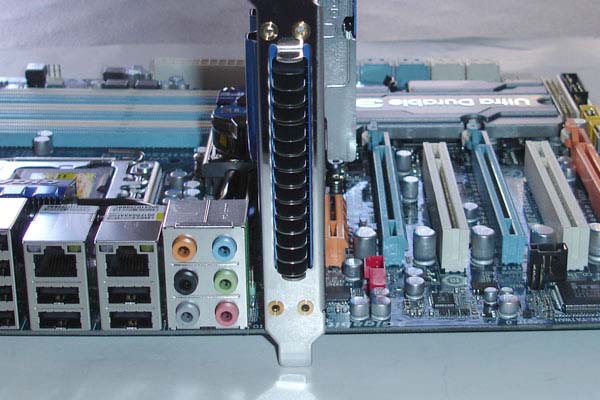
This brings us to one of the biggest issue we have with the Extreme board. Due to the size of the heatsink, it completely blocks the PCIE x1 slot and limits the length of the card we can fit into the x4 slot. Therefore, if you are not watercooling the board, you loose the PCIE x1 and x4 slots. This can severely limit the expansion for those who are running tri-SLI. If you run two video cards, you will have the third PCIE x16 left for expansion.
In addition, the CMOS battery’s location may not be ideal as it will be covered by the graphic card in primary PCIE x16 slot. Luckily, it is unlikely that you will need to take it out to clear the CMOS due to the included clear CMOS button on the back I/O.
In terms of expansion slots, Gigabyte equips the board with triple x16 PCIE slots capable of running two way or three way SLI and CrossFire. Due to chipset limitation, when all three slots are filled, the second and third slots will run at x8. In addition, a PCIE x1 slot, a PCIE x4 slot, and two PCI 2.3 slots sandwiched between the PCIE x16 slots are available for expansion. We believe that despite the fact that the board will support tri-SLI, the spacing of the third slot can prevent installing thick card like GTX 260 or 280.
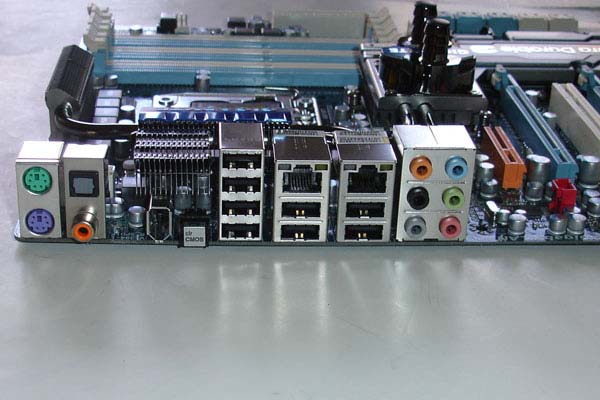
Flip to the back I/O and we will find a PS/2 keyboard and mouse connector, 6 analog audio and S/PFIF optical and RCA component audio out ports, a FireWire port, eight USB 2.0 ports, and two Gigabit LAN ports supporting teaming. Gigabyte also places a very handy clear CMOS button. Any enthusiasts would sure appreciate such port.
BIOS
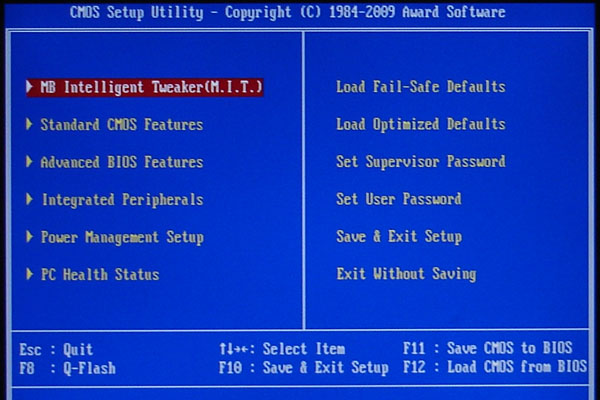
The EX58-Extreme is paired with Phoenix AWARD BIOS. We like the layout of the BIOS. All of the options are placed in a very logical order within each menu.
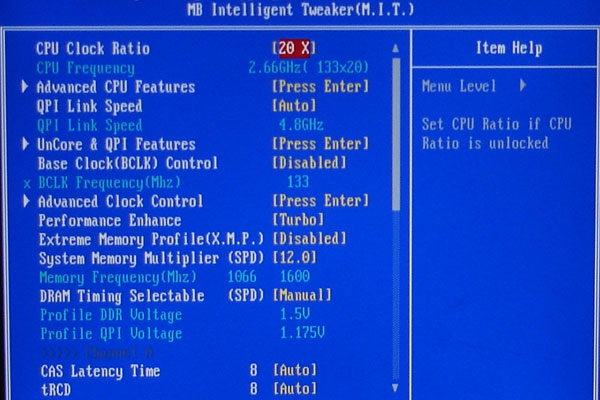
All overclocking functions are placed in the M.I.T. (MB Intelligent Tweaker). Here you find your usual settings for the CPU and your memory where you can use to achieve that sweet spot. Finally, Gigabyte has moved away from the requirement of pressing CTL+F1 to activate some of the advanced overclocking option.
The main MIT menu offers basic overclocking settings but if you go into the available submenus, you will see more advanced overclocking options. Plethoras of options are available for even the most experienced overclocker.
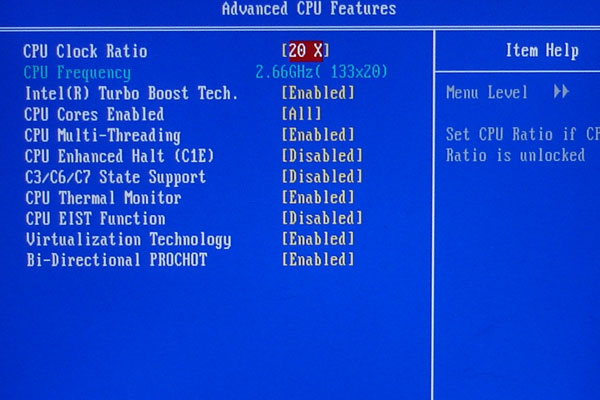
The Advanced CPU features let users to adjust the CPU clock ratio. The Intel Turbo Boost Technology controls the CPU’s internal overclocking feature where the CPU will overclock one of its cores in single threaded applications. The Cores and Hyperthreading options can be enabled or disabled in the BIOS. The C1E, C3/C6/C7 States, Thermal monitor, EIST, Virtualization, and thermal control circuit support (PROCHOT) can be configured.
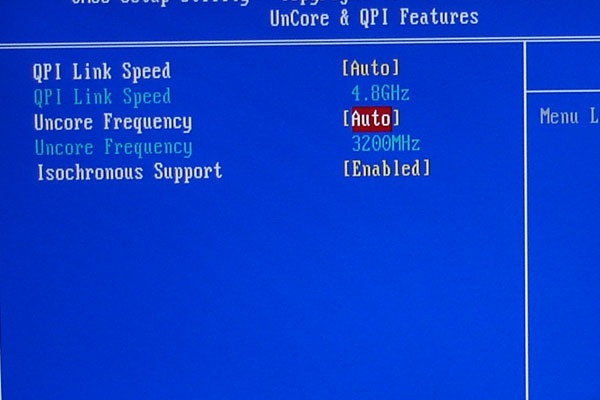
The UnCore and QPI Features submenu lets users to adjust the QPI link speed and UnCore frequency. The QPI Link speed controls the numbers of lanes between the CPU and the Northbridge. Gigabyte provides a selection of Auto, x36, x44, x48, and Slow Mode. The Slow mode would come in handy would run the memory controller at reduced speed in order to achieve a higher CPU speed. The UnCore frequency controls the link speed between the CPU memory controller and the system memory. A series of multipliers are available with the maximum setting of 48X.The Isochronous Support option controls the lanes between the Northbridge and the Southbridge.
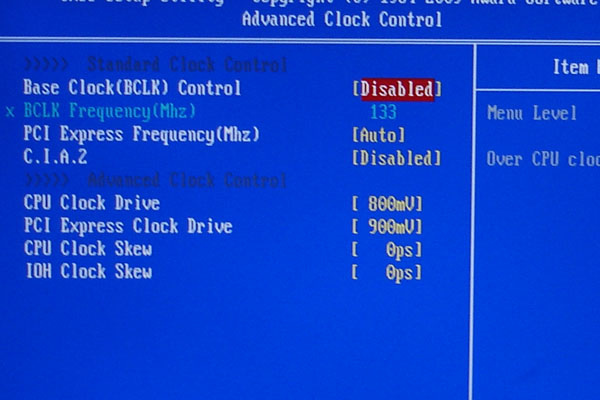
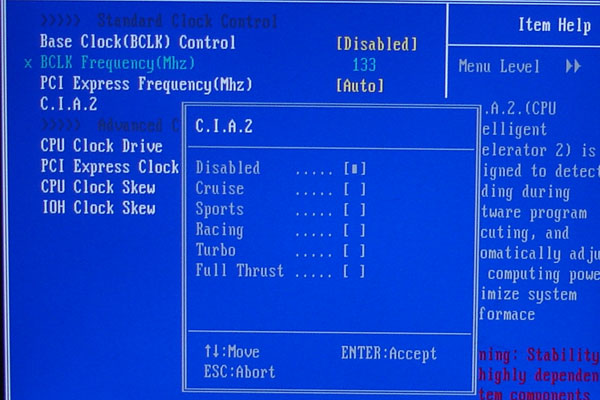
The Advanced Clock Control submenu is where users can configure the BCLK setting. Gigabyte allows the setting to be increased in incremental of 1MHz up to xxx using your keyboard to input the desired MHz. The PCI Express Frequency controls the PCI bus speed. Again, users would be able to adjust the setting with the keyboard up to 150MHz. The C.I.A.2 (CPU Intelligent Accelerator 2) is Gigabyte’s own dynamic overclocking option. A total of 5 preset profiles are available. Four additional settings are available, CPU Clock Drive, PCI Express Clock Drive, CPU Clock Skew, and IOH Clock Skew, for those who wish to fine-tune the CPU and the chipset voltage and clock delays.

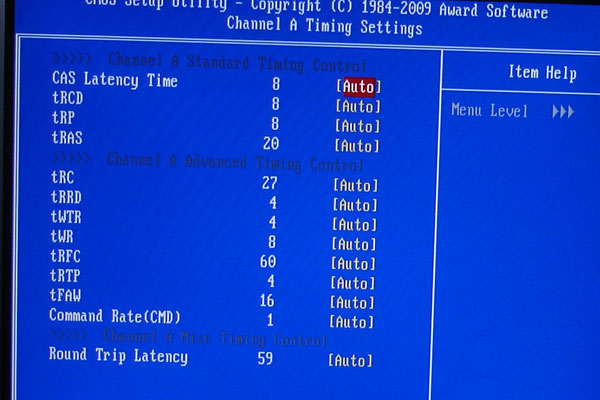
The board also supports XMP profile. Gigabyte offers a very extensive memory setting where users can adjust the memory speed and timing for each individual sticks.
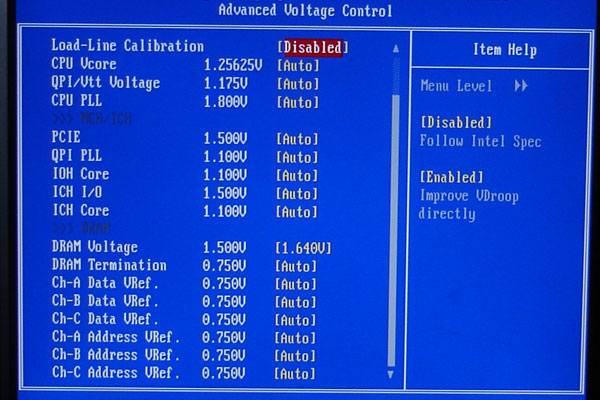
Plenty of voltage adjustments are in the Advanced Voltage Control submenu. The board is equipped with Load-Line Calibration setting where it allows vDROOP voltage setting when it is enabled. An array of voltage adjustments for the CPU, chipsets, and memory settings are available to satisfy any enthusiasts. Users are able to adjust the vCore up to 1.90V, QPI/VTT up to 2.015V, IOH up to 2.00V and DRAM up to 2.60V. Other voltages can be adjusted: CPU PLL (2.52V max), PCI Express (2.14V max), QPI PLL (1.60V max), IOH Core (2.00V max), ICH I/O (2.50V max), ICH Core (2.38V max), memory termination (1.705V max), Data VRef (1.45V max), and Address VRef (1.45V max). The memory voltage adjustments for the board are on a per channel basis.
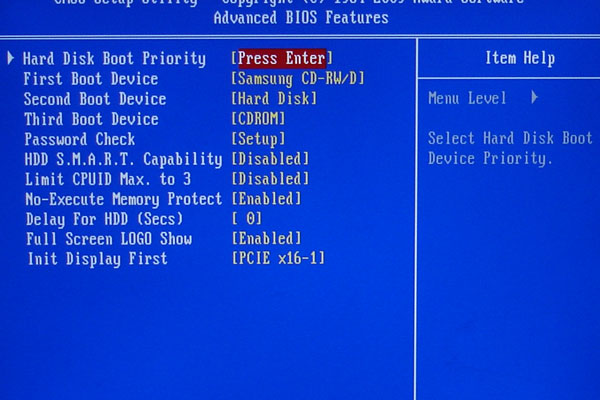
In the Advanced BIOS Features is where you will find the settings for the Hard Disk Boot Priority and order. Here is also you will get the Initial Display setting. The default setting is PCI if you clear your CMOS so make sure to switch it back to PCI express if you clear the CMOS by taking the battery out. Here is where you will also can adjust the PCI Express channel lane setting.

The Integrated Peripheral Menu contains the options for all of the ports on the board. Here you can adjust the SATA options from RAID, IDE or ACHI. Enable the USB ports, Audio function, and FireWire. Smart Backup submenu contains the options to configure the Gigabyte SATA controller (JM322). The controller allows for RAID 0 or RAID 1 array across the paired ports only, meaning that you can only setup the port 0 and 1 or 2 and 3. The ability to configure the RAID setting within the BIOS simplified the need for a separate menu that is required by some other motherboard.
PC Health Status displays the system information and allows users to make the fan speed adjustment.
In terms of overclocking, this board has all. With the right parts, it is not hard to achieve some extreme overclocking result.
TESTING & METHODOLOGY
To test the Gigabyte EX58-Extreme we did a fresh load of Vista 64 bit and updated the Operating System and drivers with all the latest versions and patches. Then we loaded the testing software and ran the machine for a few days to confirm everything was installed correctly and gave the machine a little burn in time.
Once again, we’d like to remind you that we have used the same hardware connected to the motherboard that we’ve been using on all our motherboards in this series of reviews. We use the same HD, same CPU Cooler, and keep the hardware except the Motherboard, RAM, and CPU the same as much as possible. It makes for better benchmarking if you keep the hardware as close to the same across the spectrum of tests.
| Test Rig | |
| Case Type | None |
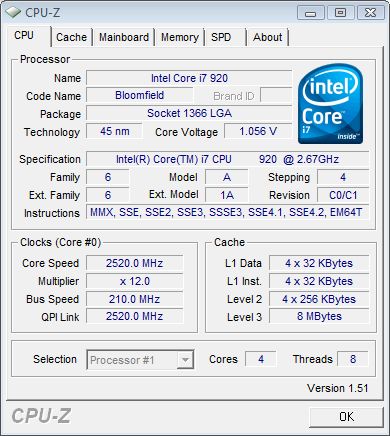
| CPU | Intel Core i7 920 |
| Motherboard |
Gigabyte EX58-UD4P (BIOS F8) Gigabyte X58-Extreme |
| RAM |
Kingston HyperX KHX12800D3LLK3/6GX |
| CPU Cooler |
Prolimatech Megahalems |
| Hard Drives | Seagate Barracuda 7200.11 1.5TB |
| Optical | Nec DVD-RW ND-3520AW |
| GPU Tested | Asus ENGTX260 Matrix |
| Testing PSU | Cooler Master UCP 900W |
| Legacy | Floppy |
| Mouse | Logitech G7 |
| Keyboard | Logitech Media Keyboard Elite |
Test Suite
|
Synthetic Benchmarks |
|
3DMark Vantage v. 1.01 |
|
3DMark06 v. 1.1.0 |
|
SiSoft SANDRA XII Professional SP2 |
|
Everest Ultimate Edition v. 4.50.1330 |
|
Cinebench R10 64 bit |
|
WinRar v. 3.71 |
Sisoft Sandra 2009 SP1
“SiSoftware Sandra (the System ANalyser, Diagnostic and Reporting Assistant) is an information & diagnostic utility. It should provide most of the information (including undocumented) you need to know about your hardware, software and other devices whether hardware or software. It works along the lines of other Windows utilities, however it tries to go beyond them and show you more of what’s really going on. Giving the user the ability to draw comparisons at both a high and low-level. You can get information about the CPU, chipset, video adapter, ports, printers, sound card, memory, network, Windows internals, AGP, PCI, PCI-X, PCIe (PCI Express), database, USB, USB2, 1394/Firewire, etc.”
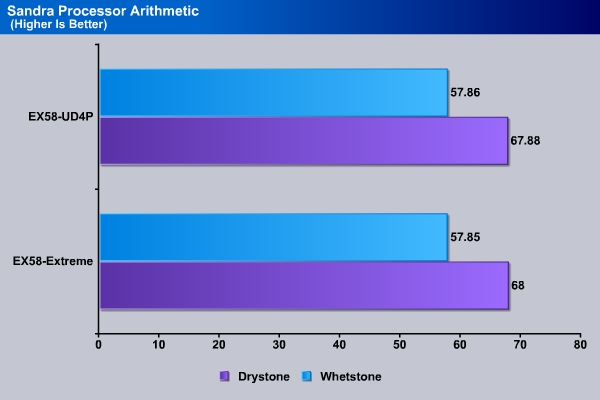
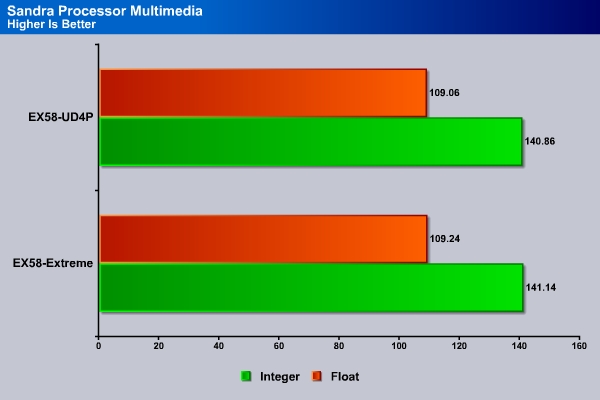
In both Integer and float point calculation, we see the Extreme board comes ahead of the UD4P.
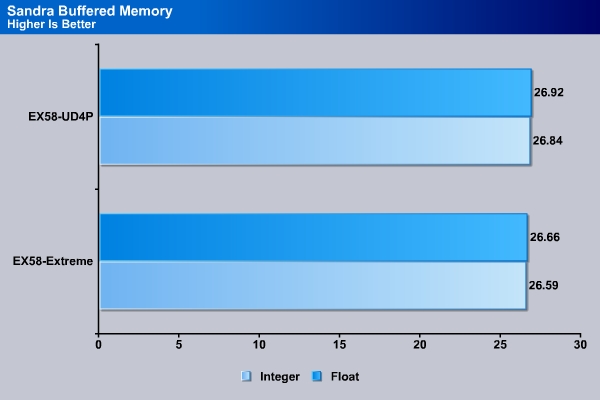
This is rather unusual. In the memory benchmark, we see the UD4P actually had a slight lead, albeit very slim, over the Extreme board. With the memory controller built into the processor and the similarity of the boards, we were expecting to see same result.
EVEREST ULTIMATE
“EVEREST Ultimate Edition is an industry leading system diagnostics and benchmarking solution for enthusiasts PC users, based on the award-winning EVEREST Technology. During system optimizations and tweaking it provides essential system and overclock information, advanced hardware monitoring and diagnostics capabilities to check the effects of the applied settings. CPU, FPU and memory benchmarks are available to measure the actual system performance and compare it to previous states or other systems. Furthermore, complete software, operating system and security information makes EVEREST Ultimate Edition a comprehensive system diagnostics tool that offers a total of 100 pages of information about your PC.”
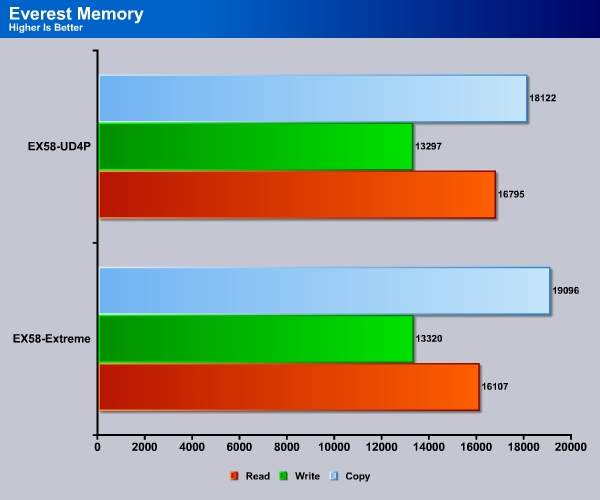
We get a better sense with the memory performance in the Everest benchmark. Here we can see that the Extreme board actually has slightly better performance in the Write while the UD4P wins the Read tests. Now what is more surprising is the Copy test where the Extreme board has 974 points higher than the UD4P.
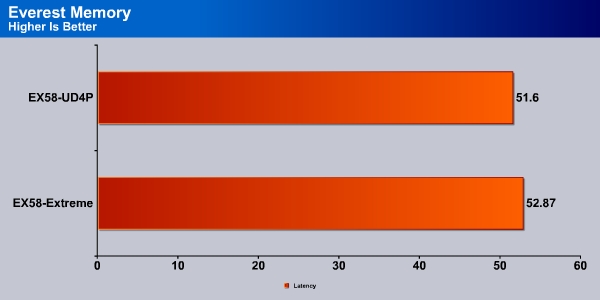
The UD4P’s memory latency is 1.2 ms lower than the Extreme board. With the faster read speed and lower latency, it can actually offset the CPU performance lead of the Extreme board that we have seen in the applications where the memory performance is critical.
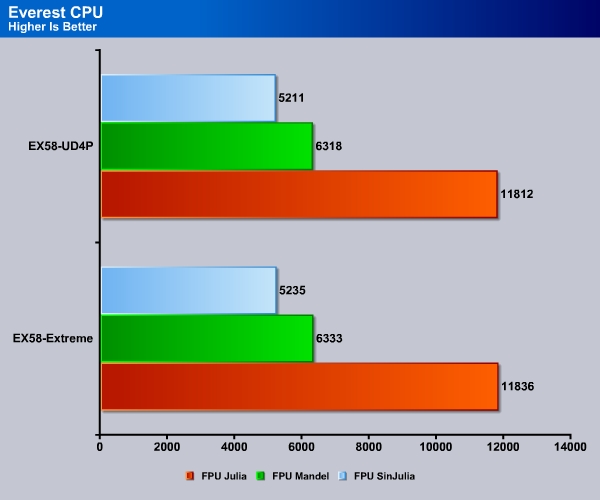
No surprise here, the Extreme board takes the lead in all three benchmarks.
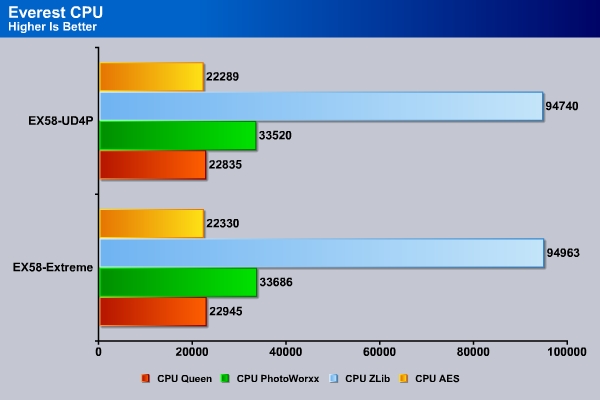
Here we can see the Extreme board comes in second only in the CPU ZLib test. This test measures combined CPU and memory subsystem performance. As we have observed earlier about the UD4P’s superior memory performance, we are not too surprised to see it comes ahead of the Extreme board.
3DMARK06 V. 1.1.0

3DMark06 developed by Futuremark, is a synthetic benchmark used for universal testing of all graphics solutions. 3DMark06 features HDR rendering, complex HDR post processing, dynamic soft shadows for all objects, water shader with HDR refraction, HDR reflection, depth fog and Gerstner wave functions, realistic sky model with cloud blending, and approximately 5.4 million triangles and 8.8 million vertices; to name just a few. The measurement unit “3DMark” is intended to give a normalized mean for comparing different GPU/VPUs. It has been accepted as both a standard and a mandatory benchmark throughout the gaming world for measuring performance.
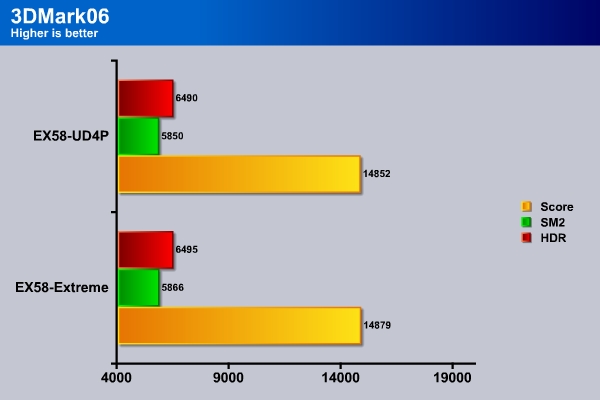
The Extreme board easily wins the test here in all three tests.
3DMark Vantage

For complete information on 3DMark Vantage Please follow this Link:
www.futuremark.com/benchmarks/3dmarkvantage/features/
The newest video benchmark from the gang at Futuremark. This utility is still a synthetic benchmark, but one that more closely reflects real world gaming performance. While it is not a perfect replacement for actual game benchmarks, it has its uses. We tested our cards at the ‘Performance’ setting.
Currently, there is a lot of controversy surrounding NVIDIA’s use of a PhysX driver for its 9800 GTX and GTX 200 series cards, thereby putting the ATI brand at a disadvantage. Whereby installing the PyhsX driver, 3DMark Vantage uses the GPU to perform PhysX calculations during a CPU test, and this is where things get a bit gray. If you look at the Driver Approval Policy for 3DMark Vantage it states; “Based on the specification and design of the CPU tests, GPU make, type or driver version may not have a significant effect on the results of either of the CPU tests as indicated in Section 7.3 of the 3DMark Vantage specification and white paper.” Did NVIDIA cheat by having the GPU handle the PhysX calculations or are they perfectly within their right since they own Ageia and all their IP? I think this point will quickly become moot once Futuremark releases an update to the test.
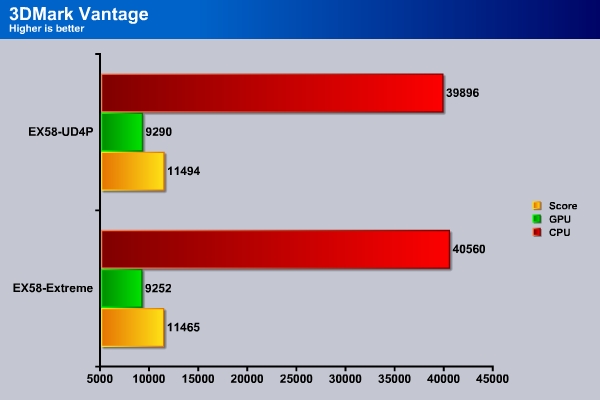
3DMark Vantage shows a slightly different story as we see the UD4P scores 38 points higher in the GPU test and 29 points in the overall score. The Extreme, on the other hand, yields 664 points higher in the CPU benchmark. It is pretty clear that the Extreme board has will offer a higher performance in CPU intensive applications while the UD4P’s higher memory throughput will help in tasks that require memory access.
Cinebench
“CINEBENCH is a real-world test suite that assesses your computer’s performance capabilities. MAXON CINEBENCH is based on MAXON’s award-winning animation software, CINEMA 4D, which is used extensively by studios and production houses worldwide for 3D content creation. MAXON software has been used in blockbuster movies such as Spider-Man, Star Wars, The Chronicles of Narnia and many more. MAXON CINEBENCH runs several tests on your computer to measure the performance of the main processor and the graphics card under real world circumstances. The benchmark application makes use of up to 16 CPUs or CPU cores and is available for Windows (32-bit and 64-Bit) and Macintosh (PPC and Intel-based). The resulting values among different operating systems are 100% comparable and therefore very useful with regard to purchasing decision-making. It can also be used as a marketing tool for hardware vendors or simply to compare hardware among colleagues or friends.”
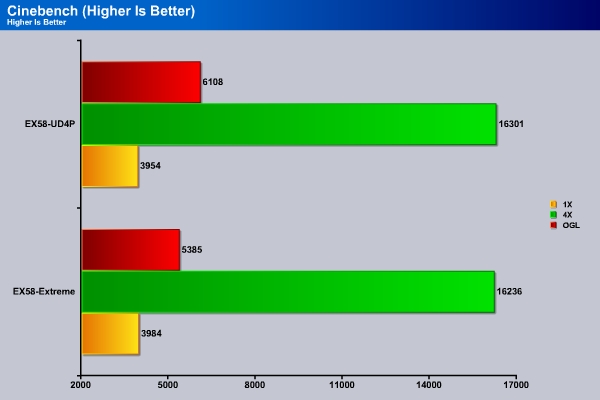
It should not have come to any surprise that we see the Extreme comes on top in the CineBench’s single core CPU benchmark. However, in the multicore rendering benchmark, the UD4P actaully edges out the Extreme.
WinRar v. 3.80
This module in WinRar generates random data, which contains specially introduced redundancy, increasing the load to both the processor and memory. Data is then passed through RAR compression and decompression algorithms, and the output of the decompression algorithm is compared to the source data. If any differences are found, WinRar then reports “Errors found – Yes” in the command window. WinRar displays a size of processed data and compression speed, current and resulting, in kilobytes per second.
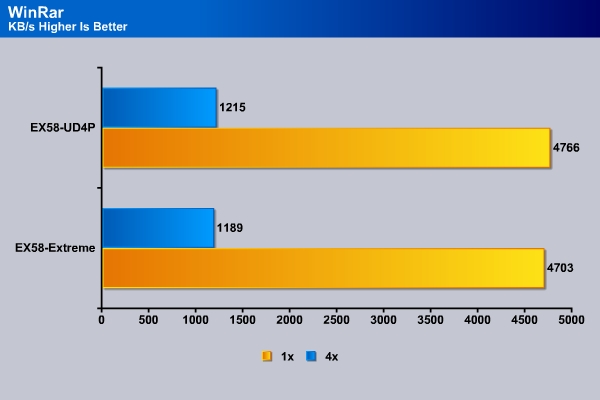
WinRar relies on both CPU and memory as it extracts the files. Thus, we see the UD4P is able to yield a better result than the Extreme.
SuperPi
Super Pi is a program that calculates pi to a specified number of digits after the decimal point up to a maximum of 32 million. The Gauss-Legendre algorithm which is a windows version of a program used by Yasumasa Kanada in 1995 to compute Pi to 232 digits.
Super Pi is used by many overclockers to test performance and stability of their systems. In this community, Super Pi has become the standard for providing benchmarks to compare pi calculation times and demonstrate their overclocking skills. The program can be used to also test the stability of a particular overclocking speed. If a computer can calculate PI to the 32 millionth place after the decimal without a mistake, it is considered moderately stable in terms of RAM and CPU performance. More intensive CPU and RAM tests include calculations that run for hours instead of minutes and better test system stress levels.
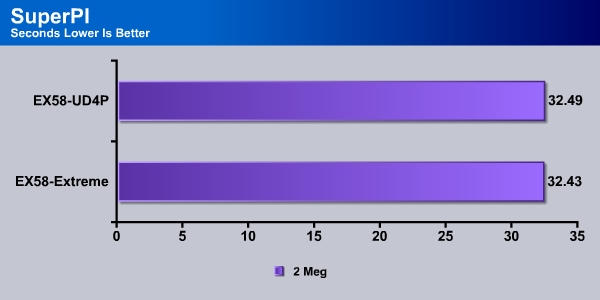
SuperPi is a single threaded application that is a very useful tool to gauge the processor’s raw performance. As expected the Extreme takes a 0.06 leads over the UD4P.
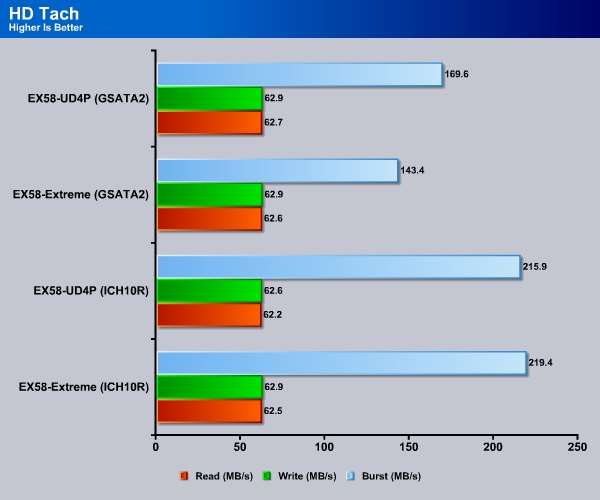
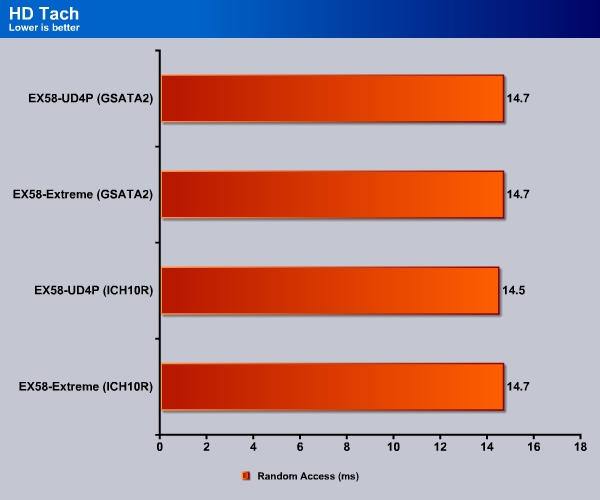
HD TACH
HD TACH performs sequential read and write tests on removable media and fixed disks. HD Tach is also capable of performing the sequential read and write tests on the entire disk instead of the small number of zones in the quick and long test. We opted to use the Short 8 (MB) and Long 32(MB) tests in the sequential read mode only, as sequential writes are covered by other benchmarks.

POWER CONSUMPTION
We thought it would be interesting to measure the power consumption of both boards. The power consumption is measured with Kill-A-Watt P4400. All power saving features are disabled. The idle power consumption is measured with the system turned on for 15 minutes with no activity running. The load power consumption is measured with the system running in 3DMark Vantage. The peak power consumption is reported.
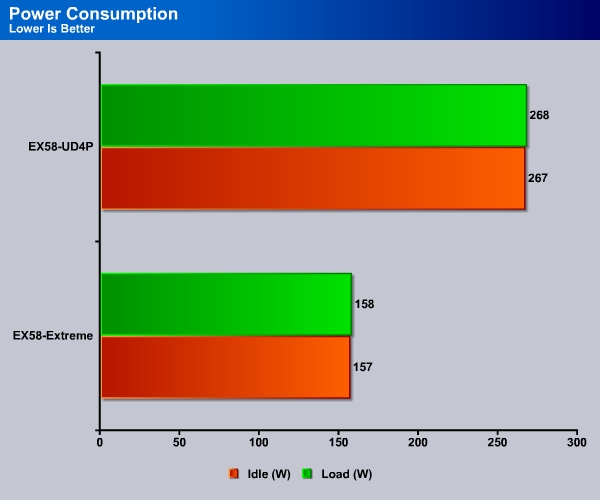
Both boards’ power consumption is very similar. We do see the Extreme board to consume 1W less than the UD4P board.
TEMPERATURE
How well is the large heatsink from the Extreme board performs? Let’s find out.
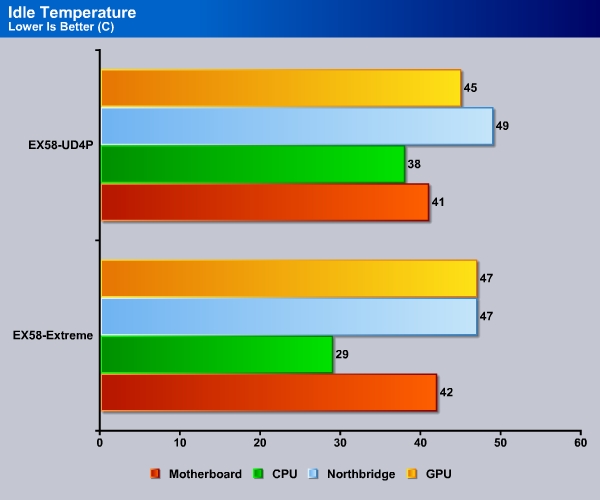
At idle, we can see that the Extreme board’s Northbridge temperature is 2 °C lower than the UD4P. What is more impressive is the CPU temperature. Apparently, the large heatsink is able to help to cool the processor by as much as 9 °C. Now, not everything is cooler on the Extreme board, the GPU and the Motherboard temperature are higher for the Extrme board under idle condition.
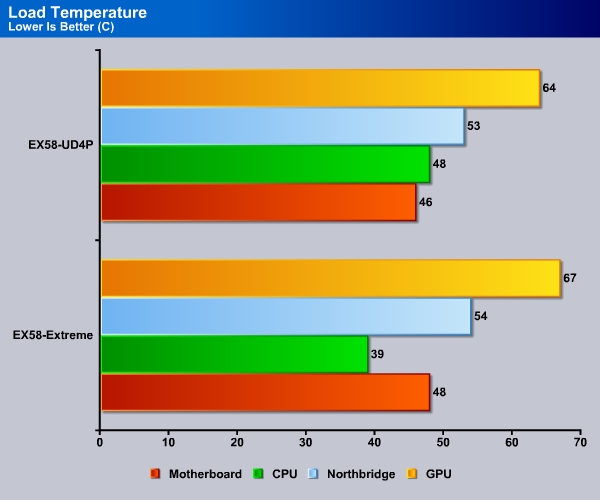
Under load, the CPU temperature for the Extreme board is also 9 °C lower than the UD4P. However, the Northbridge, GPU, and the Motherboard temperature are actually 1 °C, 3 °C, and 2 °C, respectively, higher for the Extreme board. Keep in mind that we test the system in an open case so no additional cooling is provided. We believe that due to the oversize heatsink of the Extreme board, the hot air from the GPU is isolated on the bottom section of the board. Thus, the GPU will not get the added cooling from the CPU cooler. As a result, the temperature is slightly higher.
It is quite impressive to see the decrease in the CPU temperature for the Extreme board, which we really did not expect.
OVERCLOCKING
Our previous experience with the Gigabyte UD4P motherboard reveals that this board has some compatibility issue the Enermax Galaxy 850W power supply that we were using. We were not able to overclock the bclk up to 170 but the system will fail to boot from cold boot. We could actually get the system to go higher bclk but after it has completely shut down, we were not able to boot the computer from cold boot. We swapped the power supply to the Cooler Master UCP 900W and were able to boot at higher bclk without any issue. So be warned if you plan to use Gigabyte board and Enermax power supply.
We set to find out the highest base clock that we can push this board. We lower the CPU multiplier to 12X, disable the Turbo Boost, and set the memory multiplier to 6x, QPI link speed to x36, uncore frequency to x13 and crank up the base clock. The system cruise up to 200MHz without any issue and was able to run Prime without any issue. At 210, we had to change the QPI Link Speed to “slow mode” to get it to boot into Windows. We were not able to boot the system up at 220MHz even if we raise the voltages for various components.
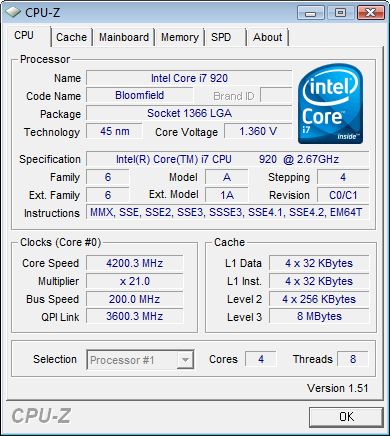
To achieve the maximum overclocking result, we increase the vCore to 1.4, and we were able to obtain 4GHz fairly easy at 190×21 with the memory running at 8-8-8-20. We were able to get the system to boot at 200×21 but it will fail to run Prime. At this point, our processor is what limits us from pushing it higher. It is very possible to reach even higher speed if you are using water cooling or have a processor that can take it that far as our base clock suggest that the board should have no issue reaching to 210MHz.
UD4P overclocking
With the same setting, we were able to push the UD4P to 210MHz without any trouble. The system actually is able to run Prime95 stable without any issue. We did not have to lower the QPI link speed like we did with the Extreme board. However, we were only able to push the maximum QPI to 215MHz prime stable.
We obtained the same overclocking result with the UD4P as we did with the Extreme board. Again, our CPU is what is limiting us from getting higher speed unfortunately.
In terms of overclocking, there are virtually no differences between the two boards. Without going to watercool, users would probably not able to gain any significant higher clock speed from the Extreme board.
CONCLUSION
So what does $70 extra gets you? For $70 extra, the Gigabyte X58-Extreme board gets you two extra SATA ports, one additional network port, and the large chipset heatsink with the ability to watercool the system. Is it worth the $70 extra? In our opinion, it does not if you plan to stay with air cool. If you have no plan to watercool your computer, we would suggest you pick the X58-UD4P or if you need the extra network and SATA ports, go for the UD5P from Gigabyte, which features the same ports sans the watercooling block.
User who want to purchase the Extreme board should definitely go all out and watercool their system. As our tests have shown, both Gigabyte boards performance are very similar to each other, often within less than 1% of each other. The only time we see a higher performance would be the secondary SATA controller where the Extreme has a better burst transfer rate. We did observe the Extreme to offer slightly better CPU performance while the UD4P has a tad better memory performance. Overall, we do not think that these minor differences in performance will be noticeable. Therefore, we do not recommend any users to go for the Extreme board if you plan to stay air cool.
We love the fact that the water block is already pre-installed and at least the board offers users with the option to go with air or water-cool. We want to point out that if you do not plan to stay with the air-cool, be warned that the oversized heatsink will virtually blocks two PCIE ports, limiting the expansion. This is just another reason why we strongly suggest users to watercool the board. In addition, the space limitation of the third PCIE slot may prevent users from running 3 graphics cards in the board when uses cards that require dual expansion slot. The expansion option is definitely the Achilles’ hill for this board.
In addition, the closeness of the RAM slots can also pose some problem with larger heatsink. We are not too fond of the SATA ports placement either. With only so much space that is allowed on an ATX motherboard, Gigabyte has done a decent job in the layout, packing so many things and ports on it is not an easy task.
Overall, the Gigabyte X58-Extreme overclocks easy and has plenty of options even for the most hardcore overclocker. It is rock solid and has plenty of features. We have come to appreciate Gigabyte’s Q-BIOS, 2 ounces of copper, Hybrid Cooling, and top notch quality components.
We are using an addition to our scoring system to provide additional feedback beyond a flat score. Please note that the final score isn’t an aggregate average of the new rating system.
- Performance 9
- Value 7
- Quality 9
- Warranty 9
- Features 9
- Innovation 8
Pros:
+ Very good overclocking result
+ Hybrid Cooling
+ Support up to 24GB of memory
+ 10 SATA ports
+ Quality Components
+ Ample tweaks and adjustments
+ Plenty of features: Q-Flash, DES, etc
+ Onboard Debug Codes
Cons:
– Price
– Oversize Northbridge will block two PCIE expansion slots
– RAM slots can have issue with some heatsink
– Only includes 4 SATA data cables
– SATA ports placement
– May not able to run tri-SLI due to space limitation on the thrid slot
The Gigabyte EX58-Extreme will receive a score of 8 out of 10. Despite its flaws, the Gigabyte EX58-Extreme’s features, overclocking potential, and stability will make your Core i7 built a breeze. However, we highly recommend buyers who wish to purchase this board to go with watercooling setup and not the air-cooling setup.


Any idea where I can find the Silent Pipe for this MB for sale? Still have one?