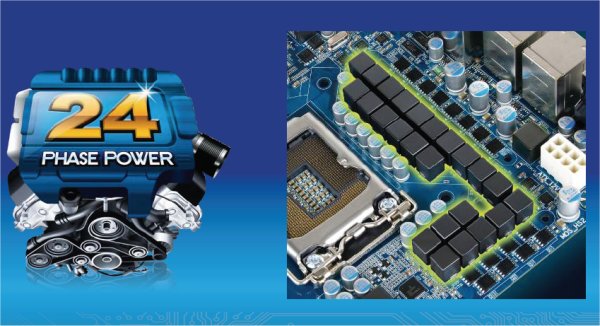
The Gigabyte GA-P55-UD6 motherboard is the worlds first 24 Phase Power motherboard ever released. The Flagship P55 board is packed with features and did we mention 24 Phase Power?
INTRODUCTION
With the introduction of the Intel Core i5/i7 LGA 1156 CPU’s, Gigabyte surprised us with a true 24 Phase power motherboard which happens to be the world’s first 24 phase power board, the GA-P55-UD6. The GA-P55-UD6 is the flagship P55 offering and believe us when we tell you it’s more than flagship quality. Once in a while a board comes along that fits into the legendary category, this is one of those boards.
We’ve run the Intel Core i7 870 “top dog” CPU on the Gigabyte and we’d have to say this is one of the best boards we’ve seen to date. Not just one of the best P55 boards, we mean of all the motherboards we’ve seen entirely. This one fits into the “Get away from my motherboard” category. With 24 Phase power, Trusted Platform Module chip, Bluetooth security, 2 oz copper PCB, Dynamic Energy Saver 2, and the Smart 6 suite of features, your going to be hard pressed to find a more feature rich motherboard. The Smart 6 suite of features contains: Smart Quickboot, Smart QuickBoost, Smart Recovery, Smart Dual BIOS, Smart Recorder, and Smart TimeLock. Seriously, this board is feature rich; it is so feature rich it will be hard to cover all that it offers.
So you’re a hard core overclocker and features aren’t that important to you. Did we mention 24 Phase Power with solid capacitors and Ferrite chokes? There’s no question about overclocking capabilities, this is the flagship board. It’s going to overclock like a demon and you won’t even have to make a deal with the devil to get the most out of your CPU.

24 Phase Power provides effortless steady voltage to the CPU and spreading that voltage across 24 VRM’s (voltage regulation modules) and 24 ferrite chokes assures you that the power delivery system is going to run cooler, provide steadier power, and last longer than boards with 6 or 8 phase power. If your looking at one of the big dog boards for P55, look here first.
Features & Specifications
- Industry leading 24 phase power VRM design for optimum power efficiency and thermal solution
- Leading quality standard of Ultra Durable™ 3 technology with 2oz copper PCB design
- Innovative Smart 6 technology for Smarter PC management
- Support Intel® Core™ i7/ Core™ i5 processors with LGA 1156 socket
- New Dynamic Energy Saver™ 2 technology enables best energy efficiency
- Support both ATI CrossFireX and NVIDIA SLI for ultimate graphics performance
- Smart TPM provides 2048 bit key via Bluetooth cellphone
- Smart DualLAN with Intelligent LAN port auto-switching
- XHD technology accelerating hard drive performance with ease
- AutoGreen technology Greening your PC via Bluetooth cellphone
- Integrated eSATA/USB combo connectors for enhanced storage flexibility
- Patented GIGABYTE DualBIOS™ technology delivering highest level failure protection
- Supports Dolby Home Theater audio to create a stunning surround sound listening experience
- Onboard debug LED simplifies motherboard troubleshooting
- The Precision OV provides more precision voltage control for system
- Compatible with Windows 7 to deliver the best operation experience
With the 24 Phase Power and 2oz Copper PCB design backed with Dynamic Energy Saver 2, you can enjoy overclocking to the max or choose to save energy during low CPU usage. The Smart 6 utility suite allows you to see and control a host of features inside Windows without having to boot into the BIOS. Ready for Nvidia and ATI multi-GPU setups, you’re good to go for SLI or Crossfire.
The Smart TPM secures your data with 2048 bit encryption and if that’s not enough security you can let your Bluetooth phone be your key to securing the PC when you are away from it. That’s right, just set up your Bluetooth phone and as long as your close to the PC you have access to it. Walk away from the PC (with your phone on you) and the PC locks down. Come back to the PC and it unlocks. Once the phone is setup, the security on the PC is end user transparent. No more forgetting to log off to protect those sensitive files.
Not only will your Bluetooth device be your key to securing your PC, you can also set low power states with your phone. The Smart Dual Lan provides teaming capabilities for greater LAN bandwidth but also provides auto switching should one port fail. If the port your network cable is plugged into fails the Smart Dual Lan will automatically switch you to the working port and keep you connected.
The onboard sound natively supports Dolby Home Theater to allow for realistic surround sound. The onboard debug LED will make it easier during setup should you run into any problems during the install. Should anything go wrong later the Debug LED will help diagnose the problem.
For the overclocking fiends you can precisely over-volt the CPU and memory if you want to get into the extreme voltage range during an LN2 or Liquid helium run.
| Specifications |
| CPU |
|
| Chipset |
|
| Memory |
(Go to GIGABYTE’s website for the latest memory support list.) |
| Audio |
|
| LAN |
|
| Expansion Slots |
|
| Multi-Graphics Technology |
|
| Storage Interface | Chipset:
GIGABYTE SATA2 chip:
2 x JMB362 chips:
iTE IT8720 chip:
|
| USB |
|
| IEEE 1394 |
|
| Internal I/O Connectors |
|
| Back Panel Connectors |
|
| I/O Controller |
|
| H/W Monitoring |
|
| BIOS |
|
| Unique Features |
|
| Bundle Software |
|
| Operating System |
|
| Form Factor |
|
| Note |
|
| Remark |
|
| * The entire materials provided herein are for reference only. GIGABYTE reserves the right to modify or revise the content at anytime without prior notice. * All trademarks and logos are the properties of their respective holders. |
| * Due to standard PC architecture, a certain amount of memory is reserved for system usage and therefore the actual memory size is less than the stated amount. |
GIGABYTE SPECIAL FEATURES
With all the features packed on some boards, the only way to cover them is to do a special features section by itself. This is one of those feature packed boards.

By far the most interesting feature on this motherboard is the true 24 phase power. This is the world’s first true 24 phase power board.

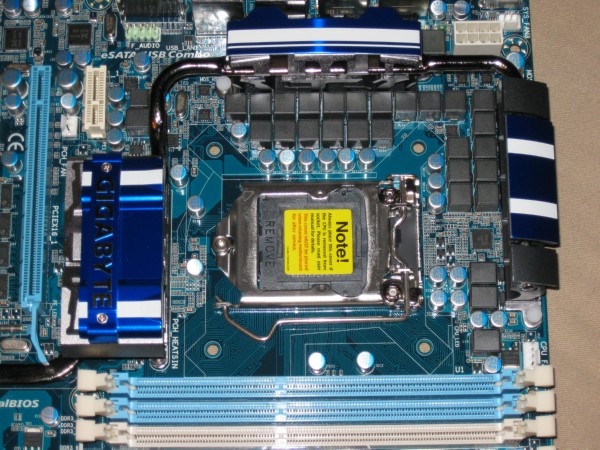
Clustered around the CPU you can see the 24 Ferrite chokes that make the 24 Phase Power possible. Spreading the CPU voltage across 24 phases will result in cleaner power delivered to the CPU, VRM’s (Voltage Regulation Modules) and as a result the Ferrite Chokes will run cooler. Cooler operation means longer life.

Now that you know about the 24 Phase power, you can make sure that your electric bill doesn’t hit the roof. Gigabyte has you covered with Dynamic Energy Saver 2.

In the Advanced screen of Dynamic Energy Saver 2, you can control CPU, Chipset, hard drive, fan, GPU and memory voltage regulation to set for low power states or leave the board running full out.

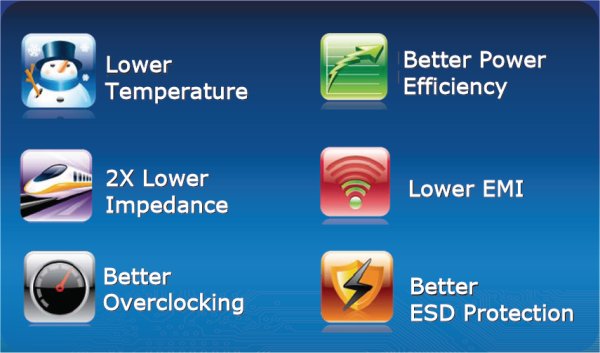
Gigabyte is serious about their 2oz Copper PCB design. Both the ground and power layer contain 2oz of copper.

The 2oz Copper PCB on both power and ground layers will result in lower temperatures, half the impedance, better overclocking, better power efficiency, lower EMI (Electromagnetic Interference) and better ESD (Electrostatic Discharge) protection.

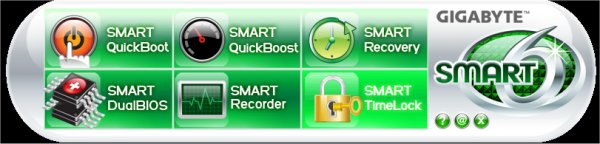
Smart 6 is a collection of software utilities that allow you to control 6 different features from a GUI (Graphical User Interface) inside Windows.

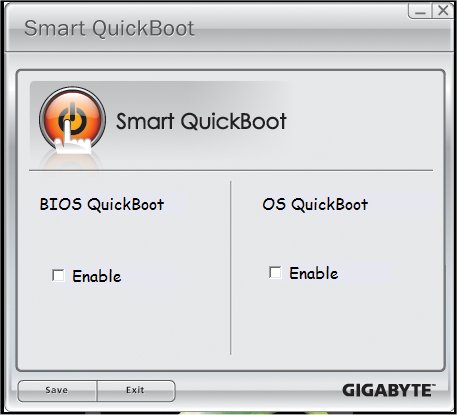
Using Smart Quickboot you can skip some of the BIOS testing prior to entering the OS and streamline the booting procedure by using OS Quickboot. From what we understand, OS QuickBoot is a utilized sleep state. Instead of shutting the computer down it forces a sleep state which results in the PC booting much faster.

We spent a lot of time testing features on the Gigabyte GA-P55-UD6 and Smart QuickBoost was the only one we had a problem with. It took our high end rig to 3.08 with a Bclk of 140 with no problems but beyond that we got bluescreens. Unlike some boards which have an auto overclocking feature, this is a preset overclock that uses a BIOS Mask. A BIOS Mask is nothing more than a pre-determined set of overclocking frequencies and voltages that worked on a specific setup. The Faster setting Mask worked for us, but Turbo and Twin Turbo caused blue screens. The good news for most overclockers is that the Turbo and Twin Turbo settings were very close to correct so they make a good starting point for stabilizing the overclock.

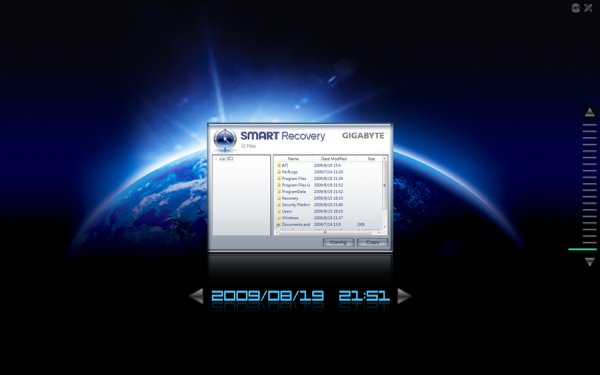
Smart Recovery is a utility that lets you recover a previously working operating system state after having an OS boot failure. Similar to System Restore but more advanced. If nothing else, it provides an extra layer of protection against those little overclocking accidents that happen. We actually corrupted our OS during testing and Smart Restore had us back in Windows in no time at all. We were of course forced to break out our test systems Hard Drive Clone and restore from the clone, but that was only to ensure consistency in testing. The Smart Restore worked just fine.

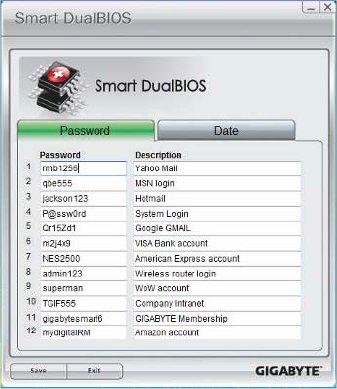
Gigabyte used to have a 8MB dual BIOS for a total of 16MB of BIOS storage. On the GA-P55-UD6 and other P55 boards they’ve moved to a larger 16MB chip. With Dual BIOS you have a total of 32MB BIOS storage space. Since they have some space left on the BIOS setup they included a password protected storage area within the BIOS. Free from the constraints of an OS crash, the passwords are stored safely in the BIOS and if the system crashes your passwords are safely stored.
You can also store important dates on the BIOS chip which again are safe from OS crash. If you happen to be one of those people that can’t remember birthdays or anniversaries you can store those in your computers BIOS.
Gigabyte hinted at other BIOS features that may utilize the extra storage space on the Chips, but it would be premature to go into any detail.

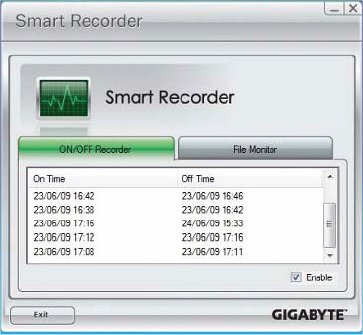
Smart Recorder’s first screen simply keeps track of when the computer was turned on and off. Probably best used to see if the computer is being accessed during times when there should be no activity on the machine. If you happen to see some 2:00AM entries on the computer and happen to have teenage kids in the house, you’ll know if they were up late surfing those dreaded recipe websites.

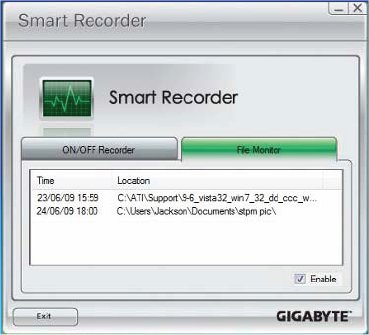
The second portion of Smart Recorder keeps track of files that have changed. While most people would wonder why you would want to do that, one instance we can think of that would be terribly handy is restoring a system after a virus issue. The BIOS will tell you which files have changed and you can clean the virus and restore the affected files without all the guess work or reloading the OS.

So you accessed Smart Recorder and the kids have been doing some midnight surfing that you don’t approve of. You can use Smart TimeLock to set constraints on when the computer can be used without turning to the OS to set the constraints. There’s a much larger chance of finding a workaround for the OS setting for limiting use of the machine than a direct BIOS lock down. Lock down the BIOS and the only way this puppy is going anywhere is if the password holder allows the machine to be booted.

Ever wondered how nice it would be to increase your hard drive speed without having to lose all the data on the drive? With Extreme Hard Drive, all you have to do is connect another hard drive and Extreme Hard Drive will handle the nuts and bolts of speeding up the system with the additional hard drive.

Smart Dual LAN is two physical LAN chips on the same motherboard. That’s not unusual to see on boards these days, but what is unusual is that the Gigabyte Smart LAN will automatically switch you to the a working chip seamlessly if one fails.

If you need blazing LAN speed you can opt to team your LAN ports. Teaming means connecting both LAN ports to operate as one LAN port but at a much higher speed.

The GA-P55-UD6 is a Smart TPM motherboard, it has a TPM (Trusted Platform Module) Chip installed, the TPM chip provides seamless 2048 Bit encryption for a portion of your hard drive to secure your sensitive files. Two methods of keying the security system are provided, you can use a USB thumb drive which has to be physically inserted in the machine to access to encrypted partition but then to secure the partition you have to remove the Thumb drive every time you leave the computer. Another method of keying the encryption chip is by a Bluetooth enabled phone. In the case of using the phone for the key, proximity of the phone to the computer is the method of unlocking the encryption. Simply by having your phone close to the rig it unlocks the encryption. We would suggest having a USB key ready for use, then using the phone for the encryption key. That way if you break your phone, or forget to bring it to work you have both methods available for accessing the encrypted files.

You can also use your Bluetooth phone to set lower power states on the rig if your going to be away from it longer than anticipated.

Here’s a feature we’ve been looking forward to. Powered e-Sata ports have been a point of contention with us for some time now. Having a lot of e-Sata devices around the lab and having to plug them into the e-Sata port and using a USB cord to power them has been the big holdup with e-Sata mainstreaming. With powered e-Sata ports the unhandy USB cord goes away and the e-Sata port provides the power to the e-Sata device of choice. If you don’t use e-Sata ports Gigabyte has made the ports USB compatible so you can also hook up normal USB devices. You’ll have 8 native USB ports and that extends to 10 if you don’t use e-Sata.

Like the LGA 1366 platform if the motherboard vendor licenses them you can have either Crossfire or SLI on LGA 1156 boards. The GA-P55-UD6 board supports both Crossfire and SLI so no matter which GPU camp you sit in you can enjoy Multi-GPU goodness.

Did we forget to mention 24 Phase power?
GIGABYTE SPECIAL FEATURES
With all the features packed on some boards, the only way to cover them is to do a special features section by itself. This is one of those feature packed boards.
By far the most interesting feature on this motherboard is the true 24 phase power. This is the world’s first true 24 phase power board.
Clustered around the CPU you can see the 24 Ferrite chokes that make the 24 Phase Power possible. Spreading the CPU voltage across 24 phases will result in cleaner power delivered to the CPU, VRM’s (Voltage Regulation Modules) and as a result the Ferrite Chokes will run cooler. Cooler operation means longer life.
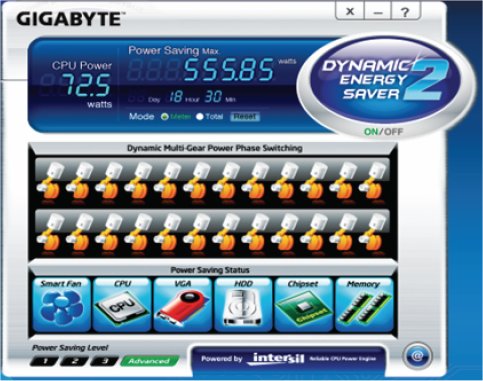
Now that you know about the 24 Phase power, you can make sure that your electric bill doesn’t hit the roof. Gigabyte has you covered with Dynamic Energy Saver 2.
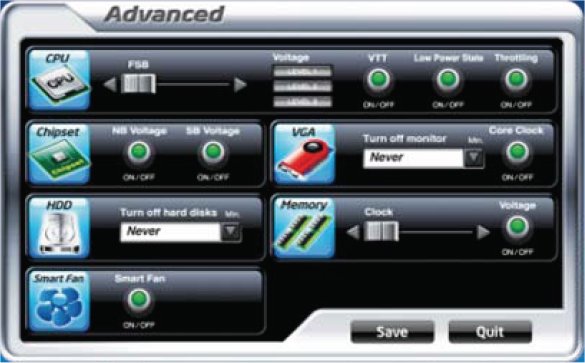
In the Advanced screen of Dynamic Energy Saver 2, you can control CPU, Chipset, hard drive, fan, GPU and memory voltage regulation to set for low power states or leave the board running full out.
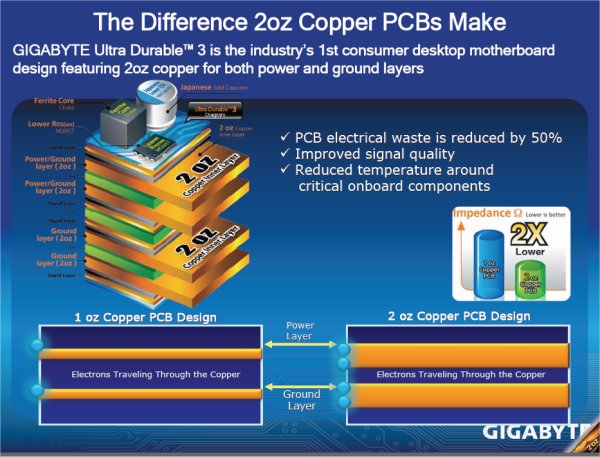
Gigabyte is serious about their 2oz Copper PCB design. Both the ground and power layer contain 2oz of copper.
The 2oz Copper PCB on both power and ground layers will result in lower temperatures, half the impedance, better overclocking, better power efficiency, lower EMI (Electromagnetic Interference) and better ESD (Electrostatic Discharge) protection.
Smart 6 is a collection of software utilities that allow you to control 6 different features from a GUI (Graphical User Interface) inside Windows.
Using Smart Quickboot you can skip some of the BIOS testing prior to entering the OS and streamline the booting procedure by using OS Quickboot. From what we understand, OS QuickBoot is a utilized sleep state. Instead of shutting the computer down it forces a sleep state which results in the PC booting much faster.

We spent a lot of time testing features on the Gigabyte GA-P55-UD6 and Smart QuickBoost was the only one we had a problem with. It took our high end rig to 3.08 with a Bclk of 140 with no problems but beyond that we got bluescreens. Unlike some boards which have an auto overclocking feature, this is a preset overclock that uses a BIOS Mask. A BIOS Mask is nothing more than a pre-determined set of overclocking frequencies and voltages that worked on a specific setup. The Faster setting Mask worked for us, but Turbo and Twin Turbo caused blue screens. The good news for most overclockers is that the Turbo and Twin Turbo settings were very close to correct so they make a good starting point for stabilizing the overclock.
Smart Recovery is a utility that lets you recover a previously working operating system state after having an OS boot failure. Similar to System Restore but more advanced. If nothing else, it provides an extra layer of protection against those little overclocking accidents that happen. We actually corrupted our OS during testing and Smart Restore had us back in Windows in no time at all. We were of course forced to break out our test systems Hard Drive Clone and restore from the clone, but that was only to ensure consistency in testing. The Smart Restore worked just fine.
Gigabyte used to have a 8MB dual BIOS for a total of 16MB of BIOS storage. On the GA-P55-UD6 and other P55 boards they’ve moved to a larger 16MB chip. With Dual BIOS you have a total of 32MB BIOS storage space. Since they have some space left on the BIOS setup they included a password protected storage area within the BIOS. Free from the constraints of an OS crash, the passwords are stored safely in the BIOS and if the system crashes your passwords are safely stored.
You can also store important dates on the BIOS chip which again are safe from OS crash. If you happen to be one of those people that can’t remember birthdays or anniversaries you can store those in your computers BIOS.
Gigabyte hinted at other BIOS features that may utilize the extra storage space on the Chips, but it would be premature to go into any detail.
Smart Recorder’s first screen simply keeps track of when the computer was turned on and off. Probably best used to see if the computer is being accessed during times when there should be no activity on the machine. If you happen to see some 2:00AM entries on the computer and happen to have teenage kids in the house, you’ll know if they were up late surfing those dreaded recipe websites.
The second portion of Smart Recorder keeps track of files that have changed. While most people would wonder why you would want to do that, one instance we can think of that would be terribly handy is restoring a system after a virus issue. The BIOS will tell you which files have changed and you can clean the virus and restore the affected files without all the guess work or reloading the OS.

So you accessed Smart Recorder and the kids have been doing some midnight surfing that you don’t approve of. You can use Smart TimeLock to set constraints on when the computer can be used without turning to the OS to set the constraints. There’s a much larger chance of finding a workaround for the OS setting for limiting use of the machine than a direct BIOS lock down. Lock down the BIOS and the only way this puppy is going anywhere is if the password holder allows the machine to be booted.
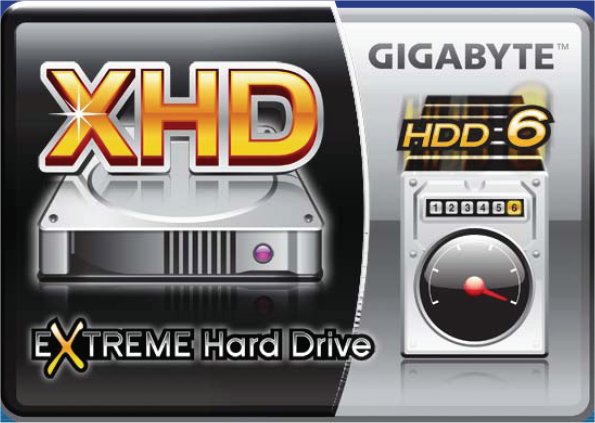
Ever wondered how nice it would be to increase your hard drive speed without having to lose all the data on the drive? With Extreme Hard Drive, all you have to do is connect another hard drive and Extreme Hard Drive will handle the nuts and bolts of speeding up the system with the additional hard drive.
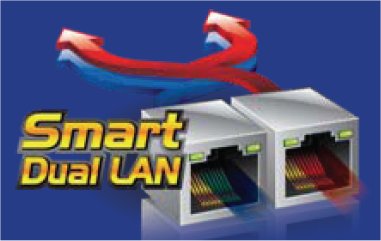
Smart Dual LAN is two physical LAN chips on the same motherboard. That’s not unusual to see on boards these days, but what is unusual is that the Gigabyte Smart LAN will automatically switch you to the a working chip seamlessly if one fails.

If you need blazing LAN speed you can opt to team your LAN ports. Teaming means connecting both LAN ports to operate as one LAN port but at a much higher speed.
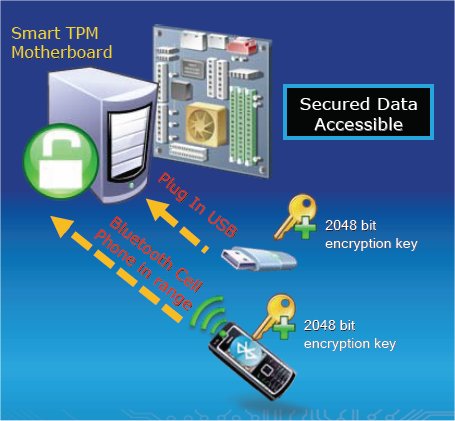
The GA-P55-UD6 is a Smart TPM motherboard, it has a TPM (Trusted Platform Module) Chip installed, the TPM chip provides seamless 2048 Bit encryption for a portion of your hard drive to secure your sensitive files. Two methods of keying the security system are provided, you can use a USB thumb drive which has to be physically inserted in the machine to access to encrypted partition but then to secure the partition you have to remove the Thumb drive every time you leave the computer. Another method of keying the encryption chip is by a Bluetooth enabled phone. In the case of using the phone for the key, proximity of the phone to the computer is the method of unlocking the encryption. Simply by having your phone close to the rig it unlocks the encryption. We would suggest having a USB key ready for use, then using the phone for the encryption key. That way if you break your phone, or forget to bring it to work you have both methods available for accessing the encrypted files.
You can also use your Bluetooth phone to set lower power states on the rig if your going to be away from it longer than anticipated.
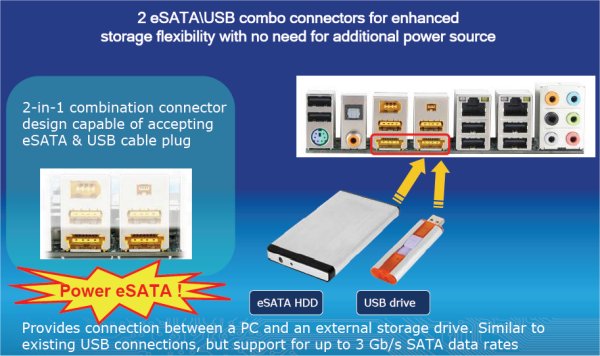
Here’s a feature we’ve been looking forward to. Powered e-Sata ports have been a point of contention with us for some time now. Having a lot of e-Sata devices around the lab and having to plug them into the e-Sata port and using a USB cord to power them has been the big holdup with e-Sata mainstreaming. With powered e-Sata ports the unhandy USB cord goes away and the e-Sata port provides the power to the e-Sata device of choice. If you don’t use e-Sata ports Gigabyte has made the ports USB compatible so you can also hook up normal USB devices. You’ll have 8 native USB ports and that extends to 10 if you don’t use e-Sata.
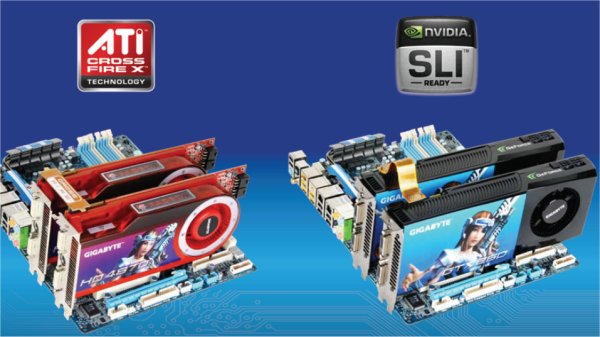
Like the LGA 1366 platform if the motherboard vendor licenses them you can have either Crossfire or SLI on LGA 1156 boards. The GA-P55-UD6 board supports both Crossfire and SLI so no matter which GPU camp you sit in you can enjoy Multi-GPU goodness.
Did we forget to mention 24 Phase power?
Pictures & Impressions
Stand by for a ton of pictures on this board. it seems like the higher end the board the more pictures we snap. We had to change the MicroSD card in the camera so be warned.

The Gigabyte GA-P55-UD6 came in a sturdy box and was well protected on it’s journey to us.

We really like the fold back flap on top end boards, it lets us get a peek at the board prior to ripping the package open.

Once we got the flap open we realized the need for it. They couldn’t fit al the features on the outer portion of the box.

Included in the box we found a Dolby Home Theatre Sticker, a Gigabyte Sticker, the driver CD, the manual, the Smart 6 manual, the Smart TPM manual, and a multi-language quick setup guide.

The hardware portion of the bundle is quite copious. We have an I/O plate, IDE cable, two 90 degree SATA cables, two regular SATA cables, an SLI bridge, a floppy cable, two eSATA Cables, two port eSATA power cable and an expansion port with two USB and a Firewire port.

Once we got a few of the layers peeled away, we found the prize protected in a plastic clamshell.

After about an hour of peeling away layers we finally got to the board itself. The NB cooler and VRM heatsinks are race car inspired but not in a tacky way. The CPU area is roomy enough that major tower CPU coolers will fit with no problem. However some CPU coolers will obstruct the first DIMM slot.

With the new two chip design on the P55 platform, the primary 16x PCI-E slot is controlled by the CPU. If you go to two GPU’s it splits the lanes to 8x-8x. Three GPU’s will run at 8x-8x-4x. Additionally, you get two PCI-E 1x slots, one of which will be obscured by most dual slot cooler GPU’s. You also get two legacy PCI slots which is nice because a lot of us still have PCI devices laying around.

Here’s a shot of the CPU area with that beautiful 24 Phase power setup. Like we mentioned earlier, 24 Phase will provide more stable power to the CPU and run cooler. We’ve had good success with less phase power but the 6 phase power and ferrite chokes on the Intel Extreme board ran hotter than we like during extreme overclocking.

We had to ask about the heatsink near the SATA ports because traditionally it would be covering the SB. Since the P55 doesn’t have a SB, we were scratching our heads. In this case, it covers the SATA controller chip. We suspect that this might have something to do with the 6GB SATA controllers we’ll be seeing sooner than you think (Hint).

We mentioned earlier that the first DIMM slot might be obscured by large tower coolers, we used the Thermalright Mux 120 and the fan obscured the DIMM slot. No need to worry though, the white DIMM’s are the preferred high speed DIMM’s and if your cooler allows, this board will take up to a whopping 24GB of RAM. Keep in mind that LGA 1156 needs low voltage ram running at or below 1.65v. You can still use older high voltage DDR3 but you need to limit the voltage to 1.65v. Most older kits will only make 1333MHz at that voltage.

Notice the CPU socket has a bolt in the middle of the hold down on the left edge. As you lift the lever the retention plate retracts to the right and the hold down lifts on it’s own. So put the screw driver back in your pocket, it’s a toolless install. While we are here, notice Gigabyte has continued using high quality solid capacitors.

Right up front by the ram banks you’ll find a large onboard power button which we really liked.

Backing up a little bit you can see the honeycomb nature of the heatsinks which maximizes the surface area on the heatsink increasing it’s cooling capacity.

Stuck in a rather odd place, right next to the front panel connector, is the CMOS reset switch. it’s a micro-switch design and is rather small.

Notice the proximity of the 90 degree SATA ports and the first PCI-E slot. You will be able to use the first set of SATA ports but if they will be under a full length GPU, it might be a chore to get to them.

A total of 10 SATA ports onboard with two eSATA ports on the I/O plate. Notice the onboard Debug LED just to the left of the SATA ports. The IDE port is in a little bit of an odd place but it rests below a PCI slot so it should be accessible to most end users.

Going top down on one of the heatsinks, right above the silk screened board name you get a little better idea of the honeycomb design Gigabyte chose for this board.

We like to throw in a connector edge shot to show the location of the connectors. The board has a legacy Floppy port which will be handy for die hard Floppy users, a COM port which is more for the RAM vendors to use for RAM testing than end users. It is a fully functional COM port though. A nicely covered Firewire port, something tells us people have been connecting USB wired to the Firewire Port which will damage the board so GIgabyte covered it as a preventive measure. Then there’s a couple of USB headers and the front panel connector. Notice in this shot how close that CMOS clear button is to the front panel connectors. Then look at the blue button right above the IDE port by the corner of the SATA ports.

Right there by the Debug LED is the Reset Button. We are glad that the board has a full complement of Power, Reset and Clear CMOS buttons but the positioning of the Reset and Clear CMOS buttons is a little funky.

The rear I/O on this board is a thing of beauty. You might say it looks pretty normal, but its definitely not. The two bottom yellow ports are powered eSATA that double as USB ports, just having powered eSATA ports is a luxury in itself. Having them double as USB ports, that’s a thing of beauty.
To the left you get 2 USB ports on top, a combo PS2 port, then an optical S/PDIF and a Digital Coaxial sound out. A Yellow Firewire port, to the right of the firewire port is a mini Firewire port and under those are a couple of USB ports. Moving to the right is a couple of GIgabit LAN ports and four more USB. Then last but not least, the normal sound connector setup.
Testing & Methodology
To test the Gigabyte GA-P55-UD6 we used the same components we used in the Intel i5/i7 review. The only component we switched was the motherboard and did a fresh load of Vista 64 on the test rig. To that end, we’ve included the Intel Extreme board results in the Gigabyte GA-P55-UD6 review for comparison purposes. Keeping the components the same across a variety of boards will ensure a level playing field for all the motherboards tested.
We’ve expanded our testing suite considerably for P55 and will continue to use the same tests across most of the motherboards and CPU’s we test. We run each test a total of at least three times minimum, some tests we run more than 3 times. We average the total of all the tests from each benchmark then report the average here.
The OS we use is Vista Ultimate 64bit with all patches and updates applied. We also use the latest drivers available for the motherboard and any devices attached to the computer. We don’t disable a bunch of background tasks or particularly tweak the OS or system for bigger numbers. We do turn off drive indexing and daily defragging. We also turn off Prefetch and Superfetch. This is not an attempt to produce bigger benchmark numbers. Drive indexing and defragging can interfere with testing in that one test might occur without defragging going on and the next test defragging might be active, the same thing goes for drive indexing. We can’t control when defragging and indexing occur precisely enough to guarantee that they won’t interfere with testing, so we turn them off.
Prefetch tries to predict what you will load the next time you boot the machine. We disable it because we want to know how the program runs without any of the files being cached, otherwise each test run we’d have to clear pre-fetch to get accurate numbers. Lastly we disable Superfetch, Superfetch loads often used programs into memory and is one of the reasons people consider Vista to be such a memory hog. Vista fills the memory in an attempt to predict what you will load. Having one test run with files cached, and another test run with the files being un-cached would result in skewed numbers. Again since we can’t control it we turn it off. Other than those 4 things which can potentially interfere with benchmarking, and do so out of our control, we leave everything else running.
Test Rig
| Test Rig “Quadzilla i5” |
|
| Case Type | Sunbeam 9 Bay Acrylic Chassis |
| CPU | Core i7 870 |
| Motherboard | Gigabyte GA-P55-UD6 Intel Extreme DP55KG |
| RAM | Kingston HyperX DC DDR3 2133MHz 4 GB Kit Cas 8 |
| CPU Cooler | Thermalright Mux 120 (Dual 120mm Fans) |
| Hard Drives | Crucial 128 GB SSD(MLC/Samsung controller) |
| Optical | Sony DVD R/W |
| GPU(s) | BFG GTX-260 Maxcore |
| Case Fans | 120mm Fan cooling the mosfet CPU area |
| Docking Stations | None |
| Testing PSU | Tagan BZ 700w Modular |
| Legacy | None |
| Mouse | Razer Lachesis |
| Keyboard | Razer Lycosa |
| Gaming Ear Buds |
Razer Moray |
| Speakers | None |
| Any Attempt Copy This System Configuration May Lead to Bankruptcy |
|
Test Suite
|
Benchmarks |
|
Excel 2007 |
|
Blender |
|
SiSoft SANDRA XII Professional SP2 |
|
Everest Ultimate Edition v. 5.0 |
|
AutoMKV |
|
Cinebench R10 64 bit |
|
WinRar v. 3.71 |
|
POVRay |
|
Pro Show Gold |
BIOS
BIOS chips have gotten so large that as many as 40 screens are included in BIOS. Trying to cover all 40 pages of the BIOS in this format just doesn’t work. What we have chosen to do is cover the most interesting pages of the BIOS. The ones that have functionality in relation to overclocking and voltages.
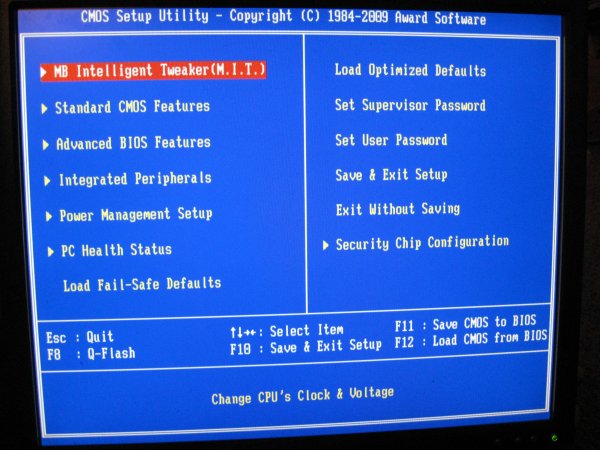
The first BIOS screen is the screen that leads you into all the other screens. This section lets you start Q-Flash and save or restore OCing profiles.
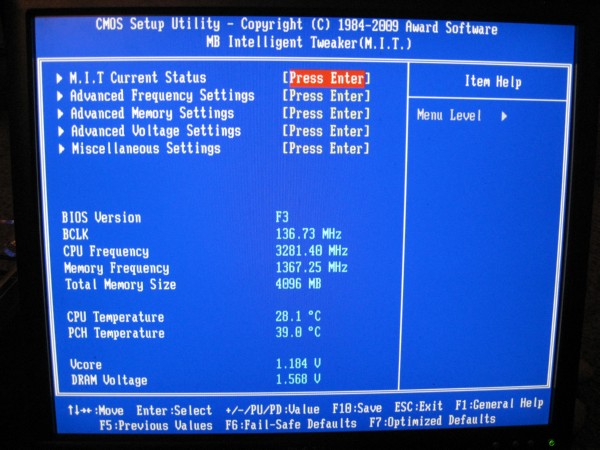
Most of what you will need for overclocking is in the MIT (Motherboard Intelligent Tweaker) Screen but split into sub screens.
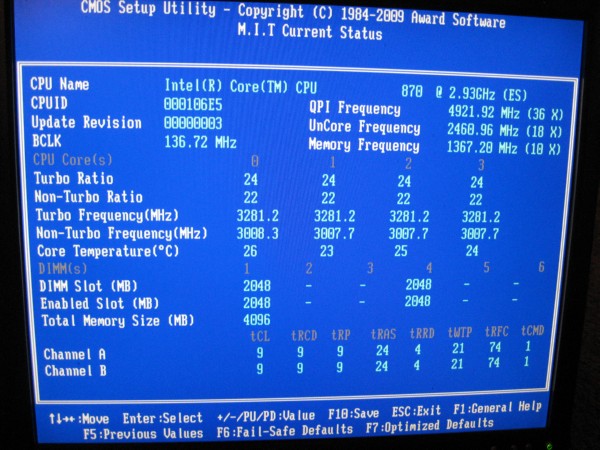
We had one minor problem with the Current Status screen. We could enter it and the values would update themselves but once in the screen we had to use the reset button on the motherboard to get out of the screen. That will be fixed in a later BIOS revision.
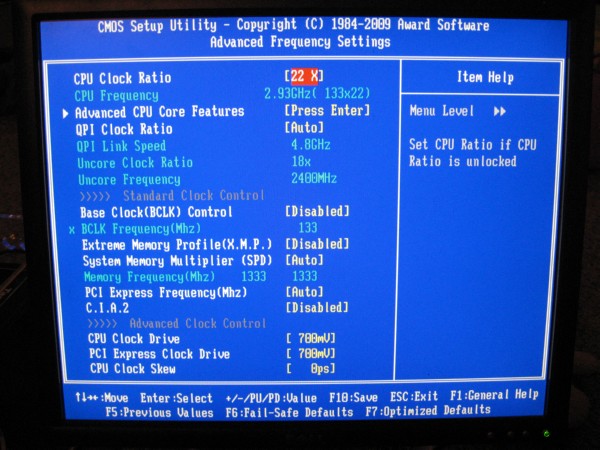
The Advanced Frequency screen is where you make adjustments to the Bclk and CPU multiplier. You also enable the XMP profile on your RAM here. Take notice that enabling the XMP profile on the RAM will in most cases change the Bclk, sometimes multiplier, and voltages so it’s best to enable the XMP and check for RAM stability. Then go back into BIOS and begin OCing. Be sure to save your OCing profile often. We didn’t have any problem with the GA-P55-UD6 but it’s just good practice to save OCing profiles often.
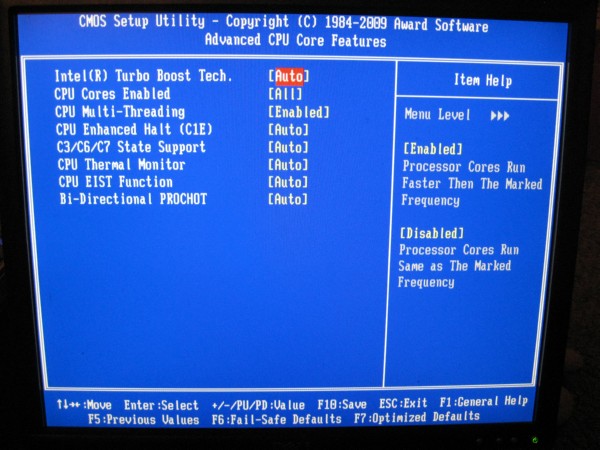
The Advanced CPU Core Features is where you can turn off Turbo Boost which you will need to do if shooting for extreme overclocking. You can also disable cores if you want and change the various CPU thermal and throttling settings.
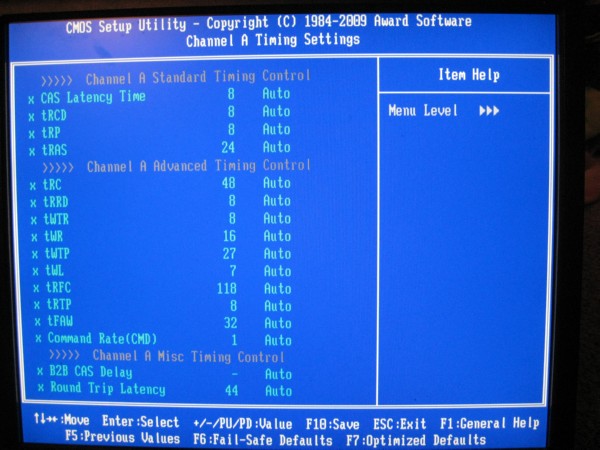
The Memory timing screen is split into Channel A and Channel B, which is a little unusual but you have a full featured memory control section.
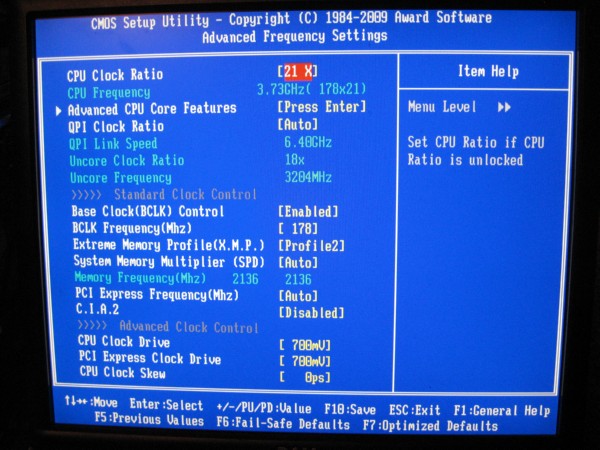
Here’s a shot of the settings we used for most of the testing. Notice we already had the Kingston HyperX 2133MHz Cas 8 kit up to 2133MHz stable. To achieve that we needed a Bclk of 178 and a CPU Multiplier of 21. Note that these aren’t the highest frequencies we achieved but under certain conditions they are the highest we felt comfortable with in the thermal envelope of the CPU.
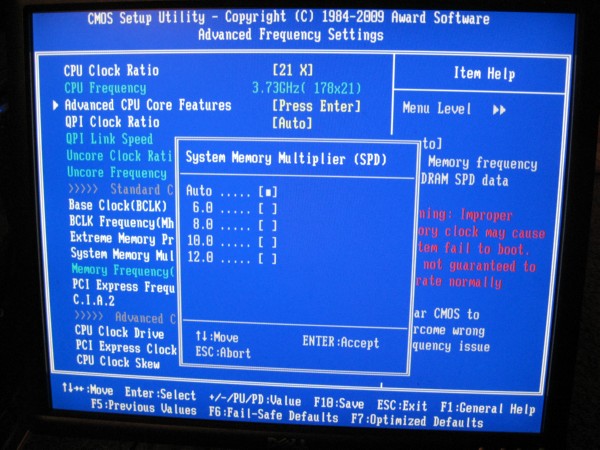
So far all of the boards we’ve had hands on the memory multipliers work like a charm. Previously on the X58 platform it was hit and miss for working memory multipliers.
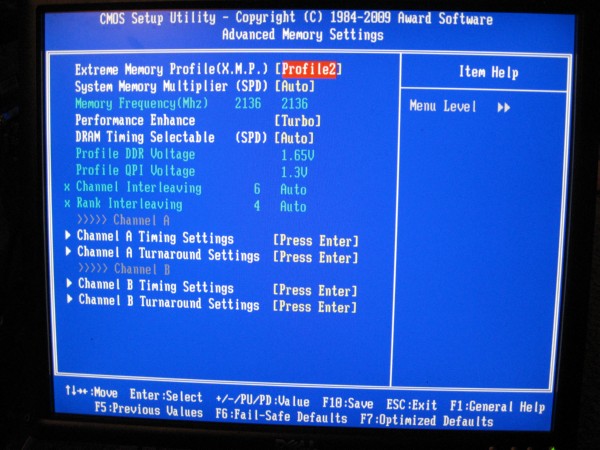
If you have XMP capable memory you’ll be happy to know that, so far, we’ve had really good luck with XMP profiles on the P55 platform. Like we mentioned, when overclocking set the XMP first, then make adjustments to frequencies and voltages to obtain your OC. Notice the 1.65v on the RAM, that’s the most that Intel recommends using and going above that may kill your CPU.
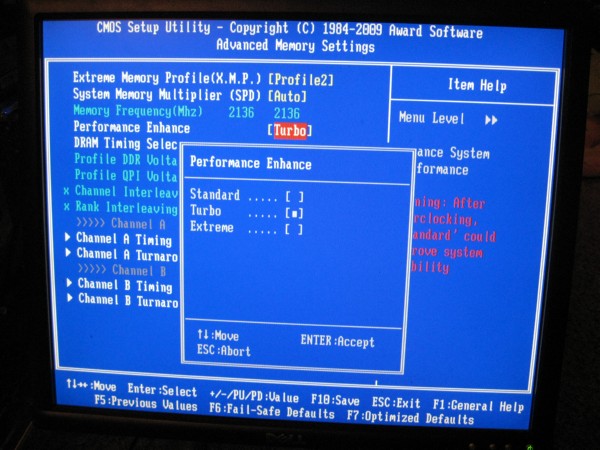
We are way up there on RAM frequencies but in the performance enhance screen we had no problem leaving the HyperX kit set to run at Turbo. Pretty amazing considering we are running at 2136 in this shot.

Now we have a shot of the all important Voltages screen. Ocing P55 is much like ocing X58 except the NB and SB has been replaced with a single chip called the PCH (Platform Controller Hub). So if you think you need more NB/SB voltage just increase the PCH voltage. The three voltages that most affect the OCing on P55 are CPU, QPI/Vtt and PCH.
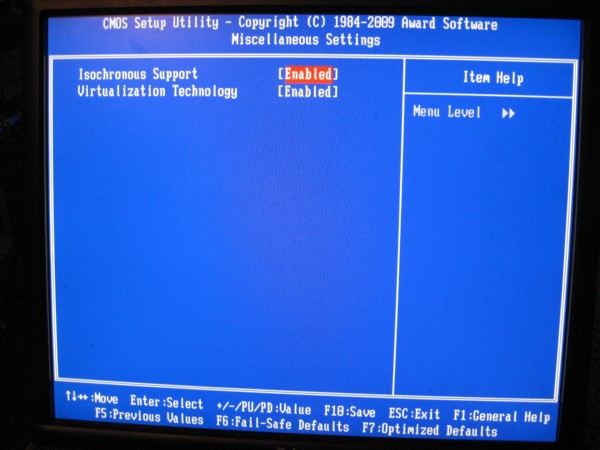
Some overclockers like to turn off Virtualization but we didn’t have any problem driving extreme frequencies with it turned on.
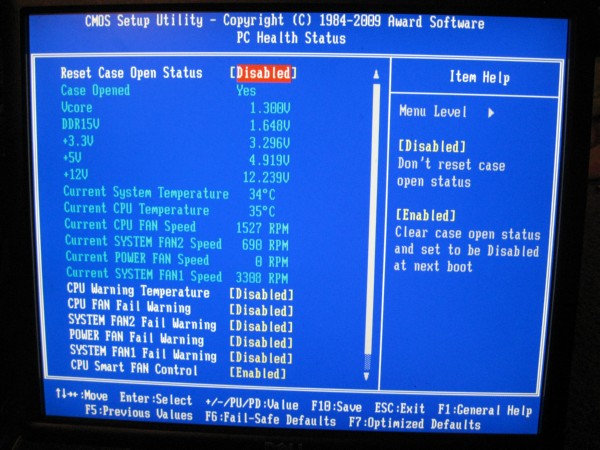
Then for the last BIOS screen we are showing we chose the PC Health Status. If your new to OCing and not sure about thermal envelopes you might want to turn on the CPU Warning Temperature option.
Everest Ultimate

“EVEREST Ultimate Edition is an industry leading system diagnostics and benchmarking solution for enthusiasts PC users, based on the award-winning EVEREST Technology. During system optimizations and tweaking it provides essential system and overclock information, advanced hardware monitoring and diagnostics capabilities to check the effects of the applied settings. CPU, FPU and memory benchmarks are available to measure the actual system performance and compare it to previous states or other systems. Furthermore, complete software, operating system and security information makes EVEREST Ultimate Edition a comprehensive system diagnostics tool that offers a total of 100 pages of information about your PC.”
CPU AES
This integer benchmark measures CPU performance using AES (a.k.a. Rijndael) data encryption. It utilizes Vincent Rijmen, Antoon Bosselaers and Paulo Barreto’s public domain C code in ECB mode.
CPU AES test uses only the basic x86 instructions, the test consumes 48 MB memory, and it is Hyper Threading, multi-processor (SMP) and multi-core (CMP) aware.
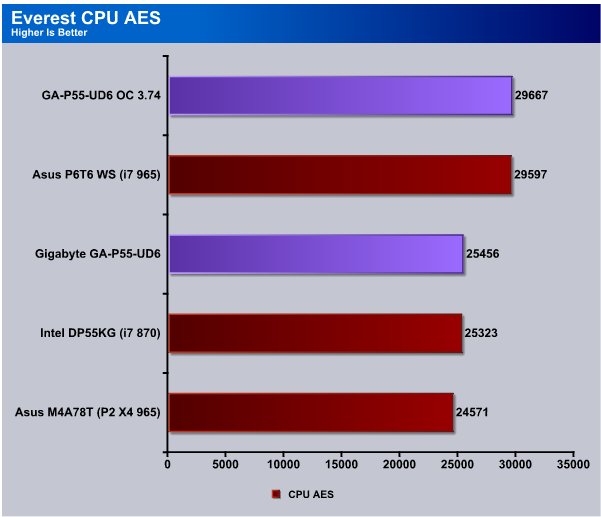
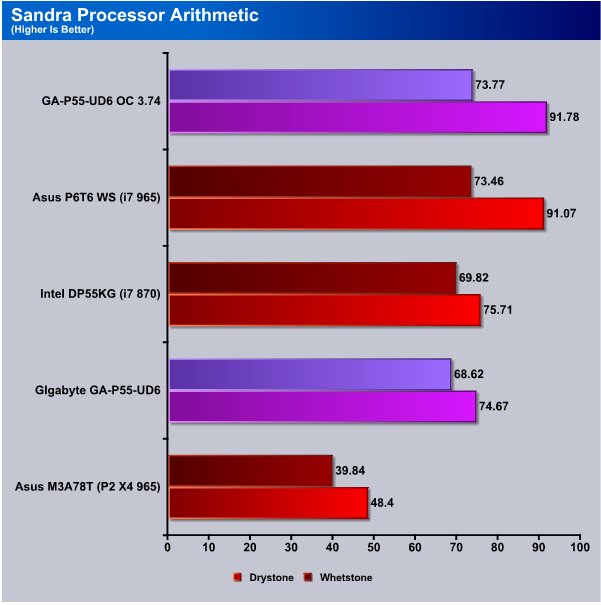
In most cases we don’t expect too large a difference between two boards with identical chipsets to present a very large difference in testing. The biggest differences between boards is going to be overclocking ability and features. We left the Asus P6T6 WS LGA 1366 and Asus M4A78T-E AM3 board on the chart for comparison point purposes.
At stock speed the Gigabyte GA-P55-UD6 pulls just a little ahead of the Intel DP55KG board. Like we mentioned both boards are identical chipsets so we don’t expect more than minor differences in performance.
CPU PhotoWorxx
This integer benchmark performs different common tasks used during digital photo processing.
It performs the following tasks on a very large RGB image:
• Fill
• Flip
• Rotate90R (rotate 90 degrees CW)
• Rotate90L (rotate 90 degrees CCW)
• Random (fill the image with random colored pixels)
• RGB2BW (color to black & white conversion)
• Difference
• Crop
This benchmark stresses the integer arithmetic and multiplication execution units of the CPU and also the memory subsystem.
CPU PhotoWorxx test uses only the basic x86 instructions, and it is Hyper Threading, multi-processor (SMP) and multi-core (CMP) aware.
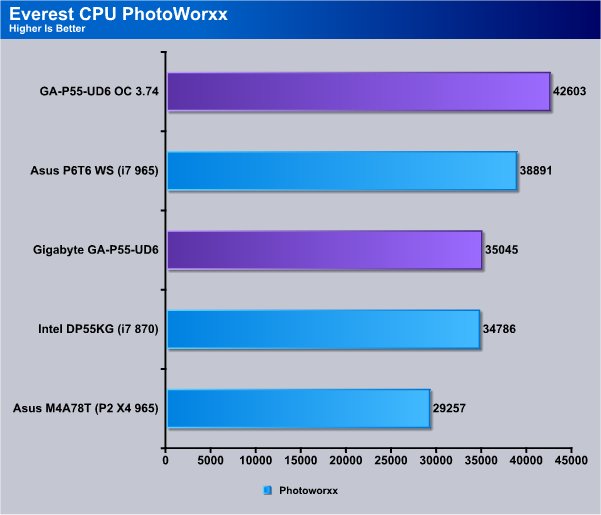
Notice we are testing the GA-P55-UD6 with the i7 870 clocked to stock speed with Turbo on, and with the CPU overclocked to 3.74GHz. The 3.74GHz isn’t near the highest overclock on the board, but thermally speaking it’s getting pretty toasty during some tests with the Thermalright Mux 120 air cooling so we left the CPU at 3.74.
In Photoworxx we see the GA-P55-UD6 taking a minor lead over the Intel DP55KG board.
CPU Queen
This simple integer benchmark focuses on the branch prediction capabilities and the misprediction penalties of the CPU. It finds the solutions for the classic “Queens problem” on a 10 by 10 sized chessboard.
CPU Queen test uses integer MMX, SSE2 and SSSE3 optimizations. It consumes less than 1 MB system memory and it is Hyper Threading, multi-processor (SMP) and multi-core (CMP) aware.
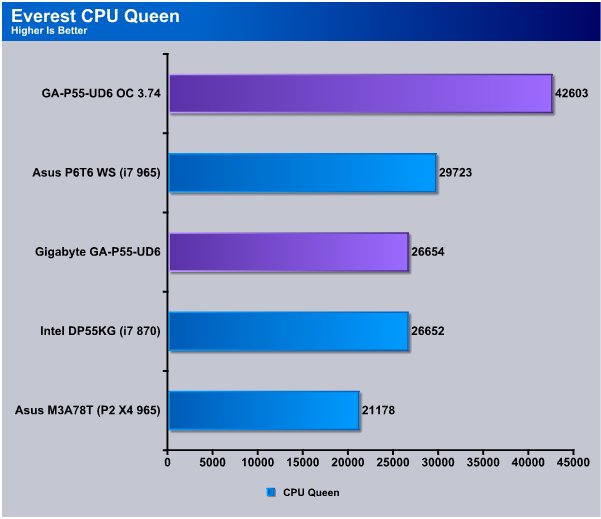
In CPU Queen you get some idea of just how similar the performance of the P55 chipset boards really are. Just 2 points separate the two boards in this test. We really feel that overclocking and features on the boards are going to tell the tale with P55. Layout on the boards might weigh into the purchase decision but so far the boards we’ve seen are all pretty well laid out.
CPU ZLib
This integer benchmark measures combined CPU and memory subsystem performance through the public ZLib compression library Version 1.2.3 (http://www.zlib.net).
CPU ZLib test uses only the basic x86 instructions, and it is Hyper Threading, multi-processor (SMP) and multi-core (CMP) aware.
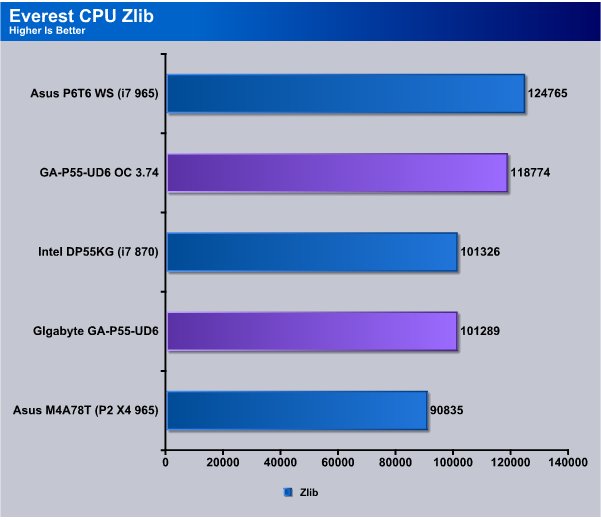
In CPU Zlib The Intel DP55KG board eeked out a win by a slim margin. Performance wise we expect both boards to be neck and neck throughout testing.
Everest Memory
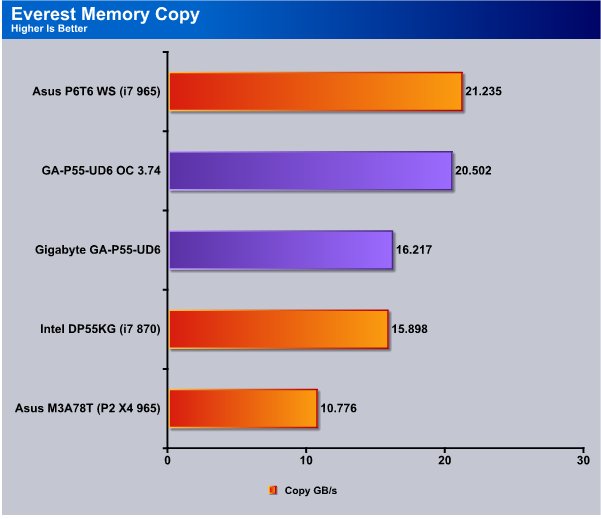
Memory wise for motherboard testing we are holding the ram at 1600MHz because we feel this to be the typical speed of end user purchases. The i7 870 being a locked multiplier processor during OC testing the ram is held as close to 1600MHz as possible. Now that Intel has reworked the Dual Channel DDR3 controller on DIE on the CPU we are seeing the true nature of DDR3 ram which took a lot of bad reviews on previous platforms. The bandwidth on DDR3 is pretty massive on the new P55 platform which is where we expected to see it. We get about 16GB/s from both the Intel and Gigabyte boards. Overclocked we got a whopping 20.5GB/s bandwidth when overclocked.

The Everest Memory Read test shows a slight lead for the GA-P55-UD6 board and the overclock speed got us a little more bandwidth.

The Memory write test in Everest sees the Intel DP55KG ahead of the Gigabyte GA-P55-UD6 board but just by a hair. By overclocking the board and CPU we got about 3.7GB/s additional bandwidth.
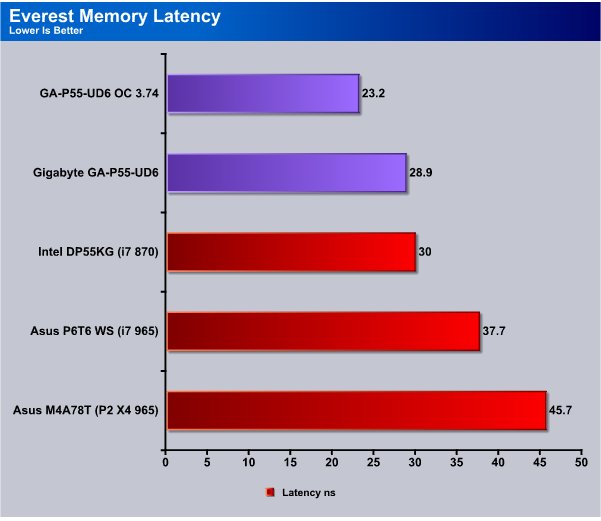
The Memory Latency on the new DDR3 Low Voltage kit shows a better latency than the previous platforms and we are seeing 30ns and below for latency on the new kits.
Cinebench

“CINEBENCH is a real-world test suite that assesses your computer’s performance capabilities. MAXON CINEBENCH is based on MAXON’s award-winning animation software, CINEMA 4D, which is used extensively by studios and production houses worldwide for 3D content creation. MAXON software has been used in blockbuster movies such as Spider-Man, Star Wars, The Chronicles of Narnia and many more. MAXON CINEBENCH runs several tests on your computer to measure the performance of the main processor and the graphics card under real world circumstances. The benchmark application makes use of up to 16 CPUs or CPU cores and is available for Windows (32-bit and 64-Bit) and Macintosh (PPC and Intel-based). The resulting values among different operating systems are 100% comparable and therefore very useful with regard to purchasing decision-making. It can also be used as a marketing tool for hardware vendors or simply to compare hardware among colleagues or friends.”
In Cinebench we are primarily looking at Single Thread and Multi Thread operation and leave OpenGL for the graphics realm. Again we are seeing similar scores between the two P55 chipsets.
At stock speed we aren’t seeing much beyond 4 core operation from the hyperthreaded i7 870, at stock speed we got 4.31 from the hyperthreaded i7 965 but stock speed the i7 870 comes in at 4 cores flat. Previous platforms we were seeing about 3.66 or in that neighborhood so we are seeing some gains from hyperthreading but not as much as i7 LGA 1366.
WinRar v. 3.71

This module in WinRar generates random data, which contains specially introduced redundancy, increasing the load to both the processor and memory. Data is then passed through RAR compression and decompression algorithms, and the output of the decompression algorithm is compared to the source data. If any differences are found, WinRar then reports “Errors found – Yes” in the command window. WinRar displays a size of processed data and compression speed, current and resulting, in kilobytes per second.
WinRAR’s built in benchmark shows a slight advantage with the Intel DP55KG during multi-threaded operation but the Gigabyte GA-P55-UD6 had a slight lead in single core operation. Of course overclocked the Gigabyte GA-P55-UD6 pulled into a good lead.
WinRAR Workload
The WinRAR workload test we bypass the built in benchmark and throw 5 large .tif images at WinRAR then compress them and record the compression time. Total workload is about 350MB or 70+ MB per TIF image. The real life compression test of a group of large image files should give us a more realistic idea of how the CPU’s perform than the built in benchmark.
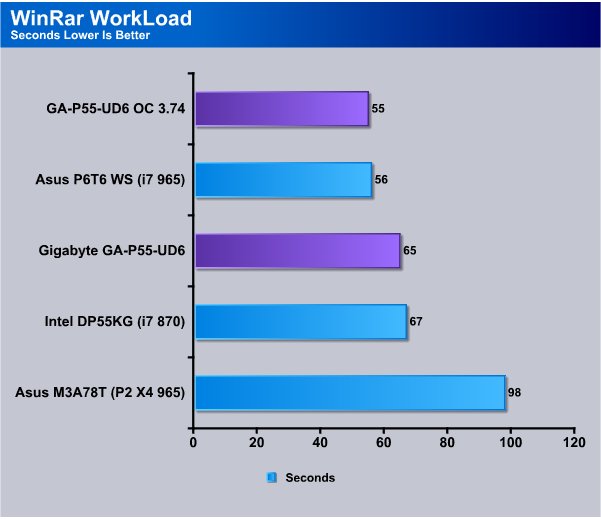
The WinRAR workload test shows a 2 second advantage on the Gigabyte GA-P55-UD6 board which is a pretty significant lead. Overclocked we see the UD6 running a blazing 55 second time on the workload test.
Sisoft Sandra
“SiSoftware Sandra (the System Analyser, Diagnostic and Reporting Assistant) is an information & diagnostic utility. It should provide most of the information (including undocumented) you need to know about your hardware, software and other devices whether hardware or software. It works along the lines of other Windows utilities, however it tries to go beyond them and show you more of what’s really going on. Giving the user the ability to draw comparisons at both a high and low-level. You can get information about the CPU, chipset, video adapter, ports, printers, sound card, memory, network, Windows internals, AGP, PCI, PCI-X, PCIe (PCI Express), database, USB, USB2, 1394/Firewire, etc.”
Sandra is showing the Intel board having a slight lead over the Gigabyte GA-P55-UD6, but once again differences are minimized by both the boards having the same P55 chipset.
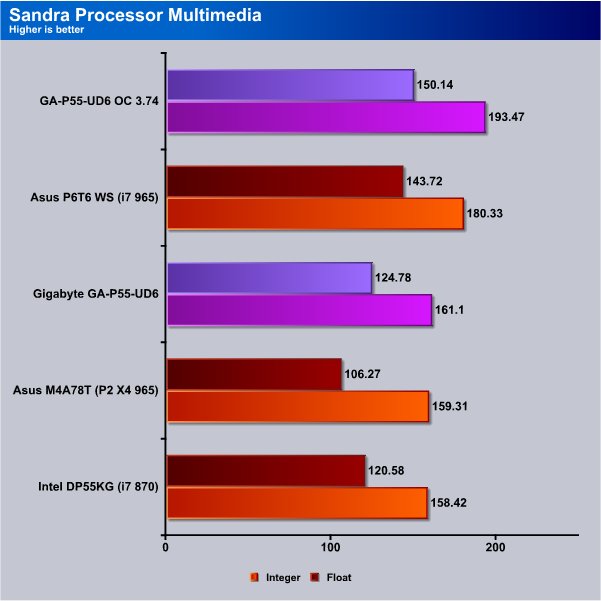
The multimedia test in Sandra shows the Gigabyte GA-P55-UD6 coming back into the lead.
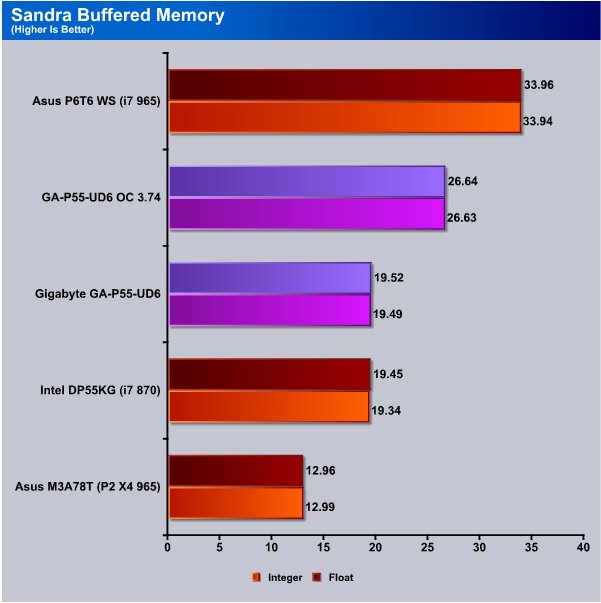
With the memory held at 1600Mhz, both the Intel and Gigabyte boards show at 19.5(ish) in the memory bandwidth test. Overclocked, the Gigabyte board gave an amazing 6+GB/s additional bandwidth.
POV-Ray 3.7 Beta 25

The Persistence of Vision Ray-Tracer was developed from DKBTrace 2.12 (written by David K. Buck and Aaron A. Collins) by a bunch of people (called the POV-Team) in their spare time. It is a high-quality, totally free tool for creating stunning three-dimensional graphics. It is available in official versions for Windows, Mac OS/Mac OS X and i86 Linux. The POV-Ray package includes detailed instructions on using the ray-tracer and creating scenes. Many stunning scenes are included with POV-Ray so you can start creating images immediately when you get the package. These scenes can be modified so you do not have to start from scratch. In addition to the pre-defined scenes, a large library of pre-defined shapes and materials is provided. You can include these shapes and materials in your own scenes by just including the library file name at the top of your scene file, and by using the shape or material name in your scene. Since this is free software feel free to download this version and try it out on your own.
Some of you might have seen version 3.6 of POV-Ray, the biggest difference between 3.6 and 3.7 Beta 25 is SMP (symmetric multiprocessing) support, which means that POV-Ray can take advantage of as many cores as your CPU has. On Single vs Dual CPU systems the speed almost doubles.
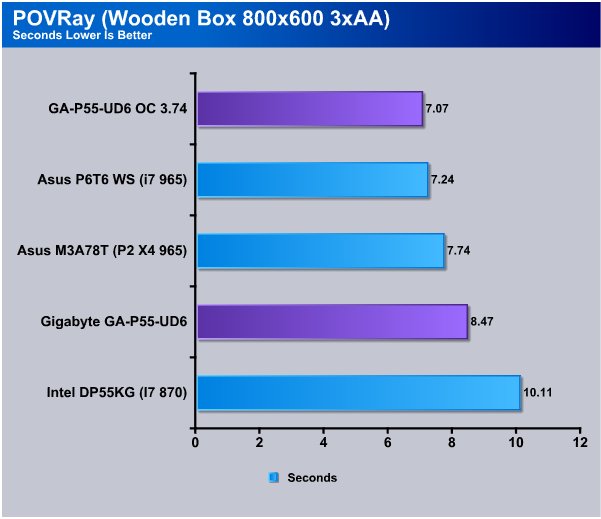
In POV-Ray the Gigabyte GA-P55-UD6 board has about a second and a half lead on the Intel board and both boards fell behind Phenom in this test. Overclocked the UD6 took the lead.
Microsoft Excel 2007
Monte Carlo Black-Scholes Option Pricing Test
Microsoft Excel is the widely known and most used spreadsheet application for the manipulation and calculation for number crunching. With Excel you can analyze and share information on small scale or the largest scale you can imagine. We’ve seen spreadsheets in every day use that contain literally tens of thousands of numbers and hundreds of equations. Bjorn3D uses two tests in Excel to determine CPU and Motherboard performance.

This workload calculates the European Put and Call option valuation for Black-Scholes option pricing using Monte Carlo simulation. It simulates the calculations performed when a spreadsheet with input parameters is updated and must recalculate the option valuation. In this scenario we execute approximately 300,000 iterations of Monte Carlo simulation. In addition, the workload uses Excel look up functions to compare the put price from the model with the historical market price for 50,000 rows to understand the convergence. The input file is a 70.1 MB spreadsheet.
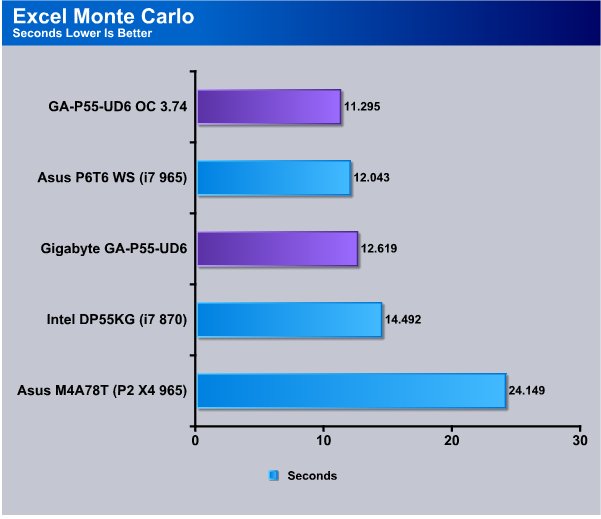
In the Excel Monte Carlo test we see the Gigabyte GA-P55-UD6 a couple of seconds out in front of the Intel board and when overclocked ahead in the 3.2 second range.
Big Number Crunch
This workload is from a 6.2 MB spreadsheet and executes about 28,000 sets of calculations. It uses the most common calculations in Excel, addition, subtraction, division, rounding and Square Root. It also analyzes statistical functions such as Min, Max Median, and Average. The calculations are done after the spreadsheet with a large data set is updated with new values and must recalculate a large number of data points.
We feel the addition of Excel to our real life benchmarks is an important one. Excel has a huge user base and is one of the most widely used applications worldwide. While Excel will run on almost and modern machine it’s the CPU performance that will determine how fast it runs making it a good application for judging CPU and Motherboard performance.
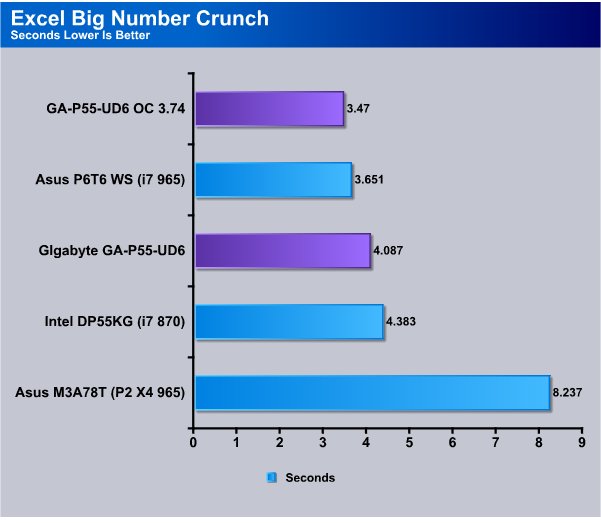
The Excel Big Number Crunch test is showing the Gigabyte GA-P55-UD6 out in front by a few tenths of a second which doesn’t seem like much time wise but you need to take into consideration the number of calculations in the Number Crunch test. Of the 28,000 calculations how many were performed in that slim tenths of a second lead.
Photodex ProShow Gold 3.2
ProShow Gold allows you to combine videos and photos and music to create slide shows, depending on the end user results can be spectacular. The application allows the end user to share photos and memories with friends in a unique and spectacular way, the different formats supported are, DVD, PC and Web. Still Photos are brought to life by adding motion effects. Supported effects include, Pan, Zoom, and rotate. You can also add captions and over 280 transition effects.

The workload we use consists of 29 high resolution images in JPG format and converts them to MPEG2 wide-screen DVD quality. The end result is a 3 minute 9 second video file in slide show format. The images are in 3872×2592 resolution and have a combined total size of about 170 MB.
We get a 3 second lead with the Gigabyte GA-P55-UD6 board in the ProShow Gold test. It seems like the Gigabyte GA-P55-UD6 has had some advantage in most of the multimedia tests.
AutoMKV 0.95c
AutoMKV is an application aiming for easy media conversion between various media formats using various third party codecs. With improved internet speed and enhanced computing power, more users are interested in encoding to different media formats for their various multimedia needs. With AutoMKV and x264 codec, a freeware H.264 encoder, users can easily create media files. For more information and to obtain AutoMKV 0.95c and AviSynth* 2.5.7, please visit (http://forum.doom9.org/showthread.php?t=134478). We create a media file using AutoMKV and x264 codec. The input file used in the document is a raw 416 MB 720×480 DV file and the output is a 253MB H.264 media file.

In AutoMKV we saw a .38 second lead with the Gigabyte GA-P55-UD6 board and again in most of the multimedia testing the UD6 board has had a lead although it’s been a small lead.
Blender
Blender is a free open source 3D content creation suite that is available for various operating systems. The application is popular among many independent animation studios and game makers. For more information, please visit http://www.blender.org/.
The workload consists of a ~6.9 MB character model of a flying squirrel. Due to time constraints we didn’t render the entire image which would be time consuming and rather pointless except to yield larger benchmark numbers. A portion of the image, the right arm is what we render. it’s a large enough portion to show differences in CPU performance, yet small enough that we don’t have to grind through a 45 minute Render waiting for a single result.
In Blender the UD6 board is showing about a 5 second lead which in this partial render of a wire frame is a pretty good lead. While both boards have the same P55 chipset the Gigabyte UD6 board just seems a little more efficient at some tasks.
CPU-Z & Overclocking
We have a lot to cover in the CPU-Z & Overclocking section this time so lets get right into some screen shots.
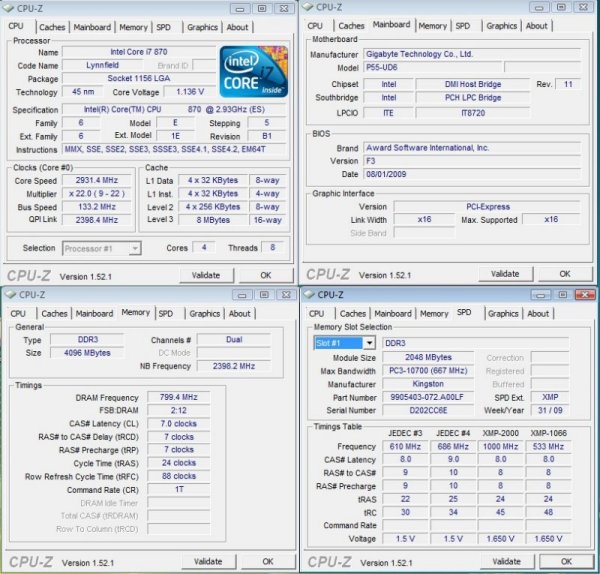
In the first shot we see that CPU-Z is picking up the Gigabyte GA-P55-UD6 correctly and that the CPU is the i7 870 running at stock 2.93GHz speed and that we’ve limited the memory to 1600 MHz which is a darn shame considering this is a killer kit of Kingston HyperX 2133. We’ll get to the Kingston kit in a moment or two.
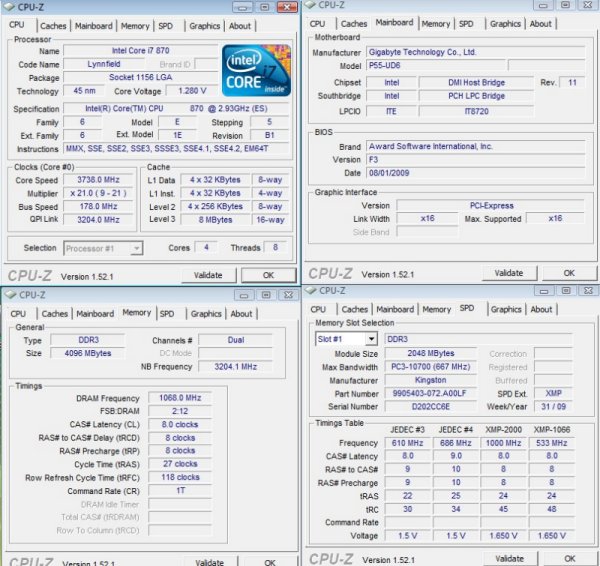
Here we have a shot of the overclock speed we tested at which is 3.738GHz. We couldn’t help ourselves in this screen shot and had the Kingston HyperX clocked to factory specs of 2133MHz. The 3.738GHz isn’t the best OC speed we hit, it’s just the best OC within the thermal limitation of the Thermalright Mux 120 air cooler we were using.
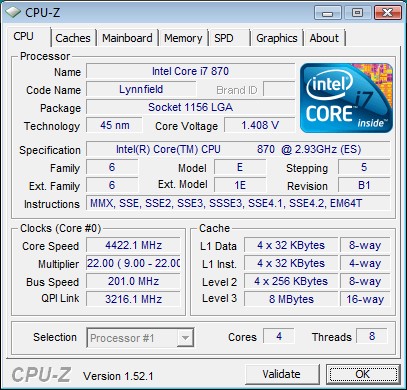
With a Bclk of 201 and a CPU multiplier of 22 we hit 4.4GHz stable pretty easy. CPU-Z is showing 1.408v on the CPU but in BIOS we had it set to 1.425v so there’s a little Vdroop on the UD6 board but that’s by design. With a fantastic OC of 4.4GHz that’s 200MHz higher than we got from the Intel board we tested against.
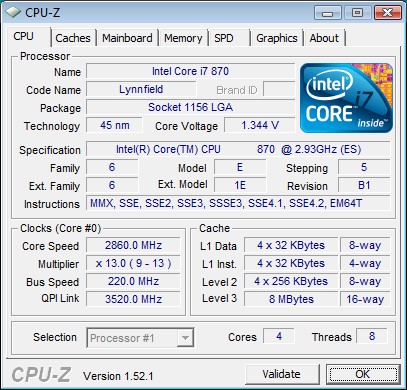
We dropped the multiplier to 13 and went for maximum Bclk on the Gigabyte GA-P55-UD6 and we got to 220 Bclk without much effort. We could probably get higher but like most reviews time constraints prevented us from attempting a better Bclk.
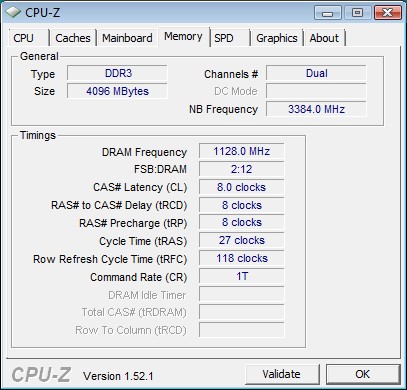
Finally back to the Kingston HyperX 2133MHz kit combined with the Gigabyte board. We hit an utterly amazing 2256MHz clock on the 2133MHz kit for a total OC of 123MHz. Notice that we achieved that without loosening the timings and running it at 1T. That was accomplished without breaking the 1.65v limit on ram voltage Intel is recommending. Just a year ago we would have said 2256MHz on 1.65v was impossible to achieve.
Conclusion
The P55 boards are all based on the same Intel chipset so base performance is going to be similar. Meaning that at stock CPU speed, performance is going to be almost identical so it’s not going to make much difference which board you use as long at it runs the CPU correctly at stock speeds. Indeed as the technology progresses we’re seeing more standardization of chipsets and with that standardization we see more consistent results.
More and more the ease of use, overclock-ability and features of a motherboard make them stand out from the crowd. In those areas the Gigabyte GA-P55-UD6 shines. We don’t generally go into great detail on the overclocking process because every OC is different but in this case it’s worth mentioning.
When we started overclocking the Gigabyte GA-P55-UD6 we were looking at a totally new two chip design that we’ve had minimal experience with. That usually means long hours of tweaking. Without changing any setting from “auto” we hit 4GHz in just a few minutes. When we checked voltages the GA-P55-UD6 hadn’t overvolted the CPU or chipset. Quite the contrary it was well within operational limits. Previous generations of boards Auto would take you to 3.7ish if you were lucky and even then the board would overvolt the components badly. Not the Gigabyte GA-P55-UD6. The CPU was in the 1.37V range, and the PCH was in the 1.3v range. Once we passed the 4GHz mark we had to manually adjust the CPU and PCH voltage but to reach 4.4GHz that’s all we had to adjust. That says a lot about the Gigabyte GA-P55-UD6 and the P55 chipset.
Features on the UD6 board are top notch to say the least. With Dynamic Energy Saver 2, Smart 6 and the Trusted Platform module just to mention a few it’s going to be hard to find a board with a richer feature set. With 24 Phase Power, the only board with 24 Phase power in existence, it’s going to be hard to top the UD6 board for extreme overclocking, and with the ease of operation and setup it is also good for the less tech savvy.
The Gigabyte GA-P55-UD6 is without a doubt a winner when it comes to overclocking and features. Overclocking on the board was a dream, operation was stable and we didn’t find much of anything on the board we didn’t love. We can easily recommend the GA-P55-UD6 to beginners and seasoned overclockers alike which is unusual. Usually a board is for noobs, or veterans and there’s little wiggle room. This board is great for both camps. Plug and play setup for the inexperienced and more than enough options for the veteran overclocker.

We are using an addition to our scoring system to provide additional feedback beyond a flat score. Please note that the final score isn’t an aggregate average of the new rating system.
- Performance 9.5
- Value 8
- Quality 10
- Warranty 9
- Features 10
- Innovation 10
Pros:
+ Champion Overclocker
+ Price Is Lower Then LGA 1366
+ Ease Of Setup/Overclocking
+ Feature Rich
+ Well Laid Out
+ Did We Mention A CPU OC of 4.4GHz and a Ram OC to 2256MHz?
Cons:
– SmartBoost Didn’t Work Well For US
– Onboard CMOS Reset And Reset Buttons in Strange Places
The Gigabyte GA-P55-UD6 is a dream board and the first true 24 Phase power board out there. The ease of setup and fantastic overclocking on the board was enough to sell us on the GA-P55-UD6. Then we looked at the rich feature set and it was love at first overclock, so it scores a: 9.5 out of 10 and the Bjorn3D Golden Bear Award.


