The Asus Maximus 3 is sure to be one of the premiere LGA 1156 motherboards available. For the love of game don’t miss out on this one.
Introduction
Once in a while when the stars align themselves just right and the moon has a blue ring around it a motherboard of epic proportions falls from the sky and graces mankind with the gift of ultimate overclockability and sheer beauty. Every feature works perfectly and the overclocking flows like a mountain stream during spring snow melts. It doesn’t happen very often that such a motherboard is gifted to use from the computing gods high on top Mount Geek but when it does it’s something you will never forget.
The Asus Maximus 3 Formula ROG (Republic of Gamers) motherboard is without a doubt one of those legendary boards. Gifted with style and grace and pretty enough to soften the heart of the hardest core overclocker the board is a sheer joy to run and overclock. Despite the ability to deliver great performance for the casual end user and self overclock the i7 870 to 3.52GHz with just a mouse click, the Maximus 3 has more than enough features for the enthusiast hard core overclocker. We would warn you though once you’ve gone Maximus 3 other boards might seem muted by it’s beauty and performance.
Designed for the gamer in all of us, the Maximus 3 packs the features you need and the simplicity of operation you only dream about.
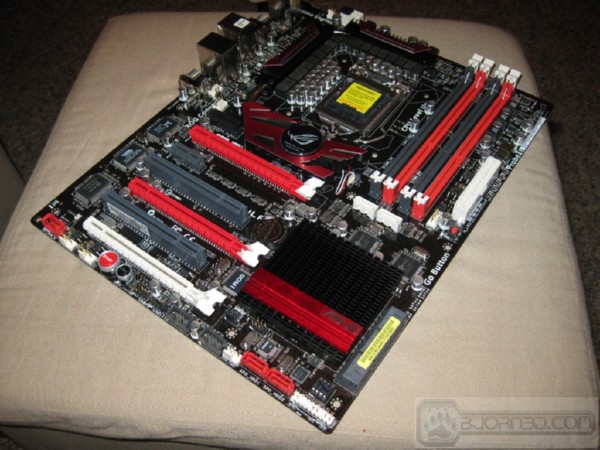
With 16+3 phase power for the CPU and load balancing across the ferrite chokes the Maximus 3 will provide plenty of stable power for overclocking and keep the power regulation components nice and cool in the process. Asus has really gone above and beyond with the Maximus 3 and unlike a lot of vendors who toss in a bunch of mostly useless software utilities that clutter up your drive and never get used, Asus is spot on with the software they included with the Maximus 3. Not only is the software spot on but Asus has been going a direction we really like and incorporating a lot of the features into the hardware itself. With large and easy to reach on board power on and reset buttons that scream turn me on and start gaming the Maximus 3 ROG board just makes you ache to get it installed and fired up. Then you start noticing things like the Go Button and SPD SATA connectors and you find yourself staring at the board an hour later mesmerized by the functionality and beauty of the board.
Specifications
CPU Features
- Supports Intel® Processors in the LGA1156 Package: This motherboard supports the latest Intel® Lynnfield processors in LGA1156 package, which as memory and PCI Express controller integrated to support 2-channel (4 DIMMs) DDR3 memory and 16 PCI Express 2.0 lanes, providing great graphics performance. Intel® Lynnfield processor is one of the most powerful and energy efficient CPU in the world.
Chipset Features
- Intel® P55 Chipset: The Intel® P55 Express Chipset is the latest one-chipset design to support the latest 1156 socket Intel® Lynnfield processors. Intel P55 provides improved performance by utilizing serial point-to-point links, allowing increased bandwidth and stability.
- PCIe 2.0: Double Speed; Double Bandwidth This motherboard supports the latest PCIe 2.0 devices for double speed and bandwidth which enhances system performance.
Multi-GPU Technology
- SLI/CrossFireX On-Demand: Why choose when you can have both? SLI or CrossFireX? Fret no longer because with the ROG Maximus III Formula, you´ll be able to run both multi-GPU setups. The board features SLI/CrossFireX on Demand technology, supporting SLI or CrossFireX configuration. Whichever path you take, you can be assured of jaw-dropping graphics at a level previously unseen.
Memory Feature
- Dual-Channel, DDR3 2133(O.C.) MHz: The motherboard supports DDR3 memory that features data transfer rates of 2133(O.C.)/2000(O.C.)/1800(O.C.)/1600/1333/1066 MHz to meet the higher bandwidth requirements of the latest operation system, 3D graphics, multimedia, and Internet applications. The dual-channel DDR3 architecture double the bandwidth of your system memory to boost system performance.
ROG Exclusive Features
- ROG Connect: Plug and Overclock – Tweak it the hardcore way! Monitor the status of your desktop PC and tweak its parameters in real-time via a notebook—just like a race car engineer—with ROG Connect. ROG Connect links your main system to a notebook through a USB cable, allowing you to view real-time POST code and hardware status readouts on your notebook, as well as make on-the-fly parameter adjustments at a purely hardware level.
- MemPerfect: Optimize your memory without lifting a finger! Why risk crippling your system with poorly tuned memory? Now, with ROG´s exclusive MemPerfect optimizing your memory performance is a simple matter of selecting the frequency you desire, and letting MemPerfect do the rest! MemPerfect quickly checks your memory settings for errors and automatically fixes them—ensuring system stability and maximum efficiency.
- iROG: Intelligent multiple control at hand The iROG is a special IC which enables several ROG highlitghted functions that gives users full disposal of the motherboard at any stage! This design allows advanced user control and management to be processed purely at a hardware level. iROG greatly increases fun during overclocking for PC enthusiasts and it offers system maintainence and management with more control and efficiency.
- MemOK!: Any memory is A-OK! Memory compatibility is among the top concerns when it comes to computer upgrades. Worry no more, MemOK! is the fastest memory booting solution today. This remarkable memory rescue tool requires nothing but a push of a button to patch memory issues and get your system up and running in no time. The technology is able to determine failsafe settings that can dramatically improve system booting success.
- ProbeIt : Get all hands-on with hardware-based overclocking ProbeIt takes the guesswork out of locating the motherboard´s measurement points, identifying them clearly in the form of 5 sets of detection points so you´ll know exactly where to get quick yet accurate readings using a multitester.
- COP EX: Maximum OC with confidence with burn proof protection to chipsets and GPU! The COP EX allows overclockers to increase chipset voltages without the worries of overheating. It can also be used to monitor and save an overheating GPU. The COP EX allows more freedom and less constraint for maximum performance achievement.
- GameFirst: The speed you need to pwn Low Internet latency allows you to frag more, and get fragged less. That´s why ROG has introduced GameFirst, a feature that manages the flow of traffic according to your needs so that you can still listen to online music, download and upload files, and engage in Internet chats without sacrificing the low ping times you need to pwn your opponents.
- Speeding HDD: Wait less. Play more! Double your hard disk drive performance easily and affordably with Speeding HDD, a remarkable ROG feature that utilizes a dual channel design to enhance HDD transfer rates. Wait less, play more!
- CPU Level Up: A Simple click for instant upgrade Ever wish that you could have a more expansive CPU? Upgrade your CPU at no additional cost with ROG´s CPU Level Up! Simply pick the processor you wanted to OC to, and the motherboard will do the rest! See the new CPU speed and enjoy that performance instantly. Overclocking is never as easy as this.
- Extreme Tweaker: One stop performance tuning shop Extreme Tweakers is the one stop shop to fine-tune your system to optimal performance. No matter if you´re looking for frequency adjustment, over-voltage options, or memory timing settings, they´re all here!
- Voltiminder LED: Friendly reminder on Voltage Settings In the pursuit of extreme performance, overvoltage adjustment is critical but risky. Acting as the “red zone” of a tachometer, the Voltiminder LED displays the voltage status for CPU, PCH, and Memory in a intuitive color-coded fashion. The voltiminder LED allows quick voltage monitoring for overclockers.
- Loadline Calibration: Optimal power boost for extreme CPU overclocking! Maintaining ample voltage support for the CPU is critical during overclocking. The Loadline Calibration ensures stable and optimal CPU voltage under heavy loading. It helps overclockers enjoy the motherboard´s ultimate OC capabilities and benchmark scores
Sound with Clarity
- SupremeFX X-Fi: Listen with Absolute HD Play in extreme fidelity !SupremeFX X-Fi delivers an excellent high definition audio experience to the gamers of ROG. The SupremeFX X-Fi features unique audio innovations for gamers to spot enemies in 3D environment during game play. SupremeFX X-Fi also provides gamers a special tool to emphasize human voices in games to help make dialogues clearer and more audible.
- Noise Filter: Eliminate background noise while recording This feature detects repetitive and stationary noises like computer fans, air conditioners, and other background noises then eliminates it in the incoming audio stream while recording.
ROG EZ DIY Features
- Onboard Switch: No more shorting pins or moving jumpers With an easy press during overclock, this exclusive onboard switch allows gamer to effortlessly fine-tune the performance without having to short the pins or moving jumpers!
- ASUS Q-Connector: Make connections quick and accurate The Q-Connector allows you to connect or disconnect chassis front panel cables in one easy step with one complete module. This unique adapter eliminates the trouble of plugging in one cable at a time, making connection quick and accurate.
- Q-Fan Plus: Optimized quietness and cooling for more devices! The Q-Fan function automatically detects temperature and adjusts fan speed accordingly to achieve quiet and efficient cooling.
- ASUS EPU Engine: System Level Energy Saving The new ASUS EPU – the world´s first power saving engine, has been upgraded to a new 6 engine version, which provides total system power savings by detecting current PC loadings and intelligently moderating power in real-time. With auto phase switching for components (which includes the CPU, VGA card, memory, chipset, hard drives and CPU cooler/system fans), the EPU automatically provides the most appropriate power usage via intelligent acceleration and overclocking – helping save power and money.
Rich Software Bundled
- Kaspersky® Anti-Virus: The best protection from viruses and spyware Kaspersky® Anti-Virus Personal offers premium antivirus protection for individual users and home offices. It is based on advanced antivirus technologies. The product incorporates the Kaspersky® Anti-Virus engine, which is renowned for malicious program detection rates that are among the industry´s highest.
| Asus Maximus 3 Specifications | |
|
CPU
|
Intel® Socket 1156 Core™ i7 Processor/Core™ i5 Processor/
Supports Intel® Turbo Boost Technology
* Refer to www.asus.com for Intel CPU support list
|
|
Chipset
|
Intel® P55 Express Chipset
|
|
Memory
|
4 x DIMM, Max. 16 GB, DDR3 2133(O.C.)/2000(O.C.)/1800(O.C.)/1600/1333/1066 Non-ECC,Un-buffered Memory Dual Channel memory architecture
* Hyper DIMM support is subject to the physical characteristics of individual CPUs. * Supports Intel® Extreme Memory Profile (XMP)
* Please refer to www.asus.com or user manual for the Memory QVL(Qualified Vendors List). |
|
Expansion Slots
|
2 x PCIe 2.0 x16 (red) support single at x16 or dual at x8 mode
1 x PCIe x16 (white) supports at x4 mode
2 x PCIe x1
2 x PCI 2.2
|
|
Multi-GPU Support
|
Supports NVIDIA® SLI™ Technology / ATI® CrossFireX™ Technology
|
|
Storage
|
Intel® P55 Express Chipset built-in
6 xSATA 3.0 Gb/s ports
Intel Matrix Storage Technology Support RAID 0,1,5,10
JMicron® 322 controller and 2 x JMicron® 363 controllers:
– 2 x SATA 3.0 Gb/s port (Red) supporting Hardware RAID 0 and 1 (SPD_HDD1 + SPD_HDD2) – 1 x External SATA 3.0 Gb/s port (SATA On-the-Go)
– 2 x SATA 3.0 Gb/s port (White) – SATA_ODD1 + SATA_ODD2
|
|
LAN
|
Realtek® RTL8110SC Gigabit LAN controller
GameFirst
|
|
Audio
|
SupremeFX X-Fi discrete Audio Card
8-Channel High Definition Audio CODEC
EAX® Advanced™ HD 4.0
X-Fi CMSS®-3D
X-Fi Crystalizer™
Creative ALchemy
Supports 1 x S/PDIF out header
Supports Coaxial/Optical S/PDIF out ports on rear
Blu-ray support
|
|
IEEE 1394
|
2 x 1394a ports (1 port at back I/O, 1 port onboard)
|
|
USB
|
14 USB 2.0/1.1 ports (5 ports at mid-board, 9 ports at back panel)
|
|
Overclocking Features
|
Extreme Engine Power Design
– 16-phase CPU power
– 3-phase VTT power
– 3-phase Memory power
ROG Connect
CPU Level Up
Memory Level Up
Speeding HDD
iROG
Extreme Tweaker
Loadline Calibration
Intelligent overclocking tools:
– ASUS AI Booster Utility
– O.C. Profile
Overclocking Protection:
– COP EX (Component Overheat Protection – EX)
– Voltiminder LED
– ASUS C.P.R.(CPU Parameter Recall)
|
|
Special Features
|
MemOK!
MemPerfect
ProbeIt
Onboard Switches: Power / Reset / Clr CMOS (at rear)
Q-Fan Plus
ASUS EPU
ASUS MyLogo3
ASUS Fan Xpert
ASUS EZ Flash 2
ASUS CrashFree BIOS 3
ASUS Q-Connector
ASUS Q-LED (CPU, DRAM, VGA, Boot Device LED)
ASUS Q-Slot
ASUS Q-DIMM
|
|
Back Panel I/O Ports
|
1 x External SATA
1 x IEEE 1394a
1 x LAN(RJ45) port
1 x Clr CMOS switch
1 x ROG Connect On/Off switch
1 x PS/2 Keyboard port (purple)
9 x USB 2.0/1.1 (1 port for ROG Connect)
|
|
Internal I/O Connectors
|
3 x USB connectors support additional 5 USB 2.0 ports (1 port reserved for ROG Connect @ rear) 1 x IEEE 1394a connector
10 x SATA connectors: 2 x Speeding HDD SATA connectors (Red) / 2 x SATA_ODD (White) / 6 x standard SATA connectors (Gray) 8 x Fan connectors: 1 x CPU / 1 x PWR / 3 x Chassis / 3 x Optional
3 x thermal sensor connectors
1 x 24-pin ATX Power connector
1 x 8-pin ATX 12V Power connector
1 x En/Dis-able Clr CMOS header
5 x ProbeIt measurement points
1 x ROG light connector
1 x Go Button
System panel connector
|
|
BIOS
|
16 Mb Flash ROM , AMI BIOS, PnP, DMI2.0, WfM2.0, SM BIOS 2.5, ACPI2.0a Multi-Language BIOS |
|
Manageability
|
WOL by PME,WOR by PME,PXE
|
|
Accessories
|
User’s manual
1 x I/O Shield
1 x ROG Connect Cable
1 x SLI Cable
1 x SupremeFX X-Fi Audio Card
1 x 2-in-1 ASUS Q-Connector Kit
3 x 2-in-1 SATA signal cables
1 x 2-port USB2.0 + ESATA module
1 x Cable Ties
1 x ROG theme label
1 x 12-in-1 ROG Cable Label
|
|
Support Disc
|
ASUS PC Probe II
ASUS AI Suite
ASUS Update
Kaspersky® Anti-Virus
Support DVD:
– Drivers and applications
Sound Blaster X-Fi Utility
ASUS TurboV EVO utility
|
|
Form Factor
|
ATX Form Factor
12 inch x 9.6 inch ( 30.5 cm x 24.4 cm )
|
We would like to mention that while Turbo Evo is included on the support disk that Asus has informed us that the Maximus 3 Formula Motherboard doesn’t oficially support Turbo Evo at this time. Only the P7P55 series boards support Turbo Evo but Asus is working on extending that functionality to the Maximus 3 board. We don’t advise using the Turbo Evo utility with the Maximus 3, we tried it and while it didn’t muck things up it also didn’t auto tune the board and went into an infinite loop of trying to tune and rebooting the rig. We fail to see how other sites reported it working on the Maximus 3 when the Maximus 3 doesn’t have the hardware chip to support the function and Asus is still trying to implement it on the Maximus 3. Anyone else smell the faint aroma of the funk coming from other review sites that didn’t actually test Turbo Evo yet reported it working on the Maximus 3? Maybe they soldered the missing hardware on the board themselves (shrug).
Asus Special Features & Software
The Maximus 3 Formula board is a feature rich board so bear with us because your going to be scrolling seemingly into infinity.
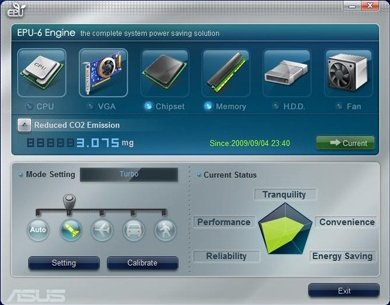
EPU-6 engine offers power savings with graduated levels. Pictured above the Turbo mode provides maximum performance.
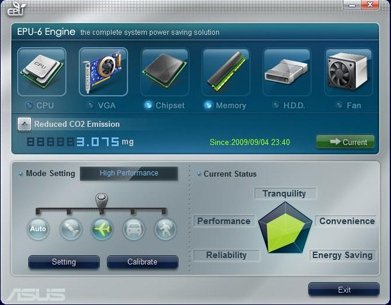
High Performance offers a little more power savings but decreases performance a little.
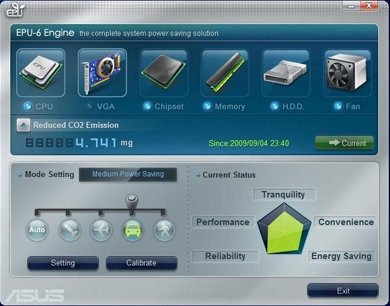
Medium Power saves yet more power but again that’s at the cost of decreased perfromance.

Then finally you have a Max Power savings setting which provides the best power management but the least performance. We tested each setting to ensure they worked but Auto seemed to work best for us by letting EPU-^ decide what power profile to run. On a side note if you are planning on running overclocked then it’s best to disable or not install EPU-6 because it will interfere with your OCing efforts.
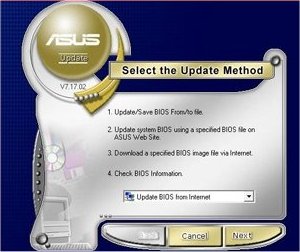
A lot of major vendors totally ignore BIOS flashing and that’s just a shame. They end up paying the price in RMA boards with dead BIOS and make end users mad with RMA delays installing or reflashing BIOS chips. Asus provides two utilities for flashing the BIOS. The first is Asus Update which will download and install the BIOS from the internet while inside Windows. We tested it and it works but we are not big fans of OS based flashing.
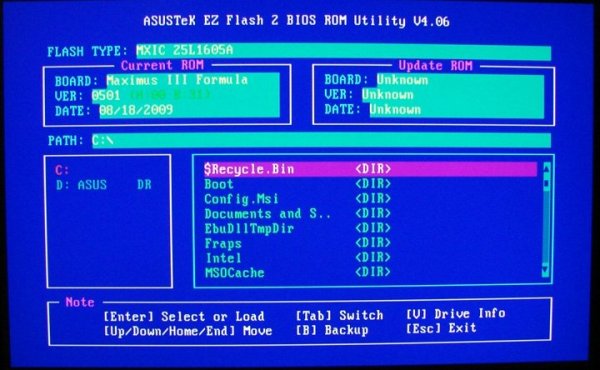
We much prefer flashing the BIOS on our Asus boards using the BIOS based EZ Flash utility found on all Asus boards. Flashing from EZ Flash is just safer than OS based flashing. While Asus Auto Update works having the OS between the BIOS and the flash adds a level of risk. We’ve never had a BIOS flash fail with Auto Update or EZ Flash but we still prefer EZ Flash. If any non-Asus vendors are reading this please take note everyone on the planet hates DOS based flash utilities and you need to catch up to the 19th century and design a BIOS based Flashing system like EZ Flash.
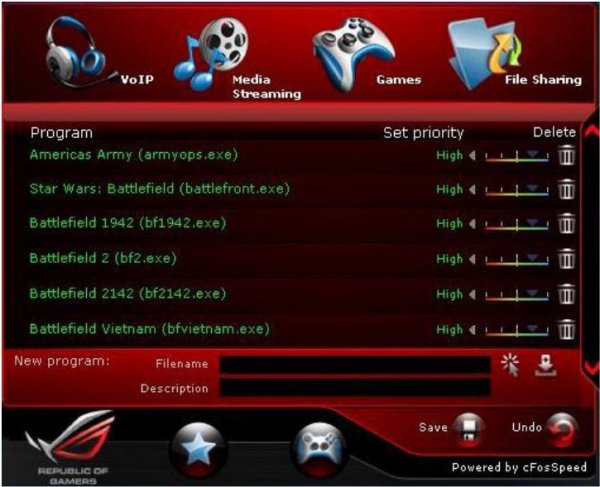
ROG Game First is a handy utility that allows you to set the piority of games and applications that want to use the internet by allocating more priority to the important software. So Say if you are online playing WoW and getting whacked because your ping time stinks, you can open up ROG Game First and give WoW priority on the Lan port and increase the available bandwidth to the game or application your using now. By the same token you can decrease priority on things you aren’t actively using.
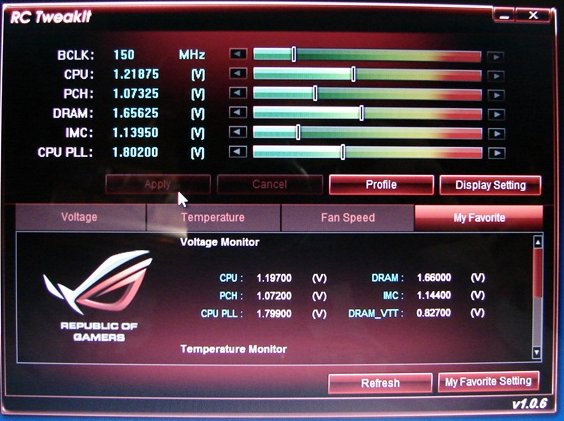
RC Tweakit is a utility you run from your laptop to Tune your desktop in real time. Yes that’s right, while your desktop is up and running you can tweak it using RCTweakit and connecting to the dedicated ROG Connect port on the I/O panel on your desktop.
Asus was kind enough to clue us in on a hidden feature on the RC Tweakit utility and for those of you thinking I’ll never use RC Tweakit this feature will knock your socks off. Here’s what we got directly from Asus on the undocumented feature.
“”I would like to let you in on a secret function we are working on as noted below. It is called BIOS Flashback. In the event the bios becomes corrupted and the system can no longer post you can still directly access the bios rom and flash it back to a working bios. Currently due to the design of the PCH on P55 we are limited to very slow speeds for this process ( approx 10 to 20 mins ) we are trying to find a solution to improve the throughput and the time needed for this process. In the end though it is still much better than needing to RMA the board. R&D has told me if you used a high speed hub connected to the ROG connect port it will improve the transfer time so this is currently a possible solution to improving the time needed.
There is a hidden function on the M3F / M3G board, which is called ROG Connect (RC) BIOS Flashback
To flash BIOS via ROG Connect, you can enable “RC BIOS Flashback (Beta version)” by pressing the hot key “B” for 4 secs when the RC TweakIt is activated.”
So you can use RC Tweakit to recover from a bad flash that bricked your motherboard, it’s still in Beta but we Flashed over a good BIOS to test the feature and while it took 16 minutes to complete it worked perfectly. So if you happen to get a bad BIOS flash RC Tweakit can prevent you from having to RMA the board and kick it back to life in just a few well spent minutes. Great feature Asus!

Right there next to the CMOS Reset button is the ROG Connect port we mentioned. That’s the prot you use for RC Tweakit to tune your PC on the fly or recover from a corrupted BIOS.
The Asus My Logo utility lets you put the boot logo of your choice onscreen during bootup. So if you have a sexy picture of your main squeeze you can enjoy that image during bootup, just don’t let your wife see it.
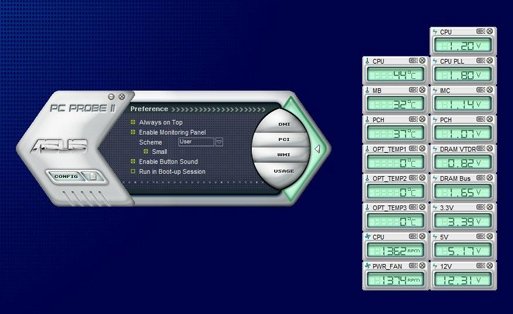
PC Probe 2 lets you monitor vital voltages and Temperatures from inside Windows. It also displays fan speeds and RPM’s in real time. You can pick which sensors it shows so if you don’t want all the sensors you can disable the ones you don’t want.
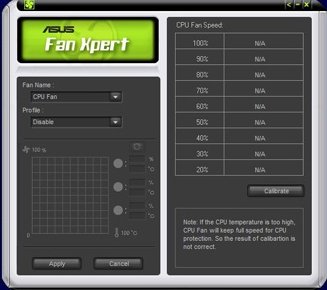
All the fan headers on the Maximus 3 are 4 pin headers and that means you can install adjustable speed fans, The speeds of the fans can be controlled in Asus Fan Xpert. A nice feature for those that want quiet operation while still having the ability to kick the fan speed up during heavy gaming or overclocking.

Asus also uses Stack Cool 2 technology to ensure nice and cool operation while running your Maximus board. While Asus doesn’t make a big deal out of it like some companies they have been using a 2oz copper PCB for reduced resistance and impedance in their motherboards positive and negative PCB layers. They just take it for granted that a board should have a 2oz Copper PCB and don’t bother with all the marketing hype.
We just got a little new info from Asus on the Maximus so we’re giving it to you just like we got it.
Your board was pre mass production, the silk screen on mass productions boards will either show StackCool3 on the back or not have a silkscreen at all. Be assured though that StackCool 3 is fully implemented on the ROG Maximus III Formula.
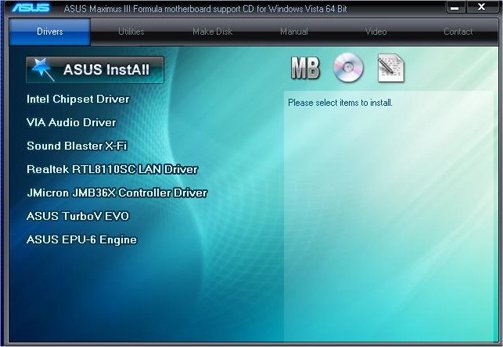
The following shots are from the support CD. Notice that Turbo Evo is included on the support CD but like we mentioned earlier it’s not supported by the Maximus 3 Formula 2 board. This is primarily the driver screen for installing you motherboard drivers but for some reason they tossed Turbo Evo and EPU-6 on the page with them.
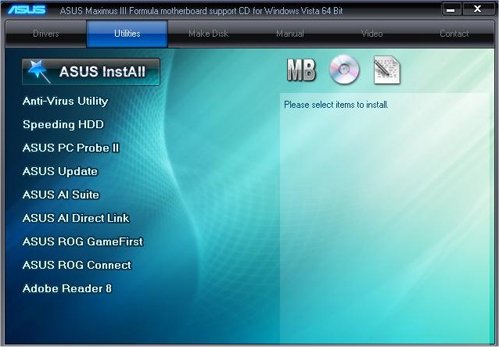
The Utility page shows us that they included an Anti-Virus utility, Speeding Hard Drive, PC Probe 2, Asus Update, Asus AI Suite, Asus AI Direct Link, ROG Game First, ROG Connect, and Adobe Reader.
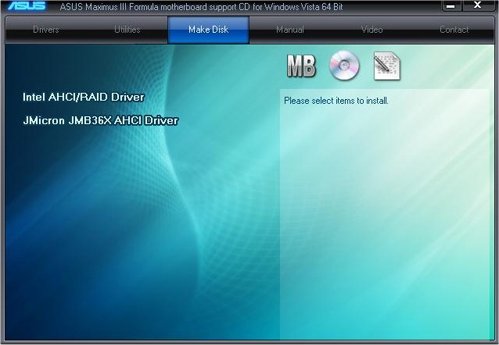
The Support CD also allows you to make a RAID Disk if you want to use the built in RAID functions the board provides.
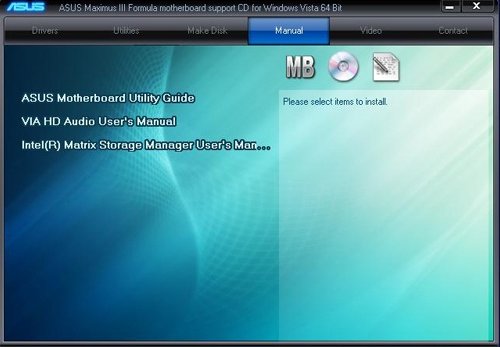
The Manual page is where you”ll find the documentation you need for the Utilities VIA HD Audio Chip, and Intel Matrix Storage Controller.
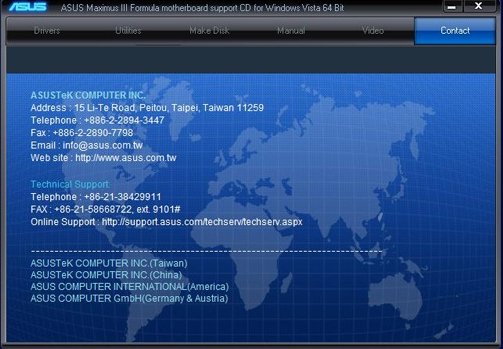
Then lastly they provide a contact information screen so you can call them up and tell them how happy you are with this beautiful board.
BIOS
The Asus Maximus 3 Formula board has a 16MB BIOS chip and like most modern boards the BIOS is to rich to picture in it’s entirety. What we’ve done is take the most interesting screens and pictured those here.
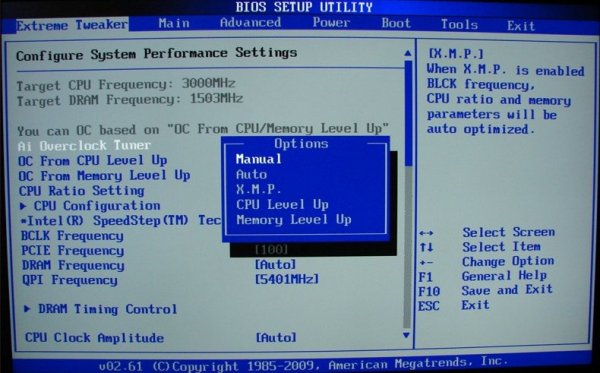
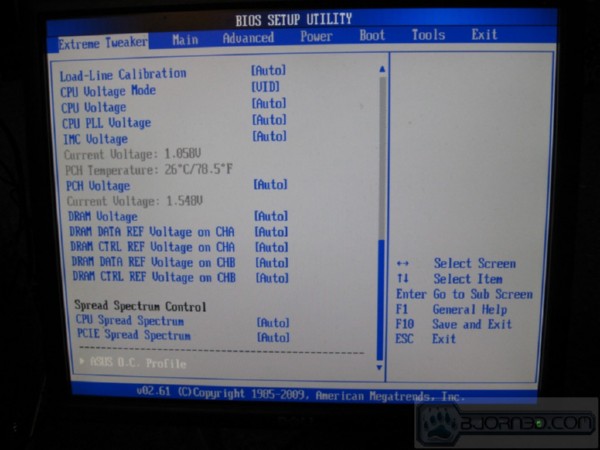
The most interesting screens for overclockers are the screens in Extreme Tweaker. Extreme Tweaker is your one stop shop for overclocking. We really like that almost everything we need for overclocking is on one screen and feel that this is a trend all board makers should follow.
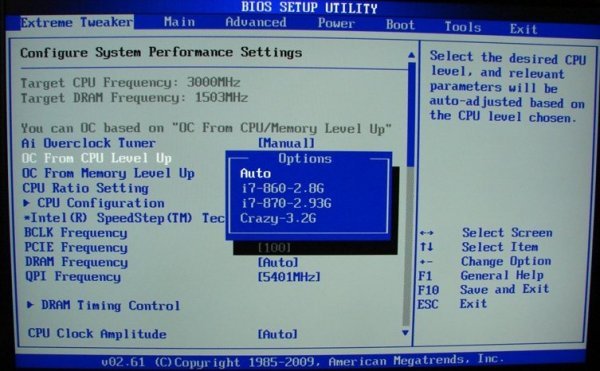
Later BIOS revisions show the CPU Level up capable of successfully OCing the i7 879 we used to 3.52GHz with the click of the mouse. This is an earlier version of the same utility and doesn’t provide as high a one button OC.

Memory OCing options go all the way up to 2133MHz which is the speed kit we used for the review and amazingly 2133MHz with our Kingston HyperX kit was plug and play.
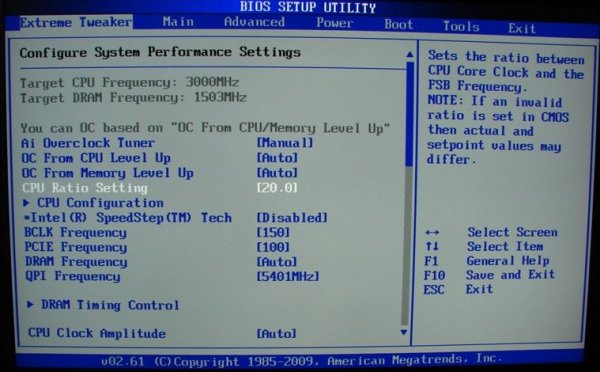
Being a full featured enthusiast BIOS you have full control of Bclk, Voltages and CPU multiplier, as well as the convenience of one click overclocks for more inexperienced overclockers.
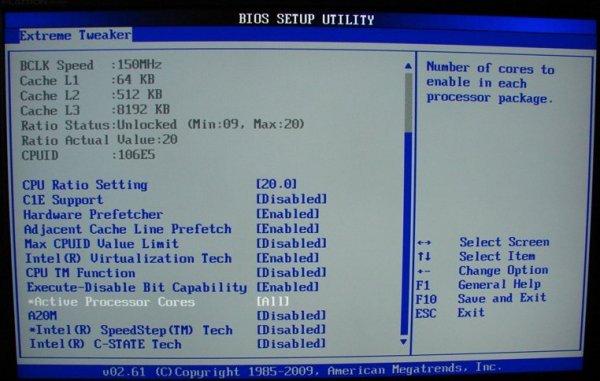
Even the C1E and Thermal settings are all found under Extreme Tweaker and we can’t tell you how nice it is not to have to go searching through screens to find the OCing options we need.
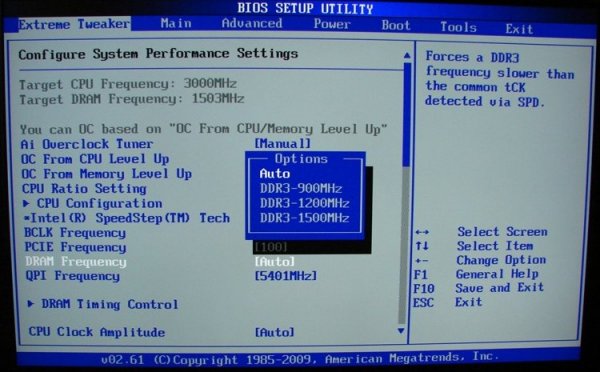
Standard Ram speeds have your normal dividers all of which work and those will change as Bclk goes up or down with your OC.
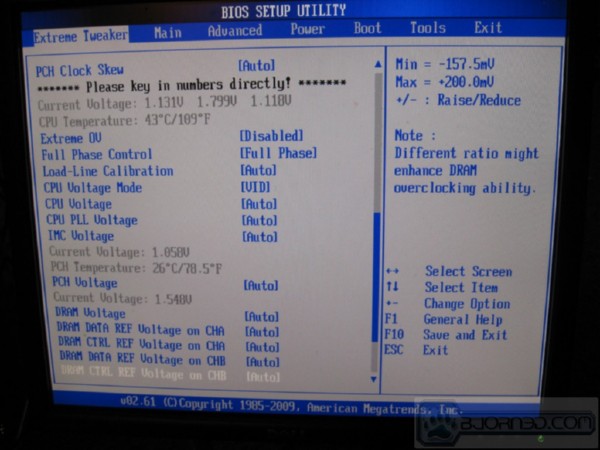
Amazingly it takes several shots and serious scrolling on the Extreme Tweaker Scren just to cover this one vital section. Everything you need for serious overclocking fun is on this one page.
They even moved the Asus OC Profile to the Extreme Tweaker page, we’ll cover that screen in a few moments.
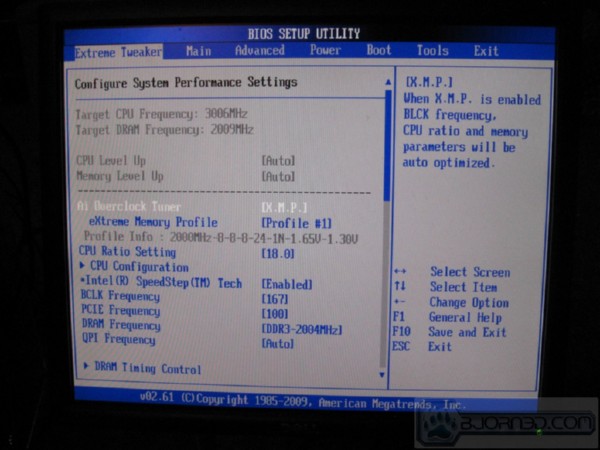
We tested several kits and their XMP profile on the Maximus 3 board and every kit we tried, Patriot, HyperX, and OCZ were all plug and play but the XMP profiles reset the Bclk and CPU Multiplier so set the XMP first then OC from there.
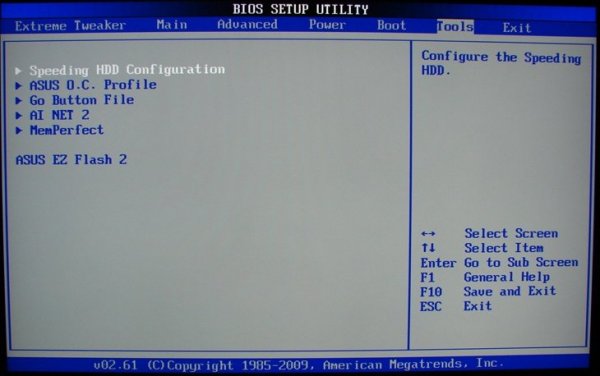
Speeding hard drive consists of this BIOS option and two red sata ports on the motherboard. We would see it as plug and play RAID for the most part. Start with one drive then add another one later and the BIOS will auto set the drives to run in 2 channel mode and you bet a better HD speed. Please note that adding a hard drive later the data on the origional HD will most likely be erased.
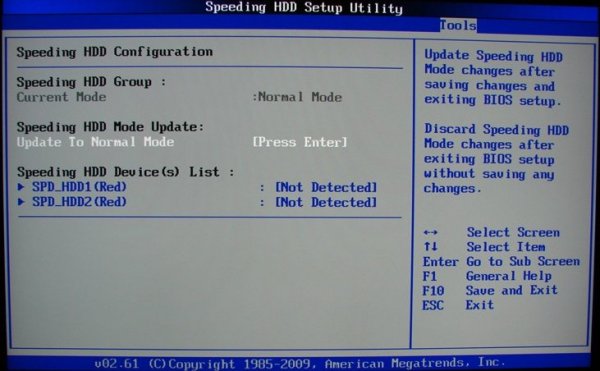
Speeding HD is a good option for those wanting faster HD speeds but we would recommend starting with two identical hard drives and enabling it prior to installing the Operating System.
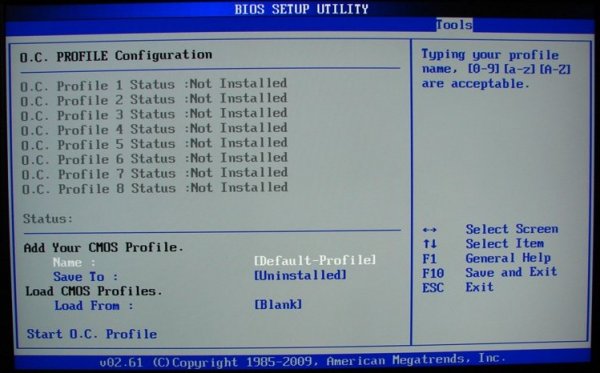
You have 8 slots for saving overclocking profiles and you can also save to and load from hard drive.
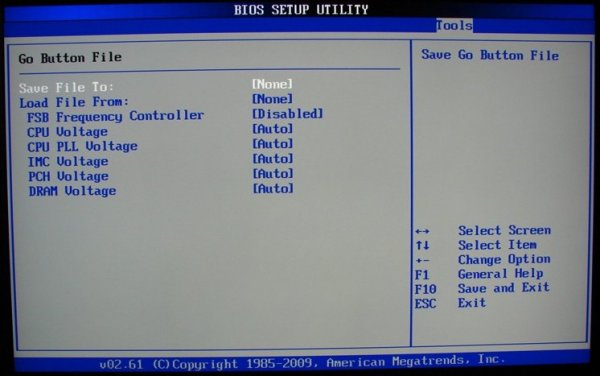
The Go Button allows you to easliy recall a previous OC without having to go into BIOS but you have to set the profile. Once you have the options set you can recover from a bad OC attempt by just hitting the Go Button.
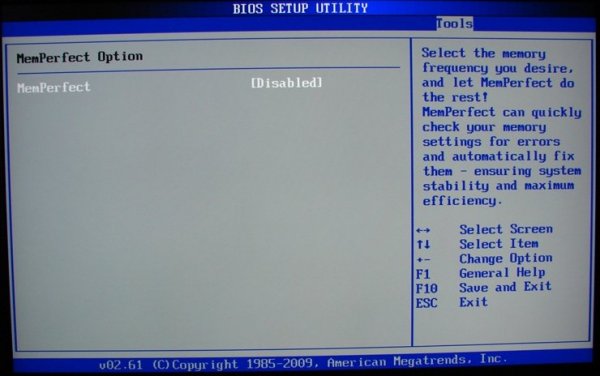
MemPerfect is a new option and you tell it what frequency you want to run the ram at and it will set the ram to that frequency and check it for errors making memory tweaking BIOS based.
Pictures & Impressions

The Maximus 3 Formula comes in a typical Red ROG box and it provided plenty of protection for the board during shipping.

Inside the outer box we find the Maximus 3 safely nestled in a cardboard protector and it’s covered with a plastic shield (Plastic shield not pictured).

Once you get the Maximus 3 out of the box it’s easy to see that this is going to be one of the nicest looking boards out there.

Next to the mainboard power connector in a somewhat unhandy spot (if your measureing voltages inside the chassis) are the CPU PLL, PCH, Dram, IMC, and CPU voltage measurement points unique to some of the higher end Asus boards.

Earlier in the BIOS shots we detailed the go button BIOS screen where you can set the BIOS options to recover to a previous setting state to recover from a failed OCing attempt.

The Maximus 3 has sizx 90 degree SATA ports on the leading edge of the board, we’ll get to the Speed HD ports a little later.

Up Around the CPU area you notice 19 Ferrite chokes for the 16+3 phase power and all the components around the CPU socket are low profile so you shouldn’t have any problems with any CPU cooler we’ve seen to date. Some coolers might overhang the first ram sockets depending on the cooler.

Since the LGA 1156 doesn’t have a Southbridge chip the large heatsink next to the SATA ports is for the SATA controller.

Three PCI-E 16x sized slots but with 1 GPU you get 16x speed, with 2 GPU’s you get 8x8x and with 3 GPU’s you get 8x8x4x. Two normal legacy PCI slots, and 2 PCI-E 1x and before we get 100 emails yes the included X-FI sound card fits in the first PCI-E 1x with a dual cooler GPU installed.

Here’s a shot of the 8 pin CPU power connector, yes they have 4 holes covered. Yes you need a PSU that has an 8 pin PSU connector for full OCing capabilities on the board.
Pictures & Impressions Cont.

On the connector edge of the board you find the two Speed Hard Drive red SATA connectors and paired with the six 90 degree ports on the leading edge of the board that’s 8 total SATA connectors.

Here’s a close up of the front panel connector for those of you that lost the book while hugging the Maximus 3.

A nice feature of the Maximus 3 is the large oversized Start Button and Reset button found on the connector edge of the Maximus 3.

Backing up from the connector edge you can see 3 four pin fan headers, the Power On and Reset buttons, Speed HD SATA connectors, front panel connectors, HD Audio Connector, and mid board USB ports. One thing we’d like to mention again is that all the fan headers on the Maximus 3 are 4 pin so if you like fan control this is probably the best board we’ve seen for that.

The Bacl I/O panels shows us a PS2 Mouse/Keyboard port, 8 USB, Reset Cmos Button, Firewire, and e-SATA. To the far right is the ROG Connect and RC Tweakit ports.

Backing up a little from the CPU area you can see the low profile design of all the heatsinks around the CPU area. This is one of the best designed CPU areas we’ve seen lately.

Notice the power connector on the PCH chip heatsink, you know Asus put some bling in there to help accentuate the boards looks during operation.

The RAM slots are a little close to the CPU area but we were able to use tall kits in the red slots and a short kit in the black slots.

Then finally on SATA ports the two white ODD ports which are controlled by the JMicron 322/363 controller. The Speed HD ports are also controlled by the JMicron controllers but the 90 degree ports on the leading edge of the board are Intel Matrix. Running total SATA ports 10, with one e-SATA SATA on the Go port.

We would be a little remiss if we didn’t toss in a shot of the ROG chip itself which controls some of the proprietary technology used solely on the ROG series boards.
Pictures & Impressions

This is a shot of the silk-screened Maximus 3 printed on the board but notice the PCH_Crazy, PCH_High, and PCH Normal, that’s a LED that tells you how tightly wound you have the PCH, you’ll also find similar CPU and Memory LED’s on board.
We wanted to toss in a couple of angled shots of th board so those looking at install angles could get a different perspective.

It really doesn’t matter what angle you see the board from it just screams speed and it’s not even installed yet.

Probably the nicest thing in the bundle is the X-FI SupremeFX Sound card.

We’re going out of order on the bundle for the Maximus 3, most interesting in the bundle is the Sound Blaster X-FI SupremeFX sound card. There in no on board sound on the Maximus 3 but with this excellent sound card bundled it’s love at first listen.

Fully capable of 8 channel High Def audio you also get the normal Sound Blaster X-FI goodies like EAX Advanced HD 4.0,X-FI CMSS 3D, X-Fi Crystalizer, BluRay support and Optical Out port.

Uses a standard PCI-E 1x slot and yes it will fit above the first GPU slot with no problems.

Unlike previous X-FI cards we had no install problems with this one at all. Seems like special attention was paid to driver support for this one. Asus bundled it with the Maximus 3 and you better believe they wanted rock solid driver support for it.

Here’s a peek at the back of the X-FI and except for a couple of stickers it’s unremarkable.

Bundle wise you get an I/O plate, Cable Ties, Manual, Support Disk, Asus Quick Connectors, Expansion Plate with 2 USB and one e-Sata, 1 ROG connect cable, 1 SLI ribbon, and a set of stickers for the cables.

You also get a large ROG sticker for your chassis but it’s a little larger than we’d like it.

Then finally the set of stickers for the cables so you can identify the cables that belong to the ports. We wouldn’t put both stickers on the cable, we’d put one on the cable and one on the device it attaches to but that’s personal preference.
Testing & Methodology
To test the Assu Maximus 3 Formula we used the same components we used in the Intel i5/i7 review. The only component we switched was the motherboard and did a fresh load of Vista 64 on the test rig. To that end, we’ve included the Intel Extreme board results in the Maximus review for comparison purposes. Keeping the components the same across a variety of boards will ensure a level playing field for all the motherboards tested.
We’ve expanded our testing suite considerably for P55 and will continue to use the same tests across most of the motherboards and CPU’s we test. We run each test a total of at least three times minimum, some tests we run more than 3 times. We average the total of all the tests from each benchmark then report the average here.
The OS we use is Vista Ultimate 64bit with all patches and updates applied. We also use the latest drivers available for the motherboard and any devices attached to the computer. We don’t disable a bunch of background tasks or particularly tweak the OS or system for bigger numbers. We do turn off drive indexing and daily defragging. We also turn off Prefetch and Superfetch. This is not an attempt to produce bigger benchmark numbers. Drive indexing and defragging can interfere with testing in that one test might occur without defragging going on and the next test defragging might be active, the same thing goes for drive indexing. We can’t control when defragging and indexing occur precisely enough to guarantee that they won’t interfere with testing, so we turn them off.
Prefetch tries to predict what you will load the next time you boot the machine. We disable it because we want to know how the program runs without any of the files being cached, otherwise each test run we’d have to clear pre-fetch to get accurate numbers. Lastly we disable Superfetch, Superfetch loads often used programs into memory and is one of the reasons people consider Vista to be such a memory hog. Vista fills the memory in an attempt to predict what you will load. Having one test run with files cached, and another test run with the files being un-cached would result in skewed numbers. Again since we can’t control it we turn it off. Other than those 4 things which can potentially interfere with benchmarking, and do so out of our control, we leave everything else running.
Test Rig
| Test Rig “Quadzilla i5” |
|
| Case Type | Sunbeam 9 Bay Acrylic Chassis |
| CPU | Core i7 870 |
| Motherboard |
Asus Maximus 3 Formula |
| RAM | Kingston HyperX DC DDR3 2133MHz 4 GB Kit Cas 8 |
| CPU Cooler | Thermalright Mux 120 (Dual 120mm Fans) |
| Hard Drives | Crucial 128 GB SSD(MLC/Samsung controller) |
| Optical | Sony DVD R/W |
| GPU(s) | BFG GTX-260 Maxcore |
| Case Fans | 120mm Fan cooling the mosfet CPU area |
| Docking Stations | None |
| Testing PSU | Tagan BZ 700w Modular |
| Legacy | None |
| Mouse | Razer Lachesis |
| Keyboard | Razer Lycosa |
| Gaming Ear Buds |
Razer Moray |
| Speakers | None |
| Any Attempt Copy This System Configuration May Lead to Bankruptcy |
|
Test Suite
|
Benchmarks |
|
Excel 2007 |
|
Blender |
|
SiSoft SANDRA XII Professional SP2 |
|
Everest Ultimate Edition v. 5.0 |
|
AutoMKV |
|
Cinebench R10 64 bit |
|
WinRar v. 3.71 |
|
POVRay |
|
Pro Show Gold |
Everest Ultimate

“EVEREST Ultimate Edition is an industry leading system diagnostics and benchmarking solution for enthusiasts PC users, based on the award-winning EVEREST Technology. During system optimizations and tweaking it provides essential system and overclock information, advanced hardware monitoring and diagnostics capabilities to check the effects of the applied settings. CPU, FPU and memory benchmarks are available to measure the actual system performance and compare it to previous states or other systems. Furthermore, complete software, operating system and security information makes EVEREST Ultimate Edition a comprehensive system diagnostics tool that offers a total of 100 pages of information about your PC.”
CPU AES
This integer benchmark measures CPU performance using AES (a.k.a. Rijndael) data encryption. It utilizes Vincent Rijmen, Antoon Bosselaers and Paulo Barreto’s public domain C code in ECB mode.
CPU AES test uses only the basic x86 instructions, the test consumes 48 MB memory, and it is Hyper Threading, multi-processor (SMP) and multi-core (CMP) aware.
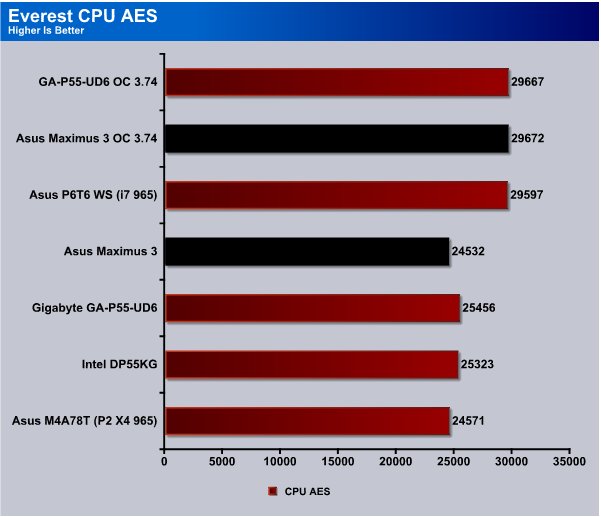
CPU AES saw the Maximus board running slightly behing the Gigabyte UD6 at stock speed but when overclocked the Maximus board came out slightly ahead.
CPU PhotoWorxx
This integer benchmark performs different common tasks used during digital photo processing.
It performs the following tasks on a very large RGB image:
• Fill
• Flip
• Rotate90R (rotate 90 degrees CW)
• Rotate90L (rotate 90 degrees CCW)
• Random (fill the image with random colored pixels)
• RGB2BW (color to black & white conversion)
• Difference
• Crop
This benchmark stresses the integer arithmetic and multiplication execution units of the CPU and also the memory subsystem.
CPU PhotoWorxx test uses only the basic x86 instructions, and it is Hyper Threading, multi-processor (SMP) and multi-core (CMP) aware.
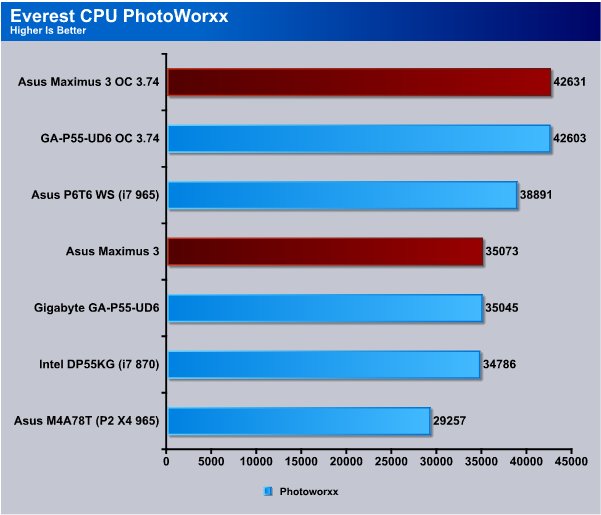
In the PhotoWorxx test the Asus Maximus 3 topped the chart but being the same P55 chipset we expect that both board will perform simularly. With boards all using the same chipset the focus is shifting more toward features and support. The features and support on the Asus Maximus is second to none.
CPU Queen
This simple integer benchmark focuses on the branch prediction capabilities and the misprediction penalties of the CPU. It finds the solutions for the classic “Queens problem” on a 10 by 10 sized chessboard.
CPU Queen test uses integer MMX, SSE2 and SSSE3 optimizations. It consumes less than 1 MB system memory and it is Hyper Threading, multi-processor (SMP) and multi-core (CMP) aware.
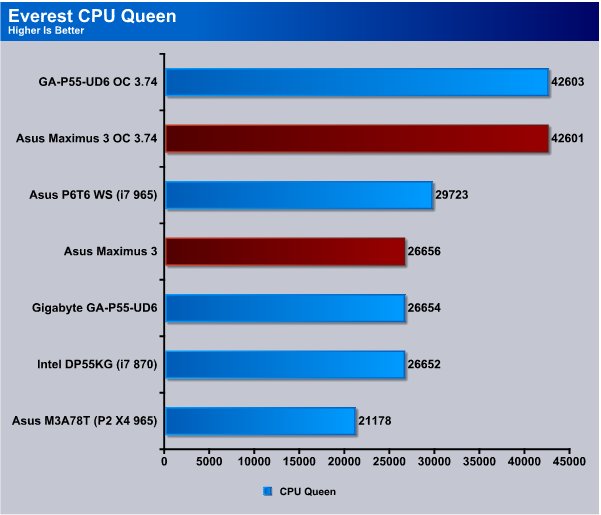
The Maximus 3 came in 2 points behind the UD6 board when overclocked and a difference that small might be a slight variation in the test run. At stock speed we see the Maximus 3 ahead by 2 points so we’d have to call this test a tie.
CPU ZLib
This integer benchmark measures combined CPU and memory subsystem performance through the public ZLib compression library Version 1.2.3 (http://www.zlib.net).
CPU ZLib test uses only the basic x86 instructions, and it is Hyper Threading, multi-processor (SMP) and multi-core (CMP) aware.
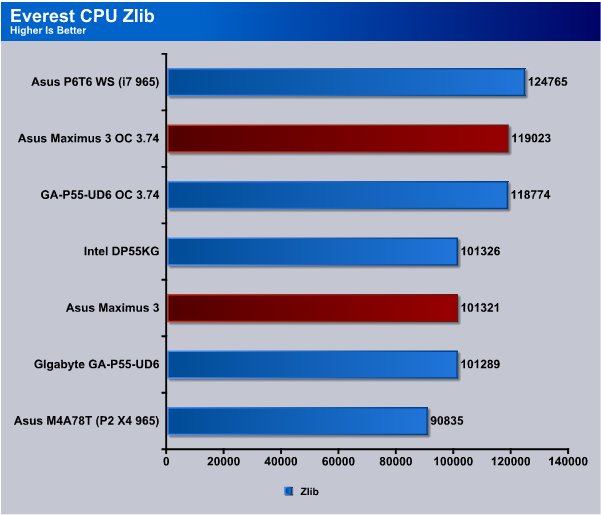
CPU Zlib sees the Maximus 3 board a few hundred points ahead of the UD6 board overclocked and just a few points ahead of the UD6 at stock speed.
Everest Memory
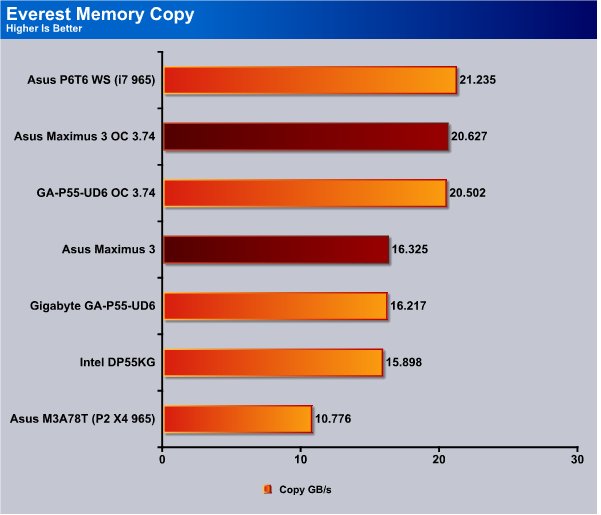
Again both boards are using the integrated memory controller on the i7 870 CPU so we don’t expect to see any great differences in performance between the two.
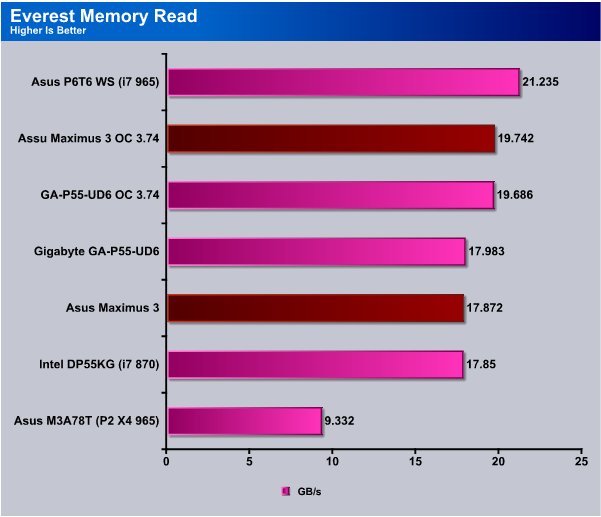
The Memory read test shows the Gigabyte UD6 board slightly ahead at stock speed but the Maximus 3 pulls ahead when overclocked.
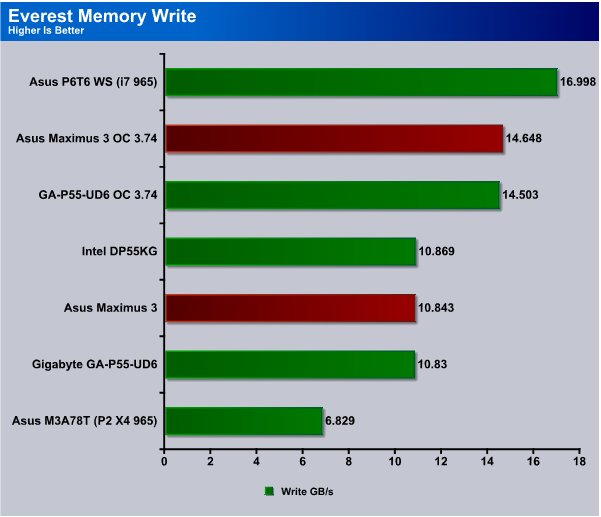
The Maximus 3 comes in ahead both overclocked and at stock speed in the memory write test but so far the fact that both use the CPU’s integrated memory controller has shown that both boards rely on the built in memory controller and memory performance is almost identical.
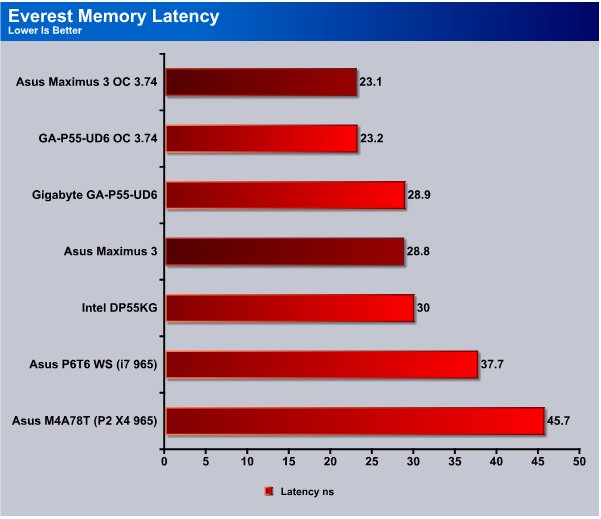
The Asus Maximus 3 gave us a hair better memory latency than the Giga UD6 board in the Everest Latency test.
Cinebench

“CINEBENCH is a real-world test suite that assesses your computer’s performance capabilities. MAXON CINEBENCH is based on MAXON’s award-winning animation software, CINEMA 4D, which is used extensively by studios and production houses worldwide for 3D content creation. MAXON software has been used in blockbuster movies such as Spider-Man, Star Wars, The Chronicles of Narnia and many more. MAXON CINEBENCH runs several tests on your computer to measure the performance of the main processor and the graphics card under real world circumstances. The benchmark application makes use of up to 16 CPUs or CPU cores and is available for Windows (32-bit and 64-Bit) and Macintosh (PPC and Intel-based). The resulting values among different operating systems are 100% comparable and therefore very useful with regard to purchasing decision-making. It can also be used as a marketing tool for hardware vendors or simply to compare hardware among colleagues or friends.”
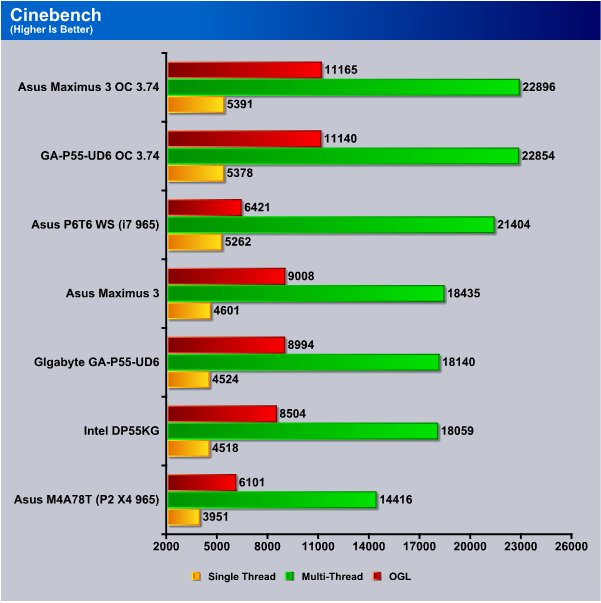
Cinebench shows the Asus Maximus 3 Formula once again just a hair out in front of the Gigabyte board.Running identical hardware with the same chipset we expect them to perform about the same clock for clock. Up to a certain point most P55 boards will deliver performance in the same range. Overclocking ability and features help define a boards potential for greatness with performance running that close.
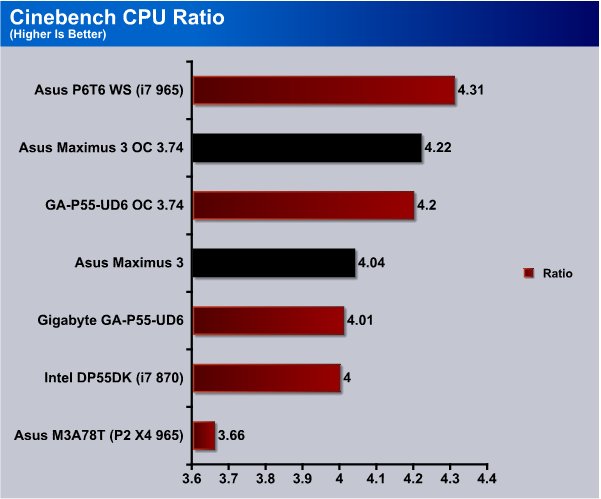
The Maximus 3 Formula board shows a little better CPU Ratio in Cinebench and that may be the reason it’s been slightly ahead in testing.
WinRar v. 3.71

This module in WinRar generates random data, which contains specially introduced redundancy, increasing the load to both the processor and memory. Data is then passed through RAR compression and decompression algorithms, and the output of the decompression algorithm is compared to the source data. If any differences are found, WinRar then reports “Errors found – Yes” in the command window. WinRar displays a size of processed data and compression speed, current and resulting, in kilobytes per second.
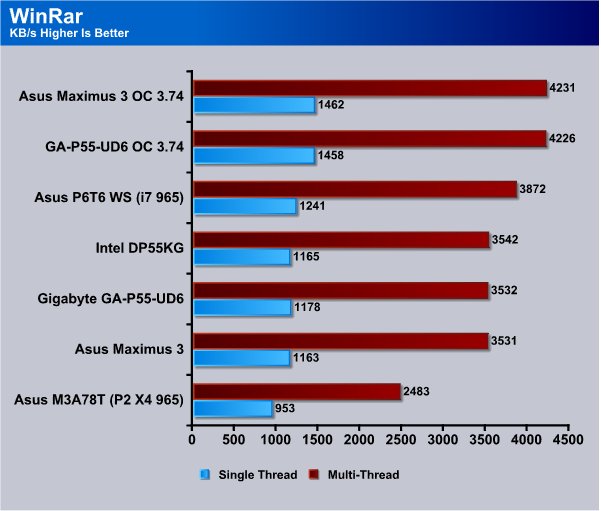
At stock speed the Asus Maximus 3 came in 2KB shy of the Giga UD6 boards score but when overclocked the Asus Maximus board came in 5 KB ahead.
WinRAR Workload
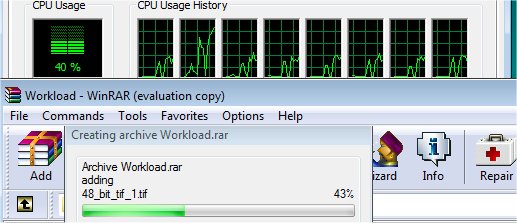
The WinRAR workload test we bypass the built in benchmark and throw 5 large .tif images at WinRAR then compress them and record the compression time. Total workload is about 350MB or 70+ MB per TIF image. The real life compression test of a group of large image files should give us a more realistic idea of how the CPU’s perform than the built in benchmark.
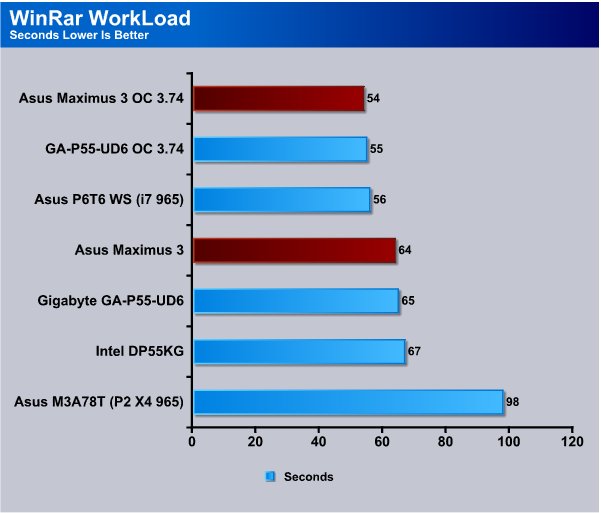
The WinRar workload test shows the Maximus 3 board coming in 1 second faster aqt both stock and overclocked speeds but both boards give a stellar performance.
Sisoft Sandra
“SiSoftware Sandra (the System Analyser, Diagnostic and Reporting Assistant) is an information & diagnostic utility. It should provide most of the information (including undocumented) you need to know about your hardware, software and other devices whether hardware or software. It works along the lines of other Windows utilities, however it tries to go beyond them and show you more of what’s really going on. Giving the user the ability to draw comparisons at both a high and low-level. You can get information about the CPU, chipset, video adapter, ports, printers, sound card, memory, network, Windows internals, AGP, PCI, PCI-X, PCIe (PCI Express), database, USB, USB2, 1394/Firewire, etc.”
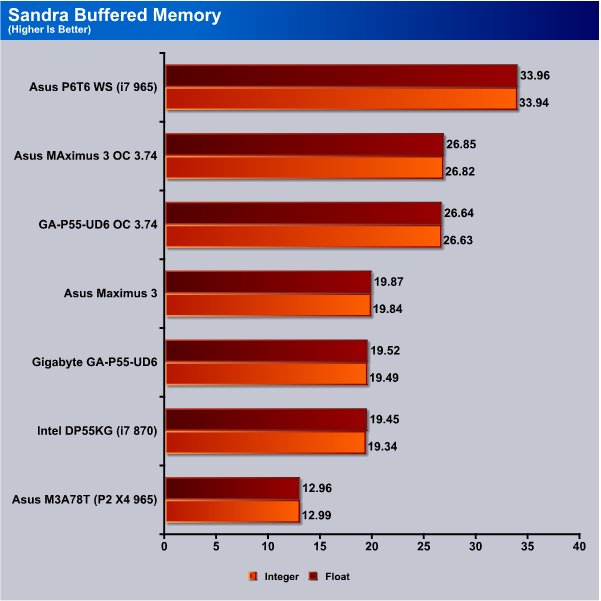
In Sandra’s Buffered Memory test the Asus Maximus came out slightly ahead of the Gigabyte UD6 board and both boards have been consistantly ahead of the Intel DP55KG board. The slight lead over the Intel board might be that the Intel board had a fledgling immature BIOS.
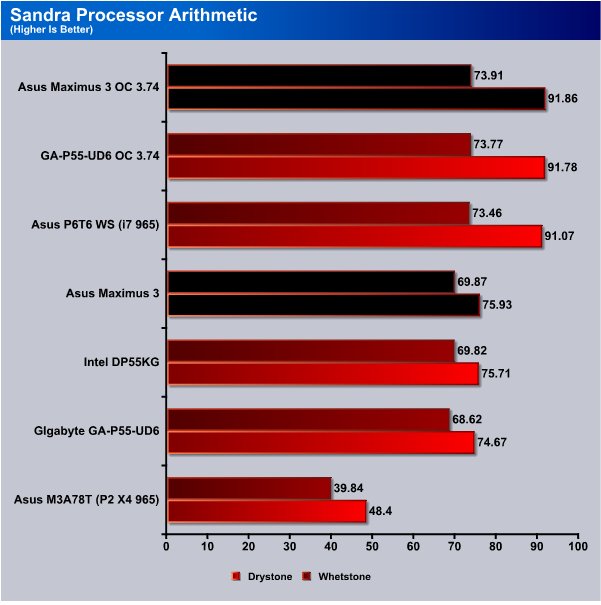
The Processor Arithmetic test shows the Asus Maximus board topping the chart when overclocked to 3.74GHz and again the performance lead is very slim. The Gigabyte UD6 dropped below the Intel boards performance in this test but only by about 0.2 in the Drystone and 0.05 Whetstone. The Asus board pulled ahead by a full point which may be the largest performance increase over the UD6 board we’ve seen.
POV-Ray 3.7 Beta 25

The Persistence of Vision Ray-Tracer was developed from DKBTrace 2.12 (written by David K. Buck and Aaron A. Collins) by a bunch of people (called the POV-Team) in their spare time. It is a high-quality, totally free tool for creating stunning three-dimensional graphics. It is available in official versions for Windows, Mac OS/Mac OS X and i86 Linux. The POV-Ray package includes detailed instructions on using the ray-tracer and creating scenes. Many stunning scenes are included with POV-Ray so you can start creating images immediately when you get the package. These scenes can be modified so you do not have to start from scratch. In addition to the pre-defined scenes, a large library of pre-defined shapes and materials is provided. You can include these shapes and materials in your own scenes by just including the library file name at the top of your scene file, and by using the shape or material name in your scene. Since this is free software feel free to download this version and try it out on your own.
Some of you might have seen version 3.6 of POV-Ray, the biggest difference between 3.6 and 3.7 Beta 25 is SMP (symmetric multiprocessing) support, which means that POV-Ray can take advantage of as many cores as your CPU has. On Single vs Dual CPU systems the speed almost doubles.
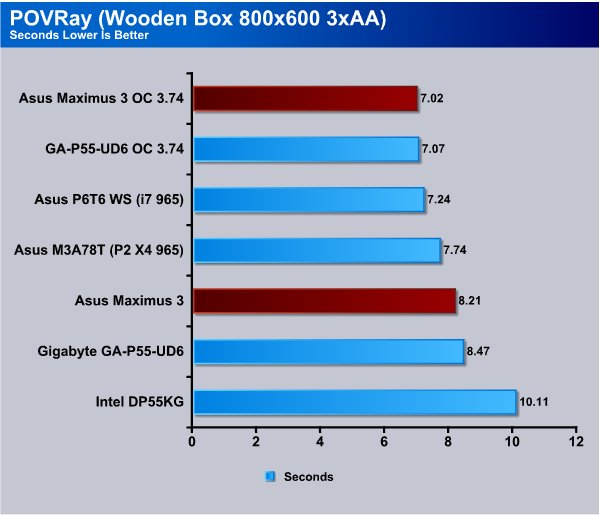
It’s starting to look like the Asus Maximus board has a little better CPU Ratio that gives it a hairs edge over the other P55 boards in heavily multi-threaded applications.
Microsoft Excel 2007
Monte Carlo Black-Scholes Option Pricing Test
Microsoft Excel is the widely known and most used spreadsheet application for the manipulation and calculation for number crunching. With Excel you can analyze and share information on small scale or the largest scale you can imagine. We’ve seen spreadsheets in every day use that contain literally tens of thousands of numbers and hundreds of equations. Bjorn3D uses two tests in Excel to determine CPU and Motherboard performance.

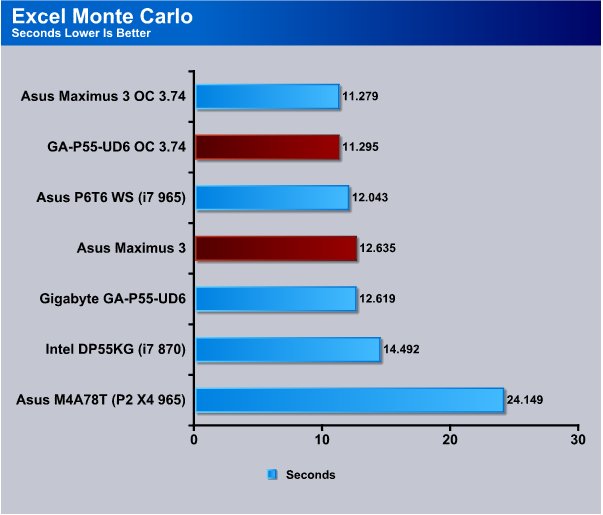
The Excel Monte Carlo test shows the Maximus 3 Formula board with the same slight lead we’ve seen in most of the testing and preference wise choosing between the two boards might come down to price or feature set.
Big Number Crunch
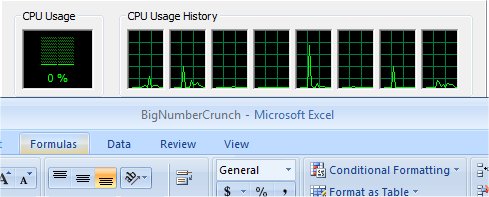
This workload is from a 6.2 MB spreadsheet and executes about 28,000 sets of calculations. It uses the most common calculations in Excel, addition, subtraction, division, rounding and Square Root. It also analyzes statistical functions such as Min, Max Median, and Average. The calculations are done after the spreadsheet with a large data set is updated with new values and must recalculate a large number of data points.
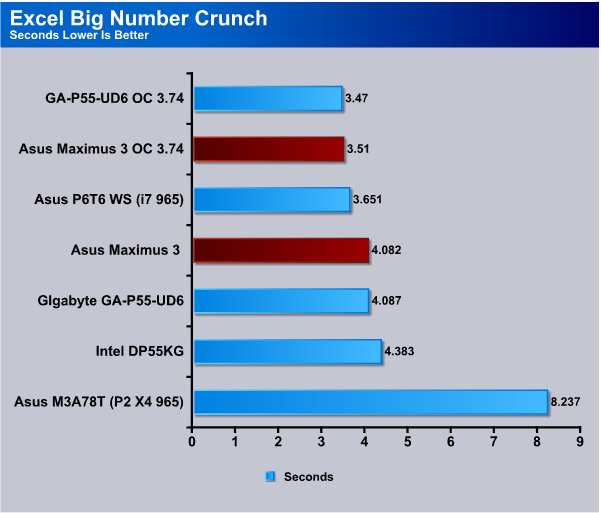
The Big Number Crunch Excel test the Gigabyte UD6 managed to jump a whopping 0.04 seconds ahead of the Maximus 3 Formula but at stock speed the Maximus 3 had a 0.005 second lead.
Photodex ProShow Gold 3.2
ProShow Gold allows you to combine videos and photos and music to create slide shows, depending on the end user results can be spectacular. The application allows the end user to share photos and memories with friends in a unique and spectacular way, the different formats supported are, DVD, PC and Web. Still Photos are brought to life by adding motion effects. Supported effects include, Pan, Zoom, and rotate. You can also add captions and over 280 transition effects.

The workload we use consists of 29 high resolution images in JPG format and converts them to MPEG2 wide-screen DVD quality. The end result is a 3 minute 9 second video file in slide show format. The images are in 3872×2592 resolution and have a combined total size of about 170 MB.
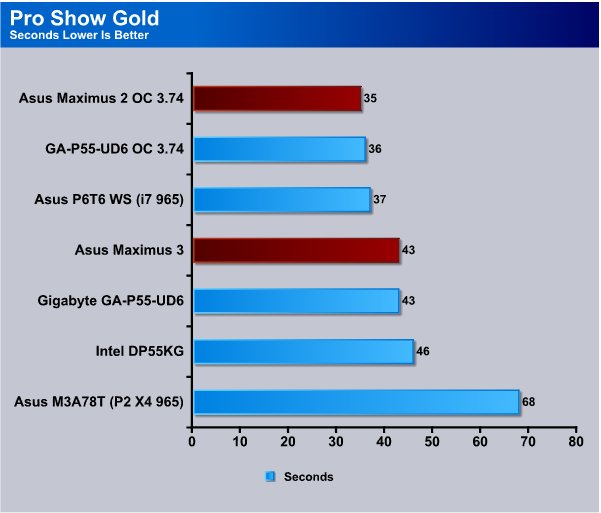
Pro Show Gold is a good indicator of how a system handles video encoding and the Maximus 3 came in a full second ahead of the GIgabyte UD6 when overclocked but the boards manages to create a tie at stock speed.
AutoMKV 0.95c
AutoMKV is an application aiming for easy media conversion between various media formats using various third party codecs. With improved internet speed and enhanced computing power, more users are interested in encoding to different media formats for their various multimedia needs. With AutoMKV and x264 codec, a freeware H.264 encoder, users can easily create media files. For more information and to obtain AutoMKV 0.95c and AviSynth* 2.5.7, please visit (http://forum.doom9.org/showthread.php?t=134478). We create a media file using AutoMKV and x264 codec. The input file used in the document is a raw 416 MB 720×480 DV file and the output is a 253MB H.264 media file.

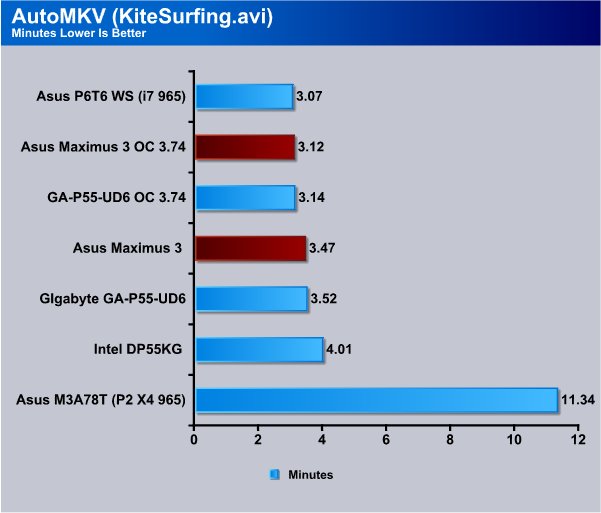
AutoMKV is another video rendering program that allows you to convert videos to different formats using different codecs and again we see the scores of the two premium P55 boards running neck and neck with the Maximus 3 board taking the win by mere hundredths of a second.
Blender
Blender is a free open source 3D content creation suite that is available for various operating systems. The application is popular among many independent animation studios and game makers. For more information, please visit http://www.blender.org/.
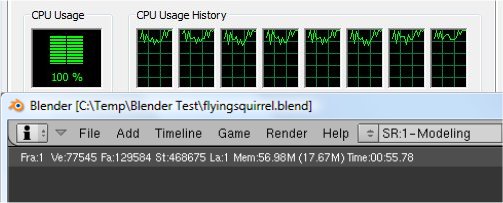
The workload consists of a ~6.9 MB character model of a flying squirrel. Due to time constraints we didn’t render the entire image which would be time consuming and rather pointless except to yield larger benchmark numbers. A portion of the image, the right arm is what we render. it’s a large enough portion to show differences in CPU performance, yet small enough that we don’t have to grind through a 45 minute Render waiting for a single result.
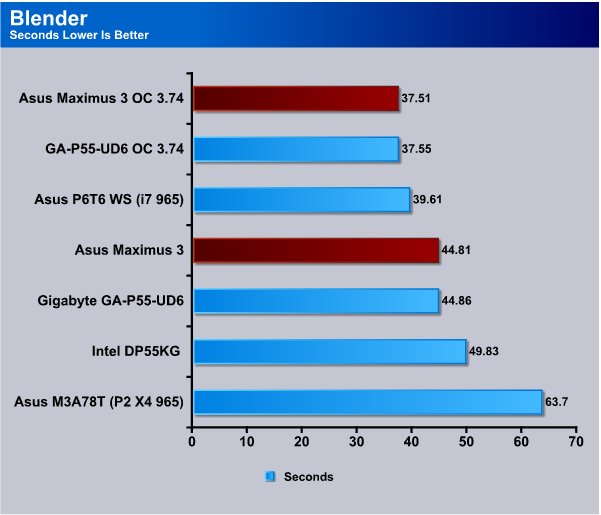
Then in Blender we see the Maximus board again just hundredths of a second ahead of the Giga UD6 board and like we mentioned earlier, feature set, overclockability and technical support are becoming more important in choosing a motherboard.
CPU-Z & Overclocking
We have a lot to cover in CPU-Z so lets get right to it.
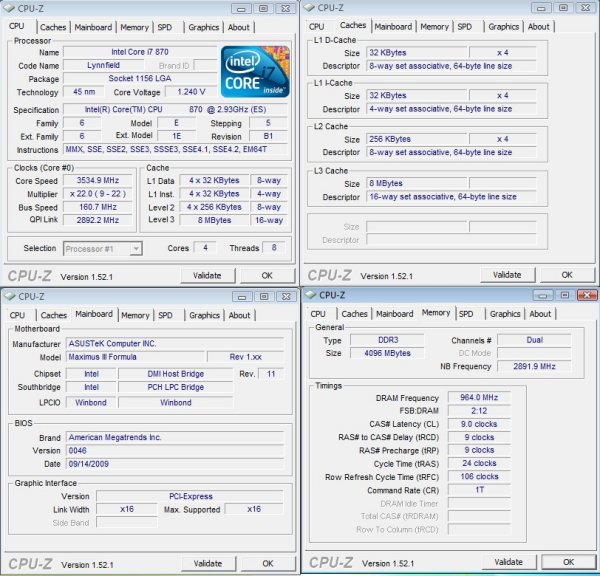
We wanted to see if the CPU Level up worked without any tweaking so we installed the Maximus 3 and before the first boot we opted for the CPU Level up to Auto OC the board to 3.5GHz and were rewarded for our faith with a sweet first boot to 3.534GHz rock solid stable. We hadn’t set the XMP at this point the Kingston HyperX 2133 kit didn’t run quite right yet.
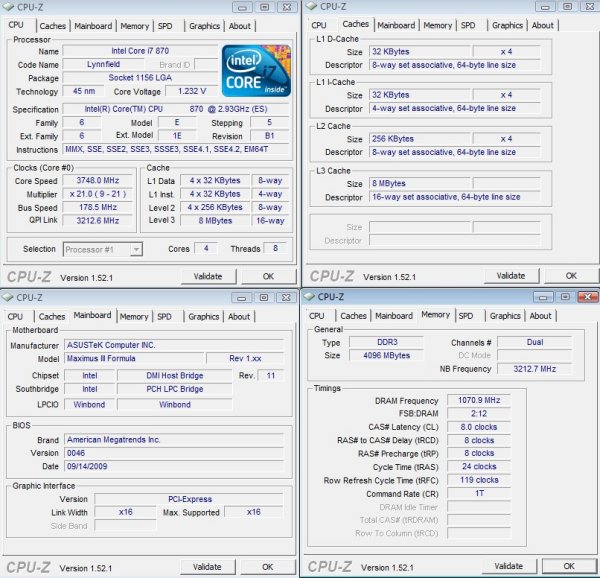
We went back into BIOS and upped the Bclk to 178 and without changing any options other than Bclk we got a solid boot that was stable at 3.748GHz with the HyperX kit running at 2040 but at rated Timings.
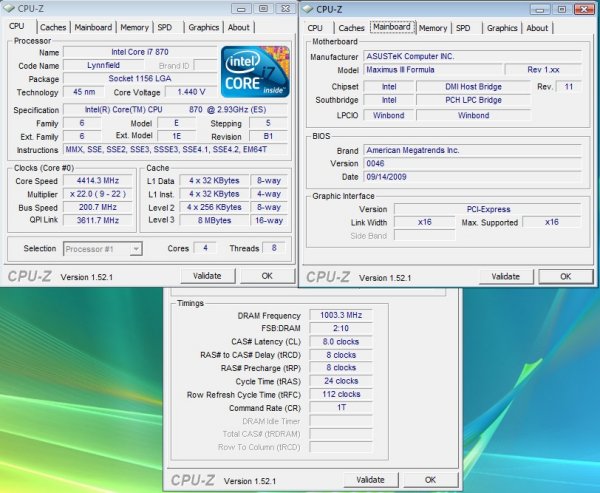
We got tired of messing with RAM and after we ran the HyperX kit at 2133MHz for a few minutes to test stability we went fo the OC on the CPU. We upped the Bclk to 200 CPU voltage to 1.45v, increased PCh voltage to 1.2v and booted right into Vista first try with an amazing 4.414GHz and we wanted to check temps so we switched back to 3.74GHz ran prime 95 for a few minutes and got the following screen shot.
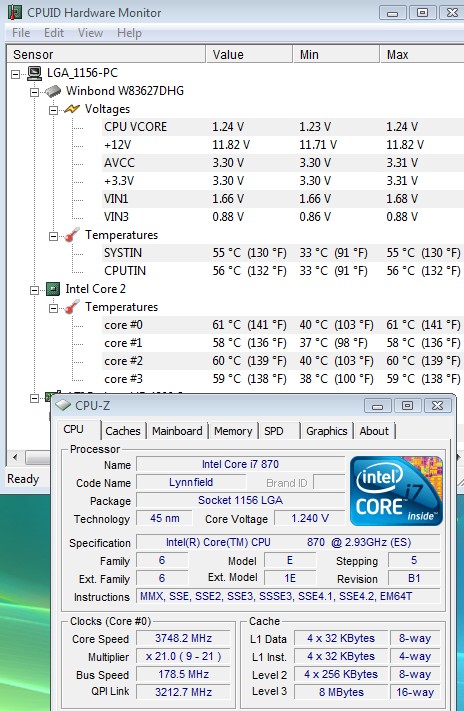
WIth Prime95 running for 5 minutes we were hitting 61° C so we felt okay to go for the maximum OC with light stability testing.
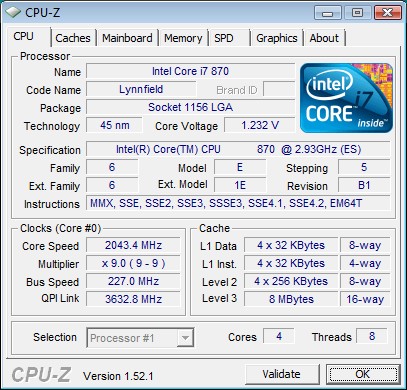
Then we remembered we needed to establish the maximum Bclk so we lowered the CPU multiplier to 9 and got a best Bclk of 227MHz.

Running a Bclk of 206 with a Multiplier of 22 we got all the way to 4.543GHz and passed light stability testing. We say light because we were able to bench at this speed but Prime95 and Intel Burn were out of the question because of thermal limitations on air cooling. We feel like we could have gone higher on Bclk and CPU speed but things were pretty toasty at this point. The Stock speed on the i7 870 is 2.93GHz and we hit 4.5GHz so we got a minor OC of about 1.55GHz. Or more than 50% additional speed out of the i7 870. We have some Maximus 3 lovin going on here.
Conclusion
The Asus Maximus 3 not only gave us an amazing 4.5GHz overclock, we achieved that overclock in just under 20 minutes and it was just too easy to reach that massive speed. The features on the Maximus 3 all worked perfectly and we spent several weeks trying to find one that didn’t work and we failed at that. You have to love a motherboard that every single feature works perfectly on.
The CPU level up with it’s one click overclock will be a boon to less experienced end users that desire a slight performance boost, but the real gold on the Maximus 3 comes with old school BIOS overclocking and with a record breaking Bclk of 227 there’s plenty of headroom to OC your CPU until it screams for mercy.
The Maximus 3 Formula board awed and amazed us at every turn, RAM running at up to 2208MHz with little effort, CPU OC to 4.5GHz, unparalleled ease of overclocking, and the feature set just blew us away. We haven’t ruled out the possibility of Marriage to the Maximus 3 Formula but those cross platform marriages are a tough sell.
We are pretty sure we found our preferred platform for i5/i7 testing and the name of the test rig, Well Quadzilla Maximus comes to mind. Literally the only thing we could find to not like about the entire Maximus 3 Formula board and bundle was the large ROG sticker in the bundle.
In addition to all the features Asus offers a premium 3 year warranty and on all ROG boards in the unlikely event of a board failure Asus will Cross Ship you a new board for the first year. In other words if the board dies in the first year they ship you a new board before you RMA the old board.
The Maximus 3 Formula board overclocks like a champ, every feature worked right out of the box, and we managed a 4.5GHz OC in under 20 minutes. There’s little else we could ask of the Asus Maximus 3 Formula, except to give us a little more challenge overclocking the CPU. Getting a 4.5GHz OC with that little effort made us feel a little abused, but we like abuse so we’re good with that.
We are using an addition to our scoring system to provide additional feedback beyond a flat score. Please note that the final score isn’t an aggregate average of the new rating system.
- Performance 9.5
- Value 9
- Quality 10
- Warranty 9
- Features 10
- Innovation 10
Pros:
+ Champion Overclocker
+ Beautiful Board
+ Ease Of Setup/Overclocking
+ Feature Rich
+ Every Feature Worked Even With An Immature BIOS
+ Did We Mention A CPU OC of 4.5GHz and a Ram OC to 2256MHz?
Cons:
– The Sticker In The Bundle Is Too Large
– Overclocked Way Too Easy We Could Lose Our Jobs
The Asus Maximus 3 Formula gave us the highest i5/i7 OC we’ve ever achieved and it did it in 20 Minutes. We love the boards layout and features, it is without a doubt the best i5/i7 board we’ve had hands on and it’s our preferred i5/i7 board so it scores a: 9.5 out of 10 and the Bjorn3D Golden Bear Award.


do you have a driver for this one.can email at [email protected]