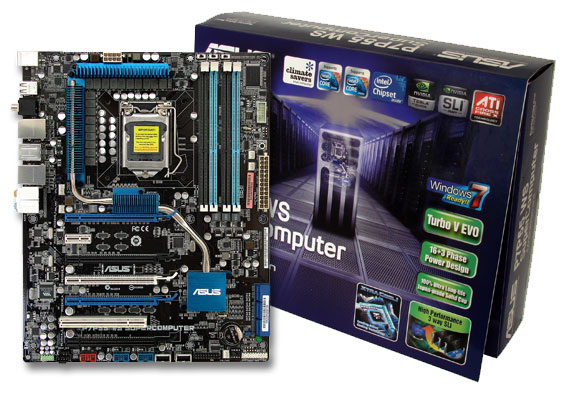
The ASUS P7P55 WorkStation SuperComputer motherboard is a perfect choice for users needing a powerful PC for their Home, Business, or Studio needs.
Introduction
There are many motherboards out there to chose from. One of the biggest questions out there is, which motherboard should I chose if I’m looking for a reliable, stable, and powerful motherboard for audio, video, 3D modeling/animation and photo editing? These tasks are usually very demanding on all parts of the system from the CPU to the memory to even the hard drives.
When thinking about using high-performance motherboards for home, business, or even studio use, the ASUS P7P55 WorkStation SuperComputer Motherboard is a great choice. Don’t be fooled by the name of this motherboard. While it is a perfect choice for work related applications, this motherboard is also an exceptional choice for gamers.
Since the P7P55 WorkStation SuperComputer Motherboard is based on the P55 chipset, it comes with socket LGA1156. There are many options that can be used with LGA1156, like for example the Intel Core i5, Core i7 and Xeon 3400 Series Server based Processors. ASUS allows users to use all these different series processors to fit the customers needs. Since we are going to be working with server based RAID cards and hard drives as well as server based applications, we are going to be using a Xeon based processor, the Intel Xeon X3470.
There are many very exciting features that come with the ASUS P7P55 WorkStation SuperComputer Motherboard, like for example the 16+3 Phase Power Design and T.Probe Microchip. The 16+3 Phase VRM design has 16-phase for vCore and extra 3-phase for the Memory controller inside the CPU to provide the highest power efficiency. This allows the motherboard to generate less heat to effectively enhance the overclocking capabilities of the processor.
ASUS has a new design on most of their new boards called the Xtreme Phase Design. This special design allows the VRM to provide unique phase angles per phase to offer the best in multiple stages of use ensuring leading efficiency. But that’s not all, with this new Xtreme Phase Design, ASUS also included hardware based automatic switching so depending on the load present on the system the VRM will automatically scale down to as little as 4 phases for idle or basic tasks and increases to its maximum of 16 phases when under moderate or heavy load.
The T.Probe feature on the ASUS’s Xtreme Design motherboard detects and balances power phase loads and temperatures in real-time. This helps spread the load on the components to extend the overall lifetime of the components, as well as lead to a more stable system.
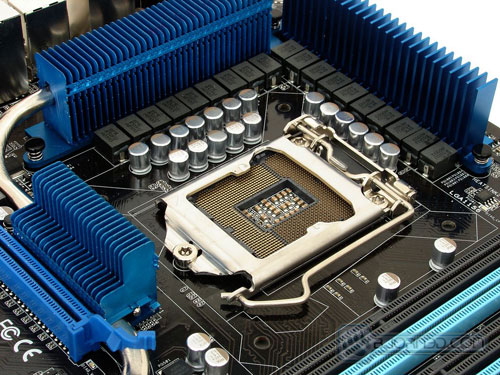
ASUS didn’t stop here, they also included the new low RDS (on) MOSFETs, ferrite core chokes and Japanese made conductive polymer capacitors to allow for longer component life and minimum power loss.
There are only a few more things that need to be mentioned. First of all, this motherboard is Windows 7 Ready, which means that you will not have any problems installing drivers and other applications that come with the motherboard on Windows 7 based systems. This saves tons of headaches and time during installation of Windows and this ensure that everything will be stable and compatible on your system. Turbo V Evo is also included with this motherboard which we will go into more detail later on in this review, but to just put it simply, Turbo V Evo helps overclock your system automatically with a click of a button. And finally, so I won’t forget, this motherboard comes with both SLI and ATI Crossfire X Technology which means you will be able to combine the most powerful video cards in SLI or Crossfire X configuration to get the extra frames per second that you will need in your games.
Features
ASUS Workstation Exclusive Features
Sufficient IO bandwidth for 2 way and 3 way SLI |
CUDA parallel computing power supported |
Diag. LED
|
ASUS Heartbeat
|
G.P. Diagnosis Card (bundled)
|
ASUS SASsaby Card Support
|
CPU, Chipset and Graphics features
LGA1156 Intel® Lynnfield Processor Ready
|
Intel P55
|
SLI Technology
|
PCIe 2.0
|
Quad-GPU SLI and Quad-GPU CrossFireX Support!
|
CUDA Technology
|
Memory Features
Dual-Channel DDR3 2133(O.C.) / 1600 / 1333 / 1066 support
![]() The motherboard supports DDR3 memory that features data transfer rates of 2133(O.C.) / 1600 /1333 / 1066 MHz to meet the higher bandwidth requirements of the latest 3D graphics, multimedia, and Internet applications. The dual-channel DDR3 architecture enlarges the bandwidth of your system memory to boost system performance.
The motherboard supports DDR3 memory that features data transfer rates of 2133(O.C.) / 1600 /1333 / 1066 MHz to meet the higher bandwidth requirements of the latest 3D graphics, multimedia, and Internet applications. The dual-channel DDR3 architecture enlarges the bandwidth of your system memory to boost system performance.
ASUS Xtreme Design – Hybrid Processo
ASUS TurboV EVO
|
Auto Tuning
|
ASUS Xtreme Design – Hybrid Phase
ASUS Hybrid 16+3 Phase Power Design
|
T.Probe
|
 Unprecedented Innovation with the Best Quality Component for Best Performance
ASUS Xtreme Design – Hybrid OS
![]()
ASUS Express Gate SSD
Instant Online! Instant Fun!
Express Gate is an ASUS exclusive OS that provides you with quick access to the Internet and key applications before entering the Windows® OS.
ASUS Exclusive Features
MemOK!
|
ASUS EPU
|
ASUS Quiet Thermal Solution
ASUS Fanless Design – Heat-pipe solution
|
Fan Xpert
|
Up to 20°C(36°F) Cooler – Stack Cool 2
|
ASUS EZ DIY
ASUS Onboard Switch
|
Q-Connector
|
Q- Shield
|
O.C. Profile
|
EZ-Flash 2
|
These are the main features of the P7P55 WS SuperComputer Motherboard. On the next page we will dig into the specifications about the motherboard.
Specifications
Here are the specifications to the motherboard. These specifications tell you exactly what the motherboard supports and what are its capabilities:
| Specifications | ASUS P7P55 WS SuperComputer Motherboard |
|---|---|
| CPU |
Intel® Socket 1156 Core™ i7 Processor/Core™ i5 Processor/Core™ i3 Processor/ Pentium® Processors |
| Chipset |
Intel® P55 Express Chipset Nvidia NF200*1 |
| Memory | 4 x DIMM, Max. 16 GB, DDR3 2133(O.C.)*/1600/1333/1066 Non-ECC,Un-buffered Memory Dual Channel memory architecture Support Intel Extreme Memory Profile (XMP) |
| Expansion Slots |
2 x PCIe 2.0 x16 (@ x16 or x8) |
| Multi-GPU Support |
Supports NVIDIA® Geforce 3 way/2 way SLI™ techonology |
| Storage |
Intel® P55 Express Chipset built-in |
| LAN |
2 x Realtek 81112L Dual Gb LAN |
| Audio |
ALC1200-GR 8-Channel High Definition Audio CODEC |
| IEEE 1394 |
VIA VT6308S controller supports 2 x 1394a port(s) |
| USB | 14 USB 2.0/1.1 ports |
| Overclocking Features |
Precision Tweaker 2 |
| Back Panel I/O Ports |
1 x PS/2 Keyboard/Mouse Combo port |
| Internal I/O Connectors |
24-pin EATX Power connector |
| BIOS |
16 Mb Flash ROM , AMI BIOS, Green, PnP, DMI v2.0, Wfm2.0, ACPI v2.0a, SMBIOS v 2.6 |
| Accessories |
1 x 2-port USB and 1-port 1394a module |
| Support Disc |
Drivers |
| Form Factor |
ATX Form Factor |
The see more information about the motherboard including the Supported Memory List as well as CPU Support list, please visit ASUS.com or go to this link HERE.
We can see that the P7P55 WS SuperComptuer motherboard comes with lots of PCI-E slots. We have an LSI 3Ware SATA + SAS 9750-4i RAID Card which we are going to use with 4x Seagate Cheetah 600GB 10,000RPM 6Gb/s Hard drives. The LSI 3Ware SATA + SAS 9750-4i RAID card is going to be used in one of the PCI-E 2.0 slots which is backward compatible to 8x. Since the LSI card can only use speeds up to 8x, this will be a perfect solution for the RAID card. Also for those not sure if a RAID cards like the LSI 9750-4i can be used with a smaller PCI-E slot connector in a standard PCI-E 2.0 slot, check with the provider of the card. For my configuration even though the LSI card is has a small PCI-E connector, since the ASUS PCI-E 2.0 slot is backward compatible, this won’t be a problem
We can also see that this board is compatible with memories overclocked to 2133MHz. This motherboard is a great choice for those looking into overclocking their CPUs and their memories to extreme clocks.
Software
After getting to know the P7P55 WS SuperComputer motherboard a bit more, it is time to take a look at some exciting software that comes with the motherboard. Aside from having a ton of features, the P7P55 WS SuperComputer motherboard comes with some very nifty software and chips that have specific jobs. Green-minded buyers rejoice, ASUS added stuff just for you. Meet the ASUS EPU-6 Engine.

EPU-6 Engine
Using lead free solder and solid state components, ASUS is doing their best to be as environmentally friendly as possible. The Energy Processing Unit (EPU) is another example of ASUS making changes to be a more “green” company. The EPU chip is basically a power moderator. The EPU automatically raises and reduces power when needed on six major components; the video card, chipset, CPU, fan(s), hard drives, and the memory. This is where the “EPU-6” name came from.

Once calibrated, the EPU-6 software will automatically adjust depending on your power demands. In total the EPU-6 software has 5 settings. Auto Mode, Turbo Mode, High Performance Mode, Medium Power Saving Mode and Max Power Saving Mode. Turbo Mode uses the most power and Max Power Saving Mode uses the least. Each mode displays how much power is being used and saved, its nice to know how deviant your being to the environment. Overall, this software is a great step in the right direction. With Intel’s own “green” feature, SpeedStep, and AMD’s ” green” feature, Cool N’ Quiet, its about time we see motherboard manufactures create software that will fully utilize these CPU features. Although the EPU is a very nice informative feature, it’s best to disable this feature if your going for your maximum overclock. It tends to hinder your maximum overclock if left enabled.
One thing to remember about the EPU engine is that when it is used for example under Max Power Saving Mode, the overall clock speed and multiplier on the CPU is lowered. If you do a lot of different types of work on your system that might requite performance it is recommended to keep the settings on Auto Mode. With Auto Mode on, the EPU Engine software will automatically downscale the performace of the system when it is not needed to save power, and raise the speed during operation.
T.Probe
Along with the new P55 chipset motherboards, ![]()


From the pictures you can see how the T.Probe chip effectively distributes power evenly throughout the power phases. We recommend selecting the Xtreme mode to achieve the highest ![]()
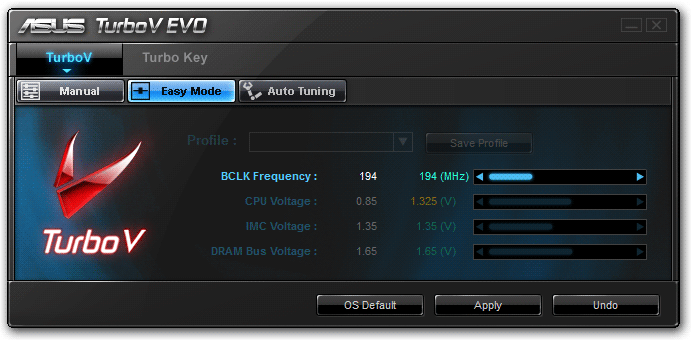
TurboV EVO
The TurboV EVO software allows you to manually or automatically oveclock your computer within Windows using three separate configurations; Manual, Easy Mode and Auto Tuning. Before we go into these configurations, I would like to mention that TurboV Evo is a true hardware based solution that comes with realtime BIOS level overclocking via an easy user interface. These settings here not just presets that will only work on certain system configurations. TurboV Evo adjust everything separately to your own system.
In manual mode the software allows you to set the BLCK frequency, and change all voltages including the PLL, CHA DATA, CHB DATA, PCH, CHA CTRL and CHB CTRL voltages.
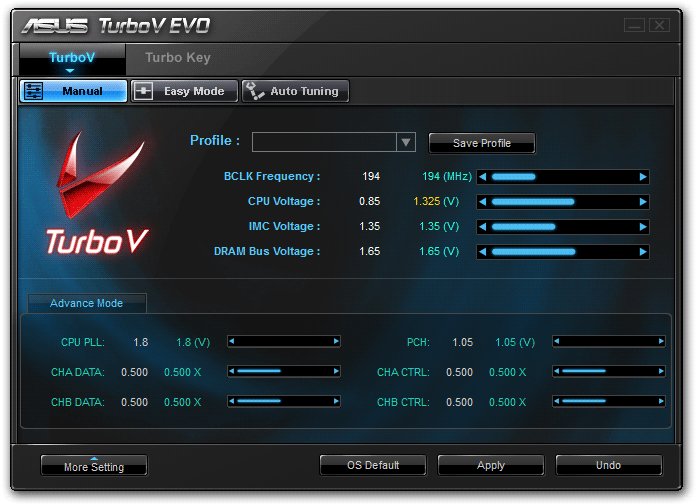
Easy Mode allows BLCK frequency adjusting and only CPU, IMC, and DRAM voltage changing. In Manual-Advanced mode you can adjust the other voltages.
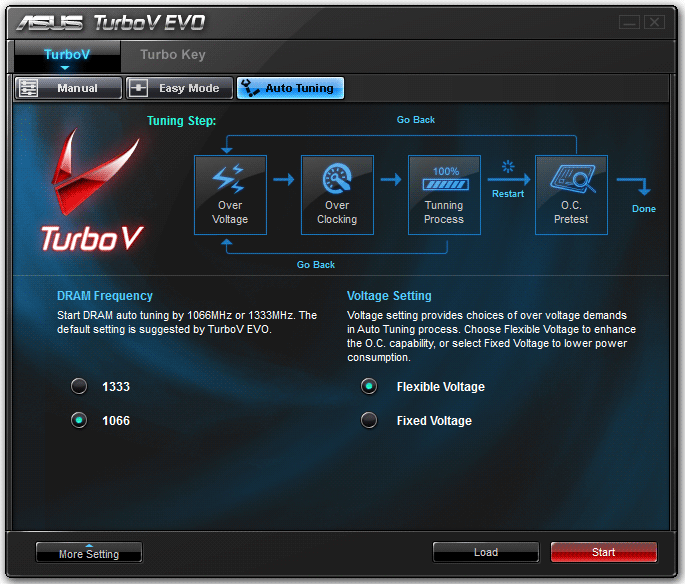
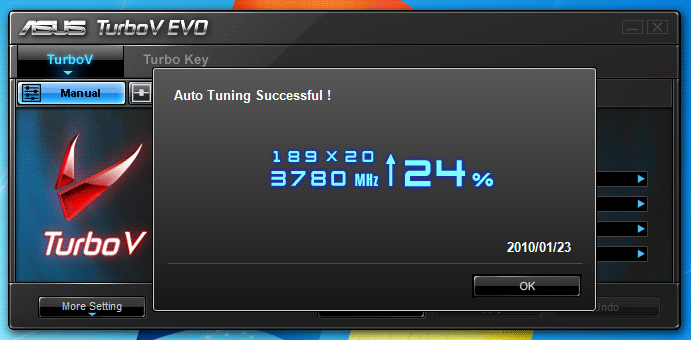
Auto Tuning mode is what makes the TurboV EVO software so special. Within the Auto Tuning mode you can let the software do 100% of the overclocking or you can use fixed settings to help the software along the way.
Once you find your preferred settings, you can save them and use the Turbo Key tab to assign the profiles saved. This comes in handy when your wanting more power when playing a game or less power when browsing the web.
We found the TurboV EVO software very easy to use and we think newcomers to overclocking will thoroughly enjoy using the suite. Although this software worked very well, we still recommend using the BIOS to achieve the highest overclock.
TurboV, MemOK!
ASUS put everything into this board. The TurboV chip is another new hardware addition on the P7P55 WS SuperComputer motherboard. The TurboV chip has one job only, the job of overclocking your computer. Combined with the TurboV EVO software, the TurboV chip allows you to overclock your machine through a GUI, or from the palm of your hand using only your mouse and keyboard. We won’t dive too deep into the overclocking results just yet, but to peak your interest, we were pleasantly surprised at the results.
The MemOK! button allows the motherboard to adjust the memory settings to a more acceptable setting if a failure occurs in any area. Either it be an overclocking failure or a default memory timing or voltage issue, pressing the MemOK! button (when warned by the DRAM LED), will help make the memory as compatible as possible.
Express Gate
The ASUS Express Gate software allows you to quickly access the Internet within 5 seconds without booting into an operating system. We did use the Express Gate software and it worked very well. We were able to turn the machine on, and within seconds we were at the Express Gate browser looking at Bjorn3D.com. This software is useful when your in a rush and need to access your email, a website, or even use an IM client or Skype for voice communication.


BIOS


And finally, I bet you guys are exited to continue onto the next pages where we are going to check out the motherboard from a closer look and its performance to our other competing motherboard model. This section just allows the user to reset the BIOS to the original settings as well as save the settings that have been made.
A Closer Look


Click Image For a Larger One
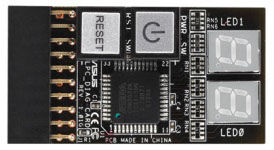
Here are some very nice accessories that come with the ASUS P7P55 WS SuperComputer Motherboard. The first device gets attached on the bottom of the motherboard as you can see on the picture on the left. There is a black connector with many gold plated fins pointing out. This is where this device gets connected. This is pretty much the debugging feature of this board. The two LEDs give the user special codes that can be decoded to figure out what problems might be going on with the system in case of booting failures. For people that like to have work benches have the possibility to Turn On and Off the PC and Reset the PC with the buttons included on this little debugging device. The other connectors in the picture help out tremendously when you have to connect the main tiny cables that start your PC, show the HD and Power LED and much more. You connect all the cables to the Q-Connect connector and then you use it to simply plug everything in at once on the motherboard.

Click Image For a Larger One
Now we can take a look at the I/O connectors. There are still connectors for the Keyboard and mouse for those using the older PS/2 connectors. There are 8 USB 2.0 Slots, two 1Gigabyte LAN connectors, a IEEE 1394 Firewire connector, S/PDIF Out (Coaxial + Optical) connectors, and finally 1 x 8-channel Audio connectors.


Click Image For a Larger One
CPU-Z & Overclocking
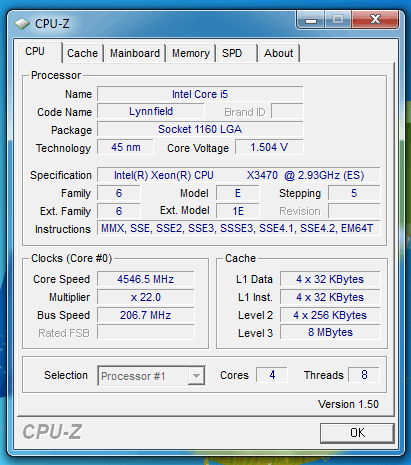
Before doing any adjustments for overclocking we wanted to see how things went with all default settings. By default the P7P55 WS SuperComputer has Turbo Boost, SpeedStep and C1E enabled. To get an accurate reading of the actual CPU frequency, we taxed the CPU using Intel Burn Test. Intel Burn Test is a linpack based stability testing application that has no issues putting a CPU at full load. Here is a screen shot of how things look with all default settings.
Right out the gate the P7P55 WS SuperComputer puts the Intel Xeon X3470 CPU at 3.6GHz thanks to Intel’s Turbo Boost technology. After verifying things were stable using Intel Burn Test, we moved on to testing TurboV EVO and OC Tuner overclocking.


TurboV EVO Overclocking
When overclocking using the TurboV EVO application we tested two configurations. One with all default settings and voltages and one with default settings except for fixed voltages. We wanted to see how software overclocking within Windows fared against BIOS overclocking, if one was more superior than the other. The only way to test this out was to put in fixed voltages to allow the software to work within preset limitations, the same limitations we used when manually overclocking via the BIOS.
OC Tuner Overclocking
The OC Tuner feature right in the BIOS was extremely easy to use. You just set the profile you want for your overclocking and within a few seconds your processor is overclocked. We tested out the Turbo Profile in the BIOS which put our processor roughly to 3.9GHz. Here is a verification picture:

Click Image to Enlarge
Manual Overclocking
Of course Manual Overclocking will allow us to overclock the system to its max performance. With Manual Overclocking through the BIOS, we were able to reach 4.7GHz with just an air cooler. Unfortunatelly, this was not stable in Windows, we could only boot but not get into windows without a crash. So we lowered the speed a bit till we were finally able to get into Windows 7. This was at 4.55GHz. While this booted into windows, it was not stable and we were still not feeling safe about the voltages used on the CPU. Here is a verification picture of the overclocking first unstable overclock:
And then finally we continued lowering the bus speed and finally got to a 100% stable system. I was extremely surprised what we were able to accomplish with an air cooler. Believe it or not, 4.41GHz.

Testing & Methodology
We’ve expanded our testing suite considerably for P55 and will continue to use the same tests across most of the motherboards and CPU’s we test. We run each test a total of at least three times minimum, some tests we run more than 3 times. We average the total of all the tests from each benchmark then report the average here.
The OS we use is Vista Ultimate 64bit with all patches and updates applied. We also use the latest drivers available for the motherboard and any devices attached to the computer. We don’t disable a bunch of background tasks or particularly tweak the OS or system for bigger numbers. We do turn off drive indexing and daily defragging. We also turn off Prefetch and Superfetch. This is not an attempt to produce bigger benchmark numbers. Drive indexing and defragging can interfere with testing in that one test might occur without defragging going on and the next test defragging might be active, the same thing goes for drive indexing. We can’t control when defragging and indexing occur precisely enough to guarantee that they won’t interfere with testing, so we turn them off.
Prefetch tries to predict what you will load the next time you boot the machine. We disable it because we want to know how the program runs without any of the files being cached, otherwise each test run we’d have to clear pre-fetch to get accurate numbers. Lastly we disable Superfetch, Superfetch loads often used programs into memory and is one of the reasons people consider Vista to be such a memory hog. Vista fills the memory in an attempt to predict what you will load. Having one test run with files cached, and another test run with the files being un-cached would result in skewed numbers. Again since we can’t control it we turn it off. Other than those 4 things which can potentially interfere with benchmarking, and do so out of our control, we leave everything else running.
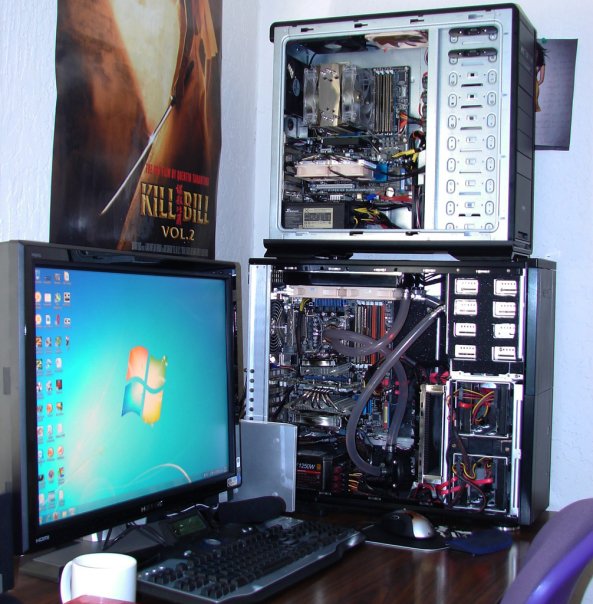
Test Rig
| Test Rig | |
| Case | Zalman MS1000-H1 |
| CPU |
Intel Xeon X3470 2.92GHz @ 3.9GHz (Turbo Profile) Intel Core i5 750 2.66GHz @ 4.2GHz*** Intel Core 2 Quad Q6600 2.4GHz @ 3.9GHz |
| Motherboard |
ASUS P7P55 WS Supercomputer Motherboard – LGA1156 GIGABYTE P55A-UD4P – LGA1156*** ASUS P5E3 WS Professional Motherboard – LGA775 |
| Ram | OCZ DDR3-12800 1600Mhz (7-7-7-18 1.66v) 8GB Kit |
| CPU Cooler | Thermalright True Black 120 with 2x SilenX 120mm fans |
| Hard Drives | 4x Seagate Cheetah 600GB 10K 6Gb/s Hard Drives |
| Optical | LG Blu-Ray Drive |
| GPU |
BFG GeForce 275 OC 896MB – Main Video Card |
| Case Fans |
1x Noctua NF-P12 120mm Fan – Top 1x Noctua NF-P12 120mm Fan – Bottom |
| Additional Cards |
LSI 3ware SATA + SAS 9750-4i 6Gb/s RAID Card |
| Additional Fans | SilenX 120mm Silent fan on Thermalright HR-03 VGA Cooler |
| PSU | |
| Mouse | Logitech G5 |
| Keyboard | Logitech G15 |
Now some of you might wonder, why I am bothering to test a LGA 775 socket X38 motherboard to a LGA 1156 socket P55 motherboard. The ideology for comparing two rigs like these is simple. Many users currently using server based workstation systems still use LGA 775 socket motherboards. Their next upgrade will probably be a P55 series motherboards or X58 series motherboards. Since both motherboards are server based workstation motherboards, this will be a good comparison for those looking for upgrade opportunities. This will also comprare how the new P55 motherboards help with power consumption and the new 16 + 4 power phase can help with temperatures.
*** The system with the Gigabyte P55A-UD4P motherboard and the Intel Core i5 750 processor was reviewed at Bjorn3D by my colleague Raymond Buckland. We are using his system as a comparison to ours. While some results might be off due to him having a different system, it is a very close comparison to our system in this review. The only major difference between this system and his are the hard drives. He was not using a SAS setup like we are using in this review. So when looking at the results make sure to understand that they were not tested on 100% identical systems.
Test Suite
|
Benchmarks |
|
SiSoft SANDRA XII Professional SP2 |
|
Everest Ultimate Edition v. 5.0 |
|
AutoMKV |
|
Cinebench R10 64 bit |
|
PCMark Vantage |
|
|
|
POVRay |
|
Pro Show Gold |
Everest Ultimate

“EVEREST Ultimate Edition is an industry leading system diagnostics and benchmarking solution for enthusiasts PC users, based on the award-winning EVEREST Technology. During system optimizations and tweaking it provides essential system and overclock information, advanced hardware monitoring and diagnostics capabilities to check the effects of the applied settings. CPU, FPU and memory benchmarks are available to measure the actual system performance and compare it to previous states or other systems. Furthermore, complete software, operating system and security information makes EVEREST Ultimate Edition a comprehensive system diagnostics tool that offers a total of 100 pages of information about your PC.”
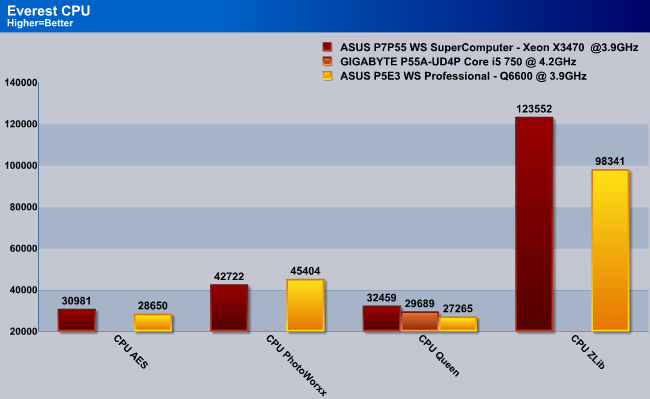
Everest CPU
Everest Memory
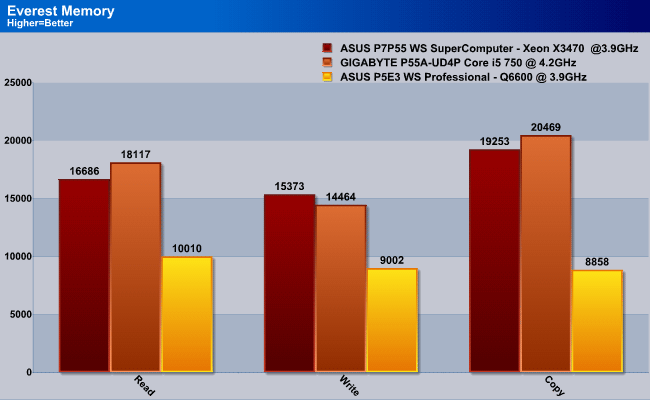
On these benchmarks, we were testing the memory speed that we can achieve with each of these boards. One thing to understand about these results are that when we overclocked our Xeon X3470, we were not able to get a perfect 1600MHz clock speed on our memory. It was around 1554MHz, which is about 50MHz lower then what the Gigabyte board was running at. On the ASUS P5E3 WS Pro motherboard however, we were running the memory at the same speed as on the P7P55 WS SuperComputer motherboard. We can just see how by integrating the memory controller into the processor how tremendous improvement we can see in memory performance. So for those with memory intensive calculations, the ASUS P7P55 WS SuperComputer motherboard is a great option if you are still running one of those old LGA 775 socket X38 motherboards.
Cinebench

“CINEBENCH is a real-world test suite that assesses your computer’s performance capabilities. MAXON CINEBENCH is based on MAXON’s award-winning animation software, CINEMA 4D, which is used extensively by studios and production houses worldwide for 3D content creation. MAXON software has been used in blockbuster movies such as Spider-Man, Star Wars, The Chronicles of Narnia and many more. MAXON CINEBENCH runs several tests on your computer to measure the performance of the main processor and the graphics card under real world circumstances. The benchmark application makes use of up to 16 CPUs or CPU cores and is available for Windows (32-bit and 64-Bit) and Macintosh (PPC and Intel-based). The resulting values among different operating systems are 100% comparable and therefore very useful with regard to purchasing decision-making. It can also be used as a marketing tool for hardware vendors or simply to compare hardware among colleagues or friends.”
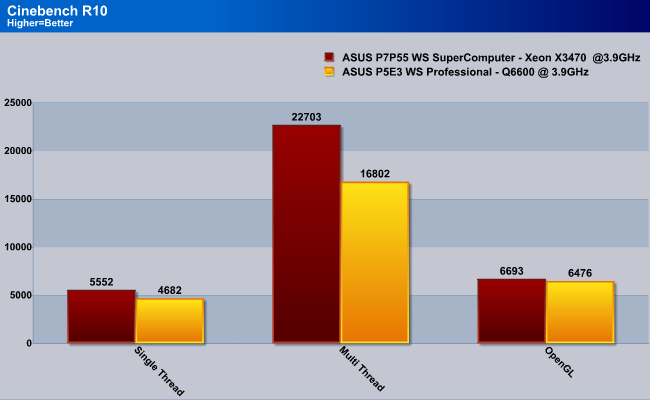
Cinebench R10 is one of my favorite benchmarks. I work a lot with 3D, and Cinebench allows me to fully measure the rendering performance of processors and motherboards under different conditions. In this benchmark we only compared the ASUS P7P55 WS SuperComputer motherboard and the P5E3 WS Pro motherboard. We can see that once again with HyperThreading and the combination of a powerful motherboard can make a huge difference in rendering performance even when the CPUs are clocked at the same speed. It is important to understand though that the Q6600 has 4 threads while the X3470 has 8 threads.
WinRAR Workload

The WinRAR workload test we bypass the built in benchmark and throw 5 large .tif images at WinRAR then compress them and record the compression time. Total workload is about 350MB or 70+ MB per TIF image. The real life compression test of a group of large image files should give us a more realistic idea of how the CPU’s perform than the built in benchmark.
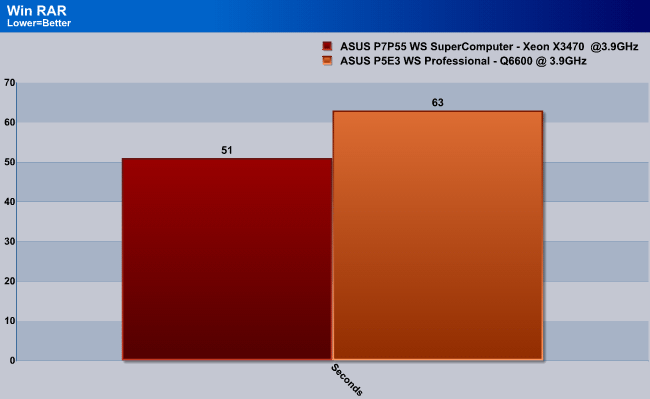
WinRAR is a very common program that online program distributors and download websites use to compress their files for easier and faster downloads. If you send a lot of files to your friends and you like compressing your files into one single RAR file, by having a newer system it can tremendously save you time if you are running lots of archiving processes. With the P7P55 motherboard we saw a 12 second decrease in archiving time with only 5 large images. Now if we do a calculation of 50 images, this process would roughly save you 2 minutes over the older P5E3 model with a Q6600 processor.
Sisoft Sandra
“SiSoftware Sandra (the System Analyser, Diagnostic and Reporting Assistant) is an information & diagnostic utility. It should provide most of the information (including undocumented) you need to know about your hardware, software and other devices whether hardware or software. It works along the lines of other Windows utilities, however it tries to go beyond them and show you more of what’s really going on. Giving the user the ability to draw comparisons at both a high and low-level. You can get information about the CPU, chipset, video adapter, ports, printers, sound card, memory, network, Windows internals, AGP, PCI, PCI-X, PCIe (PCI Express), database, USB, USB2, 1394/Firewire, etc.”
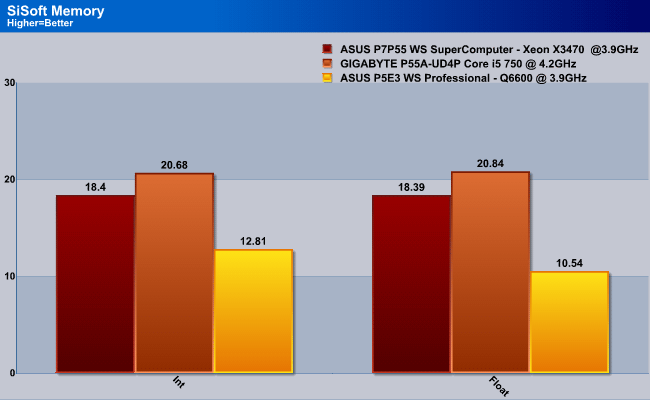
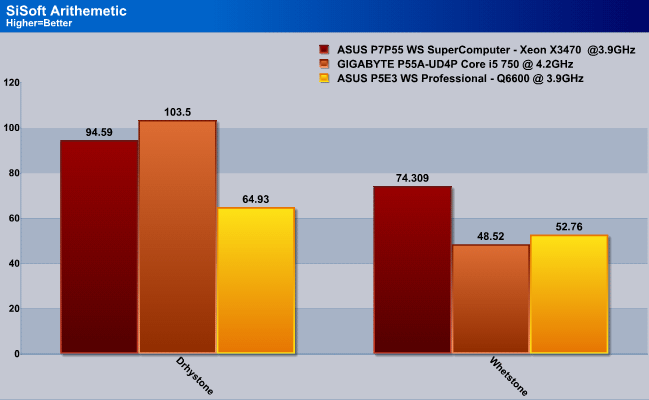
Like in the other memory test, we saw that the Gigabyte P55A-UD4P outperformed both of the motherboards in memory benchmarks. This was due to the higher frequency speed on that memory and due to a higher clocked CPU. In this benchmark, however, we see something interesting. On the Whetstone benchmark the Gigabyte board fell back quite a bit even under the P5E3 motherboard which has been out for roughly 2 years now. The P7P55 WS SuperComputer motherboard came out of nowhere and took a huge leap over the two other motherboards. Looks like a combination of a powerful stable motherboard like the P7P55 with a Xeon processor and good DDR3 memories does make a big difference in CPU performance. Very impressive!
POV-Ray 3.7 Beta 25

The Persistence of Vision Ray-Tracer was developed from DKBTrace 2.12 (written by David K. Buck and Aaron A. Collins) by a bunch of people (called the POV-Team) in their spare time. It is a high-quality, totally free tool for creating stunning three-dimensional graphics. It is available in official versions for Windows, Mac OS/Mac OS X and i86 Linux. The POV-Ray package includes detailed instructions on using the ray-tracer and creating scenes. Many stunning scenes are included with POV-Ray so you can start creating images immediately when you get the package. These scenes can be modified so you do not have to start from scratch. In addition to the pre-defined scenes, a large library of pre-defined shapes and materials is provided. You can include these shapes and materials in your own scenes by just including the library file name at the top of your scene file, and by using the shape or material name in your scene. Since this is free software feel free to download this version and try it out on your own.
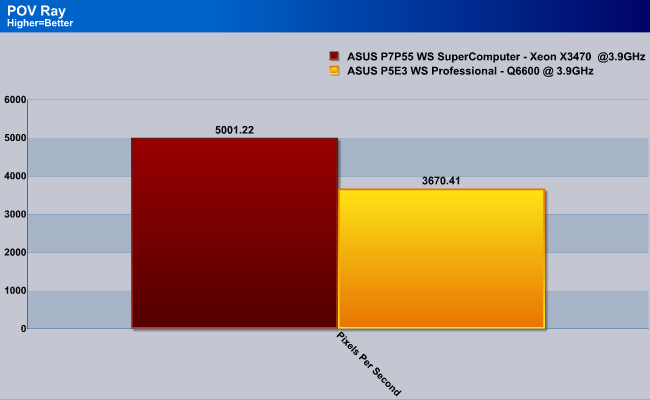
Yet this is another rendering application just like Cinebench R10 and Blender. They all have the same type of rendering process so the results on these should be identical or roughly the same. This is why we can see that the P7P55 performed better in this benchmark over the P5E3.
Microsoft Excel 2007
Monte Carlo Black-Scholes Option Pricing Test

Microsoft Excel is the widely known and the most used spreadsheet application for the manipulation and calculation for number crunching. With Excel, you can analyze and share information on a small scale or the largest scale you can imagine. We’ve seen spreadsheets in every day use that contain literally tens of thousands of numbers and hundreds of equations. Bjorn3D uses two tests in Excel to determine CPU and Motherboard performance.
Big Number Crunch
This workload is from a 6.2 MB spreadsheet and executes about 28,000 sets of calculations. It uses the most common calculations in Excel, addition, subtraction, division, rounding and Square Root. It also analyzes statistical functions such as Min, Max Median, and Average. The calculations are done after the spreadsheet with a large data set is updated with new values and must recalculate a large number of data points.
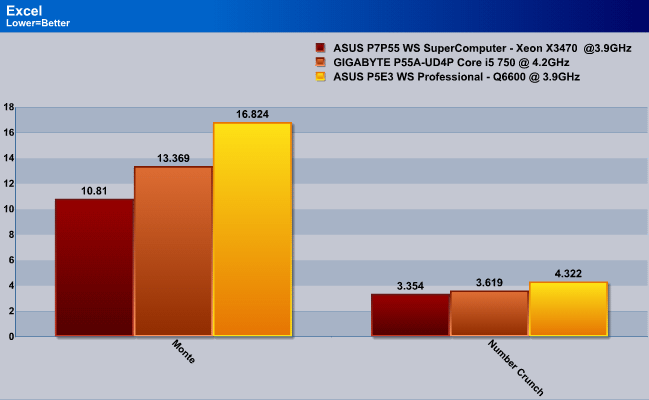
Excel is widely used around the wold in many business related jobs. These tasks can be time critical for businesses which is why higher performance is needed. THe P7P55 did an excellent job once again over the two other tested motherboards.
Photodex ProShow Gold 3.2
ProShow Gold allows you to combine videos and photos and music to create slide shows, depending on the end user results can be spectacular. The application allows the end user to share photos and memories with friends in a unique and spectacular way, the different formats supported are, DVD, PC and Web. Still Photos are brought to life by adding motion effects. Supported effects include, Pan, Zoom, and rotate. You can also add captions and over 280 transition effects.

The workload we use consists of 29 high resolution images in JPG format and converts them to MPEG2 wide-screen DVD quality. The end result is a 3 minute 9 second video file in slide show format. The images are in 3872×2592 resolution and have a combined total size of about 170 MB.
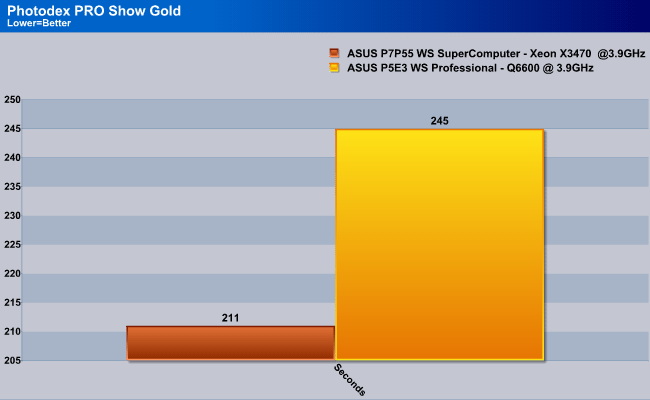
For video editors, and people that love to put photo slideshows together this benchmark is perfect to determine what will perform better. For those thinking of upgrading to an LGA1156 or LGA1366 platform, you will notice a huge performance increase in video rendering times of course if combined with a powerful motherboard. The P7P55 WorkStation SuperComputer motherboard was good enough to prove this to us.
AutoMKV 0.95c
AutoMKV is an application aiming for easy media conversion between various media formats using various third party codecs. With improved internet speed and enhanced computing power, more users are interested in encoding to different media formats for their various multimedia needs. With AutoMKV and x264 codec, a freeware H.264 encoder, users can easily create media files. For more information and to obtain AutoMKV 0.95c and AviSynth* 2.5.7, please visit (http://forum.doom9.org/showthread.php?t=134478). We create a media file using AutoMKV and x264 codec. The input file used in the document is a raw 416 MB 720×480 DV file and the output is a 253MB H.264 media file.

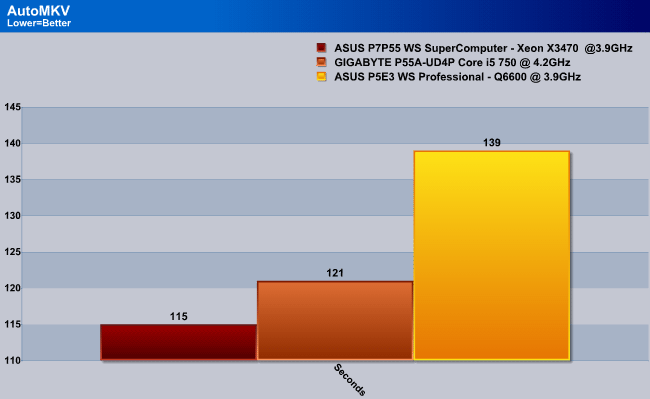
While Photodex Pro Show Gold did video rendering from images, AutoMKV is another benchmark that renders video but this time it is converting one format to another. This could be an important part of a business related task where a client has to upload a video online however the size of the video is just way too high. We can see that by upgrading to a LGA1156 socket motherborad in the P55 chipset series, we can see a big 24 second time improvement.
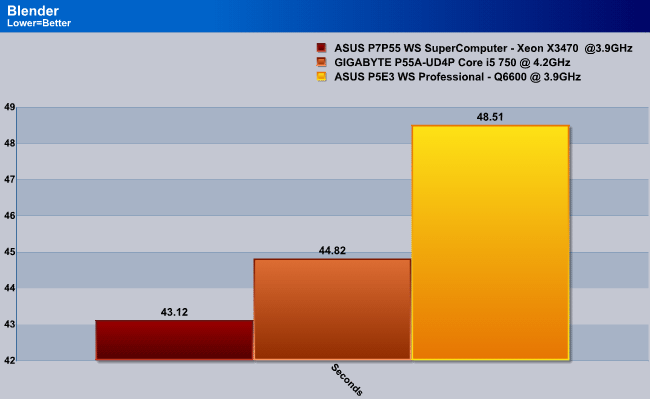
Blender
Blender is a free open source 3D content creation suite that is available for various operating systems. The application is popular among many independent animation studios and game makers. For more information, please visit http://www.blender.org/.

PCMark Vantage
For complete information on 3DMark Vantage Please follow this Link:
http://www.futuremark.com/benchmarks/pcmarkvantage/features/
PCMark Vantage is a PC benchmark suite designed for Windows Vista offering one-click simplicity for casual users and detailed, professional grade testing for industry, press and enthusiasts.
A PCMark score is a measure of your computer’s performance across a variety of common tasks such as viewing and editing photos, video, music and other media, gaming, communications, productivity and security.
From desktops and laptops to workstations and gaming rigs, by comparing your PCMark Vantage score with other similar systems you can find the hardware and software bottlenecks that stop you getting more from your PC.
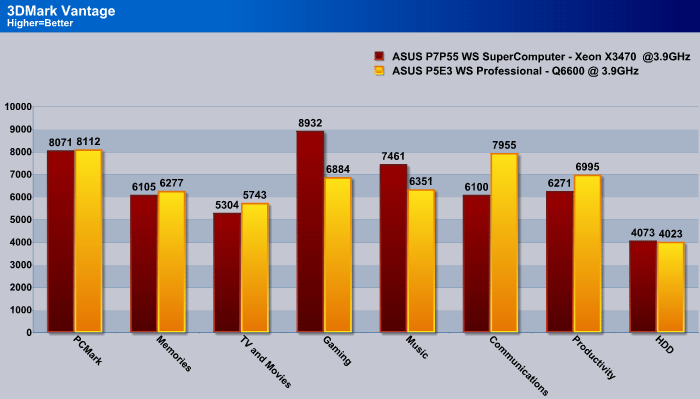
And finally we have PCMark Vantage as our final benchmark. This benchmark was a bit interesting since we didn’t quite see a big improvement in the overall PCMark score but instead we saw a tiny drop. We can see according to the other results that the P7P55 motherboard took a big leap in Gaming and Music, however it dropped big on other tests like Communications and Productivity. We are not quite sure why this happened, but it could be a connection between the RAID card we are using with the SAS setup.
Conclusion
I was very surprised with the features ASUS had included on the P7P55 WS SuperComputer Motherboard. For its price of $229.99 on Newegg, this board is definately something you might want to look into if you are looking for a powerful, stable, and power efficient motherboard that has more features than what you might ever use. TurboV Evo, T.Probe, the EPU Engine and the Turbo OC Tuner Profile in the BIOS make this motherboard an excellent overclocker as well as one of the most efficient motherboard on the market.
The ASUS Xtreme Design is again another great feature ASUS included. It’s special 16+3 Power Phase Design, 100% solid Japanese Capacitors, and the VRM load calibration system makes this motherboard stand out from the rest. During our testing period we could not find any disadvantages about the board, so in our opinion it is one solid build from ASUS that cannot be missed by any serious system builders!
The only thing that we would like to have seen on this motherboard would have been USB 3.0, and SATA 6.0Gb/s Support. Since we had a SAS setup with a powerful RAID Card capable of 6.0Gb/s, this wasn’t a problem, but this might not be the case for some on the cheap side. But there might be a solution for those looking for USB 3.0 and SATA 6.0Gb/s support. Asus also has another P7P55 board called P7P55D-E Pro which already comes with USB 3.0 and SATA 6.0Gb/s support. They also included a special chip which doesn’t take away from the performance of the PCI-E slot like other companies have done. Another option would be using ASUS’ U3S6 Add-On card which gives support for UBS 3.0 and SATA 6.0Gb/s support. With all this said lets take a look at our verdict.
| OUR VERDICT: ASUS P7P55 WorkStation SuperComputer Motherboard | ||||||||||||||||||
|
||||||||||||||||||
| Summary: The ASUS P7P55 WS SuperComputer Motherboard is something that a serious system builder cannot miss out on. This is why I am awarding this motherboard Bjorn3D’s Golder Bear Award with a score of 9 out of 10. |


