The Gigabyte UD3 series have always been targeted towards the budget minded user without sacrificing quality. Today we have the P55 version of the UD3, the P55 UD3R.
Introduction
Gigabyte has long been one of the top manufacturers for the budget minded gamer. Their lower end products carry over many of the features of their bigger brother without the high price tag. The UD3 series is no different. The UD3 series can really be considered the best mix between budget and high end. The board features Crossfire, and many other features you would expect to see on a high end board, yet the board’s price is well below many high end boards.
This mix of budget and performance is perfect for the P55 series. The P55 system itself is supposed to be a cheaper alternative to a high end X58 system, so it is only fitting to see a P55 board with high end features at a lower end price point. One of the most notable features of this motherboard is its ability to run Crossfire. This will allow you to get a serious frame rate in any game if you choose to run Crossfire. Without further ado lets get on with the review.
Features
-
Leading quality standard of Ultra Durable™ 3 technology with 2oz copper PCB design
-
Innovative Smart 6 technology for Smarter PC management
-
Support Intel® Core™ i7/ Core™ i5 processors with LGA 1156 socket
-
New Dynamic Energy Saver™ 2 technology enables best energy efficiency
-
Support ATI CrossFireX for ultimate graphics performance
-
Features high speed Gigabit Ethernet connection
-
XHD technology accelerating hard drive performance with ease
-
AutoGreen technology Greening your PC via Bluetooth cellphone
-
Patented GIGABYTE DualBIOS™ technology delivering highest level failure protection
-
Home theater quality 8-channel High Definition Audio
-
Compatible with Windows 7 to deliver the best operation experience
The Gigabyte UD3R brings a lot of the features that its older brother has. These include the now famous Gigabyte 2 OZ copper PCB, and Dual BIOS. These are two features that will make any tuner happy. Dynamic Energy Saver 2 will certainly make anyone conscious about power usage happy.
Specifications
| CPU |
|
| Chipset |
|
| Memory |
(Go to GIGABYTE’s website for the latest memory support list.) |
| Audio |
|
| LAN |
|
| Expansion Slots |
|
| Multi-Graphics Technology |
|
| Storage Interface | Intel® P55 Express Chipset:
GIGABYTE SATA2 chip:
JMB362 SATA2 chip:
iTE IT8720 chip:
|
| USB |
|
| Internal I/O Connectors |
|
| Back Panel Connectors |
|
| I/O Controller |
|
| H/W Monitoring |
|
| BIOS |
|
| Unique Features |
|
| Bundle Software |
|
| Operating System |
|
| Form Factor |
|
We see that Gigabyte has included room for up to 8 SATA II devices, which should be plenty enough even if you are running a large RAID system. Similar to all other P55 boards, the UD3R features support for all of the current i5 and i7 CPU’s on the 1156 socket.
Pictures & Impressions

Gigabyte has decided to use a similar box design in comparison to their other motherboard boxes. They have printed the main features of the board in a large font with a logo by each one. This will certainly pop out to the buyer, and set this product apart from competitors products. Lets take a look at how Gigabyte packaged the product.

Gigabyte has done a great job with the packaging.Everything is neatly placed, and packaged. From the left corner we can see a bit of the motherboard itself. You can clearly see that it is covered in a anti-static bag. Gigabyte certainly will earn some brownie points for this.

Here we have everything included in the box laid out. To the right we have the manuals. These will definitely come in handy to someone who is new at building computers. On the top left we have the driver CD which includes all of the drivers you will need to get the board fully functioning, as well as some of Gigabytes software. Below that are four SATA cables, the I/O shield, and a IDE cable.

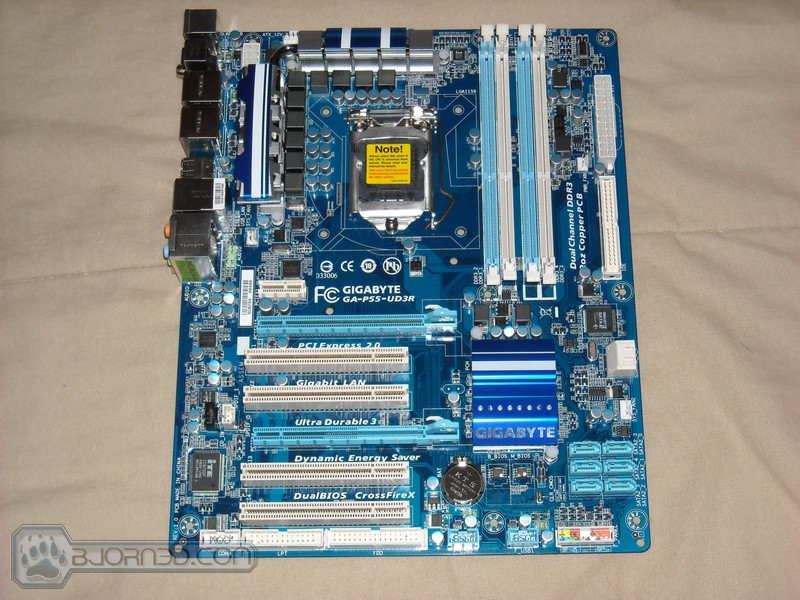
Finally a nice beauty shot of the board. Gigabyte has been leaning towards blue PCB’s lately, and I can’t say I don’t like them. The more traditional colors are much easier on the eyes than the crazy colors of the past from Gigabyte. It is worth noting that Gigabyte has chosen to not include a heat pipe system. This is a little bit of a downer, but understandable since this is a more budget minded board.

As mentioned before this motherboard has a dual BIOS. This means that if the main BIOS chip fails, there is another one to back it up. To the left of that we have the BIOS battery. This is kind of bad placement if you happen to be using a longer graphics card in the bottom slot.

A quick snapshot of the expansion slots shows that this board does have quite a bit of expansion options. Those of you who still use PCI devices will be happy to note that this board has 4 PCI slots. There are of course 2 PCIE 2.0 slots, however the bottom slot only runs at 4x. This will undoubtedly slow the card down some if you are running Crossfire. Above the top PCIE slot is a PCIE 1x slot. This can be used for a sound card, a RAID card, or anything else you can think of.

Here we have the RAM slots. As with all other P55 boards, there are 4 of them. These will allow you to use up to 4 DIMMs at up to 2200 according to Gigabyte. You should have no issue pushing beyond this provided your RAM will let you. Above the RAM slots we have the 24 pin power connector along with an IDE header. Just when you thought IDE was gone it decides to rear its ugly head

You can clearly see the CPU socket as well as the MOSFETs in this picture. Gigabyte did a good job with the layout in this zone. The MOSFETs have a clear path to the CPU, which should help the overclocking a bit. It would have been nice to see some crazy 20+1 phase power design with the VRM’s, but 12 should definitely suffice.

Now its time to take a look at the back I/O plate. Gigabyte has not forgotten about you PS2 users. They have included a PS2 port that can either run a keyboard or mouse. They also have a lot of audio options back here which include the standard plug ins, as well as digital output. There are 10 USB ports on the back, two of which are USB 3.0. There are also two eSATA ports, and a single Gigabit LAN port.

Here you can get a better look at the bottom expansion slots as well as see the dreaded floppy port. It would seem like this ancient device from when computers where much younger would just fade away, but it still exists.

You can see the six included SATA connectors here. These are controlled by the P55 chipset. The two SATA ports to the left of these are controlled by Gigabytes own controller. Theoretically they both should produce the same results, so it doesn’t really matter which one you use.
Bios
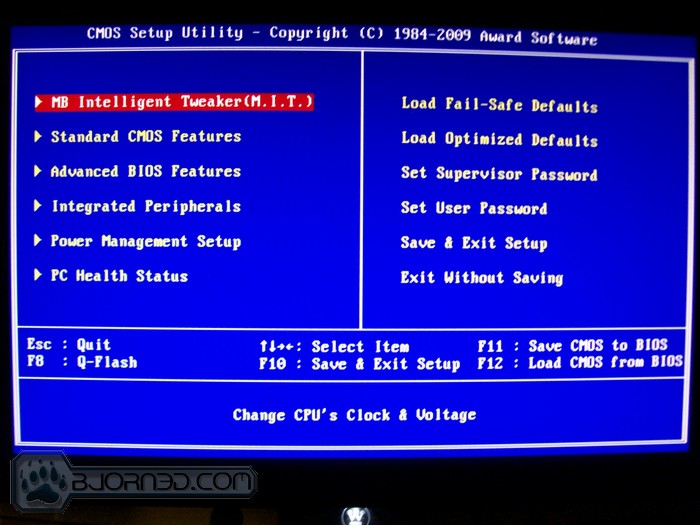
This is what you will see every time you enter the BIOS. There are many options in the BIOS, so we have decided to focus on what really matters, the overclocking settings. Gigabyte has oh so conveniently placed the overclocking menu in the top left hand corner, which happens to be the first option selected.
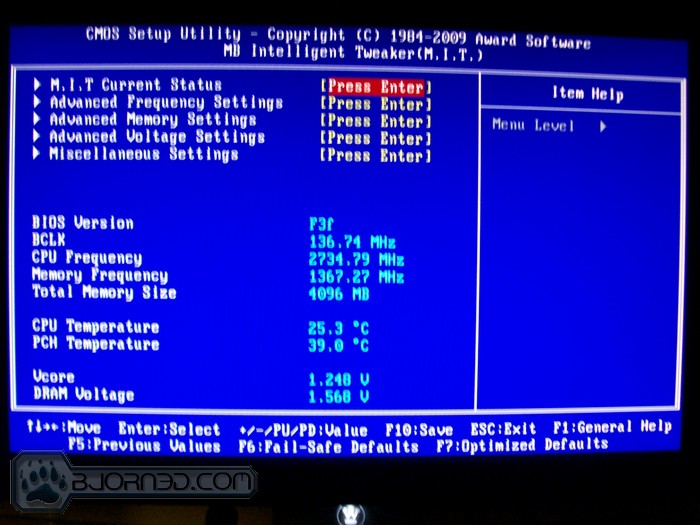
Here we have the basic menu that will lead to more advanced options. At the bottom you can see the current block, CPU frequency, and a variety of other important readings. This makes it easy to tell how fast you are going, and what voltages you are running.
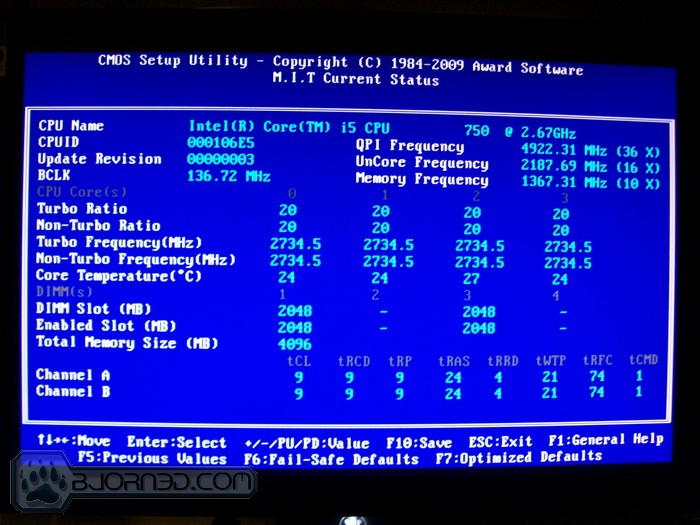
First off is MIT Status. This screen shows all of the fine details of CPU and RAM related readings. You can’t set any settings here, so lets move onto Advanced Frequency Settings.
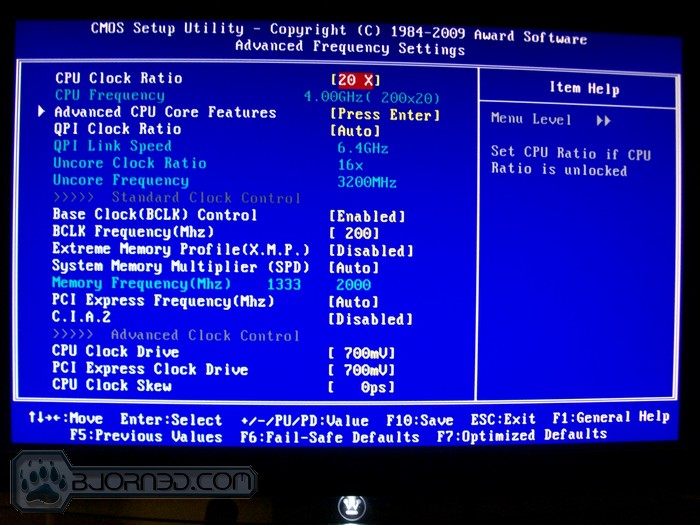
First off is the CPU clock ratio. The higher this is the higher your CPU will be clocked. To get the final speed of your CPU multiply this number with your bclk. You can also set QPI speed, which can improve your RAM performance. Bclk Frequency is how you can overclock your CPU if it does not feature a unlocked multiplier. Be careful though, as this also increases the RAM speed. Below this are more advanced clock settings. I recommend that the average user ignore these, as they are more for tuning for a world record rather than for the everyday clocker.
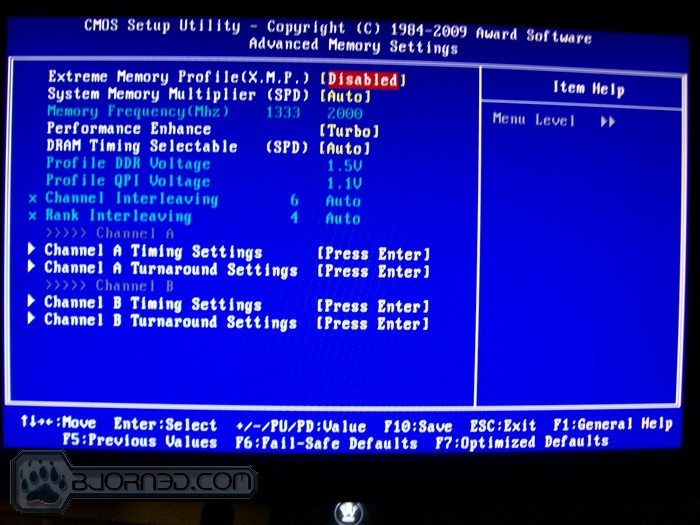
From this menu you can fine tune your RAM. As before, I just recommend you set the RAM speed, timing, and the Performance Enhance to Turbo if you are running faster RAM. The other settings are more for tuners.

This menu will come in handy. In order to achieve a high overclock you will have to mess with these voltages a bit. It is always best to run the absolute lowest voltage possible while still maintaining stability. This will not only prolong the life of your components, but it will also allow them to run cooler. CPU Vcore is what you will use when overclocking the CPU. You may have to increase QPI/VTT when going for a higher overclock. The PCH and CPU PLL voltages can be increased a bit if you find they increase stability, but they shouldn’t need to be increased by much at all. The RAM voltage will need to be increased if you plan on overclocking your RAM. Make sure to not exceed 1.65 volts. If you go any higher you could possibly damage your CPU.
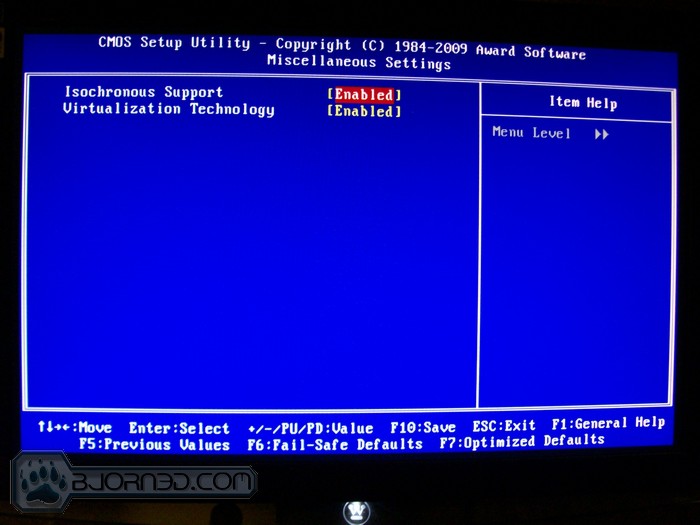
Miscellaneous settings will not be touched very often. If you don’t plan on running a Virtual PC then you might as well turn the option off, as it can sometimes make the system stabler when overclocking.
The BIOS was really full featured for such a cheap board. This only makes the board a better buy for the user who is looking to overclock on a budget.
TESTING METHODOLOGY
| Test Setup &Testing Methodology | |
| CPU | Intel Core i5 750 |
| Motherboard | Gigabyte P55 UD4 Gigabyte P55 UD3R Asus Maximus Gene |
| Case | Cooler Master HAF922 |
| Memory | GSkill RipJaw 2000 MHz |
| Video Card’s | HD 4870 |
| Hard Drives | WD 300 GB SATA 2 |
| CDRom Drive | Lite On DVD |
| Power Supply | Kingwin 1000W |
| CPU Speeds Used | 2660 MHz, 3990Mhz |
| Operating System Used | Microsoft Windows Vista 64 |
To test the Gigabyte UD3R, I ran the below listed programs three times to ensure that my results were consistent and that the motherboard was stable during testing. I will include both overclocked and default speeds.
List of programs
- SiSoft Arithmetic, Multi-Media, Multi-Core Efficiency, Memory Bandwdith, Latency
- Everst Memory Read, Write, Copy, Latency, CPU Queen, FPU Julia
- Cine Bench Core x1, Core x4 (will use amount of threads possible CPU dependant), OpenGl, Multi Threaded
- wPrime 32 Million, 1024 Million Calculations Multi Threaded
- WinRar Benchmark Compressed up to 500 MBs Wrote time it took and final result, Multi-Threaded
- POV Ray
- 3DMark Vantage 1280 x 1024 Performance run
- Far Cry 2 1920 x 1080 Max Visual Quality 4xAA
Pretty much the standard runs we normalysee, with a couple of extras thrown in for good measure.
OVERCLOCKING
The Gigabyte UD3R was very easy to overclock. All I had to do was do a couple voltage changes and disable turbo and set the multi to 19. The core voltage was set to 1.4v, and it booted up at 210blk which was 3.99ghz on the CPU, and 2100 MHz on the RAM. A long run of prime95 confirmed the overclock to be stable. After 216 blk it really did not matter what i changed, it didn’t want to go any higher. I did not have much time to tweak this board, but 216 is very good for a board. Im fairly sure given more time it could go a bit higher with more fine tuning, but overall the board is a great overclocker for a more mid-low range mobo it keeps up there with a highend motherboard.
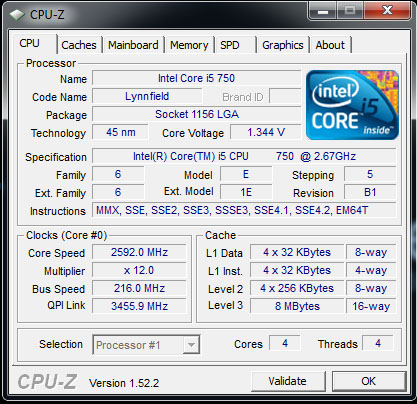
The highest block we where able to acheive was 216. As you can see the CPU’s multiplier was lowered to ensure that the chip did not become unstable, and thus lower the max blk.
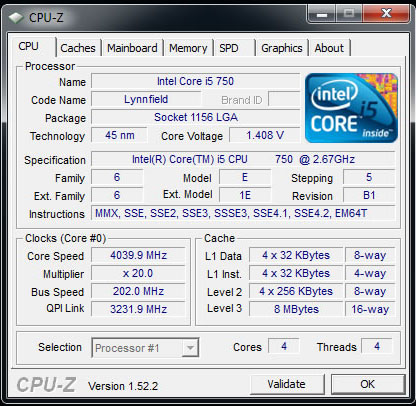
This was our max stable clock on the motherboard. Not a bad result for useing 1.4 volts and a bit of tweaking. With some time you should be able to lower the voltage.
SISOFT
“SiSoftware Sandra (the System Analyser, Diagnostic and Reporting Assistant) is an information & diagnostic utility. It should provide most of the information (including undocumented) you need to know about your hardware, software and other devices whether hardware or software. It works along the lines of other Windows utilities, however it tries to go beyond them and show you more of what’s really going on. Giving the user the ability to draw comparisons at both a high and low-level. You can get information about the CPU, chipset, video adapter, ports, printers, sound card, memory, network, Windows internals, AGP, PCI, PCI-X, PCIe (PCI Express), database, USB, USB2, 1394/Firewire, etc.”
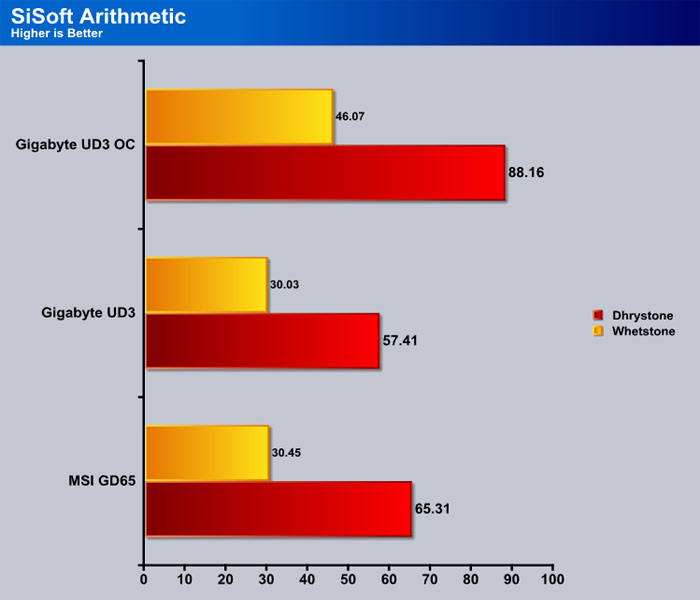
The UD3R gets off to a pretty good start. It came out a bit behind the GD65, but since the GD65 is more expensive I would call this a win.
The UD3R comes up short once again, but a bit of overclocking easily makes the board pull ahead and then some.
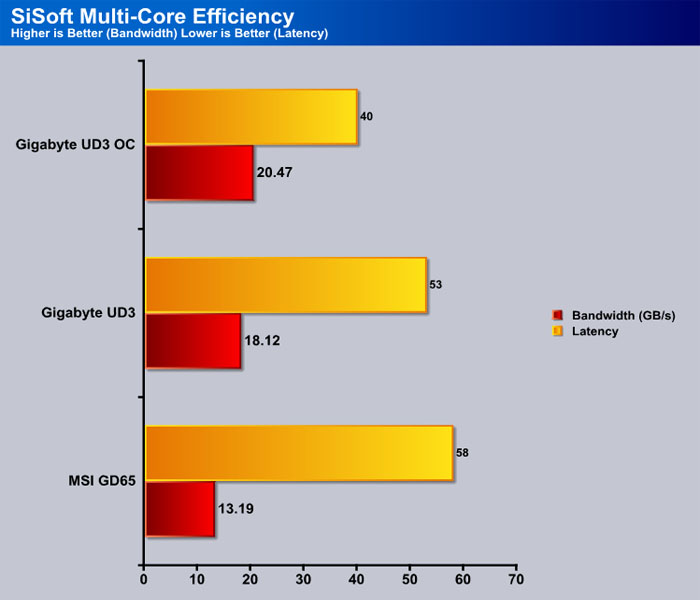
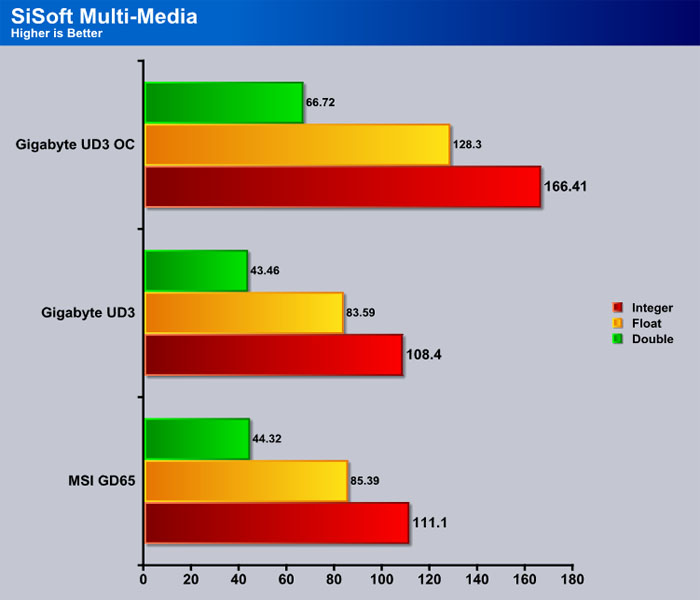
This time the UD3R actualy pulls ahead of the GD65. When overclocked we see quite a significant jump in performance.
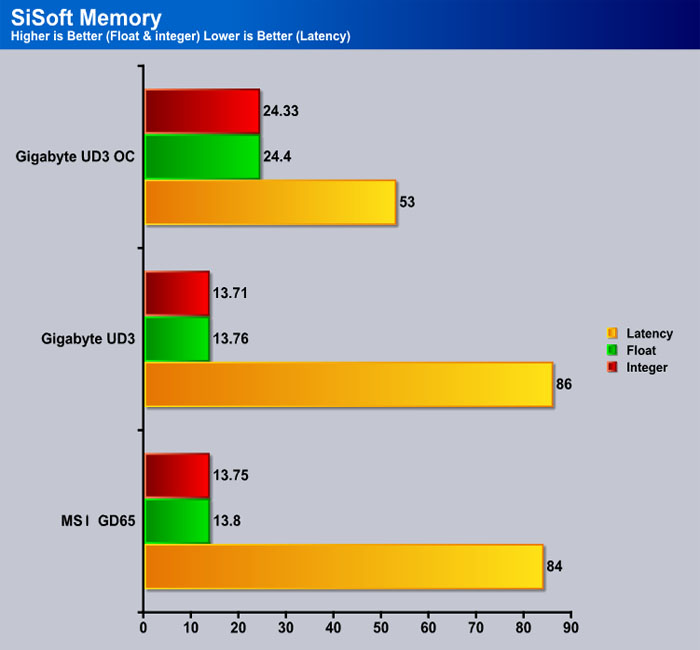
This time the UD3R comes up just behind the GD65, but it is very close. No surprize that overclocking let the UD3R easily pass the GD65.
Everest

“EVEREST Ultimate Edition is an industry leading system diagnostics and benchmarking solution for enthusiasts PC users, based on the award-winning EVEREST Technology. During system optimizations and tweaking it provides essential system and overclock information, advanced hardware monitoring and diagnostics capabilities to check the effects of the applied settings. CPU, FPU and memory benchmarks are available to measure the actual system performance and compare it to previous states or other systems. Furthermore, complete software, operating system and security information makes EVEREST Ultimate Edition a comprehensive system diagnostics tool that offers a total of 100 pages of information about your PC.”
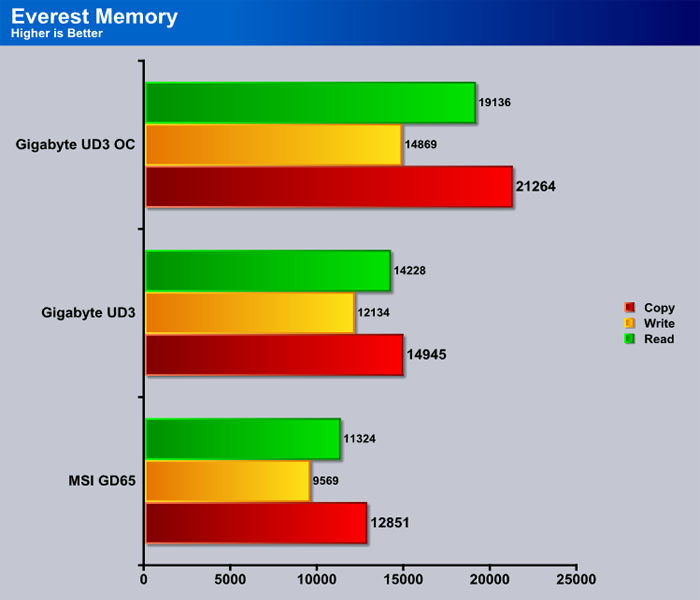
We see here that the UD3R actualy pulls ahead of the GD65 by quite a large margin. This is only increased further when the i5 750 is overclocked.
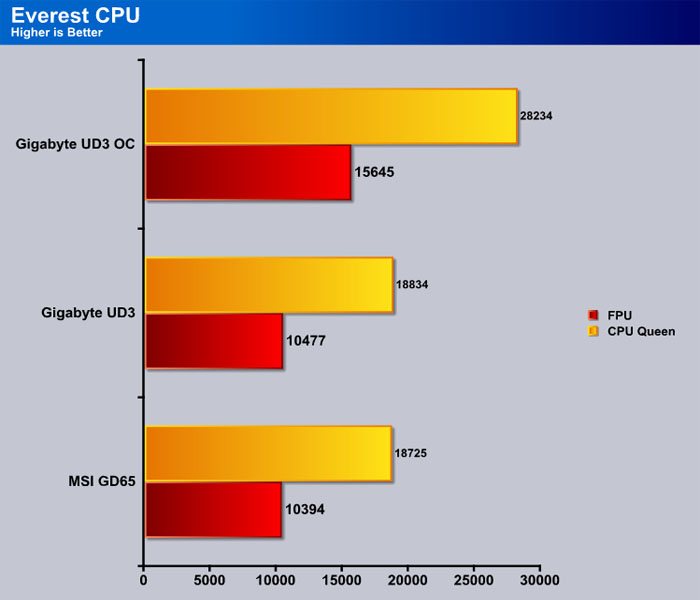
The UD3R comes up a bit short here, but not by much. As before an overclock easily overcomes this difference and then some.
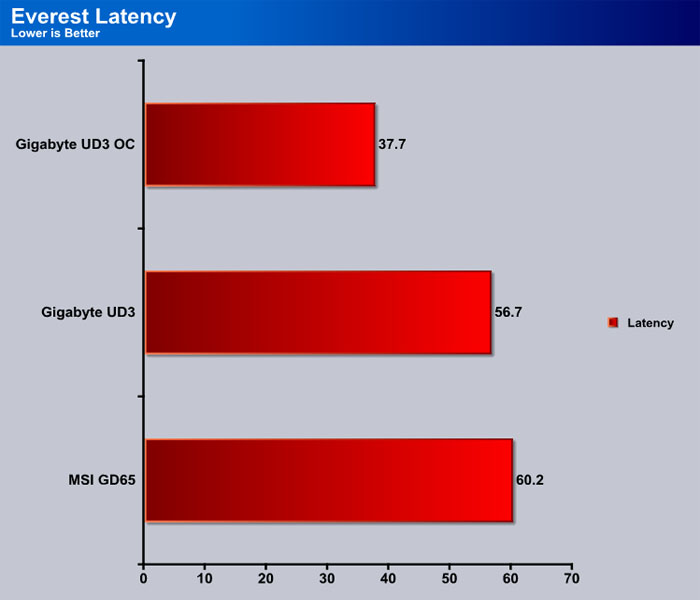
The UD3R stars off with lower latency, and when overclocked this difference gets even larger.
Cinebench

“CINEBENCH is a real-world test suite that assesses your computer’s performance capabilities. MAXON CINEBENCH is based on MAXON’s award-winning animation software, CINEMA 4D, which is used extensively by studios and production houses worldwide for 3D content creation. MAXON software has been used in blockbuster movies such as Spider-Man, Star Wars, The Chronicles of Narnia and many more. MAXON CINEBENCH runs several tests on your computer to measure the performance of the main processor and the graphics card under real world circumstances. The benchmark application makes use of up to 16 CPUs or CPU cores and is available for Windows (32-bit and 64-Bit) and Macintosh (PPC and Intel-based). The resulting values among different operating systems are 100% comparable and therefore very useful with regard to purchasing decision-making. It can also be used as a marketing tool for hardware vendors or simply to compare hardware among colleagues or friends.”
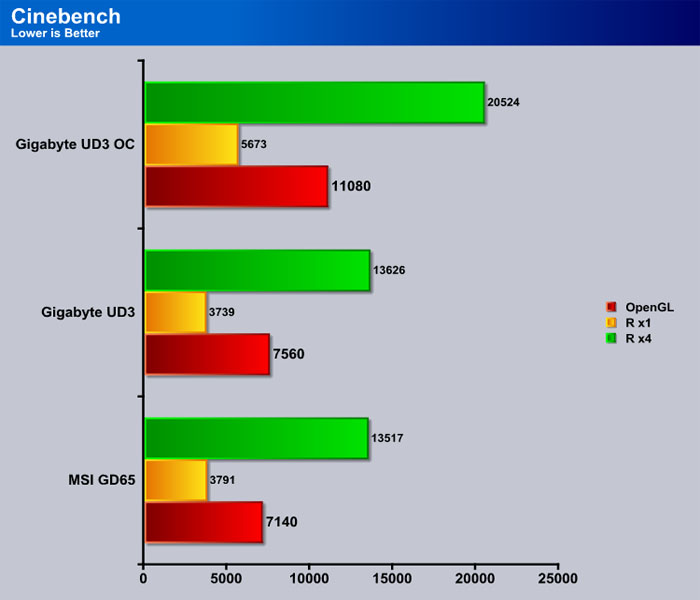
We see here that the GD65 manages to be just in front of the UD3R in the single core test, but the UD3R takes the lead in both the OpenGL and multi threaded test.
wprime
wPrime is a benchmarking application designed to use a highly multithreaded approach to calculating the square-roots of large amounts of numbers (up to 32 billion)
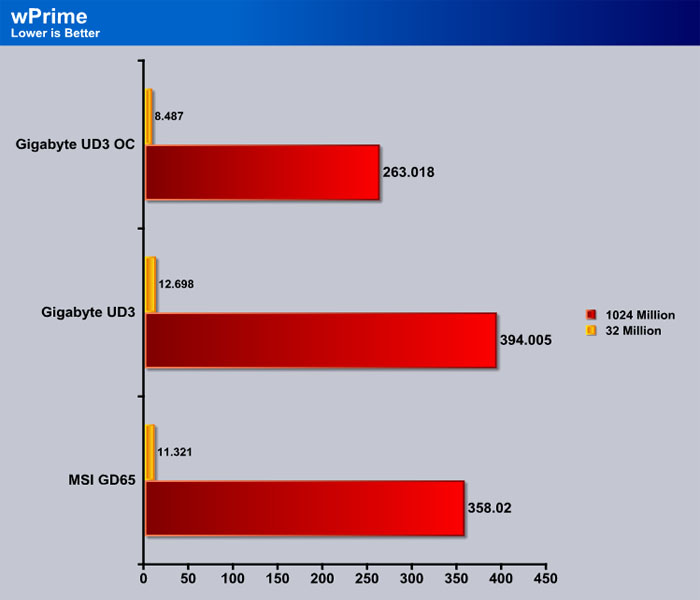
The UD3R clearly looses here. You can see that the lower processing really added up here, with a sizeable difference between the UD3R and the GD65 in the 1024 test.
WinRAR

This module in WinRar generates random data, which contains specially introduced redundancy, increasing the load to both the processor and memory. Data is then passed through RAR compression and decompression algorithms, and the output of the decompression algorithm is compared to the source data. If any differences are found, WinRar then reports “Errors found – Yes” in the command window. WinRar displays a size of processed data and compression speed, current and resulting, in kilobytes per second.

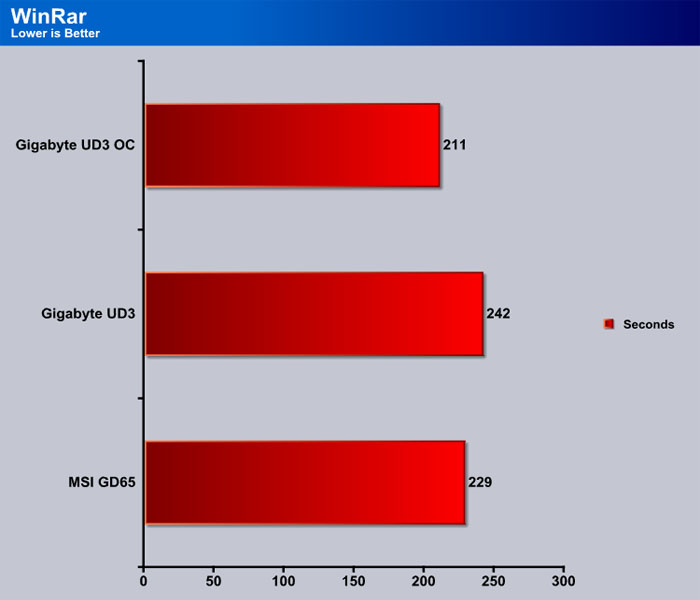
The UD3R certianly is a fair bit slower at stock, but speeds up a lot once it is overclocked. Either way, these are some respectable numbers for a file this large.
POV Ray

The Persistence of Vision Ray-Tracer was developed from DKBTrace 2.12 (written by David K. Buck and Aaron A. Collins) by a bunch of people (called the POV-Team) in their spare time. It is a high-quality, totally free tool for creating stunning three-dimensional graphics. It is available in official versions for Windows, Mac OS/Mac OS X and i86 Linux. The POV-Ray package includes detailed instructions on using the ray-tracer and creating scenes. Many stunning scenes are included with POV-Ray so you can start creating images immediately when you get the package. These scenes can be modified so you do not have to start from scratch. In addition to the pre-defined scenes, a large library of pre-defined shapes and materials is provided. You can include these shapes and materials in your own scenes by just including the library file name at the top of your scene file, and by using the shape or material name in your scene. Since this is free software feel free to download this version and try it out on your own.
Some of you might have seen version 3.6 of POV-Ray, the biggest difference between 3.6 and 3.7 Beta 25 is SMP (symmetric multiprocessing) support, which means that POV-Ray can take advantage of as many cores as your CPU has. On Single vs Dual CPU systems the speed almost doubles.

The UD3R happens to be a little bit faster when the rendering times are lower, but once we move onto a bigger scene, the GD65 pulls ahead by a small fraction. Overclocking dramaticaly helped push the UD3R far ahead of the stock clocked boards.
3DMark Vantage

Currently, there is a lot of controversy surrounding NVIDIA’s use of a PhysX driver for its 9800 GTX and GTX 200 series cards, thereby putting the ATI brand at a disadvantage. Whereby installing the PhysX driver, 3DMark Vantage uses the GPU to perform PhysX calculations during a CPU test, and this is where things get a bit gray. If you look at the Driver Approval Policy for 3DMark Vantage it states; “Based on the specification and design of the CPU![]() tests, GPU make, type or driver version may not have a significant effect on the results of either of the CPU tests as indicated in Section 7.3 of the 3DMark Vantage specification and white paper.” Did NVIDIA cheat by having the GPU handle the PhysX calculations or are they perfectly within their right since they own Ageiaand all their IP? I think this point will quickly become moot once Futuremark releases an update to the test.
tests, GPU make, type or driver version may not have a significant effect on the results of either of the CPU tests as indicated in Section 7.3 of the 3DMark Vantage specification and white paper.” Did NVIDIA cheat by having the GPU handle the PhysX calculations or are they perfectly within their right since they own Ageiaand all their IP? I think this point will quickly become moot once Futuremark releases an update to the test.
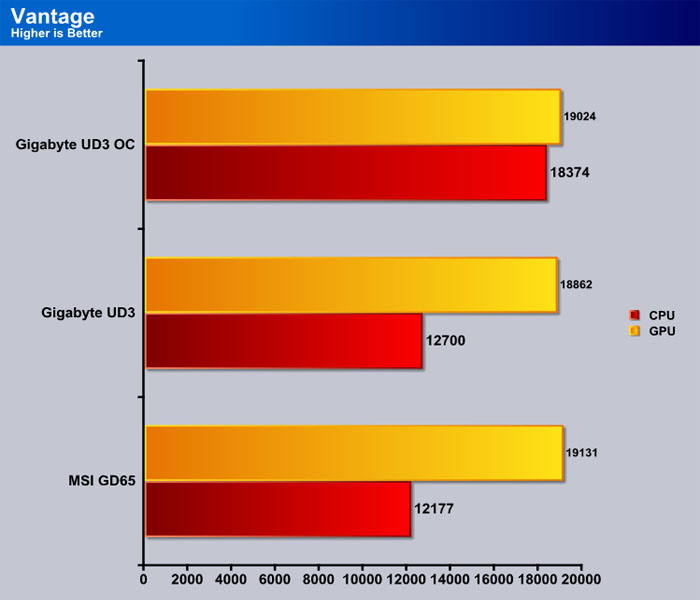
We see here that the overclock didn’t help much. Unlike 3DMark 06, Vantage scores don’t get significantly better with a higher CPU score. The stock CPU score for the UD3R is higher which is what really matters.
Far Cry 2

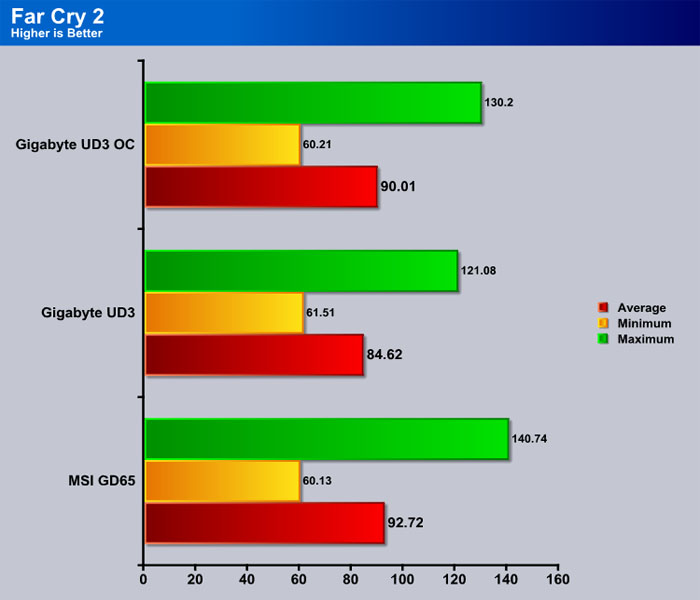
The results here are kind of weird. The GD65 had a much higher maximum FPS, but the UD3R had about the same average and minimum FPS.
Conclusion
The Gigabyte UD3R is meant to be a value board, with a few extras to make it more than a bare bones motherboard. The board uses pretty good heat sinks, even better than some of the low end X58 boards. The board also overclocks so well you would have thought it was a high end motherboard. The board also features 8 SATA ports, which should be way more than what the average user needs. This motherboard also supports DDR3 2100, which is probably a higher speed than anyone who buys this board will have. This board does not have everything though. This is how Gigabyte is able to make the board cheaper.
For one this board lacks SATA 3.0 ports. Currently this is one of the huge selling points of the P55 system. This board also lacks USB 3.0 ports. These two main things allow this board to be manufactured at a much lower cost, thus Gigabyte is able to sell the board at a lower price. Currently there is a very small selection of SATA 3.0 and USB 3.0 devices, so if you plan on upgradeing in the next couple of years you should be perfectly fine. Overall these are the only two major features lacking in this board. Gigabyte did a great job of balancing high end and low end on this motherboard.
| OUR VERDICT: Gigabyte P55 UD3R |
||||||||||||||||||
|
||||||||||||||||||
| Summary: The Gigabyte UD3R is a great budget board, that lacks some of the features of the higher end boards, but still overclocks excelently. |