Following the LGA 1156 launch, Kingston released memory kits to fill the DIMM gaps. Designed specifically for 1156 i5/i7 motherboards, we review Kingston’s 4GB DDR3 1600MHz kit.
Introduction
With Intel’s 1156 platform making its way into enthusiast’s hearts, dual channel has since become the budget builder’s memory channel priority. Lacking a triple channel memory controller, Intel’s 1156 Socket CPU’s include a newly integrated dual channel memory controller that happens to respond surprisingly well to overclocking.
Being no stranger to memory, Kingston is well known for their HyperX grade memory DIMM’s. Aside from being wonderful overclockers, the HyperX series is durable and can be more than affordable depending on the level of performance chosen. To help feed the Socket 1156 P55 chipset frenzy, Kingston has released a 4GB dual channel kit to help complete those fresh P55 chipset powered builds. The results we’ve gathered within this review will certainly keep “Kingston Memory” on the brain when shopping for that next memory kit.
Specifications
- Kit Number: KHX1600C8D3K2/4GX
- Timings: 8-8-8-20
- Capacity: 4GB (2x2GB)
- Voltage: 1.65v
- Frequency: 1600MHz
- Type: DDR3 Low Voltage
- Pins: 240
- Comes with heatspreaders and is Intel X.M.P. Ready
Pictures & Impressions
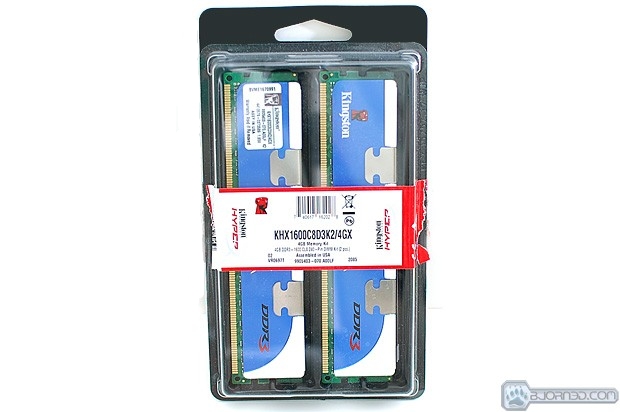
Kingston’s 4GB kit comes packaged in typical Kingston packaging. The DIMM’s are protected by plastic all around and on the top there is a model specification label.
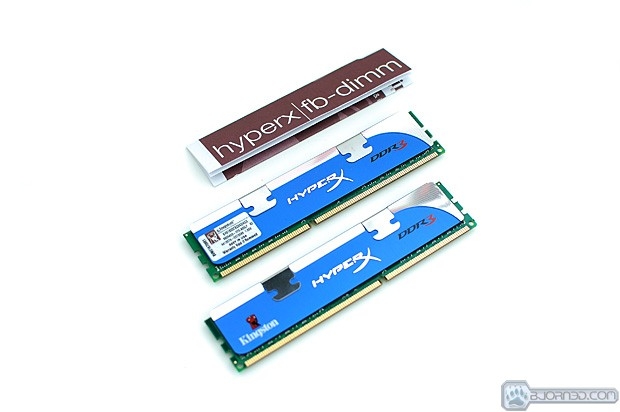
Once taken out of the packaging, you get the two DIMM’s and a folded up manual. On one side of the spreaders there is a specifications label that has the model and rated voltage listed.
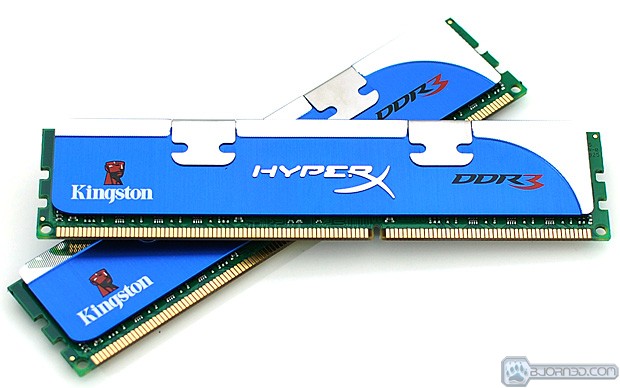
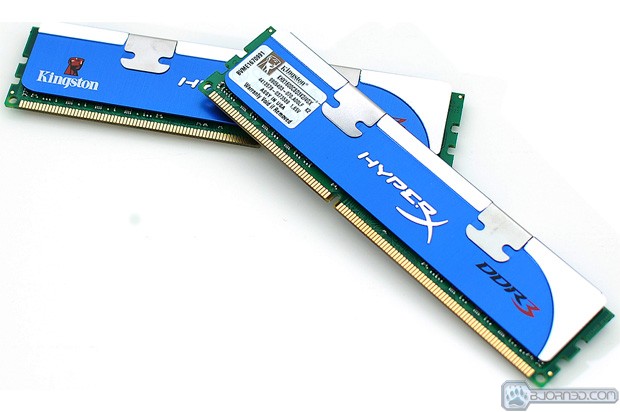
The DIMM’s come wrapped in beautiful blue HyperX heatspreaders that have a reflective silver accent. They are simple in design but far from boring. Due to them being low profile heatspreaders, fitting giant tower design CPU coolers shouldn’t be an issue.
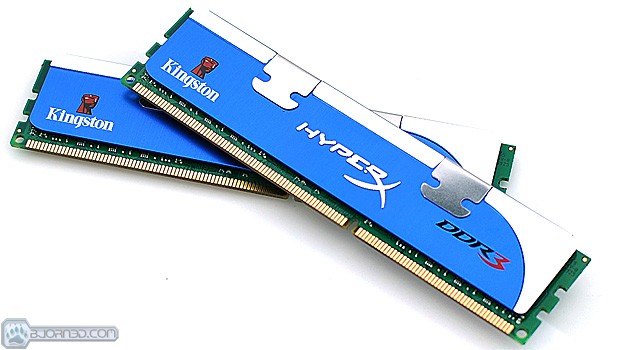
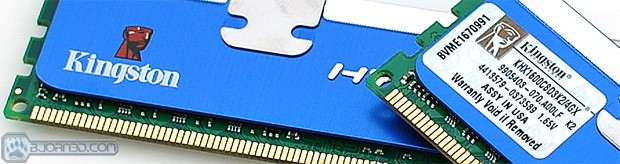
The other side of the heatspreaders are plain with only the Kingston logo’s listed. Simple in design but plenty of performance to be had.
Testing & Methodology
We’ve expanded our testing suite considerably for P55 and will continue to use the same tests across most of the motherboards and CPU’s we test. We run each test a total of at least three times minimum, some tests we run more than 3 times. We average the total of all the tests from each benchmark then report the average here.
The OS we use is Vista Ultimate 64bit with all patches and updates applied. We also use the latest drivers available for the motherboard and any devices attached to the computer. We don’t disable a bunch of background tasks or particularly tweak the OS or system for bigger numbers. We do turn off drive indexing and daily defragging. We also turn off Prefetch and Superfetch. This is not an attempt to produce bigger benchmark numbers. Drive indexing and defragging can interfere with testing in that one test might occur without defragging going on and the next test defragging might be active, the same thing goes for drive indexing. We can’t control when defragging and indexing occur precisely enough to guarantee that they won’t interfere with testing, so we turn them off.
Prefetch tries to predict what you will load the next time you boot the machine. We disable it because we want to know how the program runs without any of the files being cached, otherwise each test run we’d have to clear pre-fetch to get accurate numbers. Lastly we disable Superfetch, Superfetch loads often used programs into memory and is one of the reasons people consider Vista to be such a memory hog. Vista fills the memory in an attempt to predict what you will load. Having one test run with files cached, and another test run with the files being un-cached would result in skewed numbers. Again since we can’t control it we turn it off. Other than those 4 things which can potentially interfere with benchmarking, and do so out of our control, we leave everything else running.
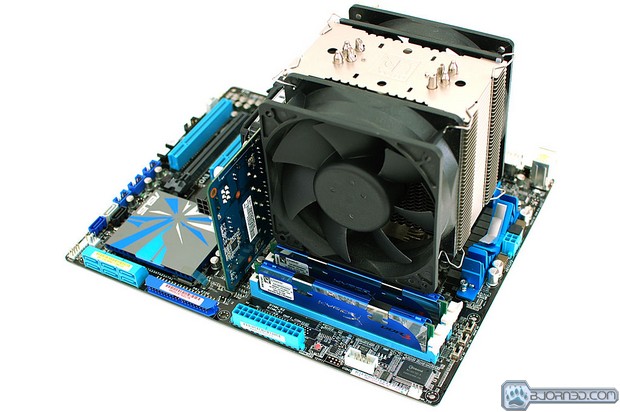
| Test Rig “Station_i5” |
|
| Case Type | Custom made tech station |
| CPU | Core i5 750 |
| Motherboard |
ASUS P7P55D Deluxe |
| Tested RAM |
Kingston HyperX DDR3 1600MHz 4GB Kit |
| CPU Cooler | Noctua NH-U12P with two Scythe 120MM 87CFM fans |
| Hard Drives | Western Digital Raptor 74GB 10,000RPM |
| Optical | Samsung DVD R/W |
| GPU(s) | ASUS 9600GSO 512MB |
| Case Fans | 120mm Fan cooling the mosfet CPU area |
| Docking Stations | None |
| Testing PSU | Thermaltake Tough Power XT 850W |
| Legacy | None |
| Mouse | Microsoft Wireless Notebook Laser Mouse 7000 |
| Keyboard | Logitech Deluxe 250 USB Keyboard |
| Gaming Ear Buds |
Senheisser HD-485 |
| Speakers | Creative 2.1 |
| *** Any attempt copy this system configuration may lead to awesomeness. |
|
|
Benchmarks |
|
Everest Ultimate Edition v. 5.0 |
|
SiSoft SANDRA XII Professional SP2 |
|
Super PI |
Overclocking
Before getting into overclocking, we wanted to see how things went with all default settings. After unboxing the pretty blue Kingston HyperX memory modules, we put them in our (ironically blue themed) ASUS P7P55D Deluxe motherboard. Along with a blue ASUS 9600GSO 512MB video card, things were looking right at home. Below is the image of the first boot up.

Thanks to the P7P55D Deluxe’s very compatible memory options, the Kingston HyperX kit was automatically set to 1337MHz with semi-loose timings of 9-9-9-24. This is similar to what most motherboards would do as the rated frequencies will require memory ratio adjustments.
After verifying the sticks were stable out of the gate, we went ahead and set the memory to their X.M.P. profile. This sets the memory to the rated frequency and timings.

At the rated timings and frequency, the Kingston HyperX kit performed without any issues. We ran our onslaught of tests, all of which passed without issues. Now that things were completely stable at default and X.M.P. settings, we wanted to go for gold and see what this kit was really capable of.
To achieve the maximum stable overclock to maintain the maximum frequency and performance, we had to loosen the timings to 9-9-9-22. This allowed us to hit an amazing 2140MHz (1070MHz DDR)!!! We tried staying with CAS 8 but the kit didn’t want to play. To make things easier across the board we raised the CAS to 9 and followed suit with the rest of the timings to ensure stability.

After running our battery of tests verifying stability, we were more than pleased at the 540MHz memory overclock. Loosening the memory timings and staying with the max BLCK of 214 allowed us to hit 4.06GHz on the i5 750 while keeping a very nice 2140MHz DDR3 frequency. Things were looking very nice at this point and we were eager to move on to benchmarking. So on that note, lets move on to the benchmarking results.
Everest Ultimate

“EVEREST Ultimate Edition is an industry leading system diagnostics and benchmarking solution for enthusiasts PC users, based on the award-winning EVEREST Technology. During system optimizations and tweaking it provides essential system and overclock information, advanced hardware monitoring and diagnostics capabilities to check the effects of the applied settings. CPU, FPU and memory benchmarks are available to measure the actual system performance and compare it to previous states or other systems. Furthermore, complete software, operating system and security information makes EVEREST Ultimate Edition a comprehensive system diagnostics tool that offers a total of 100 pages of information about your PC.”
Thanks to InteI’s P55 chipset and the 1156 Socket CPU’s Integrated Memory Controller (IMC), achieving higher memory overclocks with respectable timings has proven to be much easier than we anticipated. In all of our recent i5/i7 1156 targeted memory reviews, we have been able to push 1600MHz kits into the 2000MHz range while keeping voltages at rated ranges. There is no doubt that pushing memory overclocks on the 1156 Socket platform is easier than the big brother Socket 1366 platform. The Kingston HyperX kit we reviewed is no exception surpassing the 2100MHz mark with ease as you saw on the Overclocking portion of this review. Enough jabber, lets move on to the Everest results.
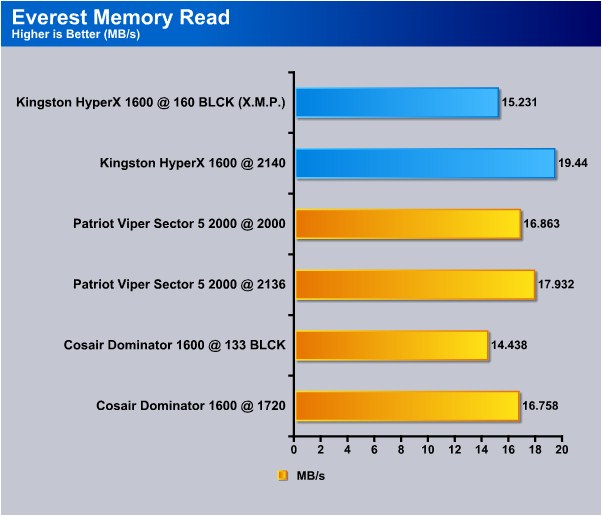
In the Everest Memory Read test we can clearly see what a high base clock (BLCK) overclock can provide despite looser memory timings. Going from 8-8-8-20 timings and 1600MHz to 9-9-9-22 timings and 2140MHz, Kingston’s kit takes the lead over the Patriot kit by 1.51 MB/s.
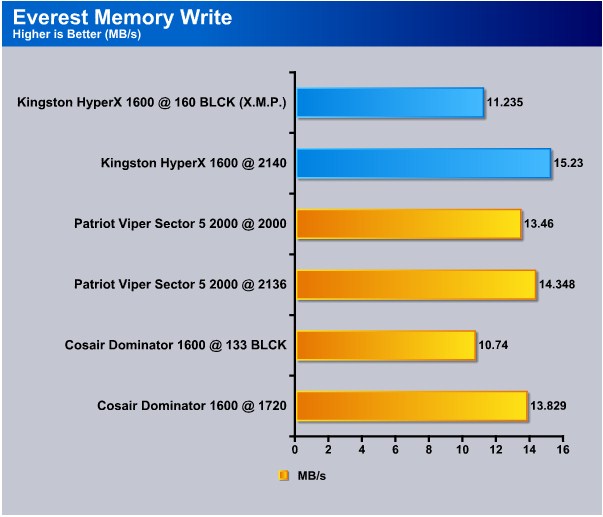
In the Everest Memory Write test the Kingston kit holds it lead beating the Patriot kit by .89 MB/s. The high CPU and memory overclock allow the Kingston kit to pull ahead of the pack.
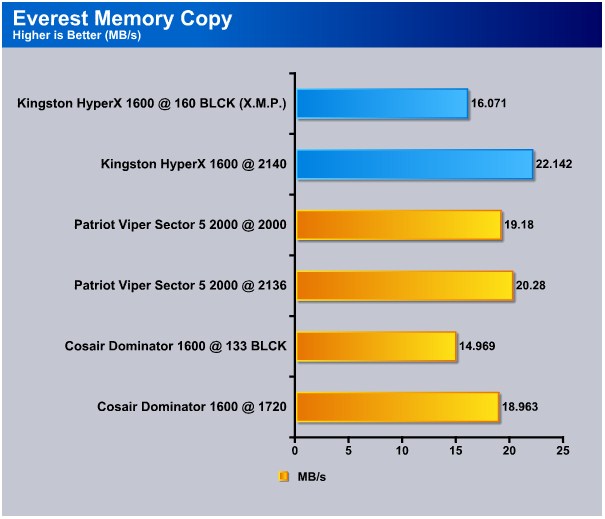
In the Everest Memory Copy test the same trend continues. Again Kingston pulls ahead of the Patriot Viper Sector 5 kit but this time the gap is even bigger. Beating the Patriot memory by 1.86 MB/s, the Kingston HyperX kit clearly improves once things are turned up. With a 214 BLCK resulting in 4.06GHz CPU frequency and the memory running at a stout 2140MHz, the i5 powered beast of a machine is showing plenty of love for the Kingston HyperX memory in the Everest benchmarks.
Sisoft Sandra
“SiSoftware Sandra (the System Analyser, Diagnostic and Reporting Assistant) is an information & diagnostic utility. It should provide most of the information (including undocumented) you need to know about your hardware, software and other devices whether hardware or software. It works along the lines of other Windows utilities, however it tries to go beyond them and show you more of what’s really going on. Giving the user the ability to draw comparisons at both a high and low-level. You can get information about the CPU, chipset, video adapter, ports, printers, sound card, memory, network, Windows internals, AGP, PCI, PCI-X, PCIe (PCI Express), database, USB, USB2, 1394/Firewire, etc.”
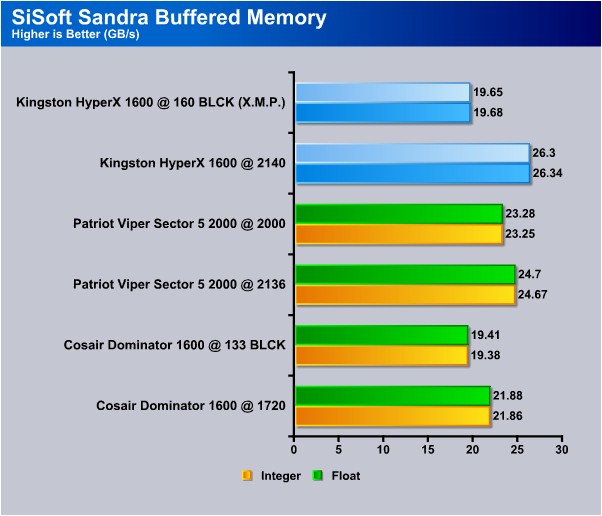
In the SiSoft Sandra Buffered Memory test the Kingston HyperX kit takes the lead in the Float test by 1.6 GB/s and the Integer test by 1.67 GB/s. Hitting 26.3 GB/s on the Float and 26.34 GB/s on the Integer, there is no doubt that these modules are utilizing the BLCK increase and the full 2140MHz. Even though the Kingston memory is clocked only 4MHz more than the Patriot memory, the 214 BLCK helps bring the performance gap to 6% declaring Kingston’s HyperX memory the clear winner.
Super Pi

“Super PI is the “Gold standard” for many when it comes to judging system performance. We ran 1 Meg and 2 Meg calculations, again running each test three times and reporting the average of the results.”
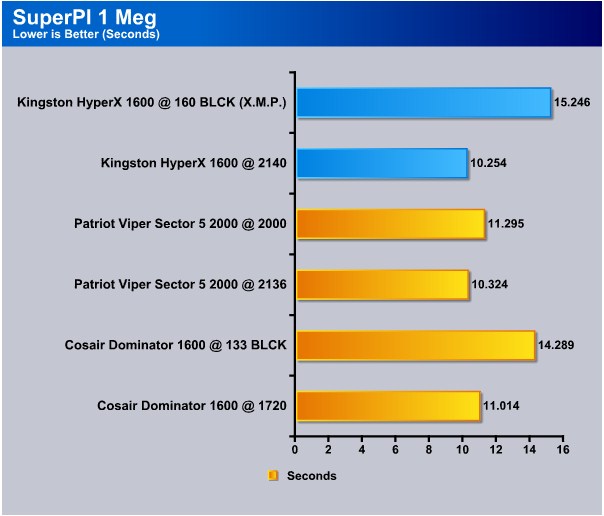
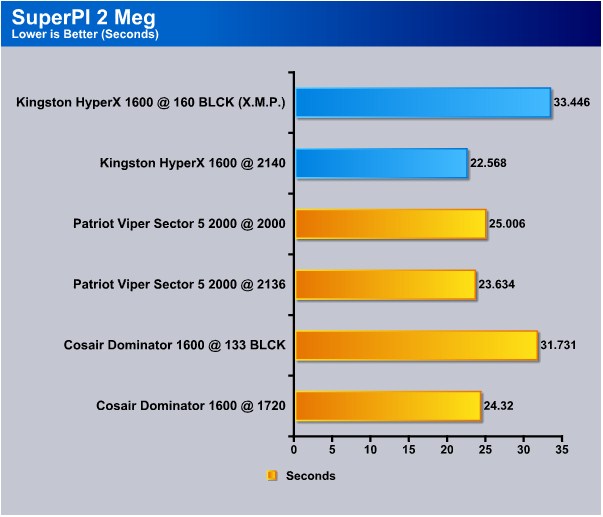
Because SuperPI is highly effected by CPU frequency we were expecting a close result between the HyperX memory and the Patriot Viper memory. Like we suspected, the gap was a very small .07 seconds in the 1 Meg test but the surprising gap in the 2 Meg test is over a second reaching 1.06 seconds. Again, thanks to the 214 BLCK, 4.06GHz CPU frequency, and 2140MHz memory frequency, the Kingston HyperX memory kit is able to take the lead in every single test we ran. This memory is certainly impressive when you take the price, warranty, and quality into consideration.
From what the results show and from what we were able to achieve during our overclocking sessions, we really can’t find a reason to not recommend this HyperX 4GB kit from Kingston. Taking a 1600MHz / 8-8-8-20 / 1.65v 4GB kit to 2140MHz at 9-9-9-22 timings using rated voltages while have no issues whatsoever is simply fantastic.
Instead of hindering our overclocking performance we wanted to utilize the maximum BLCK our motherboard would allow but also push the memory to its highest frequency with minimal timing adjustment. Kingston’s HyperX 4GB kit allowed us to push both the motherboard and CPU to their max safe frequencies while keeping performance very high and 100% stable. We highly recommend this kit to i5 and i7 owners.
| OUR VERDICT: Kingston HyperX 4GB 1600MHz Kit | ||||||||||||||||||
|
||||||||||||||||||
| Summary: The Kingston HyperX 4GB kit ran the X.M.P settings properly, overclocked beyond our expectations and performed without any issues. We highly recommend this kit from Kingston. |


