We at Bjorn3D.com going to be looking at, three of the baddest water blocks on the market. Lets see How they stack up against one another.
Battle Of the Titan Water Blocks
Since I absolutely loved the movie Clash of the Titans, both the original and the remake, and we at Bjorn3D.com happens to have the three most top end water blocks on the market. We felt the title was fitting.
Most of us all know who the top three water block manufacturers are. Just recently, these top three water block manufacturers released new improved water blocks to their line up. We at Bjorn3D.com are going to pit all three of these top three water blocks against eachother. In a true Bjorn3D.com fashion, we are going to stick to a rather tight and strict temperature limitation of 60°C (+/- a couple of degrees) on our proven and ever cranking Intel Core i7 930 CPU. We are also going to mount these CPU coolers onto two different motherboards, one of these is the reliable Gigabyte X58A-UD3R (review can be found HERE), and then we’re going to strap these CPU coolers onto our Asus Rampage II Extreme (review can be found HERE) to check out the clearances on both of these motherboards. We are all aware of some incompatibilities on certain motherboards when it comes to these higher end water blocks.
These water blocks are in the cost range of 90 USD a pop. We at Bjorn3D.com are going to grade these blocks on what comes with them, as far as mounting, and if they come with a retention plate. We are are also going to add something a bit different we have not done before. We are going to measure flow rate of these blocks, by pumping a gallon of water through these blocks.
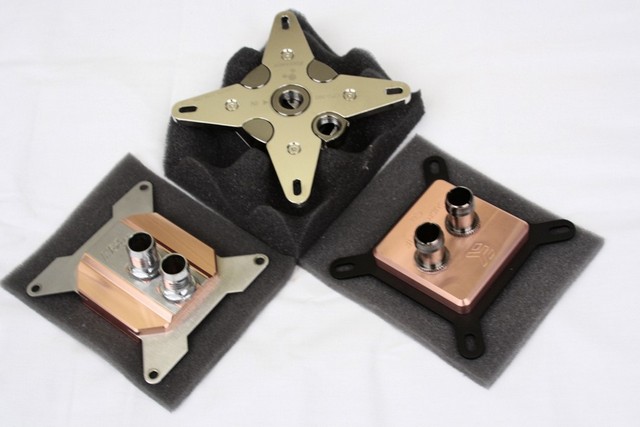
Say hello to the EK Supreme HF Universal CPU Liquid Cooling Block, the Koolance CPU 360 Rev. 1.1 water block and the the HeatKiller Rev 3 water block. We are also going to throw on a couple extra water blocks into the mix, for chits and giggles.
Testing Methodology
|
Test Setup &Testing Methodology “Mini Me” |
|
| CPU | Intel Core i7 930 D0 |
| Motherboard | ASUS Rampage II Extreme, Gigabyte X58A-UD3R |
| Case | Open Chassis |
| Memory | Corsair 1600 Dominators 7-8-7-20 |
| Video Card’s | Sapphire 5870 |
| Hard Drives | 2x Seagate 320Gig 2.5″ Momentus HDD’s |
| CDRom Drive | Lite On Blue Ray |
| Power Supply | SilverStone 1200 Watt Zeus |
| CPU Speeds Used | Have to wait for the results. |
| Operating System Used | Microsoft Windows 7 |
| Video Card Cooler |
Bistpower Cooled 5870 Swiftech Tri 120mm Radiator |
| CPU Cooler |
5 different blocks were used + Quad 120mm XSPC Radiator |
I like to keep things as evenly as possible when it comes to my testing. Each water block that is being tested will be using a retention plate. As a “True Enthusiast” will ensure that he will get the best possible temperatures at all times. Even if that requires to using a different manufacturers retention plate. One of these water blocks I purchased myself, that block is the HeatKiller rev 3. This water block will still be rated in this review. This review will be based on what water block reached the highest stable CPU speed (in this case I cannot go above 4.3 GHz on the Core i7 930 with any true stability) The lowest temperature, if multiple blocks reached this limitation of 4.3GHz. The temperature limitation I set is at 60°C +/- a couple of degrees.
I will be using Realtemp as my temperature monitor and Lynx under 20 loops x 6 runs. I will be using the same exact thermal paste on all water blocks, to ensure my results will be as close to fair as I can possibly make them. Each water block will be ran 24 hours under some rather grueling circumstances to allow the fluid to settle in to each water block tested. Your results may and possibly will vary from my own. Ambient Temperature is around 17°C.
I will be including each companies packaging, overview, and installation pages. I will be using the Gigabyte X58A-UD3R only as “test fitting”, and for the installation guide per water blocks instructions. The Asus Rampage II Extreme will be performing all my tests.

For my flow rate testing this will be performed with one of two 300GPH pumps that I have on hand. I will run the pump by itself, noting the time it takes to pump out one full gallon of water. I will perform this test three times per water block and pump, then I will average the time it took each water block. I will then take the time it took and divide that number into 60. This will give me gallons per minute, then multiply that number by 60 for gallons an hour. Our formula will be like this, 60/time x 60= gallons per hour. I will be using straight distilled water for this test. No additives or anything, just straight water from the bottle. There will be a small margin of error, this error was typically +/- 3 tenths of a second. ( that is 0.3 Seconds, in case you do not understand math). So your results will vary from type of fluid used, and additives used will influence how your flow rate will be.

The 2.5 gallon bucket I used during the flow rate testing. Line one to line two is exactly one gallon of fluid. There is enough water in the bucket to keep the pump from sucking in air during testing.

Since I am going to be testing the best water blocks on the market I felt it was time to do some updating to my water cooling set up. My specific water cooling set up, is a dual loop shared res. Loop 1, internal 300GPH pump will have the CPU paired up with the XSPC Quad 120mm radiator, Loop 2 internal 170GPH pump will have the video card paired up with the Swiftech Tri 120mm radiator. Yes people, my water cooling set up, is seriously over kill.
HeatKiller Part 1
This particular water block I purchased. Since I already had a retention plate, I did not purchase one with this block. I also had to do some modification to get it to fit a certain motherboard (I will explain this later on as the review goes on.)
Packaging

This is how Water Cool packaged up their water block. On the package Water Cool gives us some images of their products, there is also their website, www.watercool.de. On the side of the packaging it will list that this water block is compatible with the 1366 socket Intel CPU’s.

Water Cool does a pretty good job on making sure this water block would not get damaged during transporting.

This water block was packaged up with the absolute bare minimum. We get a water block that fits one socket type, in this case this block fits only an Intel socket 1366 CPU’s. We get four screws, four more stand off nuts, four springs, four nuts, and finally 8 neoprene washers, what is not shown is an allen wrench for the four big screws, it wondered off on me. No retention plate, or extra mounts, these have to be purchased separately.
Overview

Time for us to start our overview of the HeatKiller water block. Looking at the top of the water block, the water inlet is in the center, the outlet is the outer most port. Water Cool does have a sexy looking water block. The entire water block is made of copper, with a stainless steel insert.

The overall base of the water block is not a mirror, I was expecting it to be more of a mirror, being this block goes for around the 90USD mark. You will see a nice dime sized mirror spot, I Was going to lap this water block to a mirror finish, but stopped when I received word on reviewing the other water blocks.

Water Cool uses six allen type machine screws that secures the base onto the top. I thought this was going that extra mile to ensure a tight leak proof seal.

Since I removed all of the six machine screws that held the base on, lets see how the internals look like. The allen wrench you see is a 0.050 inch, as we can make out the micro fins that Water Cool uses are much smaller then the allen wrench. Water Cool machined 50 micro fins out of the base it self. Do not let the picture fool you, these fins are extremely small.

What the original water base looked like.

I had to do on a review for a specific a motherboard, when I purchased this water block. I ran into a major problem with this water fitting that motherboard properly. I had to file a side down a little bit in order for this water block to fit properly on that motherboard I was reviewing.

Turning our attention over to the upper piece of the water block, Water Cool use a stainless steel nozzle plate that will help evenly distribute the fluid over across all 50 of the cooling fins of the base.

The nozzle plate is not the only thing that ensures the evenly distribution of fluid, the inlet is also cut with a narrowed prechamber to also ensure evenly distribution of fluid across all cooling fins.

The stainless steel nozzle plate is not all that thick.

I am throwing these next few images to show you how to remove the Socket mounting inserts. You will have to remove the CPU coolers base to gain access to these small allen wrench cap screws.

I was using a 1/16″ allen wrench, just insert the allen wrench into the cap screw then turn counter clockwise.

Keep going till the screws comes out. There are two screws per socket mounting insert; both have to be removed.

Then just remove the mounting insert.

Me showing you that it is removed completely from the block. To put it all back together just go in the reverse order.
HeatKiller Part 2
Again a reminder, I purchased this water block from FrozenCPU.com. If I gotten this water block as a review I would not have made any modifications to it.

Since there has been some motherboard incompatibility issues with a few water blocks and Gigabyte based motherboards (X58 chipset based to be exact), I felt I should use my X58A-UD3R motherboard from Gigabyte for a mounting guide. Notice the capacitors are sitting right up against the CPU socket hold down bracket? Pay real close attention to these.

We need to get ahold of the stand off studs that comes with the HeatKiller water block, then put the neoprene washers onto them, like so. The CPU shown in this picture is my old burnt out Core i7 920, this is not the CPU that was used for testing.

Place the stand off stud right through a motherboard mounting hole.

Then put another neoprene washer on it then place a nut over that to fully secure it to the motherboard.

Do this three more times.

Me using the five dot thermal paste patern across the CPU IHS. This will tell l me how the water block is hitting the CPU, it also allows the thermal paste to spread evenly across the CPU IHS/CPU cooler.

Remember the position of the water block. Remember one side of this water block has been filed down a bit. This is not that side, this side of the water block has not been filed at all.

Hmm what’s this? It appears the Heatkiller is sitting right on top of the capacitors of the Gigabyte motherboard. And yes, the water block is fully secured and this is not an illusion. I had to remove the mosfet heatsink on one side of the motherboard to get a better picture of this.

Notice all the screws are standing upright? They all are threaded into there respected holes. Not fully, because I did not want to possible damage this motherboard. By fully tightening these screws down, I can damage those capacitors and render this board useless.

I already knew the block was not hitting the CPU properly, this why we should do constant test fits to ensure our CPU coolers hit the CPU IHS properly.

Always verify what is on the CPU IHS with the CPU water block.

Now, I have rotated to the side of the block I moddified. Notice how this side just barely clears the capacitors. I had to do this when I first recieved this water block, because of a review I had to do with this very same motherboard.

Perfection, I should mention for a 90 USD water block I should not have to modify anything in order for this block to fit properly on any motherboard.

Reconfirms what I have on the CPU IHS, perfect fit.
Stay tuned as the Koolance 360 CPU water block is up next.
Koolance CPU 360 Part 1
Time for us to turn our attention over to the second water block in this “Battle Of the Titans”; the Koolance 360CPU water block.
Packaging

Out of the three water blocks tested here today, Koolance packages their water block quite plain. Koolance just lists the Model of the water block, in this case it is a CPU 360 water block. Unlike their previous CPU 360 water block this one is a revision 1.1. Now I wonder what Koolance did to this water block? I guess we will have to wait and see.

Opening up the packaging, reveals how Koolance packaged up this CPU cooler. Koolance used little cardboard separators to keep things nice an tidy inside. (I will go through what comes with this product.)

Removing the part of the mounting hardware, and its cardboard separator. We can see the a quick glance of the CPU water block itself.

On the very bottom of the packaging, is the other half of the mounting hardware. Koolance includes two retention plates, 1 is strictly for the 1156 Intel CPU socket, the last retention plate is used for the AMD AM2+/AM3 socket types, Intels 775 Socket CPU’s and finally for the 1366 CPU socket family. There is a rubber separator that will be used with the retention plates. FInally Koolance includes the AMD AM2+/AM3 upper moutning hardware.

This is the other half of the mounting hardware. We will get four thumb nuts with springs. Four stand off studs that get threaded into the retention plates, four plastic washers, four copper/aluminum pieces of tape, these will be used for temperature probes that get mounted to the water block directly. Finally we have a small tube of thermal paste.
Overview

Let’s start the overview of the Koolance CPU 360 water block. But before I head over to the water block. Let’s check out the mounting hardware. Koolance uses four stand off studs that get threaded directly into the rention plates. As we can see part of the shaft is smooth.

The thumb nuts are fairly large, These will used in conjunction with the springs, that will hold the CPU 360 water block in place.

The springs that will be used. These are fairly stiff springs, It is recommended that you use the retention plate when using this water block.

I forgot in the packaging, Koolance includes an allen wrench.

Time for the water block. Out of all the water blocks tested here today and with past water blocks I used, this water block is by far best looking one.

Flipping the water block over on its back to see what is actually different from the first CPU 360 water block. Hmm, it appears that Koolance chamfered the edges of the base of the water block. Like always remove any plastic coverings on the base of the CPU cooler prior to using.

Koolance lists the revision number of the water block, right on the block itself. This one is a Rev. 1.1, when you purchase your Koolance CPU 360 water block make sure this revision # is on the block.

Previous CPU 360 water block had problems moutning to the Gigabyte X58 chipset based motherboards. Koolance chamfered the edges of the block to get this water block to fit properly.

Koolance nickle plates all of their water blocks. As we can see the base of this water block has a perfect mirror finish.


The included allen wrench, will remove both the base of the block and the top mount of the water block.

All screws have been removed. Now we can lift the Intel mounting right off.

Here is the CPU 360 water block with no base, or top attached. Unlike previous water blocks from Koolance, where the mounting harware kinda just floated on the block itself, this water blocks mounting hardware is fully secured.

In true Koolance fashion, the mounting plates are thick and heavy.

If you are an AMD user, you could use the Intel mount as a weapon. Or wife/girl friend units could also use this as a weapon. May wanna hide this mount after removal, lol.

I did not fully mount the AMD mounting hardware. This is to show you how the top gets placed onto the Koolance CPU 360 water block.

Similar to the HeatKiller water block, the 360 water block also uses a stainless steel nozzel plate.

Once again similar to HeatKIllers input, the design of this portion of the block ensures that fluid will get distributed evenly across the cooling micro fins of the base.

Like the HeatKiller water block, water comes from the center of the block, hits the cooling micro fins of the base then moves it way to the sides of the block through the channels, then out the outlet.

Looking at the chamfered base of the water block. This was done to all four sides of the base of the CPU water block.

Unlike the HeatKiller water block, Koolance puts in a small notch directly into the cooling micro fins of the base. This will also ensure evenly distribution of fluid across both sides of the base.

Looking at the cooling micro fins of the base of the water block.

These micro fins, are extremely thin.


A quick look at the stainless steel nozzle plate.


You will have to purchase your own set of barbs for this water block, as they do not come with the packaging. These barbs are what Koolance sent over with the CPU 360 water block. They come in both 3/8″ and in 1/2″ flavors.
Stay tuned; mounting is up next.
Koolance CPU 360 Part 2
Time for us to see how the Koolance CPU 360 gets mounted to our motherboards. I will be using the Gigabyte X58A-UD3R motherboard during this portion. I will also be doing a slightly different mounting guide as well.

First things first, we need to start off on the retention plate that Koolance packaged up. Notice this retention plate is for the Intel Socket 775 and 1366 CPU’s, including AMD CPU socket types. For the 1156 socket retention plate uses a completely different retention that is also included in the packaging. Both retention plates have pre-drilled, pre-tapped holes.

This is pretty simple step. Locate all four of the mounting studs and screw them directly into the retention plate. I would suggest on using a wrench to tighten these down fully to the retention plate.

This is how they should look like once all four are installed. No washers will be used for this process.

Locate the rubber separator, then place that over the retention plate. This will ensure the motherboard and retention plate do not touch each other.

Insert the retention plate through the mounting holes on the motherboard.

Place the CPU cooler through the studs until it sits on top of the CPU. (I was doing a mock up mounting, I left the base off during this portion ONLY.)

Then you will place the thumb nuts over the springs and tighten down snugly.

This image is showing you that the retention plate does not get mounted to the motherboard. It will slip out of place if the water block is not mounted.

My slight modification to the mounting. I like to have the retention plate get mounted to the motherboard. Makes it so much easier for me to switch out water blocks quickly and easily, with out removing the motherboard every-time a switch is made. I bought four 2″ #6×36 pan-head machine screws and threaded them into the retenion plate. Then tightened them down fully.

Like so.

I placed the rubber separator over the bolts and retention plate.

I will need to use four extra nuts, and washers. You will count up three neoprene washers, with one rubber O-ring, one steel washer. You can use steel washers, but you will have to use a rubber O-ring in between the washer and motherboard.

Insert the retention plate through the mounting holes of the motherboard. No different from the original way. Then slide the neoprene washers over the mounting studs.

For those with the rubber O-ring and steel washer mounting. You just place the rubber O-ring over the stud.

Place the steel washer over the O-ring, and push it down till it stops. Bingo, all rip raring to go.

Then locate your four nuts (in this case these are thumb nuts as well) tighten all four down fully, and snuggly.

Now when you move the motherboard around the retention plate stays firmly attached to the motherboard. And I can also remove and install CPU water blocks with removing the motherboard.

Even though I did a slightly different mounting style, there is still enough clearance for the water block.

Time for a full on mounting. I need to thread on the barbs of the water block prior to installation.

Both barbs are firmly secured. Your input for the fluid is the exact center barb, and the output is the farthest edge barb.

This is the CPU I will be using for my testing. It is none other then the Intel Core i7 930 1366 CPU.

Same five dot pattern I will be using through out this review.

Make sure you place these washers on all four studs after the water block gets placed over the CPU.

Another tip to remember, is too always tighten in a cross hatch pattern shown here.

Since everything is fully mounted, and secured properly. It is time to see how the 360 faired. Did the water block hit the CPU properly or is it hitting the capacitors? It looks like this water block clears the capacitors, but I am not 100% sure it really is. Only one way to find out. Remove the water block and check the thermal paste dispersion.

Perfection, this verifies that the CPU 360 water block was indeed clearing the capacitors, and it also was hitting the IHS of the CPU properly. The angled cut outs that Koolance did, did do some good.

Always check what is on the CPU we have on the water block. Again, perfection.

The Koolance CPU 360 fully installed onto “Mini Me”. Like always, prior to running any water block, run it 24 hours prior to hooking it up to the computer to ensure no leaks are present.
One more “Titan Water Block” to go through, and it is on to our testing results.
EK Supreme HF Part 1
This water block was brought to me by performance-pcs.com.
Packaging
Time for us to look at our last Titan water block.

EK, uses a rather unusual packaging. Similar to how Koolance packaged up the CPU 360 water block, but EK adds a bit more color to their packaging.

EK also ensures us that this product is for our CPU’s, and that this is a full copper water block.

EK gives us some of the technical DATA, we as water cooling users need to know about this water block.

Looking at how EK packaged up the Supreme HF CPU water block, we can see that so far not much is different with what we have seen from previous water blocks packaging. The instructions and mounting hardware is placed on top of the box to keep it from damaging the actual water block itself.

Removing the mounting hardware and lifting the inner lid up, we see how the block block is protected. EK placed the water block inside of a plastic bag; then, placed two foam pieces one on top and one bottom of the water block.

The contents of the packaging laid out. EK includes mounting for Intels 775/1156/1366 CPUs (already pre-mounted on the water block) AMD’s AM2+/AM3 CPUs, both CPU manufacturers types of retention plates. We get four extra nozzle plates to customize our specific water cooling needs even further, four machine screws, four nuts, four thumb nuts, eight isolator washers, four springs, four more black plastic neoprene washers, and finally an allen wrench. Just like the Koolance CPU 360 water block, we get a lot of extras with these water blocks. Not just the bare minimum.
Overview

Time for us to see what makes the EK Supreme HF water block.

Unlike both the HeatKiller and the CPU 360 water blocks, where the base of the CPU was thin. The Supreme HF water block uses a rather thick base. I also do not see how we can switch out the mounting hardware with this water block. Guess I will have to rip things apart to find out.

Like always remove any protective cover on the base of the water block prior to using.

This water block is a non nickle plated block, and this is an exceptional lapping job. The base of the Supreme HF water block is a perfect mirror. There is a small depression in the base itself as designated by how the screws seemed to be warped. I would not worry about that, this did not hinder this water blocks performance at all.

It only makes sense to put to use the included allen wrench. This is for us to switch out the nozzle plates, and change out the mounting hardware. These screws were tight, when I was loosening these up these creaked a little bit upon loosening them. I ended up breaking out my case hardened Snap-On allen wrenches as the allen wrench that was included, twisted a little too much for my tastes.

Remove all four screws that secures the base of the Supreme water block. Then lift the base straight up.

The one area I was not expecting with the Supreme HF water block, was the nozzle plate. As soon as I removed the base the nozzle plate slipped out of place. This presented a small minor problem when I re-assembled the block back together. I kept wondering if I got the nozzle plate in the right spot, or did it slip out place? It did slip out of place on me, on the first time I re-assembled this water block. Just needed to be mentioned.

Another unexpected thing that happened to me while I removed the upper mounting plate. The O-Ring came off with it. A little odd, but ok. Just need to figure out how to put it back together properly.

The O-Ring does not sit in a cut out like other water blocks. Instead it rests on the outside of the upper part of the water block. The upper mount also serves as a holder for the outer portion of the O-Ring.

Time for us to go over the base of the Supreme HF water block. It appears this design is being favored among the best of the water blocks. It also appears the actual fins, are a bit more wider then both of the HeatKiller, and the CPU 360 water blocks. I do not have a micrometer that small to verify this.

Giving you an idea how much space there is between each fin. If I would have doubled the piece of paper I was using, I am sure it would have hit the sides of the fins.

EK also includes extra nozzle plates for us to customize this water block for our needs. This nozzle plate is the #4 nozzle, and it is the biggest one.

The #2 nozzle plate.

The blank nozzle plate is for us to customize our own personal nozzle, for the Supreme HF water block.

To finally we have the #1 nozzle plate.
Next up is the mounting of the Supreme HF water block to our Gigabyte X58A-UD3R motherboard, and see if this water block will work on this motherboard.
EK Supreme HF Part 2
Installation

Since the Gigabyte X58A-UD3R motherboard is an Intel socket CPU. I need to locate all of the lower Intel Socket mounting hardware. You will be using all of these parts for the first bit of installation.

I got a feeling this is not going to be much different from how I mount my water blocks onto my computer. Insert the machine screws int hrough the retention plate (silver) and the rubber gasket (black).

After you get all four of the machine screws through the retention plate and gasket, locate the four small black neoprene washers and put them on the screws.

You should have this. Now the fun part is next. We need to hold all of the screws (from falling out of the retention plate) and put this onto the backside of the motherboard. I never said it was not challenging, but I have been doing this for so long it is second nature to me.

Now hold all of the screws and the retention plate to the motherboard. Do not let them slide back out. Then rotate the motherboard ride side facing up.

Next up is to locate four of the eight of the red isolator washers, then place them over the machine screws (or studs now).

Locate four the four nuts, not the thumb nuts.

Then thread them all the way down to the isolator washer. It be advisable to use a phillips head screw drive on the machine screw on the back side while holding onto the nut with your fingers and tighten these down snuggly. Otherwise the screws will just spin when you start tightening the water block to the studs.

The only thing I would have done differently, instead of using the chamfered screw head machine screws, I would have used or included pan head screws. This will ensure the machines screws do not angle themselves away or towards the CPU socket (this has happened to me once or twice with other mounting hardware). As we tighten the machine screws fully.

Now it is time for the water block to get secured to the CPU. This is just a quick test fit, to make sure everything is lining up properly. Next thing to put on is the last four isolator washers onto the water block then the springs, and then the four steel washers over the springs.

Then finally we put on the four thumb nuts over them and tighten these down snuggly. This water block has no issues being able to fit on a Gigabyte X58 based motherboard. I forgot to take snap shots of this fitting, but rest assured I have no issues regarding fit.

Since the actual testing motherboard, Asus Rampage II Extreme motherboard, is already using a much similar mounting style as the Supreme HF, I will just use that one. The same five dot thermal paste I used on the other two water blocks. This will let me know of how flat the base of the water block is, as well as fit.

I placed the water block onto the CPU, pressed down on the top of the block, counted to thirty then removed the block.

Looks good enough for me. The base of the Supreme HF water block is flat. It is too bad the CPU IHS is not. Seeing this, makes me wanna go out, and lap this IHS perfectly flat. (article for that is Located HERE)

Always make sure what is on the CPU, we have on the water block as well. Perfect thermal paste dispersion.

Final Assembly of the Supreme HF water block.
Testing is up next. Let’s see how the flow rate of five different water blocks compare to one another, and to see how each of the Titan water blocks compared to one another.
The Results
Reminder: I will be using a retention plate on all water blocks tested here today. The scoring of each “Titan Water Block” will reflect any exclusion of major components. I will be listing Maximum CPU frequencies achieved with each water block tested, along with their respected temperatures. Pay close attention to both. I set a temperature limit of 60+/- a couple of degrees as my max temperature limit. I am a true believer of not allowing our CPU’s reaching above 65°C.
Since this not a “Controlled Environment”, meaning the Dragons Lair or The Dungeon, your results may vary slightly form my own. The overall ambient temperature is hanging around the 17°C range.
The water blocks we only need to pay attention to, is the Titan Water Blocks, Koolance CPU 360, HeatKiller Rev 3, & EK Supreme HF water blocks. The other listed are here for chits and giggles.
Flow Rate
The flow rate testing was performed by pumping a full gallon of water through all water blocks tested. I timed each water block it took to pump the water through each water block, I did this three times and used the average time it took. This is just the water block with no radiator during this test. The pump I will be using is a 300GPH rated pump, I will also include this as my base line performance for this portion of testing. Since fluid types vary from computer to computer and user, your results will vary.
To get the actual GPM/GPH for the time it took, is simple. Since there is 60 seconds per minute, we divide that by our times, 60/time = GPM (Gallons Per Minute). For GPH (Gallons Per Hour) we multiply GPM by 60. 60*GPM=GPH. I will round the numbers to their nearest hundredth.
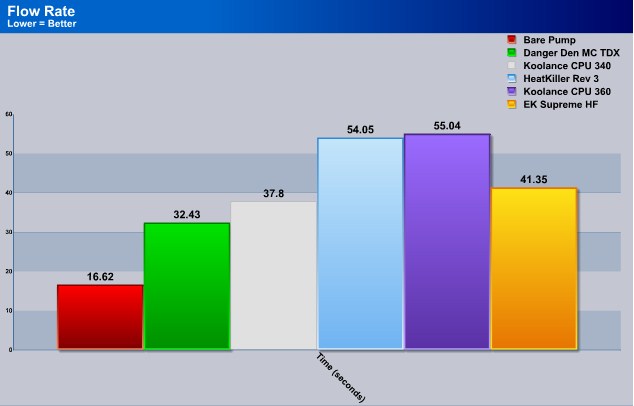
The results of the Time it took to pump one gallon of water through each water block. As we can see it takes no time at all for the pump too pump one gallong of water by itself. Out of the Titan Water Blocks tested, The best flow rate win, goes to EK’s Supreme HF. Up next is the GPM/GPH results.
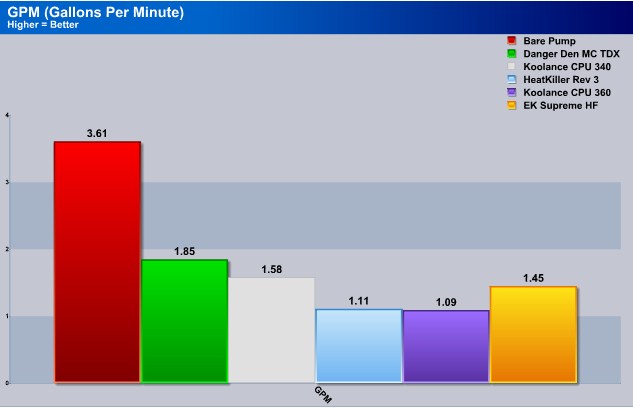
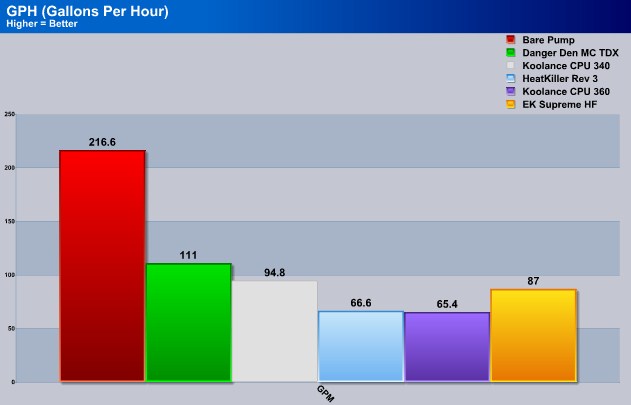
The block with the best time, naturally has the best GPM/GPH rating. As we can see again the EK Supreme HF water block has the best GPM/GPH flow rate out of the three Titan Water Blocks tested. The question is not whether how well the flow rate is, but how well these water blocks cool while maintaining a high flow rate.
Maximum Frequency Achieved
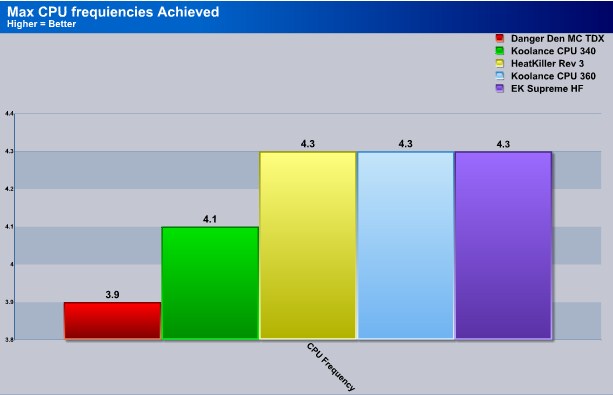
Since I placed A CPU temperature limitation of 60°C +/- a few degrees, I will need to list each water blocks maximum CPU core speed achieved. Again, I am unable to go above a 4.3GHz with any reliability on my Core i7 930 CPU. This was my maximum CPU core speed I had to use. As we can see all three Titan Water Blocks tested here, all achieved 4.3GHz. Now it is time for us to see how the temperatures fared.
Temperatures
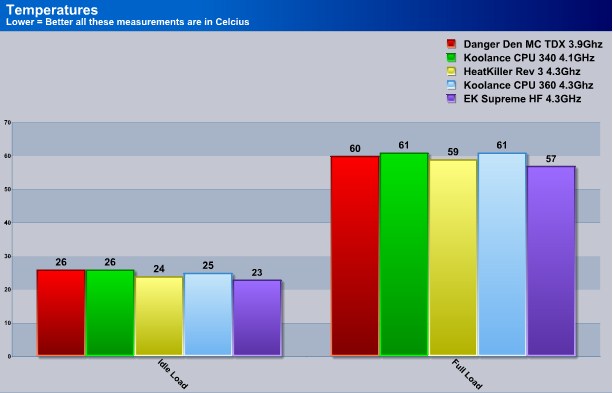
Looking at these results, got me to thinking that this is a really close race among all of the Titan Water Blocks tested. The EK Supreme HF water block had the best overall temperature of 2°C lower then the HeatKiller Rev 3, and 4°C cooler then the Koolance CPU 360. During my extensive testing of all water blocks, the EK Supreme water block kept coming in consistently with the best overall temperature.
The Conclusions
Since I was fair in the testing of each water block right down the the thermal paste used and how it was applied, I will be just as fair to their rating. All of these “Titan Water Blocks” come in the price range of 90USD a pop, so my scoring will reflect on what each water blocks extras (mounting, attention to detail, and if a retention plate was included) came with. Enough chit chatting lets get on with each water blocks individual Conclusions.
Water Cool’s HeatKiller Rev 3
My personal experience has been a good one reguarding this water block. From the minute I recieved this water block I was seriously impressed with its performance. But after receiving the Koolance CPU 360, and the EK Supreme HF water blocks, I changed my overall thought of this water block. This water block does not come with any extra mounting, No AMD mounts, No Intel socket 775/1156 CPU mounts. Not even a retention plate. The base of the water block, was ok not extravigant, I was expecting a bit better more spit and polish on the base. Even though this water block performed quite well, I cannot overlook the missing components that the other two Titan Water blocks come with. Another area I was disappointed with was the inability of being able to use this water block on a Gigabyte X58 based motherboard with out modifying it.
I give the HeatKiller Rev 3 a 8.0 out of Ten and the Bjorn3d Silver Award

Koolance CPU 360 Rev 1.1
This water block is both impressive in its ability to keep our temperatures down as well as looks. This water block simply looks amazing. Personally I think it is the Nickle Plating that Koolance Used, is what is holding this water blocks ability to perform extremely well. Koolance also gives us a retention plate (the thickest one available to date) makes this water a solid canidate for any water cooling nut. And having the ability to use this water block on an AMD platform with out having to purchase more mounts, and retention plates definetly helps this water block out.
I give the Koolance CPU 360 Rev 1.1 a 9.0 out of Ten and the Bjorn3d Golden award

Ek Supreme HF
EK has got themselves a great water block that performs extremely well, and also has a really good flow rate to boot. Giving the users the ability to switch out mounting hardware from Intel Socket CPU’s to AMD Socket CPU’s is a great added plus. Another area I am happy to see is the inclusion of a retention plate. The only area I feel the EK can do better in, that the other two Titan water blocks did, was to lock the Nozzel plate into place. Having it float around did make putting the block back together a minor issue. It is not enough to hurt the overall scoring.
EK also has this water block in three other flavors. An all nickle plated block, Acetel topped water blok, and a clear Lexan top.
I give the EK Supreme HF a 9.5 out of Ten and the Bjorn3d Golden award


