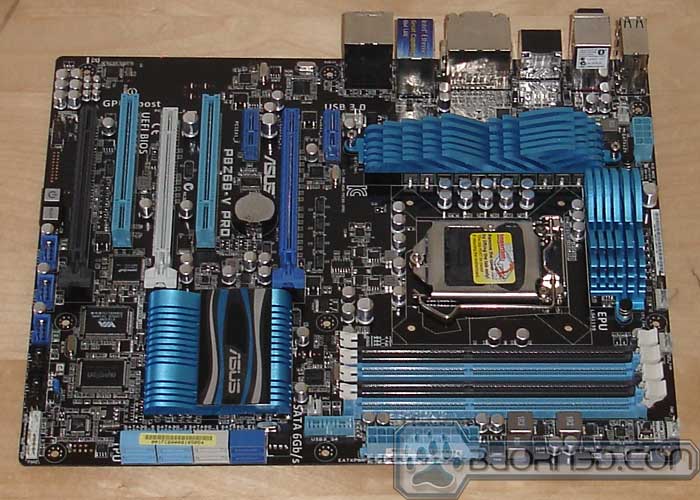
ASUS has launched its latest motherboard: the P8Z68-V Pro, using the Intel Z68 chipset. Like the P67 boards, the P8Z68-V Pro has plenty of features, ports, and the performance to back it up.
Introduction
The Sandy Bridge launch has been a bumpy road for Intel. While the processor performance is great and it is extremely power efficient, the Cougar Town (6 series) chipset recall made a dent in the sales of the new platform. The truth is the 6 series chipset defect has been slightly blown out of proportion, and that it is less severe than has been portrayed. For one, the chipset probably will not fail, and even if it does, the symptoms won’t show for 3-5 years.
The bigger issue with new 6 series chipsets, P67 and H67, from Intel is rather that it halved the market along a very rough line: enthusiasts (for whom the P67 was intended) and mainstream/budget users (for whom the H67 was intended). This allows enthusiasts to overclock the processor, however, the P67 requires a discrete graphics card, and will not let users tap into the Sandy Bridge’s on-die graphics or reap the benefits of one of Sandy Bridge’s best features–the Intel Quick Sync.
Quick Sync is probably one of the biggest selling points of the Sandy Bridge architecture. Yes, Sandy Bridge is extremely fast, and it rivals even the Core i7 980X in some applications. It is also very power efficient and overclocks easily. But Quick Sync stands out among these improvements simply because it outsrips any other means of video transcoding in terms of performance and image quality.
Unfortunately, for enthusiasts that chose P67 boards, this feature was not accessible to them as the integrated graphics is disabled on the chipset. Users who choose H67 chipset gets the benefit of the QuickSync, but unfortunately, they are limited by the overclocking potential as the Turbo Ratio has been locked.
Today’s launch of the Z68 Express chipset is aimed to merge the P67 and H67 chipsets together, offering enthusiasts the ability tap into the Quick Sync Video, and allowing mainstream users greater overclocking potential in everything (including BCLK, Turbo Ratio and iGPU).
Intel Z68 Express Chipset
The Z68 Express is the prodigal son of the marriage between the P67 and H67 Express chipsets. It brings the best of the both P67 and the H67 together. Among the new features include:
- Switchable graphics: the Sandy Bridge integrated graphics can be used in conjunction with a dedicated graphics.
- Intel Smart Response Technology: which is Intel’s name for SSD caching–adding an SSD to a mechanical hard drive to boost the system performance.
- Intel Identity Protection Technology: A dynamic code generated within the PC allowing sites to authenticate a trusted PC. For home-users, this is probably less important, but it will be crucial and useful in a corporate environment.
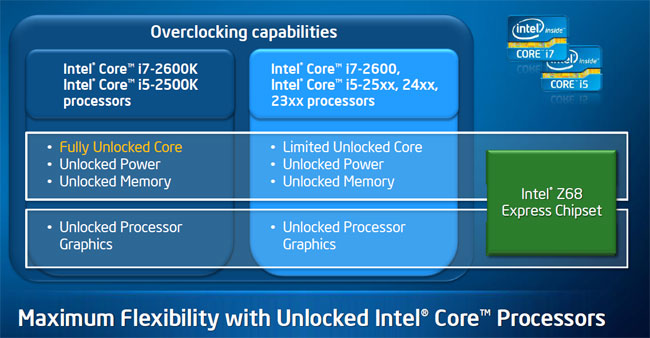
Of course, by marrying P67 and H67 and allowing users to tap into the integrated graphics, Intel brings greater overclocking potential with the Z68. Now, everything inside the processor can be overclocked–the graphics and the processor. Paired with the K series processor, users would be able to overclock with the multiplier like on the P67 boards, but at the same time, overclock the processor by raising its frequency.
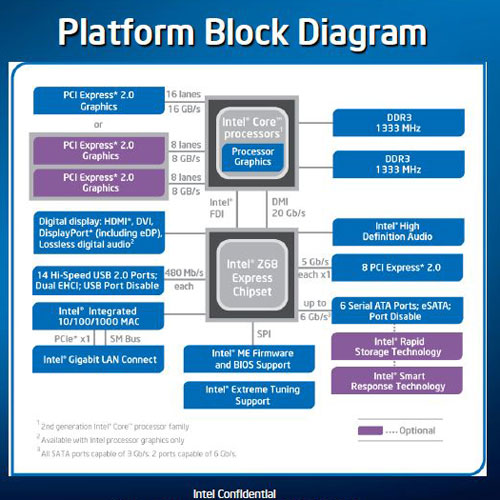
Other than these two new added features, the Z68 is essentially the same as the P67, sportin 20 PCI Express 2.0 lanes, of which 16 are dedicated for the graphic cards. The system still is only capable of supporting SLI in dual x8 configuration. Tests have shown that dual x8 configuration does not have any impact on the graphics performance, so the fact that the x16 is being split into the dual x8 should not be an issue.
The remaining 8 PCI Express 2.0 lanes are shared by the other ports such as SATA 6Gbps, network, and USB ports. There is still no native USB 3.0 support and motherboard vendors still have to rely on third party chip makers for that, and obviously we do not see Thunderbolt. For these two features, we would probably have to wait until the next generation of chipsets from Intel. The 8 PCI Express 2.0 lanes are starting to get slightly congested with so many things being attached to them.
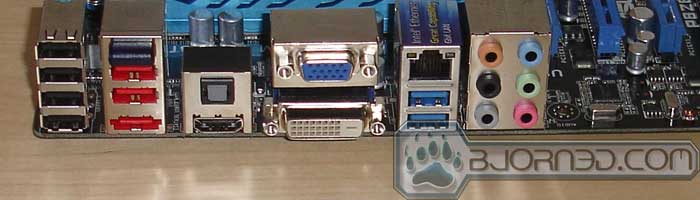
There are two 6Gbps SATA ports, four 3Gbps SATA ports and 12 USB 2.0 ports. For displays, the chipset supports HDMI, DVI, DisplayPort, including eDPI, with lossless digital audio support. This is the same support as is on the H67 Express chipset.
Intel smart response: SSD Caching Performance
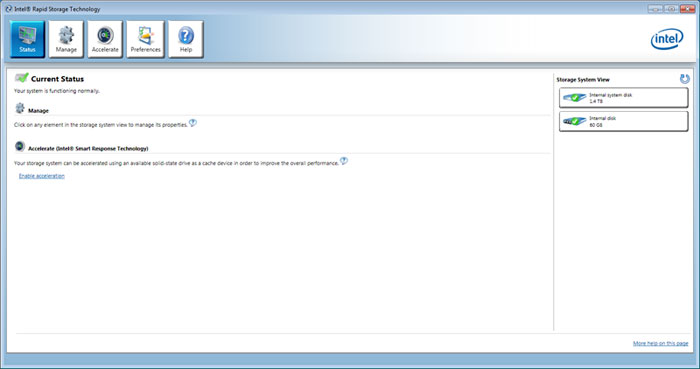
One of the most interesting features of the Z68 chipset is the Intel Smart Response, which is essentially SSD caching. The idea is very much like Windows 7 ReadyBoost which uses a flash storage device to cache contents. However, unlike ReadyBoost, where flash drives are used as random disks, the SSD caching system on the Z68 uses SSDs to cache commonly used applications. This will result in faster application launches and system performance.
The SSD caching will not compete against real SSDs in terms of performance but it will greatly enhance the system performance of a mechanical drive by adding a small size SSD. With commonly used data stored on the SSD, the system will be more responsive and applications will launch faster because SSD burst and sequential read speeds are often two to five times faster than those of mechanical drives.
To use SSD Caching, the following requirements must be met:
- 1 x SATA interface SSD drive capable of delivering read/write performance not slower than 100MB/s read and 150MB/s write.
- The minimum storage space needed for the SSD must be 20GB
- 1 x standard 7200RPM or 5400RPM HDD.
- Windows 7 operating system
Setting up SSD Caching is also extremely easy thanks to the latest Intel Rapid Storage program. Simply follow the guideline below:
- Perform a full SECURE Erase of the SSD with application from the SSD vendor.
- Format the HDD into NTFS, follow by a full format of the HDD.
- Set the Intel SATA ports to RAID mode.
- Install OS onto the HDD.
- Install Intel RST 10.5, then reboot.
- Enter RST 10.5 control interface, and click on the Accelerate button.
- Select the SSD drive, the amount of space to be used as cache, the HDD volume to accelerate, and the acceleration mode, then click on OK to proceed.
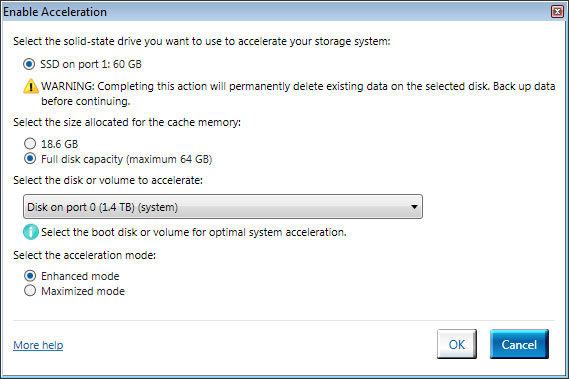
By default a minimum of 18.6 GB of space on the SSD is needed to setup the SSD caching. Up to 64GB of space can be reserved for the cache. This is a good range as it offers enough space for the OS and 2-3 commonly used applications. Also, 64GB is a good number because for those who can afford an SSD larger than 64GB, using the SSD as the primary drive would be much more beneficial for performance. After all, the data is still stored on the mechanical drive.
Intel offers two modes of caching mechanism: Enhanced and Maximized. While the read performance for both modes is roughly equal to the read performance of the SSD, the write performance for the Enhanced Mode is a little slower than the slower of the two drives used (SSD or HDD). The write performance of the Maximized Mode, on the other hand, would be closer to the performance of the SSD. In addition, the Enhanced Mode offers stronger security as it utilizes a write-through strategy where data on the SSD and the hard disk is synchronized. In the event that the SSD is lost or damaged, no data is lost. The Maximized Mode utilizes a write-back caching strategy where data is written to the disk in intervals. The risk here is that if the SSD failed or disconnected before the data was written to the hard disk, the data would be lost.
Switching the modes can be as simple as click of a button
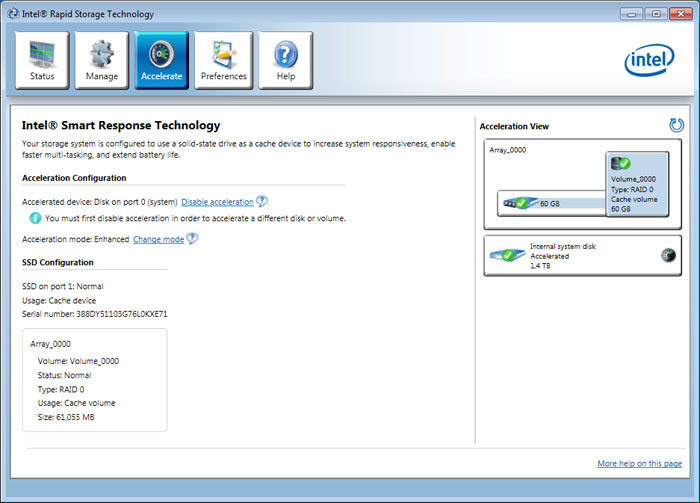
As we can see from the image above, once the SSD Caching has been enabled, a partition will be created on the hard drive with the same storage capacity as the SSD (or the size on the SSD reserved for caching). The software shows that the hard drive and the SSD are configured as RAID 0.

Something neat about the way Intel handles the SSD cache is that when an SSD is set up as the cache drive, it will not show up under Windows Computer Management. This will prevent the user from accidentally formatting the SSD.
At the moment, Intel Smart Response Technology (IST) only supports 1 HDD and 1 SSD or 1 RAID Partition + 1 SSD. In addition, the average read and write speed of the SSD must be at least 50% faster than the hard drive in a single HDD+SSD combination, and at least 100% faster for RAID 0, in order to see the performance gain.
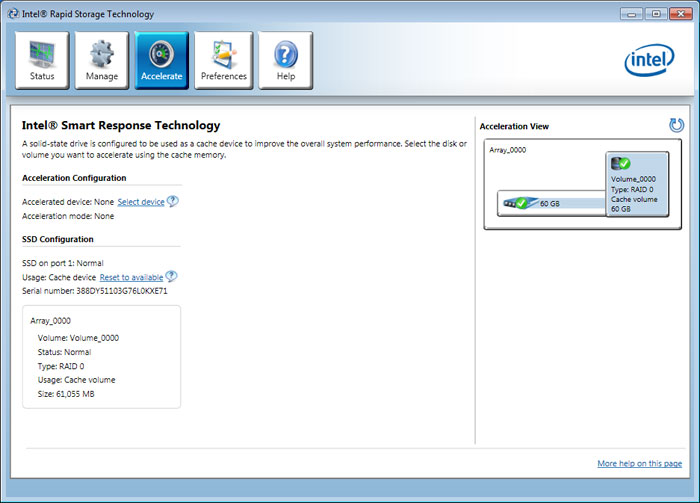
If users ever decide to stop using the SSD Caching, they can simply click on the “Reset to available” and the SSD can be used as a regular drive again.
Intel Smart Response Performance
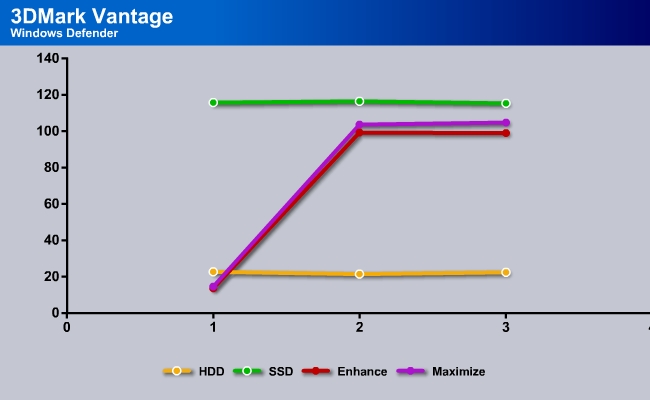
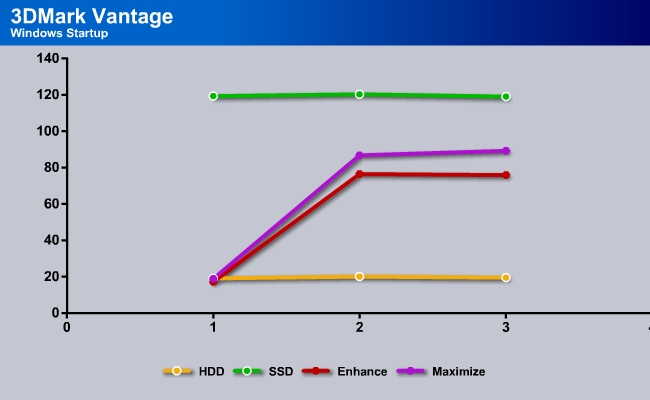
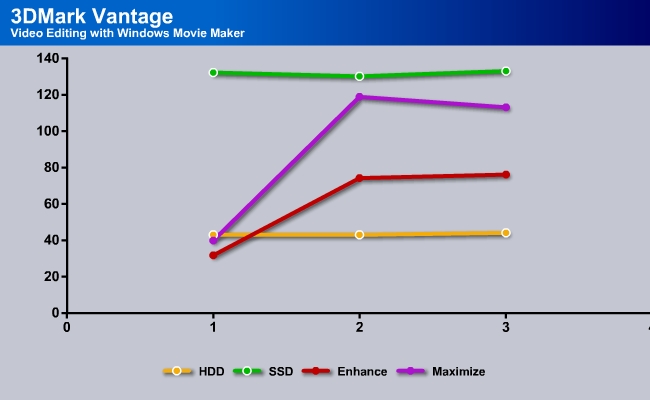
We paired the OCZ Solid 2 to our Seagate Barracuda 7200.11 drive and test out the performance of the SSD Caching. Forgive us for the typo on the labeling of the images below, we had a long night coding for the review and did not have time to fix the title. It should be “PCMark” instead of “3DMark”.
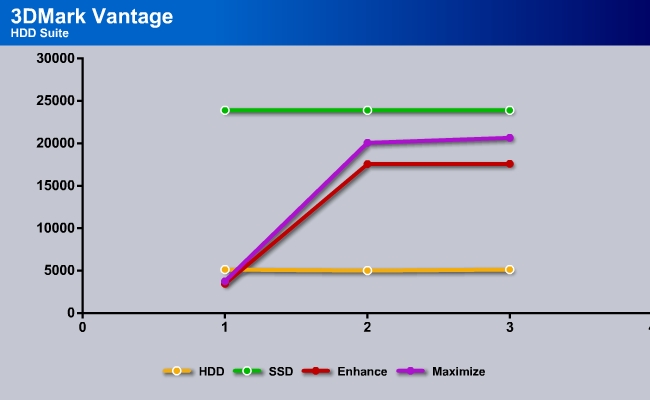
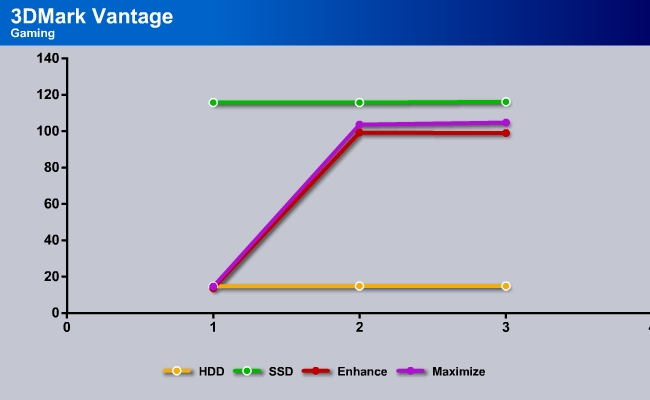
It is clear that the first time the application is launched, the performance maybe slightly slower because data needs to be written to the SSD. However, a substantial gain can be seen on the second and third times the applications are launched. While this cannot compete against real SSDs, the performance gain is substantial and noticeable where we see about 250% gain with the HDD+SSD. The Maximized mode gained an additional 18% performance.
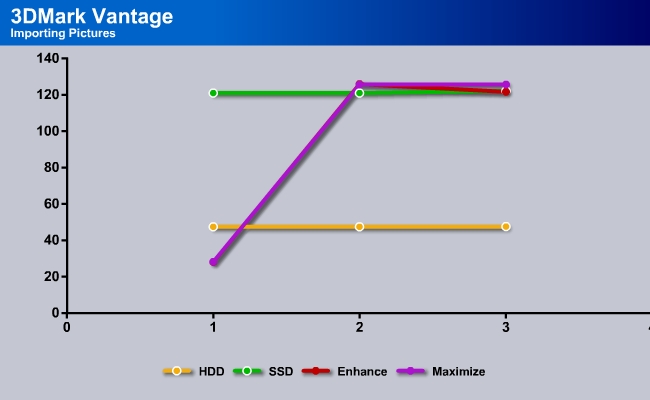
Importing picture primarily test depends primarily on a drive’s read performance and as we can see with the SSD Caching, the read performance of the HDD+SSD is on par with the SSD. This is expected as the data is being read primarily from the faster drive of the two — the SSD in this case.
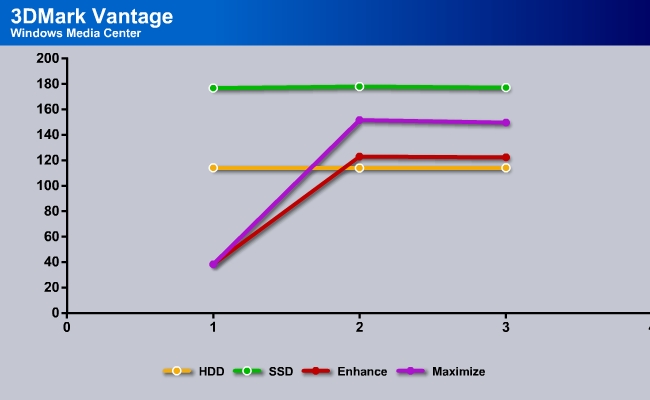
In Windows Media Center, a large chunk of data is being transcoded so it involves both read and write. Because a high amount of data is being written onto the drive, we see a smaller performance gain where the Enhance mode only offers slightly better performance than the hard drive, as the data needs to be written onto both drives simultaneously. Maximized mode offers about 40% gain over the hard drive.
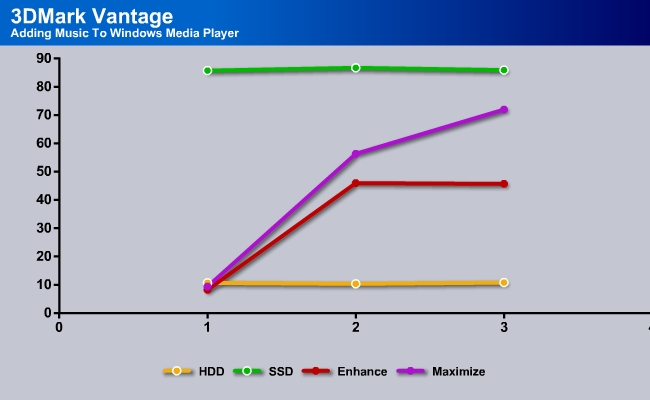
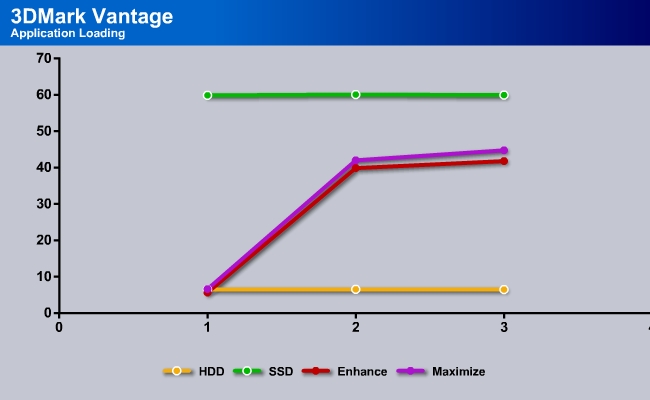
The results here clearly show that the SSD Caching can offer great performance gain by adding an SSD to a hard drive. The performance gain varies depending on the type of tasks involved. In tasks where heavy sequential data is written onto the drive, the performance gain is minimal for the Enhanced mode and is about 10-20% for the Maximized mode. However, in applications where random read, write, and sequential read is involved, the performance gain can be 400% as much as mechanical drives (especially if it’s a read heavy task). Maximized mode often shows an additional 10-20% gain in sequential read over the Enhanced mode.
iMode and dMode Dynamic Switching
The Z68 adds a Flexible Display Interface (FDI) between the processor and the chipset, allowing enthusiasts utilize the integrated graphics. As a result, users can tap into the Quick Sync to speed up the transcoding time. In addition, the new chipset also supports switchable graphics where the integrated graphics can be used in conjunction with a dedicated graphics card. At launch, only Hydra Lucid Virtu will be supported, but we have been told that NVIDIA Synergy will be available later date via BIOS and driver updates.
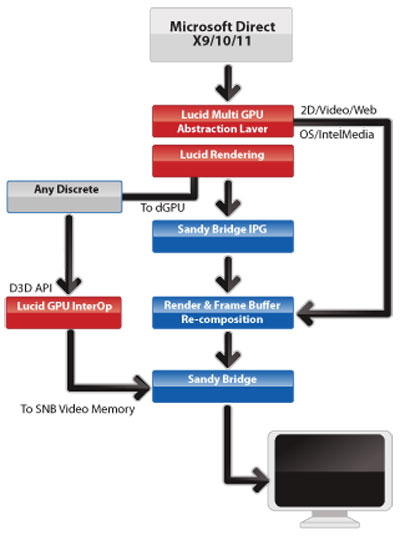
Much like what we have seen with the Hydra, Virtu sits between the GPU and the application/game, intercepting API calls and directing the workload to the dedicated graphics or the integrated graphics depending on the types of the application. Unlike the Hydra, which requires a chip, Virtu is purely software based. The Virtu software contains profiles and assigns the task depending on which GPU serves the system best for the given task. Since no physical switch is needed to direct the workload, both the integrated GPU and the discreet GPU can work simultaneously. Talk about real parallelism.
While the Z68 supports dynamic switching between the built-in graphics and the discreet graphics, how it is implemented depends on the motherboard manufacturer. The ASUS P8Z68-V Pro we received has video ports on the motherboard to be used with the integrated graphics, where consumers can set the integrated graphics as primary (iMode) or the discreet graphics as primary (dMode). Some vendors, like the Gigabyte’s Z68X-UD7-B3, may choose to simply supporting one mode or the other only supporting either iMode or the dMode.
In order to use the graphics, the system must meet the following requirements:
- Windows 7 32 or 64bit
- Z68 or H67 Express chipsets
- Sandy Bridge processor
We tested the switchable graphics with our ASUS P8Z68-V Pro board. As mentioned, ASUS boards support both modes. ASUS’s implementation allows users to choose what works best for them. Those who do more video encoding and want lower system power consumption should choose iMode mode; those who want the best gaming performance should use dMode mode.
We like how ASUS implements the GPU virtualization by offering both modes of operation. We found that if we set the system to dMode mode and Virtu did not have a profile for the particular game, it would always default to the onboard. For example, we ran the Crysis Warhead Benchmark tool, and Virtu failed to recognize it and reverted to the iMode. As a result, the performance was quite dismal. However, if we set up in dMode mode, then the benchmark tool works great because it defaults to the dMode despite lacking of the profile.
It’s nice to be able to play games at high resolution with the dedicated graphics and encode video at the same time with the integrated graphics.
Some may be thinking that’s fine to simply have the discreet graphics as the primary graphics and enjoy the best gaming performance. While this is true for gamers, people who need to tap into the Quick Sync for video encoding would suffer if a particular application lacked the appropriate profile. Thus, with iMode as the primary graphics, even if a particular application profile is not listed under Virtu, the system will still able to utilize Quick Sync.
One inconvenience, however, is that when switching between the modes, users have to physically switch the display port from the iMode to the dMode or vice versa. Also, when switching between the modes, the BIOS screen and the POST screen will not be accessible without physically reconnecting the monitor to the right port. Furthermore, if users set the system as iMode, the discreet graphics settings will not be accessible. The user would not be able to adjust the advanced settings such as AA, AF, and others for a particular game using the discreet graphics setting.
For the most part, the switch works quite well. Games run without any issue and without any noticeable performance hit. There were instances when we launched an application and we encountered the error shown above but the application still ran and worked without any issue. We did encounter one problem however: when we set the system in iMode, the 3DMark11 Physics test would not run. Also, while in dMode, we saw a black screen in the Physics test.
Lucid claims that while there will be some performance lost with the Virtu, it is minimal. We tested a couple games to see how much effect the Virtu has in games:

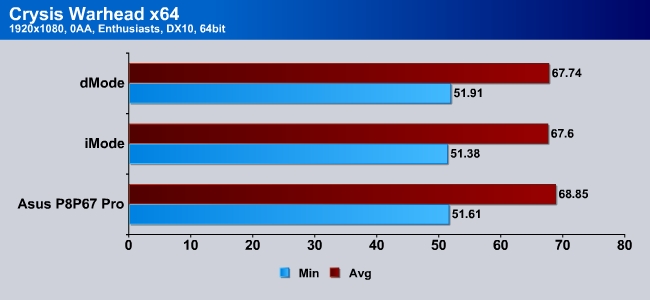

With older games like Crysis Warhead, we see only a minor performance hit. However, with newer and more graphically demanding games, we see 3% to 16% performance drop as shown with in Unigine Heaven 2. While not conclusive, this gives us a good estimate on the range of performance effect that Virtu has.
Intel Quick Sync
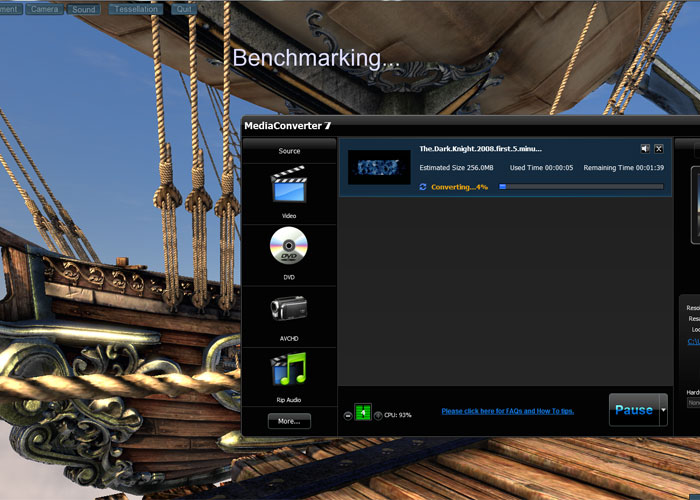
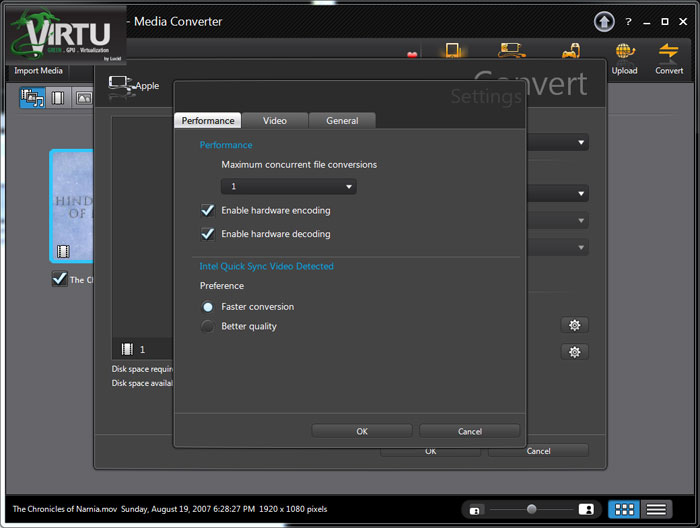
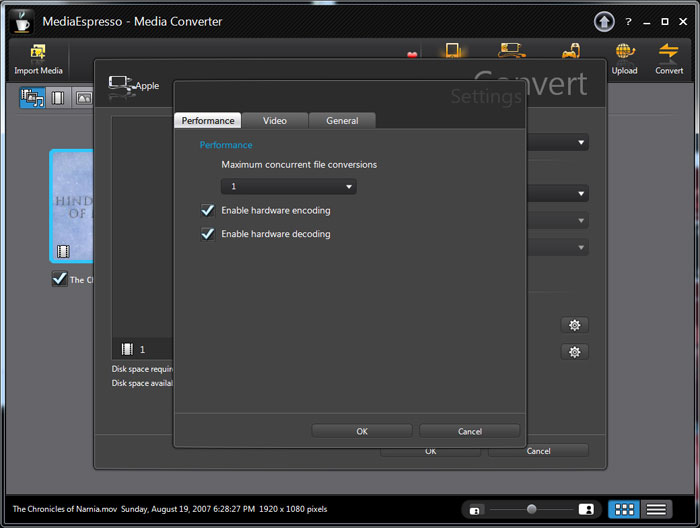
When we reviewed the Sandy Bridge back in January, our H67 board died during the testing period so we could not see how Intel Quick Sync performed. Finally, we are able to put it to the test with the Z68. We transcoded a 2 minutes video clip with 80 Mbps bitrate to iPhone 4 profile with MediaConverter 6.5, which not only supports Quick Sync, but also will work with Virtu.
The latest MediaConverter 6.5 supports two encoding profiles: faster conversion and better quality. We tested both settings and also tested ATI Stream and CPU.
If Virtu is disabled, the software will not detect the presence of the iGPU and thus revert to the ATI Stream.
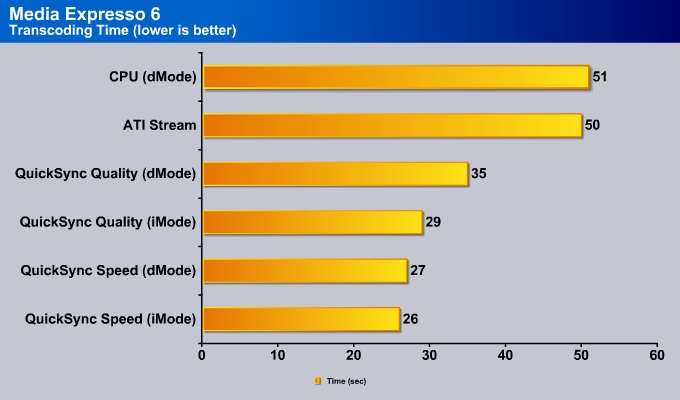
The Quick Sync is impressive! We can see that it cuts the encoding time by almost 50% compared to the CPU or the ATI Stream. In fact, the encoding performance between our Core i5 2500K and the HD 6870 used in the test is about the same.
It can also be seen that there is a slight performance hit with the dMode when it comes to encoding. The encoding time is about 10-15% slower in dMode than in iMode. Still, even with the performance hit, the Quick Sync is still much faster than ATI Stream or the CPU, so it is still worth the overhead.

From left to right: ATI Stream, QuickSync quality, QuickSync Speed, CPU (click for larger image 1.2MB)
In terms of the image quality, we cannot really tell the differences. The color reproduction looks identical for all of the clips. The clip encoded from Quick Sync Quality does seemed slightly sharper, but we cannot definitively say it is better than other methods, and it would be very difficult to distinguish between them.
A Closer Look at the ASUS P8Z68-V Pro
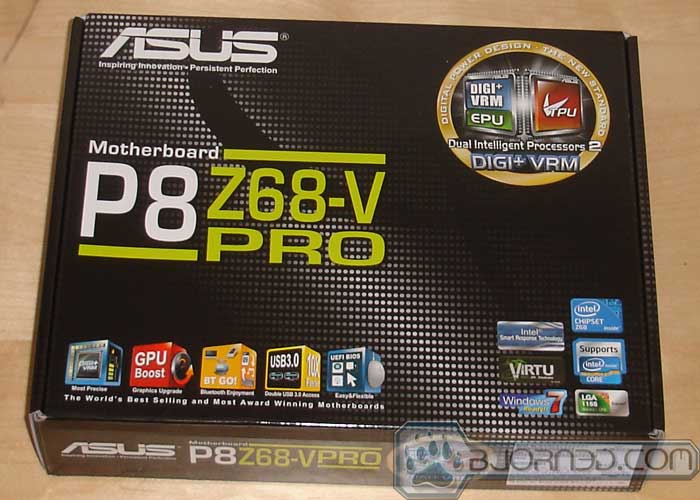
The ASUS P8Z68-V Pro is packaged in the same box as the P67 boards that we reviewed in January. In fact, the overall board design is almost identical to the P67 board. Without looking at the model number, it would be hard to tell one from the other.
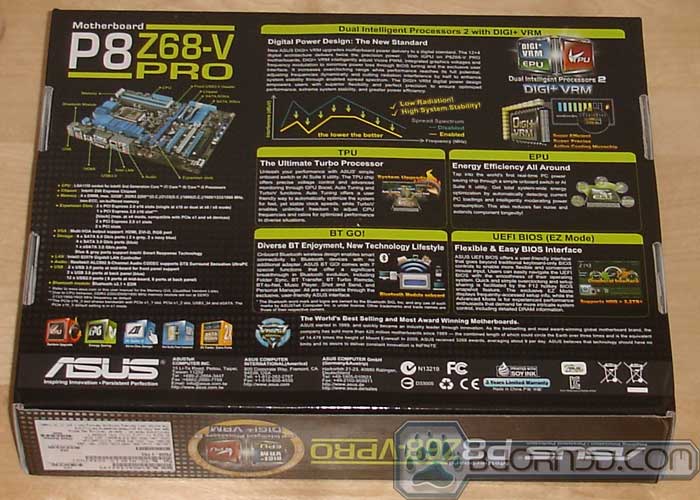
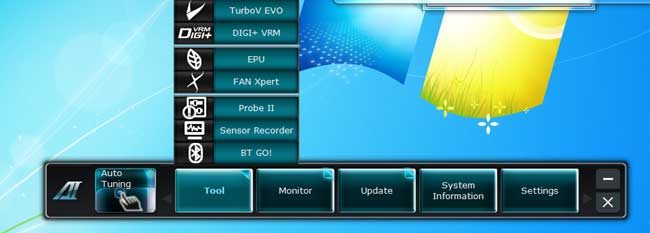
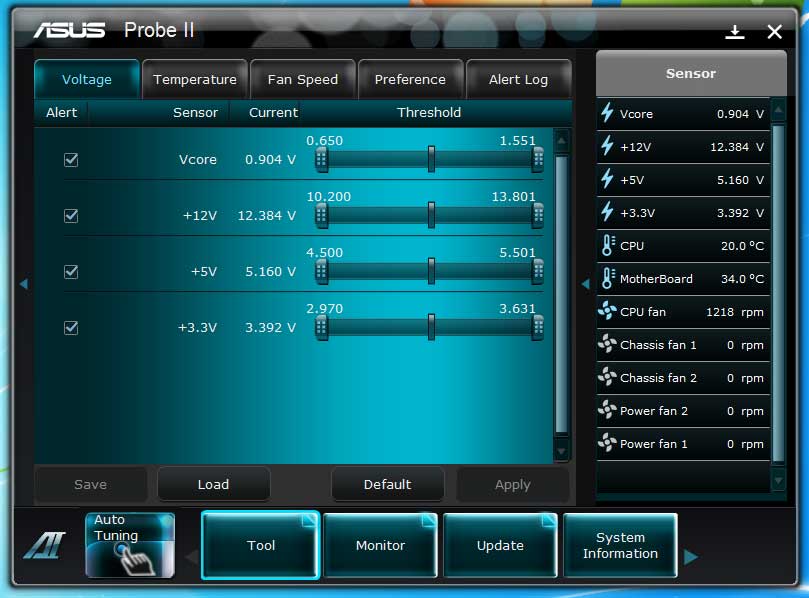
Plenty of marketing information on the back of the box highlights the special features of the Z68 board. Among the highlighted features include ASUS’s “Dual Intelligenet Processor 2 with DIGI+VRM”. The Digi+VRM was first introduced with the P67 chipset; two chips, an Energy Processing Unit (EPU) and a TurboV Processing Unit (TPU), are used to control the that power goes into the board. The EPU tweaks the power consumption for efficiency while the TPU focuses on the hardware level adjustments and monitoring functionality. The two chips work in conjunction with each other to provide real time feedback which allows the power phase to be adjusted depending on the load and temperature.
In addition, much like other P67 boards from ASUS, the Z68 board will also feature an onboard Bluetooth 2.1 receiver with ASUS’s BT GO! feature, which allows the board to share files with other Bluetooth devices. In addition, users can utilize the Bluetooth to connect to the internet, transfer files, play back music on a portable device, and overclock the motherboard with a mobile phone. We are happy to see that ASUS continues to incorporate Bluetooth in the new boards, and we wonder why other motherboards don’t have it.
Another neat feature with the latest ASUS boards is the UEFI BIOS that offers a nice graphical interface where users can change the settings with a click of a mouse instead of the keyboard. UEFI offers more than just a pretty interface, however. It also allows motherboards to support hard drives larger than 2TB.
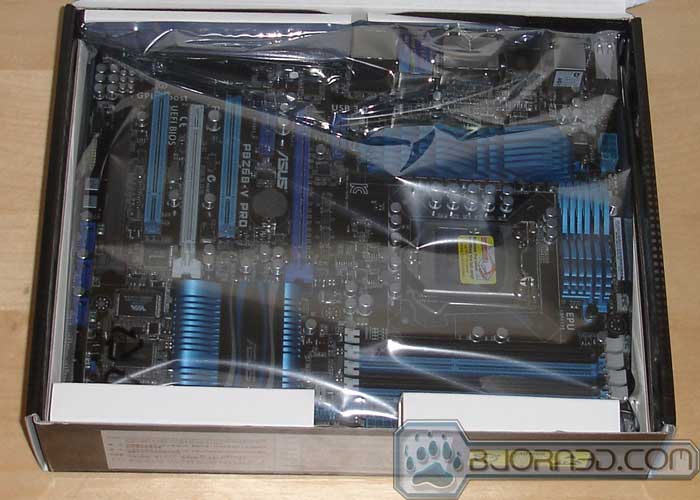
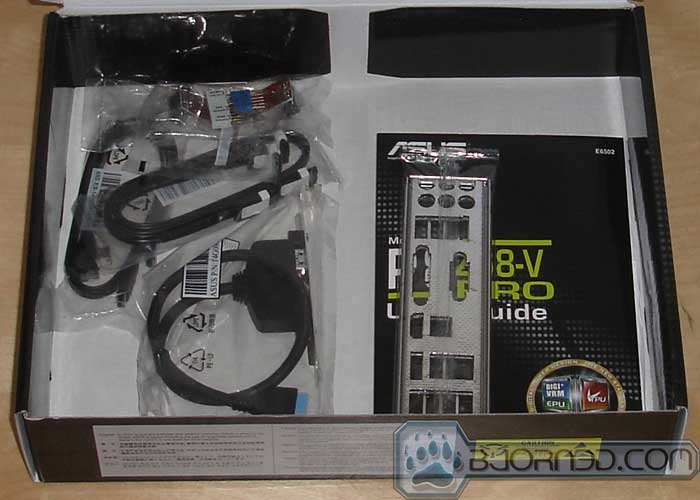
The Z68-V Pro is shipped with antistatic bags and surrounded by a cardboard holding the board in place inside the box. Underneath the board is where the accessories are located.
The board comes with
- ASUS case badge
- 1 ASUS Q-shield
- 2 SATA 3Gb/s cables
- 1 SATA 6 GB/s cables
- 1x ASUS SLI Bridge Connector
- 1x 2-in-1 ASUS Q-Connector kit
- 1x ASUS USB 3.0 Bracket
- User guide
- Support DVD

The USB 3.0 bracket is a nice touch, and it plugs into the board’s USB 3.0 header. We have always loved the ASUS’s Q-connector: attaching the front panel cables are so much easier with it.
Upon first glance, we can see that the Z68-V Pro looks almost identical to the P8P67 Pro with one noticeable difference: the heatsink. Instead of the heatsink we saw on the P67 Pro board, ASUS actually uses a slightly larger heatsink that was used with the P8P67 Deluxe over the PWM and MOSFETs. We like the slightly larger heatsink for better cooling. The neat thing about the heatsink is that it is still maintains the overall low profile design so there is plenty of space around the CPU area for large heatsinks like the Noctua NH-D14. The blue and black color scheme is carried over from the P67 boards.
The SouthBridge heatsink is still the same as it was before. We did not have much complaints with ASUS P67 board so we are glad to see ASUS kept the same design and layout.
Enthusiasts will be happy to hear that the Z68 comes with two power fan and two chassis fan headers in addition to the CPU fan header. The two chassis fans can be controlled with the ASUS Xpert Fan software.
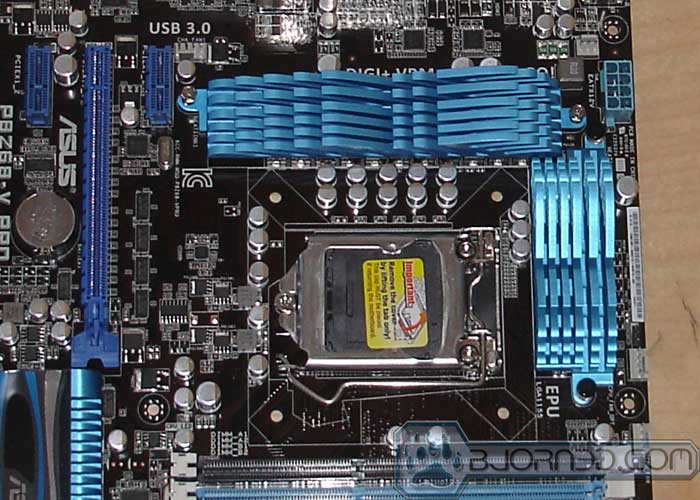
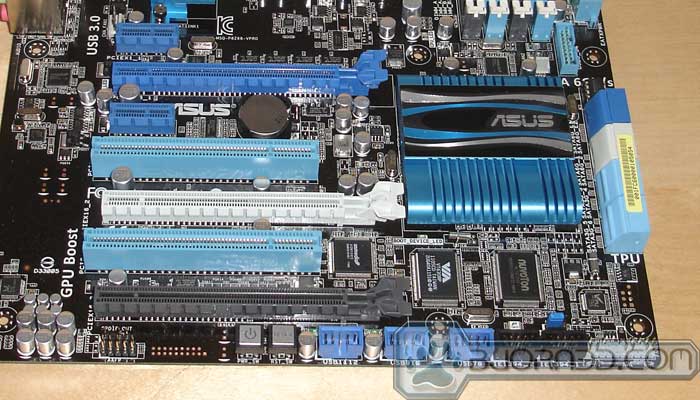
Over on the top right corner is where users will find the auxiliary 8 pin ATX 12V power connector. The Z68 board features 16 phase power (12 Phase CPU + 4 Phase GPU), four more than the P67 Pro. Overclockers will be happy to find that the board has load-line calibration for both CPU and GPU to prevent Vdroop.
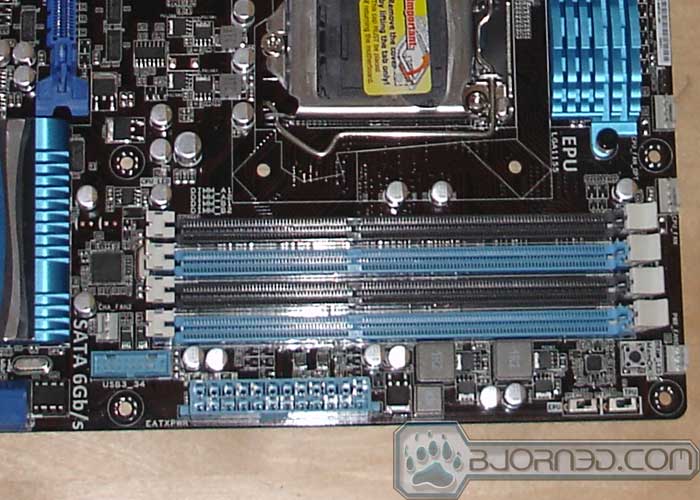
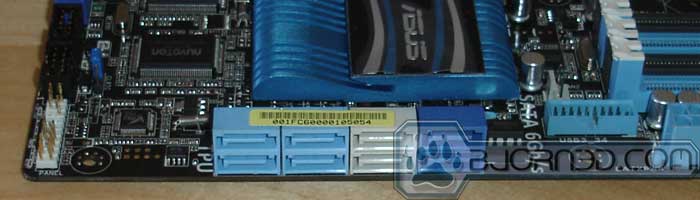
The Z68 board comes with four DIMM slots supporting up to 32GB of DDR3 at frequency of 1066/1333/1600/1866/2133/2200 MHz, with Intel XMP profile support as always. That little button next to the DIMM slot is for ASUS MEMOK!. If the memory is overclocked too far and the system does not boot, pressing the button for a few seconds will let the system boot from the last known good configuration.
Just next to the main ATX power connector is an internal USB 3.0 header.
What is neat about the board is that ASUS provides switches on the board for turning the EPU and TPU on or off, so users can choose which option to use to maximize–overclocking or power saving.

In addition to the six SATA ports on the Z68 Express chipset, ASUS adds two additional SATA 6Gb/s ports (dark blue) by Marvell. The Marvell 6Gb/s SATA controller supports HyperDuo technology. The HyperDuo supports Safe Mode, in which data from an SSD is mirrored to the hard drive, and Capacity Mode in which an SSD and hard drive will work together as a single storage device.
The rest of the six SATA ports are controlled by the Intel Z68 Express chipset: four SATA 3.0 Gb/s ports colored light blue, and two SATA 6.0 Gb/s ports colored grey. The ports support RAID 0,1,5,10 and Intel Rapid Storage as well the new technology called SSD Caching, where the most frequently used data will be cached to an SSD to maximize the performance.

BIOS
The ASUS P8Z68-V boards comes with a UEFI BIOS that looks and feels exactly like the one on the P67 boards from ASUS. Though EFI BIOS has been in existence for a while now, it has not gained widespread use. The benefit of the UEFI BIOS is that its interface is much easier to navigate (and prettier). Instead of being restricted to the keyboard, users can now also use their mouse to navigate. Also, the menu option is no longer based on dull text. Instead, the UEFI BIOS uses a pleasing GUI, like Windows. Traditionalists may find the new interface a bit strange initially, but it is very easy to get used to, and even easier to use.
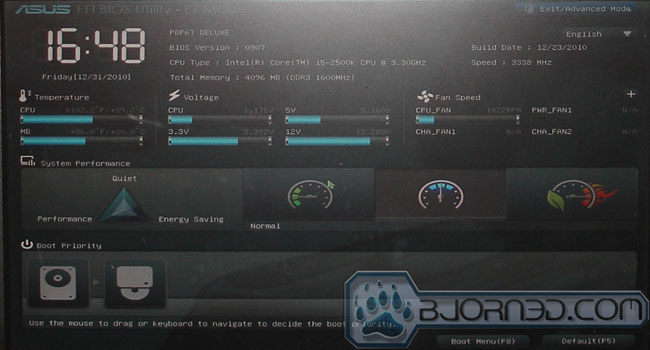
By default, when users enter the board’s BIOS, they will see the EZ Mode. The EZ mode shows very basic information about the system. The page is very much like the “Standard CMOS” page on the old text-based BIOS. Here you get to select the boot device priority, power saving mode, and the language.
Clicking on “Exit/Advanced Mode” in the upper right hand corner will bring up more options for advanced users. This is also where users can find overclocking tools. To navigate in the advanced mode, users can click on a tab on the top to display the settings below. Alternatively, users can use the keyboard to navigate through the BIOS. To go back to the previous page, click the back button or use the ESC key like the older BIOS. Navigating around the BIOS can be done with the keyboard’s arrow keys or the mouse.
The overall layout on the new UEFI BIOS is pretty nice and clean. When a given setting’s selection is limited, ASUS provides a drop down menu for users to choose an option. Clicking on an option will bring up the menu, where users can just choose the desired setting. However, not every single field can be adjusted with a click of a mouse. For many advanced overclocking settings, there is a huge range of adjustments, so ASUS still requires the use of the keyboard’s -/+ keys for incremental adjustment. Alternatively, users can manually enter a value like the older BIOS. Something we found to be very useful is the “F2: Previous Values” feature, which will return settings to the previously entered value.
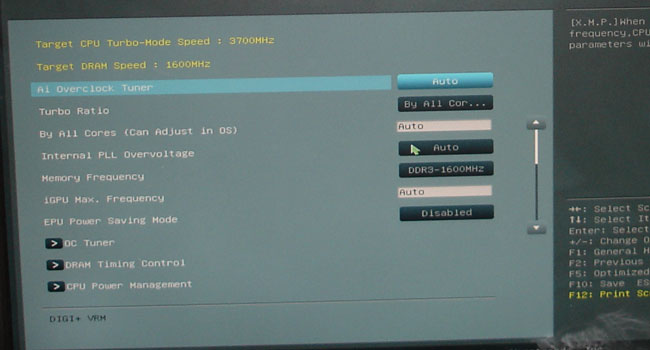
AI Tweaker is where overclockers will spend most of the time. ASUS offers a very extensive list of settings for overclockers. Intel has changed how users overclock their system, and as a result, there are less adjustments needed when overclocking the CPU. This makes the BIOS less cluttered with strange names. We feel that even a beginner overclocker can use this tool to overclock without much of an issue.
Turning the AI Overclocker Tuner to Manual mode will let users adjust the BCLK/PEG frequency from 80 MHz to 300MHz. Since Intel locked the BCLK on the Sandy Bridge processor, it is highly recommended for overclockers to adjust the multiplier rather than the BCLK. However, ASUS boards do allow a bit adjustment to the BCLK speed. The Z68 also support GPU overclocking where it can be adjusted from 1100MHz to 3000MHz in 50MHz interval.
ASUS allows users to adjust the Turbo ratio for each core either independently, or all together. This allows users to overclock each core separately, giving greater versatility.
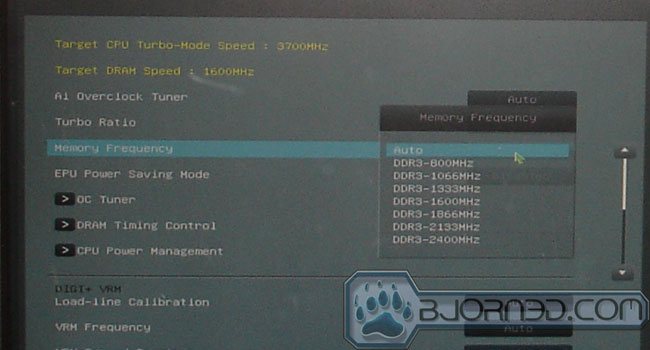
The manual and press information we received from ASUS states that the board will support memory up to 2133MHz, but with the latest BIOS, the board actually supports DDR3 up to 2200MHz.
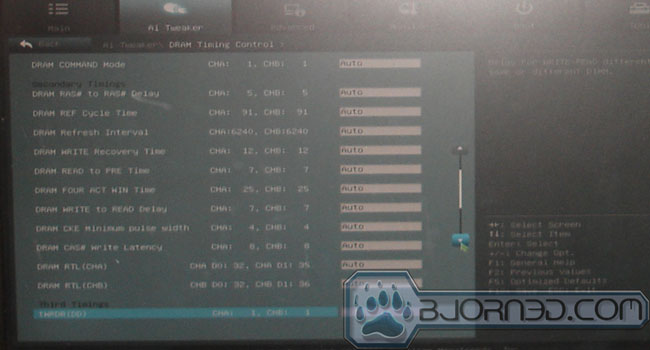
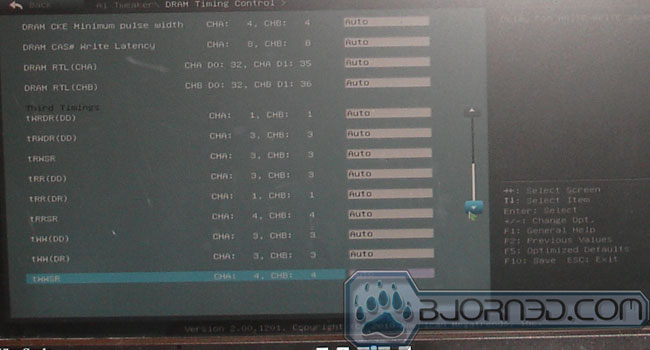
In the DRAM Timing control panel, users can adjust their memory timings. ASUS groups the timings into three categories: primary, secondary, and third. The higher the level means more the advanced the setting, and for most people, primary and secondary timing adjustments are more than enough to achieve a good result.
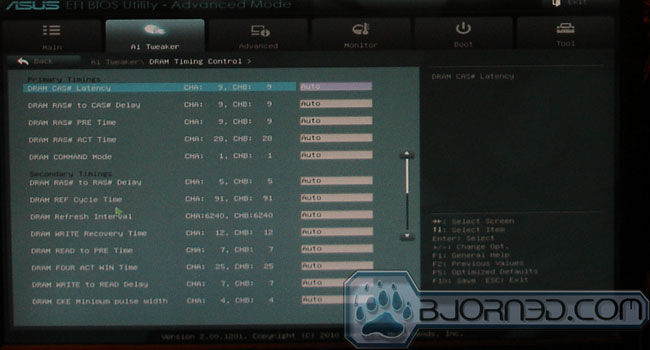
| Memory Adjustments | |
| Primary Timing | |
| CAS | Auto, 3-15 |
| RAS to CAS | Auto, 4-15 |
| RAS Pre Time | Auto, 4-15 |
| RAS ACT Time | Auto, 4-40 |
| DRAM Command Mode | Auto, 1-3 |
| Secondary Timing | |
| RAS to RAS Delay | Auto, 4-15 |
| REF Cycle Time | Auto, 48-511 |
| Refresh Interval | Auto, 3120-9999 |
| WRITE Recovery Time | Auto, 5-16 |
| READ to PRE Time | Auto, 4-15 |
| Four ACT WIN Time | Auto, 16-63 |
| WRITE to READ Delay | Auto, 4-8 |
| CKE Minimum pulse width | Auto, 3-15 |
| CAS Write Latency | Auto, 5-15 |
| RTL | Auto, 16-63 |
| Third Timings | |
| tWDR (DD) | Auto, 1-6 |
| tRWDR (DD) | Auto, 1-6 |
| tRWSR | Auto, 1-6 |
| tRR (DD) | Auto, 1-6 |
| tTTSR | Auto, 1-7 |
| tWW (DD) | Auto, 1-6 |
| tWW (DR) | Auto, 1-6 |
| tWWSR | Auto, 4-6 |
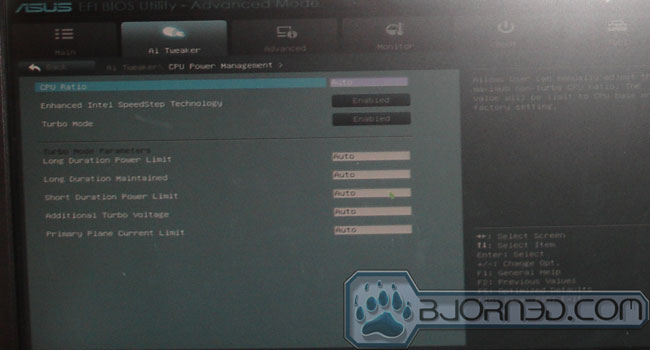
CPU Power Management offers fine-tuning of the processor’s Turbo power, adding stability and better overclocking.
| CPU Power Management | |
| Long Duration Power Limit | Auto, 1-255 |
| Long Duration Maintained | Auto, 1-32 |
| Short Duration Power Limit | Auto, 4-255 |
| Additional Turbo Voltage | Auto, 0.004-1.000 in 0.004v increments |
| Primary Plane Current Limit | Auto, 0.125-1023.875 in 0.125 increments |
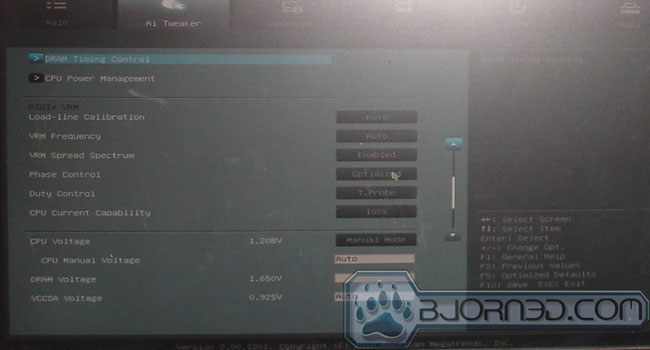
| DIGI VRM Adjustments | |
| Load Line Calibration | Auto, Regular, Medium, High, Ultra High, Extreme |
| VRM Frequency | Auto, Manual |
| VRM Spread Spectrum | Auto, 300KHz-500KHz in 10 kHz increments |
| Phase Control | Auto, Optimized, Extreme, Manual |
| Manual Phase Control | Ultra Fast, Fast, Medium, and Regular |
| Duty Control | T. Probe, Extreme |
| CPU Current Capability | 100%-140% |
Adjusting the DIGI+ VRM will provide different amount of response time and current to the Digital power phase for the motherboard. It often will increase overclocking stability and potential.
- Load Line Calibration: provides higher voltage to the CPU for better overclocking
- VRM Spread Spectrum: will affect the VRM transient response and component thermal. Higher frequency gets quicker transient response.
- Phase control: faster phase control will have a faster response.
- Duty Control: adjusts the current and thermal for the every VRM phase. The T probe will maintain a thermal balance while the Extreme will maintain the VRM current balance.
- CPU current capability: a higher value will bring a wider total power range and extend the overclocking frequency range.
The last set of adjustments for overclocking is the voltage adjustments. Below is the list of ranges allowed on the board. As mentioned earlier, since Sandy Bridge overclocking is different, less settings are needed, so we perform fewer voltage adjustments. In addition, the memory controller is built into the processor, so we do not need to perform many voltage adjustments to get a stable system.
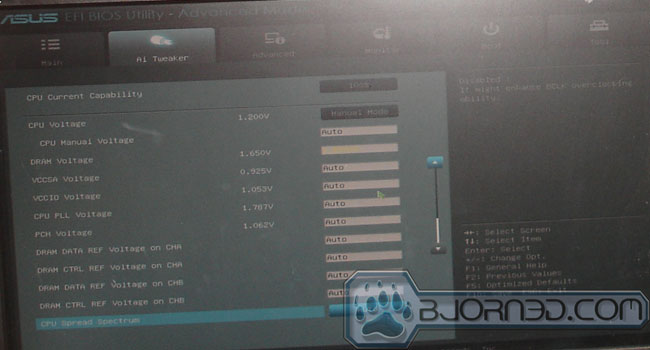
| Voltage Adjustments | |
| CPU VOLTAGE | Manual, Offset |
| CPU Manual Voltage | Auto, 0.800V – 1.990V in 0.05V |
| DRAM Voltage | Auto, 1.20V – 2.20V in 0.00625V increments |
| VCCSA Voltage | Auto, 0.8000V – 1.7000V in 0.00625V incremnets |
| VCCIO Voltage | Auto, 0.8000V – 1.7000V in 0.00625V incremnets |
| CPU PLL Voltage | Auto, 1.2000V-2.2000 in 0.00625V increments |
| PCH Voltage | Auto, 0.8000V – 1.7000V in 0.00625V incremnets |
| DRAM DATA REF Voltage | Auto, 0.3950x – 0.6300x in 0.0050x increments |
| DRAM CTRL REF Voltage | Auto, 0.3950x – 0.6300x in 0.0050x increments |
| CPU Spread Spectrum | Auto, Enable, Disable |
The Advanced menu is where users get to adjust the different components on the motherboard. We found the System Agent Configuration a bit odd because it is actually the Initial display adapater, and the PCH configuration menu is actually for the High Precision Timer setting. We’re not really why ASUS decides to call these option differently.
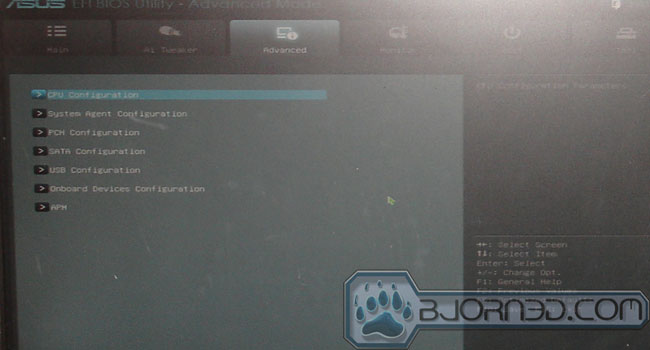
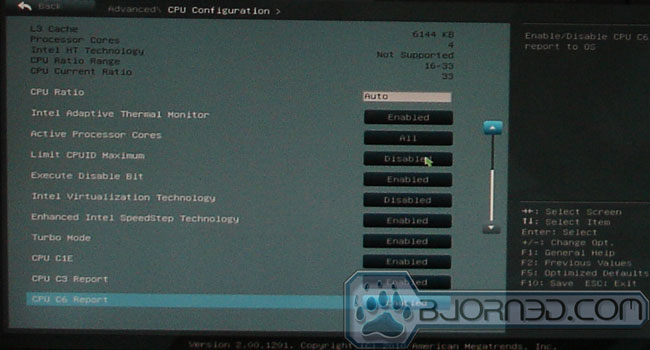
The CPU Configuration is where users can adjust the number of active cores, virtualizations, thermal throttling, and power management of the processor.
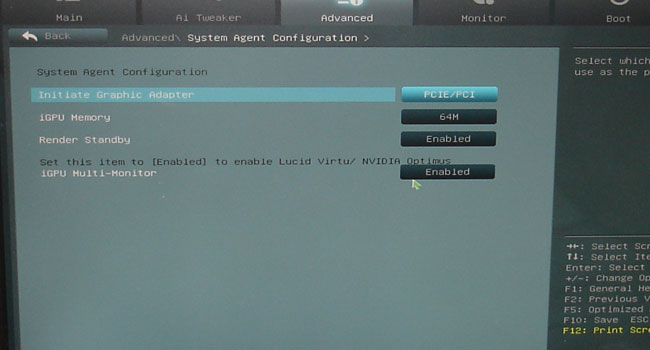
Under System Agent Configuration is where the integrated graphics can be enabled and disabled. A bit unusual title for the integrated graphics settings.
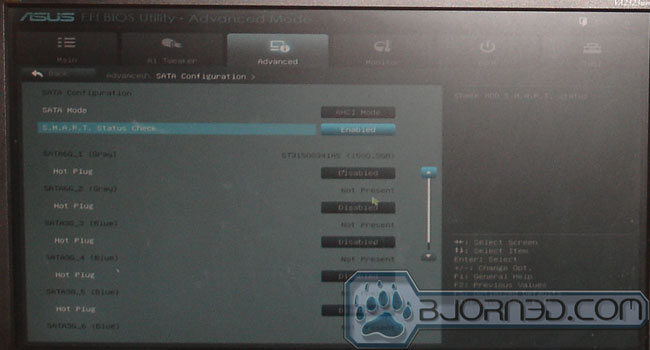
The SATA Configuration needs no introduction. We liked that ASUS set AHCI as the default setting, and let the user choose for which hard drive to enable “Hot Plug”.
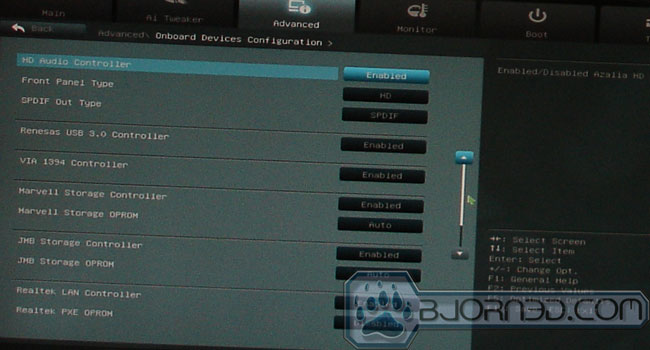
The Onboard Devices Configuration Menu is where users can adjust the various devices such as FireWire, HD Audio, eSATA, and Network for the board.
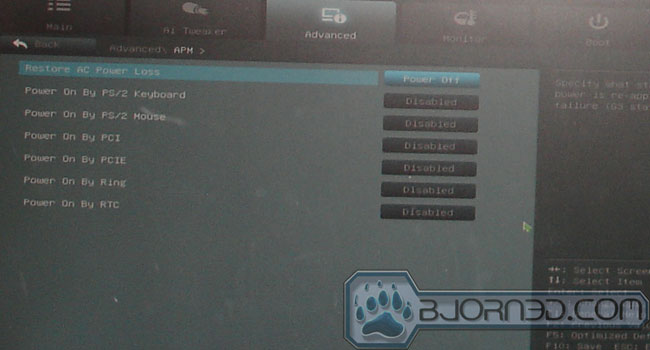
It may be hard to recognize, but APM stands for Advanced Power Management, where users can adjust the power on setting.
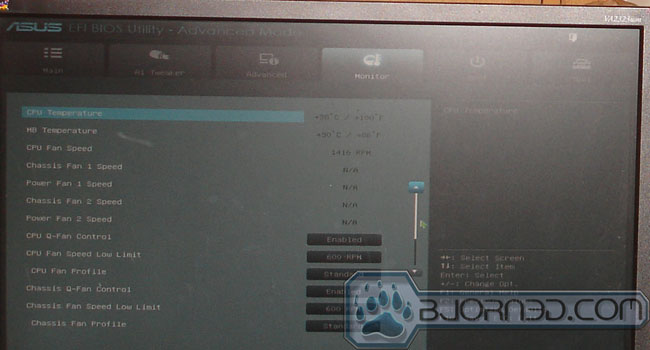
The system monitor menu shows the various vital statistics of the hardware.

The Boot Menu is where the boot devices can be selected and configured.
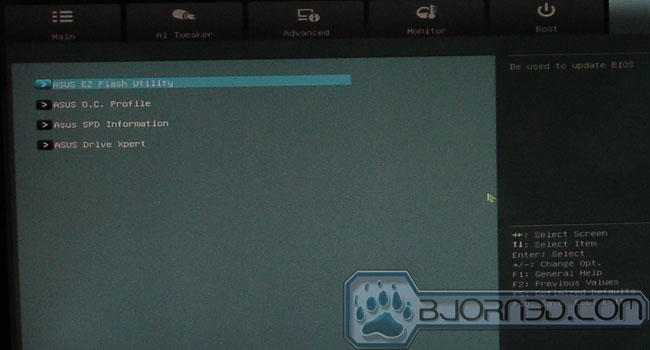
In the Tools menu, users will find ASUS Drive Xpert, which allows users to adjust the two SATA ports on the board as regular SATA, RAID 0/1.
The EZ flash utility is a very nice feature that allows users to flash the BIOS without needing a floppy drive or any additional software. Users must simply copy the latest BIOS onto a USB flash drive and select EZ Flash in the BIOS, where they can choose the BIOS file to flash.
This is also where users can save OC Profiles.
TESTING & METHODOLOGY
We did a fresh load of Windows 7 64 bit on the test rig, then once we updated the software and drivers to the latest versions, we made a clone copy of the hard drive because we’re going to run this beast like we stole it. We ran each test a total of three times and the average of each test is reported here.
| Test Rig | |
| Case Type | None |
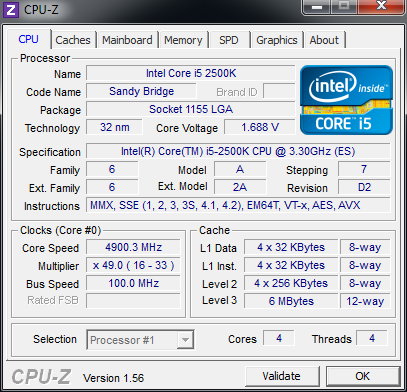
| CPU | Intel Core i5 2500K |
| Motherboard | Asus P8P67 Deluxe (beta BIOS) |
Asus P8P67 Pro (beta BIOS)
Intel DH67BL
Asus P8Z68-V Pro (beta BIOS 8801)RamKingstone HyperX 1600CPU CoolerThermalright SI-128Hard DrivesSeagate 7200.11 1.5 TBOpticalNoneGPUASUS HD 6870Case Fans120mm Fan cooling the MOSFET areaDocking StationsNoneTesting PSUCooler Master UCP 900WLegacyNoneMouseMicrosoft IntellimouseKeyboardLogitech KeyboardSpeakersNone
aida64 v1.50
“AIDA64 Extreme Edition is a streamlined Windows diagnostic and benchmarking software for home users. AIDA64 Extreme Edition provides a wide range of features to assist in overclocking, hardware error diagnosis, stress testing, and sensor monitoring. It has unique capabilities to assess the performance of the processor, system memory, and disk drives. AIDA64 is compatible with all current 32-bit and 64-bit Microsoft Windows operating systems, including Windows 7 and Windows Server 2008 R2.”
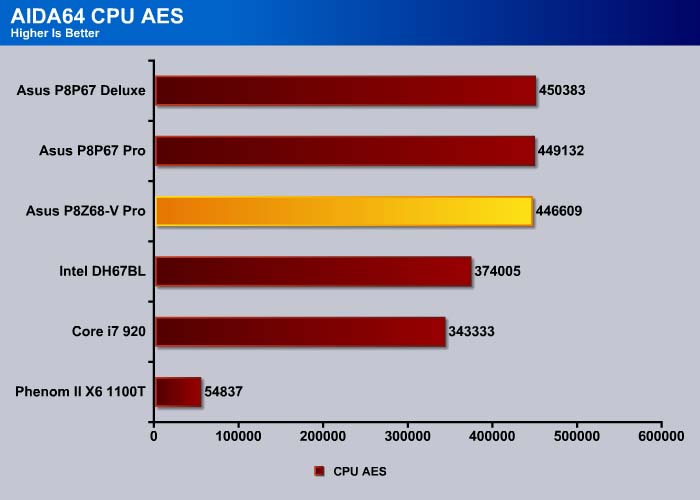
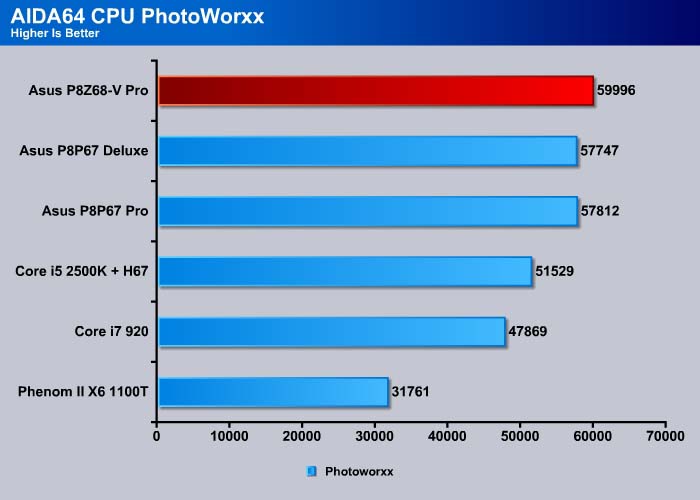
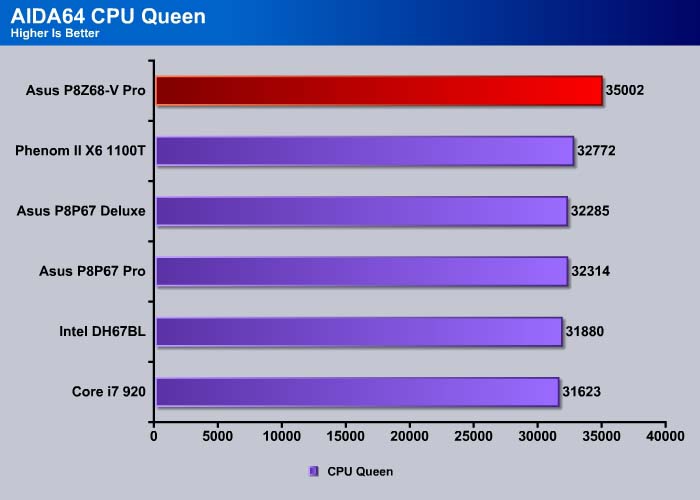
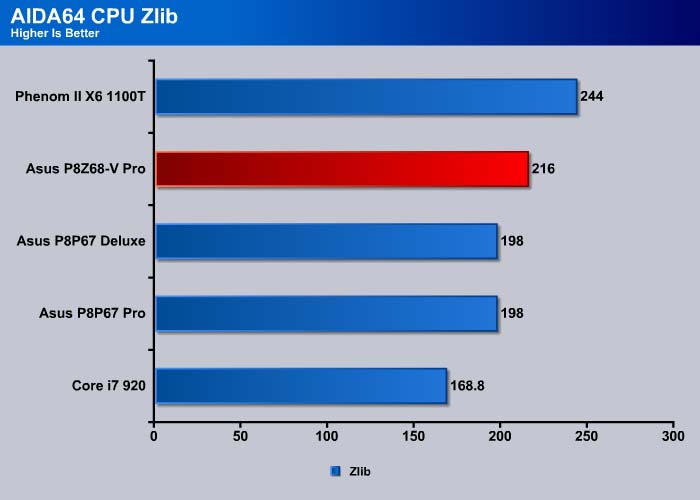
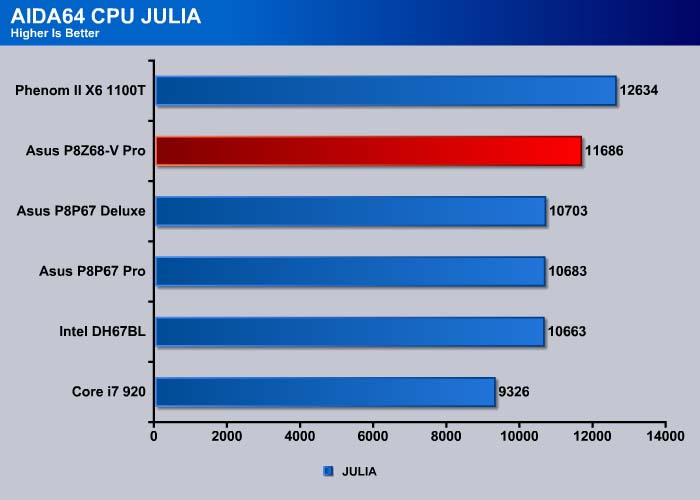
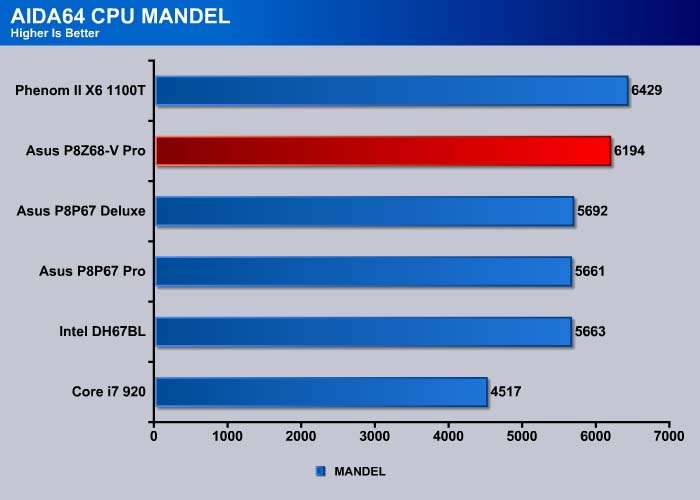
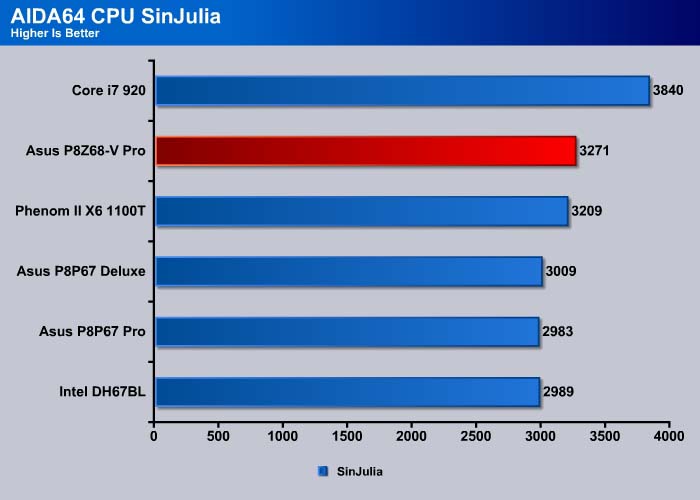
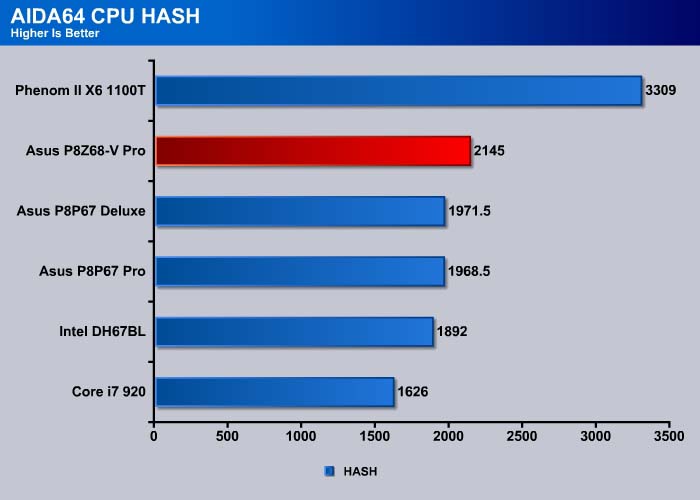
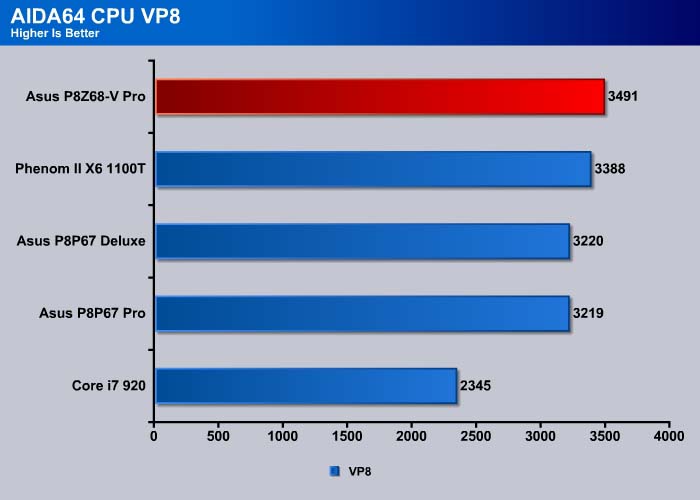
CPU
Memory
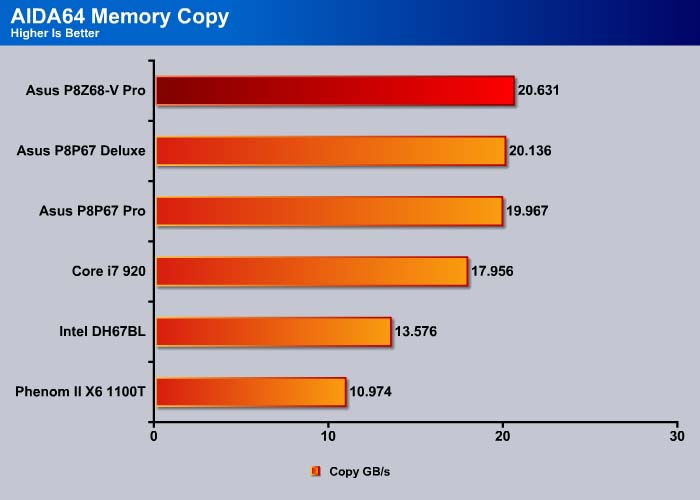
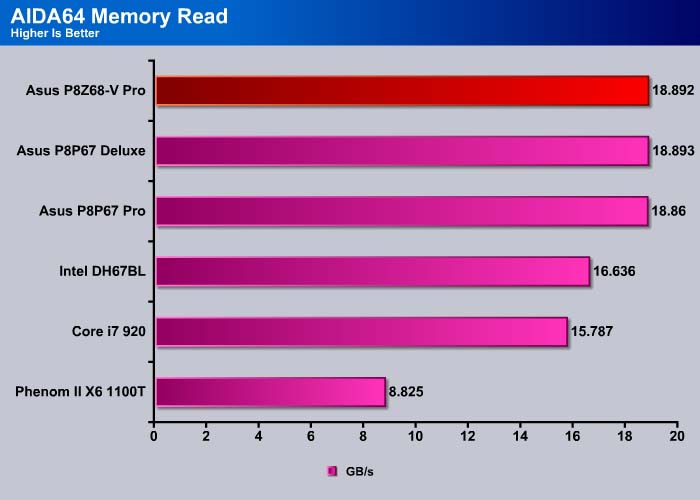
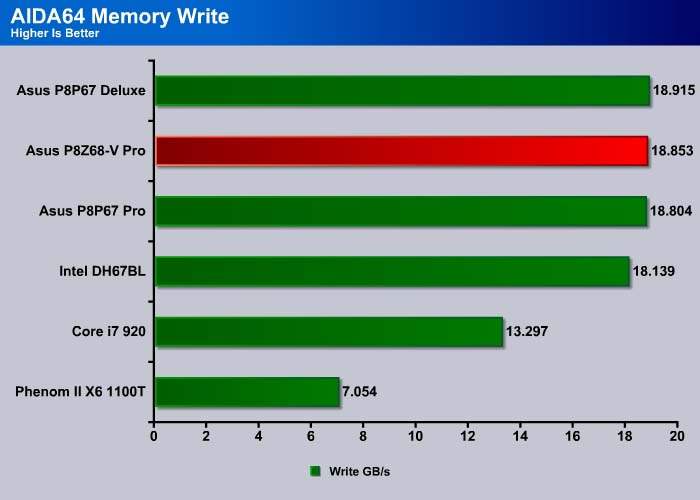
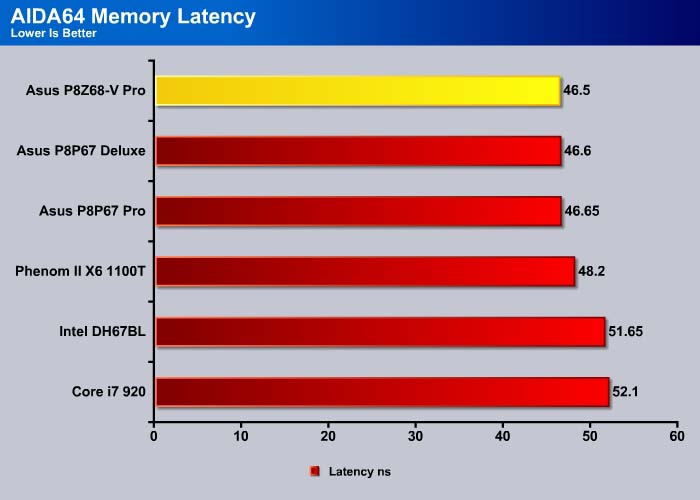
The is no major difference between the Z68 and the P67 chipset in terms of memory performance, except that the Z68 has a slightly lower latency.
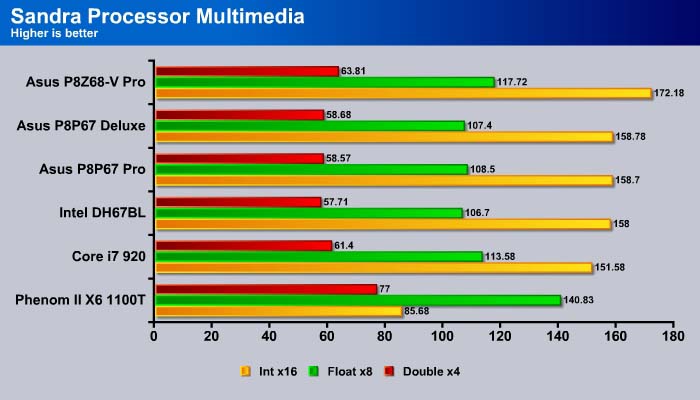
Sisoft Sandra 2011b
“SiSoftware Sandra (the System Analyzer, Diagnostic and Reporting Assistant) is an information & diagnostic utility. It should provide most of the information (including undocumented) you need to know about your hardware, software and other devices whether hardware or software. It works along the lines of other Windows utilities, however it tries to go beyond them and show you more of what’s really going on. Giving the user the ability to draw comparisons at both a high and low-level. You can get information about the CPU, chipset, video adapter, ports, printers, sound card, memory, network, Windows internals, AGP, PCI, PCI-X, PCIe (PCI Express), database, USB, USB2, 1394/Firewire, etc.”
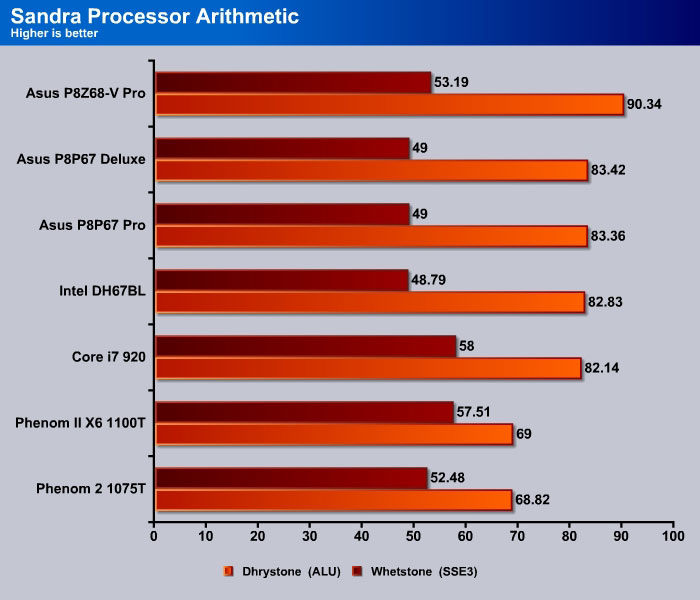
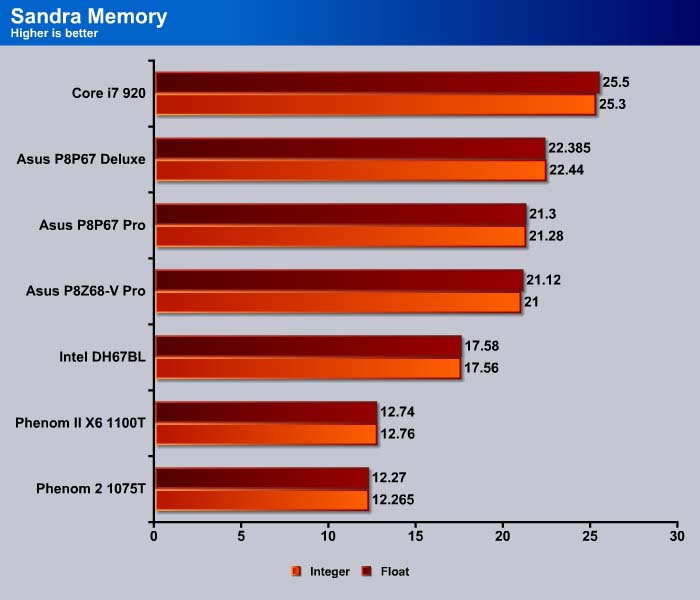
The memory test shows that the P67 takes a narrow lead over the Z68.
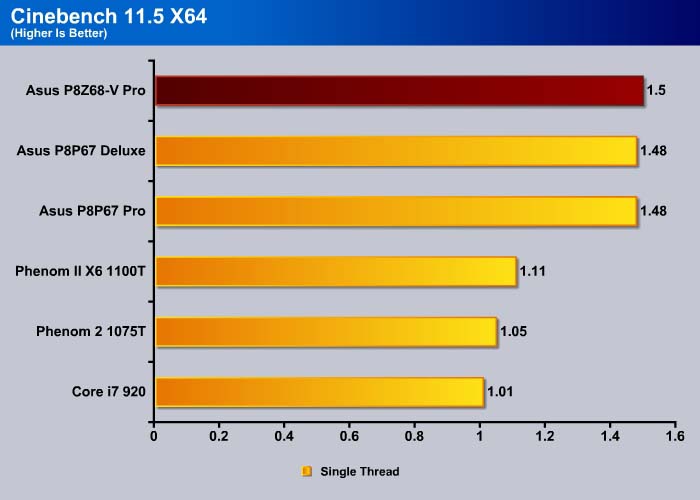
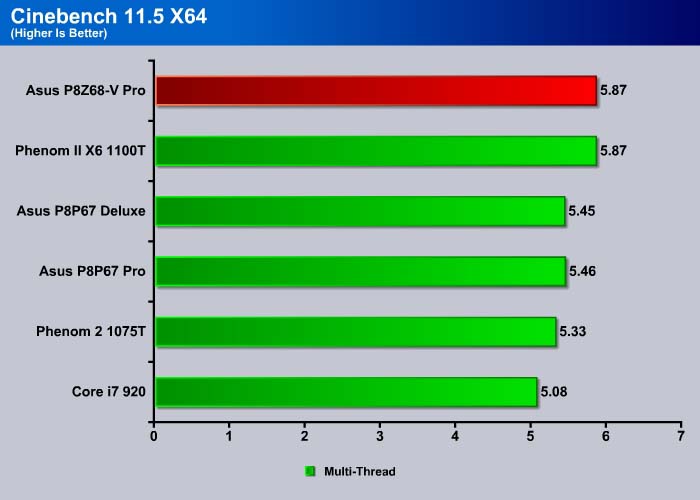
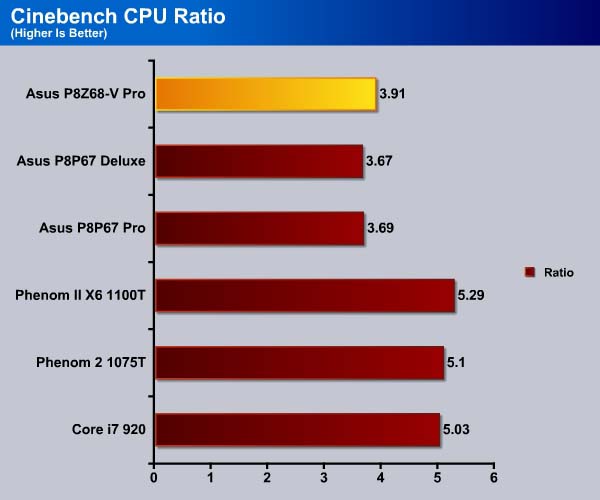
Cinebench and R11.5
“CINEBENCH is a real-world test suite that assesses your computer’s performance capabilities. MAXON CINEBENCH is based on MAXON’s award-winning animation software, CINEMA 4D, which is used extensively by studios and production houses worldwide for 3D content creation. MAXON software has been used in blockbuster movies such as Spider-Man, Star Wars, The Chronicles of Narnia and many more. MAXON CINEBENCH runs several tests on your computer to measure the performance of the main processor and the graphics card under real world circumstances. The benchmark application makes use of up to 16 CPUs or CPU cores and is available for Windows (32-bit and 64-Bit) and Macintosh (PPC and Intel-based). The resulting values among different operating systems are 100% comparable and therefore very useful with regard to purchasing decision-making. It can also be used as a marketing tool for hardware vendors or simply to compare hardware among colleagues or friends.”
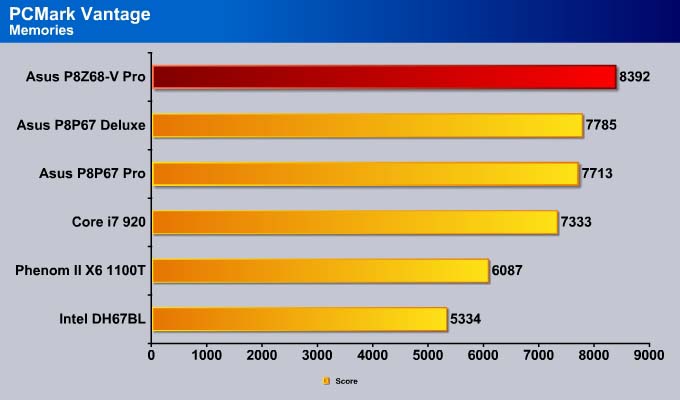
PCMark Vantage
PCMark Vantage is the latest system benchmark tool from Futuremark. The benchmark consists of tests such as application launches, file searches, web browsing, video playback, photo editing, and gaming.

Overall, the Z68-V Pro board scored 11371 points, 3-5% better than the P67 board.
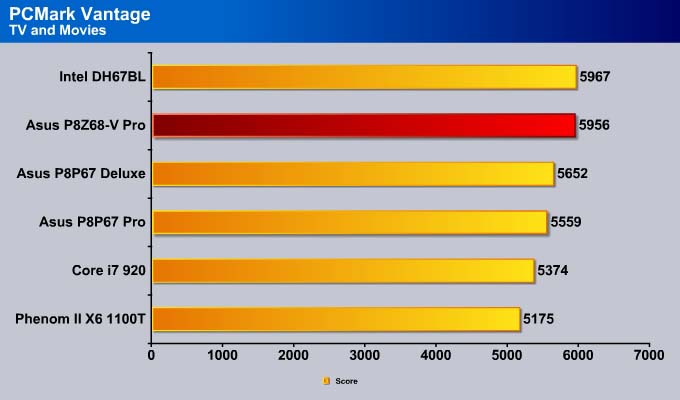
The TV and Movies test consists of transcoding video. We see here that Intel H67 chipset actually takes the top spot, followed by our Z68 board, and then the P67 board. This test shows that in areas where H67 has an advantage, the Z68 is able to perform like the H67.
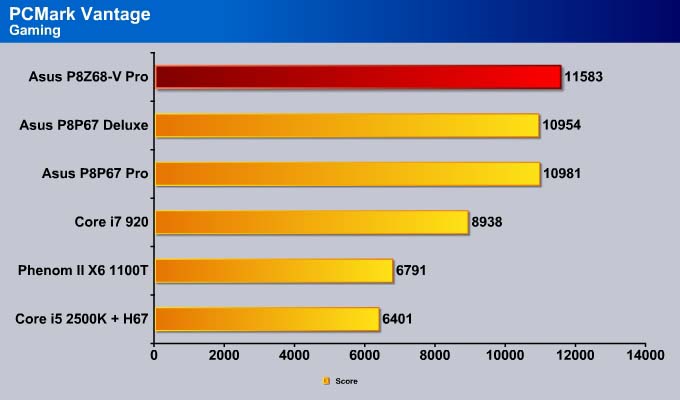
The PCMark Vantage gaming benchmark shows the best case scenario, so take the score with a grain of salt.
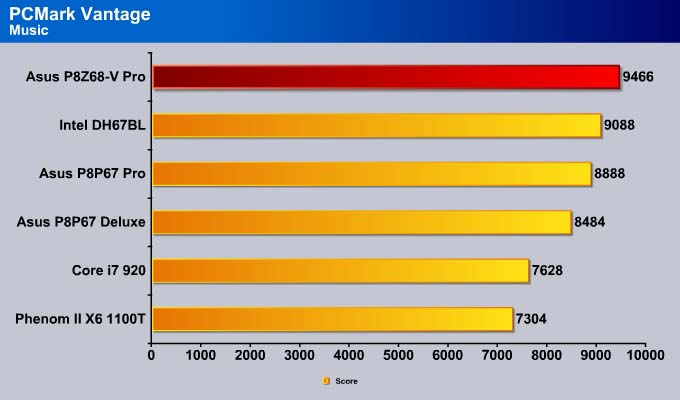
The music test consists of transcoding MP3 to WMA and adding music to Windows Media Player. While music transcoding is not particularly CPU bound, it does reflect real-life situations. Here, the Z68 dominates over the P67.
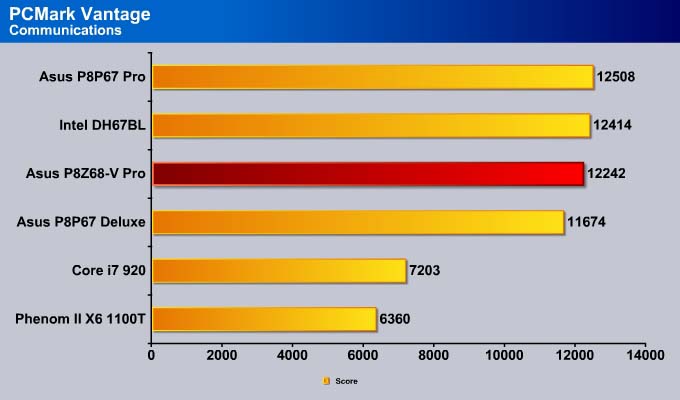
The Communications suite involves light multitasking of data encryption and web page rendering. The Z68 again shows a very nice performance gain over the P67 Deluxe board.
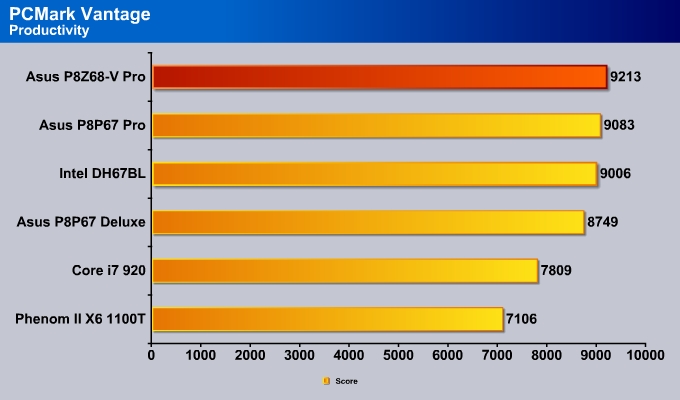
The Productivity test involves four simultaneous tasks that consist of searching contacts in Windows Contacts, searching emails, web page rendering, and application loading. This test simulates common desktop usage with multiple tasks going on at the same time.
The score here can be a true representation of the system performance in a typical environment. The Pro board scored 4% higher than the Deluxe board.
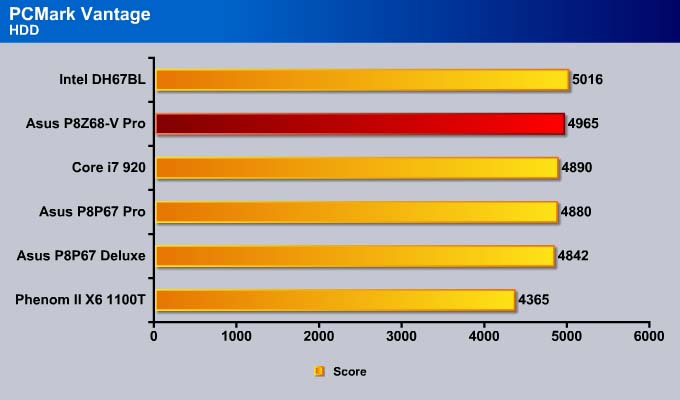
The HDD suite specifically tests the hard drive performance so it does not particularly reflect the CPU performance.
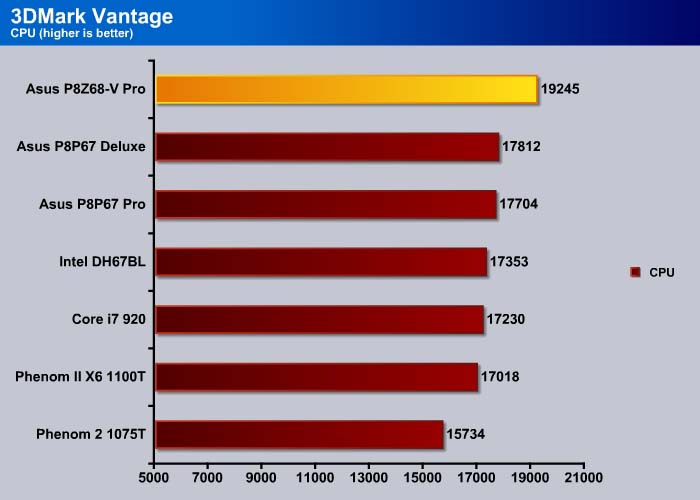
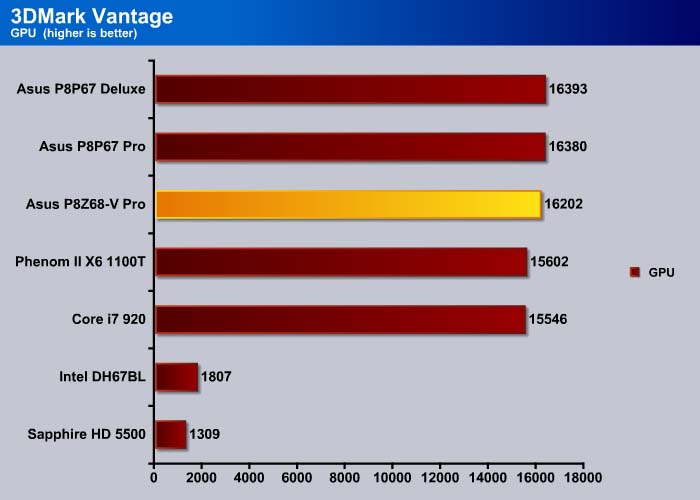
3DMark Vantage

For complete information on 3DMark Vantage Please follow this Link:
www.futuremark.com/benchmarks/3dmarkvantage/features/
The newest video benchmark from the gang at Futuremark. This utility is still a synthetic benchmark, but one that more closely reflects real world gaming performance. While it is not a perfect replacement for actual game benchmarks, it has its uses. We tested our cards at the ‘Performance’ setting.
Crysis warhead

Crysis Warhead is the much anticipated standalone expansion to Crysis, featuring an updated CryENGINE™ 2 with better optimization. It was one of the most anticipated titles of 2008.
We ran Warhead using gamer’s setting at resolution of 1280×1024 and DirectX 10. We tested both no AA an 2x AA.
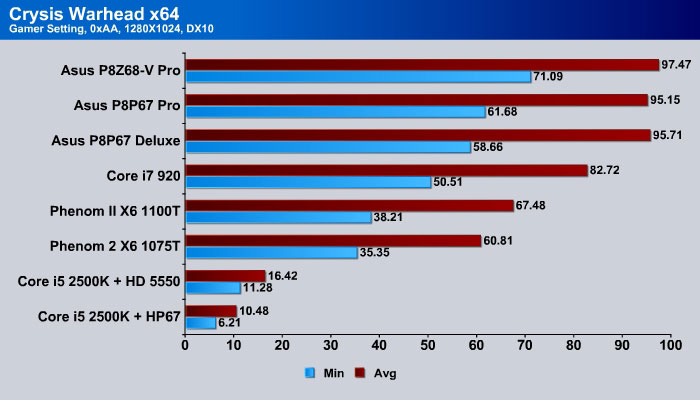

With the same layout and design, it is no surprise to see both boards offer similar result in the Crysis Warhead benchmark.
Dirt 2

Dirt 2 is the squeal to the popular racing game Colin McRae Dirt. This is a standard racing game, but with an off road twist. Instead of racing Bugattis and Porsches, players race trophy trucks and rally cars.
Again, we put the Core i7 920 OC to 2.8GHz against the X6 1075T and test them with Dirt 2. In this game, we use high setting at 1280×1024 with no AA and 2xAA.
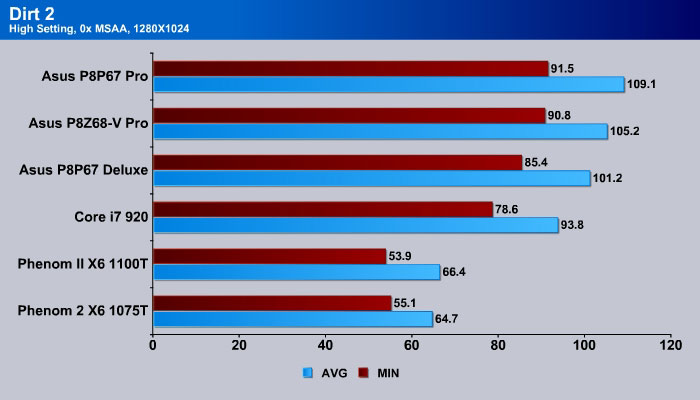
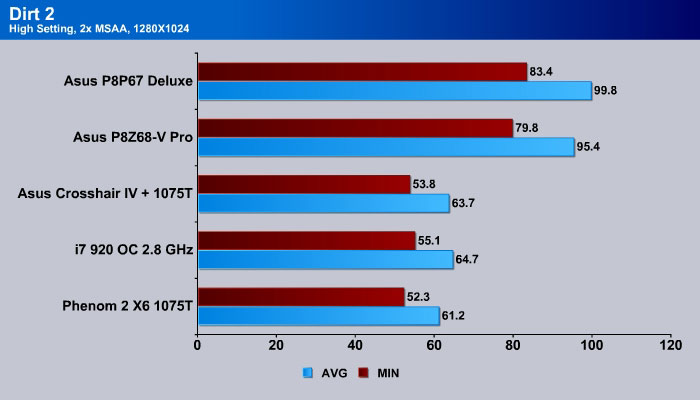
The performance difference is narrowed at a higher game detail setting.
POWER CONSUMPTION
We ran Prime95 to stress the CPU in order to measure the overall system power consumption. All of the power saving features (C&Q and SpeedStep) have been enabled, as we envision this is how most people will be running their system.
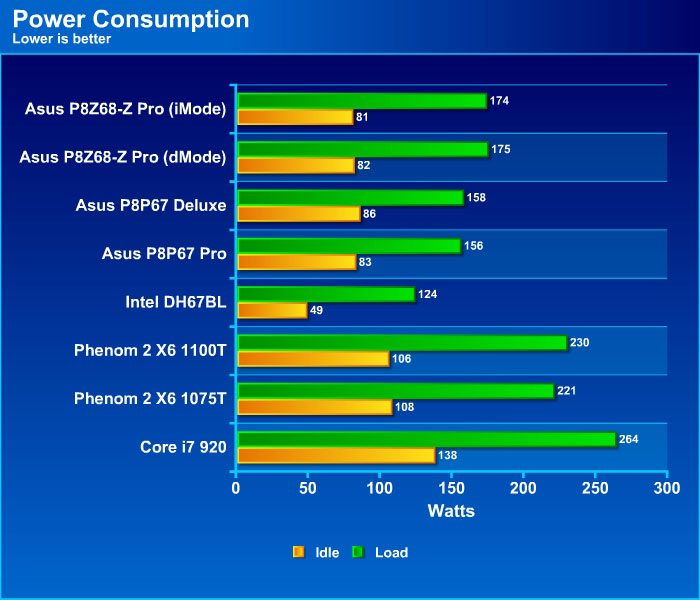
The P8Z68-V Pro consumes about the same power as the P67 boards idle. However, under load the board consumes 17W more power.
OVERCLOCKING
With both boards featuring the same DIGI+VRM, TPU, and EPU chip and the same overall layout, we do not expect much difference in terms of overclocking. Extreme overclockers should be able to take the advantage of the extra 4 phase on the Deluxe board but even with 12+2 phase, the Pro board should be able to satisfy most overclockers.
Previously we had great success with the ASUS P67 boards, and we were able to overclock the processor to 4.5 GHz without much issue. We had great expectation of the Z68 board, especially since manufacturers have more time since the Sandy Bridge launch to perfect the BIOS.
To see how far we could push the CPU speed, we left the GPU at its default setting, disabled the EPU Power Saving mode, set the Load-line calibration to extreme, raise the VRM fixed frequency to 400, and set the Phase control and Duty Control to Extreme, and raised the CPU current to 120%. This time, we were able to push our processor to 4.9 GHz without any issue. This is quite an impressive result. We did not want to push it any further because during Prime95, our CPU temperature reached 82°C and Core temp was at 99°C. We feel that with better cooling, there should definitely be room for higher clockspeed on the P8Z68-V Pro.
One thing we did notice is the power consumption of the overclocked processor. We notice that pushing the processor to 4.7GHz results in an increase in the power consumption. However, pushing the extra 200MHz to 4.9GHz costs us 60W more power. The extra frequency may be getting to the point of diminishing return in terms of extra power consumption.
Unfortunately, we did not have enough time to push the GPU. We did a quick overclock and were able to get the GPU to 1400MHz and were able to boot into Windows without any trouble. We may need to return at a later time to see how far we can push the integrated graphics.
STORAGE
SATA
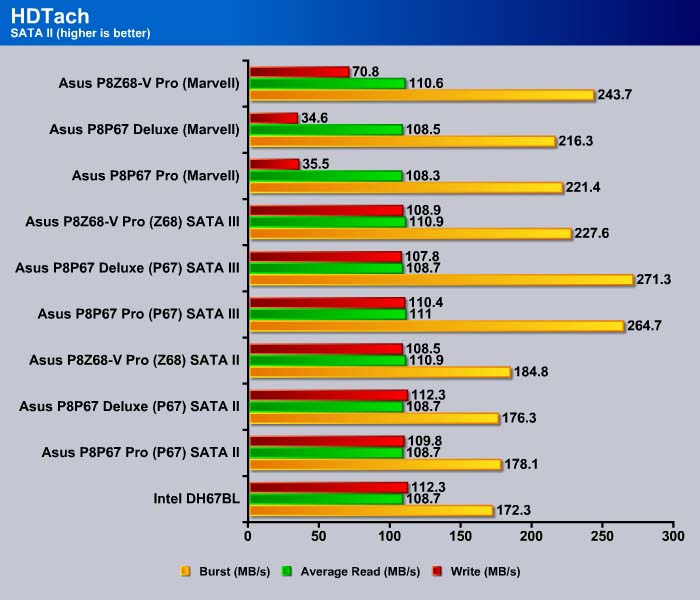
The Intel Z68 Express chipset has a better burst rate than the P67, and slightly faster read, but it is slower in the write speeds for SATA II. With SATA III, we see the burst rate is a tad slower for the Z68 but the read and write are similar to the P67. The Marvell controller on the P8Z68-V Pro has improved its write performance but it is still not able to catch the Intel controller.
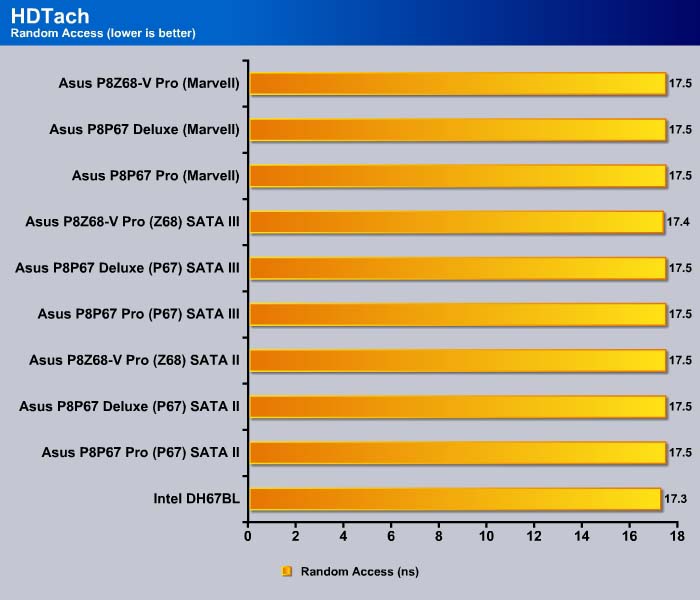
The random access time is about the same for all motherboards.
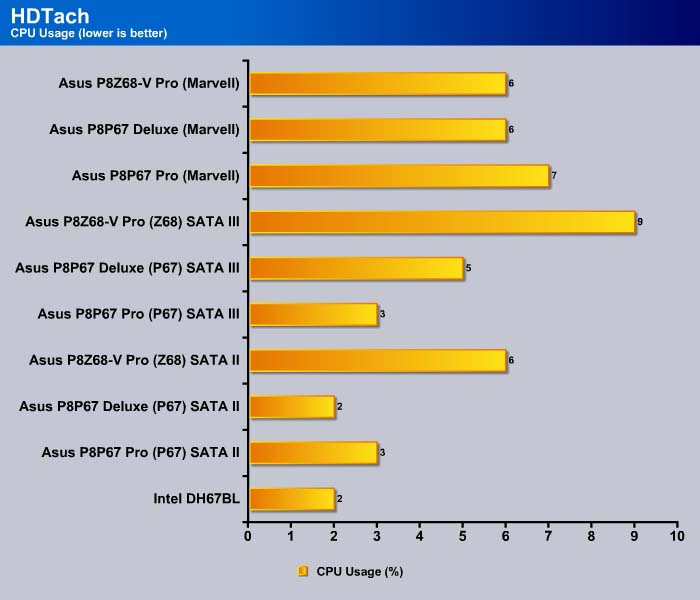
For CPU usage, the Z68 tends to consume slightly more CPU cycles than the P67 in both SATA II and SATA III.
USB
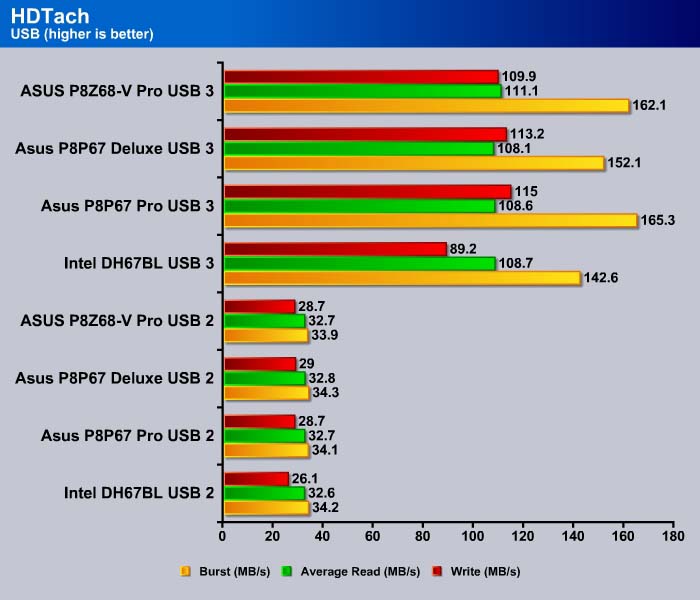
The USB 2.0 performance is about the same for P67 and the Z68. The USB 3.0 on the P8Z68-V Pro is controlled by ASMedia while the P67 boards use the NEC controller. We can see that the ASMedia controller offers a slightly better average read, but it falls behind in the average write.
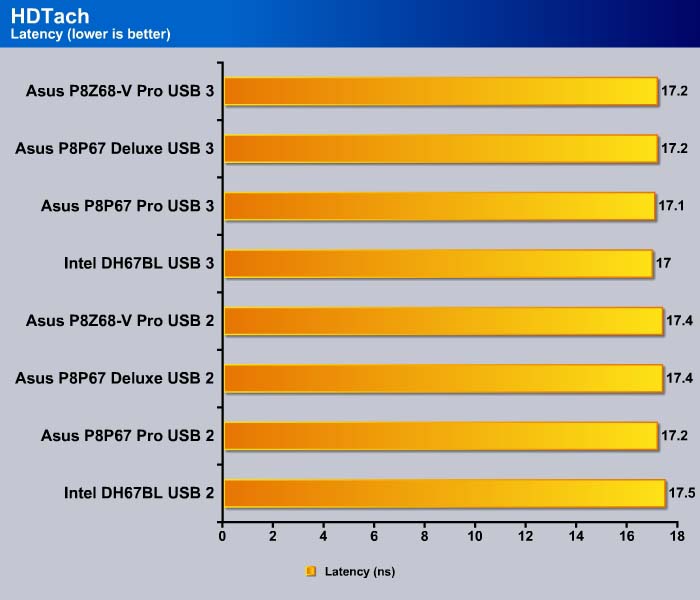
There are no major differences between the latency.
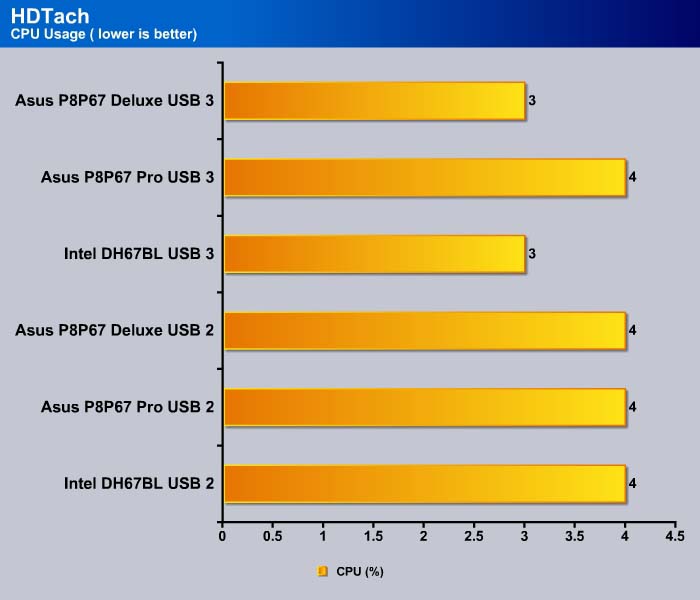
The CPU usage is also almost identical.
CONCLUSION
The Intel Z68 Express chipset is really what Intel should have brought to the market when the Sandy Bridge was launched. While the P67 is by no means a bad chip, its inability to access the integrated graphics Quick Sync feature frustrated many people. Now, if Quick Sync wasn’t as efficient in transcoding or the visual quality was not good, then it wouldn’t be such a big deal, but Quick Sync is damn good, if not the best hardware assisted transcoding tool out there.
The Z68 chipset will most likely put a hole in the P67’s market share. For those who do very little transcoding, a P67 board would suffice. It is even possible to find a very nice board at a cheaper price if manufacturers decide to offer discounts in order to clear the inventory. The performance differences between the P67 and Z68 are very close, but the Z68 always yields 5-10% higher performance depending on the task.
The selling point for the Z68 board is not only the ability to access Quick Sync but also its switchable graphics via Lucid Virtu that brings real parallelism, allowing the integrated graphics and dedicated graphics to finally work together. In most areas, it works without much issue. There are still some minor kinks that need to be ironed out, but overall, we did not encounter any issues. There is an up to 20% performance penalty with Virtu, though it is very possible that future profile updates can improve on the performance. NVIDIA is supposed to offer a true switchable graphics in the near future, which we hope would reduce the performance loss we have seen with the Virtu.
The Intel Smart Response is yet another new feature that we feel would come very handy. It essentially reduces one of the biggest bottlenecks in today’s system by pairing an SSD to the hard drive. While it will not compete against a true SSD and it is not meant to be used as one, it offers a tangible performance enhancement for those who cannot afford an SSD as a primary drive. We can see people buying older 30-60GB SSD for fairly cheap and enjoying the performance improvement.
The Asus P8Z68-V Pro that we have here today continues Asus has built with the 6 series chipset. The overall board’s layout is excellent with low profile heatsink and complete passive cooling. We love Asus continues to offer Bluetooth on the board and the extra SATA 6Gbps ports and USB 3.0 ports are much welcomed. As always, the board’s BIOS offers excellent interface via the UEFI and it is easy to navigate. Finally, for overclockers, you won’t be disappointed to as it has plenty of option and is extremely easy to overclock. In our short period with the board, we were able to overclock the processor to 4.9 GHz with air cooling. So there is definitely room for more. I think Asus has once again impressed us with the P8Z68-Z Pro.
| OUR VERDICT: ASUS P8Z68-V Pro | ||||||||||||||||
|
4 USB 3.0 and 4 SATA 6Gb/s
Easy to use EFI BIOS
Bluetooth receiver
Good combination of ports and slots
EPU and TPU switch
Excellent layout and design
Excellent overclocker
No LED error diagnostic
No clear CMOS button
Poor CMOS battery placement Summary: The ASUS P8Z68-V Pro continues with Asus tradition in offering the best combination of performance, ports, slots, and features. The board earns the coveted Bjorn3D Gold Bear Award.