With the aging X58 chipset, we were surprised to find a new top-of-the-line board for this platform. Its beastly appearance left us wondering whether it had the performance to back up its looks. Read on to find out more.
Introduction – Asus Rampage III Black Edition
 ASUS has long been known as a premier motherboard and overall system component manufacturer. ROG (Republic of Gamers) is their flagship line of motherboards and graphics cards. They are well known by gamers and enthusiasts as being the best of the best, whether we reference gaming, overclocking or just the appearance. ASUS has been engineering ROG motherboards that meet the performance many need along with the edgy appearance that matches some of the most extreme case modding and enthusiast designs out there. Also, ROG designs usually carry many features that other manufacturers either do not offer or rarely use at all. This all makes for a winning package for the end-users.
Considering that the aging X58 chipset has already been replaced, we were surprised to see yet another offering in the X58 lineup, even with the recent release of Sandy Bridge and the Z68 chipset. However, looking over the specs and feature, on this board we would dare to say that the X58 is back in black.
In this review we will look at the features of the Rampage III Black Edition and the many features and offerings that place this board at a street price of $559.99. Most importantly is it worth that much of the buyers’ hard earned cash?
Special Features
Rampage III Black Edition Product Overview

CPU Features
LGA1366 Intel® Core™ i7 Ready
![]()
![]() This motherboard supports the latest Intel® Core™ i7 processors in LGA1366 package with integrated memory controller to support 3-channel (6 DIMMs) DDR3 memory. Supports Intel® QuickPath Interconnect (QPI) with a system bus of up to 6.4 GT/s and a max bandwidth of up to 25.6 GB/s. Intel® Core™ i7 processor is one of the most powerful and energy efficient CPUs in the world.
This motherboard supports the latest Intel® Core™ i7 processors in LGA1366 package with integrated memory controller to support 3-channel (6 DIMMs) DDR3 memory. Supports Intel® QuickPath Interconnect (QPI) with a system bus of up to 6.4 GT/s and a max bandwidth of up to 25.6 GB/s. Intel® Core™ i7 processor is one of the most powerful and energy efficient CPUs in the world.
Chipset Features
Intel® X58 Chipset
![]() The Intel® X58 Express Chipset is one of the most powerful chipset designed to support the Intel® Core™ i7 Processors with LGA1366 package and Intel® next generation system interconnect interface, Intel® QuickPath Interconnect (QPI), providing improved performance by utilizing serial point-to-point links, allowing increased bandwidth and stability. It also supports up to 36 PCI Express 2.0 lanes providing better graphics performance.
The Intel® X58 Express Chipset is one of the most powerful chipset designed to support the Intel® Core™ i7 Processors with LGA1366 package and Intel® next generation system interconnect interface, Intel® QuickPath Interconnect (QPI), providing improved performance by utilizing serial point-to-point links, allowing increased bandwidth and stability. It also supports up to 36 PCI Express 2.0 lanes providing better graphics performance.
Multi-GPU Technology
SLI/CrossFire On-Demand
![]()
![]() Why choose when you can have both?
Why choose when you can have both?
SLI or CrossFireX? Fret no longer because with the ROG Rampage III Black Edition you’ll be able to run both multi-GPU setups. The board features SLI/CrossFire on Demand technology, supporting up to four graphics cards in a 3-Way SLI or CrossFireX configuration. Whichever path you take, you can be assured of jaw-dropping graphics at a level previously unseen.
Memory features
Tri-Channel, DDR3 2200(O.C.) MHz
The motherboard supports DDR3 memory that features data transfer rates of 2200(O.C.)/2133(O.C.)/2000(O.C.)/1800(O.C.)/1600(O.C.)/1333/1066 MHz to meet the higher bandwidth requirements of the latest operation system, 3D graphics, multimedia, and Internet applications. The dual-channel DDR3 architecture double the bandwidth of your system memory to boost system performance.
ROG ThunderBolt LAN/Audio Combo
Dedicated NPU
![]()
![]() Play FASTER
Play FASTER
Even with a high-end CPU and GPU, FPS and MMORPGs can still become a laggy mess if the LAN performance sucks. Gamers yearn to keep gaming framerates solid. The ROG ThunderBolt has been designed from continual feedback from the PC gaming community. By enhancing the 2 key factors (Speed and Sound) that dominate your gaming experience, the advanced integration of the LAN/Audio combo ThunderBolt offers higher throughput and decreased latency is about to bring the best in-game experience to you!
Note: Network Processing Unit (NPU)
Built-in Headset Amp.
![]() Sound GREATER
Sound GREATER
The ROG ThunderBolt is a dedicated LAN/audio combo card designed for gamers. With the ROG ThunderBolt’s high sound quality and built-in amp, gamers can discover the enemy’s position much easier and react earlier, making it just like another weapon in a gamer’s arsenal! With fine-tuned background sound effects for popular game tyes and Xear 3D Surround tech, ROG ThunderBolt lets you hear better and win easier!

Future Transfer Technology
True USB 3.0 Support
![]() 10X faster data rates!
10X faster data rates!
Experience ultra-fast data transfers at 4.8Gbps with USB 3.0—the latest connectivity standard. Built to connect easily with next generation components and peripherals, USB 3.0 transfers data 10X faster and is also backward compatible with USB 2.0 components.
True SATA 6Gb/s Support
![]() Experience the future of storage!
Experience the future of storage!
Supporting next-generation Serial ATA (SATA) storage interface, this motherboard delivers up to 6.0Gb/s data transfer rates. Additionally, get enhanced scalability, faster data retrieval, double the bandwidth of current bus systems.
ROG Exclusive Features
Extreme Engine Digi+
![]() Powerful combination of analog and digital design elements
Powerful combination of analog and digital design elements
Extreme Engine Digi+ equipped with high performance digital VRM design can easily achieve the ultimate performance with adjustable CPU PWM frequency. It expedites heat dissipation and achieves better electric conduction keeping critical components reliable. Now you’ll be able to push your spanking new Intel CPU to the limit, hitting benchmark scores that others only dream of. Extreme Engine Digi+ balances the need for voltage and the desire for rock solid performance to bring the ultimate user experience.
ROG Connect
![]() Plug and Overclock – Tweak it the hardcore way!
Plug and Overclock – Tweak it the hardcore way!
Monitor the status of your desktop PC and tweak its parameters in real-time via a notebook—just like a race car engineer—with ROG Connect. ROG Connect links your main system to a notebook through a USB cable, allowing you to view real-time POST code and hardware status readouts on your notebook, as well as make on-the-fly parameter adjustments at a purely hardware level.
ROG iDirect
![]() Tune your PC from your iPhone or iPad now!
Tune your PC from your iPhone or iPad now!
Still overclocking your PC the old-fashioned way? Let ROG iDirect bring you a whole new tweaking experience right on your iPhone or iPad! Thanks to the Bluetooth support that comes with select ASUS ROG motherboards, you can monitor your PC and tweak parameters such as voltages and frequencies in real time wirelessly from your iPhone or iPad!
GPU.DIMM Post
![]() Easily check the status of your graphics cards and memory in the BIOS!
Easily check the status of your graphics cards and memory in the BIOS!
Notice potential problems even before you enter the OS! Overclockers can save valuable minutes in detecting component failure under extreme conditions. With GPU.DIMM Post, quickly and easily check your graphics cards and memory DIMMs status in the BIOS, potentially keeping that record-breaking overclock!

Bluetooth v3.0 + HS Support
 Diverse Bluetooth and Wi-Fi Enjoyment, New Technology Lifestyle
Onboard Bluetooth v3.0 + HS enables smart connectivity to Bluetooth and wireless internet devices with no additional adapters. Enjoy the convenience and faster transfer rates of Wi-Fi anywhere on both desktops and notebooks.
*The Bluetooth® word mark and logos are registered trademarks owned by Bluetooth SIG, Inc. and any use of such marks by ASUSTeK Computer Inc. is under license. Other trademarks and trade names are those of their respective owners.
Sound with Clarity
SupremeFX X-Fi 2 Built-in
Play with ultra-real cinematic in-game surround sound!
SupremeFX X-Fi 2 delivers incredible gaming audio experiences to ROG die hards. It features EAX 5.0 and OpenAL for ultra-real cinematic in-game audio. It even comes with THX TruStudio Pro, which makes games, music and movies sound way better! SupremeFX X-Fi 2 also implements gold-plated jacks and high quality capacitors to ensure high definition adventures in audio.
Specifications
| CPU | Intel® Socket 1366 Core™ i7 Extreme Edition/Core™ i7 Processors Supports Intel® Turbo Boost Technology 2.0 * Refer to www.asus.com for CPU support list |
| Chipset | Intel® X58/ICH10R |
| Memory | 6 x DIMM, Max. 48GB, DDR3 2200(O.C.)/2133(O.C.)/2000(O.C.)/1800(O.C.)/1600/1333/1066 Hz Non-ECC, Un-buffered Memory Triple Channel Memory Architecture * Hyper DIMM support is subject to the physical characteristics of individual CPUs. |
| System Bus | 6.4 GT/s Intel® QuickPath Interconnect |
| Multi-GPU Support | Supports NVIDIA® 3-Way SLI™ Technology Supports AMD CrossFireX™ Technology |
| Expansion Slots | 4 x PCIe 2.0 x16 (dual x16 or x16, x8, x8 or quad x8) *1 2 x PCIe 2.0 x1 |
| Storage | Intel® ICH10R controller : 6 x SATA 3Gb/s port(s), black Support Raid 0, 1, 5, 10 JMicron® JMB363 controller : 2 x eSATA 3Gb/s port(s), red Marvell® PCIe 9182 controller : 2 x SATA 6Gb/s port(s), gray |
| LAN | Intel®, 1 x Gigabit LAN Controller(s) |
| Wireless Data Network | Wi-Fi 802.11 b/g/n |
| Bluetooth | Bluetooth V3.0+HS |
| ThunderBolt LAN/Audio Combo Card | Killer™ E2100 dedicated network processing unit (NPU) – Advanced Game Detect™ – Visual Bandwidth Control™ – Application Blocking – Online Gaming PC Monitor™ – Bandwidth Tester – Game Networking DNA™ Built-in 2-Channel High Quality DAC/ADC – Output Signal-to-Noise Ratio (A-Weighted): 116 dB – Output THD+N at 1kHz: 105 dB – C-Media 6631 audio processor (Max. 192kHz/ 24-bit) – TI 6120A2 high fidelity headphone amplifier – Digital-to-Analog Converter: 120 dB (Max. 192kHz/ 24-bit) – Analog-to-Digital Converter: 114 dB (Max. 192kHz/ 24-bit) – Supports 3 Headphone Impedance Gain Modes (up to 300 Ohms) – Fine-tuned Game Genre EQ Profiles – Xear™ Surround Headphone – Xear™ SingFX – Equalizer, Environment Effects, FlexBass, Smart Volume, Virtual Speaker Shifter – DS3D GX 1.0, OpenAL – Front-panel audio connector (AAFP) – Line in, Line out, Optical S/PDIF out ports – USB 2.0 Interface |
| Audio | SupremeFX X-Fi 2 built-in 8-Channel High Definition Audio CODEC – Supports : Jack-detection, Multi-streaming, Front Panel Jack-retasking Audio Feature : – X-Fi® Xtreme Fidelity™ – EAX® Advanced™ HD 5.0 – THX® TruStudio PRO™ – Creative ALchemy – Blu-ray audio layer Content Protection |
| USB Ports | NEC® USB 3.0 controller : 4 x USB 3.0 port(s) (2 at back panel, blue, 2 at mid-board) Intel® ICH10R controller : 11 x USB 2.0 port(s) (6 at back panel, black, 4 at mid-board) |
| Overclocking Features | ROG Connect : – RC Diagram – RC Remote – RC Poster – GPU TweakIt ROG iDirect Extreme Engine Digi+ : – 8 -phase CPU power design – 3 -phase QPI/DRAM power design – 3 -phase NB power design – 3 -phase Memory power design – ML Caps on CPU/Memory/QPI respectively ROG Extreme OC kit : – LN2 Mode – PCIe x16 Lane Switch – Q Reset Double Power : – Dual 8 -pin CPU ProbeIt UEFI BIOS features : – ROG BIOS Wallpaper – GPU.DIMM Post iROG Extreme Tweaker Loadline Calibration BIOS Flashback Overclocking Protection : – COP EX (Component Overheat Protection – EX) – Voltiminder LED – ASUS C.P.R.(CPU Parameter Recall) |
| Special Features | ASUS EPU : – EPU CPU Level Up ASUS Exclusive Features : – MemOK! – Onboard Button : Power/Reset/Clr CMOS (at back IO) ASUS Quiet Thermal Solution : – ASUS Q-Fan Plus – ASUS Fan Xpert ASUS EZ DIY : – ASUS O.C. Profile – ASUS CrashFree BIOS 3 – ASUS EZ Flash 2 – ASUS MyLogo 3 ASUS Q-Design : – ASUS Q-LED (CPU, DRAM, VGA, Boot Device LED) – ASUS Q-Slot – ASUS Q-DIMM – ASUS Q-Connector |
| Back I/O Ports | 1 x PS/2 keyboard (purple) 2 x eSATA 3Gb/s 1 x LAN (RJ45) port(s) 2 x USB 3.0 7 x USB 2.0 (white port can be switched to ROG Connect) 6 x Audio jack(s) 1 x Clear CMOS button(s) 1 x ROG Connect On/ Off switch(es) 2 x Wi-Fi antenna port(s) |
| Internal I/O Ports | 1 x USB 3.0 connector(s) support(s) additional 2 USB 3.0 port(s) 2 x USB 2.0 connector(s) support(s) additional 4 USB 2.0 port(s) 2 x SATA 6Gb/s connector(s) 6 x SATA 3Gb/s connector(s) 2 x CPU Fan connector(s) 3 x Chassis Fan connector(s) 3 x Optional Fan connector(s) 1 x S/PDIF out header(s) 1 x 24-pin EATX Power connector(s) 2 x 8-pin ATX 12V Power connector(s) 1 x Front panel audio connector(s) (AAFP) 1 x System panel(s) 1 x QPI Loadline Calibration switch jumper(s) 8 x ProbeIt Measurement Points 3 x Thermal sensor connector(s) 1 x En/Dis-able Clr CMOS header(s) 1 x LN2 Mode header(s) 1 x EZ Plug connector(s) (4-pin Molex power connector) 1 x Power-on button(s) 1 x Reset button(s) 1 x Go Button(s) 1 x BIOS Switch button(s) 1 x ROG light connector(s) |
| Accessories | I/O Shield 6 x SATA 3Gb/s cable(s) 2 x SATA 6Gb/s cable(s) 1 x 3-Way SLI bridge(s) 1 x SLI bridge(s) 1 x CrossFire cable(s) 1 x Q-connector(s) (2 in 1) 1 x 2-port USB 2.0 and eSATA module(s) 1 x USB to USB cable(s) for ThunderBolt 1 x ROG Connect cable(s) 3 x Thermal sensor cable pack(s) 1 x Cable ties pack(s) 1 x ROG theme label(s) 1 x 12 in 1 ROG Cable Label(s) 1 x Optional NB Fan 2 x Wi-Fi Ring Moving Antenna |
| BIOS | 16 Mb Flash ROM , PnP, DMI2.0, WfM2.0, SM BIOS 2.5, ACPI2.0a Multi-Language BIOS |
| Manageability | WOL by PME,WOR by PME,PXE |
| Support Disc | Drivers ASUS PC Probe II ASUS Update Kaspersky® Anti-Virus ASUS TurboV EVO Utility ASUS AI Suite II ASUS AI Charger WiFi Agent |
| Form Factor | Extended ATX Form Factor 12 inch x 10.6 inch ( 30.5 cm x 26.9 cm ) |
| Note | *1: 4 PCIe x16 slots ready for 4 single PCB 2-slot width graphics cards. |
Software Overview

ASUS updated their whole software bundle and put all major applications , including PC Probe, Turbo V Evo, Fan Xpert, and Update software for the BIOS, into the AI Suite II. This makes it very easy to set up everything because there is no need to run several applications at once. The one application has all the features users will ever need.
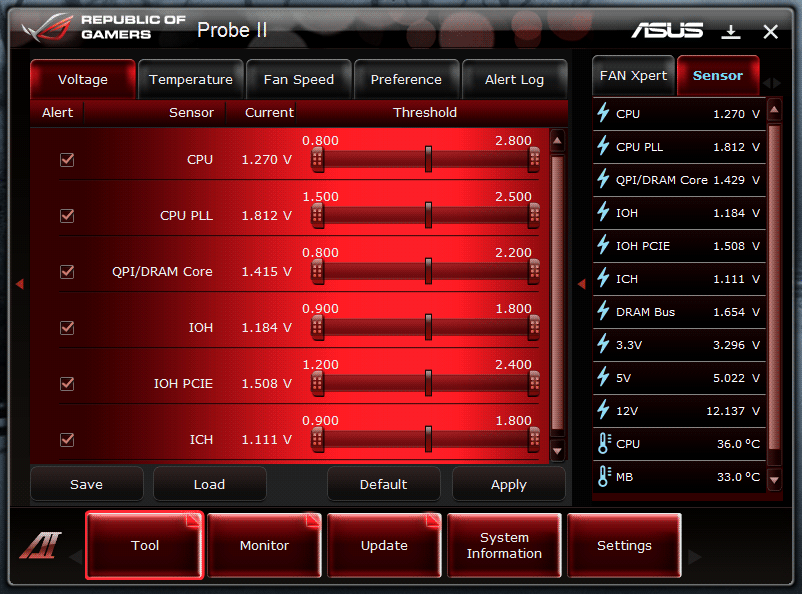
Probe II is an excellent application to monitor your computer voltages, fan speeds, temperatures and it also gives you the option to set up alert options in case voltage jumps, or there is a recent drop in the Power Supply voltage, or even if temperatures get critical or fans die in your system.

The temperature section allows users to set up alerts if certain parts of the system get too hot. Two optional temperatures can be set up for certain hardware parts that users wish to monitor. While users running components at stock speeds may not require temperature monitoring, this is a great feature for overclockers that want to make sure their components run cool enough even during the hot days. Because high temperatures could render the PC unstable, Probe II could warn users when temperatures get too high.

Probe II also includes an alerts log where all the alerts and updates are reported. This feature helps users understand problems that might have occurred while they were away.
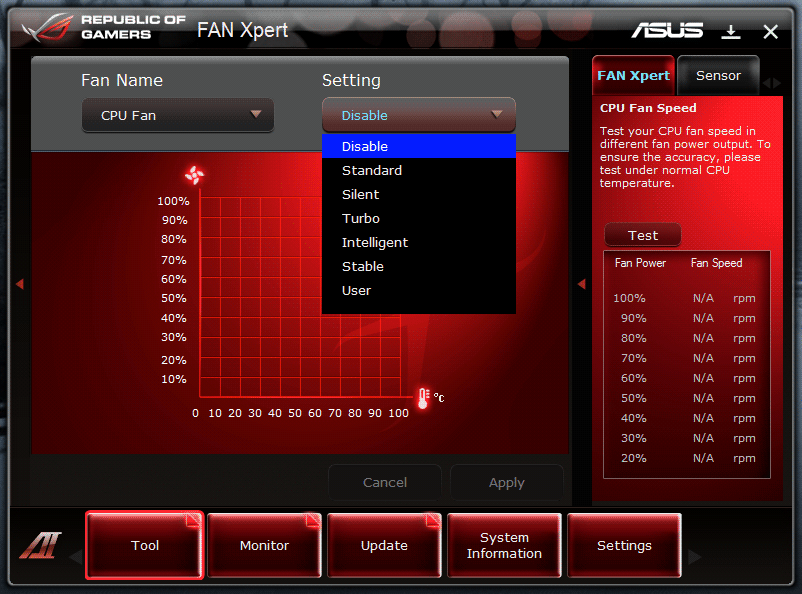
Fan Xpert helps users control the fans in their system. Since all the fan headers on the ASUS Rampage III Black Edition are PWM 4-pin headers, the RPM of each fan can be easily read and controlled by the BIOS and Fan Xpert. Think of it as a fan controller built into the motherboard that can be programmed to change the speed of the fans under different conditions. The drop down menu in the picture shows 6 different settings.
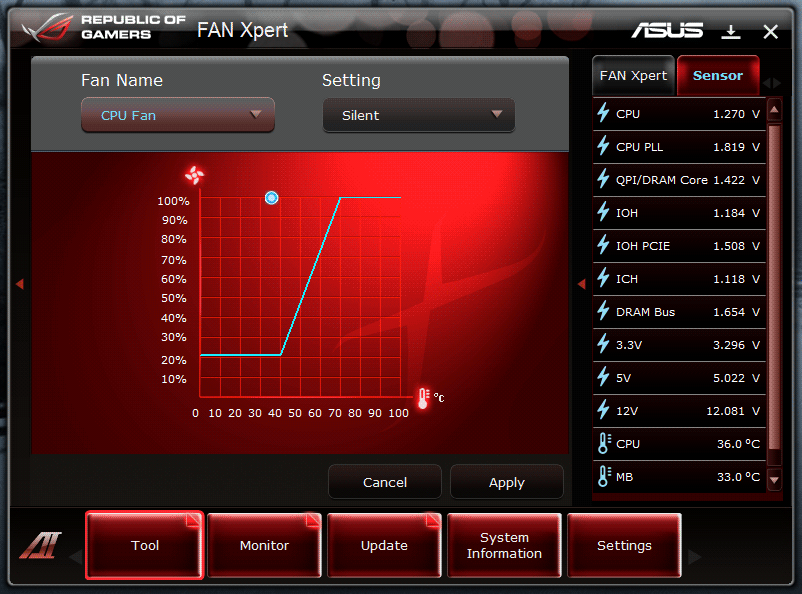
This is the Silent Preset, which is automatically set to run the fans at 20% till the temperatures on the CPU rise to 40C. As the temperature rises from 40C to 70C, the fan percentage rises at a constant slope of about 27% per 10 degrees Celsius. The fan speed can easily be programmable once the setting is changed to the User preset.
The benefit of combining all the applications into one is that in the event there is an incorrect setting in Fan Xpert and the temperatures on the hardware rise too much, users can quickly change the settings and see the temperatures change real-time on the side.
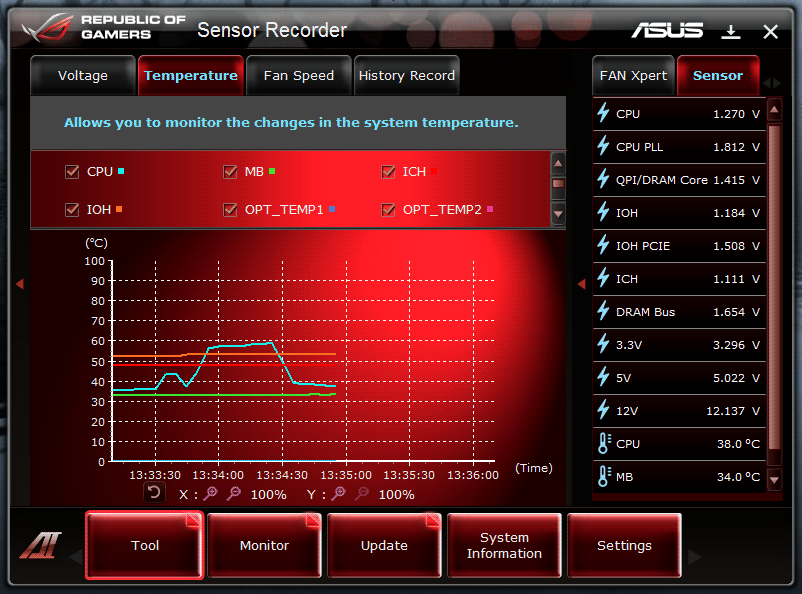
The beauty of Sensor Recorder is that users can record voltage, temperature, and fan speed information real-time and let the application graph everything. This can help in situations when users are benchmarking their system, or playing a video game, but would also like to know if the voltages, temperatures, and fan speeds are within acceptable ranges.

The TurboV EVO software allows the user to manually or automatically overclock their PC within Windows using three separate configurations: Manual, Easy Mode and Auto Tuning. Before we go into these configurations, we would like to mention that TurboV EVO is a true hardware
In manual mode the software allows users to set the BLCK frequency, and change all voltages including the PLL, CHA DATA, CHB DATA, PCH, CHA CTRL and CHB CTRL voltages.
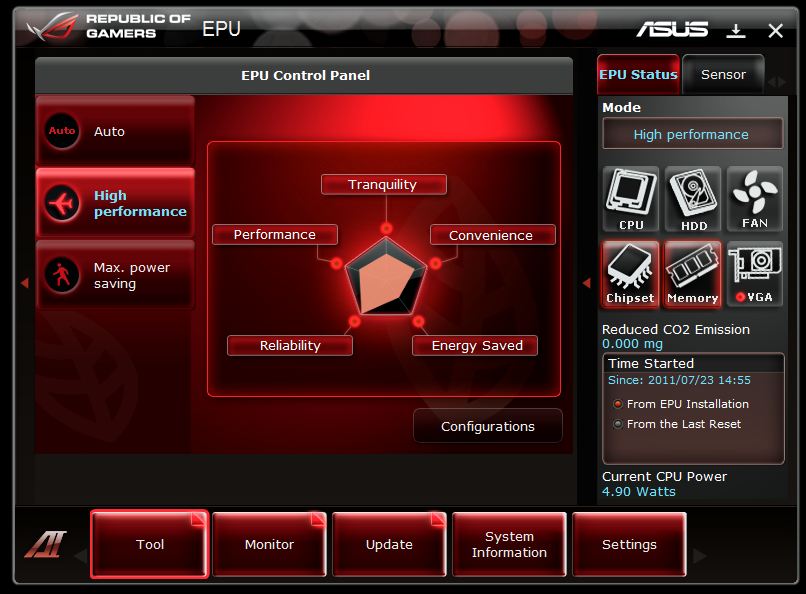
The EPU allows for tuning to best suit your needs along with a graph showing how your existing settings cooalate to Tranquility, convenience, energy savings, reliability and performance. This allows for the user to betetr tune their system to meet their specific needs.
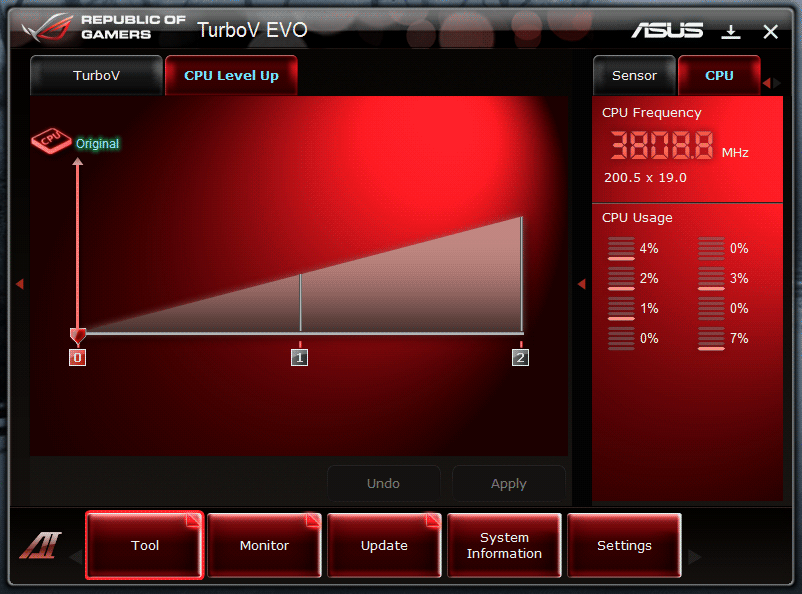
CPU Level Up helps users overclock their systems in an extremely easy way. There are two presets already included. Depending on the processor, the presets will be different, but for a Core i7 930, we have Core i7 950 and Core i7 960 presets ready. This basically allows us to overclock our system to the performance of a Core i7 950 or Core i7 960 with one click.

Here we see the Digi+ VRM settings which allows in windows changing of VRM settings. Not just PWM frequency but VRM Tprobe setting vs extreme along with OCP and LLC. This sort of adjustability is usually reserved for in BIOS only and ASUS offers it all adjustable through windows without the need to restart and go into bios every time you set it up.


The ASUS Update allows the user to quickly download and flash the latest BIOS to the BIOS chip. Since the ASUS Rampage III Black Edition comes with two separate BIOS chips, the BIOS chip being used at the time will be flashed. The other BIOS chip will stay intact with the old BIOS, and can be used at later times if there are any BIOS failures. When doing the update procedures, users can also add their own booting image. By default the ASUS Republic of Gamers animated boot screen is played every single time the system turns on. If users wish to change that, they can easily do so through the Update section while updating the BIOS. They do not have to update your BIOS to change the boot image.


Click Image For a Larger One
The system information panel shows users the most recent system specifications and settings. It’s very similar to CPU-Z.
Speaking of CPU-Z, ASUS even offers a custom ROG version of CPU-Z with the AI Suite II software.


Click Image For a Larger One
Finally, the Settings panel allows users to customize the AI Suite II control panel. Users can change colors, contrast, brightness, saturation, and more. It also lets users enable and disable several applications in AI Suite II.
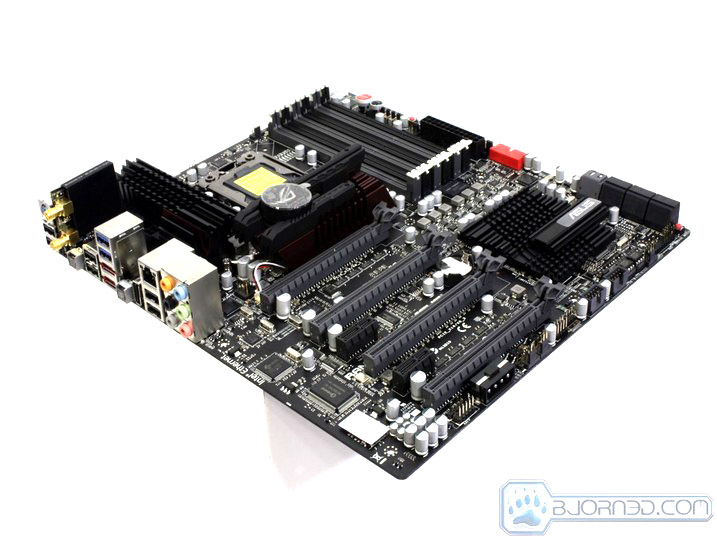
Overview of the Rampage III Black Edition


The packaging is very well made, with a flip open front. Once flipped over we can see many of the key specs and details listed on the rear side of the packaging. This has become pretty standard fare as of recent for spec listing. The flip open front is something that some manufacturers have adopted, though usually it is used for the higher end products. In this case when flipping open the front flap we see more in depth specs and information along with a direct view now of the top portion of the motherboard and also a look at the Thunderbolt card.


Here we can the motherboard enclosure removed from the box. Safely encased in plastic you have the Thunderbolt card along with the Black edition motherboard itself safely stored below.


Taking a look at the IO we can see that the Black Edition has not only the standard fare but a host more of options to give the end user the connectivity they need. Included are options such as integrated WiFi, Bluetooth, and all of the standard connections including the ROG connect all on the rear I/O. Also on the other edge of the board we see the OC ZONE which includes all sorts of controls for power up and overclock functions which will be covered in more detail later. Below the OC ZONE we see the red onboard header which is for USB 3.0 connectivity to chassis’ front panels. Here is exactly what you get for connectivity from the IO panel.
- PS2 mouse/keyboard combo port
- 6 USB 2.0 Ports
- WiFi/Bluetooth antenna connections
- Clear CMOS Button
- 2 USB 3.0 ports
- ROG Connect button/USB Port
- Intel 10/100/1000 Lan port
- High definition 8 channel SupremeFX audio


- Dual WiFi antennas
- IO Shield
- Sata cables
- USB to Thunderbolt cable
- 2 way CrossFire Bridge
- 2 Way SLI Bridge
- 3 Way SLI Bridge
- Users Manual
- Thunderbolt Test Report
- USB/eSATA backpanel
- 3 optional temperature probes
- USB cable for ROG connect
- Easy connect front panel connectors
- Optional NB cooling fan
A Closer look at the rampage iii black edition


Here we get a much closer look at the key components that make up the Black Edition board. First up we see the OC ZONE which holds a lot of the items buyers will use regularly if benchmarking the system outside of the case. This includes PCI-E slot disable switches, which help with diagnosing a possible bad card by disabling the slots without having to turn off the system. This will help a lot for those running watercooling on the cards, or even more so if running extreme cooling on the cards. We also have a jumper right next to the switches labeled “LN2 Mode”. This should allow users to better navigate around some problematic cold boot bugs, which often plague overclockers when they use extremely cold substances (such as LN2) to cool their systems. Traditionally this is only cured by heating up to a point past the system’s lowest operable temperature, at which point the system should post normally again. This can be a huge issue for overclockers, as raising the temperature can mean a number of things including possible condensation or frosting issues that can cause component damage.
Next to the 24 pin power connector we can see some small LED’s. These LED’s go step by step at each stage of the post just in case the 2 digit post indicator or the ROG connect weren’t enough to let users know at which stage of booting the computer is. Additionally, there are small silver dots that we can use to measure real time voltage from the board with a multimeter. This can be really helpful when diagnosing stability concerns or monitoring critical voltages during a subzero benching run. The smaller red button is the MemOK! button, which helps with recovering from a failed memory setting or memory failure by reverting to the fail-safe memory settings.


Next we see the CPU power area. We instantly noticed that the standard large black MOSFETs have been replaced with smaller silver ones. After some investigation we found that these MOSFETs actually are a signifiant improvement over the standard plastic covered MOSFETs, as the new metal ones (called “FET+”) can dissipate heat 1.3x faster, which means better performance and a longer life. Additionally, the FET+ transistors are capable of sustaining insanely high amperages (up to 139 Amps) to ensure that even when the best processors are overclocked, users will not encounter issues. Another thing we noticed right away was the Proadlizer capacitors, which ensure the most consistent power delivery. Looking to the left of the power package we see the dual 8 pin CPU power connectors which ensure that no matter the load being put on the power circuit, it will have plenty of power.
On the right hand picture is the WiFi/Bluetooth module. This allows connection to a WiFi network so that as long as the system can receive a signal, there will be no need to route an Ethernet cable. Also, the board has Bluetooth 3.0 integrated into the same controller, ensuring the fastest communication possible. Lastly, we have the small red button—referred to as Qreset—which allows users to reset the CMOS without restarting the computer.
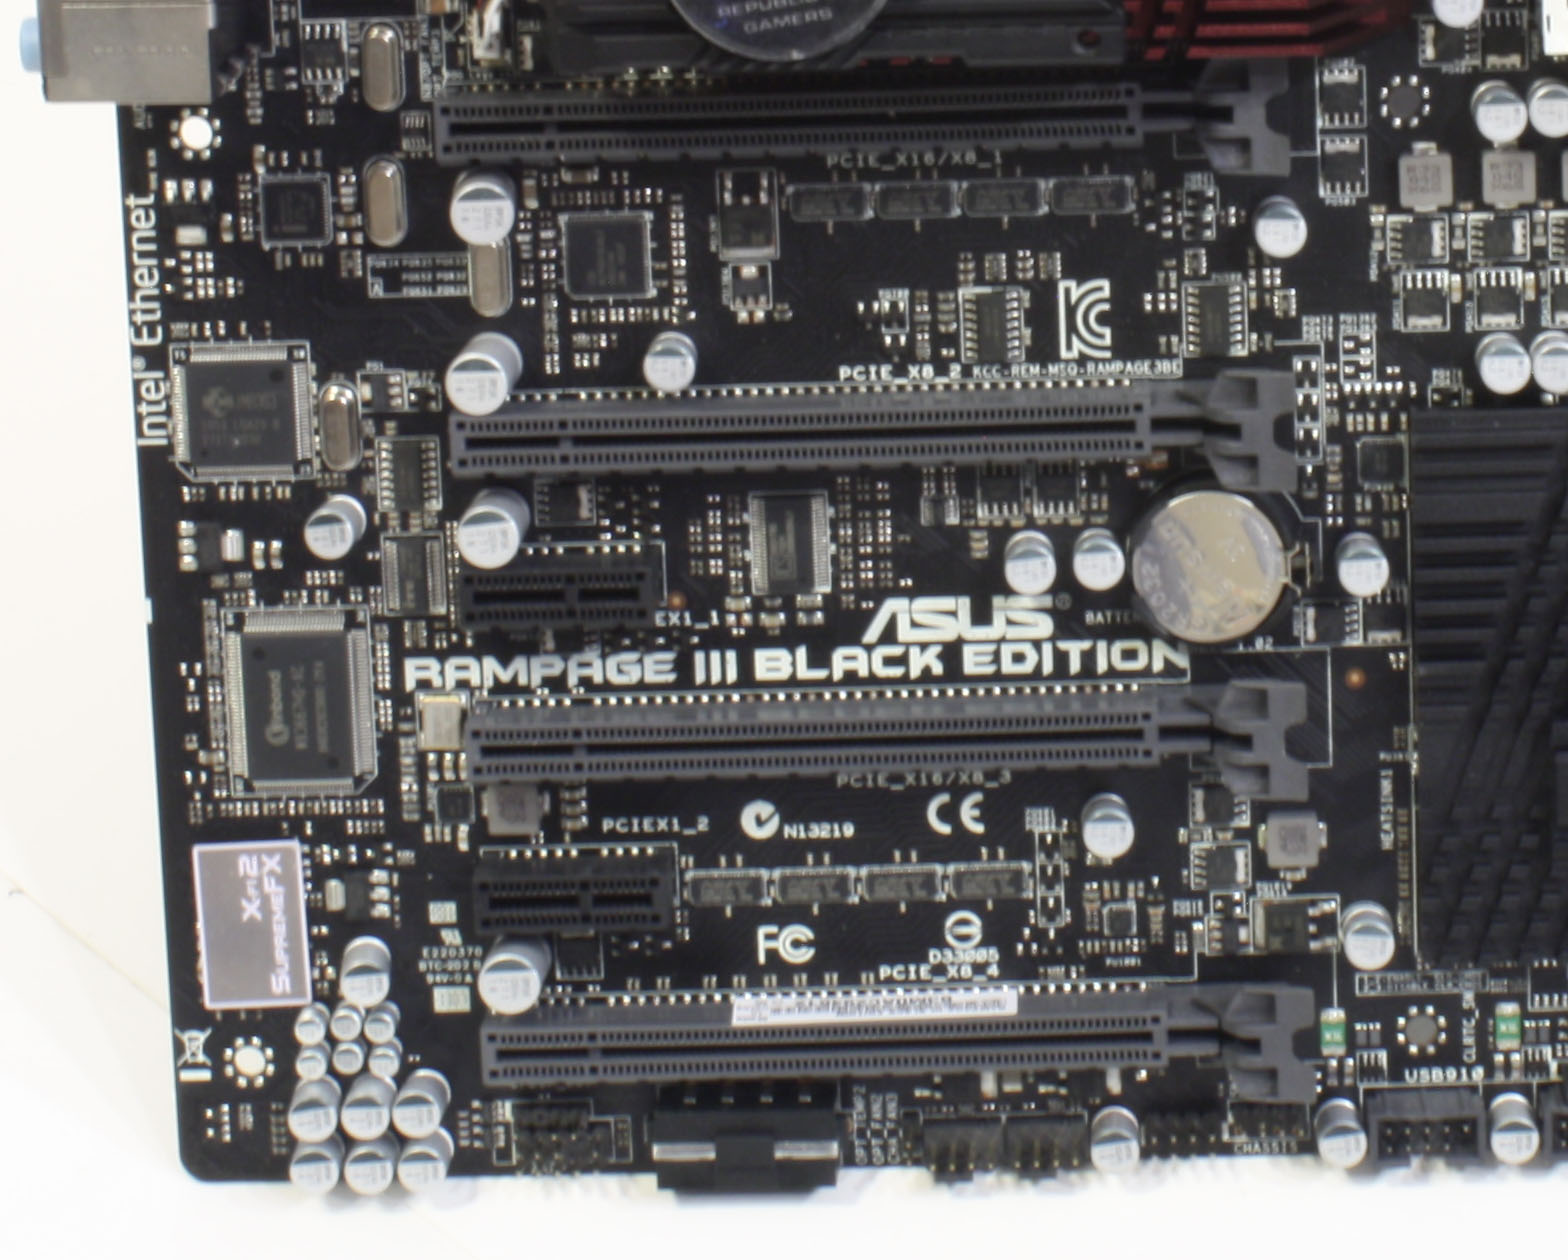
Here we see the expansion slot layout. The first thing to notice is that the 4 x16 slots are spaced far enough apart that 4 dual slot cards can be placed on the board. However, even though 4 cards can be used, the board will only natively support a maximum of 3 NVIDIA cards in SLI. It natively supports 4-way CrossFireX without issue. 4-way SLI requires dual NF200 chips to enable 4 way SLI functionality, though this can still be accommodated by using the ROG Xpander daughterboard. Natively, the slots will support two cards at x16/x16 or three cards at x16/x8/x8 (when using 4-way CrossFireX, the fourth slot also becomes x8). There are also 2 PCI-E x1 slots which allow use of any PCI-E x1 card such as the ASUS Thunderbolt card that comes with the board. One thing to note is that if 4 dual slot cards are installed into the board, the x1 slots will be inaccessible.
Below the bottom most slot we see a 4 pin Molex connector which provides supplemental power to the board so that while pushing the board to its limits, the Molex can help buffer the voltage supply to the board and enhance voltage stability by reducing load from the 24-pin connector. As more and more power-hungry components show up on boards these days, it can definitely become very helpful to have supplemental power connectors like this to avoid overloading the main ATX power connector, or even worse, cause stability problems due to lack of available power. Another part that stuck out to us was the SupremeFX decal on the I/O chip which we have seen on previous ROG boards. This signifies the high quality audio included onboard.
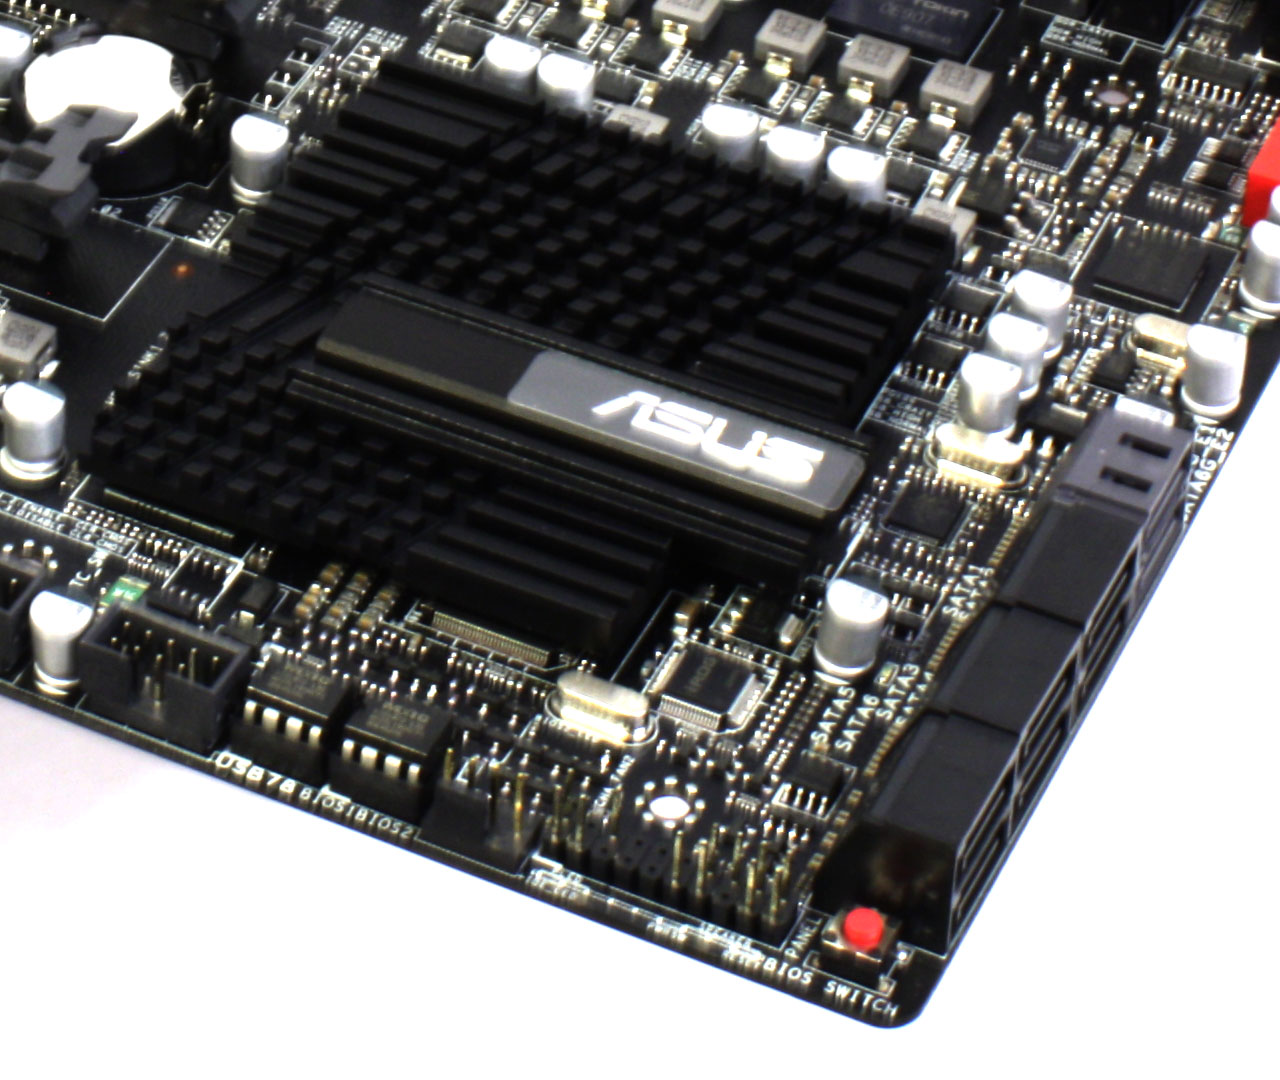
Here we see the lower right hand edge of the board. The large black heatsink covers the ICH10R South Bridge chipset. This chip controls many I/O devices such as USB and SATA ports. As we see to the right of the chipset heatsink, there are six black SATA II ports running at 3Gbps supporting RAID 0, 1, 5 and 10. The board also has two SATA III 6Gbps ports controlled by the Marvell 9182 chipset. Below the ports we see the red BIOS switch button, which allows users to switch between the two BIOS chips included on this board. To the left are the front panel headers and the dual BIOS chips. Looking to the upper right of the black chipset heatsink we also see a NEC USB 3.0 controller that is used to control the red internal header at the edge of the picture.
Thunderbolt Audio/LAN card
The Thunderbolt card is a very intriguing piece of hardware. It integrates both a Bigfoot Networks Killer 2100 Gaming Network card and a Xonar audio card into one PCI-E x1 package.


BIOS
Main Page


Extreme Tweaker


Click Image To Enlarge
Here we start to see what makes the board so great. The very first menu shows the different frequency collections along with links to sub-menus that allow much finer tweaking.


Click Image To Enlarge
Here we see the AI overclock or “easy overclock”, at which we can set 4GHz or 4.2GHz and just run it with no further tweaking necessary. It works quite well, as we tested it, but we also like to push it more leaving the auto overclock disabled and manually configuring our own settings. Another item we see is the 2D Performance Booster which we will test once we have LN2.


Click Image To Enlarge
Here we see some of the available frequency options from DRAM and Uncore frequencies. This is just a couple of the man options you can tweak on this board.


Click Image To Enlarge
Here we see the QPI link speed and the memory timings and sub-timings. Once again, the board has a lot of adjustability to ensure that even the finest detail is well-managed.


Click Image To Enlarge
Once again we see ASUS’ expertise paying off. We have what are termed as “sweet spots” for many settings, so that no matter the user’s skill level, there is a point in the right direction as to which setting would normally perform best for each platform.


Click Image To Enlarge
Here are some really cool settings. We have the clock skews which help with small delays in signaling, but more importantly, the DIGI+ VRM control shown here allows for setting up whether the VRM will control itself based upon load and temperature, or whether the VRM will not actively throttle and allow full power with no balancing for 100% stable power on high loading extreme benchmarks. Lastly we see the load line calibration, set up differently than we have seen previously, as it has option for percentages rather than levels.
The following are the rest of the fine configuration options and other BIOS setup options.


Click Image To Enlarge
Here we see the OCP settings and PWM frequency settings. These will be used likely on those pushing for the higher end of the overclocking spectrum.


Click Image To Enlarge
Here we get even deeper into the Extreme overclocking options, as these are used to allow much higher voltages for extreme overclocking.


Click Image To Enlarge
Here we see the OC profile save portion of the BIOS. It is pretty cool to see the option to not only save the profiles but to name them so that in the future they are easy to use.


Click Image To Enlarge
Here we see more of the advanced configuration which lets the user set up specific areas of the CPU to be enabled or disabled along with other onboard controllers that users can also disable or enable as needed. One cool feature we saw was the ability to shut down all of the extra controllers for benchmark runs, which lightens the system load and may help eek out that last MHz when benching.


Click Image To Enlarge
Here we can see the LED settings which is nice for anyone who is going for a specific theme in their build and does not want certain LED’s showing.


Click Image To Enlarge
Here we see the power management options along with monitoring for pretty much every temperature and voltage on the board.


Click Image To Enlarge
Here we can see the various bootup options and settings and various utilities for flashing the motherboard BIOS, along with the options to save the configuration before exiting.


Overclocking

The X58 Chipset allows for some pretty impressive levels of overclocking just through BCLK alone. This allows for locked multiplier chips to reach well past the default speed of their unlocked or “extreme edition” much more costly counterparts.
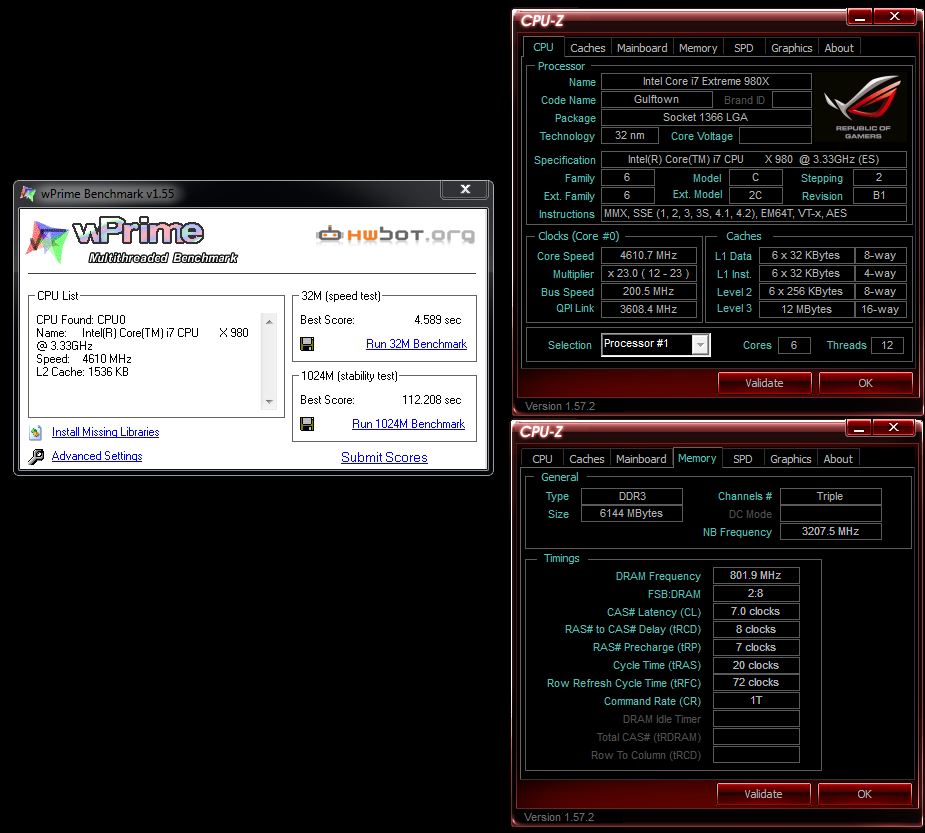
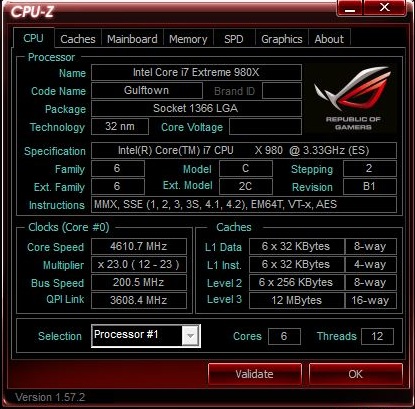
For our testing we went with the Intel i7 980x Extreme edition processor.
We started by just pushing the multiplier up some until we experienced a crash, then went back to stock multiplier and tried raising the BCLK just to see how well the board clocked without a lot of tweaking. We were pleasantly surprised to see 4.4GHz perfectly rock stable with minimal tweaking, and it all took maybe 10 minutes to achieve this overclock, so this board can run a system at 4+ GHz with little to no effort. We am quite certain that with more cooling power this board would do even better. In future LN2 runs, we’ll confirm whether this is true, but for our water cooled testing, we decided to stick around 4.4GHz as it was easily achievable on non exotic cooling and with little tweaking, which means most anyone should be able to reproduce our results.
Important note: Overclocking can cause component failure. Please exercise caution when attempting any level of overclock on system components.
Temperatures

The temperatures were recorded with Realtemp while running Wprime 1024 right before the end of the 5th run. The results were recorded carefully. After the results were recorded, we waited for 30 minutes before taking Idle temperature measurements. The results were as follows:
| CPU Temperatures | Temperature (Idle/Load) |
| Rampage III Black Edition OC (4.4GHz) | 37C/66C |
| Rampage III Black Edition | 31C/58C |
| Chipset Temperatures | Temperature (Idle/Load) |
| Rampage III Black Edition OC (4.4GHz) w/ opt fan | 31C/50C |
| Rampage III Black Edition OC (4.4GHz) | 34C/56C |
| Rampage III Black Edition OC | 32C/51C |
As we found water cooling would be a much better solution to keep temperatures lower to avoid long term issues from the higher temperatures. The 240mm Radiator did not even flinch at the higher loads and kept chugging along. Surprisingly, the included optional chipset fan worked rather well and dropped temps to below the temps that we saw at default speed.
Power Consumption

The power consumption was tested while running Wprime 1024 for a few minutes at stock settings. The results were recorded carefully with a Kill-A-Watt power consumption measuring tool at the wall. After the results were recorded, we waited for yet another few minutes minutes before taking Idle power consumption measurements.
| Configuration | Power Consumption (Idle/Load) |
| Rampage III Black Edition (4.4GHz) | 276W/395W |
| Rampage III Black Edition | 233W/349W |
The power consumption is not with GPU usage. This is with CPU/system loading but nothing graphically intensive in order to provide the most accurate results by not ramping up the GPU, which will pull significantly more power.
Testing & Methodology

We’ve expanded our testing suite considerably since the X58 chipset release, and will continue to use the same methods for most of the motherboards and CPU’s we test. In the interests of thoroughness and accurate results, we run each test at least three times, and some tests more than that. We average the total of all the tests from each benchmark then report the average here.
The OS we use is Windows 7 Pro 64bit with all patches and updates applied. We also use the latest drivers available for the motherboard and any devices attached to the computer. We do not disable background tasks or tweak the OS or system in any way. We turn off drive indexing and daily defragging. We also turn off Prefetch and Superfetch. This is not an attempt to produce bigger benchmark numbers. Drive indexing and defragging can interfere with testing and produce confusing numbers. If a test were to be run while a drive was being indexed or defragged, and then the same test was later run when these processes were off, the two results would be contradictory and erroneous. As we cannot control when defragging and indexing occur precisely enough to guarantee that they won’t interfere with testing, we opt to disable the features entirely.
Prefetch tries to predict what users will load the next time they boot the machine by caching the relevant files and storing them for later use. We want to learn how the program runs without any of the files being cached, and we disable it so that each test run we do not have to clear pre-fetch to get accurate numbers. Lastly we disable Superfetch. Superfetch loads often-used programs into the memory. It is one of the reasons that Windows occupies so much memory. Vista fills the memory in an attempt to predict what users will load. Having one test run with files cached, and another test run with the files un-cached would result in inaccurate numbers. Again, since we can’t control its timings so precisely, it we turn it off. Because these four features can potentially interfere with benchmarking, and and are out of our control, we disable them. We do not disable anything else.
Test Rig
| Test Rig | |
| Case | Thermaltake Level 10 GT |
| CPU |
Intel Core i7 980x |
| Motherboard | ASUS Rampage III Black Edition |
| Ram | 6GB Kingston 1600MHz CL 7 (7-7-7-24) |
| CPU Cooler |
Swiftech H20-220 Edge |
| Hard Drive | Western Digital Velociraptor 300GB |
| SSD |
Intel 510 series SATA III/6G 120GB |
| Optical | ASUS BD-Rom |
| GPU |
ASUS GTX 580 Matrix Platinum |
| Case Fans |
Front (intake): 200 x 200 x 20 mm ColorShift Fan x 1 (600~800RPM, 13~15dBA) Rear (exhaust): 140 x 140 x 25 mm Turbo Fan (1000PRM, 16 dBA) Top (exhaust): 200 x 200 x 30 mm ColorShift Fan (600~800RPM, 13~15dBA) Side (intake): 200 x 200 x 30 ColorShift Fan (600~800RPM), 13~15dBA) |
| Additional Cards |
N/A |
| PSU |
Thermaltake Toughpower Grand 1200W |
| Mouse | Thermaltake esports Black gaming mouse |
| Keyboard | Thermaltake Meka G1 mechanical gaming keyboard |


Test Suite
We will use the following applications to test the performance of the Motherboard. Benchmarks
| Benchmarks |
|---|
| SiSoft Sandra 2011 |
| PCMark Vantage |
| Unigine Heaven |
| Cinebench R10 |
| Cinebench R11.5 |
| 3DMark 11 |
| 3DMark Vantage |
| Wprime |
| Superpi |
| Crysis Warhead |
| Just Cause 2 |
| Metro 2033 |
SiSoft sandra 2011

“SiSoftware Sandra (the System Analyzer, Diagnostic and Reporting Assistant) is an information & diagnostic utility. It should provide most of the information (including undocumented) you need to know about your hardware, software and other devices whether hardware or software. It works along the lines of other Windows utilities, however it tries to go beyond them and show you more of what’s really going on. Giving the user the ability to draw comparisons at both a high and low-level. You can get information about the CPU, chipset, video adapter, ports, printers, sound card, memory, network, Windows internals, AGP, PCI, PCI-X, PCIe (PCI Express), database, USB, USB2, 1394/Firewire, etc.”
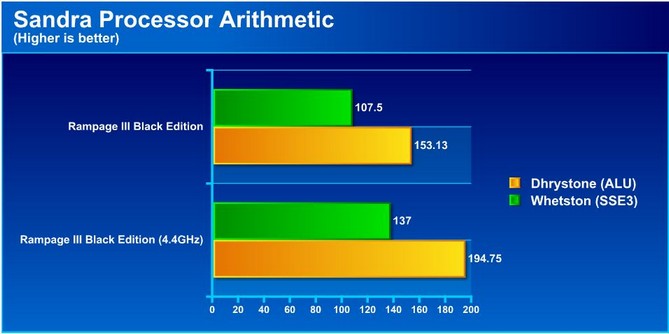
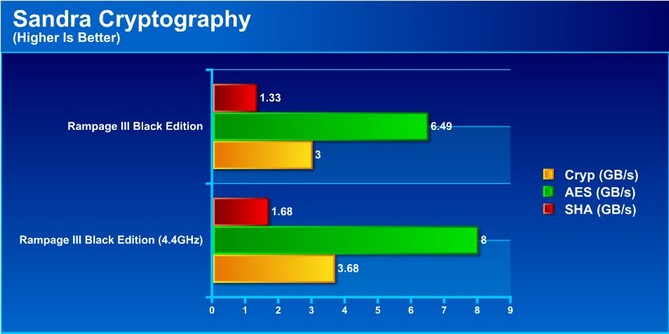
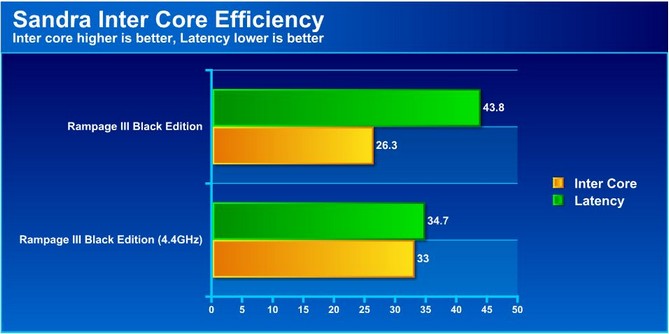
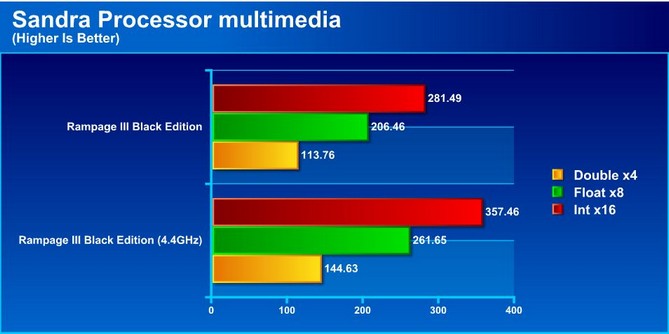
Here we can see that the overclocking of the processor offers very significant gains for all of these processor bound benchmark tests. This helps understand that overclocking makes a huge difference in productivity and anything from rendering to transcoding can be completed much quicker.
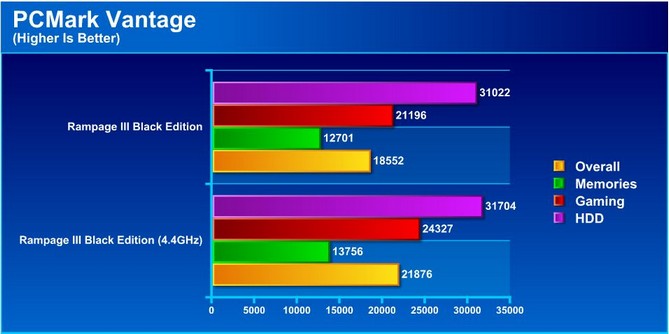
PCMARK VANTAGE
PCMark Vantage is the latest system benchmark tool from Futuremark. The benchmark consists of tests such as application launches, file searches, web browsing, video playback, photo editing, and gaming.
Wprime
Wprime is a processor heavy multithreaded benchmark at which it crunches numbers of a specific data set and gives the end user an output time which can then be used as a guage to compare system performance.
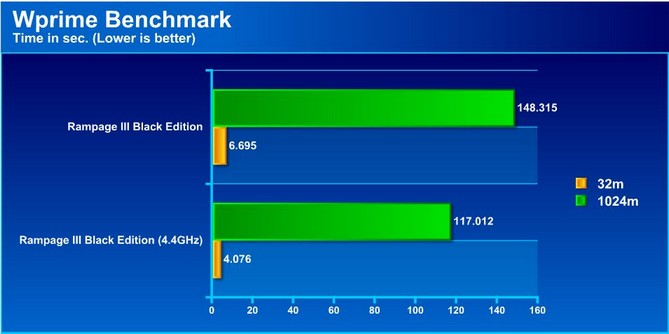
As we see here the overclock once again made very large gains as work can be completed much faster at the higher clockspeed. The graphics performance did not really see any gains which just tells us that the system is very efficient at stock and really would likely need more cards to see a bottleneck or increase in performance from the CPU clock increase.
Superpi
Superpi is a single threaded benchmark which measures efficiency and is heavily influenced by architectural changes as much as it is by clockspeeds.
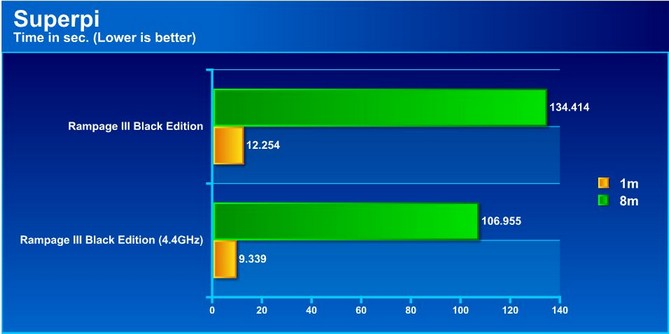
Here we once again see similar to before, the clock speed allows for large gains in performance. No matter whether single threaded or multi threaded the frequency increase just scales very well.
CINEBENCH R10 AND R11.5
“CINEBENCH is a real-world test suite that assesses your computer’s performance capabilities. MAXON CINEBENCH is based on MAXON’s award-winning animation software, CINEMA 4D, which is used extensively by studios and production houses worldwide for 3D content creation. MAXON software has been used in blockbuster movies such as Spider-Man, Star Wars, The Chronicles of Narnia and many more. MAXON CINEBENCH runs several tests on your computer to measure the performance of the main processor and the graphics card under real world circumstances. The benchmark application makes use of up to 16 CPUs or CPU cores and is available for Windows (32-bit and 64-Bit) and Macintosh (PPC and Intel-based). The resulting values among different operating systems are 100% comparable and therefore very useful with regard to purchasing decision-making. It can also be used as a marketing tool for hardware vendors or simply to compare hardware among colleagues or friends.”
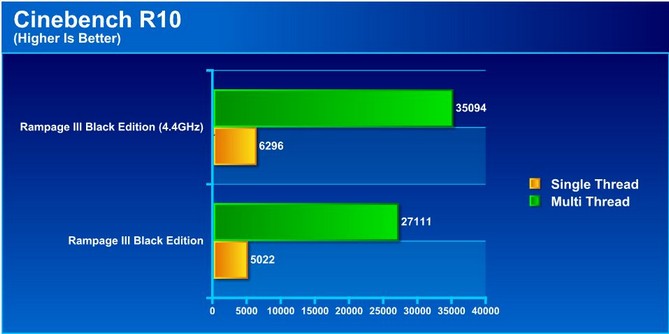
There are visible increases in performance when we overclocked the CPU, and as seen, both the multithreaded and single threaded performance received a significant bump. Once again productivity gets a huge increase, which means no matter what the system is used for, work can get done faster.
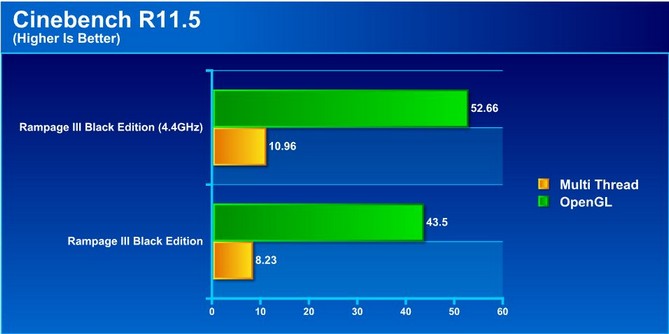
Similar results are observed when running Cinebench R11.5.
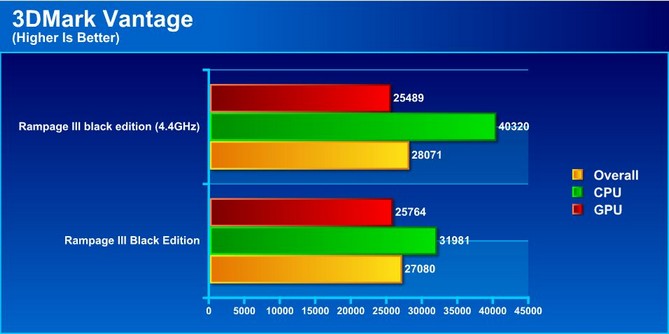
3DMARK VANTAGE

For complete information on 3DMark Vantage Please follow this Link:
www.futuremark.com/benchmarks/3dmarkvantage/features/
The newest video benchmark from the gang at Futuremark. This utility is still a synthetic benchmark, but one that more closely reflects real world gaming performance. While it is not a perfect replacement for actual game benchmarks, it has its uses. We tested our cards at the ‘Performance’ setting.
3DMARK 11
![]()
3DMark 11 is the newest in futuremark’s suite of benchmarking utilities. Its a fully capable DirectX11 benchmark which also stresses and analyzes the system performance as a whole to simulate a heavy rendering environment such as a high end game or other app the end user may run. This benchmark was run with Performance settings 5 times and all runs were averaged for the result below.

3DMark Vantage and 3DMark 11 both showed a slight increase in graphics performance, though the overall score increase could also be from better multi-threaded CPU scaling and better PCI-Express scaling. Either way, users can expect slight performance increase in 3D related applications.
Crysis Warhead

Crysis Warhead is the much anticipated standalone expansion to Crysis, featuring an updated CryENGINE™ 2 with better optimization. It was one of the most anticipated titles of 2008.
We ran Warhead using gamer’s setting at resolution of 1920X1080 and DirectX 10. We tested 15xQ AA setting.
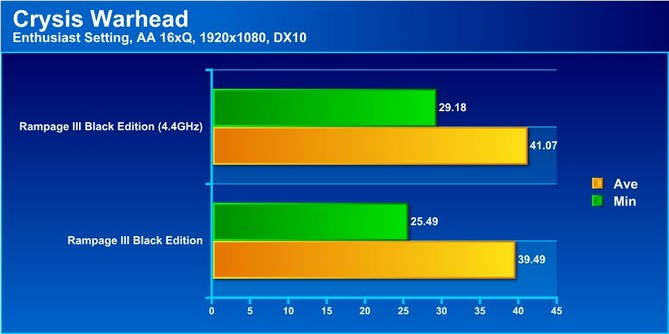
The scores are fairly similar here, showing that the game is (obviously) much more GPU-bound. The increase in clockspeed really didn’t do much, and the difference in Average FPS is barely noticeable.
just cause 2

Just Cause 2 has been out for almost a year now, but instead of running lower resolution tests, we were also interested in checking out what to expect at higher resolutions where graphics performance might get in the way. This will give a great example to those people playing games at much higher resolutions.
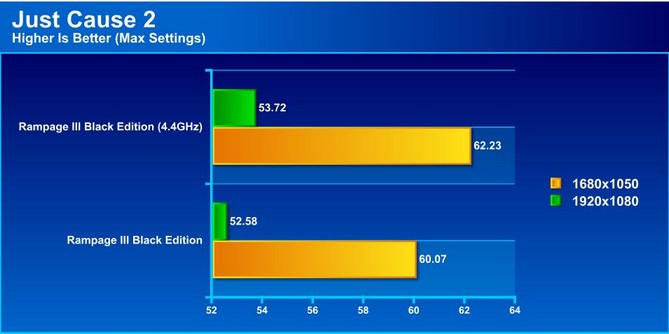
As we see here, the overclock does very little for performance which tells us that on modern architectures, the games are not necessarily bottlenecked by the CPU unless using a multi card configuration.
Metro 2033

Metro 2033 is very hard on the graphics card similar to how Crysis used to be the benchmark for every card when it first had come out. This tests the card very heavily and if overclocking will help with better FPS or gameplay this should tell us.
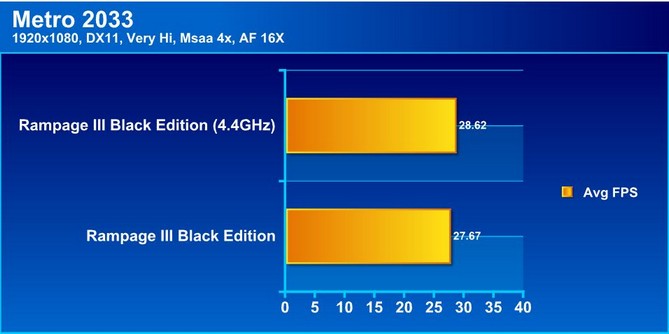
As with previous benchmarks, the CPU hardly ever bottlenecks games unless users run a multi-GPU configuration.
Unigine Heaven 2.5
Unigine Heaven is a benchmark program based on Unigine Corp’s latest engine, Unigine. The engine features DirectX 11, Hardware tessellation, DirectCompute, and Shader Model 5.0. All of these new technologies combined with the ability to run each card through the same exact test means this benchmark should be in our arsenal for a long time.
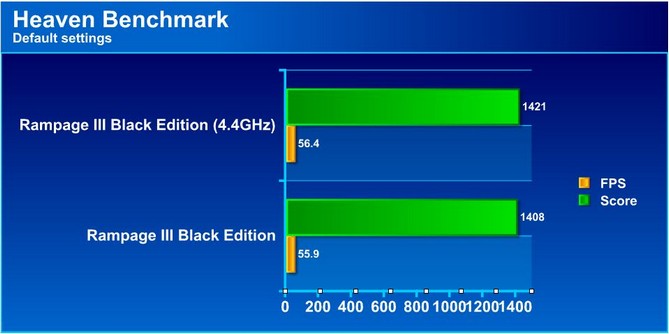
Same experience is mirrored here as the score and the FPS are barely affected by over 1GHz increase in clockspeed on the CPU which tells us that it is likely that the CPU is not at all or very little of a bottleneck.
CONCLUSION
The Rampage III Black Edition is proof that ASUS listens to enthusiasts and what they want in their computers. From a well laid out BIOS to a plethora of BIOS options to make sure users can squeeze out every ounce of speed, this board just bleeds performance and styling. From the matte black finish to the high end components used on the Black Edition, we were thoroughly impressed as to how well thought out the board design was, both from a placement standpoint and from a performance perspective. The only downside to this board is its (very) steep price, which is why the board is only meant for the most extreme of overclockers and gamers.
The inclusion of the Thunderbolt card just gives users another great addition to an already massively successful board. Additionally, the Bigfoot Networks NPU assisting with network traffic makes for a very strong addition to the package, taking the network load off the CPU for more raw processing power.
Inclusion of the Bluetooth and WiFi module onboard is another great feature, because we could place the system pretty much anywhere and we did not have to worry about routing a network cable to the system. As long as there was a wireless signal we could receive, we were good to go.
Users who want to build a high-end X58 rig and are willing to pay for it should definitely look at this board.
| OUR VERDICT: ASUS Rampage III Black Edition | ||||||||||||||||||
|
||||||||||||||||||
| Summary: The ASUS Rampage III Black Edition takes everything learned about the X58 chipset in the last couple years and turns it into a monster board that not only looks awesome, but runs awesome. For its performance, it earns the Bjorn3D Gold Bear Award. |