
The CM Storm Trooper might just be one of the most customizable and gamer friendly chassis of the year. Keep reading to find out what this case is packing!
Introduction
Ever since the HAF X was released last year in June, we haven’t seen anything too exciting from Cooler Master. The HAF X supported XL-ATX motherboards like the GIGABYTE G1.Assassin or the EVGA Classified, but for extreme enthusiasts, it is a disappointment that there are only a limited number of cases that actually support these motherboards. Users can get modded cases, but that will cost a fortune, so Cooler Master designed a case that is not only very customizable, but also easy to carry around. This is a new addition to Cooler Master’s Storm lineup of products, called the Cooler Master Storm Trooper.
The CM Storm Trooper is very customizable and user friendly. As we go through the review, we’ll explain each of the features, the pros and cons, installation, performance, and much more. Before we jump into the exterior and interior overview of the case, here is a quick video overview that should give an idea on what to expect. Make sure to check out the finished system on page 5 and how the installation process went.
Features
- Rubberized damaged resistant plastic surface with a built-in digital fan controller.
- Supports XL-ATX motherboards, and up to 4-way CrossFireX or SLI support with an extra expansion slot still available for additional hardware.
- Support for up to 14 Hard Drives or Solid State Drives.
- Dust filters on all pre-installed intake fan areas.
- Support for several 240mm radiators, but could be customized to fit several other radiators, such as 480mm or 360mm radiators.
- 6 fan speed settings and fan LED control via the fan controller on the top of the system.
- Front I/O panel with 2 internal USB 3.0 Connectors designed for the P67 or Z68 or newer motherboards.
- Easy transportation with the built-in handle that can support up to 95lbs or 43kb.
- Easy and effective cable management with rubber grommet covers.
- Two 90 degree removable and rotatable HDD cages each with an attached 120mm red LED fan.
Specifications
Here are a few specifications we were able to gather up before the actual launch of the case. Please refer to Cooler Master’s website for detailed specifications.
| SGC-5000-KKN1 (Storm Trooper) | |
| Available Color | All Black |
| Dimensions | 250 x 605.6 x 578.5 mm (9.8 x 23.8 x 22.8 in) |
| Net Weight | 14.4 KG / 31.7 lbs |
| Motherboard Type | Micro-ATX, ATX, XL-ATX |
| Case Material | Steel body, Front Mesh / Plastic bezel |
| 5.25″ Drive Bay | 9 |
| 3.5″ Drive Bay | 8 (converted from 5.25” bay by two 4-in 3 HDD modules) |
| Expansion Slot | 9 + 1 |
| Maximum Compatibility |
CPU cooler height: 186 mm / 7.3 in. GPU card length: 322 mm / 12.7 in. |
| I/O Panel | USB 3.0 x 2 (internal), USB 2.0 x 2, e-SATA x 1, Audio In and Out ( Supports HD audio) |
| Cooling System | Front : 120 mm LED fan x2, 1200 RPM, 17 dBA Top: 200 mm fan x 1, 1000 RPM, 23 dBA (converted to 2 x 120 / 140 mm fan) Rear: 140 mm fan x1, 1200 RPM, 19 dBA (converted to 120 mm fan) Side: 120 mm fan x 2 (optional) Bottom: 120 mm fan x 2 (optional) |
The Exterior of the Storm Trooper


The CM Storm Trooper comes in a fairly large box, about the equivalent size of almost all full-tower chassis on the market. The design is not too interesting, but enough to give the user an overview of what to expect when they buy the product. The back of the box especially highlights all the features in detail. The box arrived with holes on the bottom of the box and some damage, however the case was packaged in a plastic bag and some Styrofoam, so there was no damage done to the actual case.


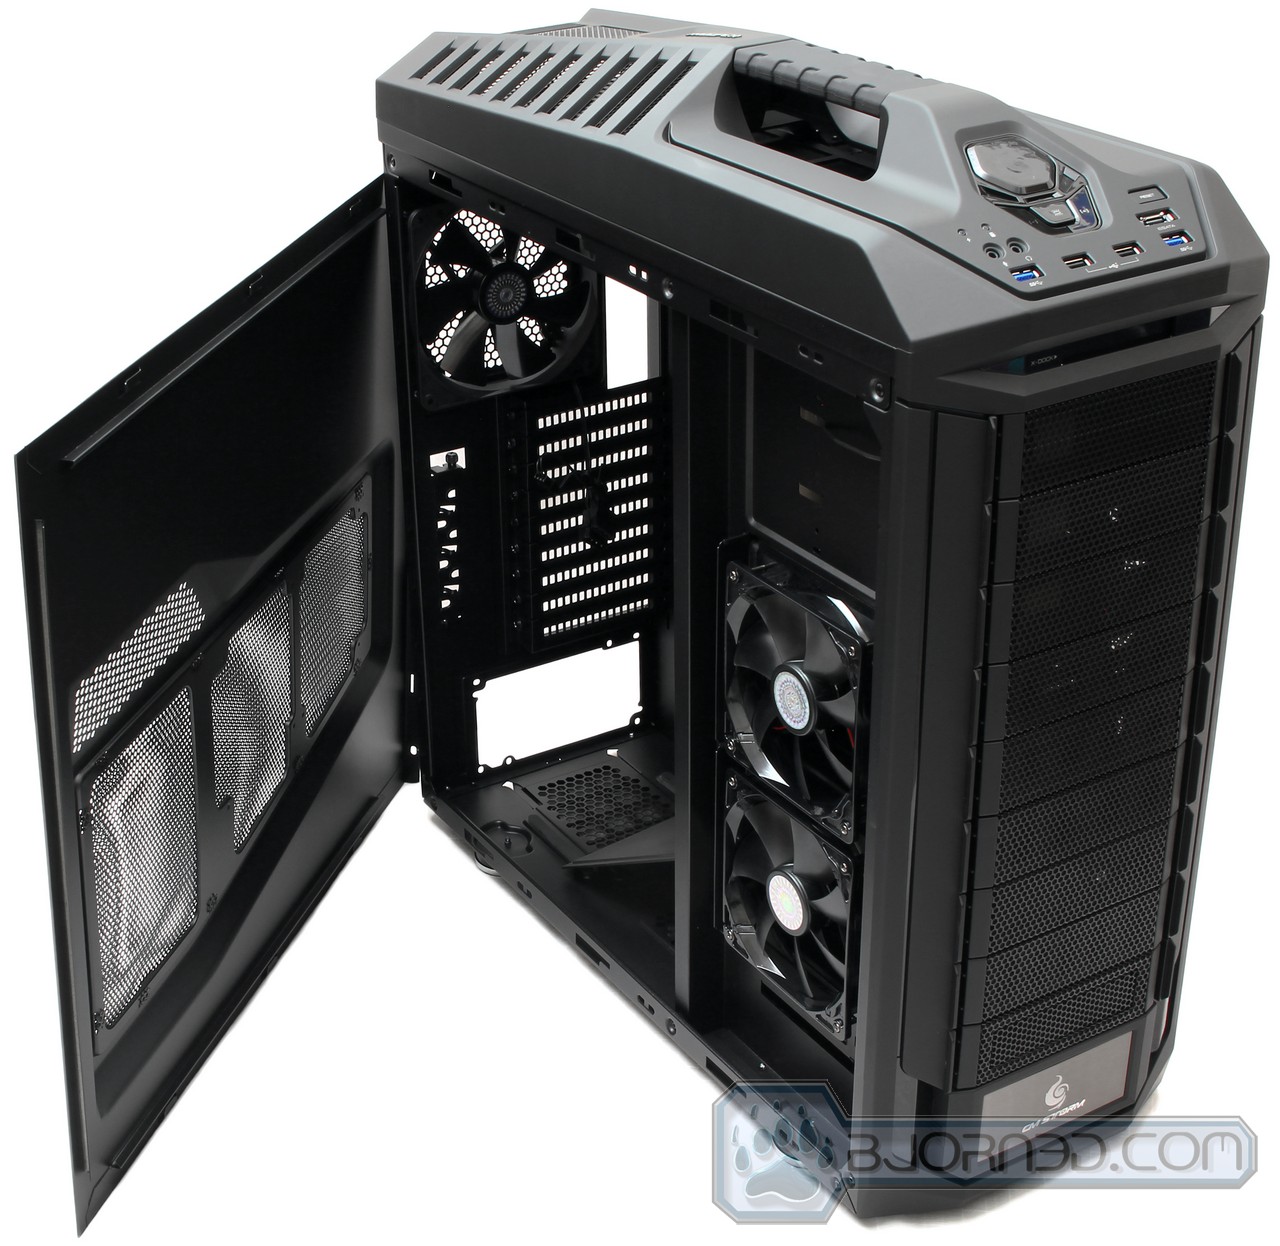
Initially, we were not too excited about the case but upon opening it, the appearance and overall quality of the case changed our opinion. The case is made of rubberized plastic and steel. It’s a big full tower case, slightly taller than other full tower cases, but definitely slightly shorter in length as well. Let’s take a closer look at front and side panels of the case. In the front, the user can install up to 9 5.25″ drives, but the last 5.25″ drive bay is also usable for floppy or fan controllers that require a 3.5″ drive bay. We’ll go into more detail about how to actually mount a 3.5″ in the front bezel later. The lowest part of the case has the CM Storm logo but this part of the case can also be modified.
The left side panel comes with a long mesh design that can accommodate up to two 120mm optional fans. The last portion of the mesh is designed to provide cool air for the hard drives and other hardware attached to the hard drive cages inside the case. We’ll see that there are two additional 120mm red LED fans attached on the hard drive cages. The right side panel is slightly different: there is no need to have fans attached here as the motherboard tray is there. The mesh that we can see is the exhaust area for the fans that blow cool air through the hard drive cages. Since it would not be good to push warm air from the hard drives to the rest of the hardware, this is a nice design Cooler Master implemented on the Storm Trooper.


The back of the case reveals some interesting features. For one, the case comes with a rear 140mm fan preinstalled. An optional 120mm fan can replace the 140mm already installed. Above the fan there are three water cooling grommets. The two larger grommets are designed for 1/2″ tubing and the last grommet is designed for 1/4″ tubing. Because this case uses internal USB 3.0 connectors for the P67, Z68 or newer chipset motherboards, the last smaller grommet is designed to run through power cables for external water cooling setups. A bit lower there are 9 expansion slots which means that this chassis supports XL-ATX motherboards. Below that we have the area where the power supply is installed.


If we take a peak at the top of the Trooper, there are some very nice features that any gamer or enthusiast will be happy to see. Starting from the front, there is a 2.5″ external docking station, which allows the user to easily install SSDs or 2.5″ HDDs. Above that, there are lots of ports and buttons. There are two blue USB 3.0 connectors, two USB 2.0 connectors, one headphone and microphone jack, eSATA connector, Reset button, power Button, LED On/Off button on the fans, and a built in digital 6-speed fan controller. Three LED indicators show exactly what speed setting the fans are set to.
The handle bar located in the middle of the case is actually very nice. It comes with a soft rubber cover with a nice mushroom head gill type texture for perfect non-slippery grip. This handle bar can hold up to 95 pounds (43kg) of weight. After working with the case for a few hours, the handle bar came in handy for moving, turning, and flipping the case over without breaking it. Behind the handle bar, there is a nice shark gill design for the exhaust with the trooper logo in the middle. The whole top part of the case can be removed by detaching 6 tabs from the inside of the case. Since this requires some extra force, users should be careful so the tabs would not break. By removing the top, the user is able to remove the 200mm fan hiding behind the mesh and install two 120mm fans or a 240mm radiator.


The front of the system has tool-less front 5.25″ drive bay covers. They can easily be removed by pushing in two of the sides, which also provide for a good grip when removing each cover. These covers are reusable and can be placed back just as easily. They also come with a fan filter preinstalled. The bottom logo cover is also removable, and this part of the case has a small accessory box. The front part is not attached with the accessory box because it would prevent the user from reusing the front cover in case they want to install a 240mm radiator or two 120mm fans on the bottom of the case. The screwdriver is not included with the accessories, we are just showing that there are two screws that need to be unscrewed to get to the accessory box, though we do not necessarily think that these screws are needed if the case is just sitting in a room.


Here we have a few close-up pictures of the back of the Trooper chassis. Right under the top cover of the case, we can see a massive fan filter for the exhaust fan. This can easily be removed by easily pulling them out. We’ll have more pictures of that on the next page. Another interesting part that included is the Storm Guard right by the 9 expansion slots. The Storm Guard allows the user to lock down their peripherals when they are at a LAN party so others could not steal their hardware. Even though this will prevent most people from stealing other’s peripherals, if a user is gone for a longer period of time from their desk, the intruder could still open up the case and detach the locking mechanism. Finally, there are 2 thumb screws each for both side panel.


Finally, here we have all the accessories that come with the Cooler Master Storm Trooper case. Starting from the left top corner, there is a motherboard speaker included for booting and error reporting purposes, several zip ties, an 8-pin CPU power connector extender for power supplies that might have short cables, 5.25″ to 3.5″ converter kit for floppy or other smaller front bay devices, a user’s manual, which is rather slim on instructions. The User manual does not have any helpful text, but rather just images depicting the instructions. Sometimes this can be confusing to figure out certain things. The next object is the cover for the accessory box, and finally 8x 3.5″ or 2.5″ Hard Drive or SSD adapter plates for the hard drive cage.
The Internal Features of the Storm Trooper


Now that the case is opened up, we can have a clearer understanding of the mesh design the left side panel has. The two box divisions on the side panel are designed to hold the two 120mm optional fans. The two 120mm fans on the hard drive cages are two red LED transparent fans that have a nice blood red color to them when they are turned on. Of course the user can disable the LEDs by pressing the LED button on the top of the case. These fans run at 1200RPM and produce 17dB noise according to Cooler Master. We’ll go ahead and test this in our labs.


Here we take a look at the fan filters installed on the Cooler Master Storm Trooper case. All of them are removable for easy cleaning. Once they are cleaned, they can easily be placed back in their slots. There are two fan filters on the bottom of the case, one for the PSU, and one for two additional 120mm fans or for a 240mm radiator. There is also a larger fan filter on the top of the case where the 200mm exhaust fan is located. Frankly, it would have been nicer to see fan filters on the side panel instead of the top panel, as the top and rear fans are exhausting hot air out of the case and not intaking cool air. This will really depend on what the user implements, but for optimal airflow it should be exhausting hot air.


Here are a few closer shots of the internal parts of the case, we can see all the cables inside the case, which include an internal USB 3.0 connector for latest Sandy Bridge motherboards, standard USB 2.0 and Audio connectors, front panel Power, Reset and HDD LED cables, three 2-pin power connectors for the fan controller, and 4 3-pin headers for fans that will be powered up by the fan controller. We have a breakdown on how to figure out the cables on the next page.
We get to see the 200mm fan from much closer. If we look at it closely, we see that there can be 2x 120mm fans installed where the 200mm fan is currently located. This fan runs at 1000RPM and has a 23dB acoustic level. The 140mm fan on the back of the system can use either a Molex connector or a standard 3-pin power conector. This fan runs at 1200RPM and has an acoustic level of 19dB.
The back of the system shows all the cable management stand-offs or hooks where cables can be tightened to. It also clearly shows all the grommets that the cables come come through. Also, do note that only one side of the case actually has fans for the hard drive cage.


Here comes tine interesting part. The Storm Trooper’s hard drive cages can be rotated 90 degrees for several reasons. Some just want to have extra air circulation through their system, especially if they are just running SSDs or only one or two Hard Drives. This can help breeze the video cards and other components on the motherboard. Another option is that when the cage is rotated and the fans are removed, the cages can be used for 5.25″ drives. Another option is to completely remove the cages and use the available space for a 360mm or 480mm radiator. There is up to 482mm space available in the front, so the user might have to come up with creative ways to mount the 480mm radiator if they can get it to fit.


Here is another look at the rotated hard drive cages. On the bottom of the case there is a smaller cage designed for up to three SSDs or 2.5″ Hard Drives. The front top of the case where the 2.5″ hard drive docking station is located needs to be plugged into power and a SATA data cable also needs to be connected to it in order to get it to work.
The System with Hardware Installed
 Installing the hardware in the Cooler Master Storm Trooper was as simple as doing it on any other case. Having a CPU cooler cutout made the CPU cooler installation much easier as it could be done after the motherboard has already been installed into the case. There were only two things that were not complicated during the installation of the hardware in the system.
Firstly, the motherboard was hard to install as it felt like the screws on the motherboard tray were off. The screws on the left side of the motherboard would match, all the way till the bottom right hand corner, however the two top right screw holes would not match up with the motherboard stand-offs for some reason. After forcing the motherboard with lots of strength, we finally managed to get it fixed to the motherboard tray.
Secondly, the cables that come with the Storm Trooper are quite confusing to distinguish. There are so many cables due to the installed fan controller and LED controls that it feels we’re disarming a bomb. Taking a look at the manual actually helped as it provided us the information we wanted to know:
| Type | Notes |
| Brown/Black Two-wire Cable | 200mm fan power / 2x 120mm fans |
| Gray/Black Two-wire Cables | 120mm red LED HDD fan power cables; connect to the long male cable |
| Black/Black Two-wire Cables | 120mm red LED HDD fan power cables; connect to the short female cable |
After installing all the hardware in the system, it was extremely simple to do cable management, though for beginners it might be a problem. Many people claim that the amount of space provided on the back of a system is not enough to hide all the cables, like the 24-pin Motherboard Power Cable, etc. This is not true, because most likely they have not done proper cable management with the previous cables and have not tightened the cables to the motherboard tray properly. If everything is properly tightened with the provided zip ties, the system should look fine. Here are some pictures of the complete system with cable management already done.


Testing methodology
Our testing methodology is rather simple for cases. We let the system idle for 30 minutes and we measure temperatures. Then we turn on OCCT to load the video cards and the processor to 100%. After 20 minutes of 100% load, we measure the overall temperatures. If there are multiple fan settings available, we test the lowest and highest fan settings.
To measure overall noise, we use an EXTECH 407730 Sound Level Meter, which is able to pick up any noise from 40dB. Anything under 40dB is recorded as LOW. We measure the system from 1 feet away at different fan settings.
Test Rig
| Test Rig | |
| Case | Cooler Master Storm Trooper |
| CPU | Intel Core i7 2600K @ 4.4GHz |
| Motherboard | ASUS P8P67 WS Revolution |
| Ram | Patriot Gamer 2 16GB (4x4GB) DDR3-12800 1600MHz 9-9-9-24 Memory |
| CPU Cooler | Noctua NH-D14 |
| Hard Drives | 2x Western Digital RE3 1TB 7200RPM 3Gb/s Hard Drives |
| SSD | 1x Kingston HyperX 240GB SATA III 6Gb/s SSD |
| Optical | ASUS DVD-Burner |
| GPU | 3x Nvidia GeForce GTX580 Video Cards in 3-way SLI |
| PSU | Cooler Master Silent Pro Gold 1200W PSU |
| Mouse | Razer Mamba |
| Keyboard | Thermaltake Meka G1 Mechanical Keyboard |
Results
Temperatures
CPU Measured with CoreTemp and averaged all cores. GPU temperature measured with MSI Afterburner and averaged all GPUs. Motherboard temperature measured to Ai Suite II.
Here are the temperatures we got from our testing:
| Temperature | ||||
|---|---|---|---|---|
| Idle (Low Fan) | Idle (High Fan) | Load (Low Fan) | Load (Max Fan) | |
| CPU | 28C | 27C | 70C | 68C |
| GPU | 48C | 47C | 85C | 84C |
| Motherboard | 43C | 42C | 45C | 44C |
The temperatures were in reasonable levels. The CPU temperatures were great, however it seems that the motherboard and the GPUs run slightly higher than what we had in our Zalman GS1200 case. We believe the reason behind this is because there are no side fans preinstalled on the CM Storm Trooper. With the addition of two 120mm fans on the side of the Trooper, gamers should be able to lower their overall system temperature.
Acoustic Levels
The Acoustic Noise we measured at 6 different fan speed settings 1 feet away from the chassis from the left side panel. The case had its left side panel on.
| Fan Speed Setting | Acoustic Levels Measured (From 1 feet) |
|---|---|
| Level 1 | LOW (<40dB) |
| Level 2 | LOW (<40dB) |
| Level 3 | LOW (<40dB) |
| Level 4 | 40.2dB |
| Level 5 | 42.8dB |
| Level 6 | 44.4dB |
Level 1 – 3 shows low acoustic levels according to the EXTECH 407730 Sound Level Meter. However, from Level 4 and up, we saw a constant increase in acoustic levels. Keep in mind that a GTX 580 at full load will hit around 48dB, and the GTX 580 is considered to be a quiet enthusiast video card. An AMD Radeon HD6990 will hit about 58dB, which is noticeably much louder than the 48dB the GTX 580 generates. Therefore in a gaming environment, when the video card causes more noise than the actual case’s fans, the case should be inaudible. Under idle operations, even on low settings the user will hear slight fan noise, though it is not too bad.
Conclusion
The Cooler Master Storm Trooper is a pleasure to work with. It’s a very solid and high quality case, and it provides options that only $200+ cases provide in this category of cases. We can definitely see lots of creative water cooling setups and modding projects with the Trooper, and with the XL-ATX motherboard support, we wouldn’t be surprised if many enthusiast gamers would use it for extreme 3 or 4-way SLI and CrossFireX systems. The CM Storm Trooper is very customizable, so it should be quite appealing to most gamers.
Even though the Storm Trooper has some very nice features like 90 degree rotatable hard drive cage, mostly tool-less hardware installation, a fan controller that has 6 speed settings, LED On/Off button, internal USB 3.0 connector for future compatibility, cable management, and CPU cooler motherboard tray cutout, there are a few things that we were not 100% sure about.
First off, the installation of the motherboard took several minutes as it was really difficult to get the motherboard mounting holes lined up with the motherboard stand-offs. Also, there are no side fans installed for cooling the motherboard and the video cards in the system. The user manual was very simple and not too informative, and the amount of cables that come with the case are so much that we were confused for the first 5 minutes till we finally figured out what each of the cables do.
| Our Verdict: Cooler Master Storm Trooper | ||||||||||||||||||
|
||||||||||||||||||
| Summary: The Cooler Master Storm Trooper chassis is definitely a recommended case for enthusiasts that go to gaming events. For a price of $189.99, the CM Storm Trooper is definitely worth what it offers. The CM Storm Trooper earns the Bjorn3D Golden Bear Award. |


this is awesome!!!
I bought this case for the full $179.99 new. One of the most beautiful cases I have owned. Mid-tower might of been cheaper but more of a hassle to work in. I still have a HAF 932 with my old but reliable GA-EP45-UD3P and 2x2GB DDR2 ram with the Core 2 Quad 9550. I like the idea of the dust filters but they don’t really work that great. The case still gets tons of dust. Only if they added dust filters on the sides also.