The BitFenix Outlaw, bending the rules to create a different take on the gaming case.
Introduction
In today’s economy, everyone is trying to stretch their investments as far as they can. Gamers are certainly no exception, especially when they look at how to build, or upgrade a system without going broke. One place to save is on the case, but can we get a decent case at less than the $100 price point? There are many choices out there in that range, but most of them are bland featureless boxes. BitFenix has recently released an offering they say is more than that. They call it a gaming case.
“The OUTLAW” conjures images of wanted posters and general mayhem–all good things from a gamer’s perspective. Perhaps that was what prompted BitFenix to choose it. With its unorthodox layout, ability to handle multiple fans, matte black finish, reasonable price, and sleek look, it has some attractive points in it’s favor. Will it fulfill the claims made by BitFenix?

CLICK IMAGE FOR LARGER VIEW
Listed at $49 USD, the Outlaw and/or other BitFenix products are available at these online retailers
Features
Unique Thermal Layout
Outlaw turns the chassis world upside down – literally. Its inverted motherboard tray places your graphics card up top, closer to the top fan locations for enhanced VGA cooling. Positioning the graphics card towards the top of the chassis also allows you to install incredibly long graphics cards, which means you can arm your Outlaw with the most advanced firepower available.
Equipped with four 5.25″ and four 3.5″ drive bays, Outlaw can handle a wealth of optical and hard disk drives. It even comes with one 2.5″ mount – perfect for the latest SSDs. Seven PCI slots are also included so you can outfit Outlaw with the hardware you need to stay one step ahead of your adversaries.

Life outside the law can be tough, so you need to keep your head cool. Outlaw can be equipped with up to eight 120mm fans, with two of those locations able to accommodate 140mm fans if extra cooling is required
The savvy desperado always has their tools close at hand. With no less than four high-speed USB 2.0 ports, you’ll be able to connect all of your gaming peripherals from the get-go.
Outlaw comes with a plethora of DIY-friendly features, including a large CPU cutout, ample cable management, and even a batch of easy-to-use thumbscrews for you to get your system up and running as quickly as possible.

With a black coated interior, quality black cabling, and signature BitFenix SofTouch™ Surface Treatment at a very affordable price, Outlaw breaks all the rules.
Specifications
| Materials | Steel, Plastic |
| Color (Int/Ext) | Black/Black |
| Dimensions (H x W x D) | 438 x 180 x 478 mm (ATX Mid Tower) |
| Motherboard Sizes | Mini-ITX, mATX, ATX |
| 5.25″ Drive Bays | x 4 |
| 3.5″ Drive Bays | x 4 |
| 2.5″ Drive Bays | x 1 |
| Cooling Front | 2 x 120mm (optional) |
| Cooling Rear | 1 x 120mm (included) |
| Cooling Top | 2 x 120mm (optional) |
| Cooling Bottom | 1 x 120mm (optional) |
| Cooling Side Panel | 2 x 120/140mm (optional) |
| PCI Slots | x 7 |
| I/O | 4 x USB2.0, Audio |
| Power Supply | PS2 ATX (bottom, multi direction) |
Outlaw Exterior & Packaging
Packaging
The box for the Outlaw forgoes the more common loud colors, and flashy pictures found on most computer products these days, in favor of a more subdued, simple black print, almost a silk-screened look, on the natural cardboard background.


CLICK IMAGES FOR LARGER VIEW
The front of the box features the BitFenix Logo along with the Outlaw stencil. The rear face has 3 drawn views of the case showing off some of the more prominent features. The left side has part of the logo from the front of the box, as well as the logo and stencil. The right side displays the logo, a drawing of the front of the case, and the specs below that. All the drawings are very accurate renditions of the actual product. As can be seen in the picture of the right side, the box was damaged when we received it.


CLICK IMAGES FOR LARGER VIEW
Upon removing the case from the box the first thing we noticed was the user manual sitting on top of the case. The second thing we noticed was that the polystyrene used to protect it in transit was damaged. As can be seen in the subsequent images it did it’s job well, absorbing whatever impact or force caused the cracking, and saved the case itself from harm.
Exterior
The Outlaw presents a simple yet elegant exterior, with a matte black finish. The chassis, side panels, top and bottom are steel. The exact gage is unknown but it is definitely not heavy. While the construction seems sturdy we would not recommend stacking anything heavy on it for any reason. The bezel itself is plastic, with no doors or other openings on the face, just three removable covers for the 5.25 bays. Outer dimensions are 438 x 180 x 478 mm (17.25 x 7 x 18.8 inches).


CLICK IMAGES FOR LARGER VIEW
In the sides of the bezel are mesh panels to allow airflow into the front of the case. There is no lettering or logos attached anywhere on the exterior of the case. A logo is included in the accessories. The rear of the case gives the user their first indication that the layout doesn’t follow the typical design types. Here one can see that the PSU is bottom mounted, not so unusual in itself these days. However we notice the in/out shield cutout is just above this with an exhaust fan, and the PCI card slots above that. This is the inverted motherboard layout, more on that on the next page. The openings allowing liquid cooling hoses to pass through the case are just to the side of the PCI slots, two grommets inserted into a mesh panel allow both air and liquid to efficiently use the same space.


CLICK IMAGES FOR LARGER VIEW
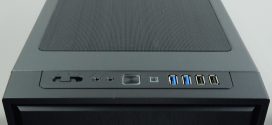
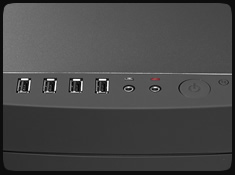
The Outlaw is capable of mounting multiple fans for increased airflow and cooling. As we can see here the top of the case can house two 120mm fans, or a double (120mm x2) radiator, while the bottom has can mount one 120mm fan, and also has an opening for the PSU fan to intake air if the consumer wishes to install it in this orientation. The top of the bezel houses the power and reset switches, along with 4 USB2.0 ports, and two 3.5 mm audio ports for headphone and mic. (see image) These are wired to dual M/B connectors for AC ’97 or HD audio, which is nice for the end user. In the floor of the Outlaw BitFenix installed rubber isolation pads for the PSU to rest on, and rather than just using a stick-on pad, these are pressed into a mounting hole so that they cannot move. This is a very good approach in our opinion. There are a total of six pads, four that handle all the conventional length PSU’s, and two more for the extended length models.


CLICK IMAGES FOR LARGER VIEW
The first thing most people will notice about the sides is that they are on the “wrong” sides. The inverted motherboard design necessitates that the side panels be placed with the vented side on the left rather than the right. The panels are simple, and light-weight. The left panel can house two 120mm fans,or two 140mm fans. The right panel is a solid sheet.
Outlaw Interior & Accessories
Interior
Removing the left panel the user will see that the interior of the Outlaw has the same color and finish as the exterior of the case. The front panel wires and connectors are given a black finish also.


CLICK IMAGES FOR LARGER VIEW
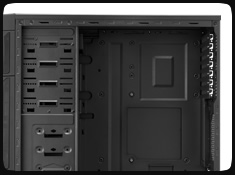
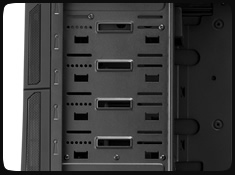
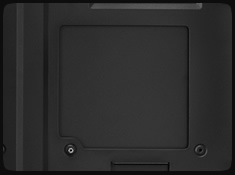
One of the first things we noticed was that there is no external access to the bottom 5.25 drive bay. While the specs list four of them, one is apparently for internal use only, and as can be seen in the image of the case with the bezel removed, that bottom bay plate contains two of the mounting holes for one of the front 120mm fan mounts, two of which may be placed here. Under the left panel we found that the wire management area is contained entirely behind the drive bays, the accessory box was hidden here as well.


CLICK IMAGES FOR LARGER VIEW
The interior of the BitFenix Outlaw includes PSU isolation pads, which reduce both noise and vibration. Two of the HDD bays include rubber mounting isolators to further reduce noise and vibration. The cutouts next to these bays facilitate wire management. Where many cases use a rubber component here to protect the wiring, BitFenix has opted to somehow roll the metal of the cutout itself to create a smooth, blunt surface which does a fine job of protecting the wires from cutting or chaffing. The motherboard tray contains a cutout enabling the consumer to change CPU coolers without removing the board. This is a nice large area so it should be compatible with a variety of motherboards layouts.
Accessories

The accessory box contains 10 wire ties, one lock loop, 9 motherboard stand-offs, 13 M3 x5mm screws to mount the motherboard and one 2.5 inch drive, 16 M3 thumb screws for mounting the 5.25 drives, eight 6-32 x 8mm thumb screws for mounting the 3.5 HDD with the included anti vibration pads, fifteen 6-32 x 6mm thumb screws for 3.5 HHD’s and the PCI slots, and one standard 6-32 screw for mounting the lock loop. Also included is one electroplated BitFenix logo, which can be place where ever the consumer desires, or left off entirely. A nice touch in our opinion.
Assembly
The manual for this case covers the removal and replacement of the side panels, the installation of the drives, the installation of the fans, the installation of the lock loop, as well as the layout of the control panel (switches and ports). BitFenix apparently assumes that anyone buying this case can install the other hardware as needed without instruction.
The first step was to install the motherboard standoffs. While some consumers might complain about having to do this, the reasons are two-fold, first only the standoffs for whatever board is being installed are needed, second not installing them reduces the cost of the unit. The second step was installing the in/out shield. The opening is cut to fit tightly so a small amount of effort was required.


CLICK IMAGES FOR LARGER VIEW
Next we installed the 2.5 inch drive. While the mounting holes are hard to see in the image, the picture of the mounted drive should give a good indication of where they are. This placement puts the drive out of the way of the airflow from the front fan should the consumer install one, while allowing the drive to still take advantage of the cooling from it.


CLICK IMAGES FOR LARGER VIEW
The images above show the 2.5 inch mounting location from the outside and illustrate BitFenix’s determination to keep this case streamlined. Wherever possible they have recessed the mounting screws that are accessed from the outside of the Outlaw, including the fan screws.


CLICK IMAGES FOR LARGER VIEW
We installed the PSU next, and then removed it as there was insufficient clearance to get the clip for the CPU cooler onto the bracket. We also took the opportunity to route the 8 pin power wire behind the PSU since there is not enough clearance between the motherboard tray and the side panel to route the sleeved cable. Non-sleeved wires may fit since they can be spread out. Wire management was achieved without the use of the supplied wire ties.


CLICK IMAGES FOR LARGER VIEW
The thumb screws made installing the drives and cards simple, this case and the supplied accessories enable an almost tool free assembly process. Only the PSU, 2.5 inch HDD, Fans, Motherboard, motherboard standoffs and the lock loop (see below) required tools. A pair of pliers and a Philips screwdriver are all that’s needed. The thumb screws can be tightened or removed using a screwdriver if need be.


CLICK IMAGES FOR LARGER VIEW
In order to add fans to the front of the Outlaw, system builders will need to remove the bezel to access the screw holes, and insert the fans from the right side of the case. Alternatively, users can also place the fans under the bezel, and mount the screws through the drive bay.
The fans used for the case side in this build have beveled mounting/screw holes. When first mounted on the side there was a clearance issue causing them not to turn. This was solved by installing small washers (not included) between the fans and the case side. This was due to the design of the fans, not the case.
The top fans are positioned to draw heat directly off the cards under them. For a GPU that develops large amounts of heat this is a definite plus.


CLICK IMAGES FOR LARGER VIEW
Planning the build before starting is advised. Mounting the top two fans required removing the upper video card. Installing the upper video card required moving the optical drive to the middle 5.25 bay as the card was about 1/8 inch to long to fit with this drive. A shorter drive would not cause this, and using a shorter video card would also allow enough clearance. Check the clearance between the CPU cooler and the side fans if used. Very tall coolers may interfere with the use side fans.

CLICK IMAGE FOR LARGER VIEW
And finally, for those worried about security BitFenix added an option to install an included lock loop. Secured to the inside of the case by a screw, once a lock is placed in the loop the side cannot be removed without cutting something. Even if the screw gets removed, the case stays secured.
This was a relatively simple assembly process As stated above it was almost tool free. Anyone who has previously built a system will have no trouble working with the BitFenix Outlaw. Those that haven’t should be able to follow the instructions in the users manual for this case, and their other equipment, and finish the build with ease.
Temperatures & Noise
| Test System | |
| Case | BitFenix OUTLAW |
|
Processor |
AMD Phenom II X4 9500 (Agena)
|
|
Motherboard |
Asus M3N-HT Deluxe (bios 3401) |
|
Memory |
4 GB Patriot 8500EL series PC2-6400 |
|
Drive(s) |
Maxtor 7H500F0, WDC WD 1600BEVT |
|
Graphics |
Video Card 1: XFX 9800GX2 (dual GPU card)
Video Card 2: Gigabyte GTX560 oc
|
|
Power Supply |
XFX 750W POWER SUPPLY BLACK EDITION |
| Operating System | Windows 7 |
| CPU cooler | SiLenex PC Cooler EFZ-92HA3 (direct touch heatpipe) |
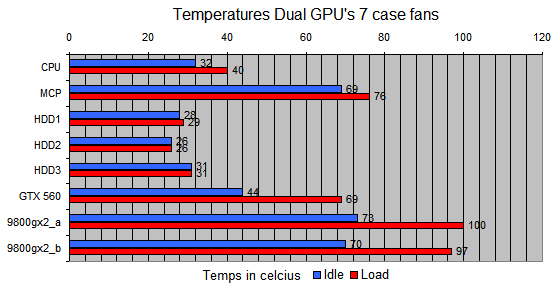
| Case fans | 1 included 120mm, 7 aftermarket 120mm |

CLICK IMAGE FOR LARGER VIEW

The first set of tests was done with only the GTX 560 and the 1 included fan installed. The second set with an additional GPU (9800GX2), and the third with the 9800GX2, and 7 of the eight fan mounts filled. The tests are simple, temps and noise at an idle, temps and noise at as close to a 100% system load as possible. To accomplish this load we ran a torture test in Prime95 (In place large FFT’s, maximum heat, power consumption, some RAM tested) to load the CPU at 100%, and ran Stanford’s Folding @ Home distributed computing application* to load the GPU’s at an average of 97-98%. the CPU was overclocked to 2.51GHz, the GTX 560 was run at a shader clock 1850, the 9800GX2 at a shaderclock of 1728. While the motherboard could handle an additional GPU the power supply can not.
*information on Stanford’s Folding @ Home app can be found HERE & HERE
Ambient temperature = 23°C (74°F)
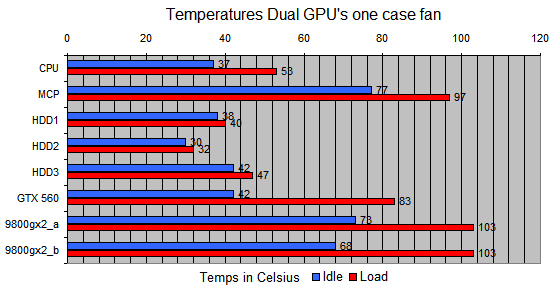
With the inclusion of the XFX 9800GX2 there was a slight increase in noise at an idle, this unit was never considered to be a quiet card. At 100% the 9800GX2 produces considerable fan noise, with the case at a distance of 3 feet at head level it was still not intolerable.
The Outlaw allows the installation of 8 fans in total. Due to the placement of the PSU and the 2.5 inch HDD we chose not to attempt to install a fan in the “floor” mount.
With the heat being generated by this system the temperatures are held within an acceptable level, with the addition of the optional fans they were noticeably reduced. Keeping a dual-GPU 9800GX2 cool is problematic at best. Hhaving the option to mount it at the top of the case directly under an exhaust fan, as well as aim a fan directly at it, has produced the lowest temperatures recorded for it on this bench so far.
In all fairness the case can be fitted with a third GPU, however a suitable PSU was not available during testing. Based on these results, and the extreme temps generated by the 9800GX2, we believe that this case could easily handle a triple GPU system.
Noise levels
With the addition of the 6 aftermarket fans to the Outlaw, the noise levels increased somewhat. As the chosen are all products with reasonably low decibel levels, the overall increase was not the horrendous cacophony one might expect. As built the system produces an acceptable amount of noise for a gaming system. It is nowhere near silent at load, but neither is it overpowering.
Conclusions
The BitFenix Outlaw is a handsome case with a nice finis. The gage of steel on the case exterior may not be suitable for those users that are careless, or heavy handed with their cases, but is strong enough to withstand normal usage, and sight accidents (such as dropping the keyboard on it). It has room for enough add-ins to keep most users happy with the seven expansion slots at the rear, however the lack of access to the bottom 5.25 inch bay in the front means that consumers can only use three items here. Two optical drives and a fan controller means not being able to mount an aftermarket front audio control panel, or other device. There is no external 3.5 bay at all.
Installation and assembly of the system in the Outlaw was relatively simple, the supplied thumb screws were a nice touch. Again we advise planning the build, as this mid-tower does have the room for a lot of gear, but doesn’t necessarily have the clearance needed to add it all in any old order.
The Interior clearances are a minor concern. Fitting a full length video card at the same level as a long optical drive is impossible. There may also be issues with fitting very tall CPU coolers while the case’s side fans are mounted.
While the inverted motherboard tray might put off some consumers, we found it has it’s benefits. By putting the GPUs above the CPU it takes advantage of the natural tendency of heat to rise and allow the cards to remain a bit cooler than they have in some other cases. Another advantage, though some might not consider it so, is that this layout allows the PSU to be mounted fan up with out putting the main cable out in the center of the case. For those worried about dust and dirt getting into a bottom mounted PSU, this is a definite plus. It also allows users who keep the system to their left to enjoy any LED fans they might want to mount in the side.
The lack of filters was a bit disappointing, but we do understand that supplying them would add to the price of the unit. Adding aftermarket filters to this case is an easy fix for that.
The Outlaw has decent airflow right out of the box. If installing a multi-GPU system we recommend using at least the top fan mounts to increase cooling capability.
The lack of space behind the motherboard tray limits wire management somewhat, but not to the extent of being a deal-breaker. The area provided does the job adequately.
If USB 3.0 ports are desired then be aware that this case has none. With no 3.5 bay in the front any extra ports would have to be mounted in the PCI slot area on the back, or in one of the three 5.25 bays would have to be converted, which would require an aftermarket adaptor as BitFenix does not supply one with the Outlaw.
ADDENDUM: Bitfenix has informed us that they will be releasing an upgrade kit in december allowing users to change the 4 USB 2.0 ports to 2 USB2.0 and 2 Usb 3.0 ports. (added Oct. 30,2011)
The Outlaw is billed as a gamer’s case but at the price of $49 US, it could be considered for any system. With it’s understated good looks, it would be as at home in an office or home theater, as it would be under a gamer’s desk. Consumers searching for a quality case at a good price, with excellent cooling, would do well to consider the Outlaw. Those looking for a flashy case should look elsewhere.
| OUR VERDICT: BitFenix Outlaw | ||||||||||||||||||
|
||||||||||||||||||
|
Summary: The BitFenix Outlaw is worth consideration by anyone who wants a good looking case that can handle a decent gaming system without breaking the bank. It has many attractive features, good cooling, easy installation, decent wire management, the ability to use multiple GPU’s, and an excellent price point among them. |