The NEXUS Prominent R is billed as a Premium Silent Case. Let’s find out if it meets these claims or not.
Introduction
When it comes to cases there are many choices. Finding the right case for a system, and environment, is a matter of looking at what they system will be used for, and what is required for the environment it will be used in. For example, a high end, overclocked gaming system would want a case with massive airflow, and since the sound system would overpower the fans as far as noise goes, sound proofing would not be an issue. On the other hand if the system is used in say, a music studio, or other environment where low noise levels are a necessity, then the user would want a case that reduces noise levels. But as we all know, it would also have to keep the components of the system cool.
Enter the NEXUS Prominent R, a case that includes many features the modern system can take advantage of, as well as built in sound absorption panels.
Does it make a real difference? Can it still keep a system cool enough? Are the features what consumers are looking for? Over the next few pages we will find the answers to these questions and more.
The NEXUS Prominent R is available for about $110 USD
Features & Specifications
SATA Dock
Noise absorption
Toolless installation
HDD-tray with vibration absorbers
PSU bumpers and Velcro strap
Toolless PCI locks
Rubber feet
2 included 12cm silent fans
Specifications
Packaging & Exterior
The Prominent R comes in a rather ordinary looking box, though our sample had been abused quite thoroughly during shipping.


Click images for larger view
The large sides of the box are the same, with a NEXUS logo in the center and the product name and a brief description in the lower left corner. The upper right sports the web address. The bottom of the box is blank and only shown to highlight the condition of the packaging. The top (not shown) displays the NEXUS logo. As for the ends, one had some labels that were removed prior to shipping, the other lists the model specifications.


Click images for larger view
The polystyrene protection on this case was severely damaged (grey background used for contrast) and while the top of the case was pressed down far enough to stop the side from being removed, there was no actual damage. Loosening 2 screws on the back and adjusting the top solved the problem. Inside NEXUS covers this case with a plastic shield to protect the finish on the bezel, and top.


Click images for larger view
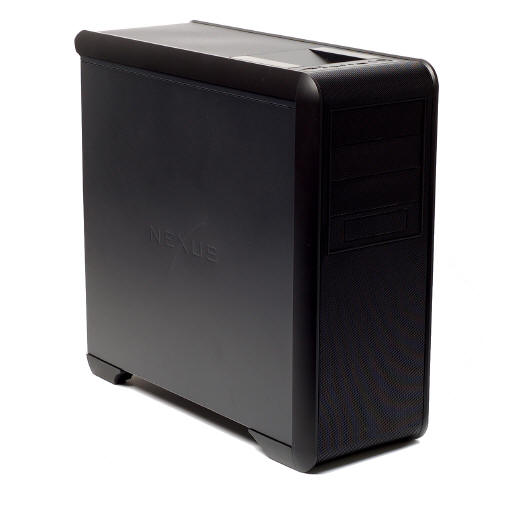
The sides of this case are un-vented, with the NEXUS logo embossed into them. These are secured via thumb screws. The finish is a satin black which matches the bezel and top flawlessly. The front of the case is mesh over a honeycomb framework with 4x 5.25-inch openings, the lowest of which contains a 3.5-inch pop out making the addition of a floppy drive or adaptor relatively easy. The rear of the case has 3 grommeted openings for water cooling or external wire pass through, as well as 8 PCI slots. As can be seen this case uses a bottom mount PSU. The bottom of the case has ventilation for the PSU, and 2 fans, 120mm or 140mm. It comes equipped with a mesh filtration, and rubber feet. Installing 2 additional fans here will require removing the lower HDD cage. The top of the case has the same mesh over honeycomb design as the front bezel. It sports an SATA dock as well the power/reset buttons and access ports (detailed below).


Click images for larger view
Removing the top shows us another filter, the top fan mounts, also 120/140mm capable, and a cutout in the chassis for the SATA dock. The port area at the very front of the top include An eSATA, one USB3.0 port, two USB 2.0 ports, the standard 3.5mm audio ports (with both HD audio and AC ’97 connectors internally), as well as the power and reset switches and LEDs for HDD and power.


Click images for larger view
The SATA dock is positioned on the top right behind the ports. It has power supplied by the case itself and comes equipped with a cover to protect it when not in use.
Accessories


Click images for larger view
The accessories for the Prominent R come in a plain white box which contains a zip-lock bag containing smaller zip-locks as well as the case lock-loop mechanism, and some wire ties. The bags are filled with a variety of screws, stand offs, etc., and a thumbscrew style tool to install the standoffs. While they don’t give a count on the labels the bags at least are labeled as to what is in them.
The case comes with motherboard and power supply screws, SSD screws, optical drive thumbscrews, HDD screws (designed to work with the vibration dampeners in the HDD racks), and standoffs. There is also one unlabeled bag containing one screw for the lock-loop. Finally, there is a bag of fan screws.
Interior & Installation
Moving to the Interior of the Prominent R we find many interesting features. Some of these are obvious at first glance, others are not.


Click images for larger view
With the side open the consumer is presented with an all black interior, hardware and chassis. The interior of both side panels are covered by a sound absorption material. Looking inside one can instantly see the rubber grommets for wire management, the included rear exhaust fan, the tool less locking mechanisms, the accessories box (contents listed on previous page) and the chassis wiring. The lower left image shows a close up with one of the 5.25 inch bay locking devices in the open position. The chassis wiring has connectors for all the front panel connections (actually located on top of this case), switches and LEDs, as well as the power connector for the HDD dock. This is oddly enough is a Molex connector instead of an SATA power connection. While some of the wires are labeled the SATA cables are not. On this sample one is orange, the other is red. The Red cable is for the eSATA port, and the orange cable is for the dock at the top of the case.


Click images for larger view
Looking a bit closer we can see a fan power distribution station mounted just below the motherboard area and just forward of the power supply. This has one Molex input and six 3 pin fan headers. Next up is the HDD cage which is actually two separate pieces. We have an angle view from the front and a shot from the back side. Each cage is removable independent of the other. Installing fans in the front of the case requires moving them for access, installing the forward floor fan requires removing the bottom cage completely along with the mount on the floor (four screws on bottom of case). The wire management grommets are set between the motherboard and the HDD cage.


Click images for larger view
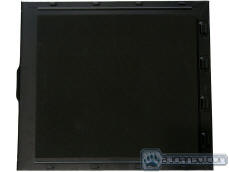
Above we present a look at the cage itself. Both cages are identical. The thumbscrews were put back in the assembly to prevent their loss, as well as to give a sense of alignment. Each of the racks in the cages are capable of mounting both 3.5 and 2.5 inch drives. IDE, SATA or SSD will all fit. The tool less pins in the racks are all mounted in rubber to reduce overall vibration and noise.


Click images for larger view
Another view of the upper front fan mount with the HDD cage removed. On closer inspection of the 5.25 inch bays we found an adapter hiding in the bottom bay. The design is such that one could mount a floppy or 3.5 card reader, mount a 3.5 inch HDD using the bottom screw holes (flip it over if you don’t think it has them), or a 2.5 inch drive. It would be possible to mount a 3.5 device and a 2.5 device at the same time but there would be virtually no clearance between them. At the back of the case we have the tool less locks for the PCI slots, and at the bottom of the image, the vibration dampener for the PSU mount can be seen.


Click images for larger view
These views allow readers to see the power supply area with its vibration dampening pads and the Velcro strap used to help reduce motion and noise. Further we can see here on the back side of the M/B tray another view of the wire management pass-throughs.
All in all, this case has many fine features and looks as though it will be a pleasure to build in. So with that, on to assembling the system.
Installation
The first step we like to perform is installing the PSU, this keeps everything else from getting in the way of the bulkiest component.


Click images for larger view
Next we installed the fans, DVD drive, hard drives, then the motherboard. The top fans require that the system builder remove four screws and the filter to gain access to the fan mounts. The next to last thing we did was to install the HSF so we could see if the clearances would make changing one difficult. There was plenty of room to work on it.

![]()
Click images for larger view
Installing the GPU’s and USB 3.0 adaptor card was quite simple as one would expect. The HSF used in this build is 161mm in height and leaves very little room for the side panel. Anything taller could cause clearance issues.
The Prominent R is a fairly easy case to work in, but we do recommend planning the wire management before the build and checking it along the way to insure the best possible layout, and maximum airflow.
Testing & Results
| Test System | |
| Case | NEXUS Prominent R |
|
Processor |
AMD Phenom II X4 9500 (Agena)
|
|
Motherboard |
Asus M3N-HT Deluxe (bios 3401) |
|
Memory |
4 GB Patriot 8500EL series PC2-6400 |
|
Drive(s) |
Maxtor 7H500F0, WDC WD 1600BEVT |
|
Graphics |
Video Card 1: Nvidia GTX 480 (reference)
Video Card 2: Nvidia GTX 480 (reference)
|
|
Power Supply |
XFX 750W POWER SUPPLY BLACK EDITION |
| Operating System | Windows 7 |
| CPU cooler | Evercool Transformer 3 |
| Case fans | 2 included 120mm, 4 aftermarket 120mm† |
Our tests are very straight forward. We load the system as much as possible and measure the temperatures on various components. To load the system we ran a torture test in Prime95 (In place large FFT’s, maximum heat, power consumption, some RAM tested) to load the CPU at 100%, and ran Stanford’s Folding @ Home distributed computing application* to load the GPU’s at an average of 97-98%. the CPU was overclocked to 2.51GHz, the two GTX 480’s at a shaderclock of 1600. While the motherboard could handle an additional GPU the power supply can not.
*information on Stanford’s Folding @ Home app can be found HERE & HERE
†Note that only 4 of 5 possible fans were added to the original 2 stock fans in this case. As the one not placed requires the removal of the lower HDD cage, we chose not to install that fan. The 4 that were added were; 2 Thermaltake silent cat 61CFM 120mm fans, 1 Enermax TBSilence 42CFM 120mm fan, and 1 SiLenx EFX-12-12 44CFM 120mm fan.
The test were run in three stages measuring temps at idle and full load. The first stage was done with all 6 case fans running and both of the case sides removed. All temperatures are in Celsius, ambient temperature during testing was 20.5°C (69°F)
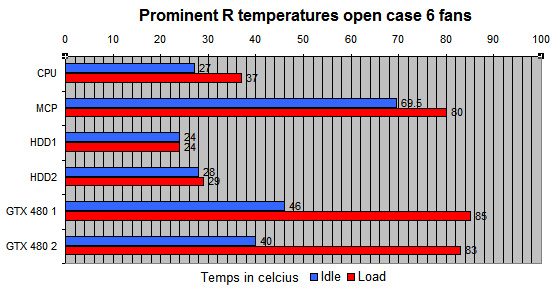
During this test the product was as loud as any average case. The temps were well within reasonable limits as the components had no airflow restrictions of any kind.
Stage two was done with all 6 fans running and both case sides installed.
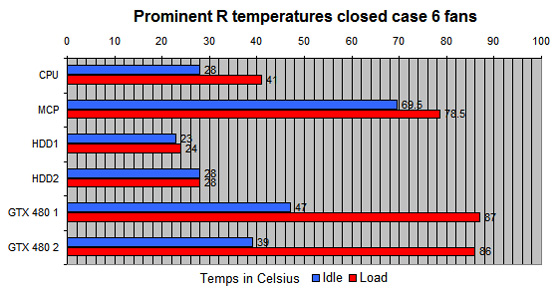
Installing the sides made a noticeable difference to the sound levels emanating form this case. The difference in temperatures illustrate the airflow patterns in the case. While the CPU temperatures went up, the MCP (chipset) temps dropped at load. The GPU temps went up slightly. The HDD temps remained fairly consistent through out the testing procedures.
Stage three was done with only the two stock case fans running and both of the case sides installed
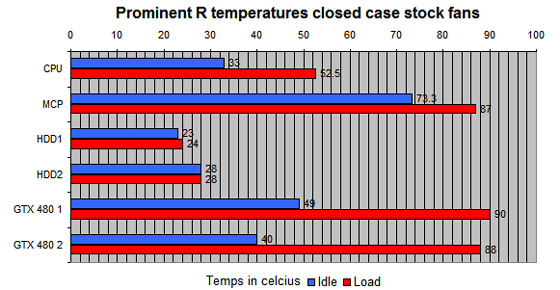
With only the stock fans we see a definite rise in temperatures on the CPU and MCP. The GPU’s see a slight gain and the HDD’s remain consistent. The one discrepancy is the temps for the second GPU, which dropped for this test. We assume this is due to its position allowing it to take advantage of the direct airflow from the front stock case fan. These temps are all still within the thermal limits of the components.
With the fans on auto this case maintains it’s claims of quiet. No system with a GTX 480 running at load on air can remain silent, yet the Prominent R comes very close. With all other sounds removed from the environment, this case was still quiet enough as to be unobtrusive. With the GPU fans above the 55% mark they do start to become very noticeable. At 100% there is no case we’ve seen that can claim to make them silent, or even quiet. When noise levels are the primary consideration pick the components carefully.
Conclusions
The Nexus Prominent R Silent ATX Mid-Tower case is a quiet case both in function and looks. When a drive is not placed in the included SATS dock it could be easily overlooked. This would be a mistake on the part of consumers. The Prominent R is a fully functional ATX case capable of housing almost any system users could want to build in it. It is solidly constructed, well designed, fairly easy to work in, and adjustable to the needs of the system builder with the built in wire management and ability to remove one or both of the HDD cages. It has a nice looking finish, and would blend into almost any environment.
The case features decent airflow right out of the box, and is able to mount multiple fans, or even a 120mm radiator setup at the back, and or/ a 240mm radiator at the top of the case. The mesh over honeycomb design used both on the front bezel and the top of the case catches dust and hair quite readily, keeping them out of the interior.
The wire management is sufficient for just about any setup we can imagine, but we do recommend planning it in advance and not tying anything down till satisfied. The rubber grommets have a tendency to slip off when pressure is applied to them. They go back on easily enough, but if like us the system builder has a tendency to pull, push, and tug on the wires, it gets annoying in short order.
The interior is spacious enough to be easy to work in without the case being overly large. The HDD cages are designed and aligned so as to make installing or removing the drives simple. The wires are hidden by the cages aiding in wire management. The tool less locks for the 5.25″ bays are simple to use and one of the most effective designs we have seen. This may be due to the fact that the fit on the optical drive was snug. The lock mechanism on the PCI slots is also a simple effective design, and Nexus included screws and screw holes for those that feel the tool less setup isn’t secure enough.
We also note that this case reduces sound levels substantially. However with dual GTX 480’s being worked hard and needing to be cooled, it could do no more than reduce their volume (we admit up front this may have been an unfair test). Silent seems to be a marketing ploy, as opposed to an actual description. That said, if the right components are chosen for the build, a powerful yet extremely quiet system could be built in this case. If all component were chosen based on their decibel level, a truly silent system could be built in the NEXUS Prominent R.
| OUR VERDICT: Nexus Prominent R Silent ATX Mid Tower | ||||||||||||||||||
|
||||||||||||||||||
| Summary: If looking for a case that cuts the noise levels, consumers would be wise to consider the Prominent R. Systems built with quiet components would be virtually silent in this case. With all it’s other great features included this is a phenomenal product. With it’s cooling capabilities it can even be used for a gaming case. For its overall quality and and performance coupled with it’s reasonable price and features, it earns the Bjorn3D Silver Bear Award. |