NZXT has updated the Phantom to the Phantom 410, adding native USB 3.0 support, and more. Let’s take a look inside.
Introduction
Cases are without a doubt one of the most important pieces of a gaming system. They need to be large enough to house one’s carefully selected components, roomy enough to work in easily, allow enough airflow to keep components cool, and do all this while looking “cool” enough to make one’s friends sick with envy. Last year we took a look at a case that did all that and more: the NZXT Phantom. Now we are going to run its little brother through the mill, and see if it is able to live up to the Phantom’s formidable reputation.
Using the same non-linear design style as it’s predecessor, the Phantom 410 strays far from the usual square box design. With the inclusion of features one would expect from more expensive cases, it would seem to be a good value. Join us as we examine the NZXT Phantom 410 and see if it’s a worthy recipient of the Phantom moniker, and if it can prove to be worth our hard earned cash.
The Phantom 410 is available at many outlets in black, red, and white, with prices ranging from $99 to $159.
We are looking at the black one today.
Features and Specifications
| Features | ||||||||||||||||||||||||||||||||||||||||||||
Design Mid-Tower Chassis NZXT introduces the next descendant of the revolutionary Phantom, the Phantom 410. The beautiful and sleek Phantom design set the trend of all white chassis and idealized optimal expansion and cooling. In comparison to its predecessor, the Phantom 410 delivers more value for every dollar spent and possesses an acrylic window that allows gamers to admire the power of their rig. The Phantom 410 features an innovative right mounted HDD rails, a solution for easy hard drive replacement. This mid tower comes equipped with a dual radiator water cooling solution with a clearance of 30mm, an interior pivot 120mm/140mm fan slot, the capability of installing up to 8 fans, and a single 30W fan control. The Phantom comes with up-to-date internal 2x USB 3.0 headers that directly connect to the motherboard. Be the envy of all PC gamers – the Phantom 410 is bringing sexy back. Specs
|
Packaging and Exterior
The NZXT Phantom 410 came to us in an average sized box for a mid tower chassis. A little rough around the edges but in good shape over all, the box features the white version in all it’s images.


CLICK IMAGES FOR LARGER VIEW
The front of the 410’s box features it’s name and product description over a a front/side angle view of the chassis on a black background with three blue stripes, this background is carried across the back but not the sides. The left side lists the specifications in English. The back of the package is used to highlight the features, and is basically a reprint of the features page from the NZXT site, just like our previous page. the information and descriptions match word for word. On the right side of the box, in much smaller print are the specs in seven languages including French, German, Spanish, Portuguese? (we think), and what appears to be two different Asian languages. Toward the bottom is a sticker with the model and serial numbers (both partially worn off in shipping).


CLICK IMAGES FOR LARGER VIEW
The case comes covered in a plastic bag and placed in a standard polystyrene bracket, for protection during shipping. The front and top bezels are further protected by a plastic film which is removed easily. Inside the chassis is a small white box containing the instructions, a booklet showing consumers the NZXT product line, an assortment of screws and some wire ties. The next image is of the standoffs and the included tool for their placement. The use of black standoffs was a bit exciting as most cases still use silver or brass colored ones. The excitement wore off when we realized that black makes them harder to see in a black case through a black PCB. The Phantom 410 makes up for this by being so well aligned that we didn’t really need to see them to hit the mark during installation.


CLICK IMAGES FOR LARGER VIEW
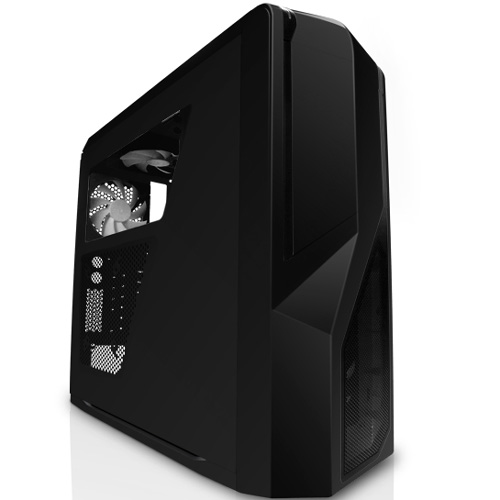
Looking at the front of the case we see the same design style made famous by the original Phantom full tower. So similar in fact, that we thought this was an update of the same case at first glance. Among the differences is the number of 5.25″ bays, this case having three hidden behind its door. The door itself uses a “push to open/close” latching mechanism similar to some household cupboards. This bezel includes a large mesh area to facilitate airflow. Behind the bezel we can see the included 120mm front fan, as well as the recessed mounts for the other 120mm, and in the center of those the mount for a 140mm fan. Looking through the case we get a peek at the included rear 120mm fan. at the top of the case, if one looks closely, the blue power LED can be seen. This LED projects to a piece of acrylic mounted in the front bezel to indicate that the unit is indeed powered up.


CLICK IMAGES FOR LARGER VIEW
Turning to the top of the case we can see another large mesh area, the power and HDD LED’s, as well as the power and reset buttons on the left, and the “front” panel ports on the right. These ports include the front audio Mic and headphones, two USB 2.0, and two USB 3.0 ports. At the end of this row is a three stage fan controller which runs up to 5 fans at a total of 30 watts. this allows users to balance noise against airflow as needed. The rear of the case is fairly standard with seven PCI expansion slots, a bi-directional bottom PSU mount, two grommets allowing for for liquid cooling or wires to pass through as need dictates, and a small mesh area for a bit of extra airflow. Moving to the bottom of the case we find a filter for the PSU intake and a fan mount which is not filtered. while it is easy enough to add a filter we feel they missed a bet here by not including one, as this is the most likely culprit when it comes to drawing dust in to a case (in our opinion). The rubber feet are a nice touch helping to reduce vibration and noise.


CLICK IMAGES FOR LARGER VIEW
Finally we have the sides. The Piano black finish is highly reflective, and shows each and every bit of dust, dirt, (Styrofoam flecks) and fingerprints. The only reason is isn’t a mirror finish is that the case side is lightly textured under the finish. The bezel is a mirror finish, and one can see their reflection in the door panel. Saving the best for last, the window side features a mesh grill in the lower part of the side allowing for airflow as well as having mounts of either a 120mm or 140mm fan. The window allows a good enough view of the interior to show off the system without giving away all it’s secrets at once. Both panels are held in place by thumbscrews, and are very easy to remove and install.
The case’s accessory pack includes:
-
Thumbscrews 6-32 x12 Side panels, Expansion ports, HDD fan cage
-
Thumbscrews M3 x6 5.25 drives
-
Screws 5x10KT x8 Fans
-
Screws 6-32×28 x8 Front fans
-
Hex screws 6-32 x4 PSU
-
Screws 6-32×5 x15 HDD tray, M/B
-
Screws M3x5 x24 2.5 HDD
-
Standoffs x9 M/B tray
-
Standoff wrench/tool x1
-
Cable ties x10
Interior & Installation
Moving on to the interior of the Phantom 410 the first thing we see when opening the case is the white accessory box (covered on previous page) sitting in an all black interior.


CLICK IMAGES FOR LARGER VIEW
Once the box is moved out of the way we can see the case wiring, all black which allows it to blend into the case, as well as the wire management grommet for the PSU, and the rubber vibration dampener on the tray. The HDD cage has dual tabs, top and bottom to allow it’s removal without tools. The tray side of the case allows us access to the HDD racks. This orientation makes hiding the drive wires a breeze. Lets take a quick look at the fan mounts.


CLICK IMAGES FOR LARGER VIEW
This view of the case with the front and top removed might seem like it should be in the exterior section but as it requires removing the covers we include it in the interior. The first image shows the included front 120mm fan and the mount for the optional 120mm fan, as well as the center mount for using a 140mm. It also allows a good look at the front panel connectors, with the power, reset, and fan switches. By taking a close look at the first image we can also see the power LED which shows up on the outside of the case as a blue stripe by projecting into a small piece of acrylic. the second and third images show the top of the case with it’s spare mount for either a 120 or 140mm fan. hidden on the floor of the case is a mount for a 120mm fan.
There is one more fan mount, and it’s a bit unusual.


CLICK IMAGES FOR LARGER VIEW
Mounted to the HDD cage on a swivel is the additional fan mount. Using a thumbscrew to secure it in the desired position, this mount can be adjusted to aim the fan upwards. This is dependent on clearance from the video cards. the NVIDIA GTX 480 reference cards in this system make adjusting this fan impossible by more than a degree or so. (see image of completed system below) With a shorter card one could move the mount so as to direct airflow upwards in the case. The HDD cage itself is a sturdy unit that is easy to remove, but requires a determined effort to replace. It isn’t difficult, it just requires a firm insertion force to get into the locked position.


CLICK IMAGES FOR LARGER VIEW
The HDD rack is similar to the ones in many of the cases available today. it can mount a 3.5 inch drive without tools, or a 2.5 inch drive using the supplied screws. Mounting a 2.5″ HDD, or SSD will necessitate removing the tool less pins that hold the 3.5″ drives on one side, due to the alignment of the mounting holes. Moving across the case to the back we find that the PCI slot covers are reusable, a nice feature for those that change their hardware configuration. and they are secured using thumbscrews which is another nice feature. A secure mount without tools. The case wires are exactly what we have come to expect in a modern case with one exception. The audio cable is HD only as opposed to the dual ended AC’97/HD audio wires we have been seeing lately. The USB 3.0 connector is a true 19 pin USB 3.0 instead of the type A socket found in some cases. Another nice touch.


CLICK IMAGES FOR LARGER VIEW
One last look at the design and then we move on to assembly. The layout of this chassis is such that it makes building a system easy enough to be pleasure. The wire management grommets are right where they need to be, at least for an ATX board. the dual access options of the HDD cage make it easy enough to install a drive from either side of the case. And the tool less ODD lock system is super easy to use. just slide the center of the lock forward and lift the back a bit. Mounting the DVD drive took seconds and it was locked securely in place with no effort.
The rest of the build was simple, every thing almost fell into place. Some CPU coolers may be better installed outside of the case but most should be manageable with the M/B already in. In fact the only problem encountered during this build was due to the reviewer being in a hurry and not looking closely enough at the routing options for the front fan. The most difficult possible path was chosen and even that only took about a min to fish the 3 pin connector through.


CLICK IMAGES FOR LARGER VIEW
This case can fit a multi GPU system, it was built and tested with a dual GPU setup due to PSU constraints. single LED fan is bright enough to light up the case but mostly highlights the window area. The rear fan having a white blade, reflects the light allowing it to have it’s own ghostly blue glow. One piece of parting advice. When reassembling this case, put the top bezel on before the front. A close inspection of the images above will show a misalignment caused by the reviewer doing it in the opposite order. There is a small pin in the front of the case that has to insert into a hole in the top. Doing it properly solved the alignment problem.
Testing & Results
| Test System | |
| Case | NZXT Phantom 410 |
|
Processor |
AMD Phenom II X4 9500 (Agena)
|
|
Motherboard |
Asus M3N-HT Deluxe (bios 3401) |
|
Memory |
4 GB Patriot 8500EL series PC2-6400 |
|
Drive(s) |
Maxtor 7H500F0, WDC WD 1600BEVT |
|
Graphics |
Video Card 1: Nvidia GTX 480 (reference)
Video Card 2: Nvidia GTX 480 (reference)
|
|
Power Supply |
XFX 750W POWER SUPPLY BLACK EDITION |
| Operating System | Windows 7 |
| CPU cooler | Evercool Transformer 3 |
| Case fans | 2 included 120mm, 1 included 140mm, 5 aftermarket 120mm† |
Our tests are very straight forward. We load the system as much as possible and measure the temperatures on various components. To load the system we ran a torture test in Prime95 (In place large FFT’s, maximum heat, power consumption, some RAM tested) to load the CPU at 100%, and ran Stanford’s Folding @ Home distributed computing application* to load the GPU’s at an average of 97-98%. the CPU was overclocked to 2.51GHz, the two GTX 480’s at a shaderclock of 1600. While the motherboard could handle an additional GPU the power supply can not.
*information on Stanford’s Folding @ Home app can be found HERE & HERE
† The 5 that were added were; 1 Thermaltake silent cat 61CFM 120mm fan, 1 Enermax TBSilence 42CFM 120mm fan, 1 Enermax TBSilence 71 CFM 120mm fan, and 1 SiLenx EFX-12-12 44CFM 120mm fan.
The test were run in three stages measuring temps at idle and full load.
The first stage was done with all case fans running and the case side removed. All temperatures are in Celsius, ambient temperature during testing was 20.5°C (69°F)
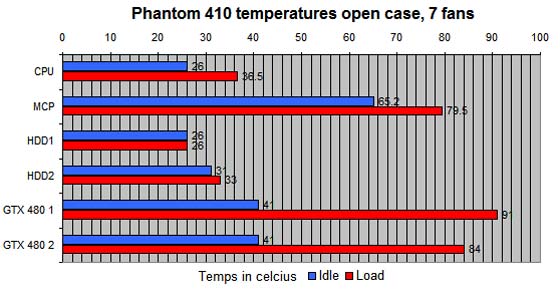
Temperatures are at levels we would expect from these components in an open case, no surprises here other than GPU2 being lower than expected at load.
Stage two was done with all fans running and both case sides installed.

These temperature reading were well within tolerance, but again GPU2 was much lower than expected. A fairly high volume of air flow allows the Phantom 410 to keep everything cool.
Stage three was done with only the three stock case fans running and both of the case sides installed
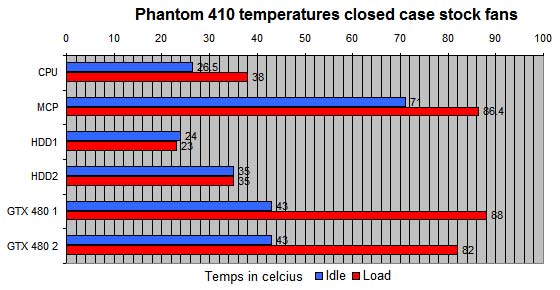
Even with only the three stock fans operating this case keeps the installed components below their thermal limits, and yet again GPU2 is operating much cooler than we anticipated.
Based on these results it is our opinion that adding more powerful fans, or liquid cooling solutions, would allow the Phantom 410 to house a highly overclocked, multi-GPU, powerhouse system.
Due to the discrepancies between the 2 matching video cards we went looking for the cause. We determined that even when working on the same work unit using Folding @ Home, the GPU load can vary. Future testing will use synthetic benchmarks to ensure even loading of the GPU’s.
Conclusions
The Phantom 410 is a solid mid tower case. It packs many great features into a well managed space. From the wire management to the adjustable fan mount, a lot of thought went into this design. The airflow in this chassis seems sufficient to handle high end gaming systems, and it has the room for a triple GPU setup. There is room for a 240mm radiator at the top, and places to fit 120mm rads as well, so cooling is not a problem here. We do feel that there should have been a filter included for the bottom fan mount as this is the most likely place for a system to pick up dust and dirt.
The HDD cage with it’s internal adjustable fan mount is a very nice inclusion in this product. When set flat against the cage and paired with a fan in the upper front mount it works in a push/pull setup throwing cool air directly at the video cards. When used with a short enough card it can be directed to increase airflow near the CPU and memory. The cage is easy to use from either side. The wire management areas have more room than we expected from looking at the outside of the case. The 5.25″ bay locks are simple to use and very effective.
The included fan controller is a nice feature that some consumers will only use once to see if it works and then leave it on full, those that do use it will find it to be very convenient. The ultra shiny finish looks great, however touching it leaves noticeable fingerprints. We would have liked to see another LED fan in the front, but that is easily remedied by installing one.
Building the system in case was truly a pleasure. It is has just enough room to be comfortable to work in without being oversized for it’s class.
The NZXT Phantom 410 is definitely worthy of the Phantom name, it is a fine addition to the NZXT crafted series, and we hope to see more cases from them that can live up to this level of craftsmanship.
| OUR VERDICT: The NZXT Phantom 410 | ||||||||||||||||||
|
||||||||||||||||||
| Summary: The NZXT Phantom 410 is a great choice for anyone that wants a feature packed, solid mid tower with great cooling, room to work, and stunning looks. For it’s quality, performance, features, and value we award it the Bjorn3D Silver Bear Award. |