Today we look at the ASUS P9X79 WS board, one of a long line of Workstation motherboards from ASUS. Keep reading to find out what kind of power this beast conceals.
Introduction – ASUS P9X79 WS
 We have seen our fair share of X79 chipset boards at this point, most of them ASUS models since they just seem to have so many. We are very happy to get a chance to see such an variety, from the extreme ROG models down to the most basic model available in their lineup.
Today we are looking at the P9X79 WS. The “WS” stands for Workstation, and this board exudes capability from the specs on up. On paper the board looks very capable and amazing as it offers many features that would make us think it belongs in the ROG class. The WS board is second to none in our book for testing even though we’re sure the ROG boards and Sabertooth go through extensive testing as well. However, this board goes through server-level compatibility and stability testing with a third party to ensure it will keep on ticking. Also, the board supports 4-Way SLI which also means 4-Way Tesla or computation cards should work well in line with that. The board is specially tested for extended compatibility with aftermarket HBA or RAID Cards and also higher end network controllers that a Server type board may require.
On top of all of the Server level components and testing the board is also supported by the newly extended ASUS APS Service which allows for advanced replacement for a quick and painless RMA service should a board failure ever occur.
Today we will take an in depth look at the P9X79 WS board and what makes us want to pay the $379.99 current price.
Workstation Essentials for Your Business
The ASUS Workstation Series is the ideal foundation for a powerful PC. It delivers awesome power, dependable performance and unmatched multiple I/O scalability for the most demanding tasks and future upgrades. The ASUS Workstation Series intelligently reduces operating noise and dissipates heat through advanced and environmentally friendly methods to accommodate user needs. ASUS Workstation Series motherboards also bring you ultimate reliability and quality through our 24×24 initiative, which means 24-hour non-stop operation and a 24-month life cycle supply guarantee so you don´t change computers so often.Instead, let the ASUS Workstation Series improve the quality of your work and life.
ASUS Workstation Exclusive Features
Best performance for 4-Way SLI™ and quad CrossFireX™
The Best Graphics Performance You’ve Ever Experienced  Based on extensive benchmarking, the 4-Way SLI™ offered by the P9X79 WS works up to 30% faster than standard 3-way SLI™ and up to 100% faster compared to 2-way SLI™, giving professional and power users more graphics performance on demand. Using PCI Express 3.0 x16 links, the four GPUs can reach their full potential, perfect for both intense gaming and commercial uses such as mechanical and architectural design, interior design, aeronautics, plus audio and video production.
Built-in Dual Intel Server-Class Gigabit LAN
 Dual Intel® hardware-accelerated LAN
For more reliable networking, the P9X79 WS features built-in dual Intel® Gigabit LAN. This leads to lower 71% CPU utilization , increasing throughput to achieve outstanding performance as well as better support for diverse operating systems.
3-color LED
![]() Instant O.C Status Checking with 3-color LED
Instant O.C Status Checking with 3-color LED
At a glance workstation overclocking status with easy to understand color coding. Red means overclocked, blue means normal, while green denotes power saving mode. This is an essential and convenient tool to let users know more about overclocking conditions without entering the BIOS.
Server-level Compatibility
![]() Server-level Compatibility with RAID card and Lan card
Server-level Compatibility with RAID card and Lan card
The P9X79 WS provides complete compatibility with RAID and LAN cards.Users enjoy a wider selection of devices and higher reliability. As a workstation motherboard that puts an emphasis on system integration, the P9X79 WS offers the benefit of greater confidence and convenience.
New DIGI+ Power Control
New DIGI+ Power Control
 All-New Digital Power Control for both CPU and DRAM
ASUS X79 motherboards include New DIGI+ Power Control with three digital voltage controllers, including all-new DRAM controllers that offers ultra-precise memory tuning in addition to ultra-precise CPU voltage control. This evolution of innovative, industry-leading ASUS technology provides the best in class control for better efficiency, stability and performance.
Best in class power efficiency and stability
Two critical components work perfectly together to match digital power signal (SVID) requests from the CPU, with ultra-fast sensing and response to efficiently deliver the right level of power on demand. Accurate power reduces wasteful voltage imprecision, and provides more a stable CPU and memory setup.  Increased CPU and DRAM overclocking range
With programmable digital controllers onboard, users can adjust CPU and DRAM voltage and VRM switching frequencies for various overclocking scenarios. New DRAM tuning possibilities make the most of DDR3 memory for better performance with VCCSA load line calibration and 30% more DRAM current capacity. Dual digital voltage controllers provide two separate outputs for AB and CD memory channels respectively. Thanks to a slew of power options teamed with an extensive and intuitive UEFI BIOS, overclocking very large memory setups is no more difficult than mainstream motherboards.
* VCCSA (system agent voltage) relates to the CPU DRAM controller. ASUS power control now provides more VCCSA options to facilitate extreme DRAM overclocking. ![]() Support for up to 64GB of system memory with an 8-DIMM design on ASUS X79 motherboards provides the capacity for users to make full use of modern 64-bit software, ideal for rendering detailed images or manipulating large files without the bottlenecks of conventional storage. It also allows users to set up big RAM disks and speed up frequently accessed programs, minimizing the impact of storage transfer delays while maximizing user benefit.
Support for up to 64GB of system memory with an 8-DIMM design on ASUS X79 motherboards provides the capacity for users to make full use of modern 64-bit software, ideal for rendering detailed images or manipulating large files without the bottlenecks of conventional storage. It also allows users to set up big RAM disks and speed up frequently accessed programs, minimizing the impact of storage transfer delays while maximizing user benefit.
ASUS Exclusive Features

ASUS SSD Caching
3X faster performance at a click
SSD Caching from ASUS is easier than ever. At 3X faster, this feature boosts system performance by using an installed SSD with no capacity limitations as a cache for frequently accessed data. Harness a combination of SSD-like performance and response and hard drive capacity with just one click, no rebooting needed and instant activation for complete ease of use, and even prevent data loss with included backup functionality.
UEFI BIOS
ASUS UEFI BIOS offers the first mouse-controlled graphical BIOS designed with selectable modes, providing a user-friendly interface that goes beyond traditional keyboard-only controls. It also natively supports fully-utilized hard drives larger than 2.2TB in 64-bit operating systems.
ASUS exclusive interface EZ Mode displays frequently-accessed info. Users can choose system performance settings and drag and drop boot priorities. Advanced Mode for performance enthusiasts includes detailed DRAM settings via a dedicated memory info page for complete insight.
New upgrade! Quick and easy info for enhanced system control
- F12 BIOS snapshot hotkey for sharing UEFI setup info and troubleshooting
- New F3 Shortcut for most accessed info
- ASUS DRAM SPD (Serial Presence Detect) Information for accessing memory info, detecting faulty DIMMs and helping with difficult POST situations

USB BIOS Flashback
Easy, worry-free USB BIOS Flashback
USB BIOS Flashback offers the most convenient way to flash the BIOS ever! It allows overclockers to try new UEFI BIOS versions easily, without even entering their existing BIOS or operating system. It even works without key components such as the CPU and memory installed. Just plug in any USB storage and push the dedicated button for 3 seconds. The UEFI BIOS is automatically flashed using ATX standby power. Worry-free updating for the ultimate convenience! > Learn More
Fan Xpert+
Customizable speeds with independent fan control
Hardware-level ASUS Fan Xpert+ allows users to independently adjust both CPU and case fan speeds with multiple dedicated controllers based on different ambient temperatures, climate conditions and system loads. Built-in profiles offer flexible automatic and manual fan speed controls to achieve a quiet and cool computing environment.
USB 3.0 Boost
Faster USB 3.0 Transmission with UASP
New ASUS USB 3.0 Boost technology supports UASP (USB Attached SCSI Protocol), the latest USB 3.0 standard. With USB 3.0 Boost, USB device transmission speed is significantly increased by up to 170%, adding to already impressively fast USB 3.0 transfer speeds. USB 3.0 Boost provides a user-friendly graphical interface, which instantly accelerates transfer speeds for USB 3.0 peripherals with exclusive ASUS device auto-detect settings.
AI Suite II
One-stop Access to Innovative ASUS Features
With its user-friendly interface, ASUS AI Suite II consolidates all exclusive ASUS features into one simple-to-use package with an elegant design theme. It allows users to supervise overclocking, energy management, fan speeds, voltage, and sensor readings. This all-in-one software offers diverse and easy to use functions, with no need to switch back and forth between different utilities. 
Latest Transfer Technology
PCIe 3.0 Ready
![]() The latest PCI Express bus standard delivers improved encoding for twice the performance of current PCIe 2.0. Total bandwidth for a x16 link reaches a maximum of 32GB/s, double the 16GB/s of PCIe 2.0 (in x16 mode). PCIe 3.0 provides users unprecedented data speeds, combined with the convenience and seamless transition offered by complete backward compatibility with PCIe 1.0 and PCIe 2.0 devices. It’s a must-have feature for PC users aiming to improve and optimize graphics performance, as well as have the latest, most future-proof technology.
The latest PCI Express bus standard delivers improved encoding for twice the performance of current PCIe 2.0. Total bandwidth for a x16 link reaches a maximum of 32GB/s, double the 16GB/s of PCIe 2.0 (in x16 mode). PCIe 3.0 provides users unprecedented data speeds, combined with the convenience and seamless transition offered by complete backward compatibility with PCIe 1.0 and PCIe 2.0 devices. It’s a must-have feature for PC users aiming to improve and optimize graphics performance, as well as have the latest, most future-proof technology.
*This motherboard is ready to support PCIe 3.0 SPEC. Functions will be available when using PCIe 3.0-compliant devices. Please refer to www.asus.com for updated details.
> Get the latest BIOS version for optimal support of PCI Express 3.0.
ASUS Crystal Sound
DTS Connect
![]() Expand Your PC Audio Experience
Expand Your PC Audio Experience
To get the most out of your audio entertainment across all formats and quality levels, DTS Connect combines two enabling technologies. DTS Neo:PC™ upmixes stereo sources (CDs, MP3s, WMAs, internet radio) into as many as 7.1 channels of incredible surround sound. Consumers can then connect their PC to a home theater system.DTS Interactive is capable of performing multi-channel encoding of DTS bitstreams on personal computers, and sending encoded bitstreams out of a digital audio connection (such as S/PDIF or HDMI) designed to deliver audio to an external decoder.
DTS UltraPC II
![]() DTS UltraPC II delivers exceptional 7.1 surround through the most popular PC audio setups – your existing stereo speakers or headphones. In addition to virtual surround, it upgrades original sound to new levels with Audio Restoration, recreating the dynamic range of audio files. Symmetry mode improves the balance of perceived loudness across different input sources and Enhance boosts audio quality through high and low frequency equalization. With these technologies, users experience better home theater audio with ease.
DTS UltraPC II delivers exceptional 7.1 surround through the most popular PC audio setups – your existing stereo speakers or headphones. In addition to virtual surround, it upgrades original sound to new levels with Audio Restoration, recreating the dynamic range of audio files. Symmetry mode improves the balance of perceived loudness across different input sources and Enhance boosts audio quality through high and low frequency equalization. With these technologies, users experience better home theater audio with ease.
CPU, Chipset and Graphics features
2nd Generation Intel® Core™ i7 Processor family for the LGA 2011 Socket
![]() This motherboard supports the latest 2nd Generation Intel® Core™ i7 Processor family for the LGA 2011 Socket, with memory and PCI Express controllers integrated to quad-channel (8 DIMMs) DDR3 memory and 40 PCI Express 3.0 lanes. This provides great graphics performance. 2nd Generation Intel® Core™ i7 Processor family for the LGA 2011 Socket is one of the most powerful and energy efficient CPUs in the world.
This motherboard supports the latest 2nd Generation Intel® Core™ i7 Processor family for the LGA 2011 Socket, with memory and PCI Express controllers integrated to quad-channel (8 DIMMs) DDR3 memory and 40 PCI Express 3.0 lanes. This provides great graphics performance. 2nd Generation Intel® Core™ i7 Processor family for the LGA 2011 Socket is one of the most powerful and energy efficient CPUs in the world.
Intel® X79 Express Chipset
![]() The Intel® X79 Express Chipset is the latest single-chipset design that supports the 2nd Generation Intel® Core™ i7 Processor family for the LGA 2011 Socket. It improves performance by utilizing serial point-to-point links, allowing for increased bandwidth and stability. Additionally, the X79 comes with 2 SATA 6Gb/s and 4 SATA 3Gb/s ports for faster data retrieval, doubling the bandwidth of current bus systems.
The Intel® X79 Express Chipset is the latest single-chipset design that supports the 2nd Generation Intel® Core™ i7 Processor family for the LGA 2011 Socket. It improves performance by utilizing serial point-to-point links, allowing for increased bandwidth and stability. Additionally, the X79 comes with 2 SATA 6Gb/s and 4 SATA 3Gb/s ports for faster data retrieval, doubling the bandwidth of current bus systems.
4-Way SLI™ and Quad-GPU CrossFireX™ Support
![]()
![]() Both SLI and CrossfireX architectures work flawlessly on new ASUS X79 boards, with PCI Express slots designed to accommodate the power of up to four current graphics cards. Whether for professional graphics work, heavy duty multimedia or dedicated gaming, more than ample graphics power can be applied whenever needed.
Both SLI and CrossfireX architectures work flawlessly on new ASUS X79 boards, with PCI Express slots designed to accommodate the power of up to four current graphics cards. Whether for professional graphics work, heavy duty multimedia or dedicated gaming, more than ample graphics power can be applied whenever needed.
Specifications
| CPU | Intel® Socket 2011 for 2nd Generation Core™ i7 Processors Supports Intel® Turbo Boost Technology 2.0 * Refer to www.asus.com for CPU support list |
| Chipset | Intel® X79 |
| Memory | 8 x DIMM, Max. 64GB, DDR3 2400(O.C.)/2133(O.C.)/1866/1600/1333/1066 MHz ECC, Non-ECC, Un-buffered Memory Quad Channel Memory Architecture Supports Intel® Extreme Memory Profile (XMP) * Hyper DIMM support is subject to the physical characteristics of individual CPUs. * Refer to www.asus.com or user manual for the Memory QVL (Qualified Vendors Lists). |
| Multi-GPU Support | Supports NVIDIA® 4-Way SLI™ Technology Supports AMD Quad-GPU CrossFireX™ Technology |
| Expansion Slots | 4 x PCIe 3.0/2.0 x16 (dual x16, triple x16/8/8, quad x8, black+blue) *1 2 x PCIe 3.0/2.0 x16 (x4 mode, white) *1 |
| Storage | Intel® X79 chipset : 2 x SATA 6Gb/s port(s), gray 4 x SATA 3Gb/s port(s), blue Support Raid 0, 1, 5, 10 Marvell® PCIe 9128 controller : 2 x SATA 6Gb/s port(s), navy blue Support Raid 0, 1 |
| LAN | Intel® 82579V, 1 x Gigabit LAN Controller(s) Intel® 82574L, 1 x Gigabit LAN Controller(s) |
| Audio | Realtek® ALC898 8-Channel High Definition Audio CODEC – Supports : Jack-detection, Multi-streaming, Front Panel Jack-retasking Audio Feature : – Absolute Pitch 192kHz/ 24-bit True BD Lossless Sound – DTS Ultra PC II – Optical S/PDIF out port(s) at back panel |
| IEEE 1394 | 1 x IEEE 1394a port(s) |
| USB Ports | ASMedia® USB 3.0 controller : 4 x USB 3.0 port(s) (2 at back panel, blue, 2 at mid-board) Intel® X79 chipset : 13 x USB 2.0 port(s) (8 at back panel, black, 5 at mid-board) |
| Workstation Feature | 6 x PCIe x 16 slot(s) Quick Gate: 1 x vertical USB 2.0 on board ASUS SASsaby series Cards support ASUS WS Diag. LED ASUS WS 3-color LED |
| Special Features | ASUS TPU : – Auto Tuning – TurboV – TPU switch ASUS EPU : – EPU – EPU switch ASUS Digital Power Design : – Industry leading Digital 8 + 2 Phase CPU Power Design – Industry leading Digital 2 + 2 Phase DRAM Power Design – CPU Power Utility – DRAM Power Utility ASUS Exclusive Features : – MemOK! – AI Suite II – Ai Charger – ASUS UEFI BIOS EZ Mode featuring friendly graphics user interface – ASUS SSD Caching – USB 3.0 Boost ASUS Quiet Thermal Solution : – Stylish Fanless Design Heat-pipe solution – ASUS Fan Xpert+ ASUS EZ DIY : – USB BIOS Flashback – ASUS Q-Shield – ASUS CrashFree BIOS 3 – ASUS EZ Flash 2 – ASUS MyLogo 2 – Multi-language BIOS ASUS Q-Design : – ASUS Q-Code – ASUS Q-Slot – ASUS Q-DIMM – ASUS Q-Connector |
| Back I/O Ports | 1 x PS/2 keyboard (purple) 1 x PS/2 mouse (green) 1 x IEEE 1394a 2 x LAN (RJ45) port(s) 2 x USB 3.0 8 x USB 2.0 (one port can be switched to USB BIOS Flashback) 1 x Optical S/PDIF out 6 x Audio jack(s) 1 x USB BIOS Flashback Button(s) |
| Internal I/O Ports | 1 x USB 3.0 connector(s) support(s) additional 2 USB 3.0 port(s) (19-pin) 2 x USB 2.0 connector(s) support(s) additional 4 USB 2.0 port(s) 1 x Vertical USB 2.0 port(s) 1 x COM port(s) connector(s) 4 x SATA 6Gb/s connector(s) 4 x SATA 3Gb/s connector(s) 1 x CPU Fan connector(s) (4 -pin) 4 x Chassis Fan connector(s) (4 -pin) 1 x Optional Fan connector(s) (4 -pin) 1 x S/PDIF out header(s) 1 x 24-pin EATX Power connector(s) 1 x 8-pin ATX 12V Power connector(s) 1 x 4-pin EZ_PLUG Power connector(s) 1 x Front panel audio connector(s) (AAFP) 1 x System panel(s) (Q-Connector) 1 x MemOK! button(s) 1 x TPU switch(es) 1 x EPU switch(es) 1 x Power-on button(s) 1 x Reset button(s) 1 x Clear CMOS jumper(s) |
| Accessories | User’s manual I/O Shield 2 x SATA 3Gb/s cable(s) 4 x SATA 6Gb/s cable(s) 1 x 3-Way SLI bridge(s) 1 x 4-Way SLI bridge(s) 1 x SLI bridge(s) 1 x Q-connector(s) (2 in 1) |
| BIOS | 64 Mb Flash ROM, UEFI BIOS, PnP, DMI2.0, WfM2.0, SM BIOS 2.6, ACPI 2.0a, Multi-language BIOS, ASUS EZ Flash 2, ASUS CrashFree BIOS 3 |
| Support Disc | Drivers ASUS Utilities ASUS Update Anti-virus software (OEM version) |
| Form Factor | CEB Form Factor 12 inch x 10.5 inch ( 30.48 cm x 26.67 cm ) |
| Note | *1-1: This motherboard is ready to support PCIe 3.0 SPEC. Functions will be available when using PCIe 3.0-compliant devices. Please refer to www.asus.com for updated details. *1-2: Blue slot can run x16 or x8 link, black slot only can run x8 link. |
APS (ASUS Premium Service)

ASUS Previously offered the APS service on ROG boards, but starting with the X79 series they have extended the service to cover much more of their X79 models in the standard channel line. This is nice to see as the APS service allows an advanced replacement or a board to be shipped to the user which in turn means less down time for the end user. More on this service can be seen on the ASUS website HERE
Dual Intel Server Grade NIC’s
ASUS knows its many markets, and with the WS series of boards they hit the mark with the high reliability high performance server market and one of the features that earmarks this best is the dual Gigabit server class Intel NIC’s. These NIC controllers are designed and tested to have superior performance, stability and reliability to ensure that even in the worst case scenarios such as a network controller fault there is another controller ready to do the job.
BIOS Flashback
ASUS offers the BIOS Flashback utility which is actually a multi-facet tool and has many capabilities which some may not be aware of. We have had many times where a motherboard did not support a CPU and had to frantically search for a supported CPU just to flash the BIOS (ex. Gulftown CPU support on X58). ASUS has eliminated the worry of these kinds of issues by allowing the BIOS flashback procedure which does not require a CPU or memory to flash the BIOS. All that is needed in order to flash the BIOS is to have the desired firmware ROM file on a USB thumb drive and insert that into the White colored USB port.
Depressing the Bios flashback button for approximately 3 seconds will start a flashing LED which indicates the firmware is being updated and once the update is complete the flashing will stop. It really is that easy and ensures that no matter the condition, the firmware can be flashed even if the newest CPU is not supported without the previously mentioned hunt for a compatible CPU.
This may seem like an odd feature but many may buy the newest and greatest CPU on the market while the board could have been shipped with the older firmware which in most cases would leave the user stuck without an option. As for our usage we have found this useful in quite a few experiences where running an LN2 cooled system in unstable conditions led to BIOS corruption.
USB 3.0 Boost
Turbo USB or USB 3.0 boost allows for users to further accelerate their old USB devices by placing them in the USB 3.0 devices and enabling the Turbo mode. Now do keep in mind that there is also the UASP mode which select devices including external drive docks and enclosures which could result in some pretty impressive speed gains as well due to the change in protocol used to communicate with the installed device.
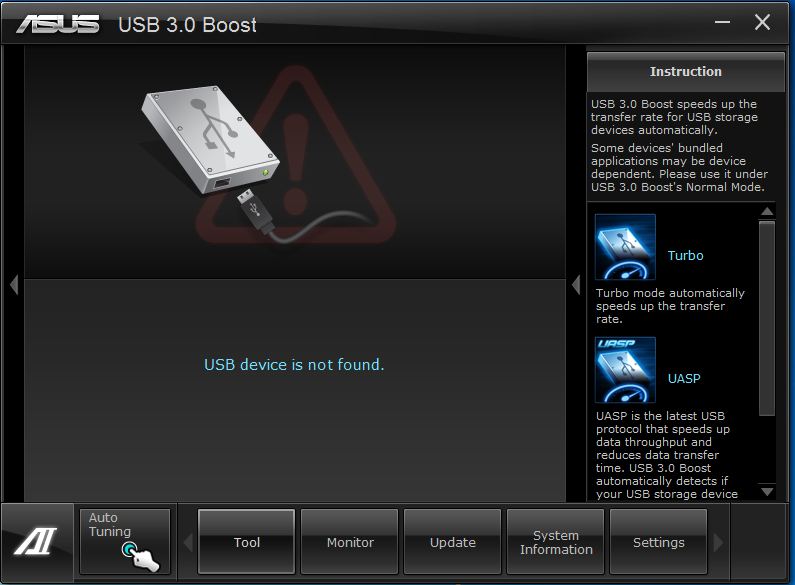
Here we see the USB 3.0 boost screen in the AI Suite II utility, which is where USB devices protocol can be adjusted. Enabling the turbo will help many models but a gain can not be guaranteed on every model for obvious reasons but if you already have the board it would be easy enough to plug in a drive and give it a try. With teh click of a button we could easily breathe some new performance into our otherwise dated old thumb drives.
For more information please see the ASUS USB 3.0 Boost landing page here
Asus SSD Caching
with the introduction of the X79 Intel Enthusiasts model chipset we found that the Intel smart response SSD caching was omitted by default from support on the chipset. Asus took this as an opportunity to add the feature themselves by way of a third party chipset which supports up to SATA III/6G speeds, but beyond that it is capable of supporting a caching drive which is what it is meant for. One thing to note which we are sure many have noticed by now is that the ROG boards do not have the Asus SSD caching but this was done by design as Asus checked the market and found that most ROG users have a primary SSD already and would better benefit from a higher performance third party controller versus a caching capable controller which may yield slightly lower results. for the P9X79 WS it opts for the SSD caching capable controller which is the Marvell 9128 model controller. One really cool feature of the Asus SSD caching is that it does not have the same capacity limitation as the Intel solution of 64GB and with the Asus solution any size SSD can be synchronized with a large capacity drive to keep hot data (data used often) on the SSD for quick and frequent access whereas cold data (data used less often) can be kept on the normal hard disk drive which means we can get a much higher capacity storage system with very fast boot times and responsivness.
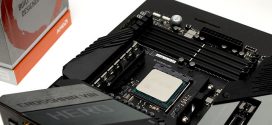
Overview of the P9X79 WS


The packaging for the P9X79 WS board is one of simplicity along with a hint of style. After all, this is not designed with the crazy off the wall styling like the ROG boards because this is aimed at a different user group. This board is aimed more at the ultra stable and ultra performance user group rather than the ROG focus on Extreme overclocking and gaming series of boards. While this may be their “target” we know from previous experience that the WS series boards can perform very well and even overclock with some of the best of them. With server grade stability and durability testing they should last a good long time as well. The front of the box shows icons of many of the advertised features for the board, some of the key features being:
- 30% Graphics boost via 4 Way SLI compatibility
- Dual Intel Server Grade Nic’s
- USB 3.0 Boost
- Asus SSD Caching
- 4 way SLI and Crossfire X compatibility
The packaging front flap lifts up much like the other high end boards we have seen and serves as an extended front end area at which we can read more in depth about the integrated features. This includes such features as the DIGI+ power controls, USB 3.0 Boost, TPU, UEFI firmware and more. Instead of just an icon, this section contains brief descriptors as to why these features are good and even how they fit the usage model the user would require.
The rear of the package reveals a complete board image along with a specifications quick reference chart along with once again a few of the key feature highlighted on the board as well.


- IO Shield
- SATA cables
- CrossFire Bridge
- 2 Way SLI Bridge
- 3 Way SLI Bridge
- 4 Way SLI Bridge
- Users Manual
- Com Port bracket
- Easy connect front panel connectors
- USB/eSATA port IO Panel
Being a professional or workstation model we did not expect a set of crazy stickers or a door hanger. The crowd this board is aimed at is not necessarily gamer centric.


A Closer Look at the P9X79 WS


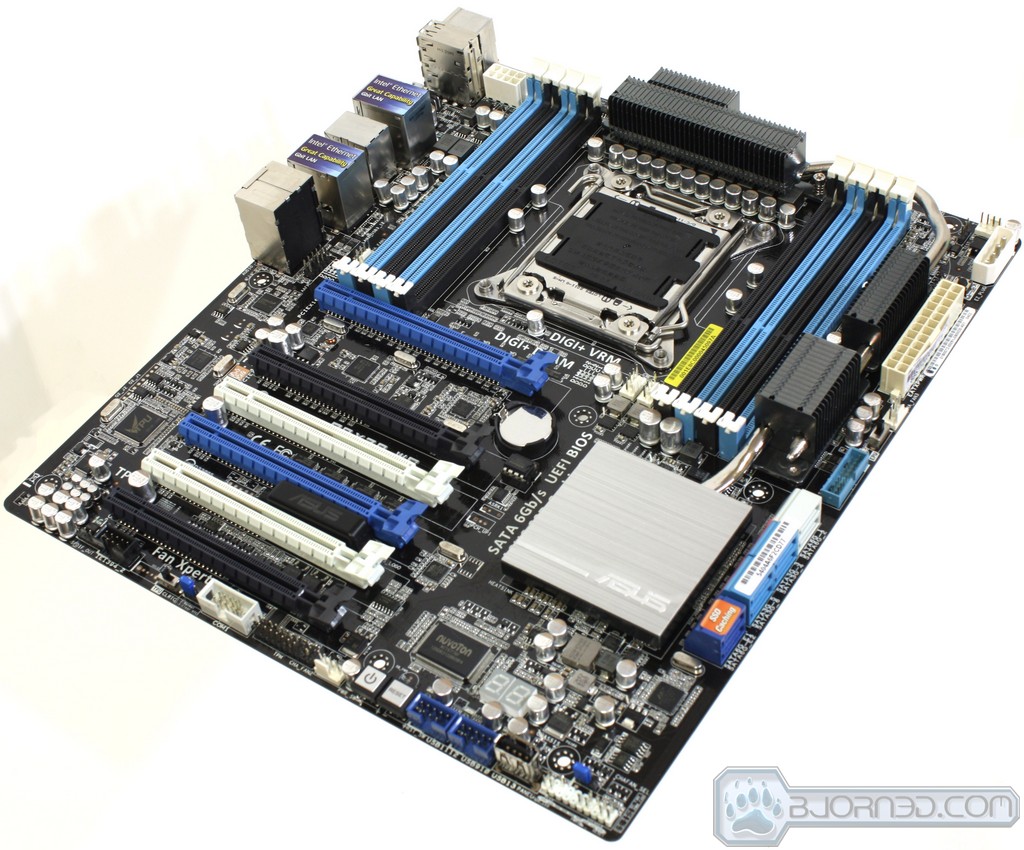
Taking a closer look at the board we look at all the little things that make the WS board special. First off at the lower edge we see the standard fare front panel connections along with pin headers for USB ports and even the power/reset switches. One part that sticks out right away is the onboard USB plug which allows direct connection of a USB device such as a thumb drive. One really cool usage is a WiFI dongle as a USB WiFi device could be installed on the board inside of a locked case, giving the board WiFi connectivity.
Next up we see the SATA ports. The 4 light blue operate at 3Gbps, and the two gray ports operate at 6Gbps; all six of these ports are based off the PCH. Lastly, the two navy blue ports which are attached to the Marvell 9128 chipset and operate at up to 6Gbps also offer ASUS SSD caching compatibility. The ASUS SSD caching is very similar to the Intel Smart Response technology, but with some major advantages. For instance, there is no limitation on the size of SSD used; the Intel Smart Response has a strict limitation of 64GB in size.
Taking a look near the ATX 24 pin connection we see just a small portion of the chipset cooling grid which is completely connected across the board via heatpipes. The PWM cooler and chipset coolers are attached at this junction to ensure maximum stability under heavy stress by transferring heat away from the key components away to these cooling grid arrays.
Looking at the I/O panel we find that the connectivity options are vast as seen here:
- Mouse/Keyboard PS/2 ports
- 2x USB 3.0 ports
- 7x USB 2.0 ports
- 1x White color USB BIOS Flashback port
- USB BIOS Flashback Button
- IEEE 1394a port
- 2x Server Grade Intel 10/100/1000 Network ports
- 8-channel audio
Looking at this connectivity we were a little surprised by the inclusion of dual PS2 ports until we realized that many workstation or server systems are connected via KVM and therefore utilize PS2 ports for both keyboard and mouse for input usage. This is excellent but it would have been nice to see at least a single eSATA port for this workstation board.


Looking to the lower edge we get a glimpse of the chipset that makes it all possible. The Marvell chipset is specially selected for many of the ASUS channel boards which allow for the ASUS SSD caching tech and the awesome performance it unlocks. The SSD caching solution is perfect for those who want faster performance than platter drives can guarantee, but don’t want to commit to the considerable expense of buying an SSD.
Moving to the lower edge of the board we find the power/reset switches onboard which can help when placed in a rack unit for even during initial setup and testing. Also at the lower edge we find the USB pin headers and the previously mentioned USB port and the excellent addition of the LCD post indicator and one of the six fan ports the board offers.
Lastly we take a quick look in between the PCI-E slots and find an illuminated ASUS logo which is a nice style addition.


Software Overview

ASUS has some very similar software as it is same updated software we have seen with the P67/Z68 series. It offers a very in depth control and management interface to help better work with the motherboard.

When opening the AI Suite II utility we see the main toolbar which is very similar to what we have seen before but with a slightly different button design for the CPU Auto Tuning utility.
The CPU Auto tuning utility can easily up the CPU’s base frequency up to an impressive 4.28GHz with no other adjustment necessary. This is all through software without even the need for entering the BIOS. However, our goals are beyond the already impressive 4.28GHz preset.
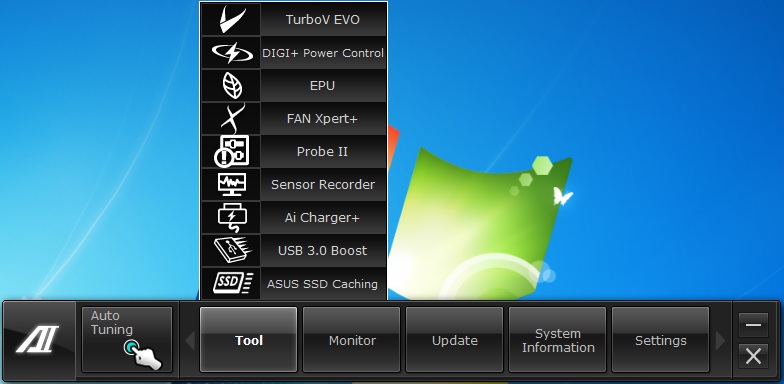
Here we see the tools menu opened with all of the features shown to see what kind of options are available through the AI Suite II utility.
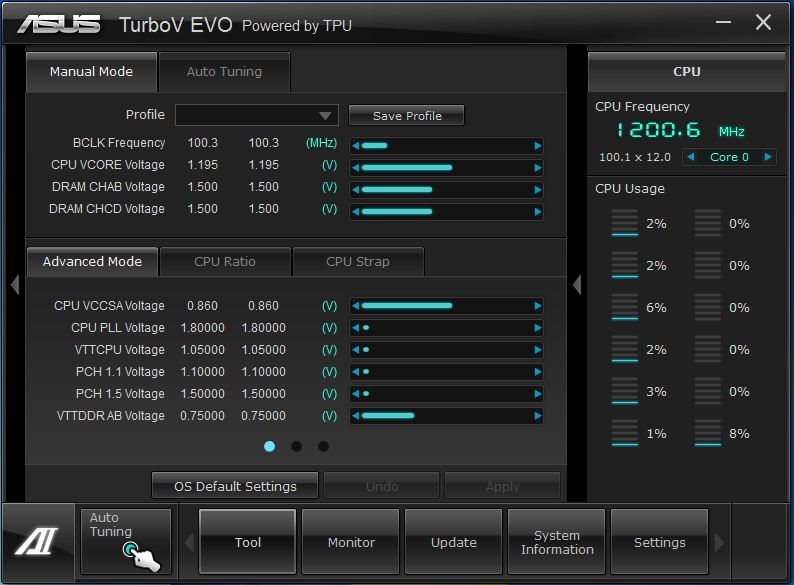

The TurboV EVO section is the polar opposite to the CPU Level Up, as it allows manual configuration of an overclock which will easily exceed the CPU Level Up presets. All of the important settings from voltages to frequencies can be adjusted here.
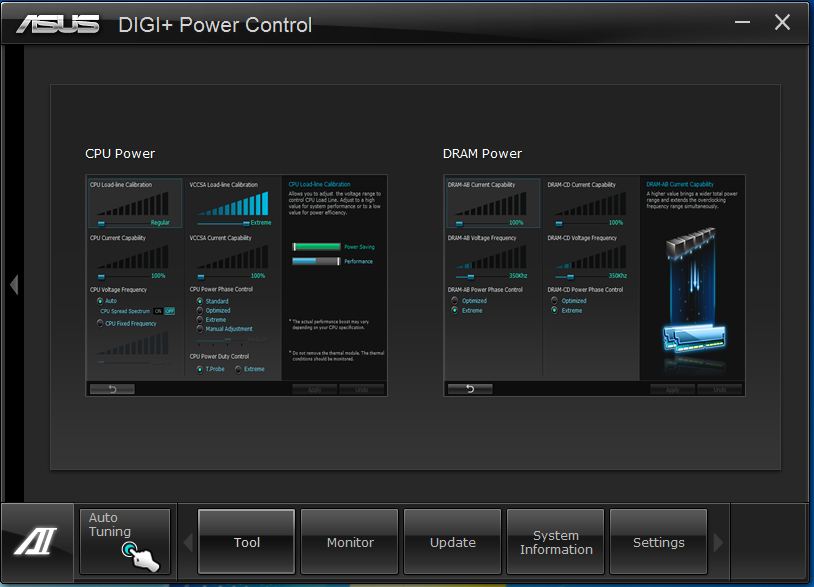
The DIGI+ Power Control Center has separate sections for both DRAM and CPU power sections. Digi+ has to do with ASUS’s implementation of its industry leading digital power controls, which have been proven for excellent efficiency and accuracy which leads to better overclocking potential.
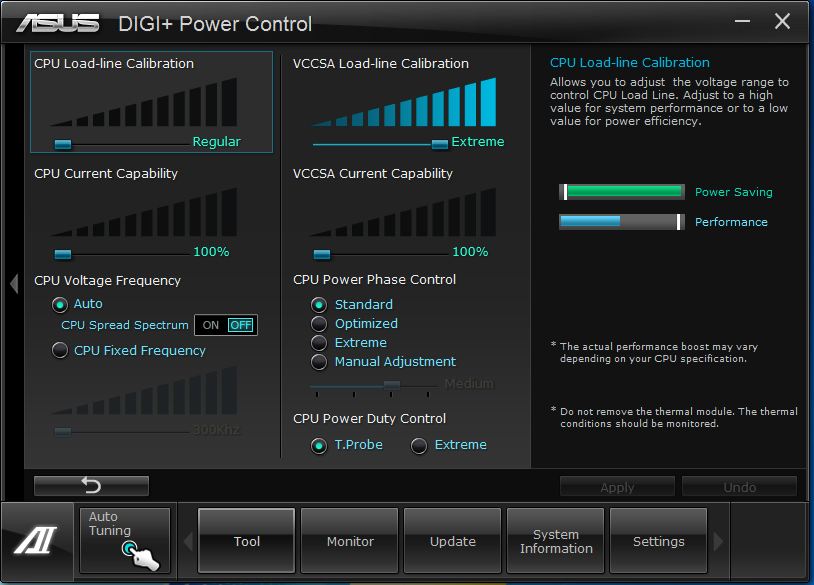
Here is what we see when entering the CPU power controls and the PWM frequency and loading as well. All of this translates into either very good overall efficiency or extreme power loads which can unlock amazing power potential.
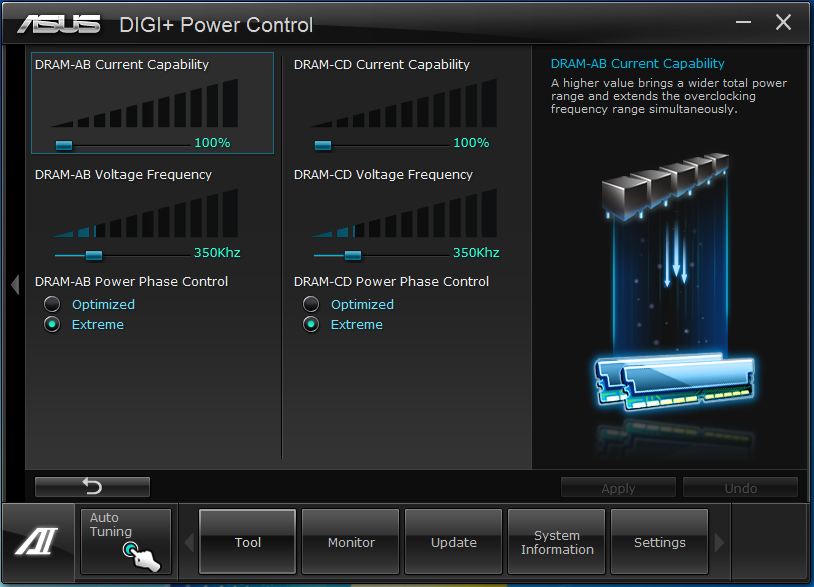
The Digi+ screen for Dram is very much the same as the CPU but with optimizations and controls based on the tuning of the Dram modules. This just like the CPU has settings that can optimize either power efficiency or extreme power delivery for pushing the overclocks.
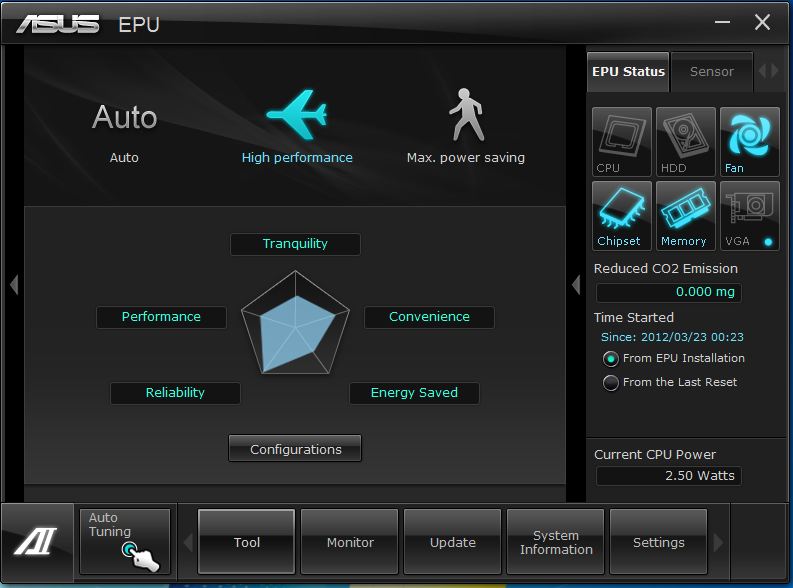
The EPU allows for tuning to best suit users’ needs, along with a graph showing how the current settings correlate to convenience, energy savings, reliability and performance. This allows for the user to better tune their system to meet their specific needs while still allowing the best possible efficiency balance.
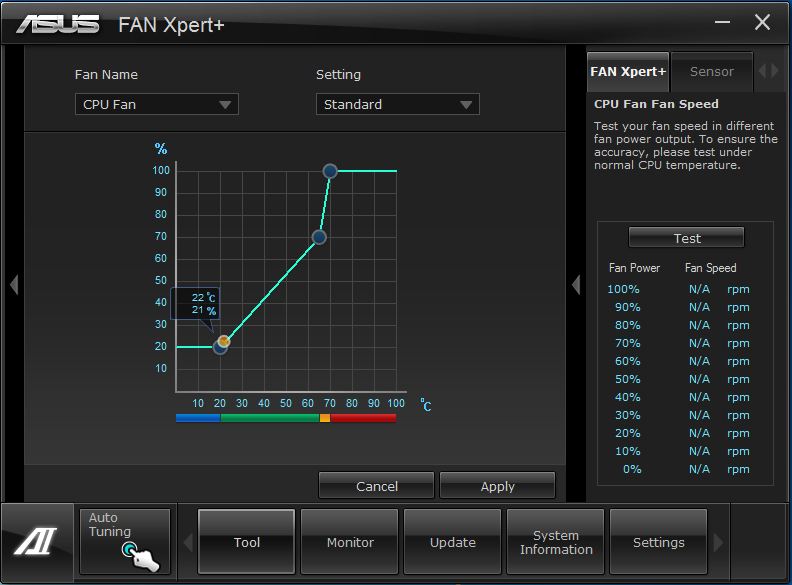
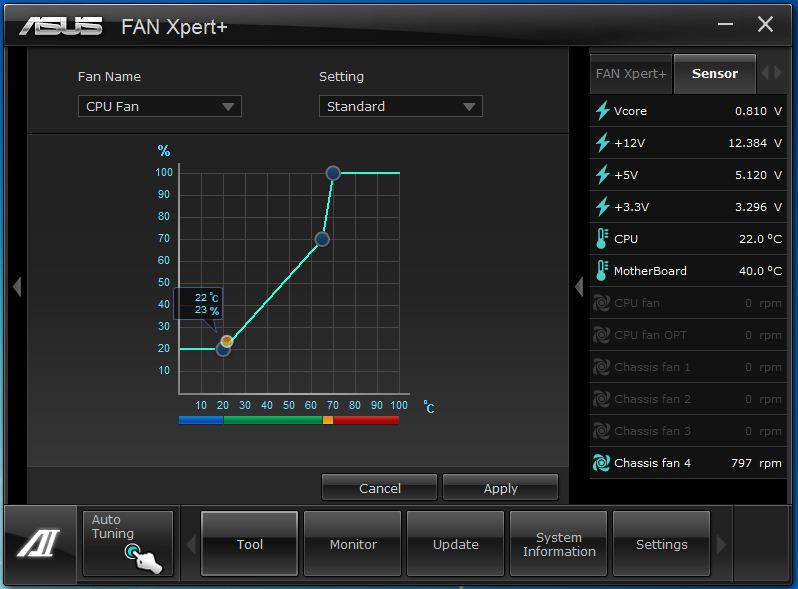
The Fan Xpert tool allows custom fan profiling so that each fan will ramp up according to the temperature it reads and allows for a great balance of noise and thermal performance.
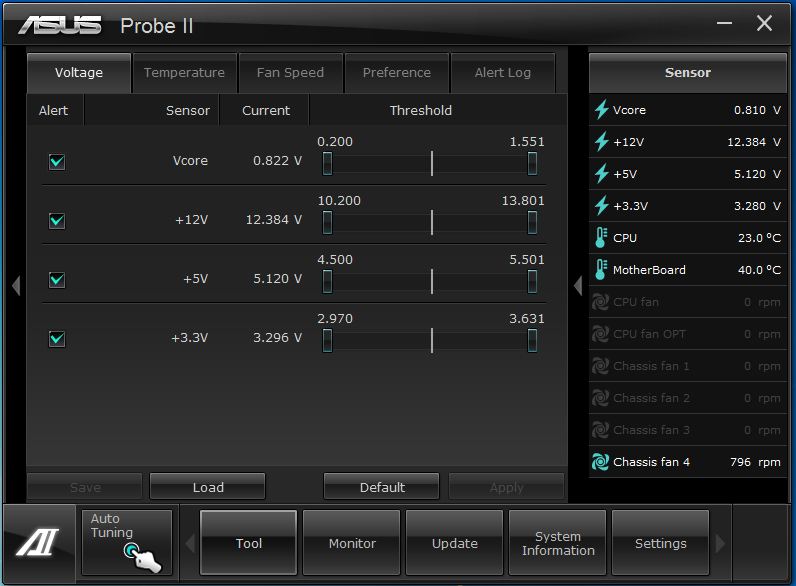
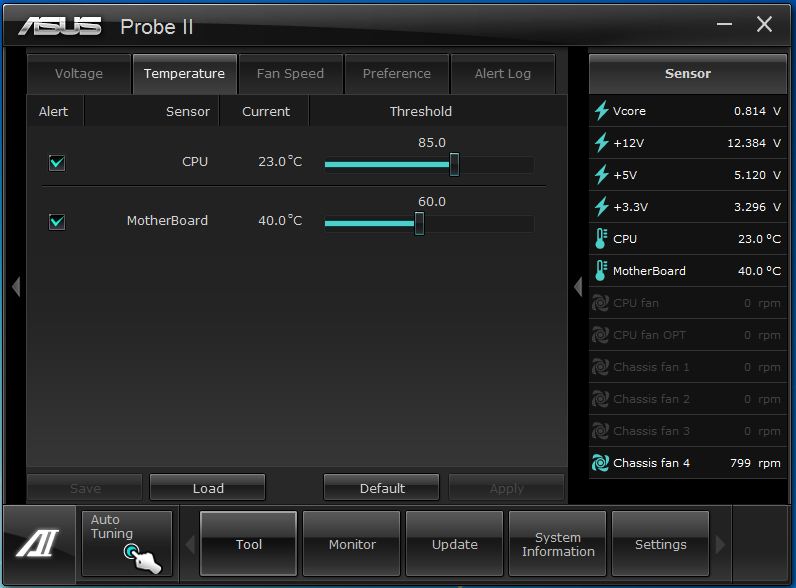
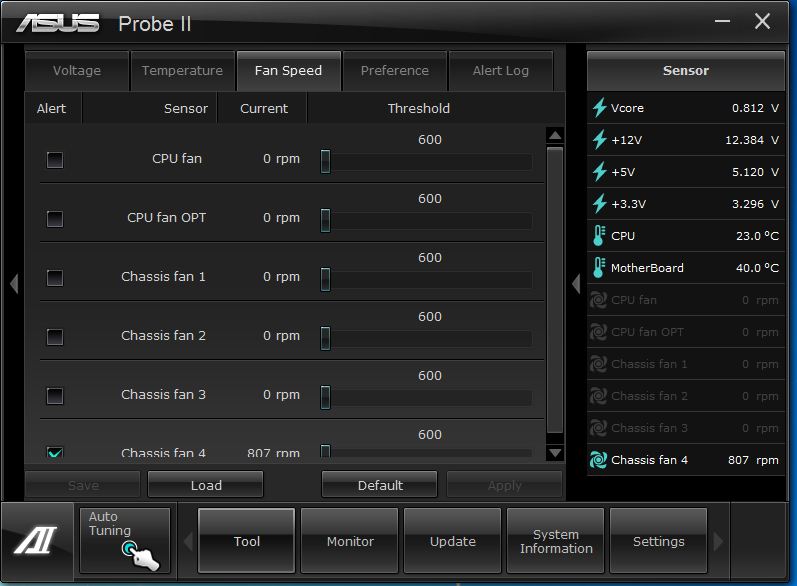
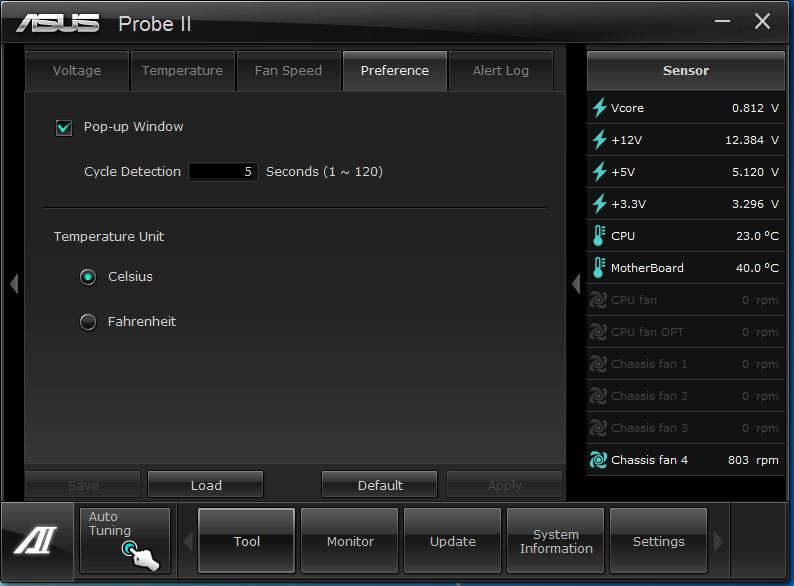
Here we Probe II software pane which has a whole slew of voltages, temperatures and other system parameters which can be monitored in real time to give us an idea of the health of our system and other monitoring info. Also warning thresholds can be set to allow warnings if a voltage beyond this threshold is reached.
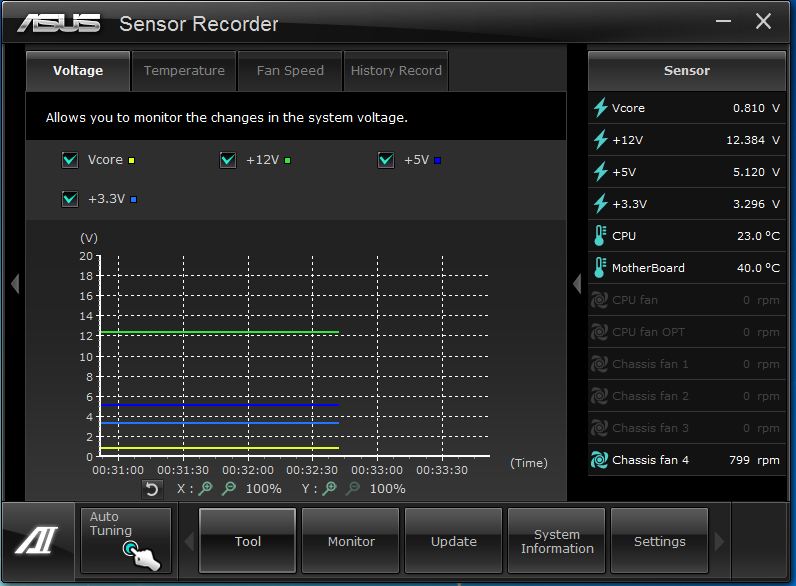
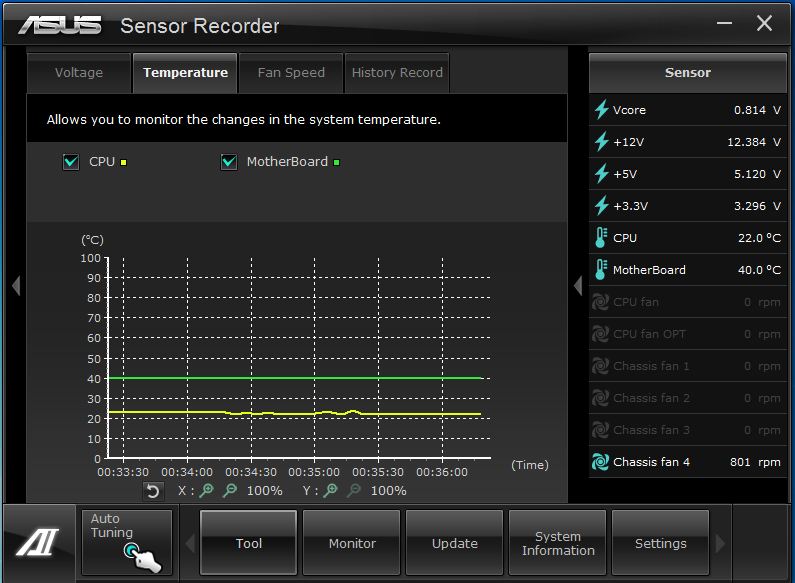
The sensor recorder software is great for monitoring activity under load, and allows users to see any instabilities in voltages or temperatures to better diagnose stability issues or thermal concerns under load. This allows for better fine tuning and finding the optimal frequency for our 24/7 rig.
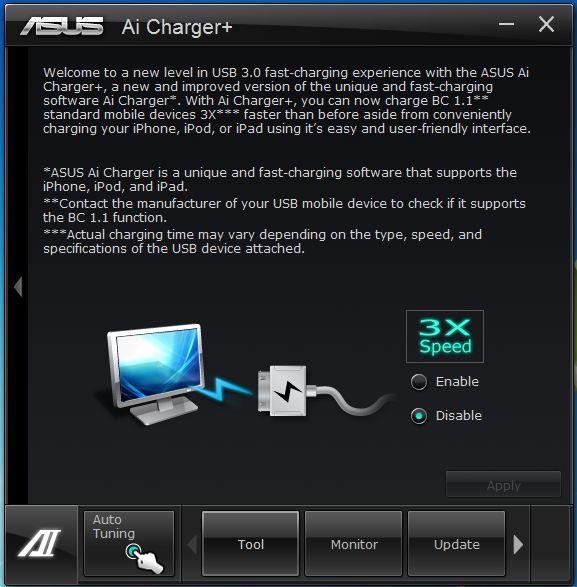
The ASUS Ai Charger+ is great in a world where many devices charge via a USB port. It allows charging via the USB 3.0 port at up to 3x faster than other motherboards will offer. This can be a great utility for those who regularly charge their phone, iPad, MP3 player, or other USB charged device.
Lastly is the USB 3.0 boost which was covered briefly before as it allows a speed boost to many USB 2.0 storage devices and even some supported USB 3.0 storage devices by changing the communication protocol being used.
A full list of supported protocols and presently supported devices can be found here
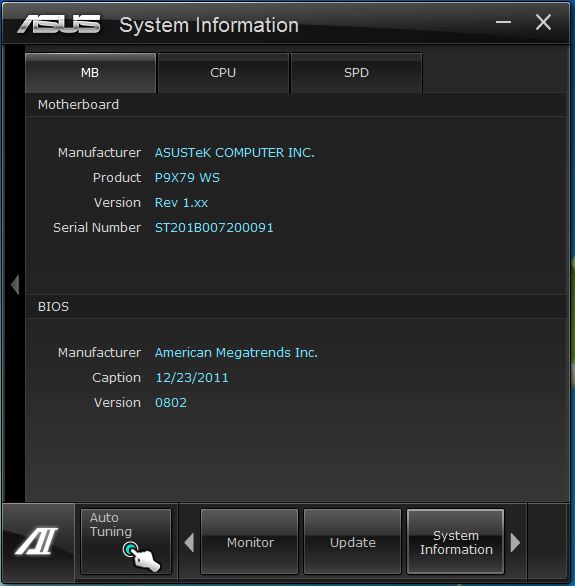
The first tab of the system information tool gives us Moitherboard info including Bios version and build date along with the board model and revision number, for those who may forget whats in the system but honestly we make ourselves pretty aware of whats in our system at all time but I guess when it comes to an integration of a hundred plus workstations we could definitely see where this info could be helpful.
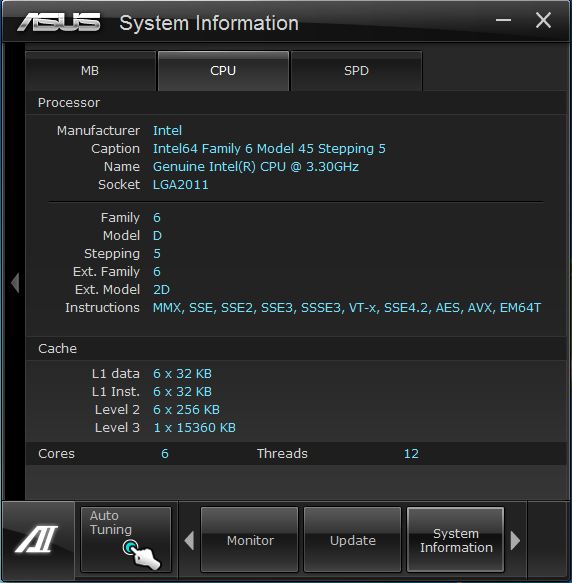
On the CPU tab we find a indepth breakdown of model information on the CPU which tells us we are running a now antiquated C0 ES CPU since those were the ones we have gotten our hands on so far and given this was in an actual workstation environment with the likelihood of virtualization being utilized in a workstation system we would recommend a new C2 CPU to anyone looking to deploy one of these.
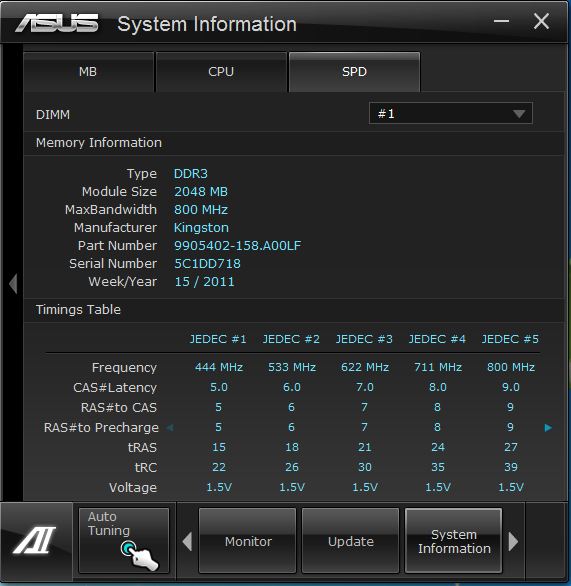
The SPD tab shows memory information for installed DIMMs and settings for the SPD and XMP profiles.
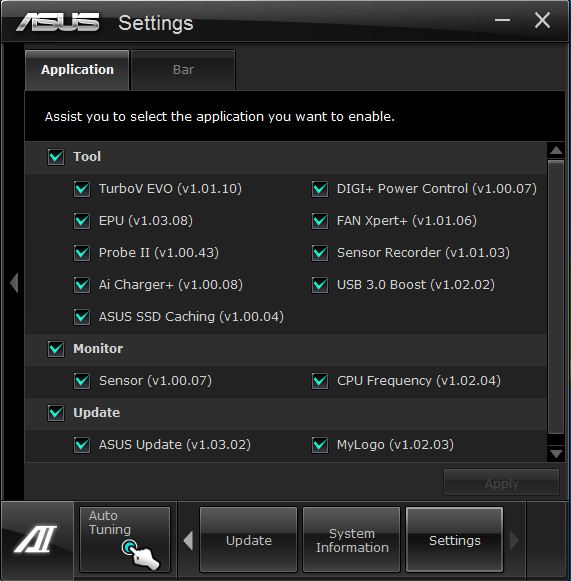
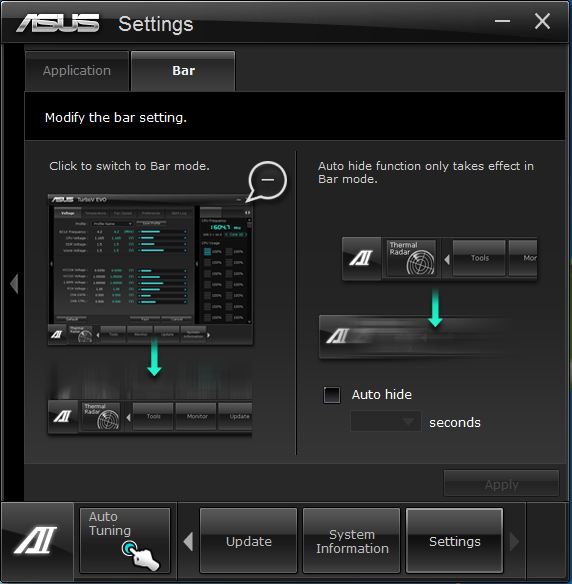
Lastly on the bill for the included software would be the settings which allows us to fine tune what our experience is like with the AISUITE II software and what options are shown or available to clean up areas that may otherwise just clutter the interface.
BIOS Overview


Click Image To Enlarge
Entering the AI Tweaker menu we see a BIOS that luckily for us is very familiar. The OC Tuner is great as when selected gave an instant boost to just shy of 4.3GHz; the OC Tuner also fine-tunes memory settings for a more stable overclock. There are many fine tuning settings such as the CPU clock Gen Filter which we see carried over from the ROG boards. There is a whole host of VRM controls, settings and tweaking options that make this board infinitely more capable.


Click Image To Enlarge
The memory frequency dividers when looking we find are adjustable from 800MHz all the way up to an insanely high 2666 MHz. Next we see the near-ridiculous amount of memory settings available to fine tune this system.


Click Image To Enlarge
The next option in the Ai Tweaker menu is the DIGI+ power control which allows for fine tuning of the CPU or DRAM power delivery. Once again the level of detail and adjustability is nothing short of extraordinary here and we are impressed by how tunable it is. The great thing about the DIGI+ system is that it allows the impressive overclocking ability with precise enough control to still allow power saving functions such as speedstep to function at over 4.8GHz. Also, the switching is so well maintained that all of those features still can work effectively.

Click Image To Enlarge
Here we see the CPU Performance settings which allows enabling and disabling of CPU performance and power saving settings which can definitely affect CPU overclock and overall performance, and therefore is a very useful tool as most of these settings can help greatly when disabled to reach maximum system performance at the cost of some power savings.


Click Image To Enlarge
Here we see the advanced settings, where we enable or disable board features and components. also some features can also be tweaked or setup to function as needed to better fit the application or usage type. These include settings such as PCI-E slot settings along with onboard components such as LAN, audio and 1394a functionality.


Click Image To Enlarge
Here we have the monitoring section and this is where we can view the system’s vital signs which can help tip us off to any abnormal conditions so they can be repaired before serious issues occur.

Click Image To Enlarge
Here we have the boot options which give us the boot priority options along with setup of how the system boots. This can help when booting from multiple different devices including possible external device booting.


Click Image To Enlarge
Here we have the separate tools which allows for easy flashing of the BIOS. The memory SPD menu allows us to view the memory SPD profiles directly within the BIOS, so we know if any of the memory modules are running abnormally. Also with this we find other cool tools such as the OC profiles which allow us to save profiles of settings so we can end a bench session and quickly with a few clicks and be back right where we left off with the same settings.


Click Image To Enlarge
This is what we see after using the OC Tuner option which gave us almost a 4.3GHz overclock with the click of a button. At the time of testing this BIOS option we have a single 1600 MHz stick which, when pushed, dropped down to a little over 1333MHz. With our 2133 kit we found the auto overclock tuned them in easily at well over 2000MHz without even a hiccup and all with the click of a button. Not bad for a server class and certified board.
Testing & Methodology

We’ve expanded our testing suite considerably since the X79 chipset release, and will continue to use the same methods for most of the motherboards and CPU’s we test. In the interests of thoroughness and accurate results, we run each test at least three times, and some tests more than that. We average the total of all the tests from each benchmark then report the average here.
The OS we use is Windows 7 Pro 64bit with all patches and updates applied. We also use the latest drivers available for the motherboard and any devices attached to the computer. We do not disable background tasks or tweak the OS or system in any way. We turn off drive indexing and daily defragging. We also turn off Prefetch and Superfetch. This is not an attempt to produce bigger benchmark numbers. Drive indexing and defragging can interfere with testing and produce confusing numbers. If a test were to be run while a drive was being indexed or defragged, and then the same test was later run when these processes were off, the two results would be contradictory and erroneous. As we cannot control when defragging and indexing occur precisely enough to guarantee that they won’t interfere with testing, we opt to disable the features entirely.
Prefetch tries to predict what users will load the next time they boot the machine by caching the relevant files and storing them for later use. We want to learn how the program runs without any of the files being cached, and we disable it so that each test run we do not have to clear pre-fetch to get accurate numbers. Lastly we disable Superfetch. Superfetch loads often-used programs into the memory. It is one of the reasons that Windows occupies so much memory. Vista fills the memory in an attempt to predict what users will load. Having one test run with files cached, and another test run with the files un-cached would result in inaccurate numbers. Again, since we can’t control its timings so precisely, it we turn it off. Because these four features can potentially interfere with benchmarking, and and are out of our control, we disable them. We do not disable anything else.
Test Rig
| Test Rig | |
| Case | Thermaltake Level 10 GT |
| CPU |
Intel Core i7-3960X |
| Motherboard | ASUS P9X79 WS |
| Ram | 16GB Gskill RipJaws Z 4x4GB (9-11-10-27) |
| CPU Cooler |
Swiftech H20-220 Edge |
| Hard Drive | Western Digital Velociraptor 300GB |
| SSD |
Intel 510 series SATA III 120GB |
| Optical | ASUS BD-ROM |
| GPU |
SLI 2x GTX 580 |
| Case Fans |
Front (intake): 200 x 200 x 20 mm ColorShift Fan x 1 (600~800RPM, 13~15dBA) Rear (exhaust): 140 x 140 x 25 mm Turbo Fan (1000PRM, 16 dBA) Top (exhaust): 200 x 200 x 30 mm ColorShift Fan (600~800RPM, 13~15dBA) Side (intake): 200 x 200 x 30 ColorShift Fan (600~800RPM), 13~15dBA) |
| Additional Cards |
N/A |
| PSU |
Thermaltake Toughpower Grand 1200W |
| Mouse | Thermaltake esports Black gaming mouse |
| Keyboard | Thermaltake Meka G1 mechanical gaming keyboard |
Test Suite
We will use the following applications to test the performance of the Motherboard. Benchmarks
| Benchmarks |
|---|
| PCMark 7 |
| Heaven benchmark 2.5 |
| Cinebench R10 |
| Cinebench R11.5 |
| 3DMark 11 |
| 3DMark Vantage |
| Wprime |
| SuperPi |
| Metro 2033 |
| Lost Planet 2 |
| SiSoft Sandra 2011b |
| HDTune Pro |
| X264HD |
| TrueCrypt 7.1 |
Overclocking

The WS board was quite a surprise, as we were able to achieve speeds just shy of 5GHz on a custom liquid cooling solution provided by Swiftech. The board ran at 5GHz but stability was rather hard to find for for a simple overclock we found that a 4.8-4.9GHz overclock is rather easy to obtain and it increases performance a lot, but in order to keep even scaling and comparability between our tested platforms, we keep our testing to a 4.6GHz clock which is still much higher than most people will need.
The feel when overclocking this board was rather pleasant as the bios has many tuning options which makes it a very easy platform to overclock as the ASUS BIOS has been very well refined to make overclocking a simplistic affair. That being said if someone was unsure or didn’t want to meddle around in the BIOS the OC Tuner option is always available and gives a very fast and stable almost 4.3GHz clock with only a click or two to get it there.
Important note: Overclocking can cause component failure. Please exercise caution when attempting any level of overclock on system components.
Temperatures

The temperatures were recorded with Realtemp while running Wprime 1024 right before the end of the 5th run. The results were recorded carefully. After the results were recorded, we waited for 30 minutes before taking Idle temperature measurements. The results were as follows:
| CPU Temperatures | Temperature (Idle/Load) |
| P9X79 WS OC (4.6GHz) | 32C/63C |
| P9X79 WS | 27C/55C |
| Chipset Temperatures | Temperature (Idle/Load) |
| P9X79 WS OC (4.6GHz) | 36C/44C |
| P9X79 WS | 30C/40C |
Thanks to Swiftech for the LGA2011 mounting to allow us to use the H20-220 Edge kit for this testing.
Power Consumption

The power consumption was tested while running Wprime 1024 for a few minutes at stock settings. The results were recorded carefully with a Kill-A-Watt power consumption measuring tool at the wall. After the results were recorded, we waited for yet another few minutes minutes before taking Idle power consumption measurements.
| Configuration | Power Consumption (Idle/Load) |
| P9X79 WS (4.6GHz) | 211W/452W |
| P9X79 WS | 163W/361W |
The power consumption is not with GPU usage. This is with CPU/system loading but nothing graphically intensive in order to provide the most accurate results by not ramping up the GPU, which will pull significantly more power.
Wprime
Wprime is a processor heavy multithreaded benchmark at which it crunches numbers of a specific data set and gives the end user an output time which can then be used as a gauge to compare system performance.
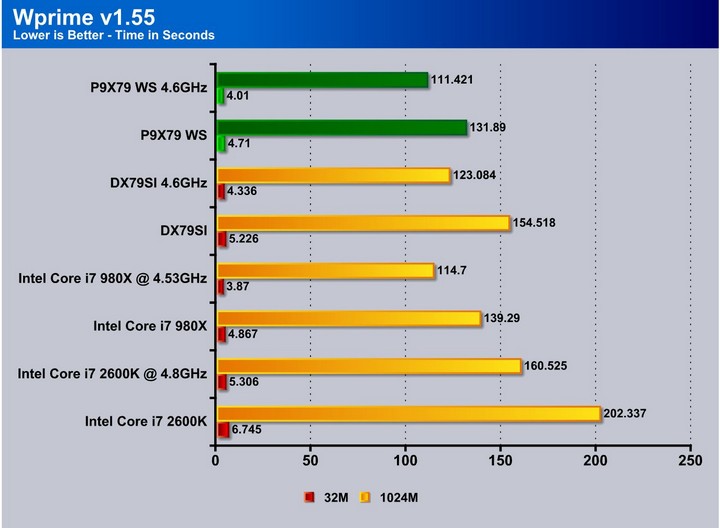
We see a trend here where all of the boards we test on the LGA2011 platform are very close in performance.
Superpi
SuperPi is a single threaded benchmark which measures efficiency and is heavily influenced by architectural changes as much as it is by clockspeeds.

SuperPi is a much older benchmark, and some may argue its obsolescence, but with some newer processors scoring poorly in this test, it is always good to include it. Once again the boards are very strong and very efficient and it exhibit themselves once again with some amazing speed and performance.
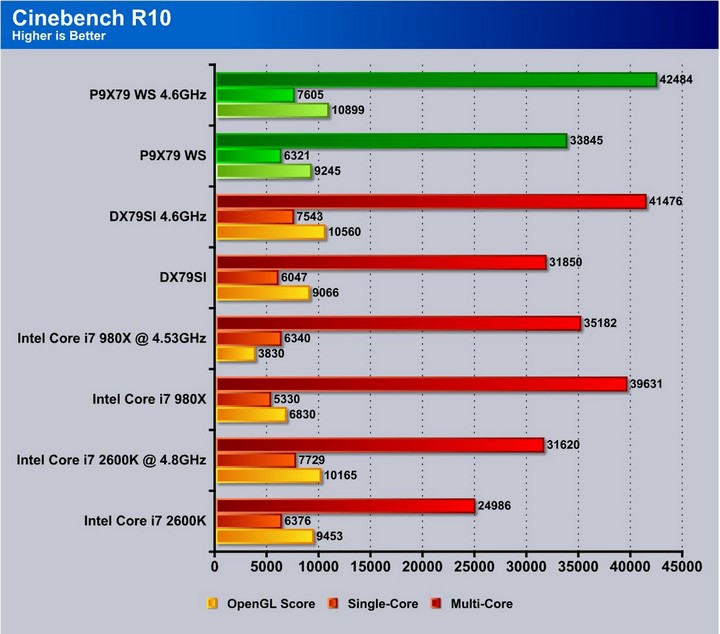
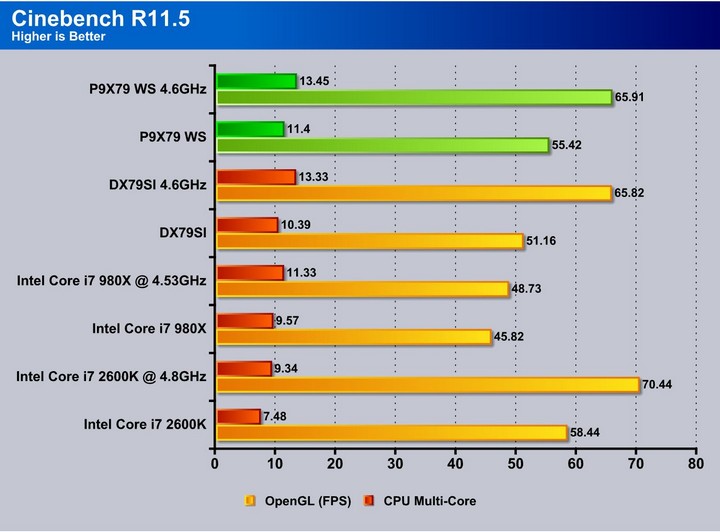
Cinebench R10 and R11.5

“CINEBENCH is a real-world test suite that assesses your computer’s performance capabilities. MAXON CINEBENCH is based on MAXON’s award-winning animation software, CINEMA 4D, which is used extensively by studios and production houses worldwide for 3D content creation. MAXON software has been used in blockbuster movies such as Spider-Man, Star Wars, The Chronicles of Narnia and many more. MAXON CINEBENCH runs several tests on your computer to measure the performance of the main processor and the graphics card under real world circumstances. The benchmark application makes use of up to 16 CPUs or CPU cores and is available for Windows (32-bit and 64-Bit) and Macintosh (PPC and Intel-based). The resulting values among different operating systems are 100% comparable and therefore very useful with regard to purchasing decision-making. It can also be used as a marketing tool for hardware vendors or simply to compare hardware among colleagues or friends.”
SiSoft sandra 2011

“SiSoftware Sandra (the System Analyzer, Diagnostic and Reporting Assistant) is an information & diagnostic utility. It should provide most of the information (including undocumented) you need to know about your hardware, software and other devices whether hardware or software. It works along the lines of other Windows utilities, however it tries to go beyond them and show you more of what’s really going on. Giving the user the ability to draw comparisons at both a high and low-level. You can get information about the CPU, chipset, video adapter, ports, printers, sound card, memory, network, Windows internals, AGP, PCI, PCI-X, PCIe (PCI Express), database, USB, USB2, 1394/Firewire, etc.”
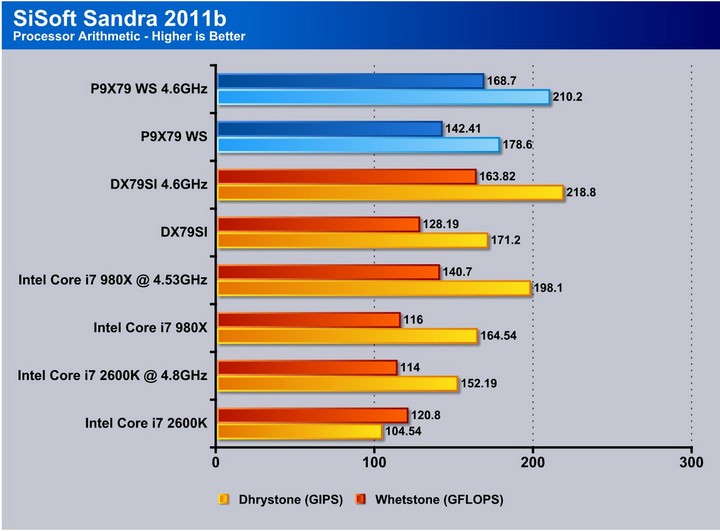
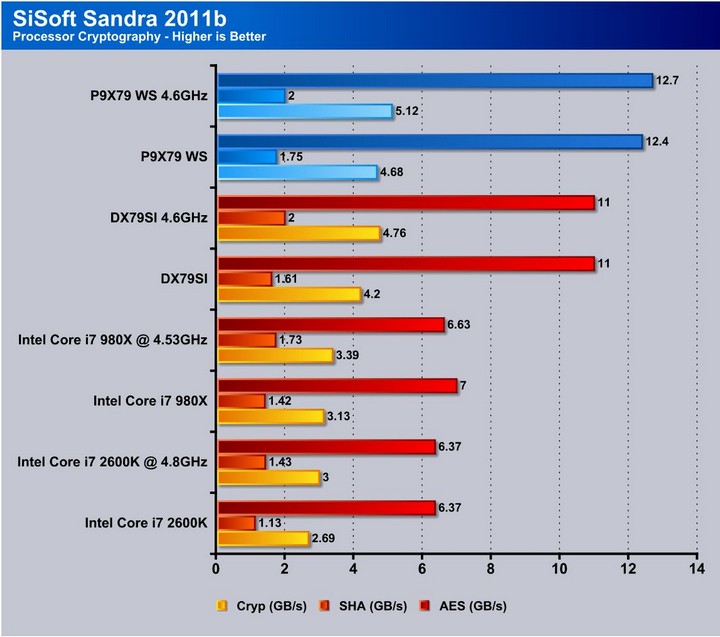
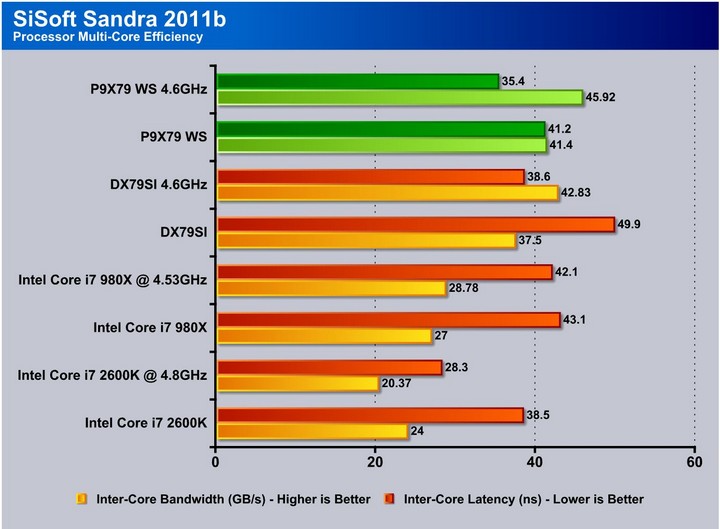
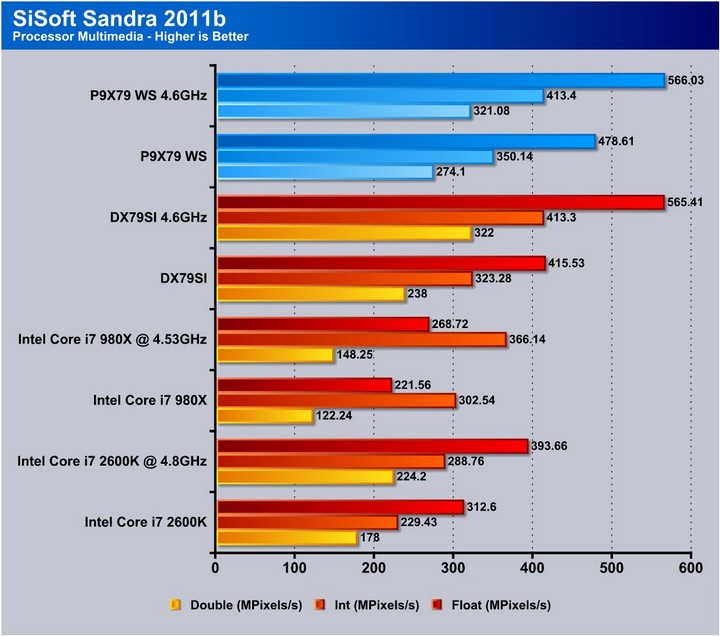
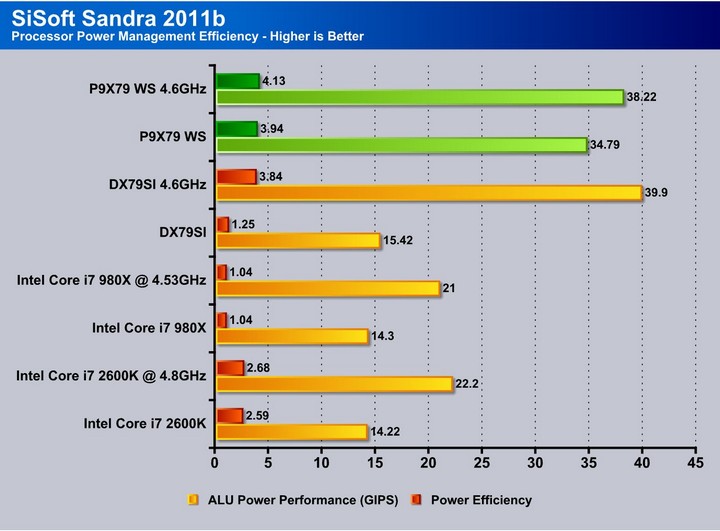
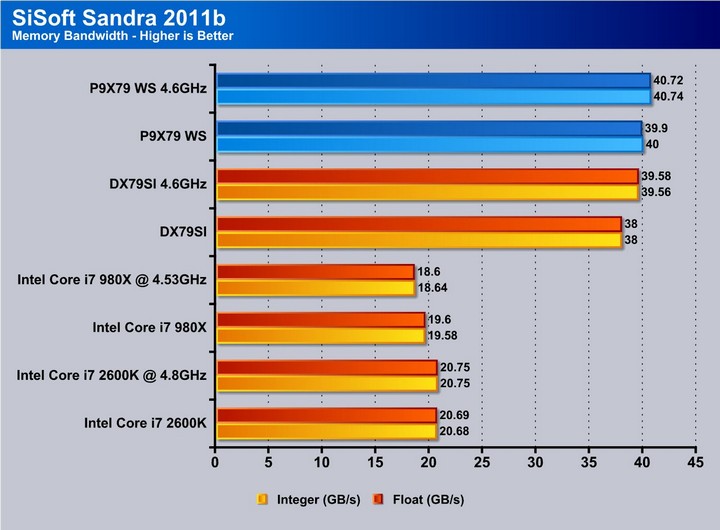
SiSoft Sandra is a synthetic benchmark which can be quite a good representation of real world performance. As we see here the X79 platform performs amazingly and overclocking increases the performance even further.
PCmark 7

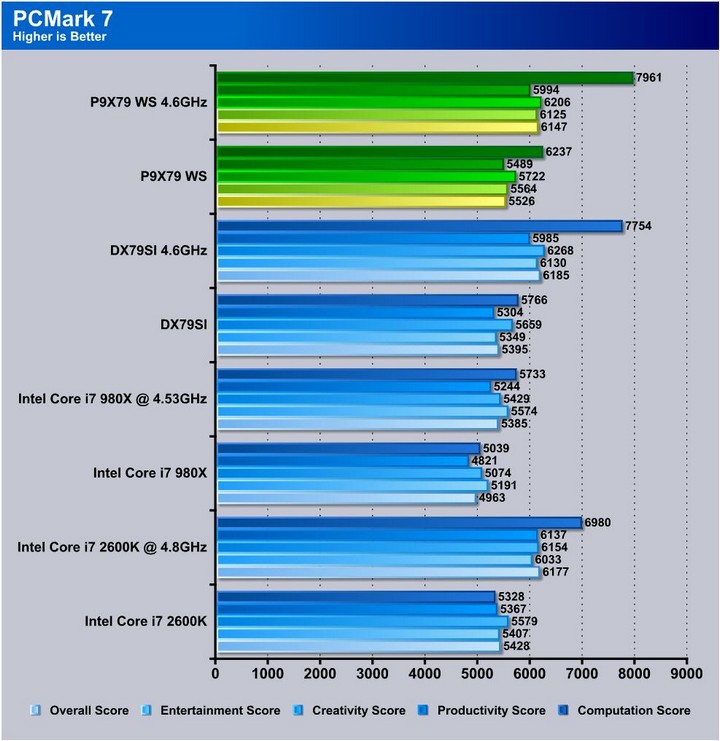
When looking at the PCMark 7 benchmark this is a complete system benchmark testing multiple facets of what a computer does every day. When reviewing each score we see that the performance as we have seen in many benchmarks is very impressive. However being a multifaceted benchmark, there are some areas we notice where there is similar performance or very little improvement. This is most likely because the bottleneck in those tests is likely in different areas not affected by clockspeeds of the system.
X264HD
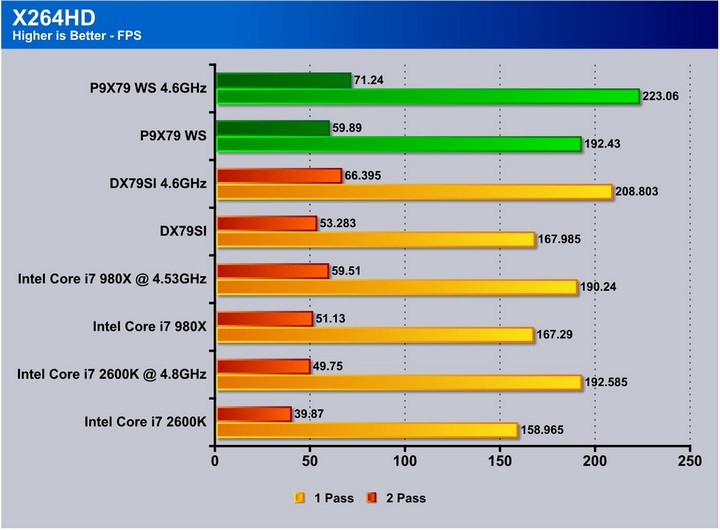
The X264HD benchmark tests the encoding capabilities of the CPU to encode a short HD video clip. the 3960X is very strong performing this task and when overclocking it only gets better.
Truecrypt 7.1
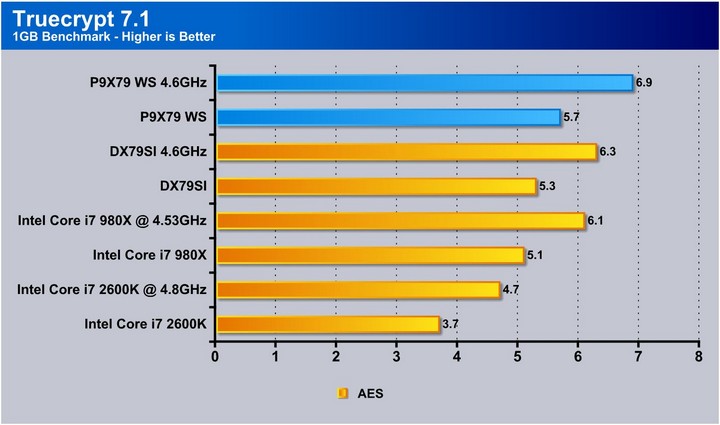
The Truecrypt benchmark shows similar to the Sandra 2011 encryption tests that the 3960X pulls ahead of the pack when punching through encryption tasks. Once again this platform only gets better when overclocked. The WS even beats out Intel’s own offering with some efficiency improvements.
HDTune pro
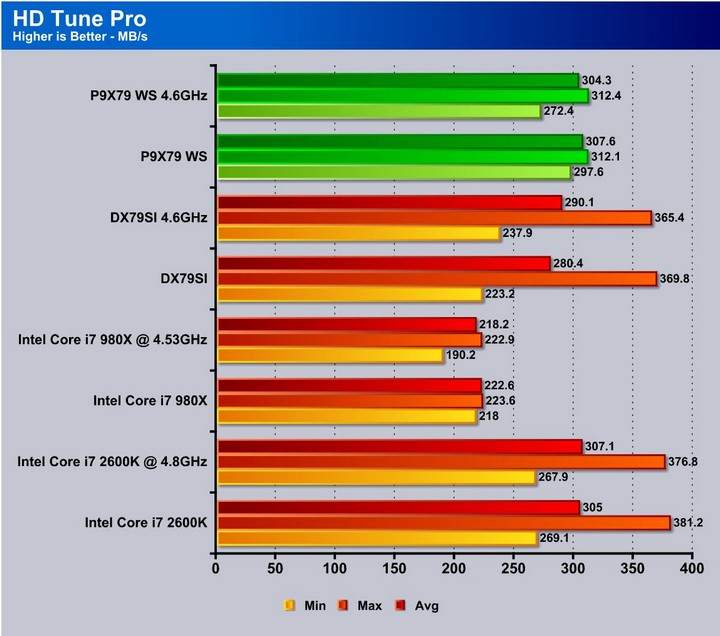
The HDTune tests were unfortunately a little skewed as the SSD used to test on the Intel board was not available at the time of testing for our test rigs due to failure so the Intel 510 series was substituted.
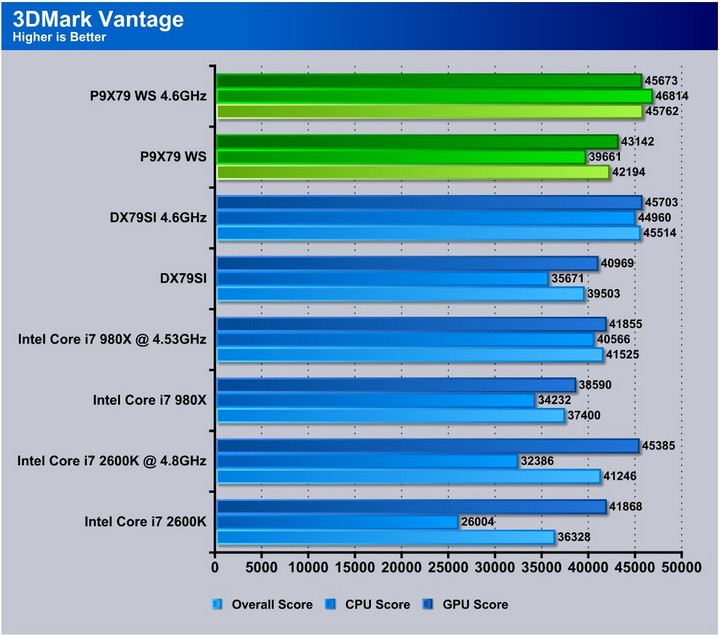
3DMARK VANTAGE

For complete information on 3DMark Vantage Please follow this Link:
www.futuremark.com/benchmarks/3dmarkvantage/features/
The newest video benchmark from the gang at Futuremark. This utility is still a synthetic benchmark, but one that more closely reflects real world gaming performance. While it is not a perfect replacement for actual game benchmarks, it has its uses. We tested our cards at the ‘Performance’ setting.
3DMARK 11
![]()
3DMark 11 is the newest in futuremark’s suite of benchmarking utilities. Its a fully capable DirectX11 benchmark which also stresses and analyzes the system performance as a whole to simulate a heavy rendering environment such as a high end game or other app the end user may run. This benchmark was run with Performance settings 5 times and all runs were averaged for the result below.
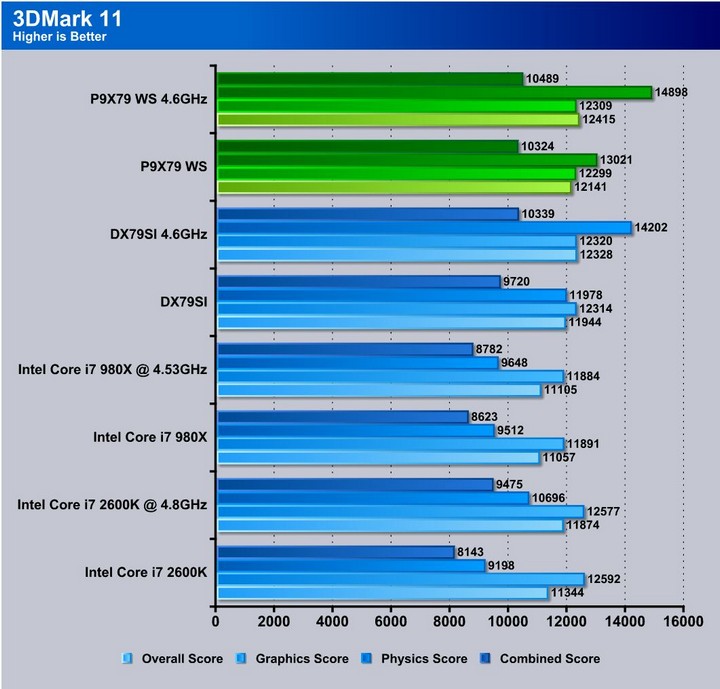
3DMark Vantage and 3DMark 11 shows an increase in the CPU performance, but the graphics scores are fairly similar. The graphics card is the bottleneck here.
Unigine Heaven 2.5

Unigine Heaven is a benchmark program based on Unigine Corp’s latest engine, Unigine. The engine features DirectX 11, Hardware tessellation, DirectCompute, and Shader Model 5.0. All of these new technologies combined with the ability to run each card through the same exact test means this benchmark should be in our arsenal for a long time.

Unigine Heaven 2.5 definitely can see the increase in performance as performance scales with the frequency increases. As we have seen on pretty much every test, improvements continue as the WS board easily beats out the Intel offering which shows off some great tuning skills pulled off by the ASUS engineering team.
Metro 2033
![]()

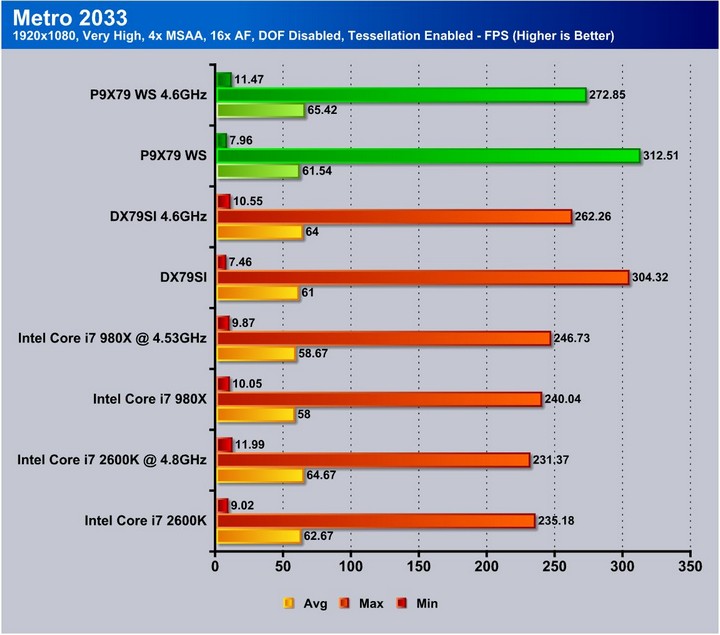
Metro 2033 is a very demanding game for graphics. We were very surprised to see this game rely more on clock frequency than overall core efficiency but the Sandy Bridge and Sandy Bridge-E models have similar efficiency, but in the case of the 3960X we find that even with similar efficiency the SB-E just simply has enough raw power to pull well ahead in Metro 2033 gameplay.
Lost Planet 2

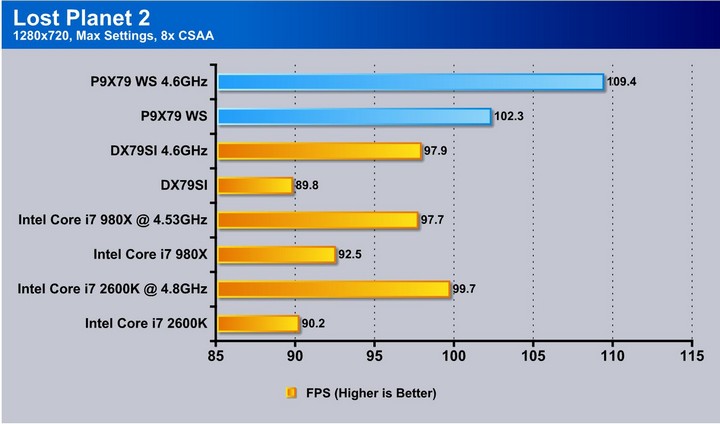
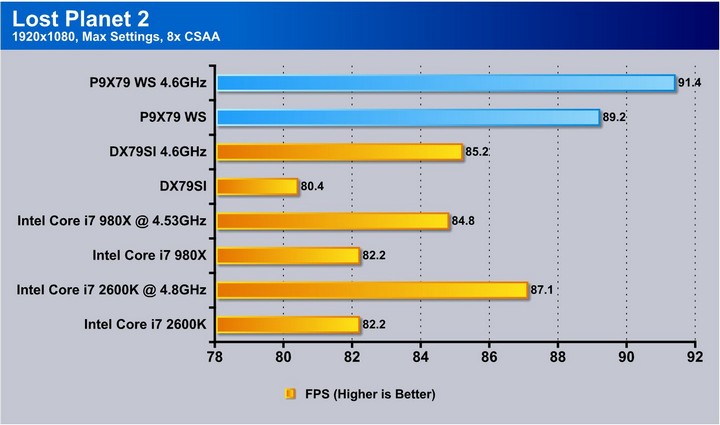
Lost Planet 2 shows a similar picture of the current situation: many games just are not threaded heavily enough to see advantages of the added cores that the Sandy Bridge-E chips have available. However, since there are far more PCI-E lanes available in Sandy Bridge-E, it can outperform the 2600K in the right conditions.
CONCLUSION
When reviewing the WS board we really had to put ourselves in the perspective of what kind of user ASUS has in mind here, and with the major amounts of work computers do these days, there is a very large market for it. One area we do not think is aware of this board would be some of the users we see now days who do rendering from their home and also like to smash on the newest games out there. With its stability, compatibility, and its ability to overclock with some of the best out there, this board could be a viable option for anyone looking for a high-performance board with server level features.
All is very good with this board but there were some things we saw which we feel could be improved on, such as the omission of eSATA natively on the back panel. While it does include an eSATA bracket, we also know that there could be even a single eSATA port on the rear panel since many of the rear slots could easily be filled with multiple compute cards or graphics processors. We do understand that there are some sacrifices that must be made especially when talking about adding yet another controller plus to ensure server level stability and compatibility..
Also, onboard WiFi and/or Bluetooth is something we would like to see, but we know the dual Intel network controllers are more ideal than onboard WiFi.
We really tried to see what we could come up with that we would find ourselves wanting with this board but they just flat out run and they run well. We also found some more performance when overclocking which makes this board just that much better. This board has most of the capability of the ROG counterparts, albeit with a little more complicated tuning.
| OUR VERDICT: ASUS P9X79 WS Motherboard | ||||||||||||||||||
|
||||||||||||||||||
| Summary: The ASUS P9X79 WS is a server class offering with extreme gamer performance capability. For great performance, and its litany of excellent features, it earnst the Bjorn3D Golden Bear Award. |


I didn’t consider overclocking when purchasing my power supply. I’m returning the one I bought and I’m stepping up to a 1050W. Thanks.