Asus has splashed many offerings into the Z77 playing field and today we are looking at the P8Z77-V Deluxe, with a high feature count and performance.
Introduction – Asus P8Z77-V Deluxe
 Z77 officially launched a few weeks ago but we delayed reporting on these boards until we could use them as they were intended with the new Ivy Bridge CPU. Yes some tested the new Z77 boards with a 2500K or 2600K, but in reality we know that through testing we found that the performance improvement with the Sandy Bridge chip in a Z77 board was negligible at best. So to be honest we just focused harder on how the new board and CPU performs as package, since anyone who has an existing Z68/CPU combo will have little reason to jump ship to a Z77. With that we now have the launch of the Ivy Bridge 1155 CPU and therefore can start benching away and showing off to you guys the new boards we have rolling into the lab over here. ASUS has always been very generous and very helpful in making sure we have every tool necessary to show off all of the capabilities of their boards, even as far as having one on one contact with their team to ensure we fully understand anything new and their focused goal for that feature.
From that point we are looking at today the top end of the mainstream market or channel market boards which is the P8Z77-V Deluxe, the highest model as of this writing for the ASUS channel series of boards and with that one of the highest featured as well. From previous experience we can definitely say that the lines separating the model boards in terms of performance have become fuzzy as ASUS has figured out a formula at which even the most basic mainstream model can overclock and perform with efficiency very close to if not on par with its big brother and more highly featured counterparts. With that in mind the boards really come down to a features race and thats what differentiates the Asus brand as they have many models so many that there is almost guaranteed to be a model that will fit pretty much exactly the application your looking for.
The Deluxe on the Z77 line has a whole bucket of features such as:
- Smart DIGI + power control
- USB 3.0 boost with blazing fast UASP support
- Lucid Virtu MVP
- Asus SSD Caching
- Wi-Fi GO
- Bluetooth
The list goes on and on, but those are just a small summary of some of the key features that make this board great. Since it’s an ASUS board we know it should overclock, but the board also has many of the listed features and many more non listed which we will explore further in the following overview.
In this review we are doing things a bit differently as performance for recent platforms have been very close to one another and they have really become a feature race of sorts as to whose board offers the most value added components. So with that we will take a dive into the Deluxe and what it is that makes this board shine above the rest and worth the current newegg price of $274.99
APS (ASUS Premium Service)

ASUS Previously offered the APS service on ROG boards, but starting with the X79 series they have extended the service to cover much more of their full board models in the standard channel line. This is nice to see as the APS service allows an advanced replacement or a board to be shipped to the user which in turn means less down time for the end user. More on this service can be seen on the ASUS website HERE
Wi-Fi GO!

ASUS offers the Wi-Fi GO feature as a very interesting feature which I could see being widely underused and mis understood as mist will simply not understand the technology or the capabilities of the implementation. Just some of the usages are as follows:
- Wi-Fi hotspot – This allows for the unit to be used as a router or access point sort of device for other Wi-Fi capable devices.
- DLNA media server function – This allows for media streaming to your household network for effortless media playback.
- Remote desktop – Users can take control of the desktop remotely via a tablet or smartphone.
- File Transfer – easy and convenioent file transfers wirelessly from a mobile device through your network.
This is just some of the ways the onboard Wi-Fi GO feature can be used but im sure that users will discover many ways to utilize it although most will likely just use it for wireless network access. But just be aware there are many capabilities to this system if you are willing to explore them.
BIOS Flashback
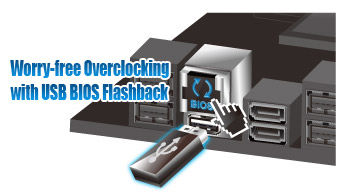
ASUS offers the BIOS Flashback utility which is actually a multi-facet tool and has many capabilities which some may not be aware of. we have had many times where a motherboard did not support a CPU and a frantic search for a supported CPU just to flash the BIOS (ex. Gulftown CPU support on X58). ASUS has eliminated the worry of these kinds of issues by allowing the BIOS flashback procedure which does not require a CPU or memory to flash the BIOS. All that is needed in order to flash the BIOS is to have the desired firmware ROM file on a USB thumb drive and insert that into the BIOS Flashback USB port.
then depressing the BIOS Flashback button for 5 seconds will start a flashing LED which indicates the firmware is being updated and once the update is complete the flashing will stop. It really is that easy and ensures no matter the condition the firmware can be flashed even if the newest CPU is not supported without the previously mentioned hunt for a compatible CPU.
This may seem like an odd feature but many may buy the newest and greatest CPU on the market while the board could have been shipped with the older firmware which in most cases would leave the user stuck without an option. As for our usage we have found this useful in quite a few experiences where running a LN2 cooled system not necessarily in the most stable conditions and a BIOS had gotten corrupt, but with the BIOS flashback it was remedied as quickly as we could copy the Rom file from our laptop to the flash drive and get it flashing.
USB 3.0 Boost

Turbo USB is a new feature we have seen from ASUS as of recent and it allows for a speed increase from older USB 2.0 thumb drives or storage devices when the Turbo mode is enabled on that device through the ASUS AISUITE II software.
One thing that not many have publicized is the fact that this boost also supports a protocol names UASP which supports a much higher transmission rate via the Asmedia controller. Asus included with the motherbard a Thermaltake BlacX 5G USB 3,0 capable external docking station along with a Corsair Force GT SSD to allow for testing of this feature. we went ahead and tested multiple different drives and combinations to see how the functions actually plays out in real world scenarios.


Keep in mind that this is not just for external docks as any USB storage device can possibly be sped up via the USB 3.0 boost even USB2.0 thumb drives may grab a small advantage from being plugged into the USB3.0 port and having the boost enabled.
For more information please see the ASUS USB 3.0 Boost landing page here
ASUS SSD Caching
![]()
Asus offers its SSD caching via the included SATA 6G capable chipset. This is the same SSD caching we have covered before which allows for caching to any size SSD drive you can stuff into the system. We found this rather interesting as the Z77 chipset supports caching in ad of itself via the Intel smart response technology and yet this controller allows the ASUS caching as well. We spoke to Asus to get some insight into this and they simply answered that they wanted to offer the maximum flexibility to the user so that they can run any configuration they desire. Lets say you want to run a smart response cached system for your OS and you want a cached 2TB storage array you can do that with the Asus inclusion on this board as it offers the ability to enable both without issues.
I could see soem cool configurations of my own with this configuration but then again after using the Asus SSD caching in comparison to the Intel which limits you to 64GB of SSD caching drive, I really feel that I would rather just stick to ASUS SSD caching for the system as it works better for me as I currently use this setup with a large (240GB) Caching drive. But the simple fact is Asus is giving you options which at the end of the day is what its all about, giving you as much flexibility as possible to build the system the way you want it.
Lucidlogix Virtu MVP

Asus like all other manufacturers offers the Lucidlogix Virtu MVP support for their Z77 line which is a very interesting improvement over the previous lucid virtu we had used before. This version of Virtu MVP does all of the same functions that the original could do but is better optimized, and now adds some new 3D enhancement features to the mix that make for a very interesting possible implementation. Virtu MVP offers HyperPerformance which allows for rendering to be offloaded to the iGPU and in turn allows the discreet GPU to do the grunt work it was designed for while the iGPU does the light frame renders to ensure better fps as the frames are pre rendered in place and any duplicate frame is not rendered by the discreet GPU and is dropped by the discreet GPU to keep the discreet GPU processing only frames which are new or different than the previous.
Also included in the MVP package is Virtual Vsync which allows for the tear free quality of vsync display without being limited to the display refresh rate which ultimately will allow for smoother performance and playback. This is accomplished by the same methods as mentioned above by pre rendered frames and dropping partial rendered frames before they get to the discreet GPU to avoid from partial redraws which will cause the undesired tearing affect we have seen before.
Further in this review we will do some game testing to find what exactly we get from Virtu and if the performance is worth the hype.
Fan Xpert 2
Asus has always had Fan Xpert technology as part of its AISuite utility chest but its always been used for manual adjustments and profiling of the system fans.

The Fan Xpert 2 now comes with a automatic profiling system which we will attempt to demonstrate in the following.
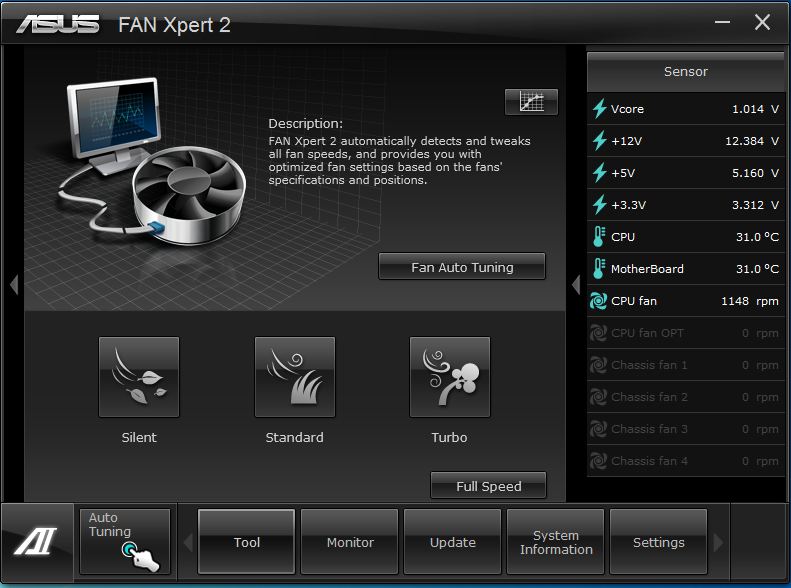
Here is the main screen where you can select between custom fan profiles such as Silent which spins down all fans except the cpu cooling fan. then standard whish is standard throttled fans depending upon temperatures, and lastly we have the Turbo mode which throttles every fan up for maximum cooling when needed.
Pressing the “Fan Auto Tuning” button will start the motherboards intelligent learing process which we see below.
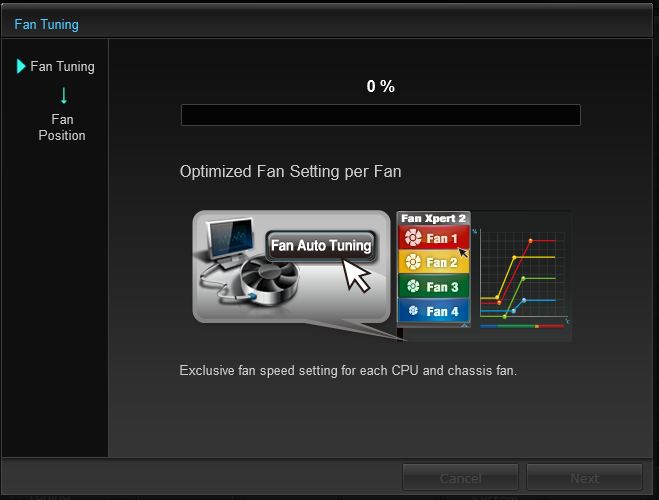
Here we see as the fans are proceeding through the automatic tune process. The fans are ramped to maximum then gradually ramped down to stopping at which point the motherboard knows where the stop and start point for every fan connected to the motherboard would be and this helps the motherboard better tune the system for an optimum airflow/noise ratio.

After the analysis is complete the fan Xpert screen moves to the next and final step which is where you select where each detected fan is on the chassis. if you are not sure you can always click the “Search” button to the right and the system will spin all fans down and it will spin the selected fan only up to maximum speed so that you can identify its position and even name it. This as well will help with the cooling setup and how the system throttles each fan independently.
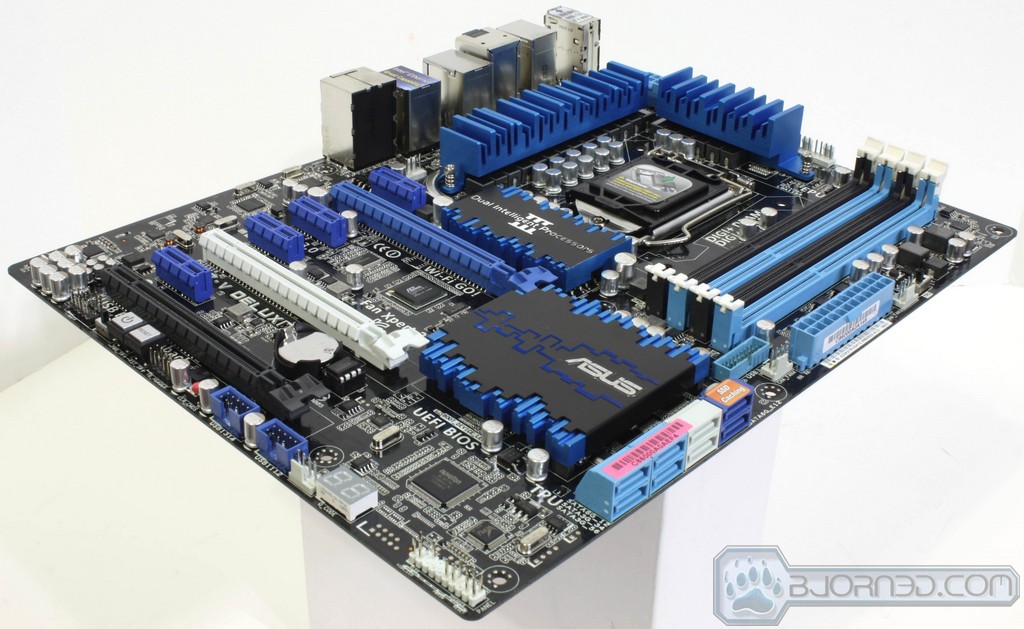
Overview of the ASUS P8z77-v deluxe


The packaging is pretty standard fare from what we have seen on ASUS products. On the flip out we have many relevant specs along with a view window for the board although the board was obscured from view quite a bit because of the opaque anti static bag it was held in. We are hoping that either the board will be in clearer sight in retail units otherwise ASUS would be better served to just have a solid flip out box with more data and no window as viewing the board with an anti static bag in place really does nothing for the user. The rear of the box covers a lot of the relevant data along with a board overview go give users a preview of some of the cool features and other specs they can expect from the board.


- IO Shield
- SATA cables
- CrossFire Bridge
- 2 Way SLI Bridge
- Users Manual
- Driver/software disc
- Wi-Fi GO! Antennae
- Wi-Fi GO! module
- Easy connect front panel connectors
The accessory package is simple and designed to do the job with not a lot of extra fluff that may increase cost to the end user. The Wi-Fi go module is a pretty cool option as it allows the system to be placed anywhere convenient without the need to run a possibly lengthy network cable. Add to this the ability to use the Wi-Fi GO as a router or access point along with its many other features and this board becomes a multi function unit.


- 4x USB 2.0
- 2x eSATA
- 6x USB3.0
- HDMI
- Displayport
- Dual Intel Gigabit LAN
- Bios Flashback Button
- 8 Channel audio with Optical S/PDIF port
The rear panel USB 3.0 consists of 2x from the native Intel PCH while 4 are provided via the ASMedia chipset. The other 2 USB 3.0 ports provided by the PCH are routed through the front panel 20 pin header for a total of 8 available super speed USB 3..0 ports which with the number of devices constantly growing this is definitely a welcome addition. One thing to note is that the ASMedia ports presently support both Turbo and UASP for supported devices whereas the Intel ports support only turbo mode for the USB 3.0 Boost function. We have discussed this with ASUS and they have reassured that the Intel native ports will have support for UASP in windows 8 natively so be mindful if looking for UASP support now in windows 7 use any UASP device in the ASMedia ports for full performance. Also notice above this was the primary device used for testing the UASP function it is the Thermaltake BlacX 5G external docking station. This docking unit has the exact specs and requirements needed to match and enable UASP, we expect many devices to show up as the UASP function becomes more commonly noticed and realized for its potential. and with UASP mode enabled the dock can take an SSD just about to its limit and even more with UASP mode we have seen speeds that can rival or even best Thunderbolt!


Software Overview

ASUS has a very familiar layout for its software so no surprise here until we run into the actual menus themselves. lets take a look and see what new gadgets we can play with in the AISuite software package.


First up is the menu bar as we have seen before, and upon opening we find a very similar list layout like we are used to seeing. entering the Turbo V Evo we see similar adjustments as we are used to including the CPU level up tab which allows an automatic overclock in a single click. Otherwise if opting for manual overclocking adjustments then voltage and frequencies can be easily adjusted all within this menu allowing a full range control similar to what can be adjusted in the BIOS itself.


When entering the DIGI+ Power control it now consists of 3 different sections which can be shuffled between.
- Smart Digi+ Setting
- CPU Digi+ Settings
- DRAM Digi+ Settings
The Smart DIGI+ settings are quite cool as it allows for advanced quick single click overclocks within the single menu. there is also another very interesting setting we ran into which deserves mention. For those looking for the ultimate in low power computing there is the Smart CPU Power Level which when enabled there are 2 options 45W and 35W. These settings allow limiting the CPU to these preset wattage settings for power savings and it will be throttled as such. this is especially great in business type environments where full CPU performance is never utilized as this can cut power consumption and wasted energy by quite alot.
CPU Digi+ settings allow full control over the CPU Digi+ Digital VRM components and the parameters at which they operate.
DRAM Digi+ settings allow for similar adjustment of the Digital VRM controls for the DRAM power circuits.


The EPU utility allows for custom tuning of the system to best match the usage model and even graphs out the present setting into whether it is more tuned toward performance and speed, or whether it is tuned toward power savings and tranquility.
A new section on these boards we come across as well is a new fan profiling software labeled “Fan Xpert 2” and this really is the next step in the way an automatic fan control interfaces with the desires of the user. The whole approach starts with a custom tuning via the board going through a learning process where all fans are throttled to max then moving downward until it learns the stopping point for each fan as well. after the board learns these limits it can profile a fan curve automatically to best suit noiseless operation at low load and ramp up properly to cool as needed under load.
After the fans are learned you are taken to another screen which allows us to tell the software where each fan is located, and in case you are not sure which fan is on which corresponding port you can easily just click the “Search” button which will throttle down all other fans while throttling up the single fan you selected, then at that point you can tell the software where it is located in the chassis which will help with profiling the cooling performance. Lastly you can even name the fan whatever you like for instance if a fan is on a radiator you can name it “Radiator fan front” or whatever fits what you need. then after naming the fans and getting it finalized the software takes you back to the Fan Xpert 2 screen where you can even set the fans to a specific mode for that time such as silent which throttles every fan down with the exception of the CPU cooling fans and even those are at lowest setting possible that can still adequately cool your chip. Or there is standard mode which runs the standard profile it built from the previous learning experience, and lastly we have Turbo which ramps every fan up for when maximum cooling is needed.


The Probe II software is very similar to what we have seen before which is simply allowing monitoring of temperatures, voltages and fan speeds all to keep a good eye on the system performance. Also here we can set alarms for specific areas we want to keep an eye on such as if a fan drops in speed below an amount we specify.


The sensor recorder function is cool because if you hear a fan ramping up during gaming or something seems to be getting to hot you can always engage the sensor recorder to monitor and graph the fan speeds, voltages or temps recorded while in game so you can better diagnose possible issues before they become bigger ones.
AI Charger + allows for charging of high draw devices at a much higher rate than before. This allows for charging of BC1.1 mobile devices much more quickly although for that function you would need to confirm that the device you are charging actually supports the BC1.1 function.


USB Charger + is a general fast charging option via a USB charger + port designated by a green outline on the IO Shield which indicates the port utilized for this faster charge power delivery. Fast charging function can even be enabled for power down modes such as sleep, hibernate or shutdown modes.
USB 3.0 Boost we touched on earlier and we are rather impressed as to the level of performance we were able to achieve from USB 3.0 devices. Just for testing we even tested a USB 2.0 Patriot Memory thumb drive and we were surprised to see that on USB 2.0 we saw the following results.
- USB 2.0 port: 29MB/s Read – 18MB/s Write
- USB 3.0 Port (Normal Mode): 32MB/s Read – 21MB/s Write
- USB 3.0 Port (Turbo Mode): 36MB/s Read – 24MB/s Write
This in and of itself is cool as the read speed jumped by up to 8MB/s which breathes a whole new life into the old thumb drives you may have sitting in your desk drawer. That may seem like a small jump but remember that is a free performance boost by just a press of a button and the performance boost is far more dramatic on USB 3.0 spec devices.


Network I control software is a nice feature as it allows active control and management of the way your network bandwidth is allocated to ensure whether streaming a movie or gaming the packet priority is always in the right configuration as you are in the drivers seat so you tell it what is important to you.
The system can have different profiles to best match your usage model which enables downloads to be performed at the same time as online gaming without the issues normally seen such as increased latency or jumpiness caused by uncontrolled packets and no prioritizing of which should take priority.

The Asus SSD Caching we have covered multiple times at this point but it bears repeating as it really is an excellent feature. The Asus SSD caching allows for caching of any drive with a high speed SSD to cache commonly used data to the high speed SSD for SSD like performance with the capacity of a much less expensive standard platter drive.
This technology is very similar to the Intel smart response technology except it is much better since it allows a single click implementation and also one of the major benefits is that the Asus solution has no limit to the caching drive size whereas the Intel solution has a strict 64GB limit to the caching drive capacity.


The system info screens show data about the present system configuration such as CPU info, motherboard and even installed Memory SPD/XMP profiles read from the DIMMS.
BIOS Overview


Click Image To Enlarge
The Ai Tweaker sections is quite similar to what we have seen just recent on the X79 reviews. It has all of the basic clock settings and tweaks well laid out and easy to find for the mot part either in the main page or in a sub-menu. there are many sub menus to control things such as Dram performance tuning, DIGI + Control and tweaking and even CPU power management settings to help fine tune the way the board responds and performs. Moving downward we find the voltage settings which are rather extensive but more importantly they are rather well described in some cases which help understand some of the function and the effect they have on the performance you may achieve.


Click Image To Enlarge
Here we have the advanced screens mentioned previously. The Dram settings are more than adequate for standard tuning and will likely be downright confusing pending the level of user. I would suggest leaving most of the advanced options on defaults as setting them incorrectly can cause a no post condition and unless knowing how to set them correctly the performance can actually be made much worse, especially since the auto values are actually quite good. The DIGI + controls allow for setting the amount of current and thresholds for the VRM components performance. These settings will allow for much more overclocking headroom at the expense of higher power usage and hotter VRM components as this will lower the amount of power saving features used since the extreme settings are designed for the maximum loading and extreme benchmarking setups which of course means that power savings comes secondary as priority is maximum power delivery and stability under excessive load.The CPU performance settings allow for disabling of power saving features and other CPU settings to allow either ultra stable high power benchmarking or power saving and stable regular 24/7 performance.


Click Image To Enlarge
The Advanced Tab covers many of the integrated components on the board along with the options to enable or disable specific features or functions of the board to better fit your usage model and possibly even reduce resource usage by eliminating features or components you do not plan on utilizing. Also control over SATA ports and their function can be found as well. Moving to the monitoring area we find a plethora of monitor able fields which help us get the low down on the operation of our system and find possible warning signs of an issue before it becomes a bigger problem.


Click Image To Enlarge
Here we have the monitoring/fan speed settings which allows for specialized “smart” fan settings to modulate the fans as needed. one of the last pages to round out the BIOS we have the boot screen which gives us setup of the boot devices and how the board performs during the post process.


Click Image To Enlarge
Lastly we have some of the key BIOS level tools including the Asus SPD information which in the BIOS level will show the SPD readout directly from the DIMM that is installed. Also another nice utility is a flashing utility which can view installed drives or thumb drives to actively flash the BIOS from within the menu itself.
Testing & Methodology

We’ve expanded our testing suite considerably since the X79 chipset release, and will continue to use the same methods for most of the motherboards and CPU’s we test. In the interests of thoroughness and accurate results, we run each test at least three times, and some tests more than that. We average the total of all the tests from each benchmark then report the average here.
The OS we use is Windows 7 Pro 64bit with all patches and updates applied. We also use the latest drivers available for the motherboard and any devices attached to the computer. We do not disable background tasks or tweak the OS or system in any way. We turn off drive indexing and daily defragging. We also turn off Prefetch and Superfetch. This is not an attempt to produce bigger benchmark numbers. Drive indexing and defragging can interfere with testing and produce confusing numbers. If a test were to be run while a drive was being indexed or defragged, and then the same test was later run when these processes were off, the two results would be contradictory and erroneous. As we cannot control when defragging and indexing occur precisely enough to guarantee that they won’t interfere with testing, we opt to disable the features entirely.
Prefetch tries to predict what users will load the next time they boot the machine by caching the relevant files and storing them for later use. We want to learn how the program runs without any of the files being cached, and we disable it so that each test run we do not have to clear pre-fetch to get accurate numbers. Lastly we disable Superfetch. Superfetch loads often-used programs into the memory. It is one of the reasons that Windows occupies so much memory. Vista fills the memory in an attempt to predict what users will load. Having one test run with files cached, and another test run with the files un-cached would result in inaccurate numbers. Again, since we can’t control its timings so precisely, it we turn it off. Because these four features can potentially interfere with benchmarking, and and are out of our control, we disable them. We do not disable anything else.
One thing to note is that we are revamping our testing method in order to better represent motherboard performance and offering to you guys the consumer. Also we want to make it an easier read for you without miles of endless charts. Please feel free to provide feedback on what you think as many benchmarks will be shuffled or removed completely.
Test Rig
| Test Rig | |
| Case | Thermaltake Level 10 GT |
| CPU |
Intel Core i7-3770K/Intel Core i7-2600K |
| Motherboard | ASUS P8Z77-V Deluxe |
| Ram | (TBA) 16GB Patriot Viper Xtreme 2400MHz + |
| CPU Cooler |
Swiftech H20-220 Edge |
| Hard Drive | Western Digital Velociraptor 300GB |
| SSD |
Intel 510 series SATA III 120GB |
| Optical | ASUS BD-ROM |
| GPU |
Asus GTX680 Top/GTX 580/Intel HD 4000 |
| Case Fans |
Front (intake): 200 x 200 x 20 mm ColorShift Fan x 1 (600~800RPM, 13~15dBA) Rear (exhaust): 140 x 140 x 25 mm Turbo Fan (1000PRM, 16 dBA) Top (exhaust): 200 x 200 x 30 mm ColorShift Fan (600~800RPM, 13~15dBA) Side (intake): 200 x 200 x 30 ColorShift Fan (600~800RPM), 13~15dBA) |
| Additional Cards |
N/A |
| PSU |
Thermaltake Toughpower Grand 1200W |
| Mouse | Thermaltake esports Black gaming mouse |
| Keyboard | Thermaltake Meka G1 mechanical gaming keyboard |
Test Suite
We will use the following applications to test the performance of the Motherboard and installed components. Benchmarks
| Benchmarks |
|---|
| PCMark 7 |
| Heaven benchmark 3.0 |
| Cinebench R11.5 |
| 3DMark 11 |
| SuperPi |
| Metro 2033 |
| Lost Planet 2 |
| SiSoft Sandra 2011b |
| X264HD |
Overclocking

The Z77 platform is brand new but when clocking is very similar to what we have seen with the Z68 models we have tested previously. One thing we did note is that it seems a outcome of the new 22nm technology unlike we have seen before there is a higher amount of heat generation than we did expect when pushing the clocks. We pushed to 5GHz on air with hopes that the new lower TDP chip would translate into cooler temps and much higher clocks. But from what we have seen on our few samples the chips run quite hot but do clock quite well as said before 5GHz+ with decent “benchable” stability is nice although it definitely gets toasty and water was needed to get to 5GHz stable and higher… We even setup an old Vapochill unit and 5.5GHz was achieved although stability was an issue as the unit was quickly overloaded. we were able to rip off some benches at 5.5 Ghz but fully threaded benches were just too much so lookout for some DICE or LN2 very soon!
Now to the board, This board is highly featured but being an ASUS model we knew it would clock well, how well is always a guess, but as we have seen with the X79 boards the Asus boards all seem to hit around the same clock from their most mainstream board to their upper end with the exception of course of the ROG board which has some special tweaks and tricks that can really make a difference to the extreme community out there who have to squeeze every ounce of performance out for a benchmark run.
For the Ivy Bridge benchmarks we stuck to a modest 4.6GHz overclock as we found it easily obtainable with acceptable temperatures without too much tuning hassle. This is not an indication of the boards inability to overclock but more a representation of what any user could expect with a decent air cooler and a few minutes of settings. This as said before can also be attributed to the large amount of heat dump from the chip when overclocking which is why we always recommend maximum cooling capability such as a liquid cooling system to ensure thermals are kept under control.
Important note: Overclocking can cause component failure. Please exercise caution when attempting any level of overclock on system components.
Temperatures

The temperatures were recorded with RealTemp while running wPrime 1024 right before the end of the 5th run. The results were recorded carefully. After the results were recorded, we waited for 30 minutes before taking Idle temperature measurements. The results were as follows:
| CPU Temperatures | Temperature (Idle/Load) |
| ASUS P8Z77-V Deluxe OC (4.6GHz) | 31C/67C |
| ASUS P8Z77-V Deluxe | 27C/55C |
| Chipset Temperatures | Temperature (Idle/Load) |
| ASUS P8Z77-V Deluxe OC (4.6GHz) | 40C/48C |
| ASUS P8Z77-V Deluxe | 34C/43C |
The reason temps may look a little lower than seen elsewhere online is that We are using a custom liquid cooling loop compliments of Swiftech which helps us reach an area of much higher headroom for overclocking and performance testing.
Power Consumption

The power consumption was tested while running Wprime 1024 for a few minutes at stock settings. The results were recorded carefully with a Kill-A-Watt power consumption measuring tool at the wall. After the results were recorded, we waited for yet another few minutes minutes before taking Idle power consumption measurements.
| Configuration | Power Consumption (Idle/Load) |
| ASUS P8Z77-V Deluxe (4.6GHz) | 202W/424W |
| ASUS P8Z77-V Deluxe | 141W/331W |
The power consumption is not with GPU usage. This is with CPU/system loading but nothing graphically intensive in order to provide the most accurate results by not ramping up the GPU, which will pull significantly more power.
SISOFT SANDRA 2011

“SiSoftware Sandra (the System Analyzer, Diagnostic and Reporting Assistant) is an information & diagnostic utility. It should provide most of the information (including undocumented) you need to know about your hardware, software and other devices whether hardware or software. It works along the lines of other Windows utilities, however it tries to go beyond them and show you more of what’s really going on. Giving the user the ability to draw comparisons at both a high and low-level. You can get information about the CPU, chipset, video adapter, ports, printers, sound card, memory, network, Windows internals, AGP, PCI, PCI-X, PCIe (PCI Express), database, USB, USB2, 1394/Firewire, etc.”
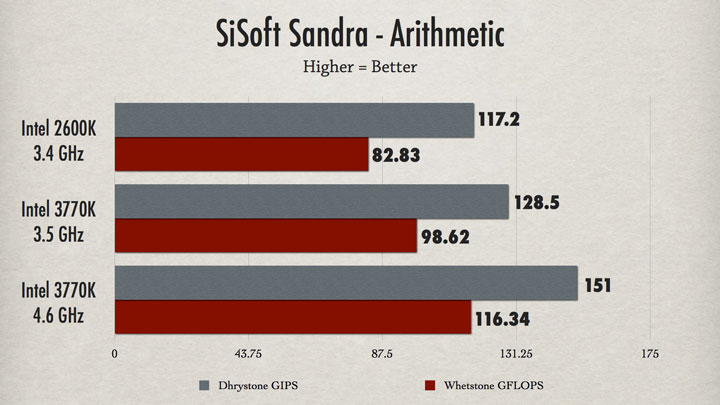
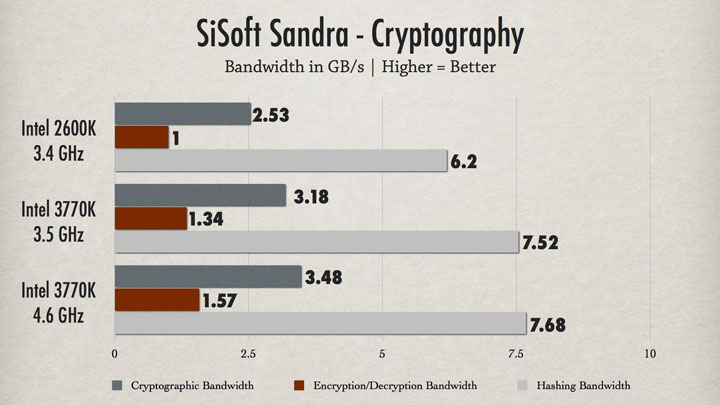
First up we have the Sisoft Sandra benchmark which we have listed by CPU to make it an easier read since all benches were done on the same board. One thing we noted right off the bat is that the Ivy Bridge CPU is a bit fater than the sandy bridge 2600K and yes we know that 2700K was a clock for clock comparison but most people had the first generation (2600K) and therefore 2700k seems to be much less widely adopted…. that and well I killed all my 2700K’s as of this time so this is what I had to test with 😉 besides the jump in clock speed which definitely gives the 3770K a nudge higher in the chart we still saw at clock per clock comparison of about 5% improvements give or take depending on benchmark, so anyone on a 2600K now which I believe was most users of 1155 as 2700K didnt come till awhile after then you can see your not going to see a giant leap in performance…. more of a step forward. As we overclocked we found that the IMC on the 3770K is quite strong and seems to be much more capable than the 2600K and is definitely a marked improvement.
SUPERPI
SuperPi is a single threaded benchmark which measures efficiency and is heavily influenced by architectural changes as much as it is by clockspeeds.
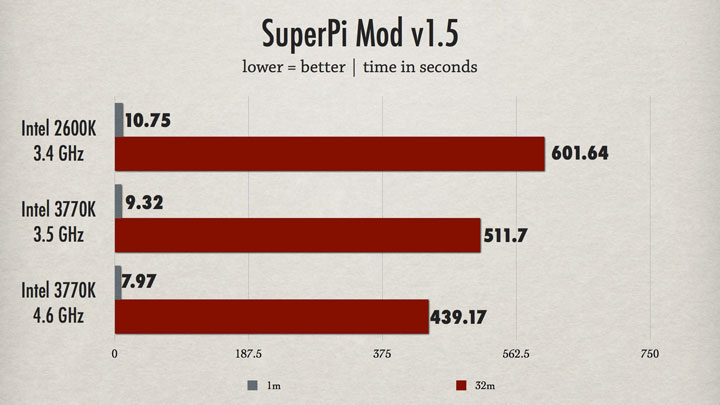
Superpi is a great efficiency benchmark and one we always use just because its simple and it shows improvements when they exist. Now bear in mind that the slightly higher clock speed plays a role in the difference but also the clock per clock comparison we are seeing similar to approximately 5% difference across our benhcmark suite which means once again the 3770K is a small step up or forward so to speak.
X264HD
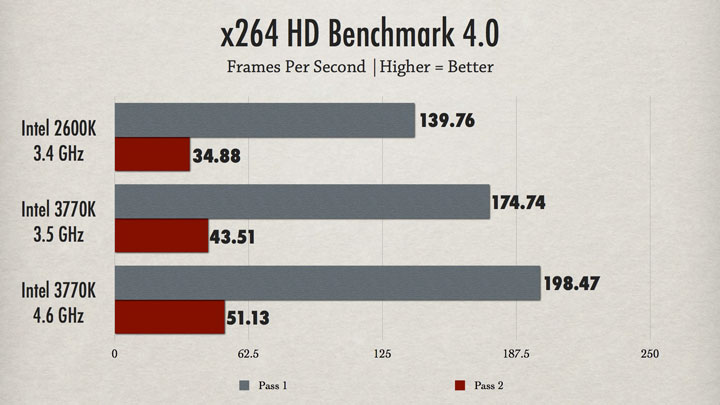
The X264 benchmark is all about encoding and how well your CPU can do it. Well the 2600K was great with it…. then came the 3960X and it was a monster, well now with the 3770K we see jumping from the 2600 we net about 35 FPS average for the main 1st run and the 2nd gives us about 9 which means were talking a marked improvement. Yes the higher frequency of the 3770K accounts for some of that but 1x multiplier jump will not make this big of a difference.
3DMARK 11
![]()
3DMark 11 is the newest in Futuremark’s suite of benchmarking utilities. Its a fully capable DirectX11 benchmark which also stresses and analyzes the system performance as a whole to simulate a heavy rendering environment such as a high end game or other app the end user may run. This benchmark was run with Performance settings 5 times and all runs were averaged for the result below.
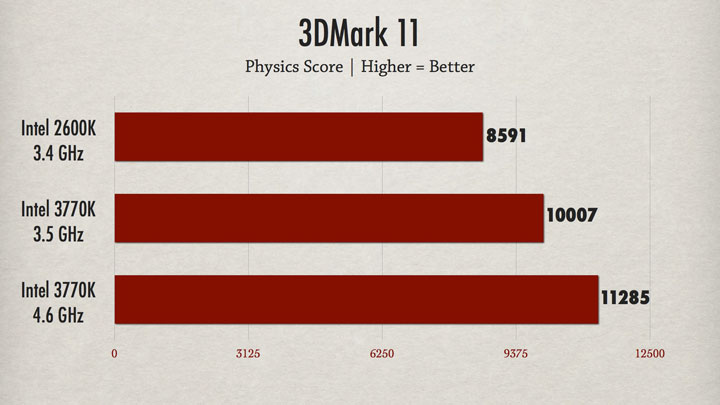
3DMark 11 we opted for the Physics score as this test is CPU based and relies on no graphics honestly so we just see the CPUs ability to render the preset Physics test. as we see the new architecture scales ahead by a decent amount especially when overclocked and this shows for gamers coming from the common 2600K this would be a rather decent upgrade.
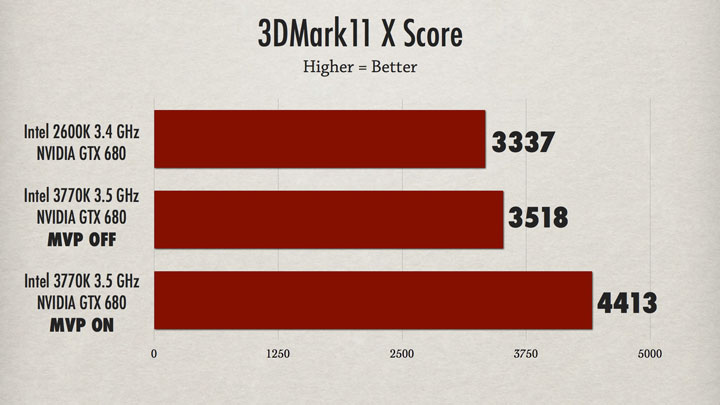
Here we look at how the system scores with a Asus GTX680 installed in the system. now remember that the 2600K offers PCIe 2.0 whereas the 3770K is PCIe 3.0 enabled and therefore we do see a small jump in graphics performance when we run the Xtreme preset which pushes the benchmark with 1920×1080 resolution and high preset detail levels. Also we enabled the Virtu MVP for some testing as well and were surprised by an almost 900 point jump and this definitely tells us that there may be something to this Virtu MVP system.
Unigine Heaven 3.0

Unigine Heaven is a benchmark program based on Unigine Corp’s latest engine, Unigine. The engine features DirectX 11, Hardware tessellation, DirectCompute, and Shader Model 5.0. All of these new technologies combined with the ability to run each card through the same exact test means this benchmark should be in our arsenal for a long time.
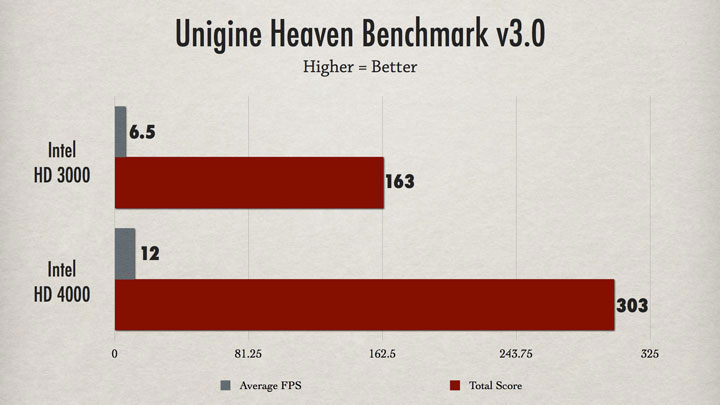
For Heaven we tested first the iGPU to see how it fared and we must say that with the Ivy Bridge chip has a quite capable GPU onboard as it was less than playable in this highly stressful benchmark but for casual games or less demanding titles we could see this being a relevant solution for a small form factor low power gaming rig.
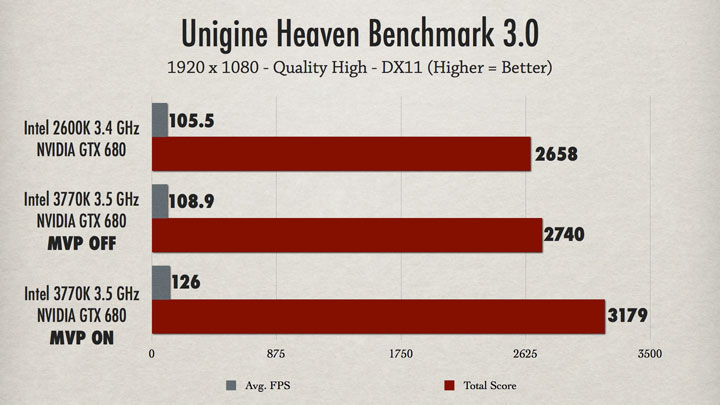
Here we took a crack at the 680 again and we see a minor jump going from PCIe Gen 2 to Gen 3, but more impressive is the Virtu MVP performance again giving us a very nice jump in performance.
Metro 2033
![]()
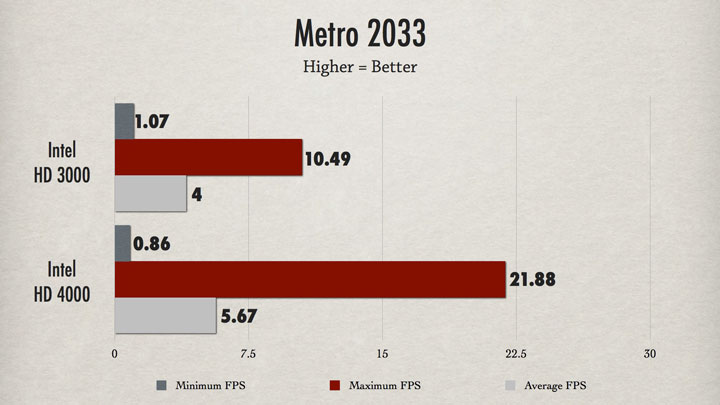
Metro 2133 puts a hurt on a GTX580 in most cases so testing on the iGPU was more of a exercise in futility than actually expecting playability. We were surprised to see the jump when switching to the Ivy Bridge chip as we picked up over 1.5 avg FPS and peaked out over 11 FPS at the top end which once again speaks volumes to the improvements that went into the HD4000 GPU.
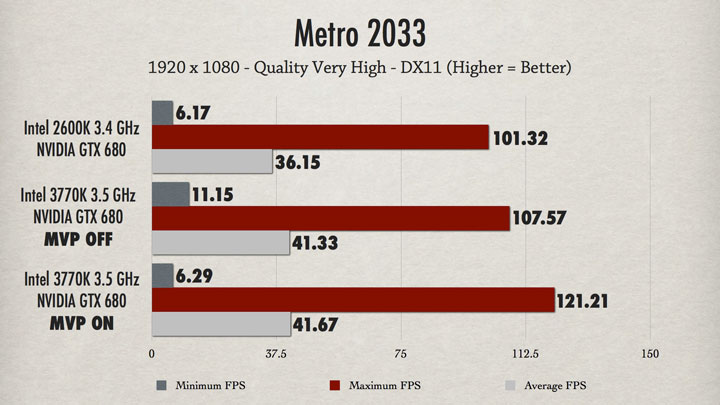
Virtu MVP rocks the boat again with another awesome result capping off max fps in excess of 13+ FPS gain on the max, although the minimum FPS definitely took a hit which tells me that theres still some refinement to do but as of now the results look quite promising.
PCmark 7


PCMark 7 is a pretty good synthetic benchmark that mixes many everyday tasks to give a good representation of what kind of relative performance to expect from platform to platform. Once again anyone coming from a 2600K based system would be in for a very nice performance bump and even more so if they were to bump it up to around 4.6GHz.
CONCLUSION
We really do like this board, it has a plethora of features and overclocks rather well for being a upper end mainstream offerings. But with that said its not really a surprise as ASUS has put a hard focus on ensuring that all of the boards can overclock to similar levels within a lineup. The inclusion of such features as the USB 3.0 Boost, Wi-Fi GO and ASUS SSD Caching add to make a rather versatile combination for any user. The ability to setup dual Cached drives is pretty cool and something I could see myself doing for sure. The Wi-Fi Router capability is also another plus as a system in the middle of my place could definitely help from lower signal issues I have had before on my wireless devices.
This is really a great board but having so many features shows itself in the cost equation as it is currently second to only the ASUS Z77 WS model. Add to this that many of the features on the board are very awesome but getting people aware of them can be very difficult as many users just plug in the system and go never looking into what the true potential of the board is.
We will not bash on the board because of the heat output of the chip as we all are very well aware this is something we have experienced from the 22nm chip itself and the board should have no blame in that as it only helps the chip run. Speaking of running when overclocking we figure a safe zone will be around 4.6-4.8 GHz for most users to allow adequate cooling without custom water loops or anything of that nature. And for the record this board does that without even thinking about it.
Now we see the performance of the boards, the chip and the memory, we can safely say that with the right cooling this could definitely be a step up for any gamer running a 2600K presently and looking for the next step forward. Temp isseus aside as many gamers do not even overclock, the Ivy Bridge chips can clock well but also run rather well at stock and there is a definite and clear efficiency gain there along with the inclusion of PCIe 3.0 and Intel native USB 3.0 there are many advantages to this platform for performance and expandability. However if you are looking to run a 3 way SLI setup or a crazy extreme gamer than this board is not for you as the board supports 2 way or Quad SLI, and 2 or 3 way and quad crossfire options but if looking for more you may be better served by the X79 lineup as it offers more PCIe lanes and more compatibility with extreme setups.
| OUR VERDICT: ASUS P8Z77-V Deluxe | ||||||||||||||||||
|
||||||||||||||||||
| Summary: The ASUS P8Z77-V Deluxe is a great performing and highly featured board which would be hard to pass up when setting up a new home or even high end gaming system, for this it earns the Bjorn3D Golden Bear Award. |