Does the Revolution87+ 1000watt PSU really hit the 80+ gold efficiency level? Let’s find out.
Introduction
Powering a PC doesn’t take much when running a stock name brand “let’s check our email and browse the social network site” system. Then again, the people reading this are likely to use their systems for a lot more than that. They will include gamers, enthusiasts, overclockers, and some who fit all those categories, or might simply fall into the “mad scientist” category. These are the ones that push their systems while editing video and/or music files, that turn the settings all the way up for anything they do, that want that little bit of extra performance out of whatever they run.
These users will require a bit more power to run the overclocked, multi GPU, end all, be all, monstrosities they lovingly refer to as “My Rig”. To get that power we want a strong PSU that has multiple protections, good efficiency, and, hopefully, a good warranty.
There are many choices for aftermarket PSU’s these days from several companies. One of these is Enermax who recently launched their Revolution87+ line of PSU’s. Today we are going to examine an Enermax Revolution87+ 1000 watt PSU and push it as hard as we can to see if it meets their claims, can keep up with our system’s demands, and is worth the price.

At the time of this writing we were able to find this product online for prices ranging from $220 to $259 USD
Features and Specifications
|
|||||||||||||||||||||||||||||||||||||||||||||||||||||||||||||||||||||||||||||||||||||||||||

*With ErP Lot 6 enabled motherboard.
|
|
|
|
|
|
Specifications
|
||||||||||||||||||||||||||||||||||||||||||||||||||||||||||||||||||||||
Cables and connections
|
||||||||||||||||||||||||||||||||


Understanding PSU Rails, and Single vs Multi rail
We have all no doubt been told when purchasing a power supply, that the number to look for is the amps on the 12V rail. What are each of the different rails for though, and why is the 12V rail typically the most important? Why are they called rails? Let’s take at look at each one and see.
-12V – This rail is pretty much obsolete now and is only kept on to provide backward compatibility with older hardware. Some older types of serial port circuits required both -12V and +12V voltages, but since almost no one except industrial users use serial ports anymore you as a typical home user can pretty much disregard this rail.
-5V – Again this is another obsolete rail, the -5V was used for old school floppy controllers and some ISA bus cards. Again, no need for the typical home user to worry about this rail.Most modern PSU’s no longer include this.
0V – Though not listed on any manufacturer spec sheet, every power supply has a 0V ground line. The ground signal is used to complete circuits with other voltages and provide a plane of reference against which other voltages are measured.
+3.3V – Finally we are starting to get into something useful! The +3.3V rail was introduced with the ATX form factor in order to power second generation Pentium chips. Previously the CPU was powered by the +5V rail (along with the system memory and everything else on the motherboard), but a reduced voltage was needed in order to reduce power consumption as the chips got faster.
+5V – As mentioned above, the +5V used to run the motherboard, CPU and the majority of other system components on older pre ATX based systems. On newer systems, many of the components have migrated to either the +3.3V or +12V rails, but the motherboard and many of its onboard components still use the +5V rail so it is of importance to the typical home user.
+5V SB – The +5V Standby or “Soft Power” signal carries the same output level as the +5V rail but is independent and is always on, even when the computer is turned off. This rail allows for two things. First, it allows the motherboard to control the power supply when it is off by enabling features such as wake up from sleep mode, or wake on LAN technology to function. It also is what allows Windows to turn your computer off automatically on shutdown as opposed to previous AT supplies where you had to bend over and push the button. Every standard ATX power supply on the market will include this rail.
+ 12V – The +12V, also known as the mother of all rails, is now used to power the most demanding components in your system including the CPU, hard drives, cooling fans, and graphics cards. Historically the +12V rail was used only to power drives and cooling fans. With the introduction of the 4-pin CPU plug on P4 motherboards and then eventually AMD based motherboards, in order to supply newer power hungry CPUs, the +12V rail suddenly started to grow in importance. Today, multi core based motherboards require an 8-pin +12V connector to supply their power needs. High end GPU cards have also jumped on the +12V rail, which has required PSU makers to adapt. Where previously there was only a single +12V rail, there are now two or more, each designated to power specific devices in order to ensure that nothing is underpowered
Finally, the reason they are called rails is based in engineering, historically a long flat metal strip was used to run power for easy connections . The engineers referred to it as the “power rail” this was shortened to rail, and is still used today to refer to a common connection point for supplying power.
Which is better? Single Rail or Multi Rail PSU’s?
This is still under debate by many computer enthusiasts. There are users in both camps, and each side presents some fairly convincing arguments. We are not here to settle this.
Single rail PSU’s supply all the +12v power from a single source with a single protection circuit. This method allows for full loading of the +12v with no separation causing an inability to access amperage. This also means less overall protection for components in the system.
In Multi rail PSU’s while the +12v supply starts at a single point it is then separated into several different circuits, each with it’s own protection.
While researching it ourselves we found a very well written explanation of multi rail PSU’s. We present it in whole here and leave it to our readers to decide which is best for them.
{source}
As power supply capacity increased, the ATX power supply standard was amended (beginning with version 2.0) to include:
3.2.4. Power Limit / Hazardous Energy Levels
Under normal or overload conditions, no output shall continuously provide more than 240VA under any conditions of load including output short circuit, per the requirement of UL 1950/CSA 950/EN 60950/IEC 950.
—ATX12V Power Supply Design Guide, version 2.2
This is a safety limit on the amount of power that may pass, in case of a fault, through any one wire. That much power can significantly overheat a wire, and would be more likely to melt the insulation and possibly start a fire. Each wire must be current-limited to no more than 20 A; typical supplies guarantee 18 A without triggering the current limit. Power supplies capable of delivering more than 18 A at 12 V connect wires in groups to two or more current sensors which will shut down the supply if excess current flows. Unlike a fuse or circuit breaker, these limits reset as soon as the overload is removed.Ideally, there would be one current limit per wire, but that would be prohibitively expensive. Since the limit is far larger than the reasonable current draw through a single wire, manufacturers typically group several wires together and apply the current limit to the entire group. Obviously, if the group is limited to 240 VA, so is each wire in it. Typically, a power supply will guarantee at least 17 A at 12 V by having a current limit of 18.5 A, plus or minus 8%. Thus, it is guaranteed to supply at least 17 A, and guaranteed to cut off before 20 A.
These groups are the so-called “multiple power supply rails”. They are not fully independent; they are all connected to a single high-current 12 V source inside the power supply, but have separate current limit circuitry. The current limit groups are documented so the user can avoid placing too many high-current loads in the same group. Originally, a power supply featuring “multiple +12 V rails” implied one able to deliver more than 20 A of +12 V power, and was seen as a good thing. However, people found the need to balance loads across many +12 V rails inconvenient. This problem was exacerbated by the fact that the assignment of connectors to rails is done at manufacturing time, and it is not always possible to move a given load to a different rail.
Rather than add more current limit circuits, many manufacturers have chosen to ignore the requirement and increase the current limits above 20 A per rail, or provide “single-rail” power supplies that omit the current limit circuitry. (In some cases, in violation of their own advertising claims to include it.) The requirement was deleted from version 2.3 (March 2007) of the ATX12V power supply specifications.
Because of the above standards, almost all high-power supplies claim to implement separate rails, however this claim is often false; many omit the necessary current-limit circuitry, both for cost reasons and because it is an irritation to customers. (The lack is sometimes advertised as a feature under names like “rail fusion” or “current sharing”.)
If our visitors would like to read this with the original annotations and notes included they need only click the {source} link.
Power Factor Correction
Power factor correction has become very important as PSUs have gotten stronger to reduce harmonics and boost efficiency. The use of both passive and active PFC has become common.
Wikipedia also has a very enlightening article on the subject HERE
A closer look


![]()


CLICK IMAGES FOR LARGER VIEW
The package is done in an eye catching color scheme that doesn’t make shoppers eyes bleed to get attention. A simple black and gold background with the logos on the front and 3 sides the features and capabilities on the back and the specs on the side that will be down when it’s on the shelf.


CLICK IMAGES FOR LARGER VIEW
Opening the box we see the intake fan and one face of the PSU, it has the same tasteful black and gold color scheme as the box. Moving the cardboard out of the way we find all the goodies we need to install it and a few extras.


 <
< 
CLICK IMAGES FOR LARGER VIEW
So we have the PSU which has the bare minimum necessary wires permanently attached, the 24pin, an 8pin, a 4+4pin and two 6+2pin for the GPU(s). Once everything else is out of the box we find a a user manual, a bundle of modular wires, 2 Enermax branded Velcro wire straps, an Enermax case sticker, a metal “cord uard” that locks the power cord into the PSU so that it can not be accidentally unplugged, a flyer that shows off the Enermax product line, and a nice bag to store any of this that is not being utilized at the moment. The next two images show the wires available. Further down the page we cover them in a bit more detail. The mounting screws are also included.


CLICK IMAGES FOR LARGER VIEW
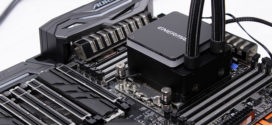
Now we get to the good part. The PSU itself. The finish on this unit will protect the housing quite well and looks good doing it, but we don’t buy PSU’s for their looks. Well, not just for their looks, we are also concerned with what they have and can do. What this one has is 3 modular connections for use with GPUs and theoretical use with future standards for CPU and RAM applications. (Think they might know something we don’t?) It also sports five modular 5pin connections giving it native support for SATA, as well as IDE, HDD and ODD units, and peripheral products (it can also power one floppy drive should the need arise). These connection not only feature shaped openings to force proper alignment, they also have a small arrow printed on them that lines up with one on the modular cable being plugged in.
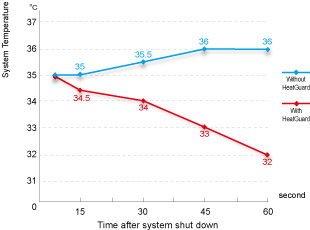
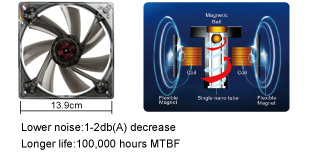
Cracking it open (don’t do this at home, it voids the warranty) allows us to have a look at the working parts. rather that waste our readers time with a long explanation of the circuitry, we instead offer an explanation of what it will do for you. The large Enermax brand fan will pull cool air into the unit and across the heatsinks the allowing this product to run fairly cool even when pumping out the wattage. The fan features Enermax’s patented Twister-bearing for low noise and promises 100,000 hours MTBF. meaning the fan should out live any system it is installed in The two large capacitors we see will allow it to supply power at a steady rate even when there is a sudden rise in the draw from the system. these and all other capacitors in this unit are 100% 105°C Japanese electrolytic capacitors, designed for maximum durability and stability. The several transformers and regulators are there to give users the desired voltages at a stable output using what Enermax calls Dynamic Hybrid Transformer Topology. For efficiency it uses DC to DC conversion conserving energy that would be lost in a traditional AC-DC conversion, and active Power Factor Correction for maximum efficiency. Another feature is what Enermax calls HeatGuard, which quite simply means that when the system shuts down the fan keeps running for up to one minute, allowing additional heat to be removed from the system after it is turned off. This theoretically prolongs the life of the entire system. This PSU also features automatic selection of input voltage, so there’s no switch to worry about for that.


CLICK IMAGES FOR LARGER VIEW
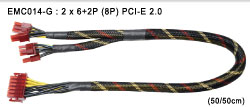
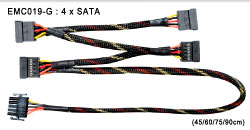
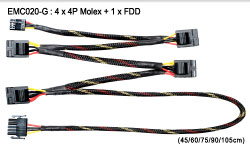
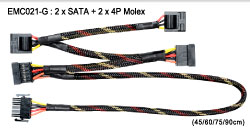
The modular cables include one with 4 Molex and one Floppy connections, two with 2 Molex, and 2 SATA connections, two with 4 SATA connections, and 2 with dual 8-pin PCI-E connections. These cables are long enough to be used in full tower cases.
While hooking up the system to the PSU we ran into one problem. Using the connector for the GPU closest to the permanent wires, the PSU would shut down as soon as the system was started. We assume that this rail is the same one that the CPU and motherboard are connected to, possibly the same as the permanent GPU wires. Once the connection was moved to another port the unit functioned perfectly, quite nicely powering 3 GPU’s.
Testing and Methodology
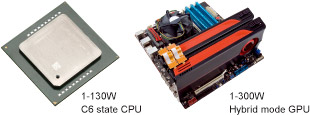
We tested the Enermax Revolution87+ 1000watt PSU with the system at stock clocks on the GPU’s, and overclocked on the CPU for the idle readings, and again with the 2 of the GPU’s and CPU overclocked for the next 2 tests. The CPU was O/C’d from 2.2Ghz to 2.5GHz, while the GTX 480’s were taken from the stock clocks of 700/1401/1848 to 800/1600/1848 and the GTX 295 was left at the stock clocks of 576/1242/1008. Messing with the memory clocks made the F@H app crash repeatedly so we left them at stock.
To hit the “mid point” levels we ran F@H on both of the 480’s and let the CPU and 295 cores idle. This isn’t 50% , but a representation of mid level usage. This runs the GPU’s hard enough to to get the PSU to a little over half of it’s rated output..
To maximize the draw from the system we ran FurMark on the 480’s, F@H on the 295, and a Prime95 torture test on the CPU.
Ripple was not tested for, due to lack of access to an oscilloscope. Anyone seriously worried about line noise should invest in a power stabilizing device.
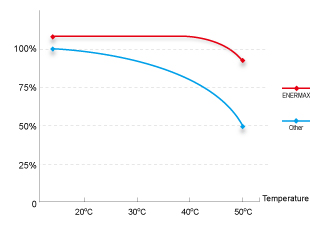
We have seen several sites comment that testing at room temps of 23°C is not indicative of real world conditions. These same sites are claiming temps of 50°C (122°F) would be more realistic. We disagree. If a PSU is used at the top of a system in a case where the temps are reaching 50°C, then that case needs more airflow or should be replaced with one that has more. Temps of 26- 33°C (79-92°F) are a realistic range. However the tests on this unit were conducted at room temperatures, which was 23°C, due to it being out of the case and opened for access to the wiring. Enermax maintains that this unit will function efficiently at up to 50°C
| Test System | |
| Case | Testing conducted on custom open test deck (hacked generic case) |
|
Processor |
AMD Phenom II X4 9500 (Agena)
|
|
Motherboard |
Asus M3N-HT Deluxe (bios 3401) |
|
Memory |
4 GB Patriot 8500EL series PC2-6400 |
|
Drive(s) |
Maxtor 7H500F0, WDC WD 1600BEVT, WDC WD5000AAKX |
|
Graphics |
Video Card 1: Nvidia GTX 480 (reference)
Video Card 2: Nvidia GTX 480 (reference)
Video Card3: Galaxy GTX 295
|
|
Power Supply |
Enermax Revolution87+ 1000w SLI |
| Operating System | Windows 7 |
| CPU cooler | Evercool Transformer 3 w/ a Noctua NF-F12 PWM fan |
| Fan controller | NZXT Sentry 2 |
| Case fans | 5 various fans, 2 80mm, 3 120mm |

Equipment used, RadioShack™ DC/AC True RMS Clamp Meter, Kill A Watt™ EZ, and a Commercial Electric™ MAS830B Multi Meter
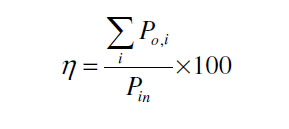
Efficiency % = (SUM of output) ÷ draw from wall x 100 (+/- 1-3% for fluctuations and rounding).
Results
This PSU does not have a -5 volt circuit. The -12v measured at -12.12 V with a draw of 0.61 A for a total of 7.39 W. (we’re not sure where this draw was coming from) The sb5v came in at 5.04 V at 0.69 A equaling 3.48 W. These values stayed consistent throughout the testing process. All values were rounded up or down at the second decimal place, 10.956 becomes 10.96, 10.955 becomes 10.95.
Idle
| Draw at wall 298 W | ||
| 3.3v = 3.32 V | 5v = 5.04 V | 12v = 12.17 V |
| SATA 0.08 A | SATA 1.18 A | SATA 0.66 A |
| 24 pin connector 2.39 A | Molex 0.04 A | Molex 0.69 A |
| 24 pin connector 6.55 A | 24 pin connector 3.98 A | |
| 8 pin CPU connector 6.29 A | ||
| GTX480 GPU1 PCI-E 1.97 A | ||
| GTX295 GPU2 PCI-E 1.29 A | ||
| GTX480 GPU3 PCI-E 1.83 A | ||
| (2.39 +0.08) x 3.32 v = 8.2 watts | (1.18+0.04+6.55 ) x 5.04 v= 39.16 watts | ( 0.68+0.66+1.97+1.29+1.83+3.98+6.29) x 12.17v= 203.24 watts |
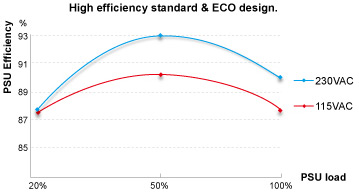
| ((7.39+3.48+8.2+39.16+203.24)=261.48÷298)x100= 87.74% | ||
Assuming that our measurements are accurate, and that our math is correct, at an idle with 2 GPU’s driving monitors, a few apps in the task tray doing nothing, and Microsoft Messenger running in the background, this PSU gives us a very high efficiency rating. At this point all the voltages are above spec.
Partial Load
| Draw at wall 673w | ||
| 3.3v = 3.3 V | 5v = 5.01 v | 12v = 12.15 V |
| SATA 0.16 A | SATA 0.88 A | SATA 0.51 A |
| 24 pin connector 3.30 A | Molex 0.06 A | Molex 0.58 A |
| 24 pin connector 7.26 A | 24 pin connector 10.32 A | |
| 8 pin CPU connector 11.51 A | ||
| GTX480 GPU1 PCI-E 7.06 A | ||
| GTX295 GPU2 PCI-E 3.10 A | ||
| GTX480 GPU3 PCI-E 10.20 A | ||
| (0.16+3.30)x3.3 v = 11.41 watts | (0.88+0.06+7.26)x5.01 v= 41.08 watts | ()x12.15 v= 525.85 watts |
| ((7.39+3.48+11.41+41.08+525.85)=589.21÷673)x100= 87.55% | ||
At the mid usage point this PSU produced steady voltages on all rails staying at or above rated spec. The efficiency stayed high while the PSU produced little extra heat.
“Full” Load
| Draw at wall 1060 W | ||
| 3.3v = 3.28 V | 5v = 4.99 V | 12v = 12.11 V |
| SATA 0.09 A | SATA 1.04 A | SATA 0.52 A |
| 24 pin connector 3.28 A | Molex 0.13 A | Molex 0.59 A |
| 24 pin connector 8.40 A | 24 pin connector 14.02 A | |
| 8 pin CPU connector 9.89 A | ||
| GTX480 GPU1 PCI-E 19.24 A | ||
| GTX295 GPU2 PCI-E 10.38 A | ||
| GTX480 GPU3 PCI-E 17.26 A | ||
| (0.09+3.28) x 3.28 v = 11.05 watts | (1.04+0.13+8.40) x 4.99 v= 47.75 watts | (0.52+0.59+14.02+9.89+19.24+10.38+17.26 ) x 12.11v= 870.71 watts |
| ((7.39+3.49+11.05+47.75+870.71) = 940.29 ÷ 1060) x 100 = 88.7% | ||
As close to a full load as we could push this system came up at 88.7% efficiency. The rails maintained a steady voltage that was within acceptable limits. The 3.3 and 5 volt rails went slightly under spec, the 12 volt stayed above it. At no time during the testing did the PSU get hot enough to cause concern. The air coming from it stayed exceptionally cool considering the amount of wattage it was producing. According to the Kill A Watt meter this PSU has a Power Factor of 0.99 which tells us there is very little wasted power with this one.
Conclusions
The Enermax Revolution87+ 1000 watt PSU is a capable product. It allows consumers to power their systems what ever their needs through the use of modular wiring connections. The modular wires are all contained in mesh sleeves. The connections on both ends of the wires are solid and tight making assembly easy. It supplies more than enough current for most configurations, including multi GPU systems. The Revolution87+ has multiple protection circuits, excellent Power Factor Correction, a nice looking finish, and solid casing. The finish is easy to scratch if not careful.
The power regulation seems decent as it stayed at or near spec across all the rails, the 12 volt never went under and stayed over spec during all the testing. The 3.3 volt rail dropped to 3.28 and the 5 volt to 4.99 when we pushed this product, while we would like to see them stay at or above spec these are well within acceptable ranges. This unit will give most users enough overhead for overclocking both the CPU and the GPU’s.
The fan in this unit draws plenty of air without creating a lot of noise. It is a dependable design offering 100,000 hours MTBF. It also continues to run for around one minute after system shutdown. This should prolong the life of the unit and if mounted at the top of a system should help draw heat from the entire case.
At the MSRP of $239 USD this unit is a pretty good value. It can be found for both a little less and a little more than that. We found the Revolution 87+ to be a great PSU for building a custom system and would recommend it to our friends. That said, there are more powerful PSU’s that can be purchased for less, but the difference might be made up in the lower power bills from better efficiency. And the 5 year warranty is nothing to sneeze at.
| OUR VERDICT: Enermax Revolution87+ 1000 watt SLI PSU | ||||||||||||||||||
|
||||||||||||||||||
| Summary: The Enermax Revolution87+ 1000watt PSU is a solid performer that supplies enough juice to run a multi GPU system overclocked. It provides excellent circuit protection and great efficiency while staying cool and quiet. For it’s features and overall performance the Enermax Revolution87+ 1000watt PSU earns the Bjorn3D Silver Bear Award. |