Intel launched the 7 series chipset in preparation for the upcoming Core processor. The new chipset brings with it a few “Smart” features that Intel has introduced. Keep reading to find out more!
INTRODUCTION
Sometimes we are astonished by how fast the computer industry is moving forward. Last January, Intel launched a new Socket 1155 platform (Sandy Bridge) along with the P67/H67 chipset, and four months later Intel launched the updated Z68 chipset. Today, almost a year later, Intel is launching the successor to the 6 series. Intel has been steadily progressing, following their tick-tock policy ever since its introduction in 2006. Following the same model, Sandy Bridge brought us a new architecture (tock) and very soon Intel will launch the die-shrink Ivy Bridge processors (tick). Today’s launch of the 7 series chipset is a sign that the processors are coming very soon.
In the past, Intel has always launched the chipset and the processor at the same time. This time around, Intel is doing things slightly differently. Today, Intel launches the chipset, and the much anticipated Ivy Bridge processor will come later. Because of the separate launches of the processor and the chipset, we may not be able to fully test all of the features of the new chipset until Ivy Bridge is released. However, since the 7 series chipset brought us a few new technologies, this gives us a chance to take a more in depth look of these features.
Despite having an absolute monopoly on its own chipset, Intel is not idling and continues to be innovative and brings new technology and features. With Intel now controlling both the chipset and processors, it is able to have a more tightly integrated platform. This allows Intel to better utilize their processor to work with the chipset to yield a much better overall PC performance.
The 7 series chipset brings us updated I/O support with addition of USB 3.0, PCI Express 3.0, and Thunderbolt. Intel also aimed to offer a broader wireless support. The visual and media experience will also see a boost thanks to the improved graphic on the upcoming Ivy Bridge. Additionally, Intel tried to improve overall system performance with what the company called “Smart Performance.” The Smart Performance brings improved energy efficiency (for Ivy Bridge CPU users), Intel Smart Response Technology (which was first introduced with the Z68), Intel Rapid Start Technology, and Intel Smart Connect Technology. Ultimately, Intel is able to move forward, resulting in a faster computing experience by having a faster processor paired with chipset enhancements.
Intel 7 Series Chipset: USB 3.0, SATA 6Gbps, Thunderbolt
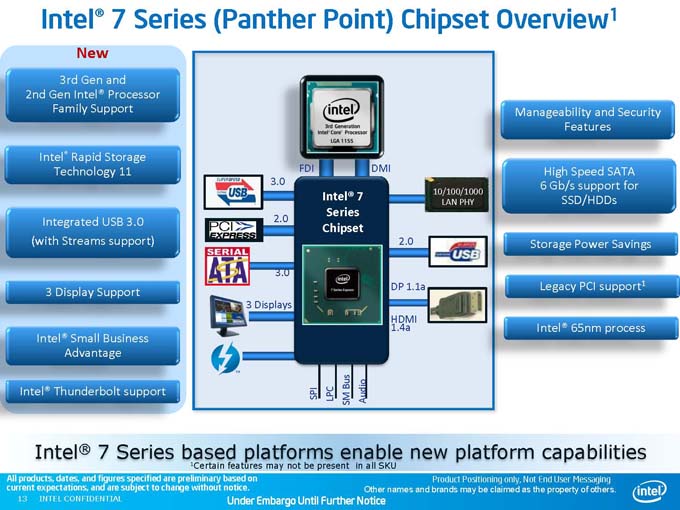
The 7 series chipset, codenamed Panther Point, will be socket compatible with all socket LGA 1155 processors, which means it will work with second generation Core processors (Sandy Bridge) and the upcoming third generation processors (Ivy Bridge). However, some features on the board will only be available to those using the upcoming third generation Core processor (Ivy Bridge). Six desktop chipsets are being launched today: Z77, Z75, H77, B75, Q75, and Q77. The B75, Q75, and Q77 are designed for business and corporate environments, and will not be covered in this review. Intel also launched a few chipsets for the mobile platform, which we will not cover here today either. Our focus will be the Z77, the Z75, and the H77 chipsets designed for consumers.
Intel separated the market with the 6 series chipset: the H67 supported IGP with limited overclocking, whereas the P67 had a wide range of overclocking features, but did not support IGP. The following iteration, Z68, supported both. Luckily, all of the 7 series chipset support IGP so we can take the advantage of the video encoding power built into the CPU. Additionally, the difference between the chipsets is not as big and the essential features such as PCI-E 3.0, USB 3.0, and SATA 6 Gbps are all present on every single chipset.
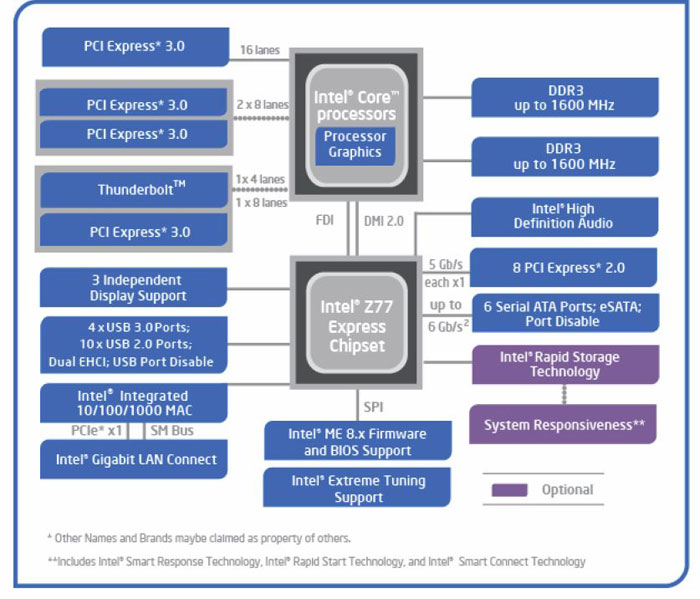
Looking at the Z77 Express Chipset block diagram, we see that there are 16 lanes of PCI-E 3.0 connected to the CPU that can be converted to two x8 lanes for dual GPU configuration. A PCI-E x4 3.0 is reserved for Thunderbolt and another PCI-E x8 3.0 is available. The official maximum memory support is still DDR3-1600 MHz like the Z68 chipset.

click for larger image

Chipset |
Z77 | Z75 | H77 | Z68 |
| CPU OC | Yes | Yes | No | Yes |
| CPU RATIO (max ratio) | Yes | Yes | Limited | Yes |
| BASE CLOCK | Limited | Limited | Limited | Limited |
| RAM OC | Yes | Yes | Limited | Yes |
| GPU OC | Yes | Yes | Yes | Yes |
| PCIe Configuration | 1×16 or 2×8 or 1×8+2×4 PCIe 3.0 | 1×16 or 2×8 PCIe 3.0 | 1×16 PCIe 3.0 | 1×16 or 2×8 PCIe 2.0 |
| Graphic Support | Yes | Yes | Yes | Yes |
| RAID Support | Yes | Yes | Yes | Yes |
| USB 2.0 (USB 3.0) | 14(4) | 14(4) | 14(4) | 14(0) |
| SATA Ports (max number of SATA 6 Gbps) | 6(2) | 6(2) | 6(2) | 6(2) |
| Smart Response | Yes | No | Yes | Yes |
| Smart Connect | Yes | Yes | Yes | Yes |
| Rapid Start | Yes | Yes | Yes | No |
The chipsets are still built on the 65nm process like the previous generation so we should expect the power consumption to be quite similar to the 6 series (~6 watts). Intel has finally brought much needed native USB 3.0 support. The PCI Express 3.0 support is also there. Intel also added Thunderbolt support to the new chipset.
Looking at the block diagram, we can see the overall layout on the Z77 chipset is not much different from the Z68 chipset. The link between the CPU and the PCH has not changed: the DMI 2.0 provides 20 Gbps bandwidth each way with a x4 link. There is also a Flexible Display Interface (FDI) that carries the display traffic from the processor graphics controller to the PCH.
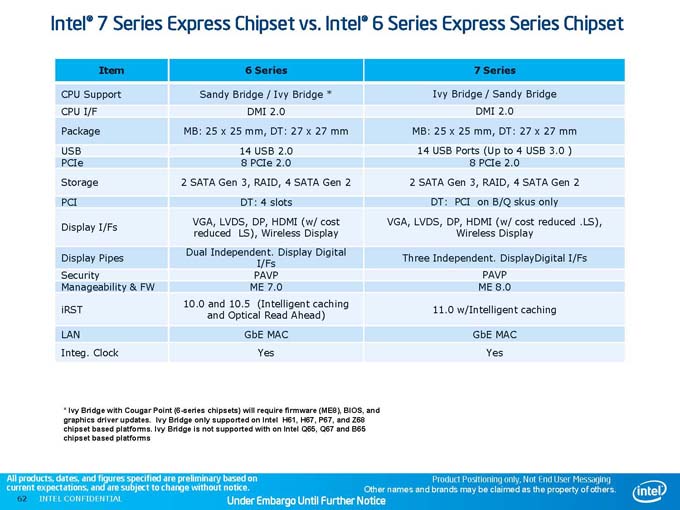
The table above gives us an overview of the difference between the 6 Series chipset and the 7 Series chipsets. As we can see, the 7 series chipset adds support for up to 4 SuperSpeed USB 3.0. In addition, you can now use three independent displays as opposed to two on the Z68. The Rapid Response Technology also saw a bit of an update as well.
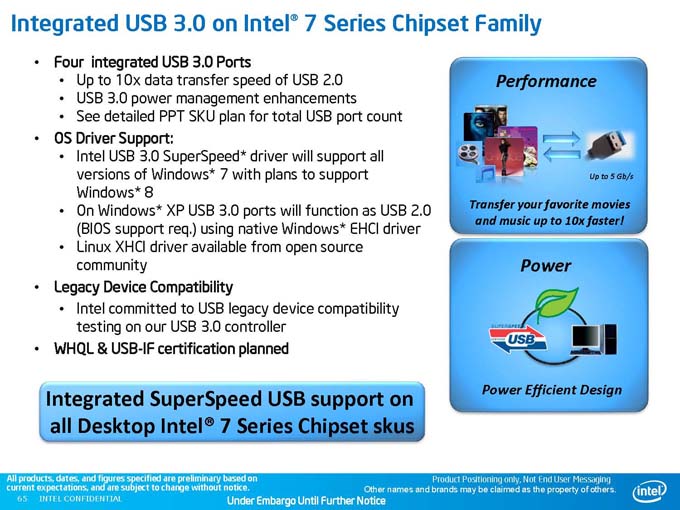
With a theoretical transfer speed up to 10 times that of the USB 2.0, USB 3.0 has taken a long time to be implemented onto the motherboard chipset. The 7 series marks the first chipset to have native USB 3.0 support. Finally, we no longer need to rely on third party chips like the NEC or ASMedia for high I/O transfer.
All of the 7 series chipsets will support 10x USB 2.0 and up to 4x USB 3.0 ports. The USB ports will use a dual EHCI setup (two controllers) which will provide users with more bandwidth, as not all 14 ports will be sharing the same controller.
The USB 3.0 ports will also support Stream. Traditionally, USB transfers data in single block format, so data are synchronously transferred between the host and device per request from the host. With Stream, the data are transferred isochronously, as data is continuously streamed between the host and the device, and the device directs the host controller as to which data stored on the buffer to move. This reduces overall transfer overhead.
Be warned though: the USB 3.0 driver will only work with Windows 7 and support for Windows 8 is coming. Linux XHCI drivers are supported from the open source community. Windows XP and Vista are unfortunately not able to take the advantage of the speed enhancements, as the ports will only function at USB 2.0 speeds.
The 7 series chipset still maintains the same number of SATA ports: two 6Gbps and four 3Gbps. It is unfortunate to see that Intel did not increase the number of SATA 6Gbps ports, as AMD’s 900FX series chipset already supports six SATA 6Gbps ports natively.
Besides the addition of USB 3.0, the PCI-E 3.0 is probably the other big upgrade we see on the 7 series chipset. With the Nvidia GTX 600 series and AMD HD 7000 series graphics cards all supporting PCI-E 3.0, we are glad to see Intel adding such support. In practical use, the current generation of graphic cards do not need the 32Gbps bandwidth provided by PCI-E 3.0; in fact, the current generation cannot even saturate the 16Gbps provided by PCI-E 2.0. Still, the addition paves the way for future compatibility, and will also be useful for multi-GPU configurations.
Intel Smart Performance
Smart Response, Smart Connect, and Rapid Start
The slowest component inside a PC is most likely not the CPU. Rather, it is that slow spinning mechanical hard drive. Unfortunately, we don’t see hard drives being replaced en masse any time soon. We have been a proponent of SSD upgrade for anyone who can afford it. However, not everyone can afford an SSD or buy a large enough SSD to be used as a primary drive. Despite the fact that SSD prices have been dropping, they are still relatively expensive at $1.5-$2 per GB compared to $0.06 per GB for mechanical drives.
Intel has been working on making systems run faster while still using mechanical drives. We saw the beginnings of this when Intel launched the Smart Response Technology on the Z68 chipset. The Smart Response Technology uses a small SSD (20-60GB) to act as a caching device. It will cache frequently used software applications, so that applications launch faster and the overall system will feel much more responsive.
SRT is still present with the 7 series chipset. Additionally, Intel has updated the Rapid Storage software to 11.0 (compared to the 10.5). Intel’s Rapid Storage provides the support for RAID rebuilding and migration. It also provides the ability to set up RAID when the OS is already installed. The new version adds support for enabling the Smart Response Technology to the 7 series chipset.
We had previously looked at the SRT with the Z68 chipset, and the Z77 has not made much change so we will not repeat the same information. For more information on SRT, including how to set it up, check our previous review.
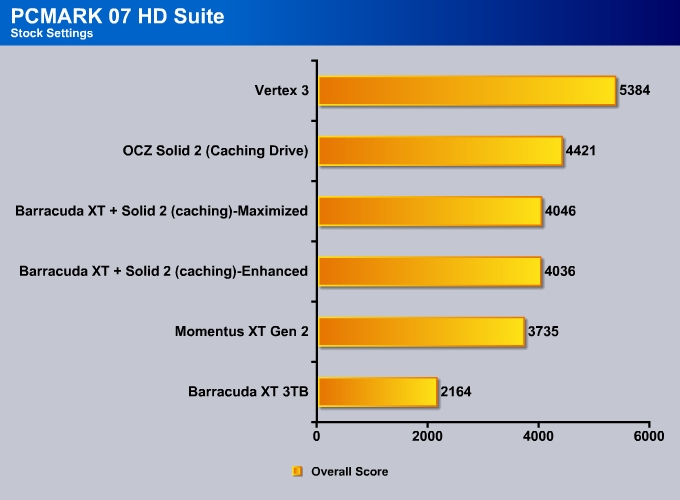
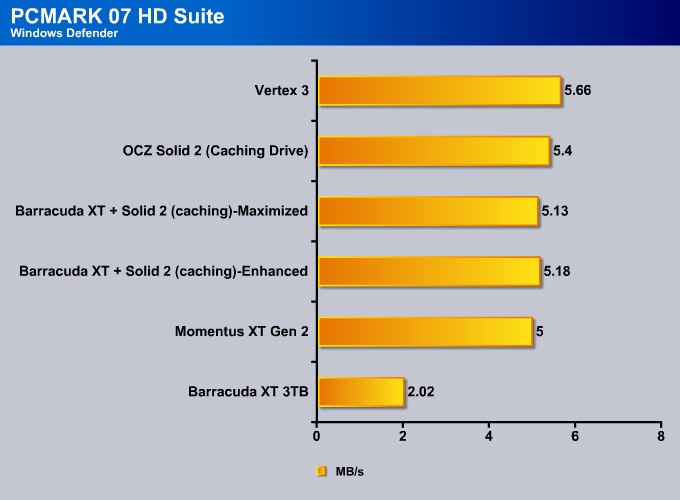
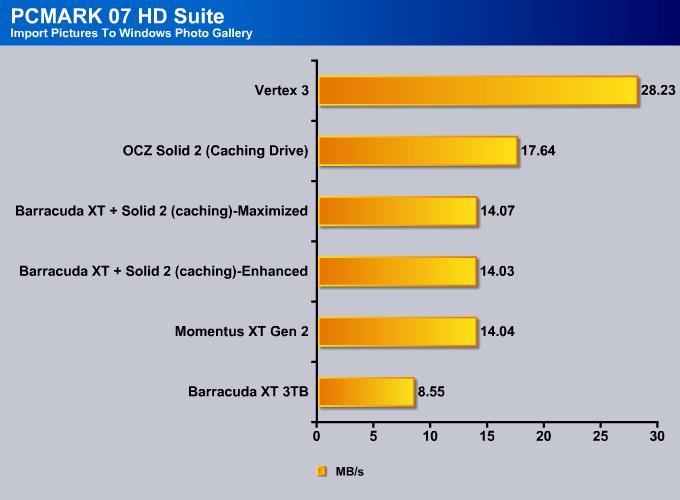
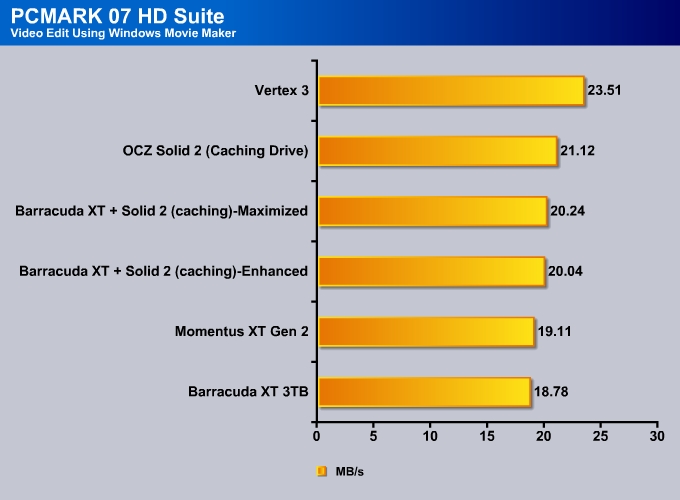
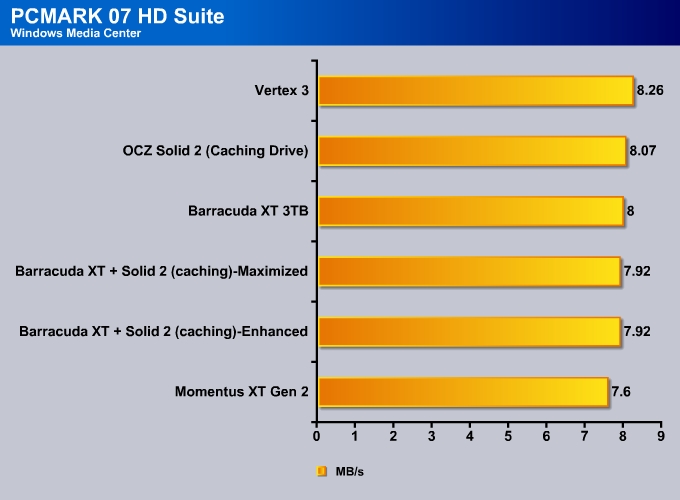
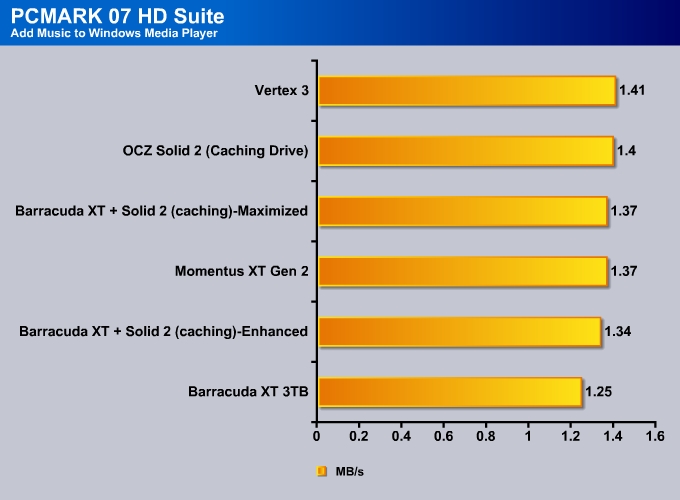
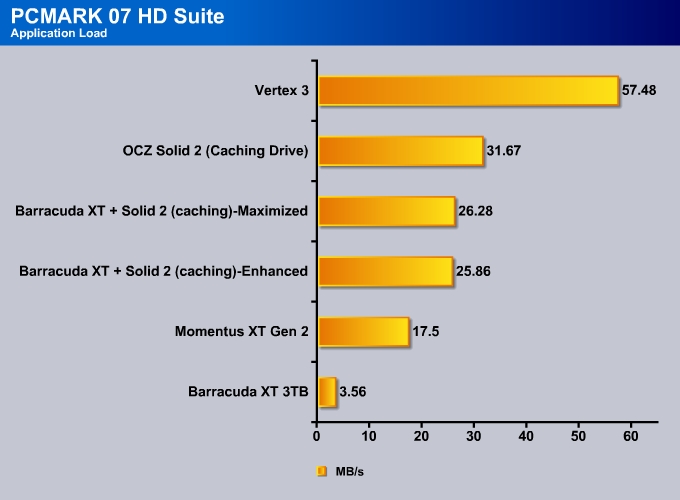
The new SRT seems to perform caching much faster than previous version. We noticed this when we ran PCMark 07 HD Suite: the score we obtained from running the suite the first time did not differ significantly from the result when we ran it the third time. This means that less time is required for data to be cached, and users can enjoy the faster performance much more quickly. Maximized mode offers slight performance gain but the difference is pretty small, so we would probably suggest using enhanced mode. Keep in mind that the Smart Response performance depends largely on the SSD and the HDD chosen, so users who choose a relatively fast SSD will see performance close to that of a regular SSD boot. Our result shows that our Barracuda XT and OCZ Solid 2 combination offers a good performance that is faster than the second generation Seagate Momentus XT.

Rapid Start and Smart Connect
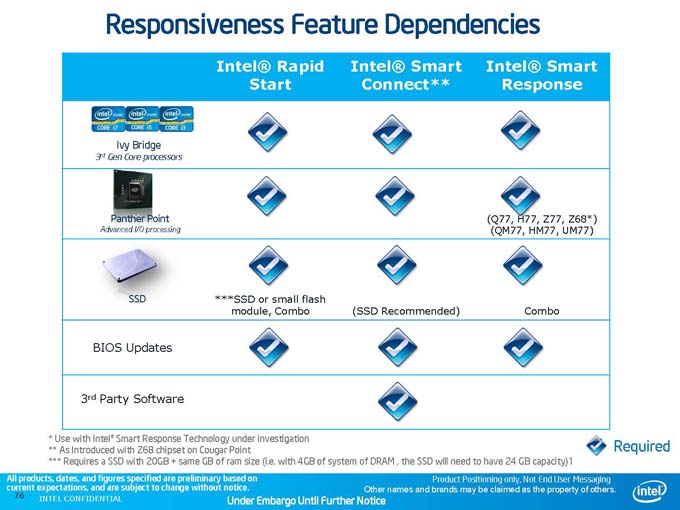
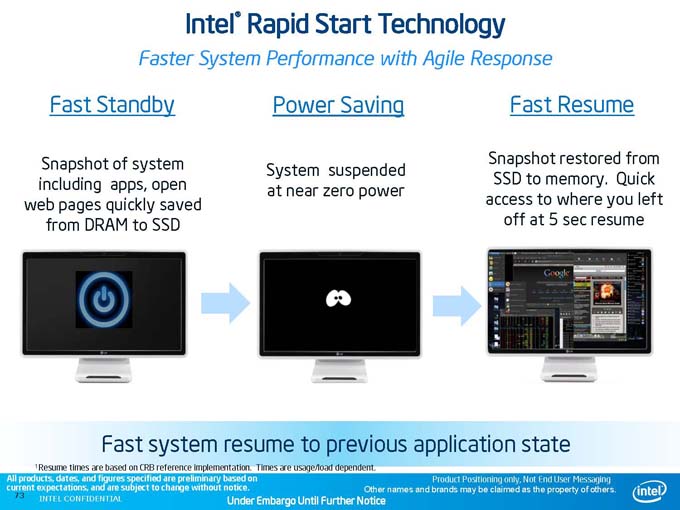
The 7 series chipset adds two new features to increase system responsiveness. One of them is called Rapid Start Technology. The other is Smart Connect. These two technologies first were demonstrated with the Intel Ultrabook and they are now making their way to the desktop. The Rapid Start Technology is designed to provide a quicker OS resume time—about 5-7 seconds—from zero power state. According to Intel, this will offer 70% improvement over Windows’ Hibernate. This feature will work with all 7 series chipsets and second and third generation Core processors. Since this is a chipset and CPU specific feature; it will not work with 6 series chipsets, or Sandy Bridge processors used on a 7 series chipset board.
When a PC is left idle for a long period of time, the system is often in three states: sleep, hibernate, or off. While turning the system completely off saves the most power, it has obvious drawback that it takes much longer to start up again. Even with fairly modern systems, the boot up time can take at least 30 seconds or more. The hibernate and sleep are designed to conserve power by shutting down most components but not completely turning the PC off. This will allow a faster resume time that often takes only a few seconds.
The difference between hibernation and sleep modes is that hibernation takes a snapshot of everything on the RAM and saves it to the hard disk, then shuts the PC down. This way the system consumes very little power (almost as much as when it is completely off). However, when you resume the PC, it takes a little time as data need to be copied back to the RAM before you can use the system. Sleep, on the other hand, wakes the system faster but it takes up a little bit of power to keep the data on the RAM. Since the information is not saved to a drive, the system resumes almost instantaneously. The obvious risk with sleep is data lost there if no backup of data on the hard drive, so in the event of a power failure, the data on the RAM will be lost, whereas hibernate will be able to recover the data from the hard drive.
For mobile users, hibernation is often the better choice to conserve battery life. For desktop users, the little power used in the sleep mode may not matter that much, but it can add up. Additionally, the risk of data lost due to power failure is certainly not desirable, so hibernate is still the better choice over sleep.
The Rapid Start solution is aimed to bring the best of the both worlds and it shares some common ground with SRT. While SRT caches the commonly used applications to an SSD, Rapid Start caches the data from the RAM to the SSD. SSDs are often faster than mechanical drives for both reading and writing data. So, when system enters hibernation, data will be saved to the SSD. When it is time to resume usage, the data can be quickly retrieved from the SSD and written back to the RAM. The faster read and write times on the SSD makes the data transfer faster. The end result is faster system resume times from sleep mode, and data integrity in the event of a power failure.
To use Rapid Start, all you need is an SSD or small flash module that is exactly the same size as the system memory. In other words, if your system has 32GB of RAM (the maximum that the 7 series chipset supports), you would need a 32GB SSD for caching. Luckily, you can use the same SSD for both Rapid Start and Smart Response, so a 60GB SSD can be easily partitioned to take the advantage of both performance enhancements.
Rapid Start is chipset and CPU specific, and will only work on a combination of a 7 series chipset and an Ivy Bridge CPU. Setting up the Rapid Start requires to you format the SSD manually. The Intel software did not automatically partition and format our SSD. We had to manually shrink (or partition) our SSD to the appropriate size.
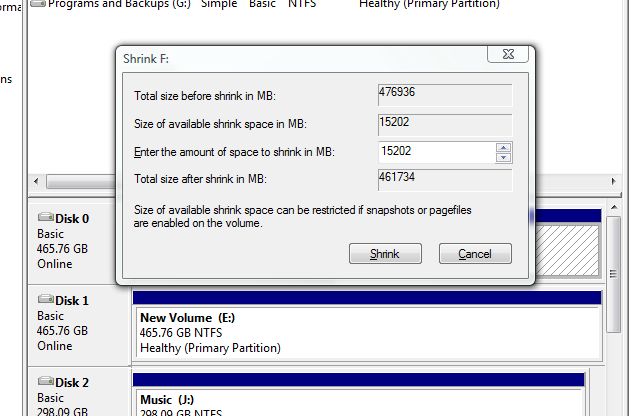
Users can shrink the disk from windows by going to the Computer Management window, right clicking on the appropriate disk choosing Shrink Volume, and entering the appropriate size (this must match system RAM size).
After this, follow these instructions:
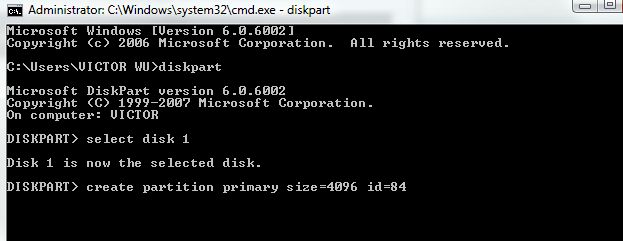
- Open up command prompt (Windows icon, type cmd), and type in Diskpart
- Enter the disk you wish to partition (verify this under the computer management) by type in “select disk 1” (1 being the number of the disk)
- Then type in the command “create partition primary size=XXXX id=84” (change the “XXXX” to the number of megabytes in your system RAM. The id=84 is critical as this will create a partition that allows data to be cached to.
- Finally, just install the Rapid Start software.
Intel Smart Connect
The last Smart technology that Intel brings to the 7 series chipset is Intel Smart Connect. Unlike Smart Response and Rapid Start, this feature does not require an SSD, though Intel recommends having one. Additionally, this feature will work with both 6 and 7 series chipsets.

On a smartphone, information such as email and social media statuses are constantly being pushed to the mobile device. Even when phones are on standby mode, they continue to receive incoming data. Desktops or laptops, on the other hand, require us to keep them on to receive information. As soon as we put them in standby mode or hibernation, they stopped receiving any information. When we wake them up, we would need to sync our data in order to have access to the latest content. The Intel Smart Connect is Intel’s solution to make our PC more like mobile devices, so that even if the system is in standby mode, it will still able to pull data from the internet, so that when we resume our work, the information will be up to date.
To use Intel Smart Connect, all you have to do is download the software and install it on your PC. The software simply wake the PC up at a set interval to allow any application running on the foreground or background to pull data from online. After the data has been updated, the system will then go back to standby mode.
Unlike mobile systems that do not wake the whole device up to retrieve data, desktops still need to wake up every component (video card, CPU, motherboard, hard drive, etc.) in order to retrieve data. This is due to the long lineage of desktop PC and OS design. Intel’s implantation with Smart Connect may not be ideal but it is a step in the right direction at least. With time, we hope Intel would be able to improve upon the technology so that only a minimum components must be turned on to retrieve data.
Other features: Better Security & Communication
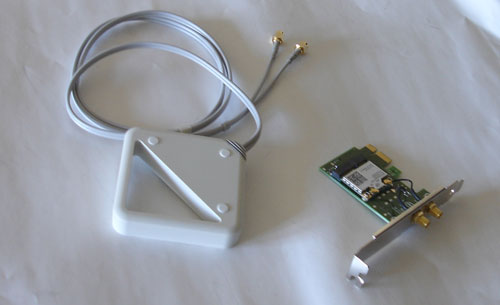
With the 7 series platform, Intel is starting to push for Wireless connection. Intel sells Centrino Advanced-N 6205 for desktops as an add-on accessory. The Centrino Advanced-N 6205 is a PCI-E x1 add-on card that features a dual-stream (2×2), dual band (2.4 GHz and 5GHz), 802.11 a/g/n Wi-Fi product with Wi-Fi Direct. A four foot cable external antenna is provided with the add-on card for up to 300 Mbps speed.
Lastly, the security feature has been beefed up with the new platform. It supports the new Intel Identity Protection technology, a feature that has more use in the business and corporate environment as well for laptops. In addition, the security and manageability has also been improved with the new platform. The Management Engine is Intel’s hardware controller, residing in the chipset’s graphics and memory controller. This application is primarily designed for corporate and enterprise markets, so it may not be something most customers use.
The vPro has been updated with the Management tool 8.0. However, for desktop chipsets, such features will be absent. Additionally, the board adds support for other security features such as anti-theft, OS Guard, and Secure Key. Many of these features are designed for mobile or corporate environments.
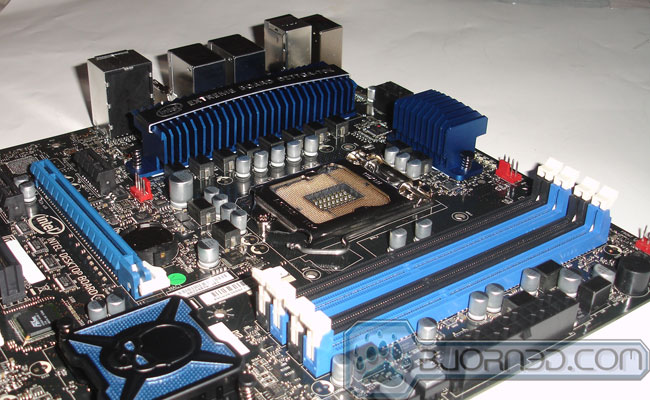
Intel DZ77GA-70K
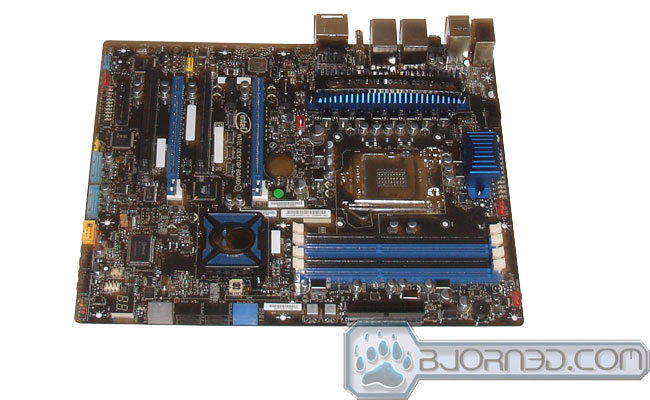
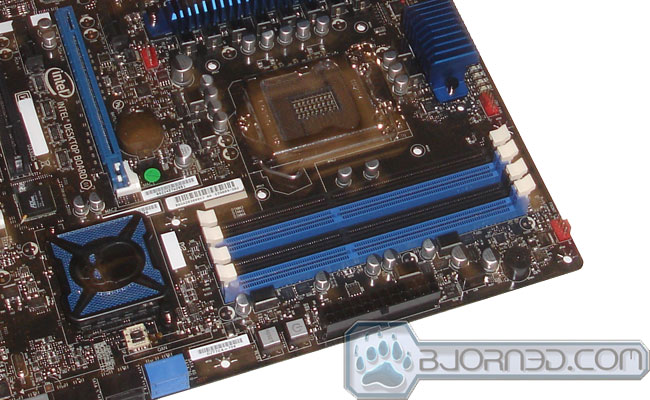
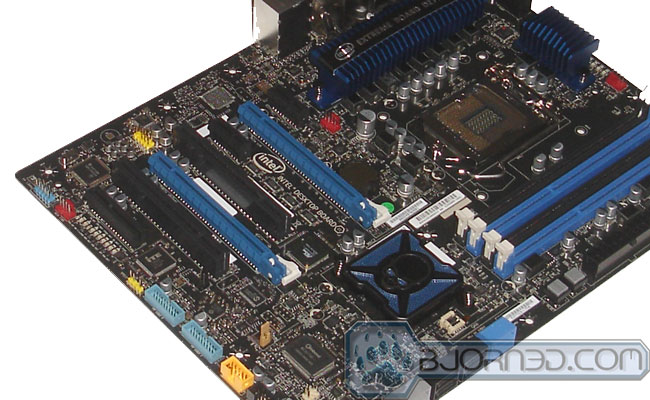
As always, Intel includes their own board when they launch a new chipset. Intel shipped us their extreme board, the DZ77GA-70K, for review. The board continues the Intel’s Extreme DNA with its black PCB and blue slots. As usual, there is an image of the skull on the board to signify that the board is designed for performance.
The board is an ATX form factor. Overall, the board’s layout is quite good. It has a low profile heatsink above the PWM. There is good clearance around the CPU area for large heatsinks. Notice that there is no heatpipe connecting the PWM and the chipset to help to cool the chipset. There is good spacing between the CPU socket and the memory slots. The board comes with four DDR3 DIMM slots for up to 32GB of memory. The official memory speeds supported are 1066MHz, 1333MHz, and 1600MHz with 1.35V and 1.5V as specified by the JEDEC. XMP profiles are supported, and higher speeds can be achieved with overclocking as always.
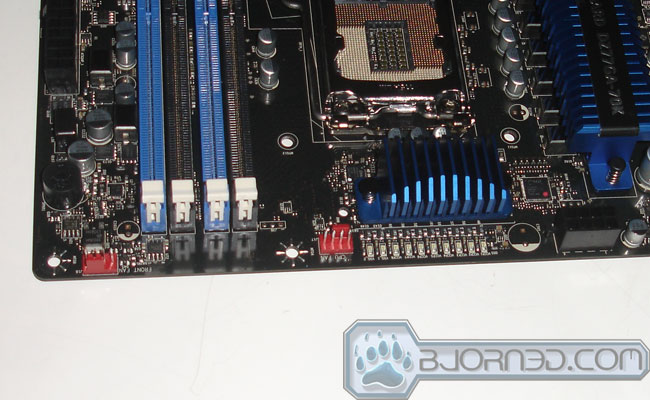
A series of LED indicators is used to display CPU power usage. They are labeled VCCP1 through VCCP8. Depending on the CPU load, different numbers of LED will lights up. In addition, there are two additional indicators for the VGA.
Sitting on the edge of the board is where we will find the main ATX 24pin power connector. Next to it are the power on/off reset buttons. It is always good to have these buttons. Moving down, we see eight SATA ports. The first two blue ports are 6 Gbps controlled by the Z77 Express chipset, and the next four black ports are 3 Gbps controlled by the Z77 chipset as well. The last two gray ports are SATA 6Gbps controlled by Marvell 88SE9172 that hops along the PCI-E x1 interface. The Marvell chipset is also responsible for the back panel eSATA connector. The PCI-E 2.0 x1 has a maximum transfer rate of 500MB/s so we may see these ports slightly worsen due to the bandwidth cap compared to the SATA 6Gbps’s maximum transfer rate of 600MB/s. The Intel ports will support RAID 0, 1, 0+1, and 5. Additionally, they will support Intel Smart Response Technology and Intel Rapid Start Technology.
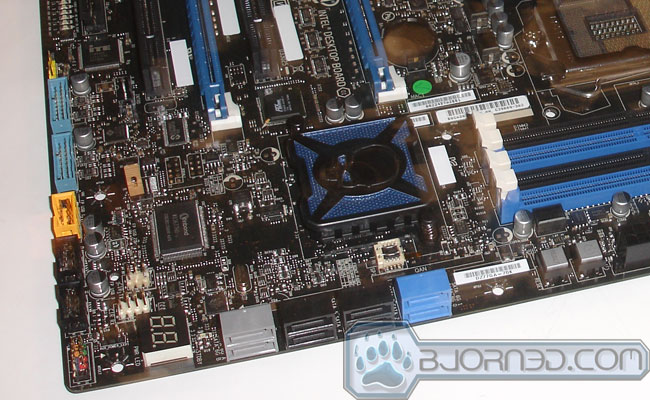
Next to the SATA ports is a handy LED debug code display. Personally, we would prefer to see the debug code display next to the power button and closer to the top of the board for easier viewing. The board’s sensors are controlled by the Winbond W83677HG chip.
Today’s motherboards are often fan-less for complete silent operation, and Intel’s DZ77GA-70K is no exception. A small chipset heatsink sits above the chipset, and on it we can see the skull image that Intel includes with their extreme boards. It is actually a little piece of metal double taped to the heatsink.
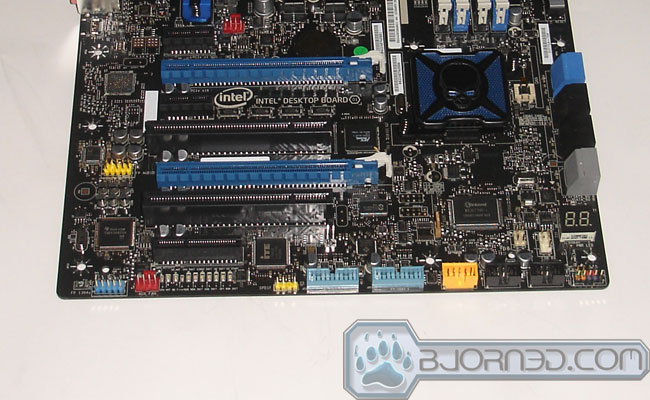
Lining the bottom of the board are the usual internal headers. Starting from the bottom right and moving toward the left, we have front panel headers, an alternate front panel power LED header for those who may be using the fan pin type header, three USB headers (two black and one yellow; the yellow is designed with high current for charging), two USB 3.0 headers (light blue), an SPDIF, a four pin auxiliary fan header, and a FireWire 1394a header controlled by TI TSB43AB22A. Sandwiched between the USB headers and the FireWire header is the status indicator for various components.
Looking a little inward from the bottom we can find a few more headers for lesser used ports. Above the USB 2.0 header are the IR receiver and transmitter headers. Slightly towards the left are the clear CMOS jumper, a serial port header, and the chassis intrusion header.
Lastly, sitting next to the second PCI-E x16 is where we find the front panel audio header. This is probably the biggest layout issue with the board. We do not mind that Intel places the lesser used port headers a little bit inside of the motherboard but the front panel audio is one of the most commonly used headers. It is rather inconvenient to have this header sitting here, as it will get in the way when an add-on card is installed.
For expansion, we find the board features two PCI-E 3.0 x16 slots that are capable of either running at x16 for a single GPU or x8 for dual GPUs. Four P13PCI-E 3415ZHE chips are responsible for the PCI-E 3.0 switch. Additionally, there are three PCI-E x1 slots and two PCI slots. The last PCI-E x1 slot is slightly longer and has the end open so that it can accommodate longer cards. Still it is only able to communicate at x1 speed. A set of PEX 8606 AA50BA PCI-E 2.0 switch chips sit between the slots. Since the Z77 chipset does not natively support PCI, Intel relies on the iTE IT8892E PCI-E to PCI bridge for backward support. The same bridge is also used to handle the data coming the FireWire chip (header).
We see a total of four fan headers (red color) located throughout on the board with. Three of them are near the CPU area: one is next to the CPU, one is next to the DIMM slots, and one is just above the first PCI-E x1 slot. The last fan header is located on the bottom left side of the board.
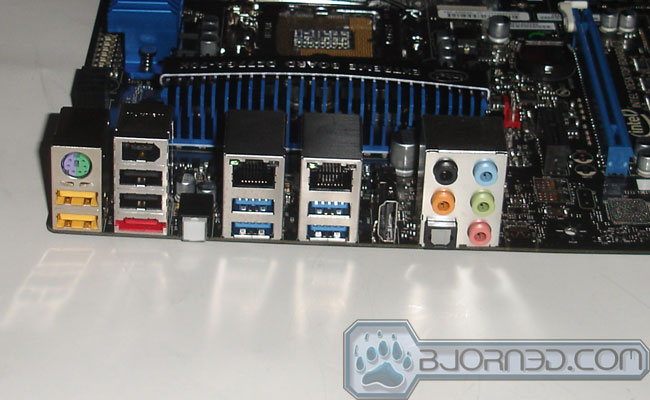
The back panel of the Intel DZ77GA-70K is pretty standard. It has a PS/2 keyboard/mouse port, four USB 2.0 ports (two yellow ports are designed for high current charging), four USB 3.0 ports, an eSATA port a FireWire 1394a port (TI TSB43AB22A), two Ethernet port controlled by Intel 82579 and Intel 82574 controllers, a Clear CMOS button, an HDMI port, and the usual audio ports with SPDIF out. Sandy Bridge supports two independent displays, and the upcoming Ivy Bridge will support 3 displays but since the board only comes with a single HDMI, users are pretty much limited to one display on the integrated graphics. The audio on the board is handled by Realtek ALC898, pretty much standard nowadays.
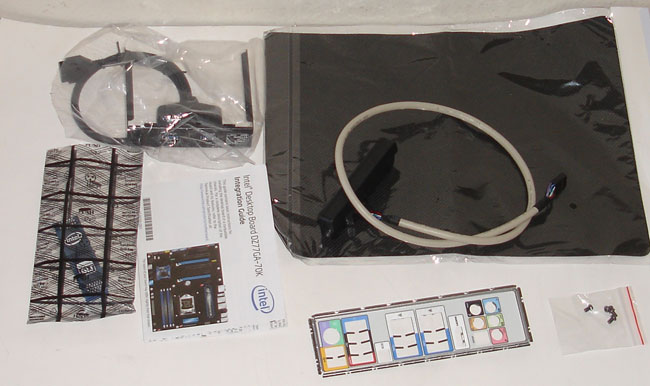
The board we received comes with:
- SLI bridge
- Front panel USB dock
- Back I/O plate
- a bag of screw for the USB dock
- mousepad
- Colored installation guide.
Since our review unit is not a retail boxed unit, there is no cable included with the board. The retail box most likely will come with a few SATA cables. Additionally, we did not receive a manual either.
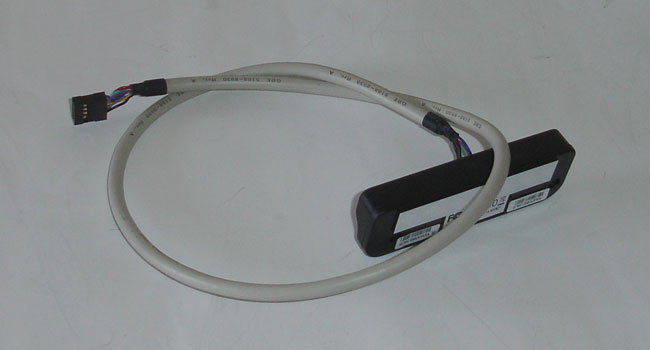
Intel bundles the board with the MSI MS-3871 Bluetooth 2.1 EDR and Wi-Fi 802.11 b/g/n combo module. The unit is installed internally to the USB 2.0 header on the board and one one side of the module has double sided tape that can be used to tape it to the side of the case. Since the antenna is built into the module and not external, we probably do not expect it to have a great range, but it’s nonetheless a very nice addition.
Additionally, Intel also shipped us the Intel Centrino Advanced-N 6205, a WiFi add-on card for desktops. The WiFi module is based on Ralink RT8070 chip that offers 802.11 b/g/n wireless connection. The WiFi module features dual-stream (2×2), dual-band (2.4GHz and 5GHz) connection up to 300 Mbps of transfer speed.
Revamped UEFI BIOS
We were surprised to find out that the Intel DZ77GA-70K board uses F2 to enter the BIOS as opposed to the Delete key like ASUS, MSI, and Gigabyte boards do. It’s not a major issue but over the years we have grown used to using Delete as opposed to F2.


Intel’s UEFI BIOS has gone through some facelift with the DZ77GA-70K. With the 6 series, the UEFI BIOS was still more text-based with a few graphical enhancements. This time, the BIOS is has a prettier interface and has greater support for mouse input.
By default when we first boot into the BIOS, the Home is the first screen that greets us. This screen is a major departure from the old BIOS interface. It consists of processor, graphics, and memory settings. A panel is provided above each setting where it allows us to quickly overclock the component.
On the left side of the Home screen is where we can quickly switch the boot order by simply dragging the hard drive icon around. On the bottom of the Home screen is a list of four options: Tuning, Devices, SATA, and Profiles. If users click on one of them, they will be taken to the advanced settings.
The Home actually consists of three screens. When we click on the right arrow, we can see the second Home screen. Here we have a preview of the board image on the left side. In the middle is where the system monitoring is located, displaying the fan speed, temperature, and voltages. On the right side, we have the SATA devices. If we move the mouse over one of the SATA drive, the image above will highlight which port the drive is connected. We like this feature a lot because this means that we no longer need to dig through the manual or read the tiny label on the board to know which port the hard drive is connected to. It is useful for troubleshooting and when swapping hard drives in and out.
The third Home screen consists of system information like the board model and processor speed.
Switching to the Advanced mode reveals more settings that are not available in Home screen. The top has a list of different setting menus, and when we click one of the menus, we will see more detailed options available on the bottom. The options in Advanced mode are grouped in blocks: similar settings are grouped together. Settings are often adjusted with either a slider or a drop down menu. The BIOS organization seems to reduce the number of clicks or the need to scroll down through a long list of settings. When a menu is selected, we are presented with all of the settings. Overall, it is a very good use of the graphical interface.
The BIOS is completely void of any issues. Bare in mind that the BIOS we have here is still in beta as it is not finalized yet, and Intel is aware of some of the issues and have promised to have them fixed by the launch date. For example, we did notice some graphical anomalies, such as when we clicked a drop down menu, the menu would be carried over to the next screen. In addition, we noticed that there are some lags when switching between windows. The scrolling function is also not supported here which makes it difficult to sort through a long list of options. We also had trouble setting our RAM at 1600MHz. While we were able to set this speed, in Windows, it still shows the memory running at 1333, and memory tests supported the speed. With XMP Profile, however, we were able to run the RAM at higher speeds like 1866.

The Main screen displays processor information, memory information, system date and time, and the ability to adjust the event log.


Under Device and Peripheral is where we can adjust the USB, SATA, and onboard devices.


The Cooling is where we will find the System Monitor, and the options to adjust the Fan speed and the temperature threshold. Notice that Intel provides the ability to label the type of device connected to a particular fan header, another neat feature that can reduce the need to refer to the manual. The board offers the ability to set the processor, PCH, Memory, and VR temperature threshold. Lastly, the Threshold menu offers the ability to adjust the system voltages.


All of the overclocking settings are grouped under the “Performance” menu. Here we have four submenus: Summary, Processor, Memory, and Graphics. Notice the Host Clock Frequency shows up on every single setting. Since the new Core processors host clock affects the CPU, Memory, and graphics, it makes sense to see it on every single menu.
By default, Intel already has some overclocking presets. When we use the slider, we have the ability to overclock our CPU from 3.9GHz to 4.5GHz with the following settings:
| Clock speed (GHz, all four cores) |
3.9 |
3.8 |
3.9 |
4.0 |
4.1 |
4.2 |
4.3 |
4.4 |
4.5 |
| CPU Voltage Offset (mV) |
0 |
0 |
20 |
40 |
60 |
80 |
100 |
120 |
140 |
| Burst Mode Power Limit (W) |
120 |
170 |
180 |
190 |
200 |
210 |
220 |
230 |
240 |
| Sustained Mode Power Limit (W) |
95 |
160 |
170 |
180 |
190 |
200 |
210 |
220 |
220 |
| Processor TDC Current Limit Override (A) |
112 |
130 |
135 |
140 |
145 |
150 |
155 |
160 |
165 |
The setting above is when all four cores are overclocked.
It is possible to overclock the processor even further by tweaking the individual cores. The maximum multiplier allowed on the Z77 board is x65. The board offers CPU voltage adjustment up to 1.92V, CPU voltage offset up to 1000mV, and host clock up to 120. More power adjustments are available on the left side of the screen where we can set the Burst Mode Power Limit from 120-1000 watts, Sustained Mode Power Limit up to 500 watts, Processor TDC Current Limit Override up to 200 amps, Processor PLL up to 2.4 volts, and Processor I/O up to 1.8 volts. We see the board also supports VDroop where we have three different settings: High (Power Saving), mid, and low (Performance).
In the memory settings, we have the ability to adjust the memory voltage up to 2.0 volts and Processor System Agent up to 1.75 volts. The secondary timing settings list is not as extensive as on other boards but all of the essentials are here. Users can use either the keyboard to key in the timings or the slide to select the timing.
Unfortunately, none of the drop-down menu settings can be entered manually. For most of the settings, this is not an issue as there are only two to three selections. However, with voltage settings, it is rather troublesome to scroll through a long list of numbers, especially since the scroll wheel does not function in the BIOS.
For the graphics, we have the option to adjust the multiplier up to x19 of the host clock. The increments are in steps of 0.5x. Additionally, we see the power settings on the right side that is the same as those found on the Processor section.


The Security is where we can set the password, enable options like the Execute Disable Bit and the Virtualization.
Power is where we have the option to adjust the system power settings. Interestingly, Intel places the Smart Connect and the Rapid Start in here. In a way, it makes sense since these options are related to the system’s power consumption.
Lastly, Boot is where we can adjust the boot order, boot option, and also enable or disable boot devices. We can also adjust boot display options here.
TESTING & METHODOLOGY
We did a fresh load of Windows 7 64 bit on the test rig, then once we updated the software and drivers to the latest versions, we made a clone copy of the hard drive because we’re going to run this beast like we stole it. We ran each test a total of three times and the average of each test is reported here.
| Test Rig | |
| Case Type | None |
| CPU | Intel: Core i5-2500K |
| Motherboard | ASUS P8Z68-V PRO
Intel DZ77GA-70K MSI Z77A-GD65 |
| Ram | Kingston HyperX 1600 |
| CPU Cooler | Cooler Master CNPS9900 Max |
| Hard Drives | Seagate 7200.11 1.5 TB
OCZ Vertex 3 |
| Optical | None |
| GPU | Gigabyte GTX 580 SOC |
| Case Fans | 120mm Fan cooling the MOSFET area |
| Docking Stations | None |
| Testing PSU | Cooler Master UCP 900W |
| Legacy | None |
| Mouse | Microsoft Intellimouse |
| Keyboard | Logitech Keyboard |
| Speakers | None |
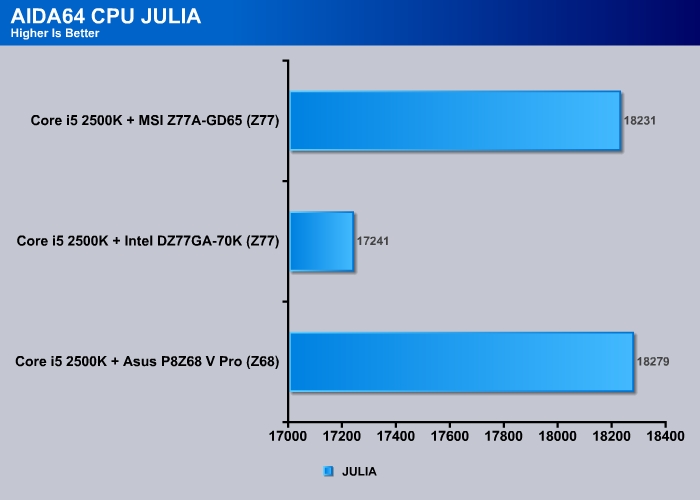
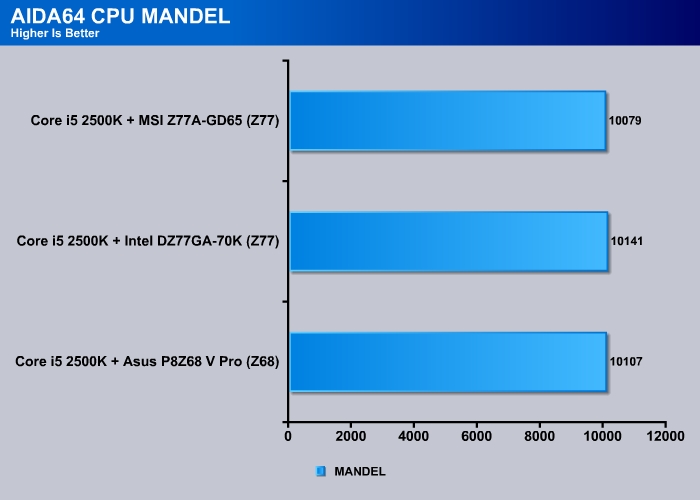
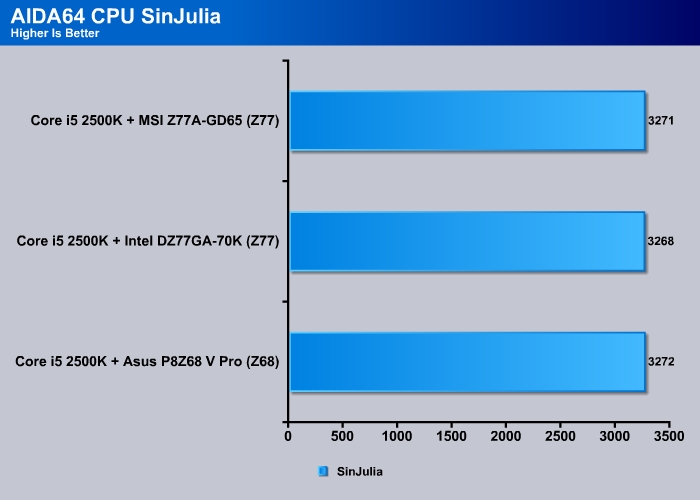
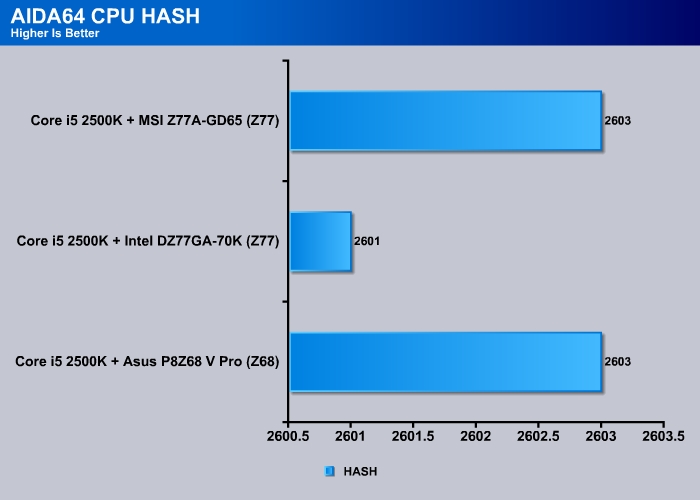
aida64 v1.80
“AIDA64 Extreme Edition is a streamlined Windows diagnostic and benchmarking software for home users. AIDA64 Extreme Edition provides a wide range of features to assist in overclocking, hardware error diagnosis, stress testing, and sensor monitoring. It has unique capabilities to assess the performance of the processor, system memory, and disk drives. AIDA64 is compatible with all current 32-bit and 64-bit Microsoft Windows operating systems, including Windows 7 and Windows Server 2008 R2.”
CPU

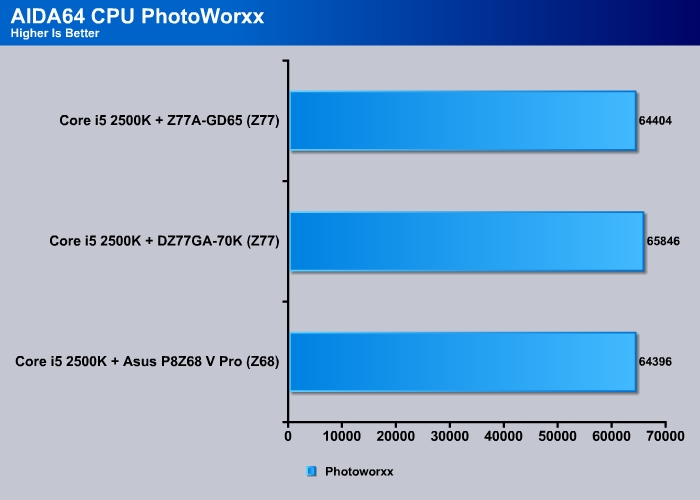
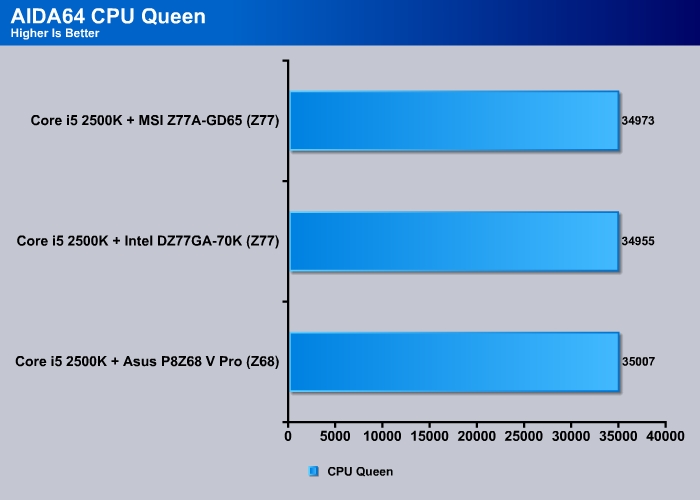
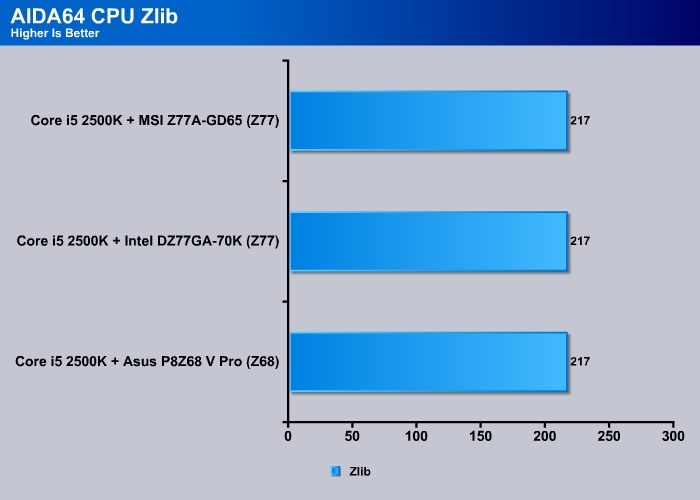
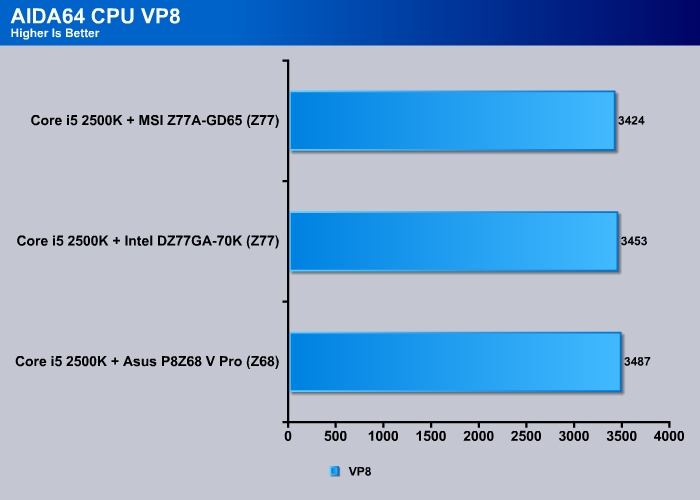
FPU VP8 is an interesting benchmark. It takes a look at video compression performance using the Google VP8 video codec version 0.9.5. This benchmark encodes 1280×720 resolution video frames in 1-pass mode at 8192 kbps bitrate with best quality settings.
While the AIDA64 benchmarks do not show much performance variations between the Z77 and Z68 chipsets, we believe this will change once Intel releases their next generation CPU running with die shrink later on this month.
Memory


When testing the memory read, it looked like the Z77 would be lower than Z68, until we tested it on the MSI Z77A-GD65 motherboard. The MSI motherboard managed to push out an additional 0.62GB/s over the Intel DZ77GA-70K, and about 0.45GB/s over the Z68 counterpart.
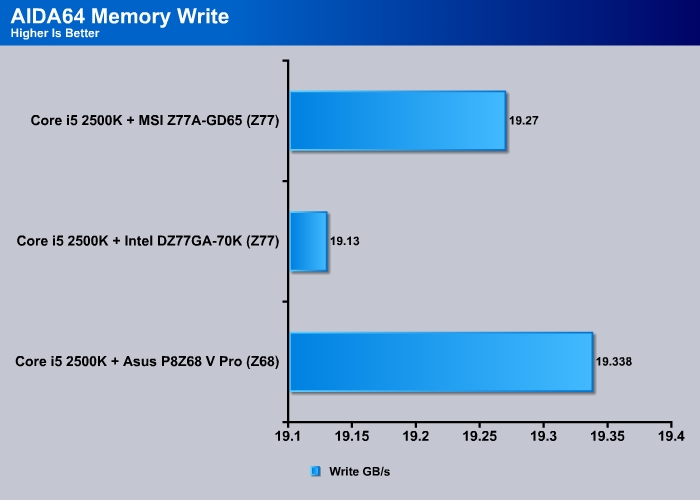

There is a slight improvement on memory latency with the introduction of the Z77 boards. There is about 6% improvement in memory latency on the Intel DZ77GA-70K over the previous Z68 ASUS P8Z68 V Pro motherboard.
SiSoft Sandra 2011

“SiSoftware Sandra (the System Analyzer, Diagnostic and Reporting Assistant) is an information & diagnostic utility. It should provide most of the information (including undocumented) you need to know about your hardware, software and other devices whether hardware or software. It works along the lines of other Windows utilities, however it tries to go beyond them and show you more of what’s really going on. Giving the user the ability to draw comparisons at both a high and low-level. You can get information about the CPU, chipset, video adapter, ports, printers, sound card, memory, network, Windows internals, AGP, PCI, PCI-X, PCIe (PCI Express), database, USB, USB2, 1394/Firewire, etc.”
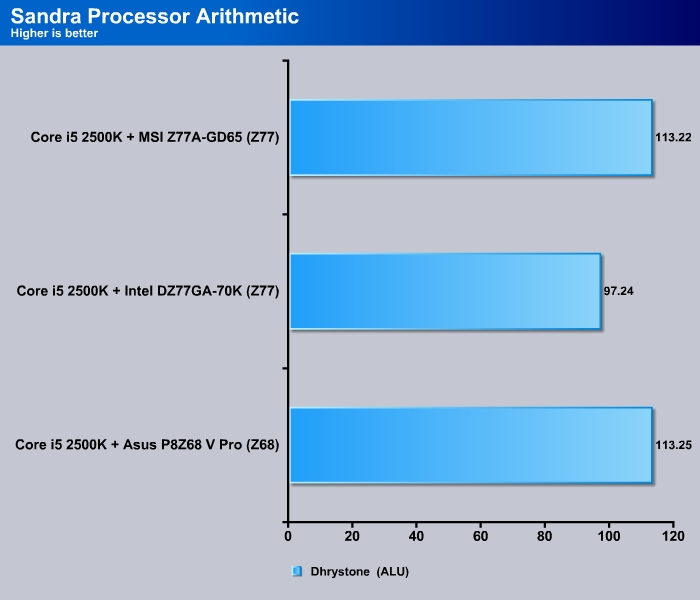
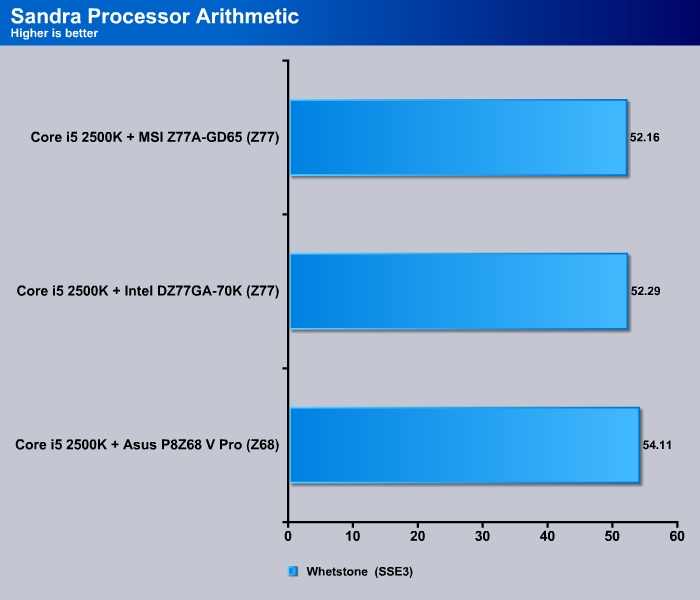
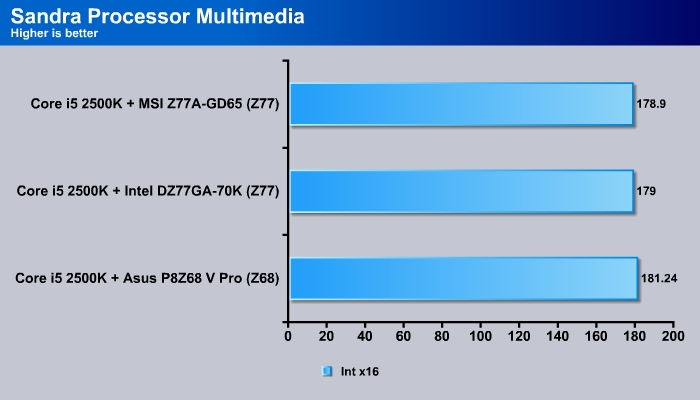

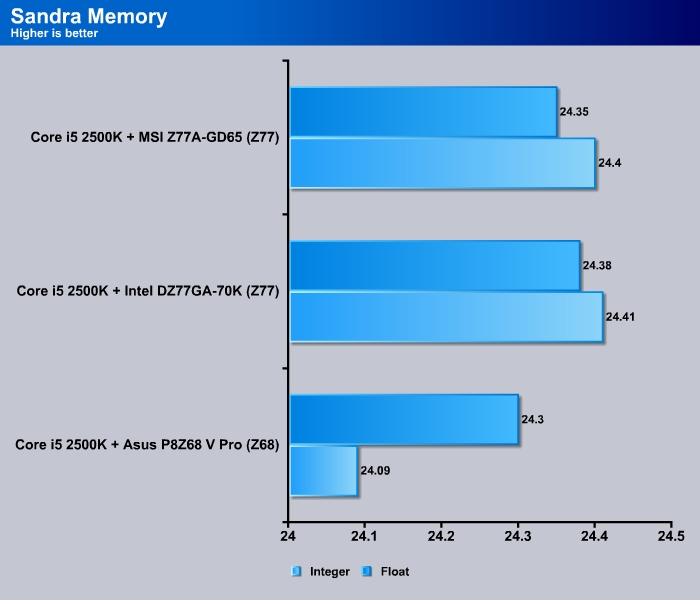
The Sandra CPU and Memory benchmarks are essentially very similar to the ones done in AIDA64, however there is one interesting thing to note. When looking at the last benchmark (Sandra Memory Integer and Float) performance, even though the performance difference is minimal, the Z68 chipset showed a slightly lower performance over the Z77 chipset motherboards.
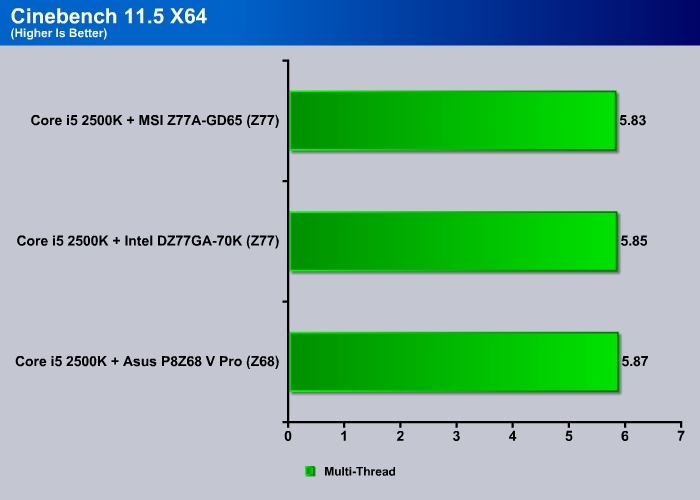
Cinebench R11.5
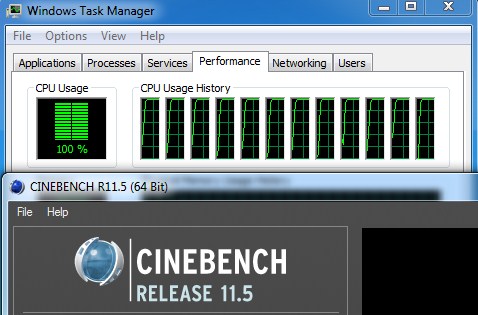
“CINEBENCH is a real-world test suite that assesses your computer’s performance capabilities. MAXON CINEBENCH is based on MAXON’s award-winning animation software, CINEMA 4D, which is used extensively by studios and production houses worldwide for 3D content creation. MAXON software has been used in blockbuster movies such as Spider-Man, Star Wars, The Chronicles of Narnia and many more. MAXON CINEBENCH runs several tests on your computer to measure the performance of the main processor and the graphics card under real world circumstances. The benchmark application makes use of up to 16 CPUs or CPU cores and is available for Windows (32-bit and 64-Bit) and Macintosh (PPC and Intel-based). The resulting values among different operating systems are 100% comparable and therefore very useful with regard to purchasing decision-making. It can also be used as a marketing tool for hardware vendors or simply to compare hardware among colleagues or friends.”
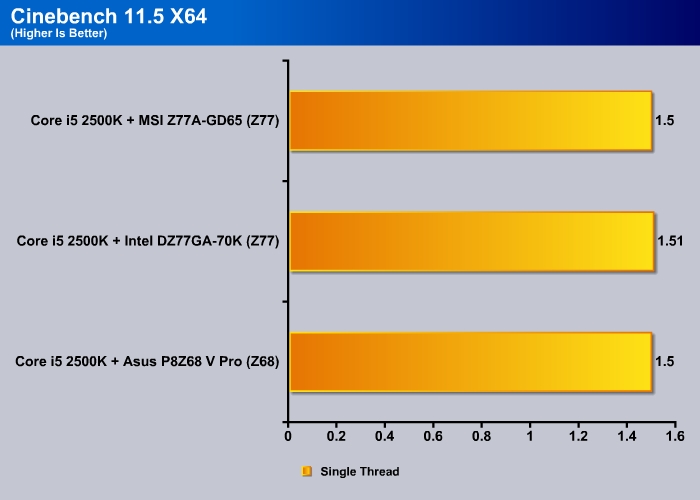
All the previous benchmarks showed the very minimal difference in processor and memory speeds on the new Z77 chipset compared to the Z68 chipset, so we see the same results on the Cinebench R11.5 benchmark as well. Cinebench heavily utilizes the CPU, and since there are no major performance optimizations that we can see on the new Z77 chipset, there are no big differences in performance.
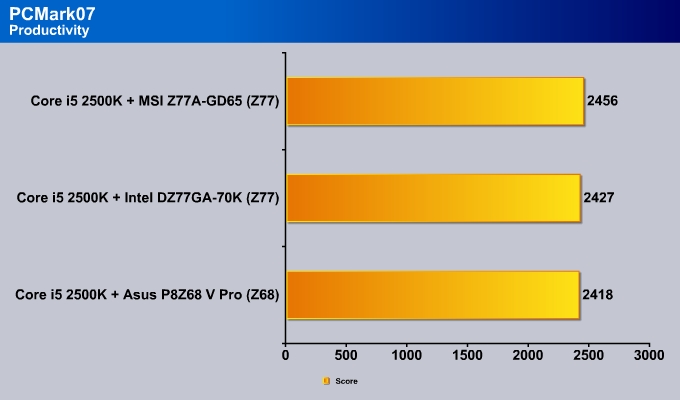
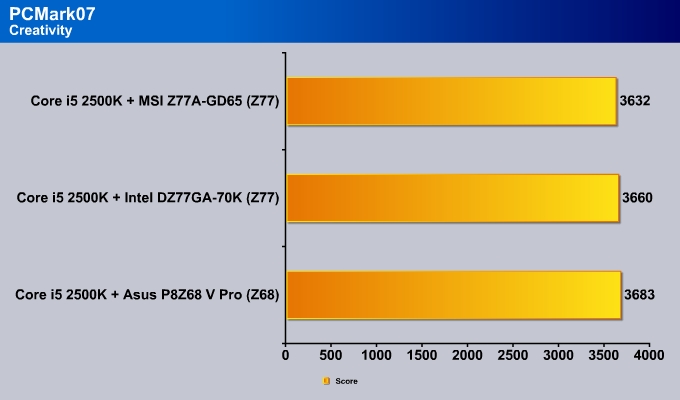
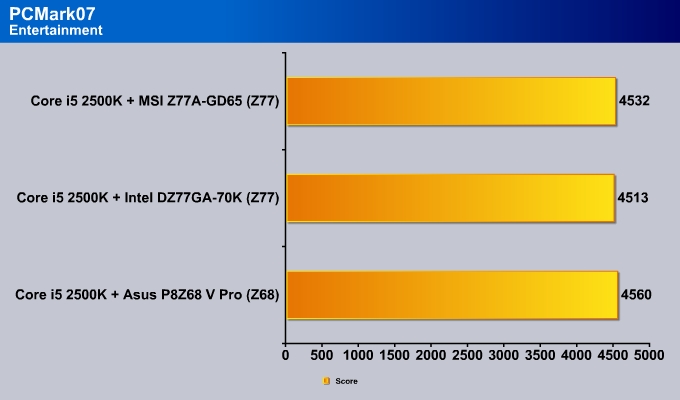
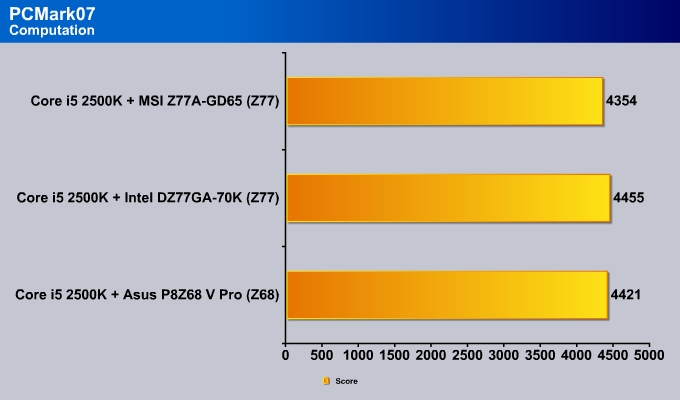
PCMARK 7
The latest benchmark suite, PCMark 7, puts a greater stress on the system than PCMark Vantage. In contrast to PCMark Vantage, the latest edition stresses types of workloads rather than individual tasks. It consists of Lightweight, Productivity, Creativity, Entertainment, Computation, and Storage benchmarks. Readers can refer to the PCMark 7 whitepaper for the detailed list of applications and tests run for each suite.
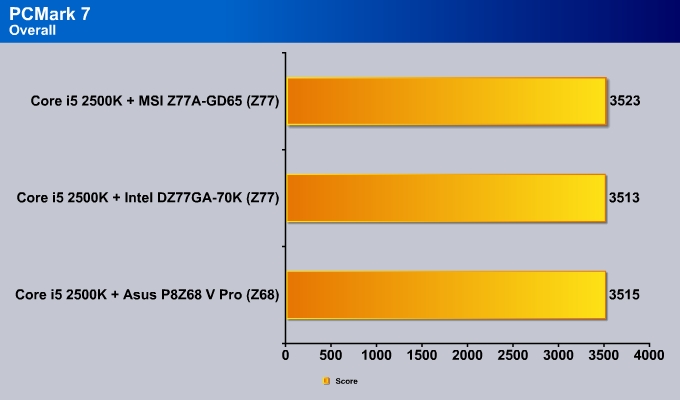
In terms of day to day use, only two points separate the Z68 and Z77 board. Do not expect a huge performance gain with the new chipset. Digging deeper into the individual tests, we can see that the Z77 actually performs quite well in the light workloads such as Lightweight and Productivity, so the higher slightly higher memory bandwidth and the lower latency is probably helping out with the performance gain.


Gaming benchmarks
3DMark11
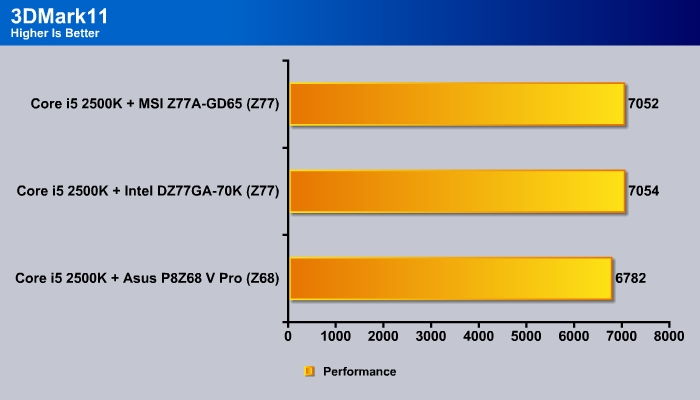
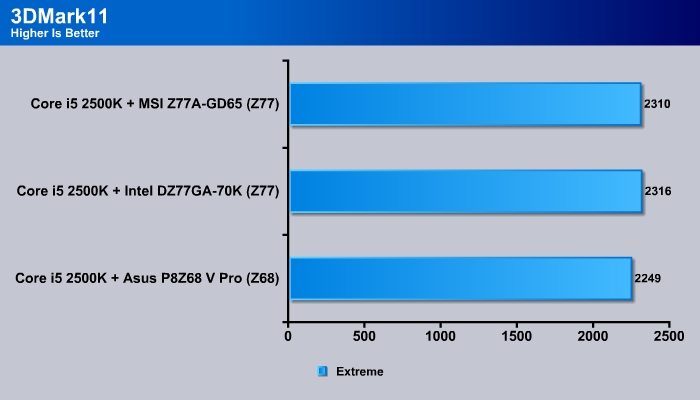
Interestingly, in 3DMark 11, the Z77 shows 2% gain in Extreme mode and 4% gain in Performance mode. Obviously, the Z77 chipset will not have much performance enhancement in the CPU since we are using the same processor on both boards. However, if we consider the system-wide performance enhancement, as shown with 3DMark, we can see that the new chipset has slight improvements.
IGPU Performance
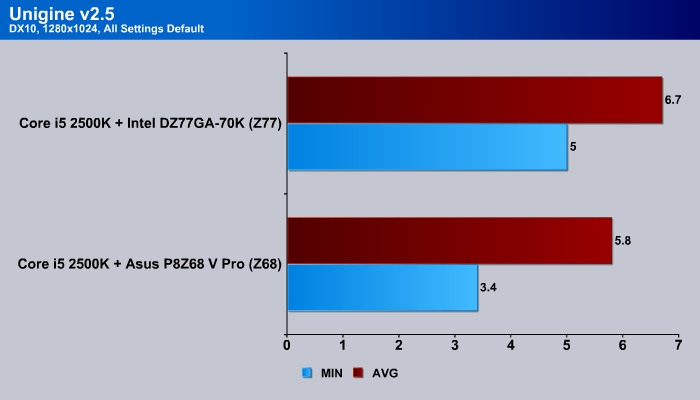
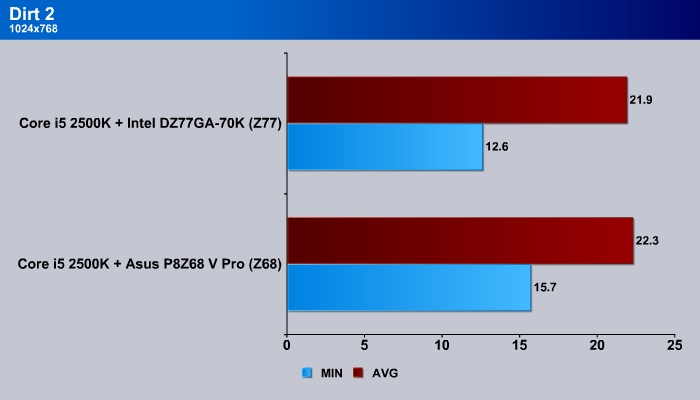
Looking at the integrated GPU performance, we get a mixed result where Unigine 2.5 has a slightly improvement while the Dirt 2 performance is slightly worse.
Discrete GPU Performance
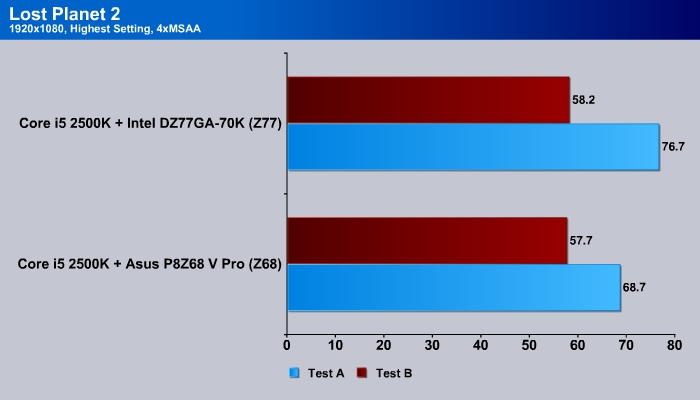
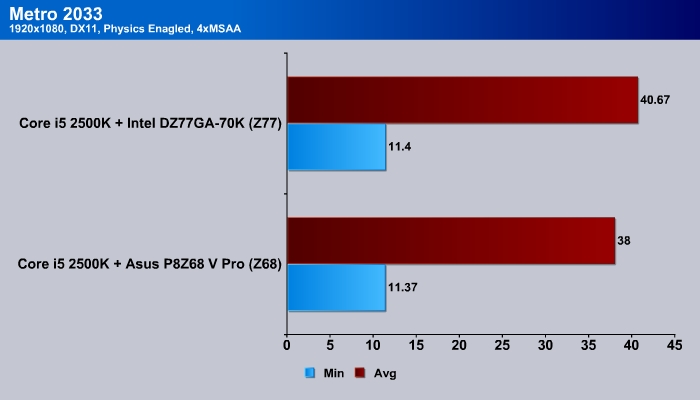
With a discrete card, we can see that there is definitely improvement in the average FPS. Lost Planet 2 shows a bigger gain in the performance, but a more demanding game like Metro 2033 shows only a 4% gain in performance.
STORAGE & Peripherals
SSD: SATA III
| Burst (MB/s) | Random (ms) | CPU (%) | Avg Read (MB/s) | Avg Write (MB/s) | |
| ASUS P8Z68-V Pro (Z68) | 407.4 | 0.1 | 5 | 323.3 | 381.9 |
| Intel DZ77GA-70K (Z77) | 392.3 | 0.1 | 2 | 330.2 | 379.9 |
| Intel DZ77GA-70K (Marvell) | 296 | 0.2 | 7 | 208 | 157 |
The SATA performance for the Z77 chipset is comparable to the Z68 chipset. ASUS boards traditionally have a slightly better SATA performance than those of other manufacturers. Bear in mind that SSD’s lose performance with extended usage, so every subsequent testing can result in a slight loss of performance. Thus, the number can be different if we use different drives or test in different order. All in all, we would say the Z77 SATA III performance is on par with the Z68. Notice that the CPU usage on the Z77 is lower than the Z68.
USB 3.0
| Burst (MB/s) | Random (ms) | CPU (%) | Avg Read (MB/s) | Avg Write (MB/s) | |
| GIGABYTE Z68XP-UD3-iSSD (Eton) | 171.4 | 17.1 | 2 | 108.4 | 113.2 |
| ASUS P8Z68-V Pro(ASMedia) | 162.1 | 17.2 | 2 | 111.1 | 109.9 |
| Intel DZ77GA-70K (Z77) | 144.7 | 17 | 5 | 111.1 | 109.9 |
USB 3.0 on the Intel Z77 chipset is comparable to a third-party chip like the ASMedia. The Burst speed on the Intel chipset seems to be lower than the other controller but the average read and write speed is comparable. The CPU usage, however, is a tad higher for the Z77.
OVERCLOCKING
If you choose to use the built-in overclocking setting set by Intel, then overclocking the DZ77GA-70K is very easy. You can easily get your processor running at 4.5GHz by simply sliding the slider in the BIOS with the following settings set by Intel:
- CPU Voltage offset: 140 mV
- Burst Mode Power Limit: 240W
- Sustained Mode Power Limit: 220
- Processor TDC Current Limit Override: 165A
At this speed, the processor is rock solid but the power consumption under load is 270W. This is 96W higher than the default speed. The overall result is quite good for a 36% gain in performance without much tinkering. We were able to push the CPU to 4.7 GHz and keep the stock power and voltage settings.
If you want to do more tinkering to see how far you can push, we found that overclocking on the Intel board is slightly more difficult than on ASUS or Gigabyte boards, since you would have to manually adjust the voltage and current settings. The board does have the ability but it requires playing around with more settings in the BIOS.
POWER CONSUMPTION
We ran Prime95 to stress the CPU in order to measure the overall system power consumption. All of the power saving features (C&Q and SpeedStep) have been enabled, as we envision this is how most people will be running their system.
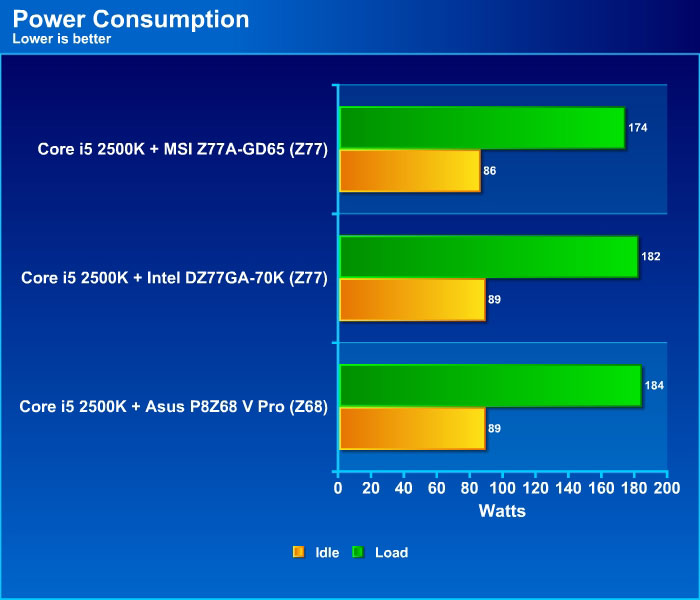
The power consumption for the Z77 is comparable to the Z68. We can see that when idle, the new board consumes the same amount of power, but under load, it consumes 2 fewer watts.
CPU Temperatures

The temperatures were recorded with RealTemp while running wPrime 1024 right before the end of the 5th run. The results were recorded carefully. After the results were recorded, we waited for 30 minutes before taking Idle temperature measurements. The results were as follows:
| CPU Temperatures | Temperature (Idle/Load) |
| Asus P8Z68-V Pro (Z68) | 31C/48C |
| Intel DZ77GZ77GA-77K (Z77) | 31C/52C |
| MSI Z77A-GD65 (Z77) | 30C/52C |
| Chipset Temperatures | Temperature (Load) |
| Asus P8Z68-V Pro (Z68) | 34 |
| Intel DZ77GZ77GA-77K (Z77) | 33 |
| MSI Z77A-GD65 (Z77) | 31 |
The idle CPU temperature for the MSI board is 1C lower than the Intel board but under load, there is no difference in the temperature. However, the chipset temperature for the MSI board is clearly cooler than the Intel board.
Conclusion
The Z77 chipset brings us native PCI-E 3.0, USB 3.0, and a few small technological enhancements over the 6 series chipset. Overall, there is no radical new technology on the new chipset that demands an upgrade from a 6 series board. New features such as Rapid Start and 3-display support will only work if you pair the chipset with the new Ivy Bridge processor. If you are using the Sandy Bridge processor, these features will not be available to you. Virtu MVP will be available to 6-series chipset board users if the manufacturers choose to enable it on the boards. All in all, if you really do not need these features, there’s no real reason to upgrade. Technically, motherboard manufacturers can very well add such features and enable support on 6 series boards, but Intel has limited it strictly to the new platform. One of the more useful features with the new chipset in our opinion is the Smart Connect, which will be available with the 6 series chipset as it is software based.
The performance difference with the 7 series and 6 series board using a Sandy Bridge processor is very small. When we look at the CPU and memory subsystem performance, they are almost identical. The 7 series seems to have a slightly better memory performance over the 6 series but the CPU performance is pretty much identical. In real world applications that are CPU and memory bound such as Cinebench, X264, and TrueCrypt, we noticed that there is virtually no difference between the two chipsets. However, in games, there can be up to 5% gain in the performance. The difference is very small, but it is there nonetheless.
We are very happy to see the native USB 3.0 support built into the 7 series chipset. Its performance is on par with other third party chips like the ASMedia controller in the average read and write, but it seems to be consuming slightly higher CPU usage and has a slightly lower burst performance. We are a bit disappointed that Intel could not have gotten few extra SATA 6 Gbps ports or added additional PCI-E supports.
Ultimately, if you are considering upgrading, then you have to consider if the new features are worth it. If you are looking to build a new system, there is really no reason to choose the older Z68 chipset boards since the Z77 is now the standard. The included PCI-E 3.0 support also provides a future upgrade path. Now we just have to wait a little longer to see how the new processor performs when paired with the new chipset.