The MSI Z77A-GD65 is clearly designed for hardcore overclockers with its array of overclocking features and high quality components. Check out the review for more detail.
Introduction
It’s finally here! We can finally talk a little bit about what is coming next for the mainstream desktop. While we still are not able to give out any information regarding the next generation Core processor, we can talk about the new chipset that will work with it, as well as with older Sandy Bridge processors. We previewed the MSI board a month ago and now we can finally give you more information,especially regarding its performance. If you have not yet read our overview of the features on the 7 series chipset, especially the Z77, we suggest you check our other article first.
In contrast with ASUS and Gigabyte, which add ports and connectors (Bluetooth, WiFi, or mSATA) to their motherboards, MSI has stayed true to its roots with the Z77A-GD65 by offering a board that is full of overclocking potential. The Z77A-GD is designed with overclockers and enthusiasts in mind. The board comes with features like voltage probe headers, digital debug code readouts, an onboard power switch, and a clear CMOS button.
Features Overview
Military Class II
MSI has a continuing trend that we have seen before. The Military Class II is a feature which is strictly component-based. These select components make up the board as a whole, and ‘military class’ means they meet the strictest performance requirements and some of the roughest durability conditions known to man.
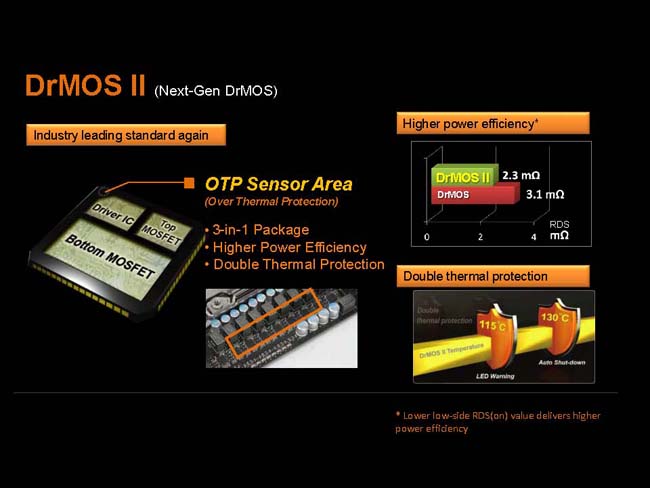
Build with MSI’s Military Class III components, the board uses the new generation of DrMOS II. In addition to have the single package of Driver IC and the MOSFETs, the new DrMOS has an onboard over thermal protection. This provides higher power efficiency, which according to MSI is able to reduce the resistance by 35%. The chip provides double thermal protection where if the chip reaches to 115C, an LED warning will be displayed and when it reaches to 130C, the system will automatically shut down.
MSI’s military Class components gone through 7 rigorous MIL-STD0810G tests by an independent company and every board will come with a certificate indicating its quality and stability
Super Charger
The Super Charger Feature is increases the utility of USB 3.0 ports over the older USB 2.0 standard. As USB-charged devices have become commonplace now, the higher power provided by USB 3.0 ports is a handy tool.

The MSI Super Charger feature allows for faster and stronger charging of devices, which means that the user will spend less time charging and more time using their mobile devices. This is accomplished via a software which revises the way the power is delivered to the USB port for optimized charging conditions which will allow for a better and faster charging experience.
Winki 3
Winki 3 is a very light and very fast Linux distro which allows quick boot and access for the user if they do not need the full functionality of Windows.

This feature may not seem like much on the surface but with the imaging software that is integrated, it could be a lifesaver in the event of a boot fault in Windows. Users can boot into Winki 3 and just image the drive and save data without formatting and losing everything due to the OS not booting. This still seems a little far fetched as far as real world usability goes but the feature can definitely be useful if the situation presents itself as we never really notice how important our data is until we lose it.
Click Bios II
MSI’s Click BIOS II is a very clean looking integration of a GUI UEFI interface. In addition, MSI worked very hard to make the interface of their Windows-based application very similar to that of the BIOS.

This is not really a new feature as we have seen this previously in various implementations, but the way it was designed and styled to closely mirror the actual UEFI BIOS is well done. It is a great and smooth interface so that the user does not need to learn 2 different modes.
 |
Military Class IIIMSI mainboards maintains the commitment to product stability and reliability by introducing Military Class III components! In addition to the use of Hi-c CAP, SFC, and Solid CAP, MSI now incorporates DrMOS II, the next-generation DrMOS that provides an integrated Double Thermal Protection to maximize the lifespan of components. All Military Class III components have passed MIL-STD-810G certification, making MSI’s Military Class III components synonymous with premium quality and ultimate stability.
|
|
 |
World’s 1st PCI Express Gen 3 mainboard brandWith ultra-high 32GB/s transfer bandwidth, PCI Express Gen 3 provides a 2X faster transfer rate than the previous generation, this delivers amazing capabilities for true next generation extreme gaming. |
|
 |
World’s 1st UEFI and software graphical user interfaceMSI ClickBIOS II provides a consistent user interface both in the UEFI BIOS and in Windows, it provides the most convenient way for users to control system settings and supports touchscreen control. Benefits:
|
|
 |
NVIDIA SLISLI technology allows using multiple Nvidia graphics cards in a single computer system with a mainboard equipped with an nForce SLI MCP. Users need an a mainboard with two PCI-Express 16x graphics slots and two matching GeForce graphics cards which are “SLI Ready”. Most NVIDIA’s PCI-Express graphics cards starting from the 6600 GPU can enjoy the benefits of SLI. |
|
 |
THX TruStudio PROTHX is a trade mark of a high-end audio/visual reproduction standard for movies, home theaters, computer speakers and other audio devices. THX Certified Audio products are designed to let users experience movies & videos as live show. The true sound effect can make high definition video more powerful. Features |
|
 |
AMD CrossFireXAMD CrossFireX™ is the ultimate multi-GPU performance gaming platform. Enabling game-dominatig power, AMD CrossFireX technology enables two or more discrete graphics processors to work together to improve graphics performance. AMD CrossFireX technology allows you to expand your system’s graphics capabilities. It allows you the ability to scale your system’s graphics horsepower as you need it, supporting up to four AMD Radeon™ HD graphics cards, making it the most scalable gaming platform ever. With an AMD CrossFireX gaming technology, the traditional graphics limitation exists no more, allowing you to enjoy higher performance as well as visual experience. |
|
 |
SATA 6Gb/s
Features |
|
|
Super ChargerMobile consumer appliances are getting more and more attention in current day fast moving life style, with smart phones and tablets almost becoming a fashion accessory. However, many ordinary personal computers cannot charge some of these devices, making it difficult to stay connected. The MSI Super Charger is a Windows resident program capable of revising the power supply mode of your USB port to become more powerful. Once your phone or tablet is connected to your USB port, the Super Charger sends a signal to initiate its charging circuit, making it a really smart and convenient charging solution for mobile computing needs. Features |
|
 |
M-FlashCompared to common mainboard which need extra BIOS chips, MSI’s M-Flash has a double advantage which doesn’t need extra components and secondly, all your BIOS data will be saved in the USB drive. The stored data does not only have backup and upgrade function, moreover it can also be seen as a portable BIOS chip which is actually able to boot up your PC. Features |
|
 |
APS (Active Phase Switching)Active Phase Switching, APS, technology is an intelligent design that helps to save energy on MSI’s mainboards. The underlying idea is to switch |
|
 |
USB 3.0Compared to the 480Mbps provided by traditional USB 2.0, the all-new USB 3.0’s 5Gb/s offers 10 times the transfer bandwidth, so transferring a Blu-ray movie takes less than one minute. Features |
|
 |
Lossless 24-bit/192KHz HD Audio
|
|
|
Winki 3Winki 3 is a free Linux-based O/S which is based on the Linux core. With an ultra-fast booting speed and a multi-language interface, the built-in Winki 3 provides an easy-to-use internet environment that includes the most popular functions such as internet surfing, web mail, instant messaging, picture browsing, and more. It’s the most practical way to be online in the shortest time. Features |
|
 |
USB SafeguardUSB Safeguard can prevent mainboards and USB devices from being damaged by short-circuit and ESD (Electro-Static Discharge) with Anti-ESD chips built-into the mainboards. Additionally, the safeguard can protect against such dangers multiple times, and greatly improves product lifespan. Features |
|
 |
Live Update 5
Features |
|
 |
Instant OC• Instant MB info monitor |
|
 |
3TB+ Infinity3TB+ Infinity is not only breaking through the limit of traditional BIOS, but also enhancing the utilization of hard drives efficiently. In addition to supporting the latest 3TB hard drives, MSI 3TB+ Infinity technology can use the 3TB hard drive as boot disk when installing a 64-bit operating system. Compared to competitors, MSI 3TB+ Infinity is an industry-leading technology which substantially presents an advantage of development and application in the future. Features |


 SATA 6Gb/s provides double the bandwidth of traditional SATA 3Gb/s, and increases the data transfer rate between your mainboard and internal storage devices, such as 7200RPM HDDs, 10000RPM HDDs and SSDs. It’s also the current trend for upcoming high-speed internal storage devices to to break the existing bottleneck of a PC’s performance.
 off the power supply as soon as no electricity is needed, and when the system needs more resources again, APS will automatically adjust electricity supply accordingly. APS will automatically detect your processor’s loading at any given time and save energy accordingly. This is only possible by means of a very advanced power controlling technology. Other than software-based solutions, APS technology stands out from MSI’s own research. The specially developed IC chip can operate automatically depending on the demands of the power supply, which is to reduce the total power usage.
 Onboard PC audio gets better! MSI is the first to implement the most high-end HD Audio codecs available. Don’t be fooled by other inferior audio solutions onboard (sometimes you can’t even find the driver!) Only MSI offers the Loss-less 24-bit/192KHz HD Audio function with an incredible 109 SNR dB value to provide the most clear & vivid HD audio quality and support 7.1 channels surround sound playback with a 2-channel independent stereo output (multiple streaming) through the front panel 3.5 inch phone jack.
 MSI Live Update 5 is a powerful and useful application for updating the latest BIOS and Drivers, saving you time and lowers the risk of updating. End-users can install and run the Live Update 5 software on their computers with the companion CD or downloading the app from the MSI website.
MSI Z77A-GD65

MSI previewed their Z77A-GD65 board at CES 2012 at a private meeting suite their upcoming motherboard for the LGA 1155. The board accommodates socket LGA 1155 processors which include the second generation of Core i7, i5, and i3 Sandy Bridge processors and the third generation Intel Core CPUs. This means that users will be able to pair it up with the board with current generation LGA 1155 processors like the Core i7 2600K and should have no problem with future processors that is using the same socket.

Aesthetically, the MSI Z77A-GD65 looks very pleasing to the eyes with MSI’s Military Class II components. The black and blue color scheme is pretty without going overboard. It gives users a sense of performance without being too flashy. Upon the first inspection of the MSI Z77A-GD65, we can see that the MSI board is packed with ports and slots. The overall layout is pretty clean without major obstruction. MSI puts the ports that are most often accessed, like the Easy Button 3 and voltage checkpoint connector, near the edge of the board. The SATA ports and SuperSpeed USB 3.0 are all rotated at 90 degree angle for easy cable management.

low profile heatsink covers the MOSFET and PWM
Over at the CPU corner, we see MSI places a low profile heatsink above the MOSFET and PWM. The board utilizes MSI’s own DrMOS II, Hi-C Cap, Super Ferrite Choke (SFC), and Solid CAP. The 12 Super Ferrite Chokes with 30% higher current capacity and 10% higher power efficiency translates into better overclocking power stability. These components ensure highest power efficiency, lower heat output, higher thermal stability, and lower ESR for longer component lifespan and higher overclocking potential.
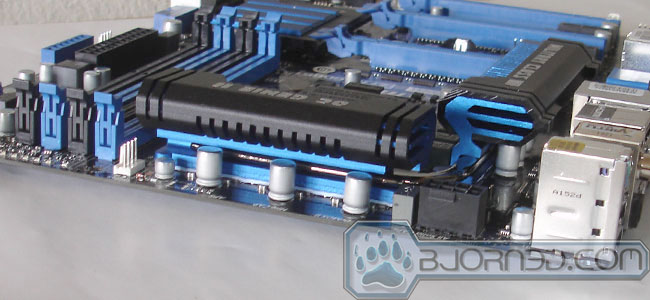
The heatsink covers the components at the top and left sides of the CPU and the two pieces of metals are interconnected by a heatpipe to conduct heat toward to rear of the case. The 8 pin auxiliary power connector sits at it usual upper corner close to the back I/Os and the 4-pin CPU fan connector is located just above the DIMM slot. The auxiliary and the CPU fan header is a tad bit closer to the heatsink and can be slightly hard to gain access to with the board installed in the system.


The board will come with an extension cable that you can use to monitor your hardware voltages.
Moving toward the DIMM slots, we see four color coded DIMM slots for dual-channel DDR3 all the up to 2667MHz and up to 32GB capacity. Two additional 3 pin fan headers are located in this area. One is on the corner of the board (just above the DIMM slots) while the other one sits next to the main 24pin ATX power connector. MSI opted to put the main ATX power connector a little bit farther from the edge of the board and place the voltage checkpoint connector in front and closer to the edge of the board. The idea is that most people would want these checkpoints to be the most accessible, rather than the power connector. In addition, we see a handy power button, a reset button, and OC Genie button. The OC Genie Button is used to automatically overclock the processor.
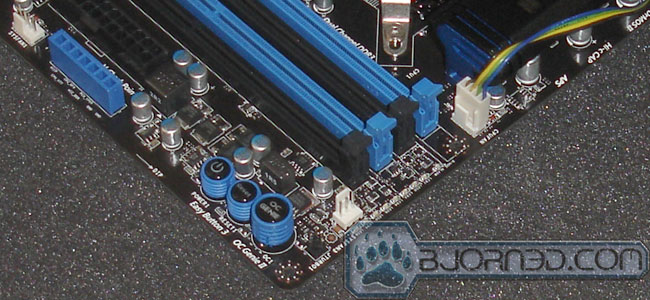
Sitting above the DIMM slots is a series of 9 LEDs. The first LED is the DrMOS alarm while the rest eight LEDs are for the CPU power phase. There is a header labeled JTURBO1 that is designed for the MultiConnect Panel that fits into the 2.5” drive bay. The panel offers overclocking, USB ports for charging, and WiFi and Bluetooth connectivity. Unfortunately, this is not included with the G65 board.
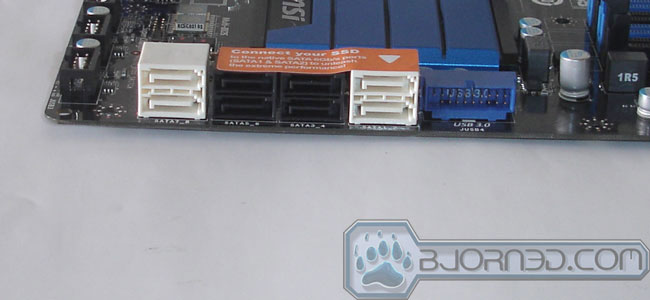
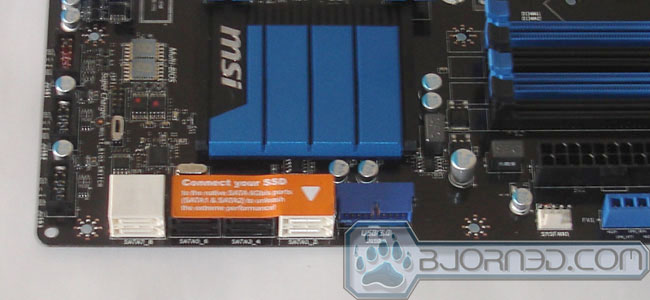
Toward the bottom right edge are the usual SATA ports. The MSI Z77A-GD65 comes with four SATA 6Gbps ports where two on the right are controlled by the Z77 chipset and the two on the left controlled by the ASMedia ASM1061. Four additional SATA 3Gbps ports are found on the board courtesy of the Z77 chipset. The ports controlled by the Intel chipset will support AHCI/RAID0/1/5/10 and Intel Rapid Storage Technology. MSI recommends using the ports controlled by Intel chipset as you can see from the sticker above the SATA connector, which is a nice touch on MSI’s part since Intel often has better performance than other controller. Sitting next to the SATA ports is the SuperSpeed USB 3.0 header. This is again controlled by the chipset.
A very low profile heatsink covers the chipset and just south of it is where you will find the two digit LED Debug indicator. A little BIOS switch sits next to the debug indicator for switching between the two BIOSes. In the event that one BIOS is crashed, users can simply flip the switch and boot the system up and perform a recovery, as the board features the ability to automatically reflash the newer BIOS over the older one.
We would’ve actually preferred if MSI had placed the debug indicator closer to the power button near the top edge of the board as opposed to this location. It is easier to have these things in one area for easy access.
Along the bottom edge of the board is where the usual internal headers are located. Here we get three USB 2.0 headers, one FireWire header, two types front panel headers (a 7-pin and a 9-pin version), a Voice Genie Connector (JDLED3), a TPM Module connector (JTPM1), a 3-pin system fan, and the front panel audio. The audio is provided by the Realtek ALC898 high definition audio codec.

Fintek F7189AD Super I/O controller is used and the network is controlled by the Intel 82579V that provides 10/100/1000 fast Ethernet.
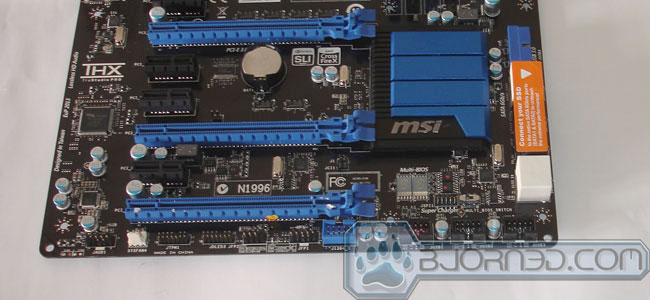
For expansion, the board comes with three PCI-E 3.0×16 slots and four PCI-E 2.0 x1 slot. Despite the fact that the three PCI-E x16 are physically x16 there are only 16 lanes available to be shared among the lanes. The board will support CrossFire and also SLI as indicated by the marking on the board. The first slot will run x16 by defualt when only 1 card is installed if there is a card installed on the 2nd slot, it will be reduced to x8. When the last slot is filled, the second and third slot will run at x8 badwidth while the first slot will run at x16.
The PCI-E slots are nicely spaced. The first slot and second slot are separated by two slots to enable installation of triple-slot video cards. Also, if dual-slot cards are installed in SLI/CrossFire, users still have two x1 slots and the last x16 slots for expansion. One issue we have with the PCI-E slot is that the expansion tab is a little too close to the heatsink, which makes it harder to gain access to.
The battery placement is a bit awkward for the Z77A-GD65 as it is sitting next to the primary PCI-E x16 slot, so if you are using card that takes up two slots, it would be necessary to remove the card before users can pop out the battery. Also, the Clear CMOS jumper is located in an awkward position just between the third PCI-E x1 and second PCI-E x16 slot. Luckily MSI includes a Clear CMOS button on the rear of the board, so the likelihood that users will need to access either one of these are pretty slim.
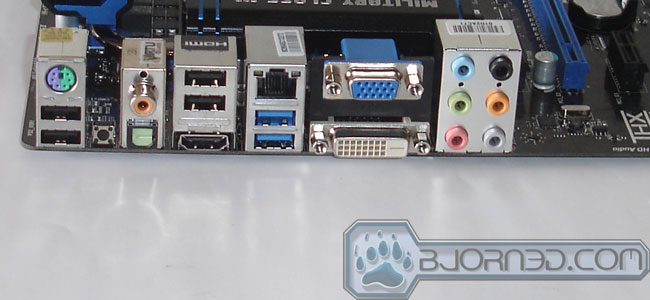
The rear I/O panel of the MSI Z77A-GD65 has the standard connectors: a PS2 keyboard and mouse combo port, four USB 2.0 ports, two USB 3.0 ports, a single Gigabit LAN port, the clear CMOS button, optical and coaxial SPDIF out, and the usual audio ports. For displays, the board comes with HDMI, 15-pin D-sub VGA, and DVI-D. Two of the three video ports can be used in conjunction for multi-displays. Unfortunately, there is no DisplayPort included.
Accessories and Bundled Software
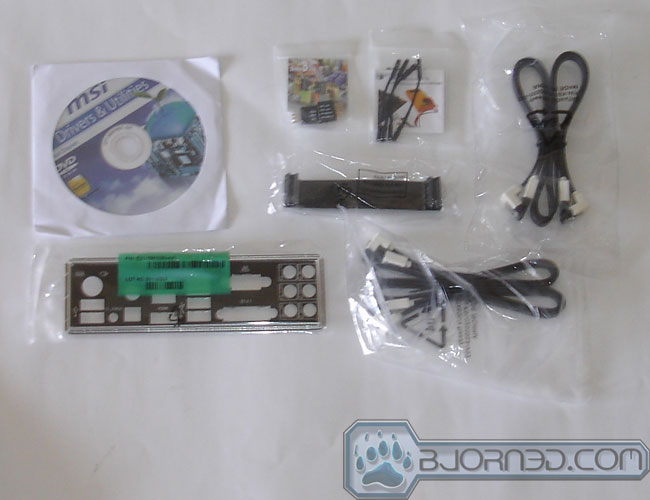
MSI bundles the Z77A-GD65 with:
- Certificate of quality and stability
- Back panel I/O plate
- 4 SATA data cable
- Sli bridge
- Front panel connector adapter
- Voltage lead cable
- An overclocking guide
- Quick installation guide
- Software and application user guide
- User’s manual

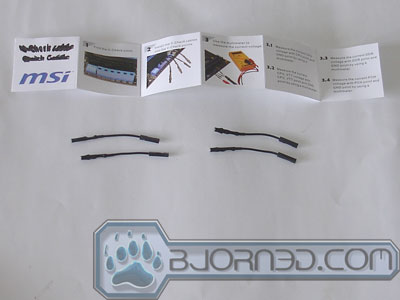
The Front panel adapter included is like ASUS’ Q-Connect, allowing users to simply connect the loose cables from the case to the adapter and insert the adapter to the headers on the board, greatly simplifying the installation process.
We also get extension cables for the voltage connector so it is easier to hook up a multimeter probe.
We do appreciate that MSI included so many guides. We found MSI’s overclocking guide to be rather useful. If you are looking to buy a new system based on the Socket 1155 platform and you came from AMD or Core 2 era, you will find that there are quite a few things changed since then. For one, the BIOS is almost all UEFI and it can take a bit of time to get used to the new interface. Additionally, the new Intel processor features different overclocking than its predecessors, and MSI’s quick and simple graphical guide provides good information to allow users to familiarize themselves with the new BIOS and the overclocking settings. It also highlights some of the features on the board that a first time buyer may find it useful to know without having to look over the big manual booklet. The back of the guide also has a very useful table summarize commonly used settings to achieve different clock speed.
Bundled software:
- Control Center
- Super-Charger
- Winki III
- Audio Genie
- Video Genie
- Network Genie
- Teaming Genie
- Live Update 5
- EasyViewer
- Virtu Universal MVP
- Click BiOS II
MSI’s Software and Application User Guide is also quite useful, detailing the software bundle’s feature. The user guide details how to setup various features that are included on the board, and how to best utilize the software.
Control Center and Click BIOS are both meant for overclocking the board. We were not sure why MSI bundles both tools as designed for overclocking. Your eyes are not fooling you, the image you see above is the Click BIOS II software we installed. We are absolutely love how MSI’s BIOS and the Windows software are almost identical, as that makes it so much easier to adjust settings.
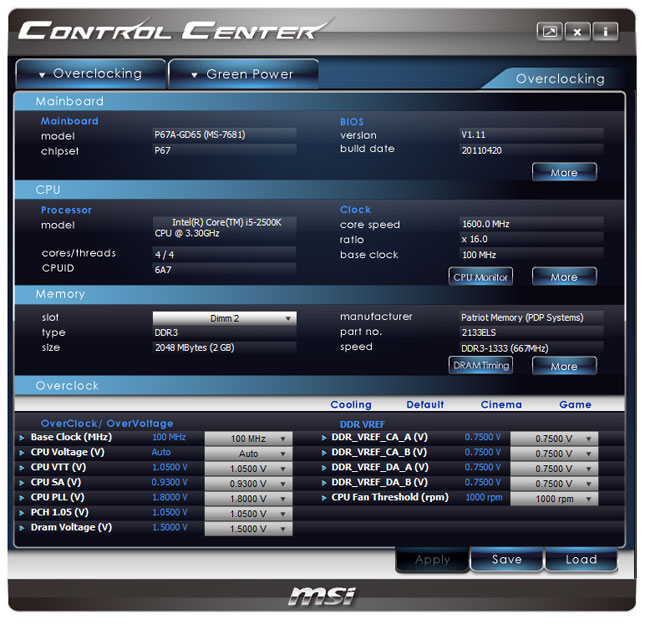
MSI Control Center
We did encounter a small issue: when we launched the Click BIOS II or the Control Center, a USB mouse would lag a little bit. Once the software is launched, the lag will disappear. Additionally, the software also takes a little bit of time to start, most likely due to the need to read information from the BIOS.
The Control Center provides four settings: OC, OC Genie, Green Power and LED where users can use to monitor the board’s CPU load LED indicator.
Winki III
MSI’s Winki III is a Linux distro developed by MSI that works with MSI’s motherboard. With Winki III, users can boot into the Linux distro for data recovery or quick access to the internet. Simply insert the DVD to the DVD drive and you can boot into Winki III OS. Alternatively, you can choose to use the DVD drive to create a bootable USB driver and boot off from your USB Flash drive.

Inside Winki III, users can back up the hard drive, edit and create documents with the included OpenOffice, access the internet both wired and wirelessly, and others. The recovery may be the most useful feature here.
Audio and Video Genie
The Audio Genie offers the ability to adjust the speaker configuration and the audio profile. This software is a bit redundant as it is essentially the same as what is included with the Realtek driver. The Hotkey feature maybe useful save you can save up to 6 profiles and assign them to a hotkey for quick switching between different profiles.
The Video Genie offers the ability to adjust the display. Again, not the most useful tool as both NVIDIA and AMD graphic card’s drivers have the same feature.
Network Genie and Teaming Genie
This maybe useful for some people. The software works with any MSI board with Realtek 8111E or newer controller, Windows 7 32/64 bit, and Windows Vista 32/64bit. This is a software level network control where you can finetune which program to have higher network priority and the internet speed. Four preset modes are available: Game, Stream, Browswer, and Auto.
Teaming Genie needs no explanation: it lets you combine two network connectors to increase throughput.
Live Update 5 and Easy Viewer
Live Update 5 is MSI’s all-in-one update tool that will check the server for BIOS, software utility, and driver update. A handy tool to have if you are the type of person who is obsessed to keep every little software up to date. The EasyViewer is a full 3D image browser that works with NVIDIA 3D Vision.
Virtu MVP
The Virtu is one area where users will find it useful to have a user guide. The guide is easy to follow if you ever need to setup Virtu. With the Z77 board, we are now able to use Virtu Universal MVP. The biggest difference between the two is the support for HyperPerformance. The HyperPerformance reduces the redundant rendering tasks between CPU and GPU to help improve performance and power management. It helps:
- Boosts responsiveness to the game at any frame rate
- Improves gaming frame rates 30-70%
- Increases Vsync frame rates – up to 120 FPS and beyond
- Sharpens visual quality without tearing
- Works seamlessly with hundreds of game stations
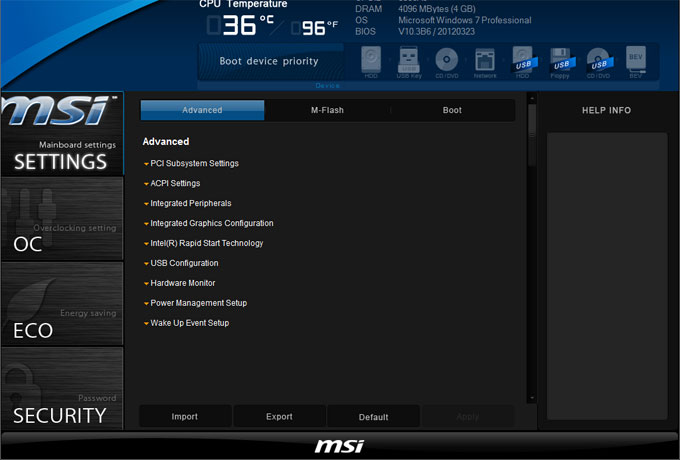
BIOS
It took MSI awhile to implement UEFI BIOS properly, but they have finally gotten there with the new version. There are still a few lags occasionally and the mouse click sometimes does not register, but overall, we like what we see. MSI takes the new UEFI BIOS a step further than other manufacturers by providing the same user interface in Windows with the new Click BIOS II. This makes it so much easier adjusting the settings, as there is just one interface to learn.

The MSI UEFI BIOS is divided into three sections. The top of the BIOS features system information such as CPU temperature, clockspeed, system temperature, time, and date. This section will always stay even when you navigate through different portion of the BIOS. Below the top section is divided into two sections where the left and right features menu tabs and the central area is where all of the adjustment options are located. To adjust settings, users simply click on one of the six tabs on the bottom and the central portion will reveal with more detail adjustment options. MSI divided their BIOS into the following categories: MSI Settings, OC Setting, ECO, Browser, Utilities, and Security.
Overall the MSI BIOS is easy to navigate. The mouse and keyboard support works very well. You can use the left click to select and option and use the right click to return to the previous setting, a nice touch. However, we wish that MSI had made the middle section a tad larger and the text a bit bigger so settings are easier to read. It makes no sense that the four categories take up all of the space while the central section is so tiny with small text.
The BIOS offers screenshot capabilities simply by pressing F12, a feature that makes our lives much easier when doing reviews. MSI’s implementation of screen capture is much better than ASUS, because it allows users to enter the file name they wish to save the picture as.


The Settings is where we can turn various features of the board on and off. When we click on the Settings, we see there are four submenus. System Status is pretty self-explanatory: it provides an overview of system information. Advanced is where we can adjust the PCI Subsystem, ACPI, Integrated Peripherals, USB, Intel Smart Connect, Intel Rapid Start, Wake up Event, Power Management, and Hardware Monitor. The board offers the ability disable the PCI-E 3.0 and force PCI-Express slots to run at 2.0 speed.

The Integrated Graphics Device Configuration is where users go to enable the Virtu Technology. By default, Virtu Technology is disabled. Once we set it to i-Mode or d-Mode, we are presented with additional options. The board actually did not hide the ability to adjust the initial display setting when either mode is selected, which can pose boot up problems when it is set to i-Mode and the initial display shows PEG (or d-Mode and the initial display shows IGD). We see a few of these types of inconsistencies throughout the BIOS.

The hardware monitoring is a tad weak on the board. We only have the ability to adjust two system fans and we were only allowed to adjust the fan speed from 50-100%. The CPU Smart fan allows adjustment from 40-70%.


The board has a very good collection of wake up options, allowing users to resume by RTC Alarm, PCI-E device, onboard LAN, keyboard and mouse. The Boot options are fairly standard, allowing users to prioritize up to 9 devices.


The OC Menu has tons of option. In a way, we feel that MSI’s OC options can be overwhelming for first-time overclockers. When greeted with so many options, it is difficult to know what to adjust. MSI just plops every single setting on the screen without any distinction or category separation like CPU, memory, GPU, voltage, etc. Additionally, the repetition and inconsistency of settings also can be a bit confusing. For example, the main OC setting has the ability to set the CPU ratio for all of the CPU cores. Initially, we wondered where we could fine-tune each core. After a bit of digging, we found that the option actually resides in CPU Features, which is placed at the end of OC Menu, a bit hard to find from a cursory glance. The way MSI has implemented the BIOS, users set a max CPU Ratio for all cores, and then set the Ratio Limit depending on number of cores active.
Despite its difficulties for new users, experienced users and enthusiasts would appreciate this organization as every setting can be quickly accessed and adjusted without digging into arrays of menus. There are plenty of overclocking settings available that will surely satisfy any overclocker. Most of the settings in Overclocking have a drop down menu where users can scroll through the list of settings. Unlike ASUS or Gigabyte, MSI did not have a label indicating what voltage values are safe, so users must be careful when adjusting the voltage. Additionally, a few settings, like the Long/Short/Power Plane Limit and Core Ratio Limit in CPU Features, require keyboard input and the BIOS did not indicate what range is allowed.
All of the essentials are here. We have the VDroop support, Digital Compensation, Core OCP Expander, CPU Core voltage, CPU I/O Voltage, DRAM Voltage, GPU Voltage, and the System Agent Voltage. The VDroop has a total of 8 levels, enough for hardcore overclockers; however, we do wish MSI labelled the VDroop a bit more clearly as it only says level 0-7.
There are a couple interesting settings in the overclocking area: the Enhanced Turbo and the My OC Genie. When the the Enhanced Turbo is enabled, our Core i5 2500K is overclocked to 3.7GHz from the stock 3.4GHz. This is actually not new as we have seen ASUS P67 and Z68 boards do this by default. MSI, however, offers the ability to turn it on/off depending on user’s preference.
The board supports XMP Profiles but under the XMP profile, the board only shows Profile 1 and Profile 2, as opposed to the actual clockspeed. Luckily, the board includes Memory-Z and CPU specifications in the BIOS (which we like a lot). However, the Memory-Z does not read all of the XMP Profiles, and only displays the highest profile with the highest speed supported.

The My OC Genie is an enhancement of MSI’s OC Genie: the user now has the ability to customize their own settings.


Under the Utilities is where we will find the HDD backup, Live Update, and M-Flash.
TESTING & METHODOLOGY
We did a fresh load of Windows 7 64 bit on the test rig, then once we updated the software and drivers to the latest versions, we made a clone copy of the hard drive because we’re going to run this beast like we stole it. We ran each test a total of three times and the average of each test is reported here.
| Test Rig | |
| Case Type | None |
| CPU | Intel: Core i5-2500K |
| Motherboard | ASUS P8Z68-V PROIntel DZ77GA-70KMSI Z77A-GD65 |
| Ram | Kingston HyperX 1600 |
| CPU Cooler | Cooler Master CNPS9900 Max |
| Hard Drives | Seagate 7200.11 1.5 TBOCZ Vertex 3 |
| Optical | None |
| GPU | Gigabyte GTX 580 SOC |
| Case Fans | 120mm Fan cooling the MOSFET area |
| Docking Stations | None |
| Testing PSU | Cooler Master UCP 900W |
| Legacy | None |
| Mouse | Microsoft Intellimouse |
| Keyboard | Logitech Keyboard |
| Speakers | None |
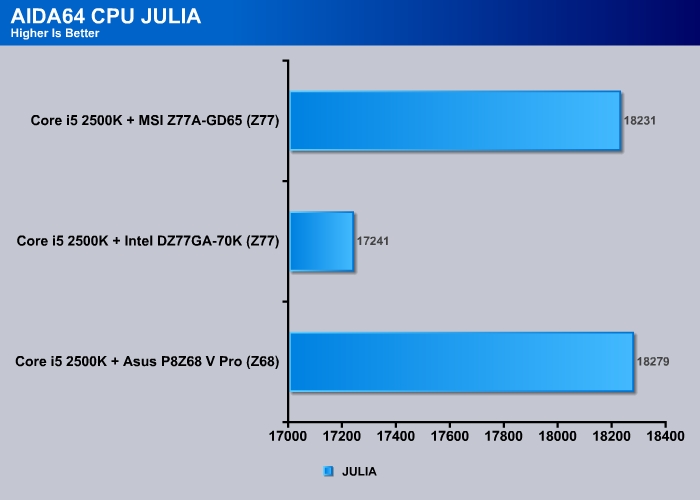
aida64 v1.80
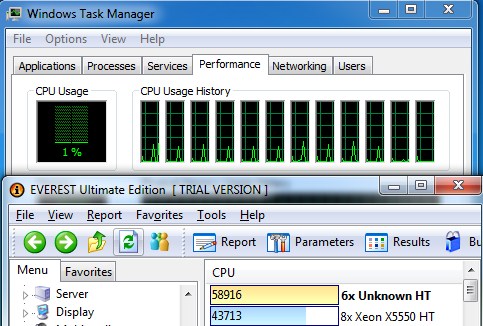
“AIDA64 Extreme Edition is a streamlined Windows diagnostic and benchmarking software for home users. AIDA64 Extreme Edition provides a wide range of features to assist in overclocking, hardware error diagnosis, stress testing, and sensor monitoring. It has unique capabilities to assess the performance of the processor, system memory, and disk drives. AIDA64 is compatible with all current 32-bit and 64-bit Microsoft Windows operating systems, including Windows 7 and Windows Server 2008 R2.”
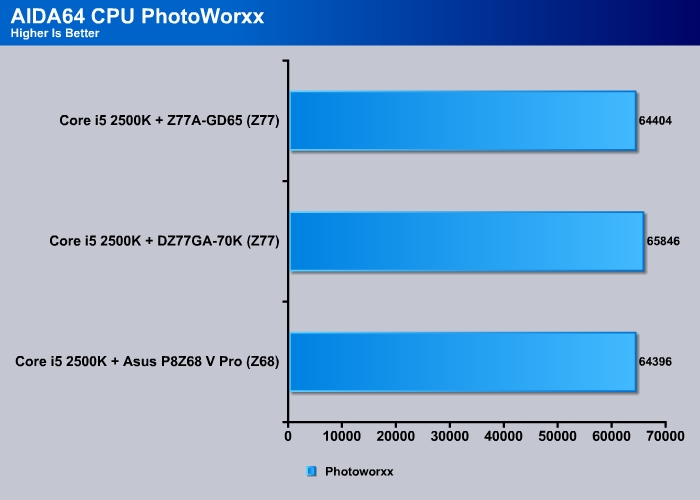
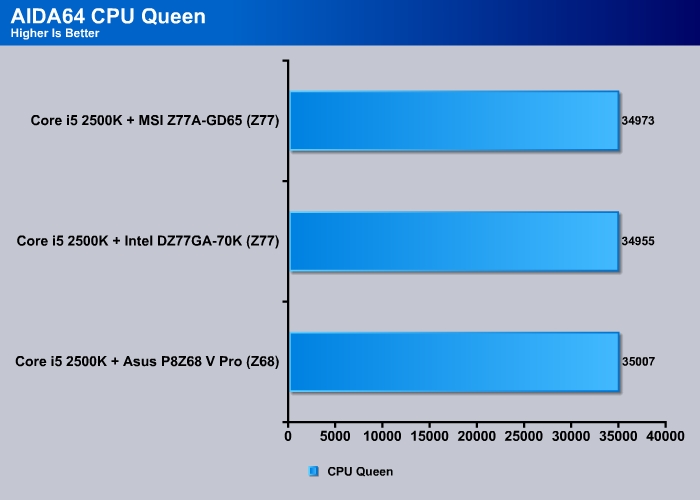
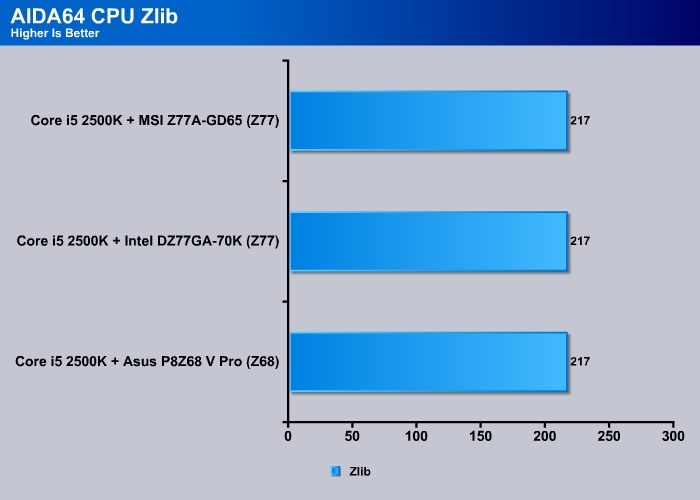
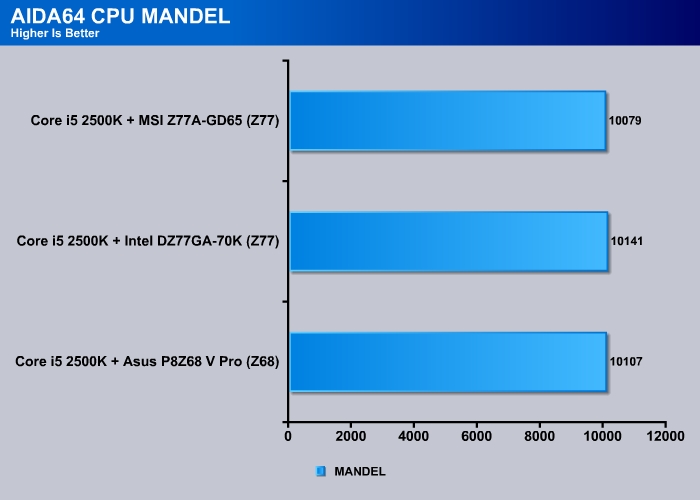
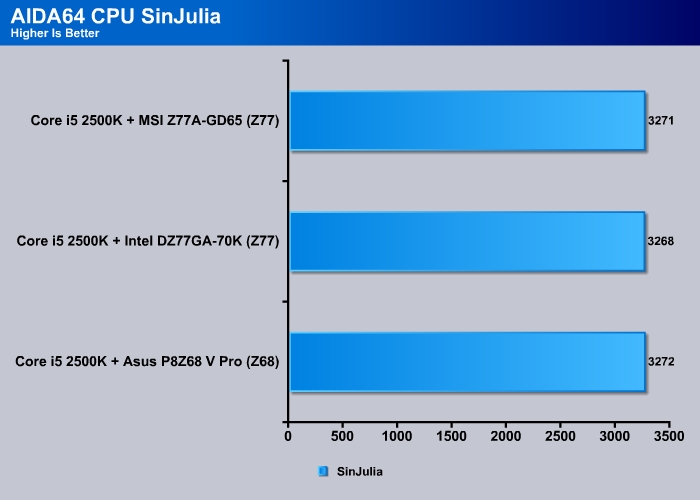
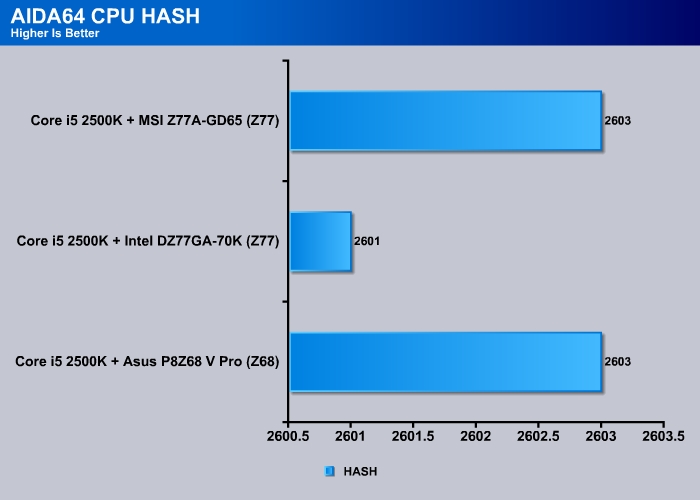
CPU

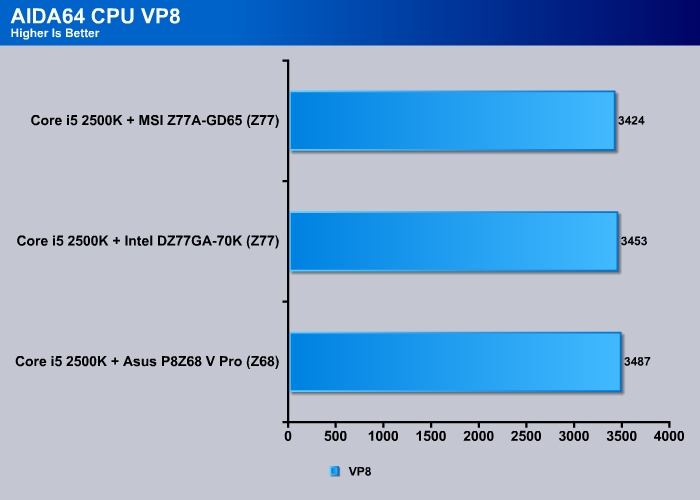
FPU VP8 is an interesting benchmark. It takes a look at video compression performance using the Google VP8 video codec version 0.9.5. This benchmark encodes 1280×720 resolution video frames in 1-pass mode at 8192 kbps bitrate with best quality settings.
While the AIDA64 benchmarks do not show much performance variations between the Z77 and Z68 chipsets, we believe this will change once Intel releases their next generation CPU running with die shrink later on this month.
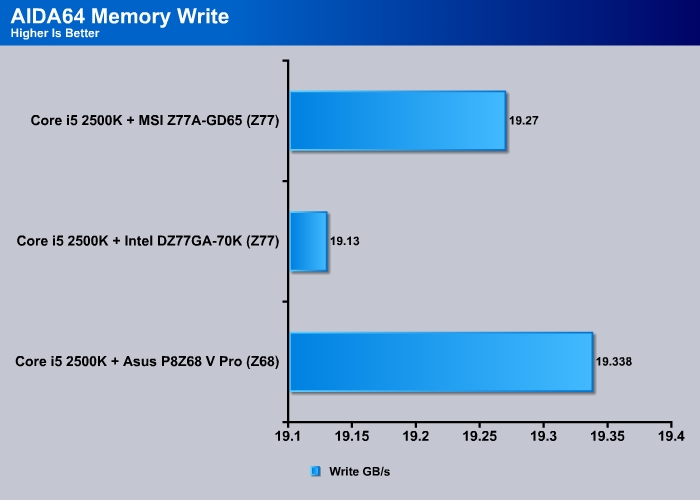
Memory


When testing the memory read, it looked like the Z77 would be lower than Z68, until we tested it on the MSI Z77A-GD65 motherboard. The MSI motherboard managed to push out an additional 0.62GB/s over the Intel DZ77GA-70K, and about 0.45GB/s over the Z68 counterpart.

There is a slight improvement on memory latency with the introduction of the Z77 boards. There is about 6% improvement in memory latency on the Intel DZ77GA-70K over the previous Z68 ASUS P8Z68 V Pro motherboard.
SiSoft Sandra 2011

“SiSoftware Sandra (the System Analyzer, Diagnostic and Reporting Assistant) is an information & diagnostic utility. It should provide most of the information (including undocumented) you need to know about your hardware, software and other devices whether hardware or software. It works along the lines of other Windows utilities, however it tries to go beyond them and show you more of what’s really going on. Giving the user the ability to draw comparisons at both a high and low-level. You can get information about the CPU, chipset, video adapter, ports, printers, sound card, memory, network, Windows internals, AGP, PCI, PCI-X, PCIe (PCI Express), database, USB, USB2, 1394/Firewire, etc.”
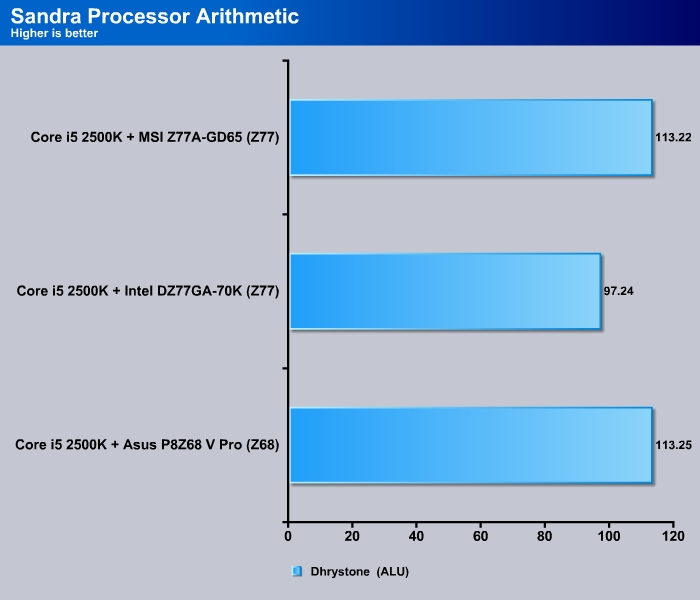
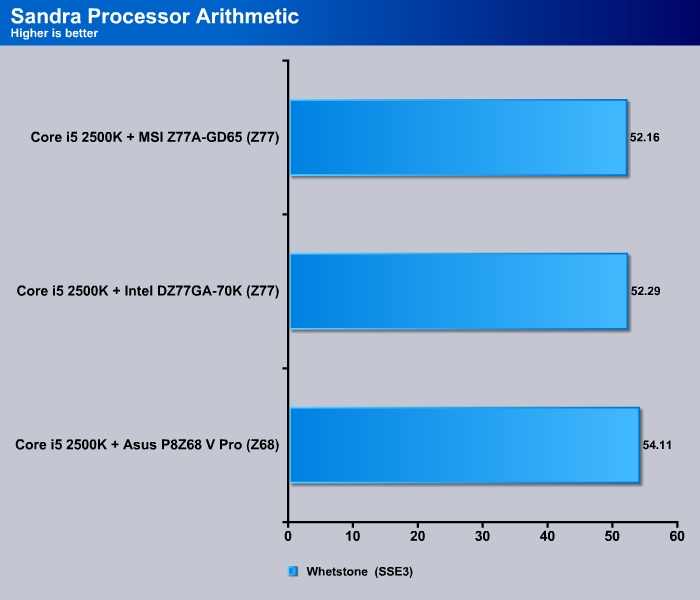
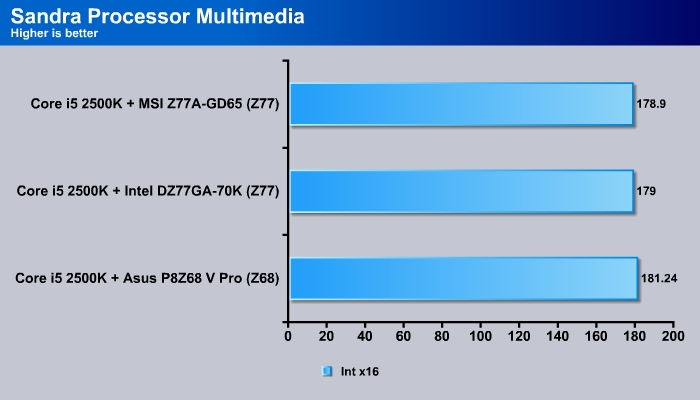

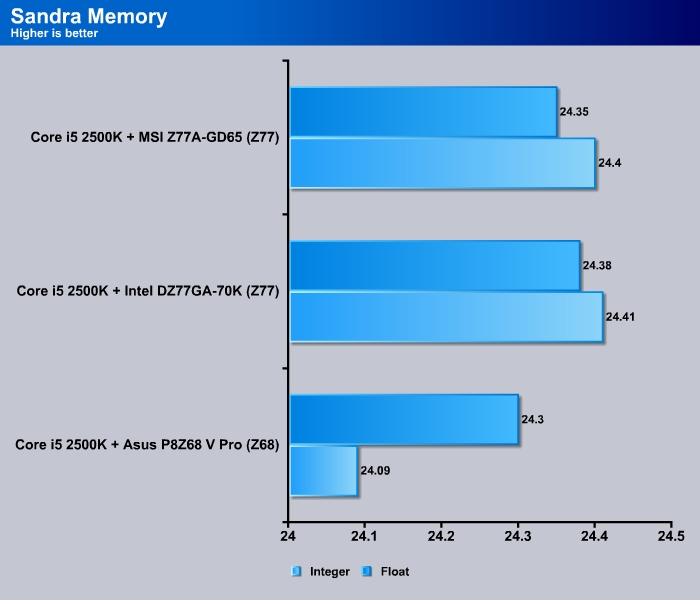
The Sandra CPU and Memory benchmarks are essentially very similar to the ones done in AIDA64, however there is one interesting thing to note. When looking at the last benchmark (Sandra Memory Integer and Float) performance, even though the performance difference is minimal, the Z68 chipset showed a slightly lower performance over the Z77 chipset motherboards.
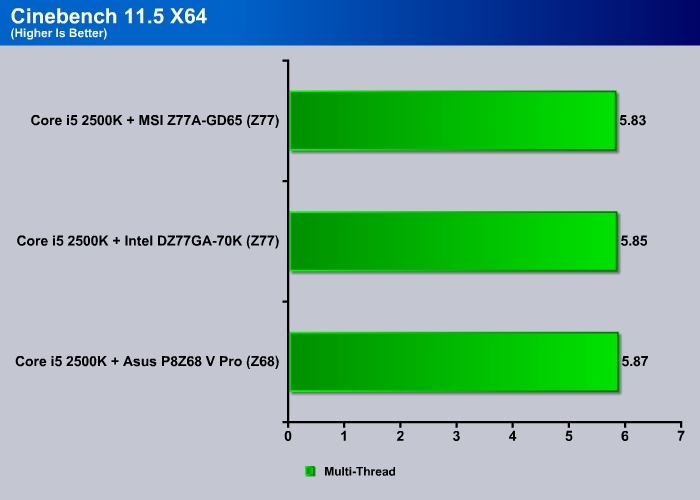
Cinebench R11.5
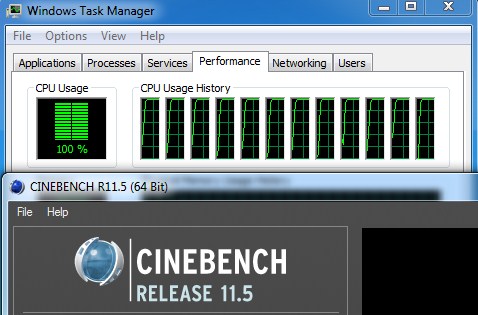
“CINEBENCH is a real-world test suite that assesses your computer’s performance capabilities. MAXON CINEBENCH is based on MAXON’s award-winning animation software, CINEMA 4D, which is used extensively by studios and production houses worldwide for 3D content creation. MAXON software has been used in blockbuster movies such as Spider-Man, Star Wars, The Chronicles of Narnia and many more. MAXON CINEBENCH runs several tests on your computer to measure the performance of the main processor and the graphics card under real world circumstances. The benchmark application makes use of up to 16 CPUs or CPU cores and is available for Windows (32-bit and 64-Bit) and Macintosh (PPC and Intel-based). The resulting values among different operating systems are 100% comparable and therefore very useful with regard to purchasing decision-making. It can also be used as a marketing tool for hardware vendors or simply to compare hardware among colleagues or friends.”
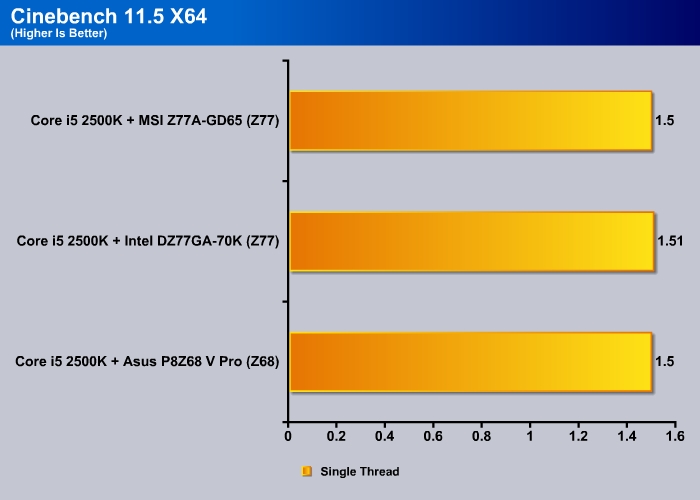
All the previous benchmarks showed the very minimal difference in processor and memory speeds on the new Z77 chipset compared to the Z68 chipset, so we see the same results on the Cinebench R11.5 benchmark as well. Cinebench heavily utilizes the CPU, and since there are no major performance optimizations that we can see on the new Z77 chipset, there are no big differences in performance.
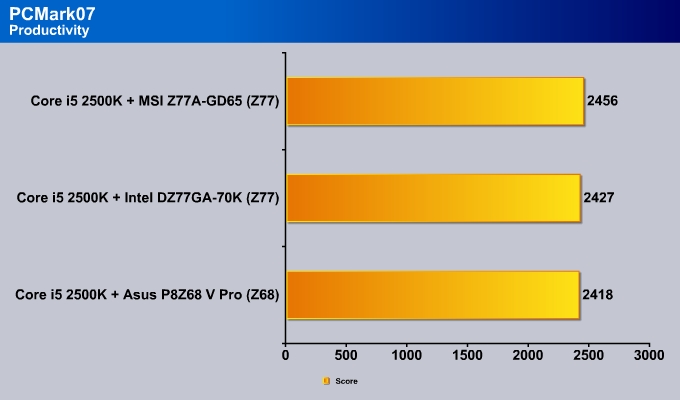
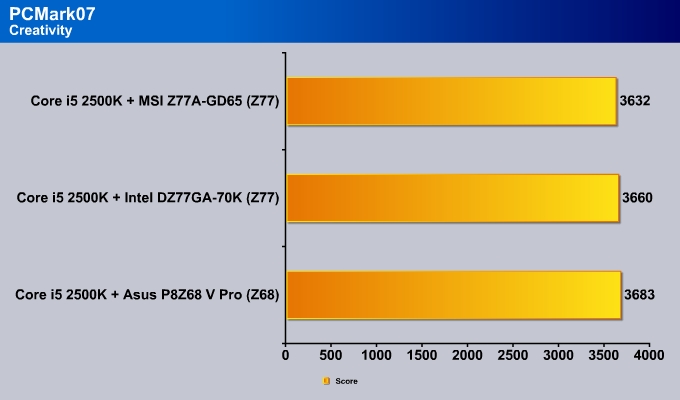
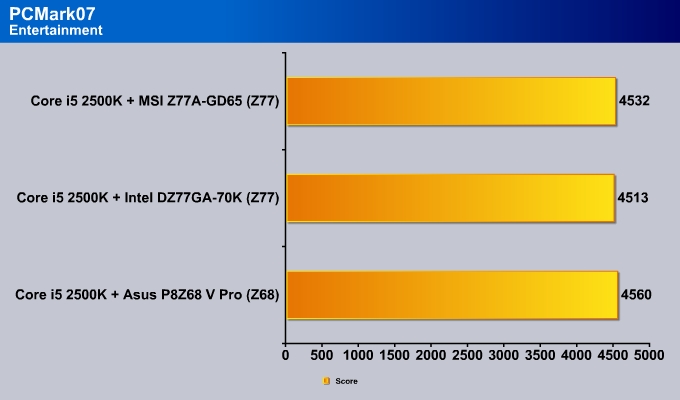
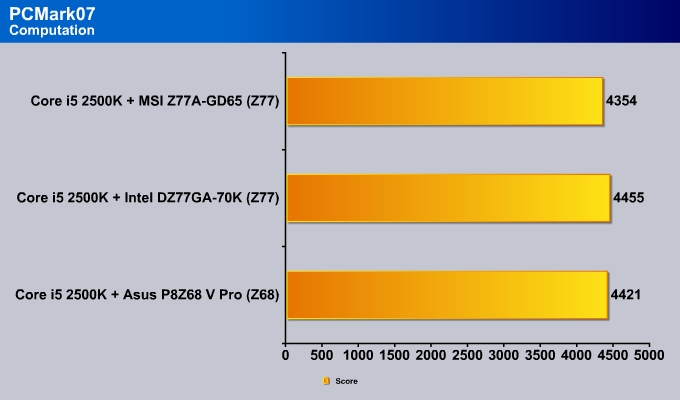
PCMARK 7
The latest benchmark suite, PCMark 7, puts a greater stress on the system than the PCMark Vantage. in contrast to PCMark Vantage, the latest edition stresses types of workloads rather than individual tasks. It consists of Lightweight, Productivity, Creativity, Entertainment, Computation, and Storage benchmarks. Readers can refer to the PCMark 7 whitepaper for the detailed list of applications and tests run for each suite.
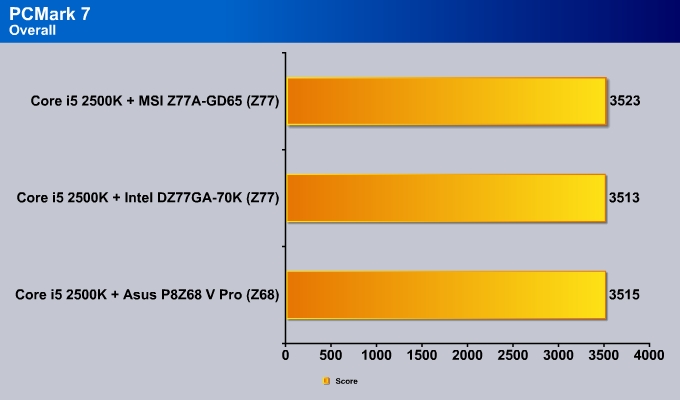
Overall, the MSI Z77A-GD65 takes the lead here with 10 extra points over the Intel board. When we look at the individual tests, we can see that the Intel board seems to perform better at CPU intensive applications such as Media encoding and Computation but the MSI board comes ahead with other light workloads. This may partially due to the fact the MSI board seems to have a better performance on the Storage test. So, as a platform, the MSI board may be slightly faster over the Intel board.


Gaming benchmarks
3DMark11
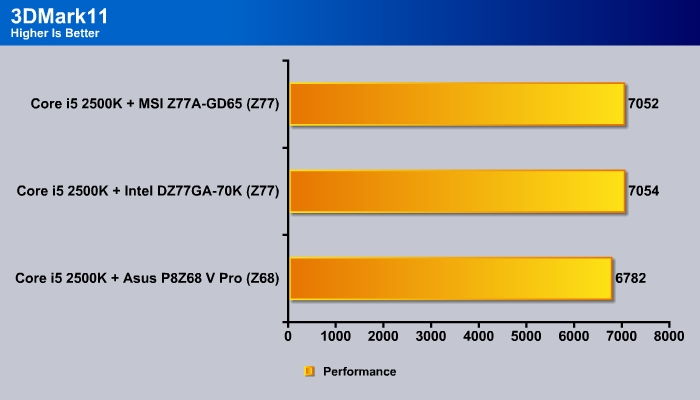
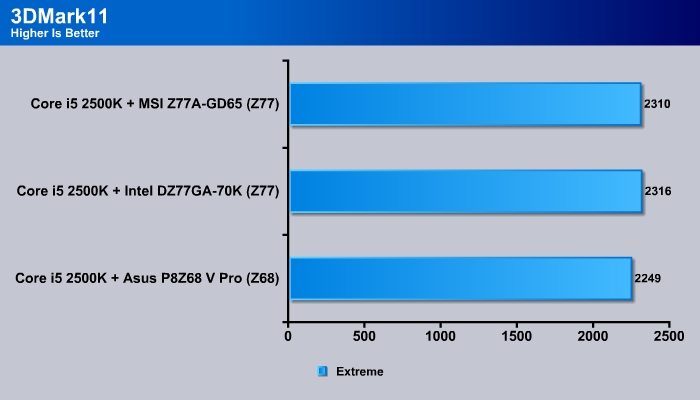
Clearly, the Z77 has a slightly edge in terms of gaming performance over the Z68. Intel board gets a couple extra points in 3DMark 11 over the MSI board here.
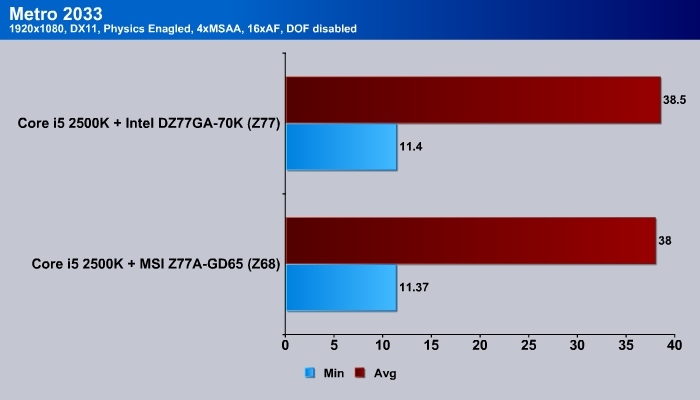
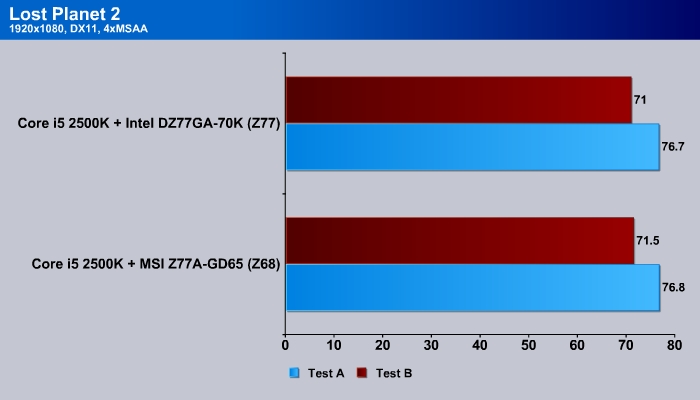
In real games, there would probably be no difference in gameplay with either board since the change in performance is not noticeable.
STORAGE
SSD: SATA III
| Burst (MB/s) | Random (ms) | CPU (%) | Avg Read (MB/s) | Avg Write (MB/s) | |
| GIGABYTE Z68XP-UD3-iSSD (Intel Z68 Express) | 434.1 | 0.1 | 3 | 323.3 | 381.9 |
| ASUS P8Z68-V Pro (Z68) | 407.4 | 0.1 | 5 | 378.7 | 381.9 |
| Intel DZ77GA-70K (Z77) | 363.9 | 0.1 | 3 | 326.2 | 349.9 |
| Intel DZ77GA-70K (Marvell) | 296 | 0.2 | 7 | 208 | 157 |
| MSI Z77A-GD65 (Z77) | 348.4 | 0.2 | 4 | 328 | 380.8 |
| MSI Z77A-GD65 (ASMedia) | 283.9 | 0.2 | 4 | 221.8 | 168.3 |
Looking at the SATA III performance with an SSD, the Z77A-GD65’s SATA ports are a tad faster than those on the Intel Z77 board.
The secondary SATA III controller on the MSI board is a tad faster than the Marvell controller bundled with the Intel board. Additionally, it also consumes less CPU power than the Intel board.
USB 3.0
| Burst (MB/s) | Random (ms) | CPU (%) | Avg Read (MB/s) | Avg Write (MB/s) | |
| GIGABYTE Z68XP-UD3-iSSD (Eton) | 171.4 | 17.1 | 2 | 108.4 | 113.2 |
| ASUS P8Z68-V Pro(ASMedia) | 162.1 | 17.2 | 2 | 111.1 | 109.9 |
| Intel DZ77GA-70K (Z77) | 144.7 | 17 | 5 | 111.1 | 109.9 |
| MSI Z77A-GD65 (Z77) | 157.4 | 17.1 | 3 | 111.1 | 109.9 |
The MSI board only comes with four USB 3.0 ports controlled by the Intel controller, and their performance is identical to other Z77 boards.
overclocking

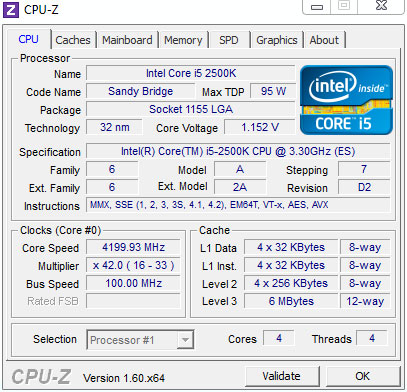
There are two types of automatic overclocking with the Z77A-GD65. First, the BIOS has an option called “Enhanced Turbo”, which if enabled, will automatically overclock the processor to 3.7GHz no matter how many cores are active. This yields a performance boost without having to mess around much in the advanced settings.
The second automatic overclocking features the company’s OC Genie II, where the system can easily be overclocked by pressing a button or enabling the option under BIOS. The process is really painless and fast. We pressed the button and within a couple of seconds, the system rebooted and we had already overclocked our CPU to 4.2GHz. This is slightly different than ASUS or Gigabyte features, in which the board will incrementally increase the speed and test to see if a given setting is stable. Other manufacturers’ solutions often require a few reboots as the system goes through incremental speed bumps; however, with OC Genie, there is only one reboot and couple of seconds. While this is easy, the setting that MSI has set is actually not stable and won’t pass the Prime95 test. We had to tone down the clockspeed to 4.1 GHz to run Prime95 stable. Thus, as always, when it comes to overclocking, do not be sure to do extensive stress testing before settling for a final setting.
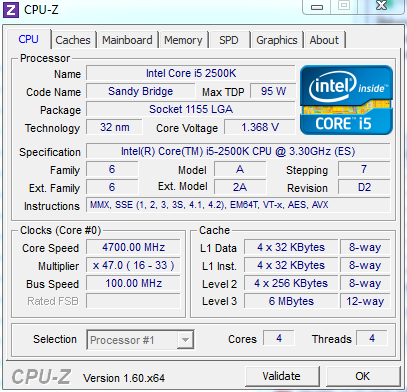
Of course we are not satisfied with the default overclocking and have to see how far we can push the board. We manually set the CPU voltage to 1.4V while keeping the rest of the board setting to auto. At this speed, we were able to overclock our processor up to 4.7GHz without any issue. Our power consumption was 237 W, an increase of 55W over power consumption at stock speeds; the CPU temperature was 69C. We did notice that the CPU temperature wais actually lower on the MSI Z77 board at this speed than it was on the ASUS Z68 board (78C).
We also noticed that with the MSI board, when we overclocked too far, the thermal regulator would kick in and shut off one core, leaving three cores running at the maximum speed. With older boards, the system would often will crash. Thus, there is higher thermal protection built-in that will prevent hardware damage to the CPU.
Power Consumption

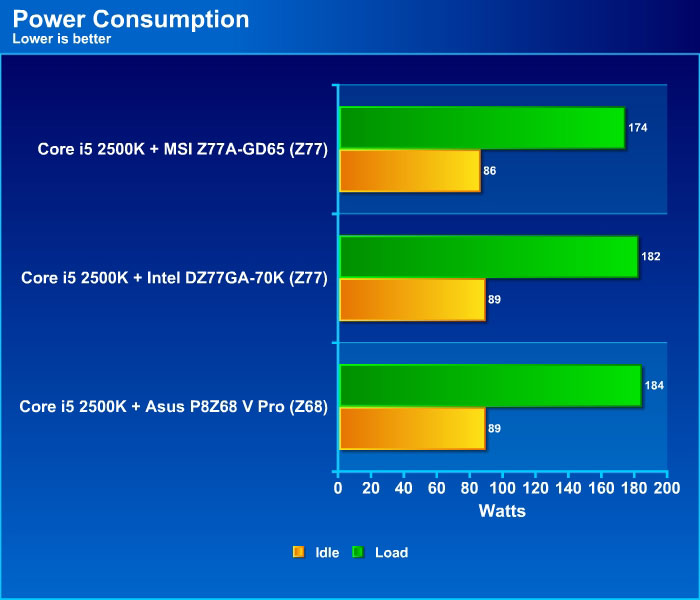
In terms of power consumption, we can see that the MSI Z77A-GD65 consumes 1W less while idle and 8W less under load than the Intel board. Looks like MSI’s Military Component III does indeed help out to reduce our system power consumption after all.
CPU Temperatures

The temperatures were recorded with RealTemp while running wPrime 1024 right before the end of the 5th run. The results were recorded carefully. After the results were recorded, we waited for 30 minutes before taking Idle temperature measurements. The results were as follows:
| CPU Temperatures | Temperature (Idle/Load) |
| Asus P8Z68-V Pro (Z68) | 31C/48C |
| Intel DZ77GZ77GA-77K (Z77) | 31C/52C |
| MSI Z77A-GD65 (Z77) | 30C/52C |
| Chipset Temperatures | Temperature (Load) |
| Asus P8Z68-V Pro (Z68) | 34 |
| Intel DZ77GZ77GA-77K (Z77) | 33 |
| MSI Z77A-GD65 (Z77) | 31 |
The idle CPU temperature for the MSI board is 1C lower than the Intel board but under load, there is no difference in the temperature. However, the chipset temperature for the MSI board is clearly cooler than the Intel board.
CONCLUSION
Just like we said, the MSI Z77A-GD65 is clearly designed for enthusiasts and not for someone looking for bundles of accessories. The board does not have WiFi, Bluetooth, or external FireWire (there’s one internal header), or extra USB 3.0 (though two internal and two external are provided). In its place, the board gives plenty of overclocking feature such as as voltage contact points, onboard error debug code, onboard power switch, dual BIOS and Clear CMOS button. There are also plenty of overclocking settings that should allow anyone to reach that bragging-rights clockspeed. If accessories and features are important to you, then the Z77A-GD65 is clearly not designed for you, but if overclocking is what you are looking for, the MSI Z77A-GD65 certainly won’t disappoint.
In compensation for the rather skimpy hardware bundle, MSI does provide an extensive list of software. The Click BIOS II that seemingly works with the board’s BIOS is excellent. We really love that MSI designed the software and the BIOS with the same interface so that it is so much easier when adjust any setting. Additionally, the board runs cool and the power consumption is lower than the reference Intel board by 8 watts under load. Also, the two additional SATA 6 Gbps ports are definitely something we are glad to see.
While the board is designed for hardcore enthusiasts, the board does come with tools for casual overclockers who simply do not want to spend hours tweaking their system but want that extra performance. The “Enhanced Turbo” feature is a neat little option for tiny overclocking and extra speed. For those who want more, the OC Genie II is very simple and is able to overclock in a few seconds. However, we do not recommend that keeping either one of these settings without doing stress test, since the default setting from OC Genie II failed a Prime95 test. Always do extensive testing before using any setting.
Overall, the board does not have any major problems. We do wish MSI would improve the software load time and also eliminate the USB mouse lag we experienced when launching the Click BIOS II and the Control Center. The fan control on the board can also be improved as well.
Retailed at $189.99, the MSI Z77A-GD65 is certainly worth considering if you are on the market for a Z77 board for the upcoming processor.
| OUR VERDICT: MSI Z77A-GD65 | ||||||||||||||||
|
Good performance
Very nice software bundle
Lower power consumption
OC Genie and Turbo for simple overclocking
Onboard debug code
Dual BIOS
Onboard voltage contact point
Software launch time can be improved
Software launch causes USB mouse to lag
No Bluetooth, WiFi, or additional USB 3.0 ports
8-pin ATX and CPU fan header is a bit too close to the PWM heatsink
PCI-E tab is a bit close to the chipset heatsink Summary: Designed for overclockers, the MSI Z77A-GD65 features plenty of overclocking options such as dual BIOS, voltage contact points, high quality components, OC Genie, and an LED debug readout. For its features and overclocking ability, the MSI Z7A-GD65 earns the Bjorn3D Silver Bear Award.


Great Review thank you very much!