Gigabytes G1 series is a premier gaming/performance offering and with the Sniper M3 it is a mATX highly featured gaming board. Lets see exactly what it has to offer.
Introduction – Gigabyte Sniper M3
![]() Well the Z77 chipset is now upon us and with it came some interesting things. One being Intel's Native USB 3.0 and also all boards of Z77 nature will be PCIe 3.0 spec. Along with the Z77 we also have the long awaited Ivy Bridge CPU which brings with it a host of new features including but not limited to the new PCIe 3.0 spec lanes offered by the CPU. A total of 16 lanes go directly to the graphics slots for a single x16 slot or dual X8, unless as we have seen on some boards that used multiplexer chips to increase the lane count for even a more expanded configuration of installed components. The Ivy Bridge CPU also includes the new onboard Intel GPU, the HD4000, which is Intel's first DirectX 11 compatible offering to date. The Ivy Bridge CPU is built upon a 22nm design which yields a significantly lower TDP from its predecessor, the Sandy Bridge CPU, which top models were at 95W. This should be great news to those who want a quiet system as they can rely on a more quiet cooler and lower speed fans due to the lower thermal properties from the low TDP.
Well the Z77 chipset is now upon us and with it came some interesting things. One being Intel's Native USB 3.0 and also all boards of Z77 nature will be PCIe 3.0 spec. Along with the Z77 we also have the long awaited Ivy Bridge CPU which brings with it a host of new features including but not limited to the new PCIe 3.0 spec lanes offered by the CPU. A total of 16 lanes go directly to the graphics slots for a single x16 slot or dual X8, unless as we have seen on some boards that used multiplexer chips to increase the lane count for even a more expanded configuration of installed components. The Ivy Bridge CPU also includes the new onboard Intel GPU, the HD4000, which is Intel's first DirectX 11 compatible offering to date. The Ivy Bridge CPU is built upon a 22nm design which yields a significantly lower TDP from its predecessor, the Sandy Bridge CPU, which top models were at 95W. This should be great news to those who want a quiet system as they can rely on a more quiet cooler and lower speed fans due to the lower thermal properties from the low TDP.
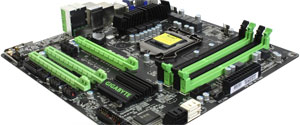
The Gigabyte Sniper M3 is the board we are taking a look at today. Just like the previous G1 motherboard line from GIGABYTE, the Sniper M3 it is a gaming centric board with many gaming style features all packed into a micro ATX form factor board. We have seen other offerings of gaming boards that are mATX and they are usually lacking in specific areas due to the small size and the simple fact that there is only so much PCB real estate. Gigabyte prides itself on the high feature set provided by the G1 series. The Sniper M3 should be no different and we expect to see some good thing from this board. Now lets take a look at what Gigabyte has to offer on this go around.
When looking at the Sniper M3 we are going to address performance but most importantly features that make this board worth the $179.99 price tag. Honestly, for a higher end gaming board, it is really a fair price depending upon feature sets you may need.
New Digital power design
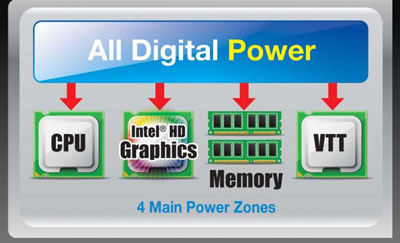
Gigabyte has long been a proponent of the analog power design. Recently they have jumped aboard the digital train as newer platforms are requiring much more finite levels of control that are easier accomplished with a digital controller and the accuracy it provides. The Sniper M3 does not provide a multi tier digital solution like ASUS, but instead offers the digital control for the CPU and iGPU. This is not necessarily an issue, but could impose limitations as to how far the board can clock and how well it can be tuned into a 24/7 overclock.
Gigabyte 3D BIOS
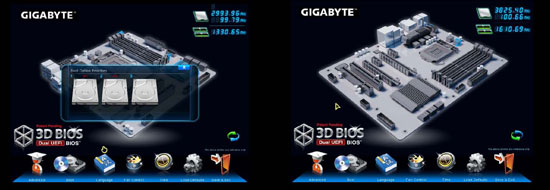
Gigabyte has implemented the 3D BIOS on the X79, and this is Gigabyte's form of a clickable UEFI GUI BIOS interface. The board image has been significantly improved and the interface smoothed out a little, but we will discuss that in more detail when it comes to the BIOS section of this review.
Super Sight

Gigabyte offers a feature called "Super Sight", which is Gigabytes way of saying that the M3 supports 2 video cards in SLI or CrossfireX. This means that the motherboard should stand up easily to almost any gaming demands, especially due to the recent release of the NVIDIA GeForce GTX 690. This should have performance close to a 4-way SLI GTX 680 configuration, albeit that would be one hell of an expensive setup and would likely be better served on a bigger board.
Virtu MVP
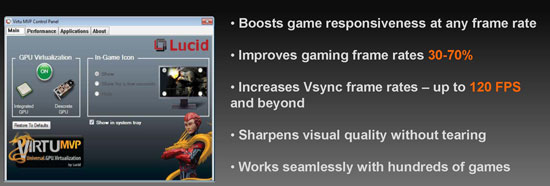
Gigabyte has included Virtu MVP on their motherboard just like we have seen on other Z77 boards we have taken a look at recently. Virtu MVP allows the user to pair the iGPU and discreet cards for some really cool features, such as Hyperformance. Hyperformance pre-renders frames by the iGPU and removes some of the workload from the discreet GPU. This helps by delivering even higher framerates in games and other 3D applications.
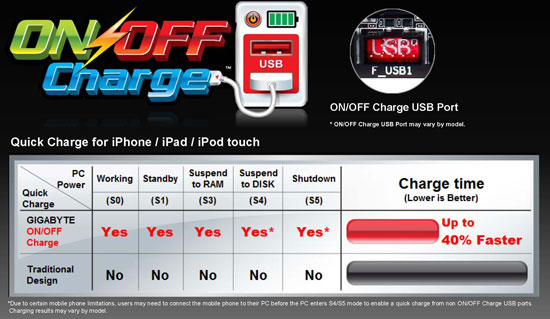
Gigabyte ON/Off charge
Gigabyte does have a pretty neat feature, its ON/OFF charge. ON/OFF charge allows charging of even high load devices in all power modes, even (S5) power-off mode. This may not seem like such a big deal until you need to charge your phone and realize your system is off, and without this feature, you would have to power on your system and leave it on just to charge it. With the ON/OFF feature, it's not necessary to do that, and you can just have it plugged in without needing to worry about keeping your system powered on.
Ultra Durable 4

Gigabyte has been promoting their Ultra Durable designs for some time now, and now with the Ultra Durable 4, Gigabyte has added even more features into an already impressive package. Originally, I can remember when 2oz copper PCB was one of the biggest selling points, and now it has added many more features such as the new Glass Fabric PCB, Thermal protection, Humidity protection, Electrostatic protection and Power Fault protection. These all add up to a complete package of protections and features that should make for a solid and long lasting motherboard.
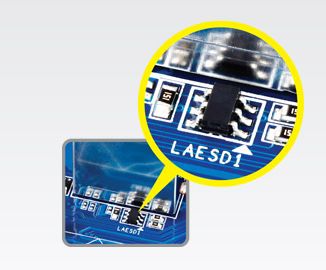
ESD Protection

Gigabyte has also built in ESD protection. Now for those who may not know ESD is Electro Static Discharge, which in a nutshell means all the little static spikes that can develop from you or even just the environment. These discharges are dangerous to components, as when you are dealing with micro voltages, many things can happen with even the smallest blip. Humans always consider static to be harmless as it is just a small sting or tingle, but we fail to remember that those static discharges can be in the thousands of volts. But because of the low amperage it won't kill a person, but could still damage components. These ESD circuits are basically a buffer to protect the critical components and they basically take the brunt of the static shock to ensure the components live a nice happy life, or at least have a better chance of it.
For full specification listings see Gigabytes website here
Overview of the Gigabyte Sniper M3


The packaging for the Sniper M3 is very similar to the camouflage design GIGABYTE used on their G1 Killer series motherboards. The front is adorned with logos of many of the features that you get with this board. Everything from 3D BIOS and Power, Creative CORE3D, Virtu MVP and cFos network boost technologies.
Moving to the rear it has the standard board layout along with descriptors of the features and specs. This gives anyone looking at it on the shelf an idea of what to expect from it.
When opening the box this is what you will be greeted with, a sizable stack of accessories with the board tucked away underneath it.


- G1 Series Poster
- G1 Series Decal Set
- SATA Cables
- IO Shield
- SLI Ribbon Cable
- User Manuals
- Installation Disc
As you can see everything needed to install the board is included along with some unique decals to bling out your gaming space or anywhere else you might feel like sticking some bullet hole stickers on.

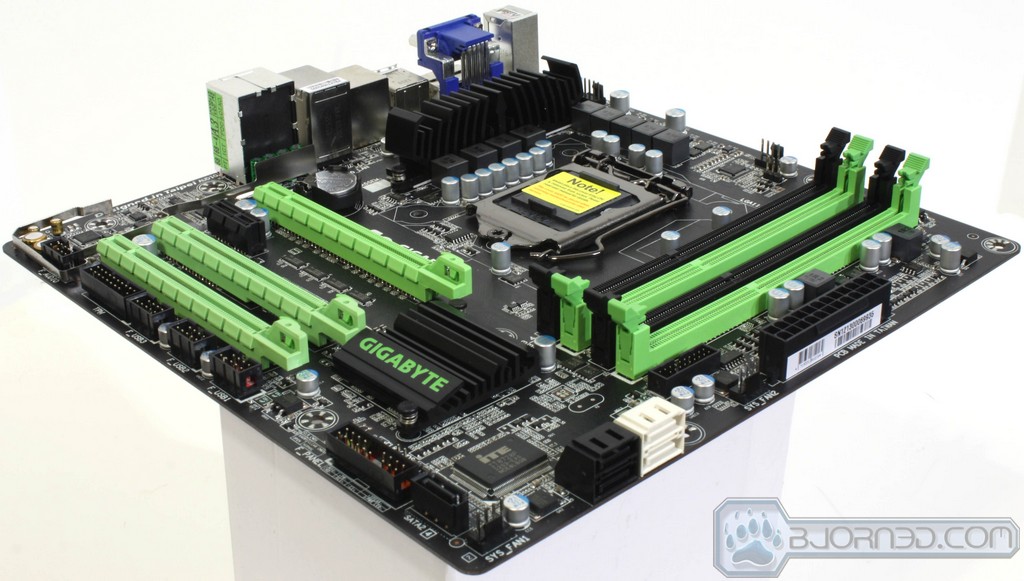
Here we see the layout of the board and it is quite nice as component location is rather good. With the connectors all located at close to board edge means wire management is pretty effortless and connectivity is made much easier. The slot layout is kind of odd for a mATX board as most mATX or lanbox style chassis have only 4 slot openings and with the 2nd GPU slot being triple slot spaced from the top (Primary) slot we can see some issues when trying to run dual slot cards in a multi GPU configuration. This really is an odd layout choice as it really limits the capabilities for the configuration you can use in 4 slot chassis. Also note the omission of power/reset switches which is another thing we feel could be added to the board for a minimal cost and would add huge value for the end user. The same goes for omission of the LED post code indicator.


- PS2 combo keyboard/mouse port
- 4x USB 2.0 Ports
- D-SUB Output
- DVI-D port supporting 1920×1200 Resolution
- HDMi Connection supporting up to 1920×1200 Resolution
- Displayport output supporting up to 2560×1600 Resolution
- eSATA port supporting up to SATA 3Gb/s
- Intel Gigabit LAN port
- up to 5.1 Channel HD audio via creative Chipset w/ Optical S/PDIF output
The connectivity is quite nice but the PS2 I feel is a little aged. Because I find it unnecessary, if eliminated, it could allow for a quad USB 2.0 block. Also the large DVI/VGA block takes the place of what could be much more connectivity options as DVI or VGA could both be used via adapters and allow much better options as to what can be placed on the IO.
Looking at the lower edge we see the audio solution which is fed via the Creative audio CA0132 chipset. A unique feature here is the shield which protects the audio components from interference from the surrounding computing components, which could otherwise introduce unwanted interference into the audio circuit. Another nice addition would be the high end MUSE caps used which are known for their use in high end audio systems and the amazing quality not just of build but in audio output.


BIOS Overview
3D BIOS


Click Image To Enlarge
The 3D board image is quite nice and as we move the mouse over each section it gives a description of what clicking that area would allow control over.


Click Image To Enlarge
Here we have the different control areas available within the click portion of the BIOS, and it is quite usable but there are limits and the mouse lag got the better of us after a while, so we move to the advanced version.


Click Image To Enlarge
The advanced section is very similar to the older AMI BIOS that we have grown used to on the Gigabyte boards of yesterday, but without the bright blue background which makes me smile. So imagine the old working BIOS your used to but with much more pupil friendly color scheme.
The MIT section once again is everything we have come to expect from the Gigabyte BIOS and it has a large amount of adjustability with some very informative MIT features that really make monitoring and viewing installed components a breeze. The overclocking adjustments are plentiful and very helpful for pushing the limits, although, after we had covered this area, there were some improvements worth mentioning. GIGABYTE has been hard at work hitting the competition head on as they have even added recently options such as a 3DMark 2001 setting which optimizes the board settings for efficiency to capitalize on that specific competitive benchmark. In the future, we hope to get some time to try that out and at that time we will report back as to how far we were able to push that.


Click Image To Enlarge
Here we see the basic system settings this is strictly informational and shows current system info along with an option to show the installed drive info.


Click Image To Enlarge
Here is the BIOS features area and it coverers most all of how the board posts and what order parts post as.


Click Image To Enlarge
Here are the final peripheral and power settings to allow for setup of the rest of the minor settings along with power management and other common settings that we have seen on most boards. It is pretty standard faire but is laid out well and in a way that most users should have no issue locating the setting they are looking for.
Testing & Methodology
We've expanded our testing suite considerably since the X79 chipset release, and will continue to use the same methods for most of the motherboards and CPU's we test. In the interests of thoroughness and accurate results, we run each test at least three times, and some tests more than that. We average the total of all the tests from each benchmark then report the average here.
The OS we use is Windows 7 Pro 64bit with all patches and updates applied. We also use the latest drivers available for the motherboard and any devices attached to the computer. We do not disable background tasks or tweak the OS or system in any way. We turn off drive indexing and daily defragging. We also turn off Prefetch and Superfetch. This is not an attempt to produce bigger benchmark numbers. Drive indexing and defragging can interfere with testing and produce confusing numbers. If a test were to be run while a drive was being indexed or defragged, and then the same test was later run when these processes were off, the two results would be contradictory and erroneous. As we cannot control when defragging and indexing occur precisely enough to guarantee that they won't interfere with testing, we opt to disable the features entirely.
Prefetch tries to predict what users will load the next time they boot the machine by caching the relevant files and storing them for later use. We want to learn how the program runs without any of the files being cached, and we disable it so that each test run we do not have to clear pre-fetch to get accurate numbers. Lastly we disable Superfetch. Superfetch loads often-used programs into the memory. It is one of the reasons that Windows occupies so much memory. Vista fills the memory in an attempt to predict what users will load. Having one test run with files cached, and another test run with the files un-cached would result in inaccurate numbers. Again, since we can't control its timings so precisely, it we turn it off. Because these four features can potentially interfere with benchmarking, and and are out of our control, we disable them. We do not disable anything else.
One thing to note is that we are revamping our testing method in order to better represent motherboard performance and offering to you guys the consumer. Also we want to make it an easier read for you without miles of endless charts. Please feel free to provide feedback on what you think as many benchmarks will be shuffled or removed completely.
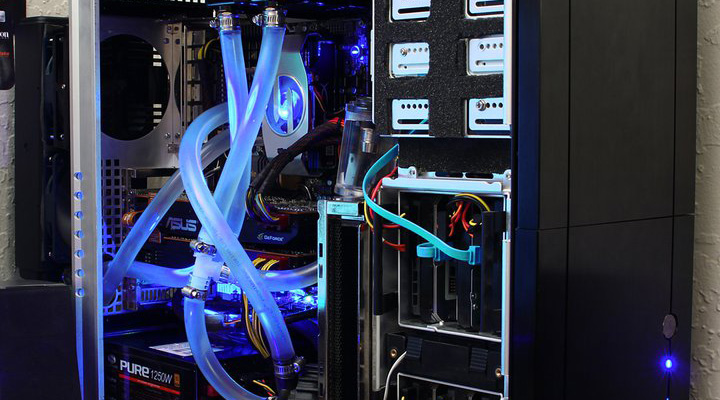
Test Rig
| Test Rig | |
| Case | Thermaltake Level 10 GT |
| CPU |
Intel Core i7-3770K |
| Motherboard | Gigabyte Sniper M3 |
| Ram | 16GB Patriot Viper Xtreme 2400MHz + |
| CPU Cooler |
Swiftech H20-220 Edge |
| Hard Drive | Western Digital Velociraptor 300GB |
| SSD |
Intel 510 series SATA III 120GB |
| Optical | ASUS BD-ROM |
| GPU |
Asus GTX680 Top/GTX 580/Intel HD 4000 |
| Case Fans |
Front (intake): 200 x 200 x 20 mm ColorShift Fan x 1 (600~800RPM, 13~15dBA) Rear (exhaust): 140 x 140 x 25 mm Turbo Fan (1000PRM, 16 dBA) Top (exhaust): 200 x 200 x 30 mm ColorShift Fan (600~800RPM, 13~15dBA) Side (intake): 200 x 200 x 30 ColorShift Fan (600~800RPM), 13~15dBA) |
| Additional Cards | N/A |
| PSU |
Thermaltake Toughpower Grand 1200W |
| Mouse | Thermaltake esports Black gaming mouse |
| Keyboard | Thermaltake Meka G1 mechanical gaming keyboard |
Test Suite
We will use the following applications to test the performance of the Motherboard. Benchmarks
| Benchmarks |
|---|
| PCMark 7 |
| Heaven benchmark 2.5 |
| Cinebench R11.5 |
| 3DMark 11 |
| SuperPi |
| Metro 2033 |
| Lost Planet 2 |
| SiSoft Sandra 2011b |
| X264HD |
Overclocking

Ever since the Sandy Bridge came around we have noticed a trend going on here. The boards make little difference when finding a 24/7 clock for gaming. The difference really happens when pushing on extreme benchmarks that the board will make a difference but for the most part under normal usage all of the boards perform very close to one another. This may seem a little confusing but to explain more clearly the newer architectures tend to be so easy to clock that the limit really does become the chip or cooling itself. Until you start delving into the extreme benchmarking and overclocking world all boards will do similar clocks at close to the same settings in most cases so clocking on this board was of little difference.
When Pushing the Sniper M3 we found that the board could clock very well or at least just as well as the other boards we have tested for gaming. We can honestly say that for most users cooling solutions we would expect capabilities of 4.6-4.8GHz without much issue but it has much more capability pending the cooling can support it.
The Ivy Bridge platform also has a very good IMC which enables some very high memory clockspeeds and capabilities. From this which we also have taken advantage of to the tune of 2800MHz + but keep in mind that when pushing CPU clocks the memory overclocking can be affected. So try finding each limit for your chip individually then clocking accordingly to find where each will be happy at.
For testing continuity and to keep the clock at something that should be obtainable by most users we are sticking with 4.6GHz will give us some great performance along with a reasonable clock that will give us the best possible platform for the enthusiasts gamer.
Important note: Overclocking can cause component failure. Please exercise caution when attempting any level of overclock on system components.
Temperatures

The temperatures were recorded with RealTemp while running wPrime 1024 right before the end of the 5th run. The results were recorded carefully. After the results were recorded, we waited for 30 minutes before taking Idle temperature measurements. The results were as follows:
| CPU Temperatures | Temperature (Idle/Load) |
| Sniper M3 OC (4.6GHz) | 34C/69C |
| Sniper M3 | 27C/53C |
| Chipset Temperatures | Temperature (Idle/Load) |
| Sniper M3 OC (4.6GHz) | 57C/64C |
| Sniper M3 | 51C/59C |
We used the same Swiftech LCS to ensure similar temperature comparisons available as similar application and mounting conditions were used.
Power Consumption

The power consumption was tested while running Wprime 1024 for a few minutes at stock settings. The results were recorded carefully with a Kill-A-Watt power consumption measuring tool at the wall. After the results were recorded, we waited for yet another few minutes minutes before taking Idle power consumption measurements.
| Configuration | Power Consumption (Idle/Load) |
| Sniper M3 (4.6GHz) | 198W/416W |
| Sniper M3 |
137W/328W |
The power consumption is not with GPU usage. This is with CPU/system loading but nothing graphically intensive in order to provide the most accurate results by not ramping up the GPU, which will pull significantly more power.
SiSoft sandra 2011

"SiSoftware Sandra (the System Analyzer, Diagnostic and Reporting Assistant) is an information & diagnostic utility. It should provide most of the information (including undocumented) you need to know about your hardware, software and other devices whether hardware or software. It works along the lines of other Windows utilities, however it tries to go beyond them and show you more of what's really going on. Giving the user the ability to draw comparisons at both a high and low-level. You can get information about the CPU, chipset, video adapter, ports, printers, sound card, memory, network, Windows internals, AGP, PCI, PCI-X, PCIe (PCI Express), database, USB, USB2, 1394/Firewire, etc."
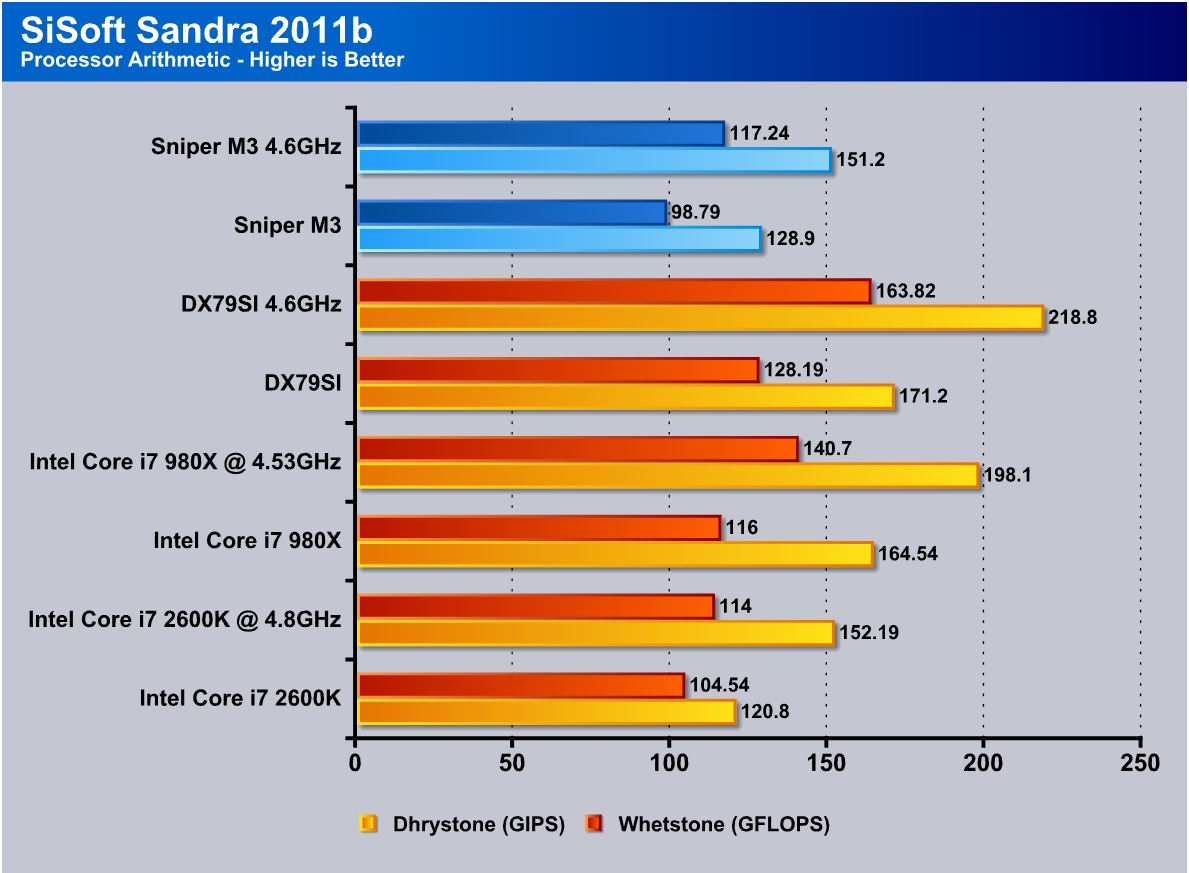

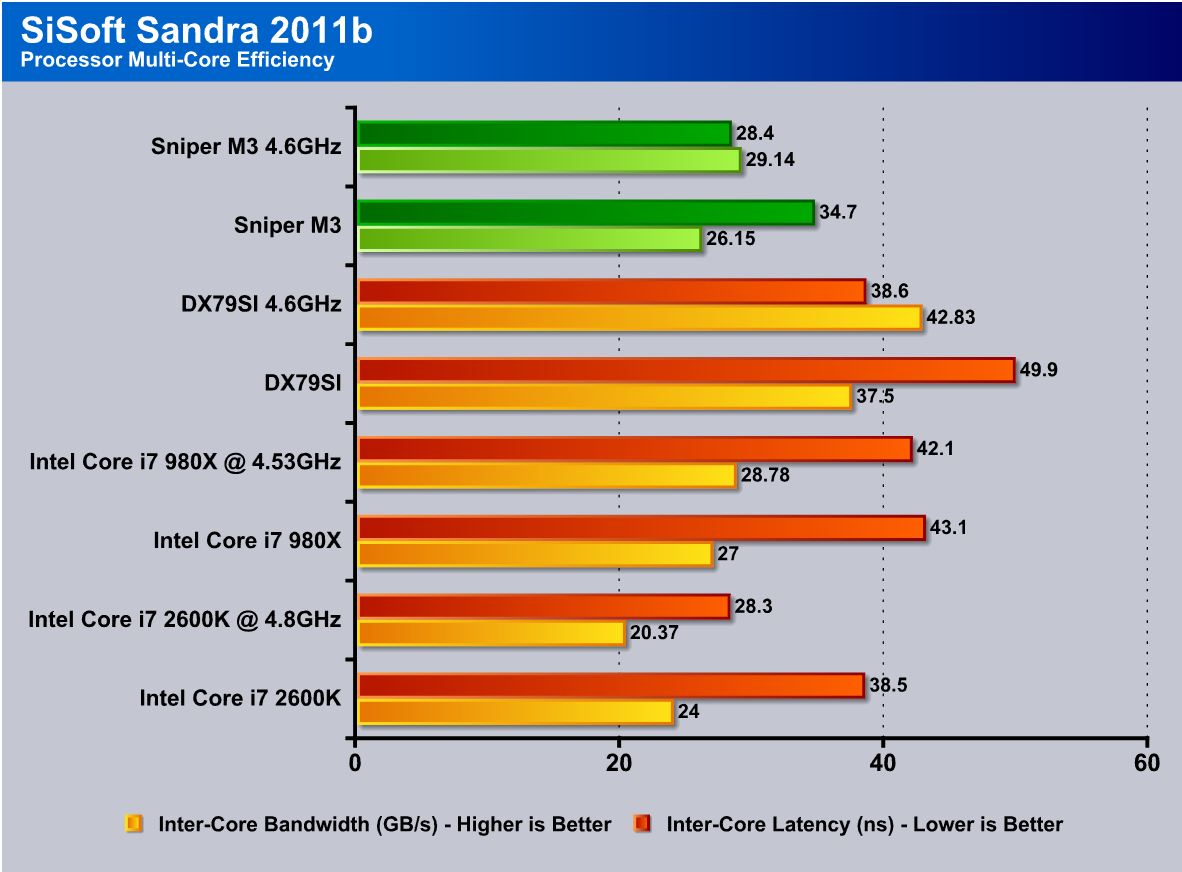
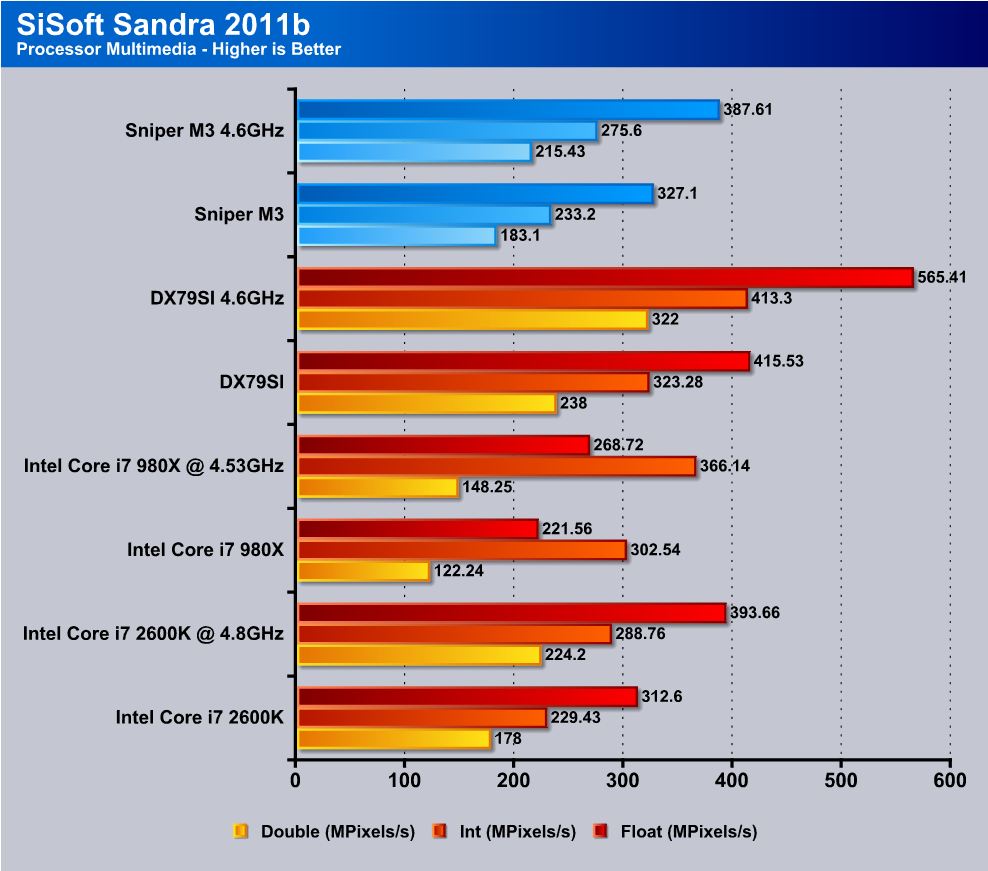
SiSoft Sandra is one of those benchmarks that gives a good idea of how a platform can handle specific tasks. I personally like this benchmark as it does a decent job of showing small efficiency differences from board to board while not taking too long to run. We did find that the performance here was quite close to our first Ivy bridge benches we have run and this just goes along with what we have seen as since Sandy Bridge was first introduced. Most boards perform within a percent or so of each other and therefore the separation from board to board is more based on features rather than performance. The Sniper M3 performs similarly to others we have tested and therefore is quite good.
Superpi
SuperPi is a single threaded benchmark which measures efficiency and is heavily influenced by architectural changes as much as it is by clockspeeds.
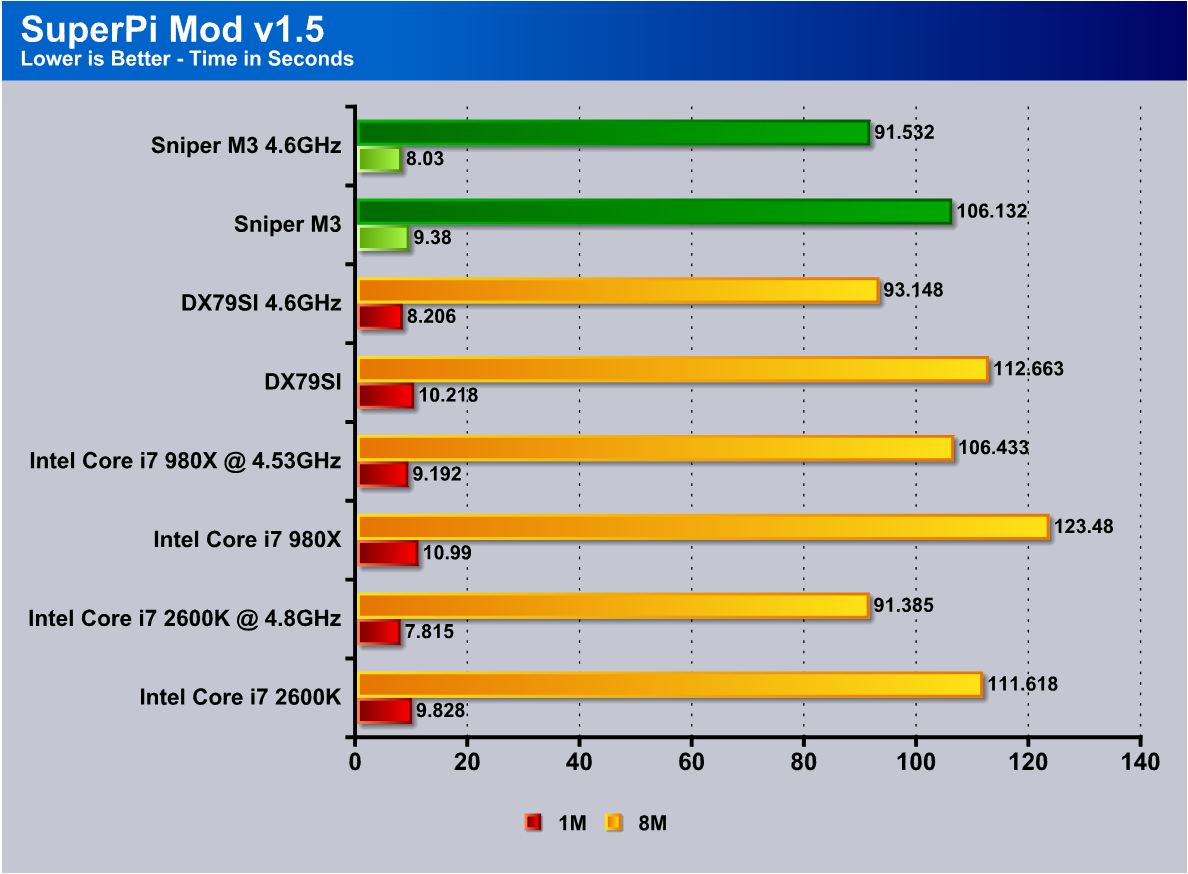
Superpi is a great efficiency benchmark and one we always use just because its simple and it shows improvements when they exist. The Sniper M3 board performs well for a mATX and overclocked with relative ease. All in all the efficiency seems quite well although i think more memory tweaking in the sub-timings could really help efficiency as the overclocked run the 8 M just didn't hold up to expectations. I will be testing a little further with the newer BIOS revisions recently released to see what kind of efficiency can be gained or what kind of improvements we get from it.
X264HD
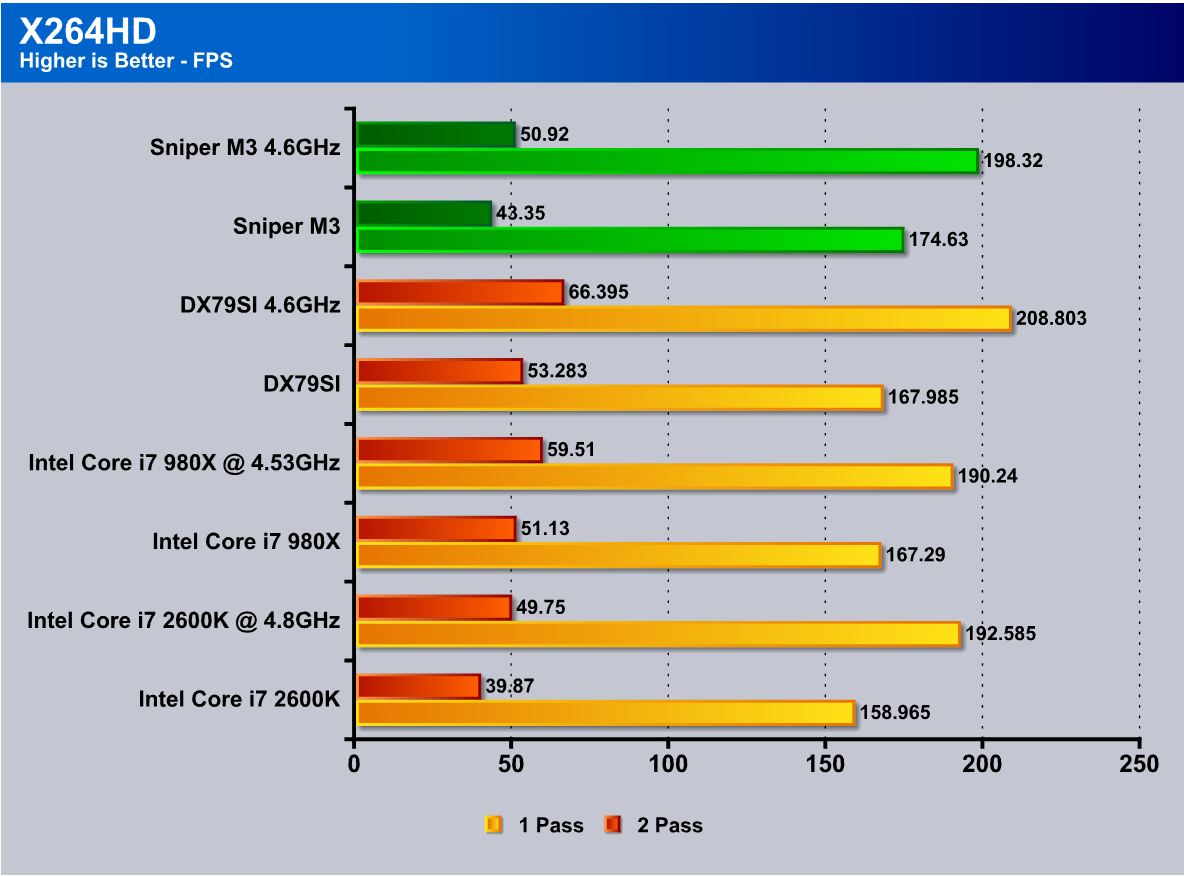
The X264 benchmark is all about encoding and how well your CPU can do it. as we see the contenders are real strong with it and the Sniper M3 handles the job in short order with little issue but once again overall efficiency was a little odd and I am hoping it was just a firmware update or fine tuning needed. The performance is not bad but I know it can be better and i plan on making it that way.
3DMARK 11
![]()
3DMark 11 is the newest in Futuremark's suite of benchmarking utilities. Its a fully capable DirectX11 benchmark which also stresses and analyzes the system performance as a whole to simulate a heavy rendering environment, such as a high end game or other application the end user may run. This benchmark was run with Performance settings 5 times and all runs were averaged for the results below.
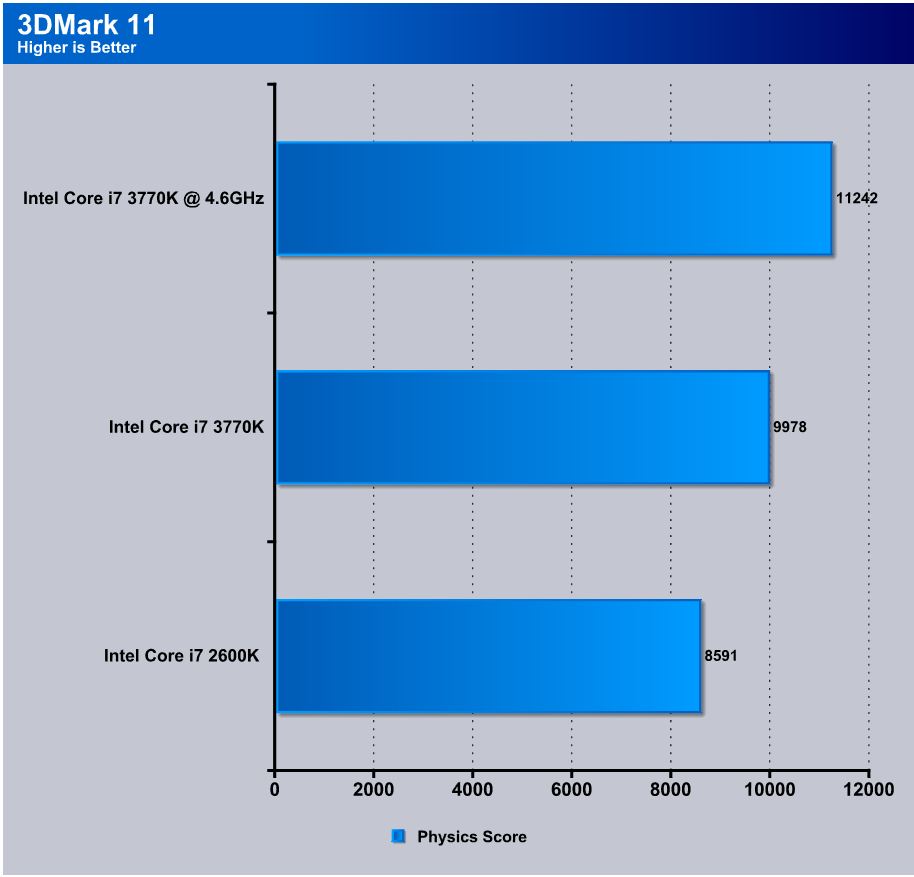
3DMark 11 we opted for the Physics score as this test is CPU based and relies on no graphics honestly, so we just see the CPUs ability to render the preset Physics test. Just as our first test showed the Sniper M3 follows suit and delivers a nice performance improvement with the new architecture. The Sniper M3 definitely looks to do well with 3D benchmarks and this is to be expected as it is a gaming class board, or at least that is what it is marketed as.
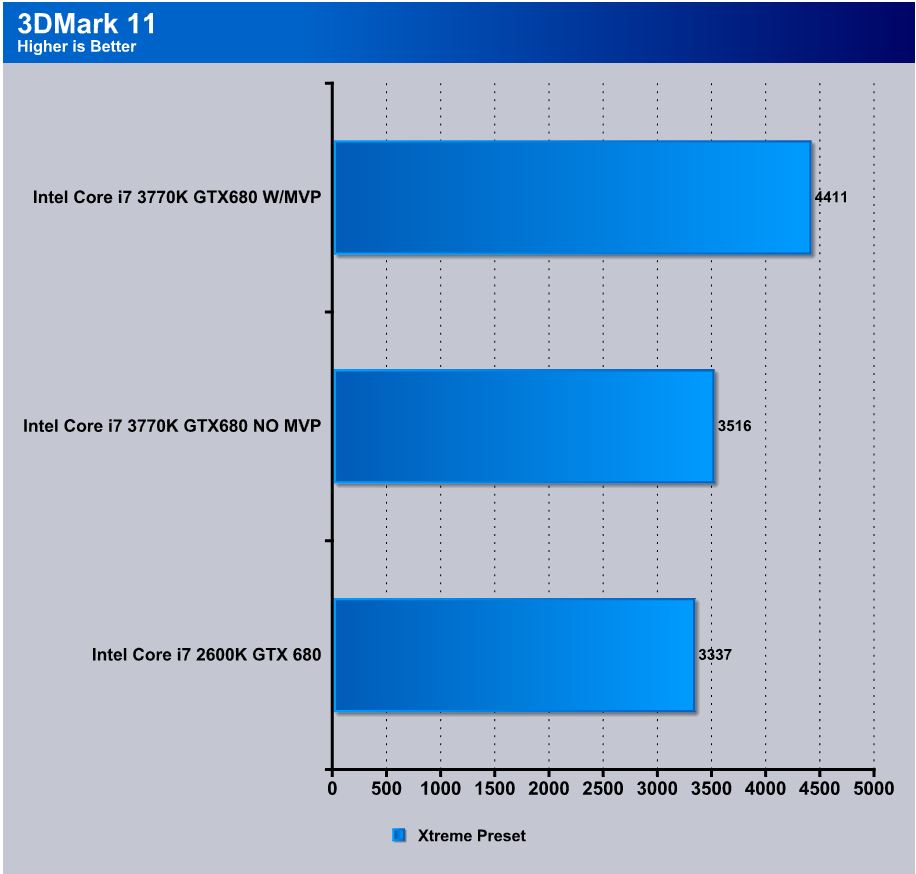
Here we see the performance scaling in the 3D side of the benchmark and with a Asus GTX680 installed. Now the i7-2600K has a PCIe GEN 2 controller where the 3770K offers full PCIe GEN 3 compatibility. This shows a small improvement without the help of the Virtu MVP software. With the MVP software and Hyperformance enabled, we see a sizable increase which would speak to the real capability of this offering, and what it could offer to gamers.
Unigine Heaven 3.0

Unigine Heaven is a benchmark program based on Unigine Corp's latest engine, Unigine. The engine features DirectX 11, Hardware tessellation, DirectCompute, and Shader Model 5.0. All of these new technologies combined with the ability to run each card through the same exact test means this benchmark should be in our arsenal for a long time.
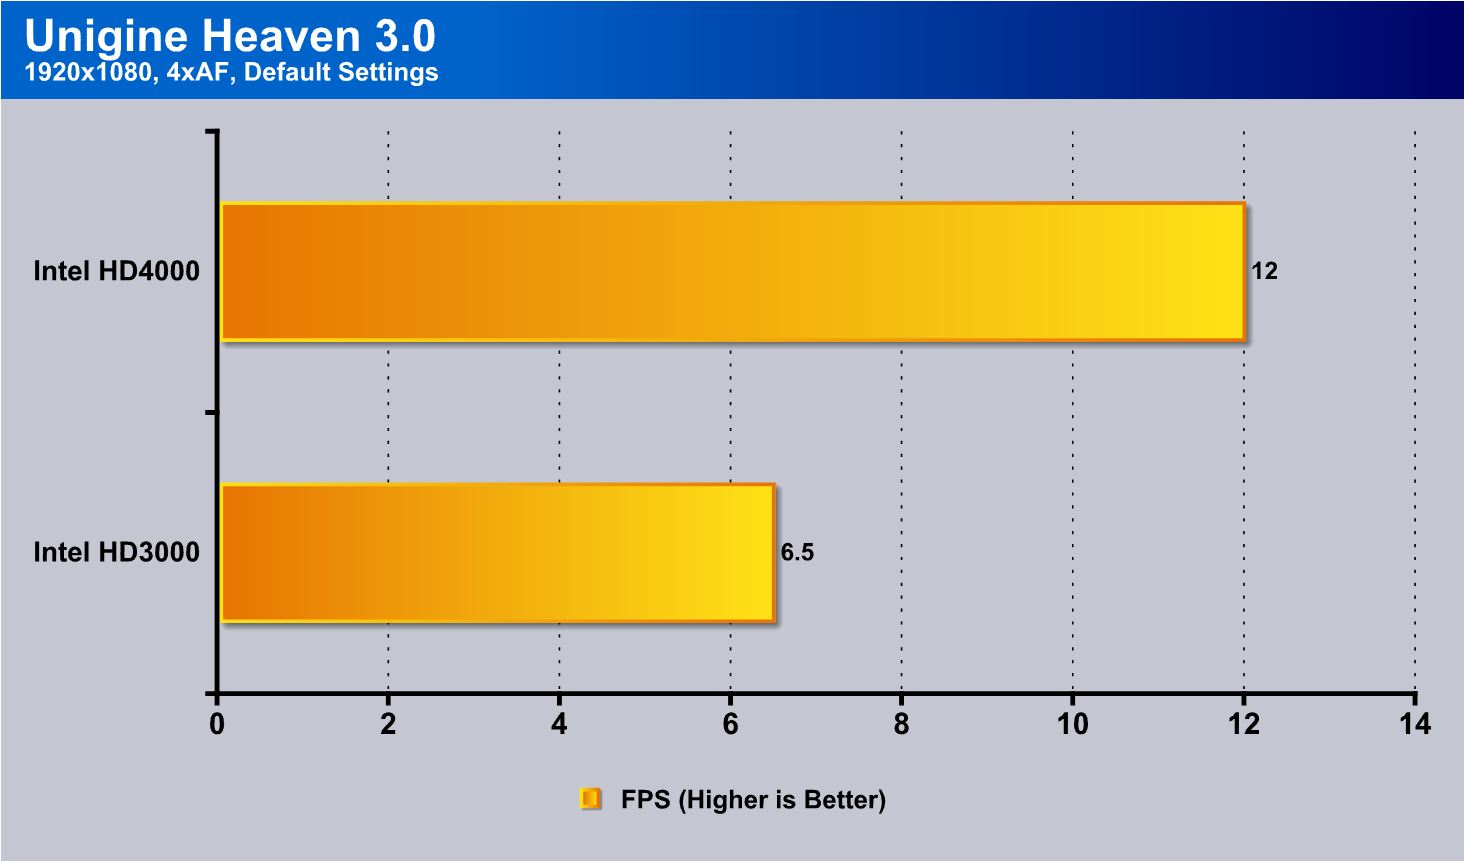
For Heaven, we again tested the 3770K iGPU vs the 2600K iGPU. To say the performance is great would be a understatement of the worst sorts. The iGPU within the 3770K is very capable for DX11 gaming on a medium/low level. So for casual gamers we could see a real benefit here.
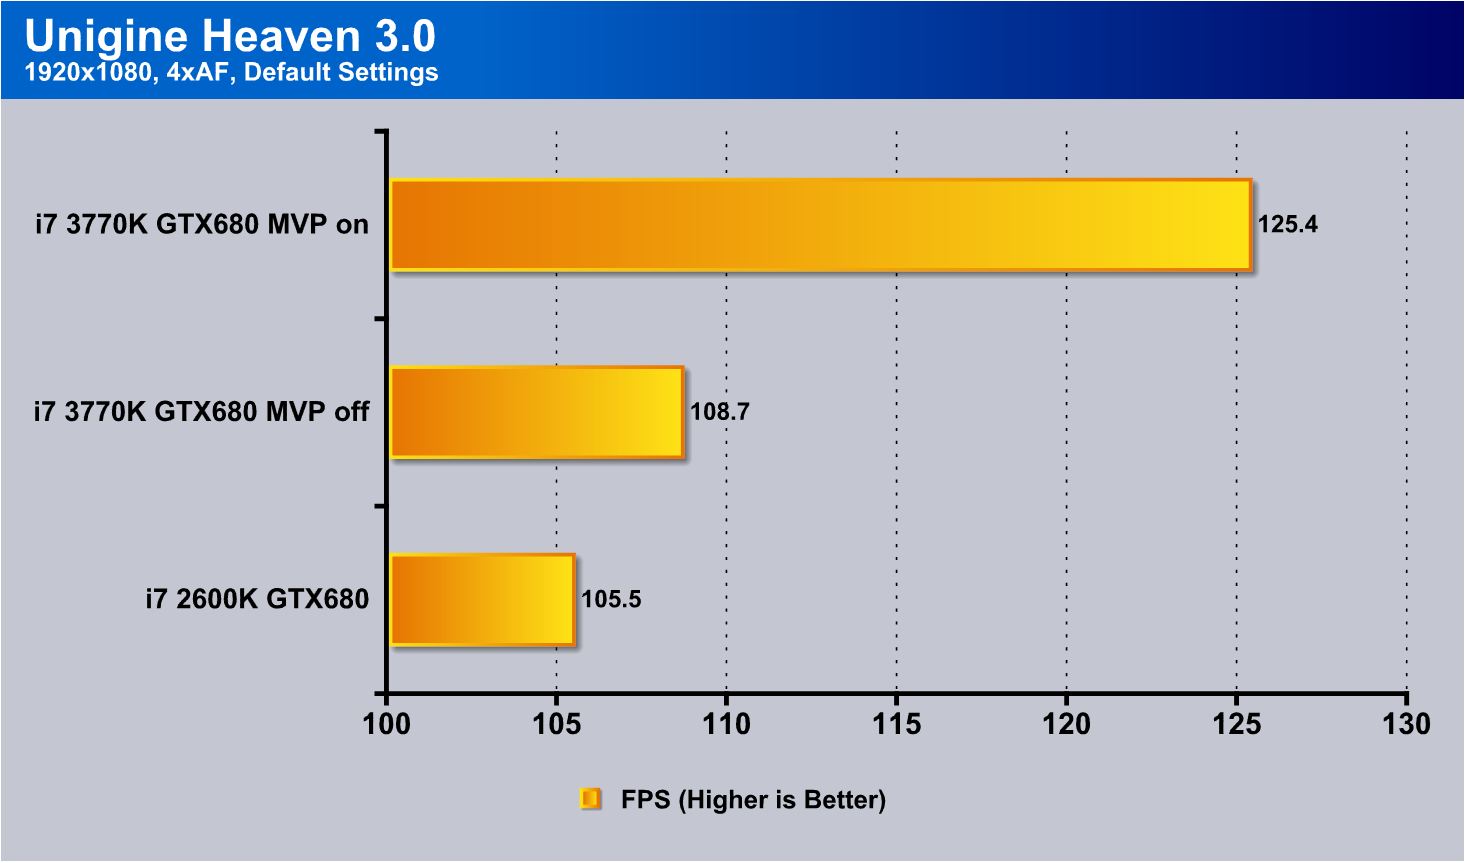
Here we see once again the GTX680 getting a slight increase from the switch to GEN 3 lanes, but once Virtu MVP was enabled we see some serious increase, and it does appear that Virtu MVP could be a real hidden befit for gamers looking for a little free performance boost from their gaming rig.
Metro 2033
![]()
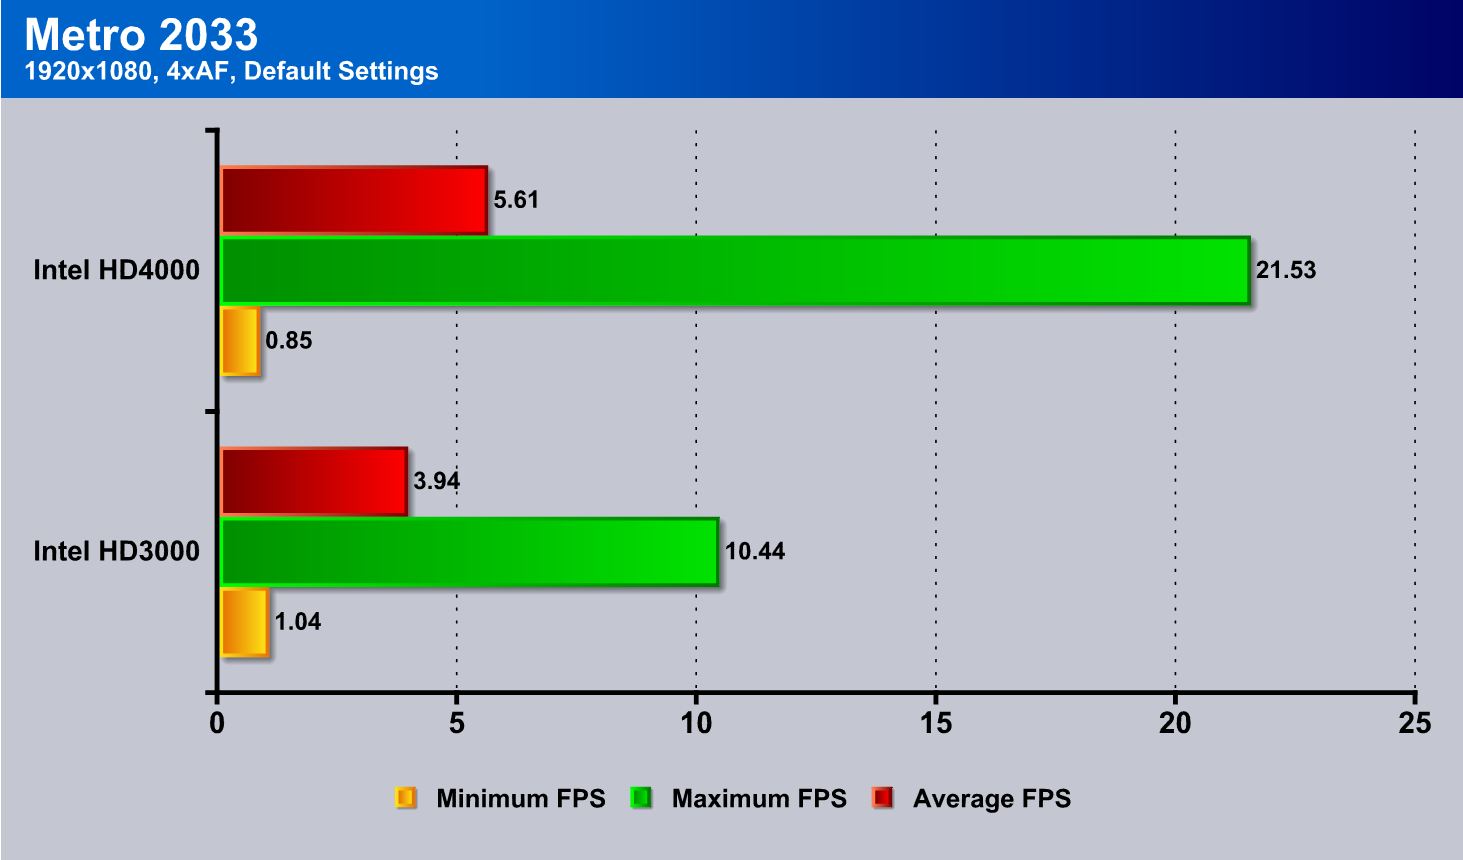
Metro 2133 is a overly brutal GPU stressing game and even SLI GTX580's can struggle at points, so putting the iGPU through the ringer on this test was nothing more than pure cruelty. To our surprise, at full HD resolution the game actually wasn't as bad as we thought it would be with the HD4000. However, this is still not something we would recommend.
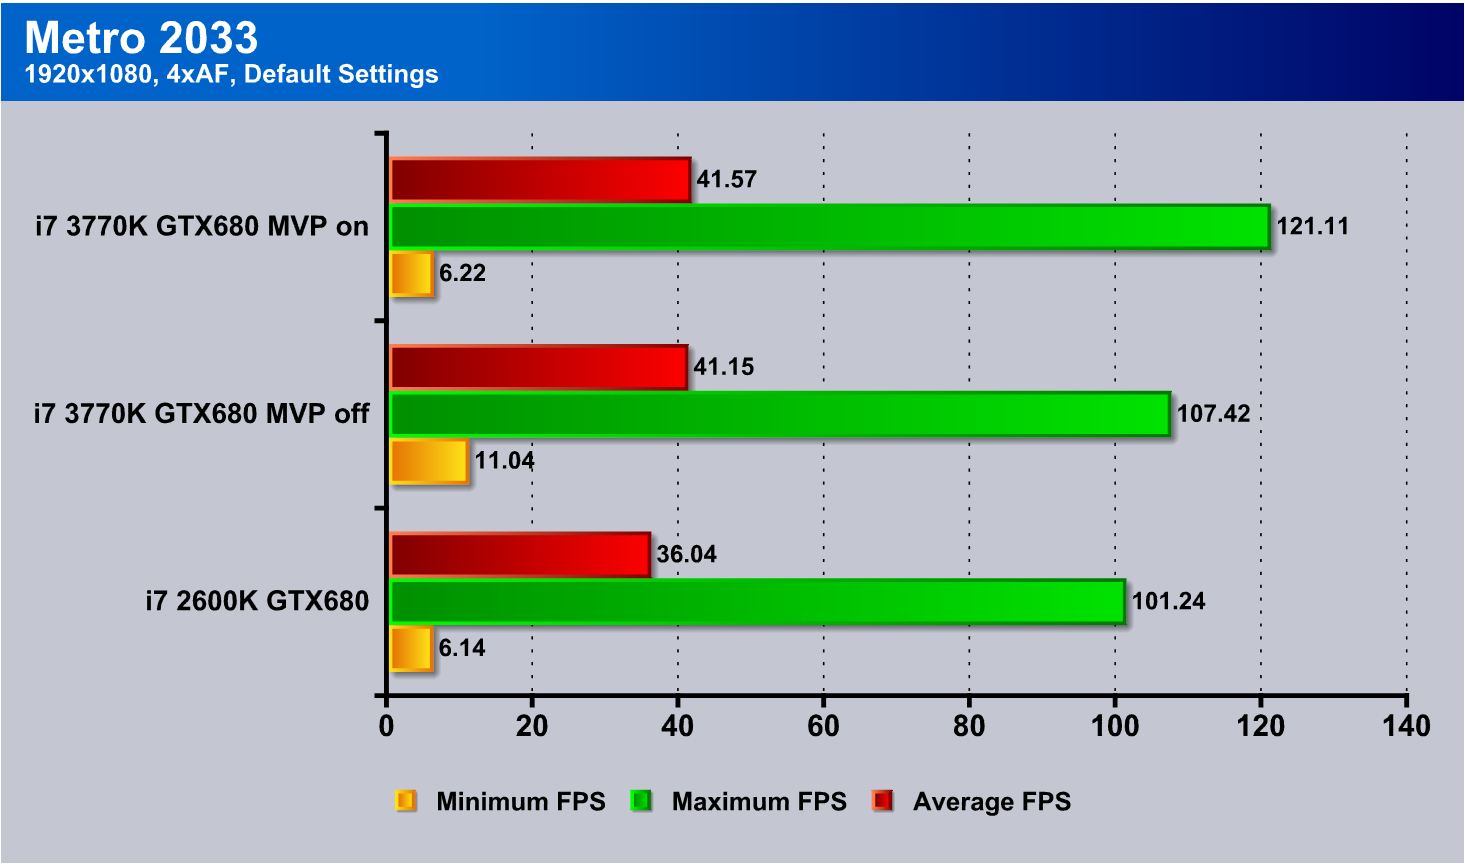
Well the GTX680 still pulls some amazing runs and rockets forward yet again with the help of MVP. The MVP software and its ability to pre render frames shows us that there is a significant amount of wasted GPU power here and I personally am glad that someone found a way to work around this to give us these performance boosts with really no harm to system performance.
PCmark 7

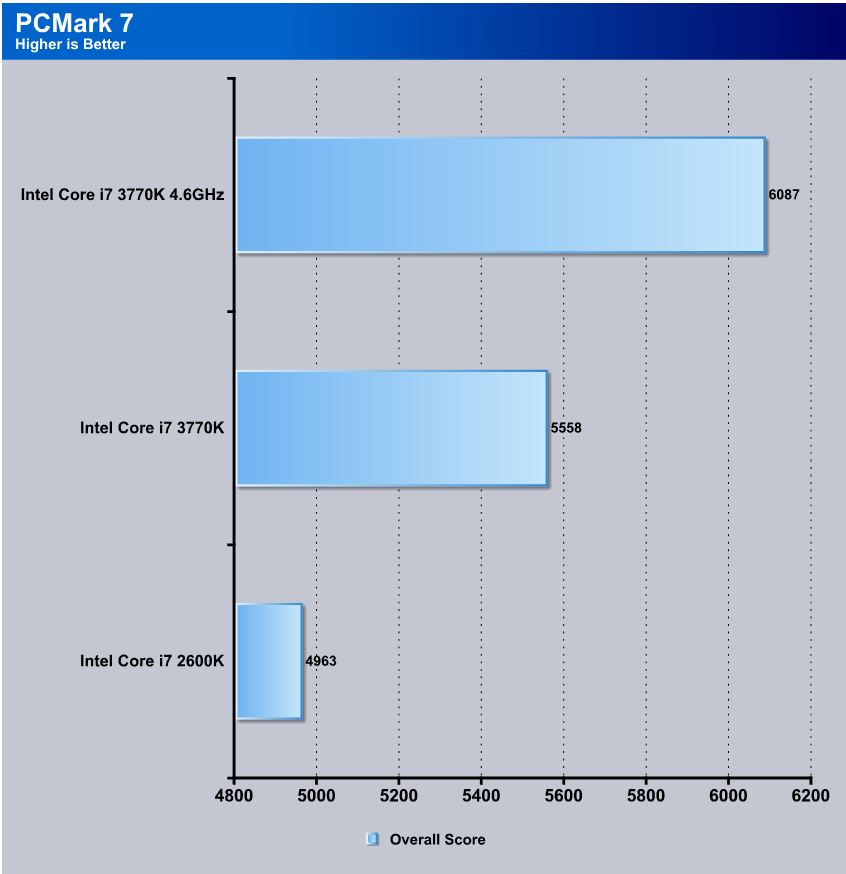
PCMark 7 is a worthy synthetic full system benchmark, and we have found it a good measure of total system performance. The Ivy Bridge architecture takes a nice jump here especially when overclocked.
CONCLUSION
When I first received the Sniper M3, memories of the Weapon-centric heatsinks popped into my head until I opened the box. Then I realized that in reality, this model really shared no design similarities except the same color scheme from previous G1 Killer series boards. Missing from the roster is the Killer network controller which has been one of the mainstays of the G1 Killer line, and therefore was an odd omission for me. The Weaponized heatsinks are also absent instead replaced by a functional albeit somewhat boring standard heatsink design. The lack of onboard post LED, and power/reset buttons also were kinda odd omissions for a gaming centric or high end gaming model motherboard. Then we come to the slot layout, which giving 3 slot spacing between the two main GPU slots is a total blunder to us as this basically omits dual card configurations for many users who may use a mATX chassis with 4 slot outputs, such as many of the LANBOX style cases on the market. Lastly, while every other Z77 midrange and high end model motherboards we have seen on the market has had an 8 pin CPU power connector, for some reason Gigabyte chose to go with a 4 pin connector instead. I feel it could impact maximum performance potential as the extra power headroom is now lessened.
The news is not all bad here, as the board is a great performer and the CPU and memory both clock rather easily with the Sniper M3, but there is a bit of tweaking needed to get to really high clocks. The audio solution is quite strong and it sounds very nice in-game. This is always good, as most of the time I find that integrated solutions can be a bit lacking or just not hit the mark for good gaming audio. Clock for clock performance is good and as we have found that it is very close from board to board, so with the exception of some minor tweaks, we really cannot see one board model or vendor pulling significantly ahead at standard and gaming clocks. Going subzero and extreme clocking is a whole another animal and not something I could realistically do on every board, as it would take far to long to test every board to that level, not to mention the LN2 costs. But from what I have seen, the board can clock chips quite well and up with some of the bests, which is impressive with a 4 pin CPU power connector. But, I am sure when starting to really push the limits this could become a limiting factor.
Anyone looking to build a capable and powerful LAN gaming system I think would have a hard time turning this board down pending a single card is used or if used with a chassis with more than 4 slots. The board is a G1 Killer board at a value price, but all omissions aside can do the job and rightfully so would be a good option for anyone looking to get into an Ivy Bridge gaming rig.
| OUR VERDICT: Gigabyte Sniper M3 | ||||||||||||||||||
|
||||||||||||||||||
| Summary: The Gigabyte Sniper M3 is a solid board with a good value price and great performance and for this, it earns the Bjorn3D Silver Bear Award. |


