Biostar has recently been pushing its way into the enthusiasts offerings, and with the new TPower TZ77XE4, they have introduced a board designed for overclocking. Knowing the TPower line’s capabilities and excellent value we should be in for one hell of a show.
Introduction – Biostar TPower TZ77XE4
The Z77 chipset has been out for a while us and knowing now after many boards tested that overall performance on air/water cooling is very similar from board to board the features start to be the key selling point. Of course there is another factor at play here and this is the cost, if the board can perform well and be extremely cost friendly that could actually be an excellent choice for many users.
Due to these key points we try to look at target markets and what segment the board will fit into. the TPower comes in at a street price of$139.99 on Newegg. this places it in a very unique position as it is very low cost and at entry level status now lets dive in and see what the TPower has to offer and if it can do what it needs to earn your hard earned buck
Key Features
Virtu MVP

Biostar like every other Z77 Manufacturer has adopted the Lucid VirtuMVP software which is similar to their original GPU virtualization software but with extra benefits. Such as Hyperformance and virtual Vsync, both of which are designed around improving the gaming experience. Hyperformance offloads pre rendering of frames to the iGPU allowing the main GPU to do the heavy lifting it was designed for and not waste some of its precious GPU cycles on the pre render work. virtual Vsync is very similar to in game Vsync or “Vertical Vsync” in that it eliminates screen tearing issues but without the performance hit that games see from standard Vsync. Normal Vertical Vsync locks the framerate to a max of the refresh rate of the display whereas the Lucid Solution allows the much higher framerates while also eliminating the tearing issues.
13 Phase Power Design

Biostar has implimented a 13 Phase VRM to ensure that the critical components get the power they need when they need it. Phase count I feel is only important to a certain level and with quality components a monsterous huge phase count VRM is just unecessary or a manufacturer trying to pay a visit to the EPEEN olympics. Its nice to see that Biostar avoided such things and gave the board a nice VRM without wasting extra cost on extra components just to make the board look fuller.
BIOS Flasher

Biostar advertises the ability flash the bios directly from a flash drive within a bios feature. to many who have been spoined by having this feature for a long time now, dont realize that there are still some (very few) who do not have a bios flashing utility within the bios itself or during startup and actually force users to flash within windows which can go badly very fast. So Kudos to Biostar for being up to date o what users want and giving it.
Puro Tone 110dB

Puro Tone 110dB is one of those things I dont think I could even justify myself as I am not an audiophile but I can say taht upon testing the audio from this board vs some others well above its price range it sounded excellent or just as good. Things so far are shaping up nicely for the Biostar entry.
e-Hotline

Biostar offers a specialized support system where you can submit tickets directly to their support team via the e-Hotline software. One issue I have with this is if the board wont boot how doI use the e-Hotline software? but it could definitely be useful for those odd other issues you run across such as weird issues or instabilities…
Overview of the Biostar TZ77XE4
The packaging is standard and simple with a little flash and for the most part littered with icons of supported features. Normally we like to see more subdued packaging but we can’t really blame them for trying to push everything it offers just for me it seems cluttered.
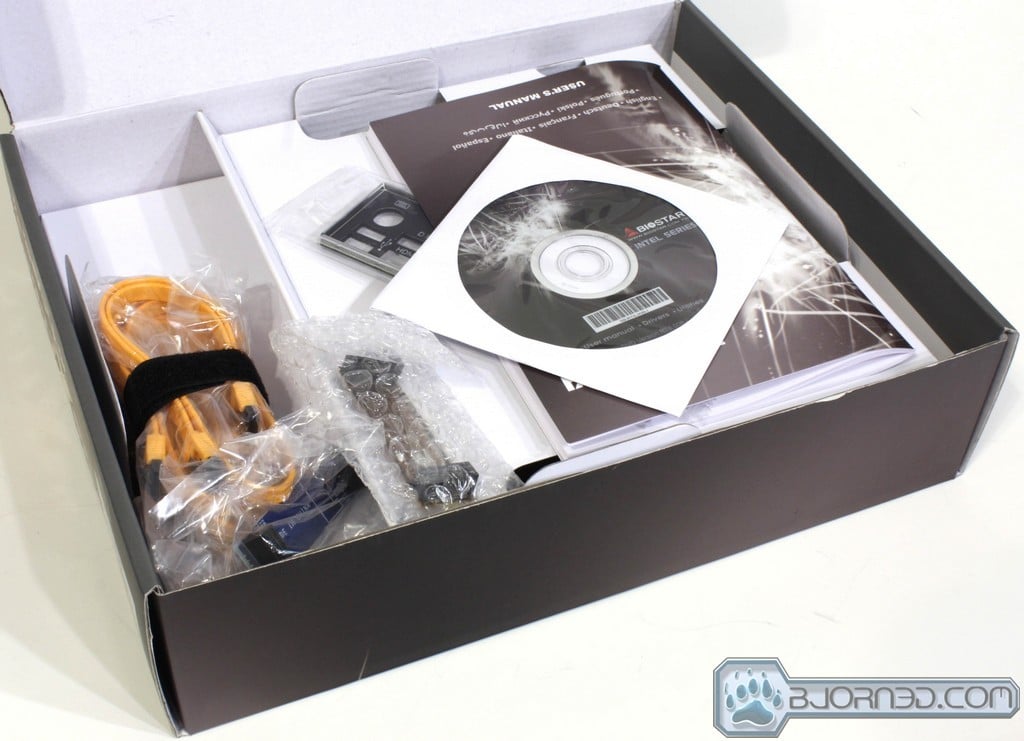
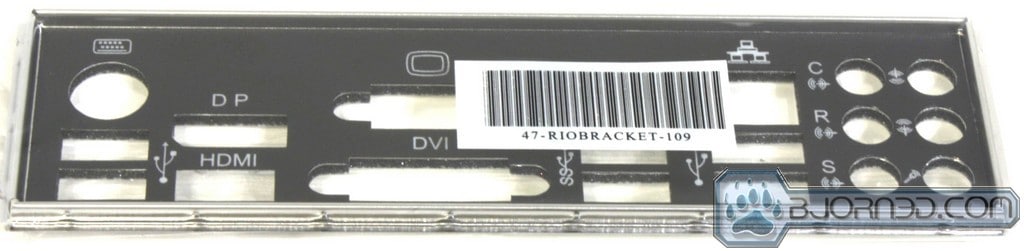
- IO Shield
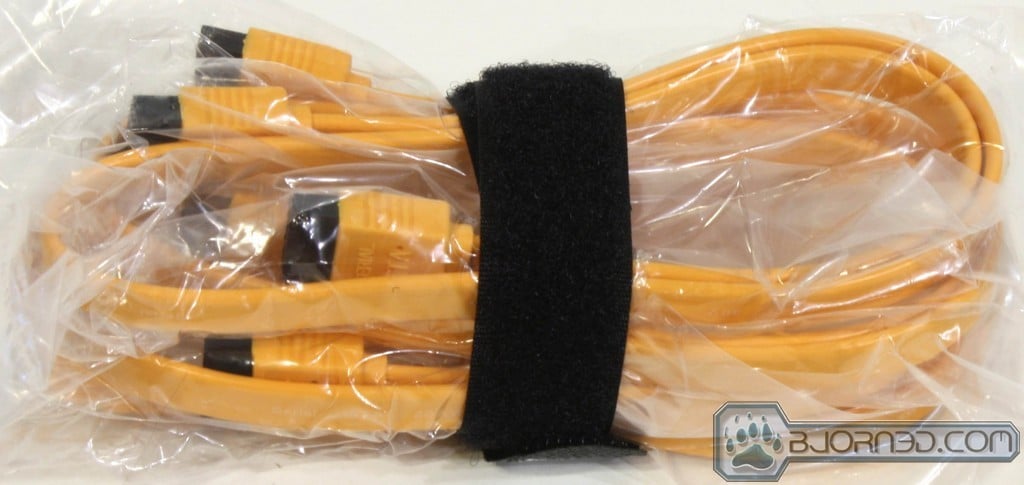
- SATA cables
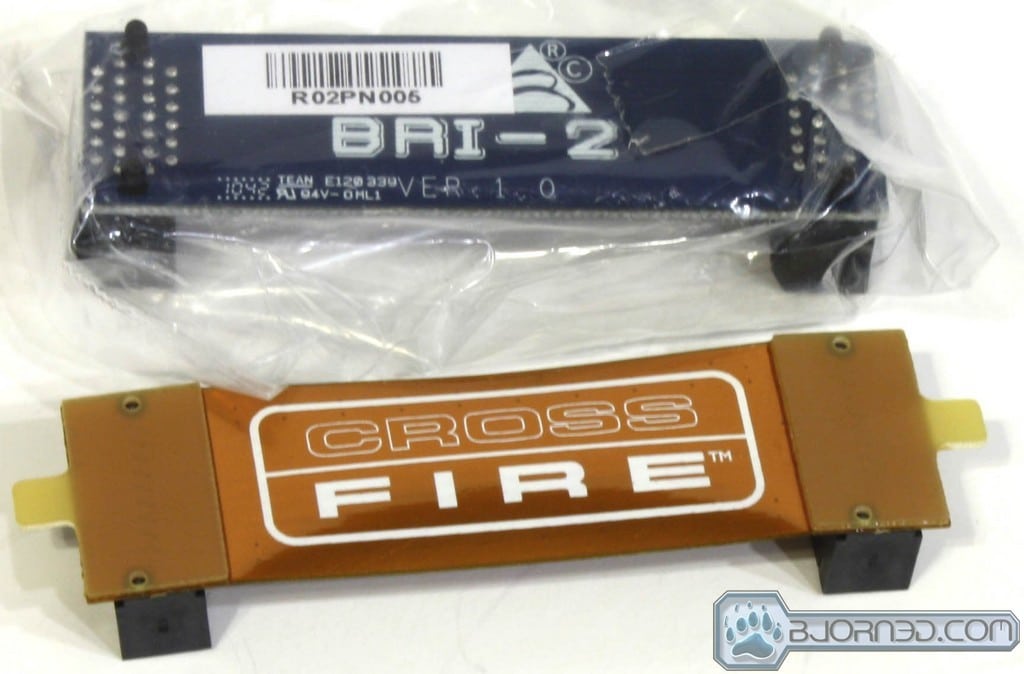
- 2 Way SLI Bridge
- Crossfire Bridge
- Users Manual
- Driver/software disc
The accessory package covers the basics needed to connect the board and is more of a no frills entry but nothing is really missing tha would be needed to get it up and running.
Click Images to Enlarge
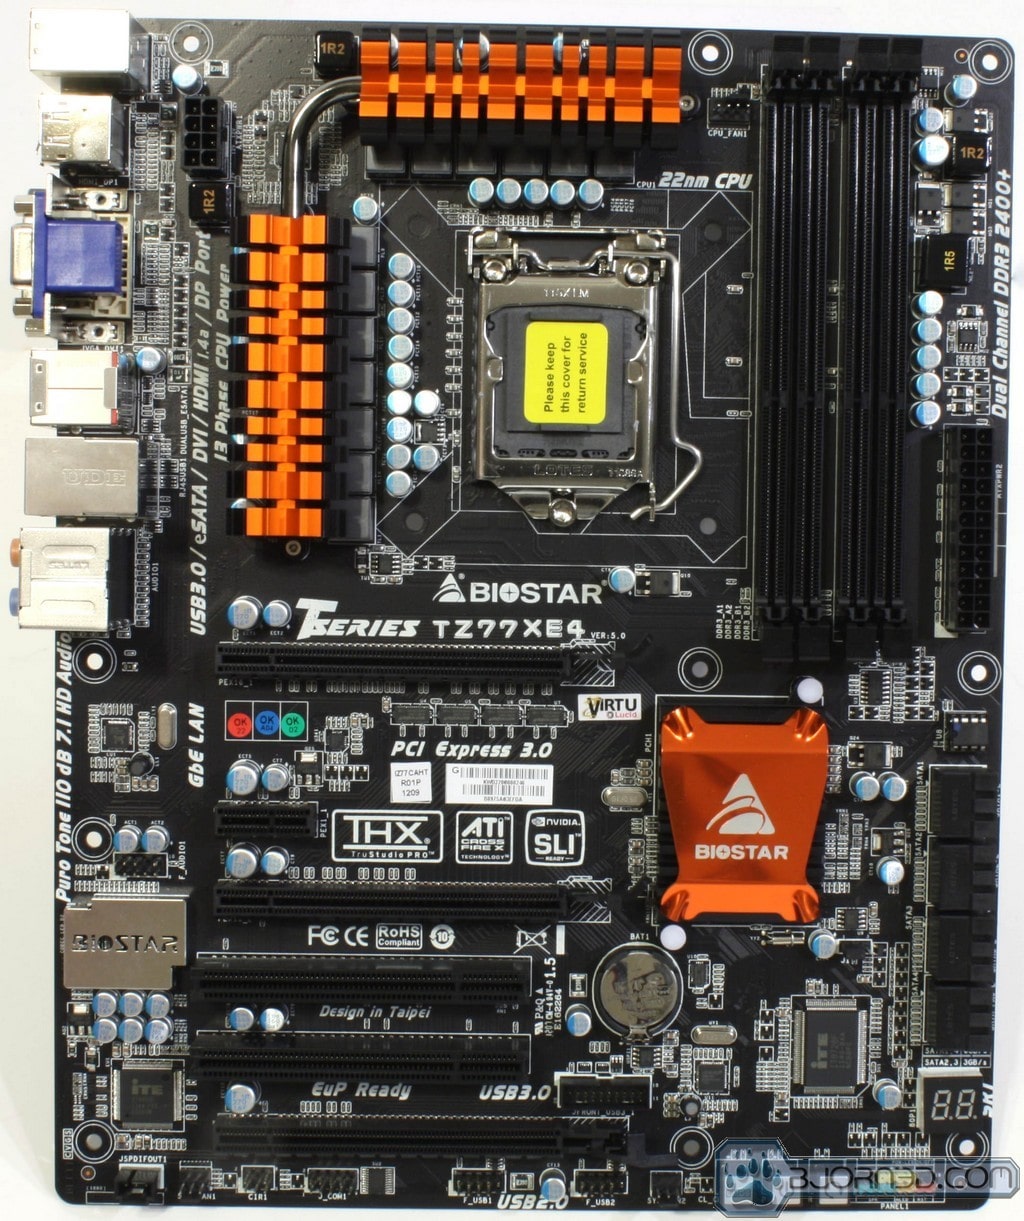
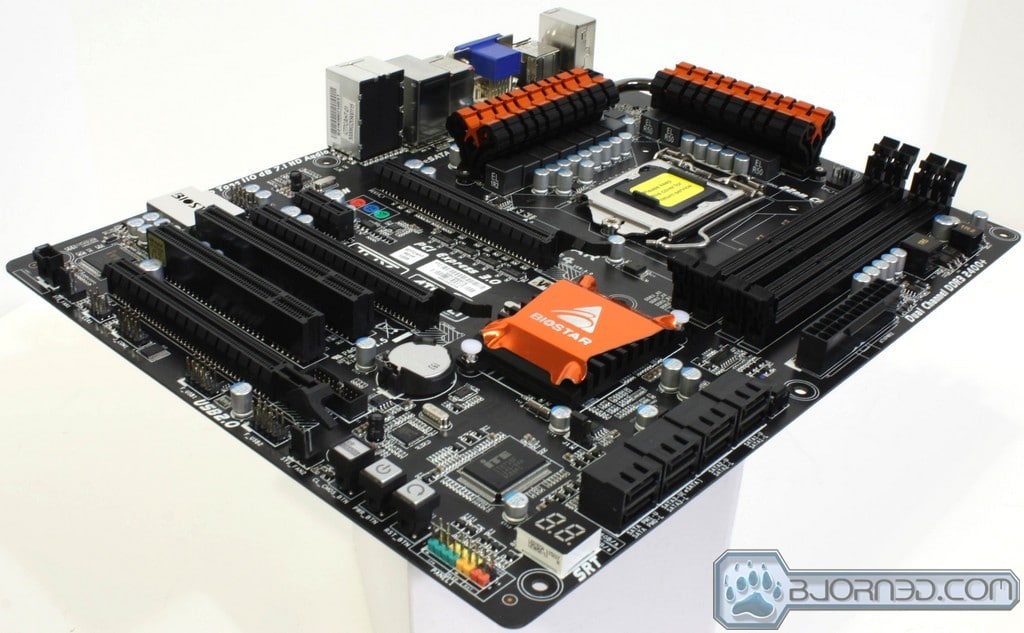
Here we see the main board layout which is triple slot spacing between all 3 of the PCIe x16 slots even though 2 of them could realistically be used for GPU usage. the last slot pulls x4 lanes from the PCH and will easily fit such things as a raid card or other PCIe device. The triple slot spacing means that if using triple slot cooled cards you can easily fit them or even better in dual slot card usage they will very easily fit with a single slot space of air gap allowing for cooling airflow to get between the GPU the adjacent GPU in SLI or crossfire configurations. For the most part the component connector placement is along the board edge which makes for awesome cable routing but the exception here being the USB3.0 20 pin header which for some reason is right above the lowest PCIe x16 slot. This will not cause major issues but we feel the location could have definitely been selected better. The other noteworthy thing we saw is an older style configuration for the location of the onboard FP audio header which is located right above the 2nd GPU slot on the far left of the board. This is far less of an issue now days as the GPU’s have a cutout in this area that cables can be run under but thats with the hope that the chassis has a long enough cable to react that without having to be strewn across the board surface. One other thing to notice is that the board does carry 2 legacy PCI slots which can be used for any older audio cards or whatever you may need them for. We do not see a need for these at this point but im sure someone will find at least one of them useful.

Click Images to Enlarge

Click Images to Enlarge
- 4x USB 2.0
- PS2 keyboard port
- Displayport Connector
- HDMI Connector
- Dsub connection
- DVI-D Connection
- eSATA Connection
- 2x USB 3.0 ports
- Gigabit Realtek LAN
- 8 Channel Realtek Audio
At the rear IO there is plenty of connectivity or more than enough. We would prefer to see D-Sub removed from the IO in favor of more USB connectivity as a DVI-I could be used with a DVI/VGA adapter if needed. This is to just the caseI with Biostar boards, as many boards have this connectivity when I feel it could have lesser display connectors or smallder digital connectors with included or available adapters for legacy display types which would allow for more IO connectivity. All in all Biostar did a good job of covering damn near anyones connectivity needs even down to a legacy PS2 keyboard port.
Click Images to Enlarge
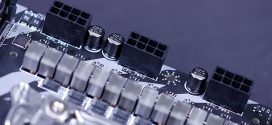
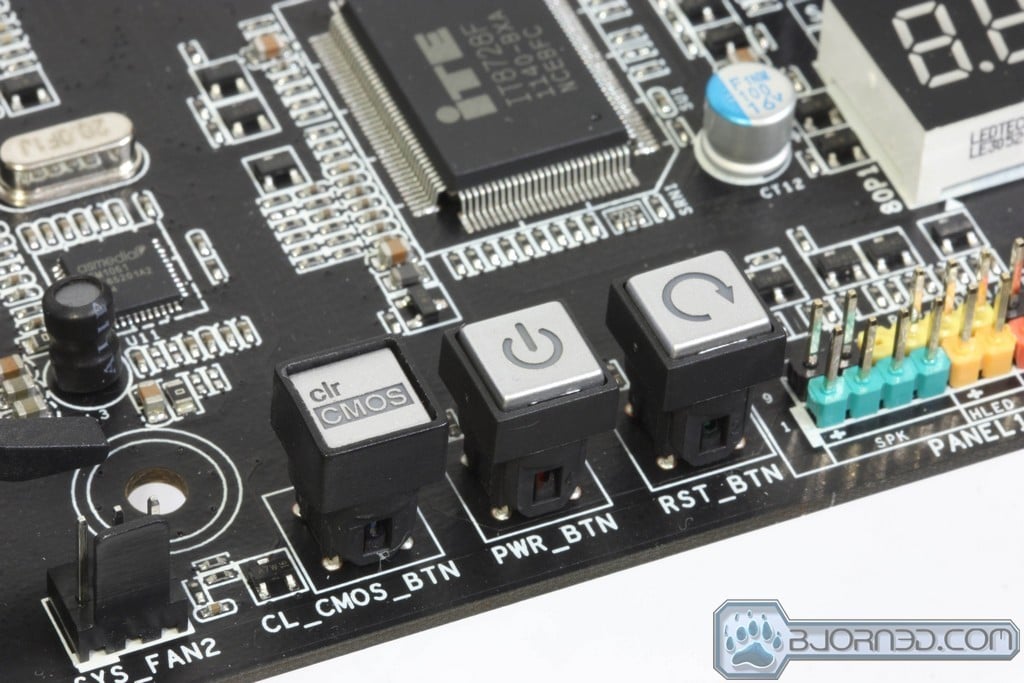
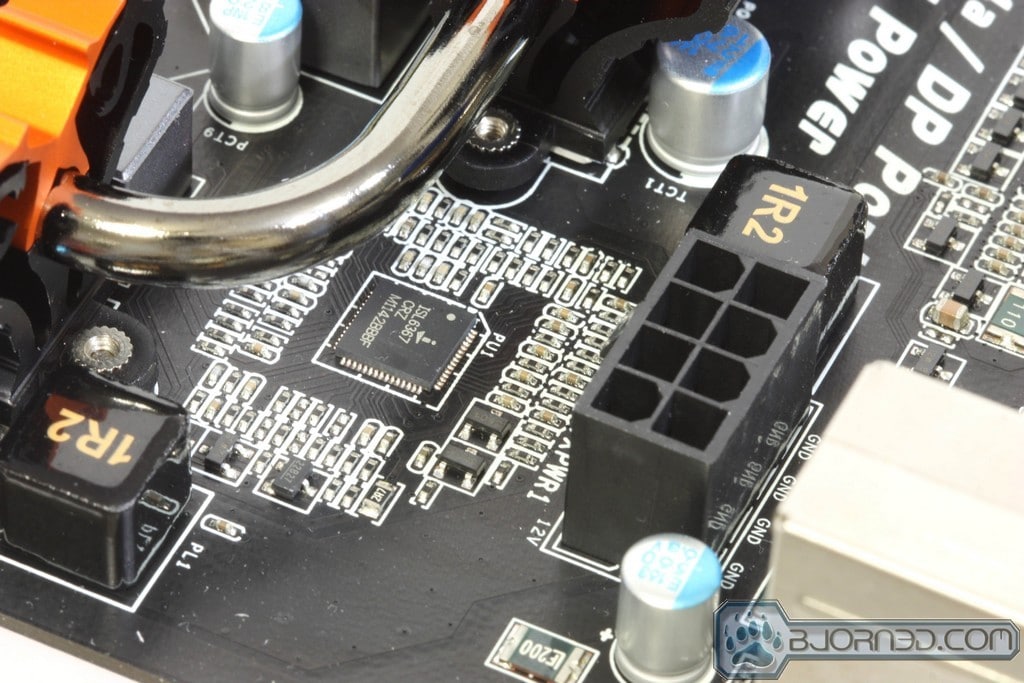
The bottom edge of the board houses the control switches which can be used for power/reset and clear CMOS and they light up so even in a poorly lit situation it can easily be used. The top VRM area is fed by a 8 Pin power connector which should eb more than enough for even the most demanding users.
Click Images to Enlarge
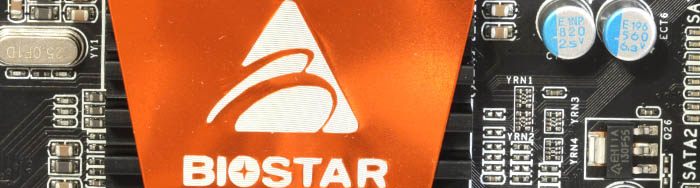
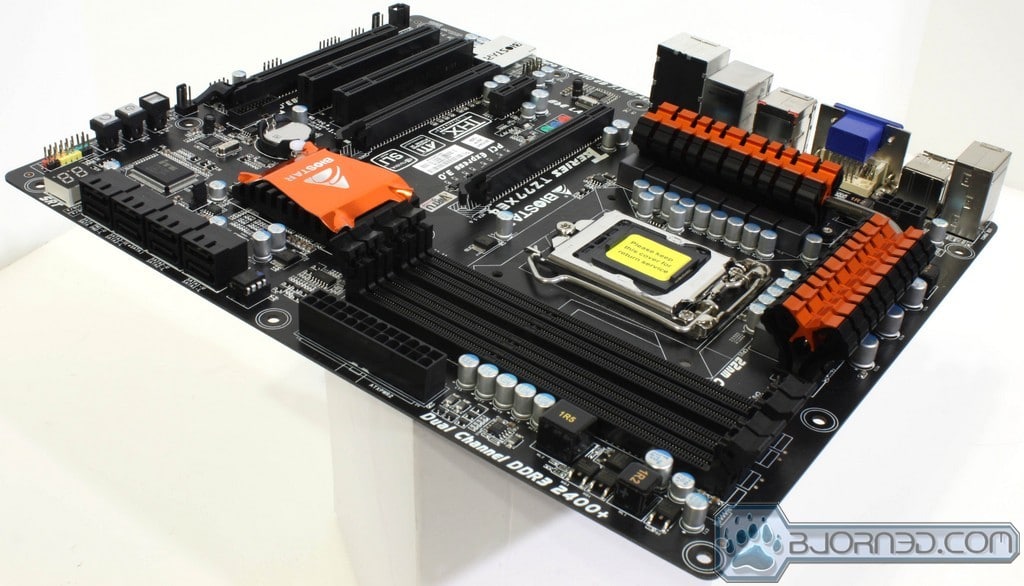
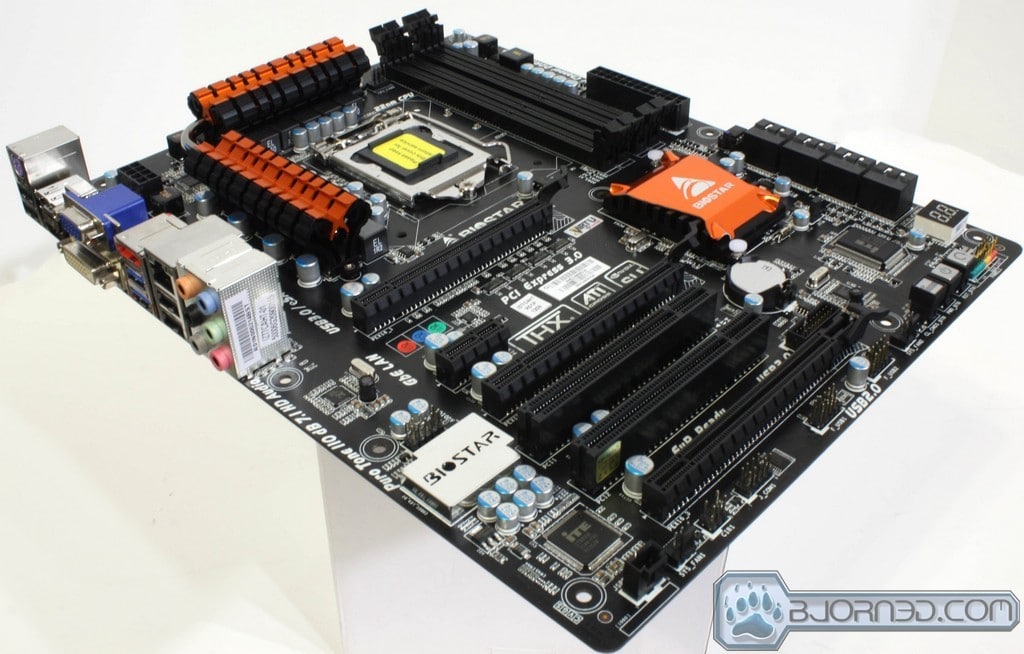
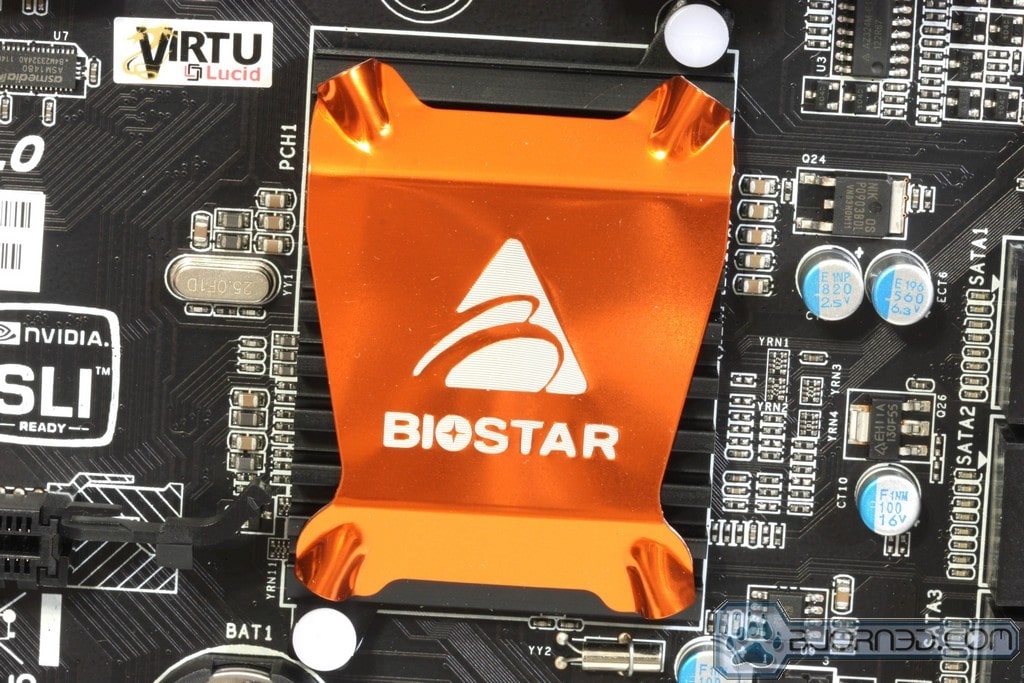
The PCH is covered by a standard passive black sink with a shiny and bright orange Biostar cover which is actually quite cool looking and can definitely fit in with some unique case mods and custom designs out there. It looks like Biostar listened and observed the enthusiasts market and the OEM style we are used to is definitely fading away for a much neater look to it and with some cool accents to make it look just flat out cool. the idea carries over to the VRM cooler which has a machined insert of the same orange color and it just adds a flat out cool accent strip to the cooler while not inhibiting its cooling ability.
Click Images to Enlarge
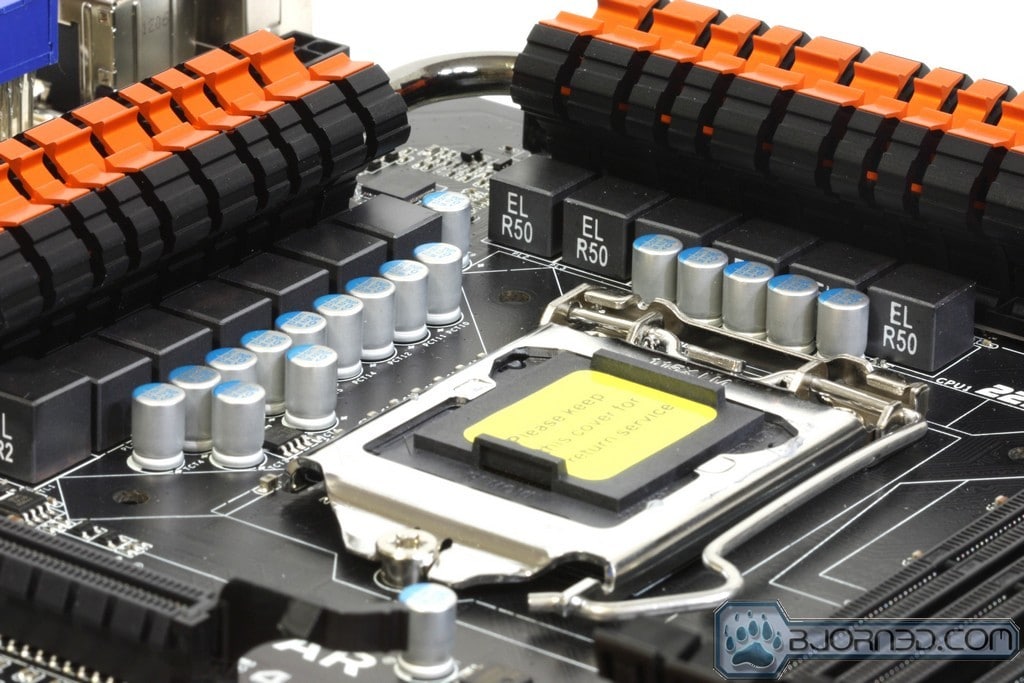
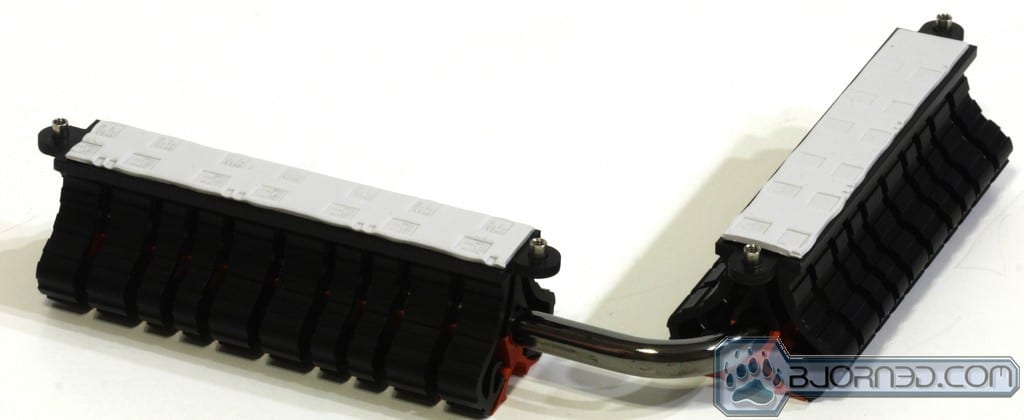
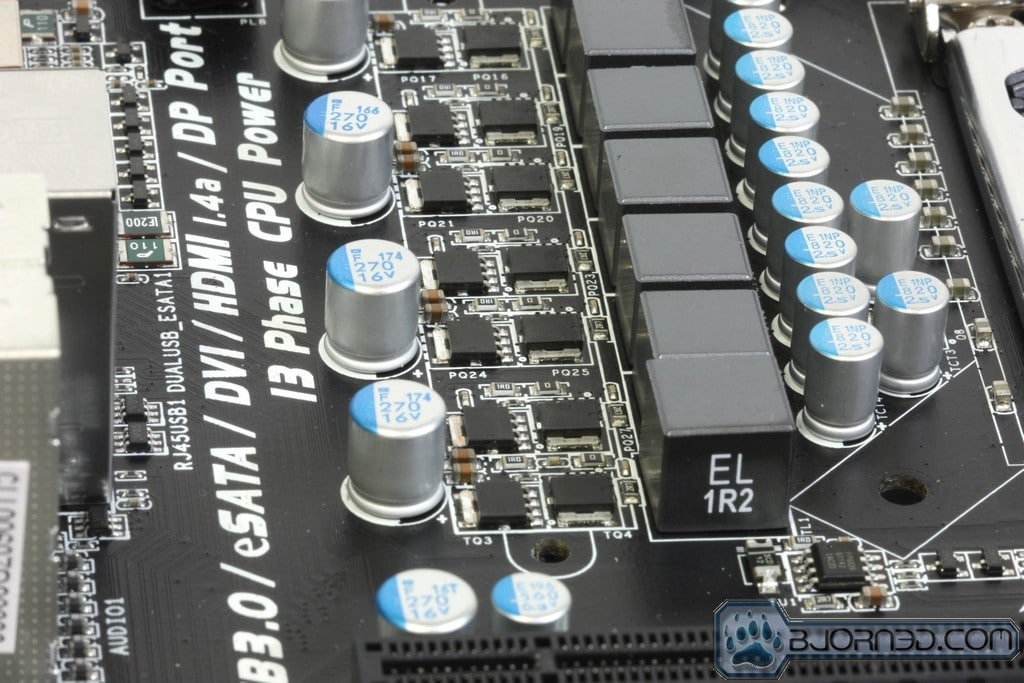
The top end is where we find the VRM section which as we said before is fed by a 8 pin ATX connector which is more than enough AMP capability to handle any load this board could throw at it under normal circumstances so we went ahead and popped the top or the heatsink array that is to see what we are dealing with. the components are all quality and the board itself has a solid feel but the VRM is laid out much in a way that we have seen on many top end boards and also we gotta give Biostar credit as one again they listened and omitted plastic clip hold downs in favor of screws on the VRM cooler to ensure a nice solid mount. This can be evidenced from the impressions on the thermal pads for the VRM cooler.
BIOS Overview


Click Image To Enlarge
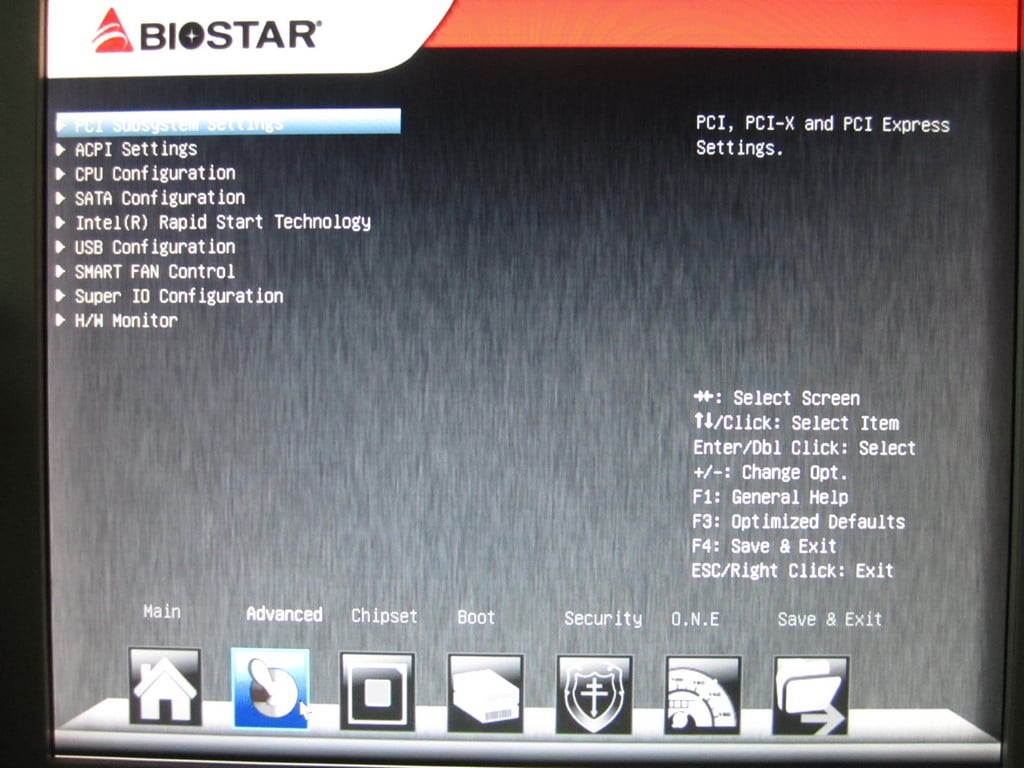
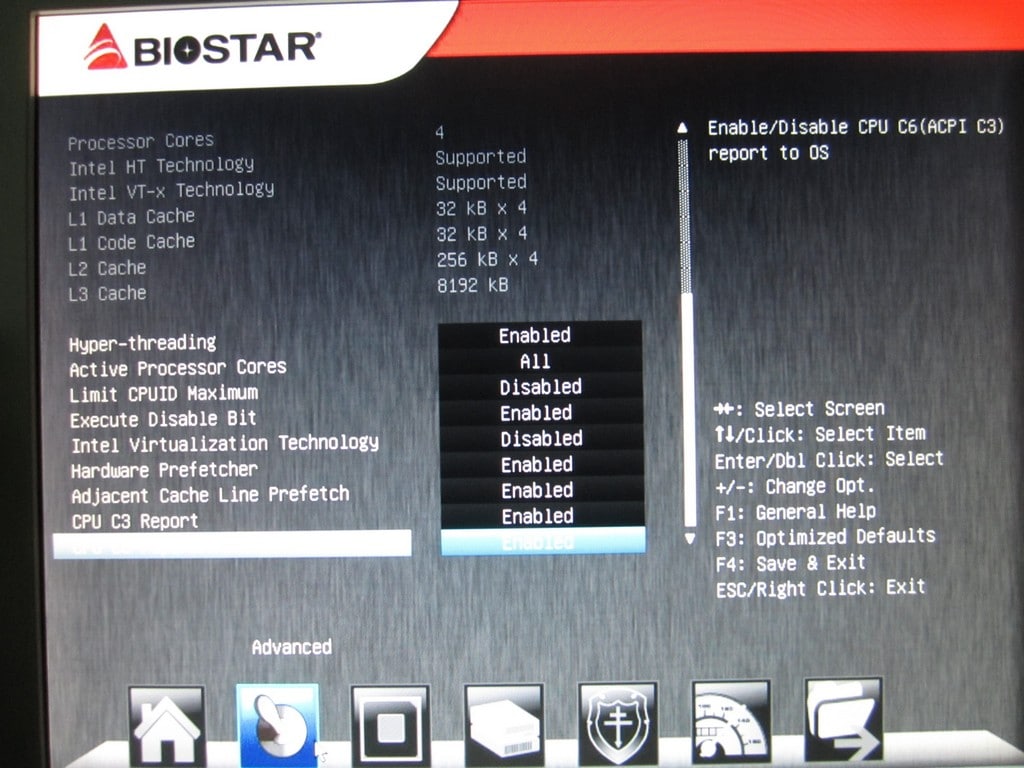
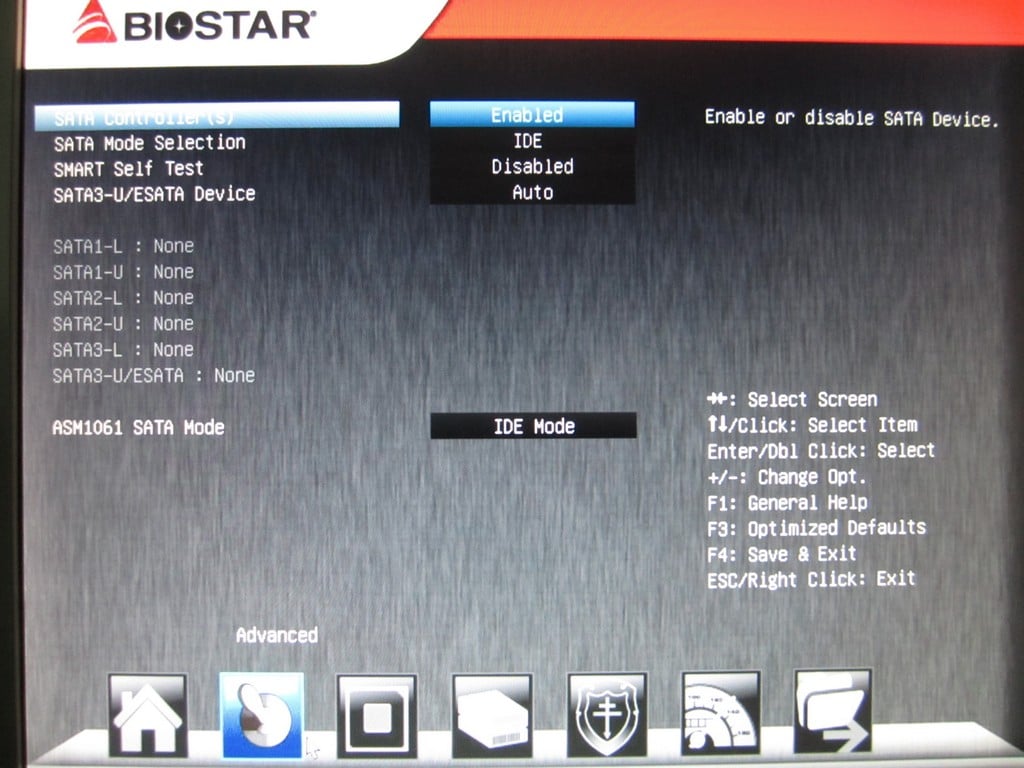
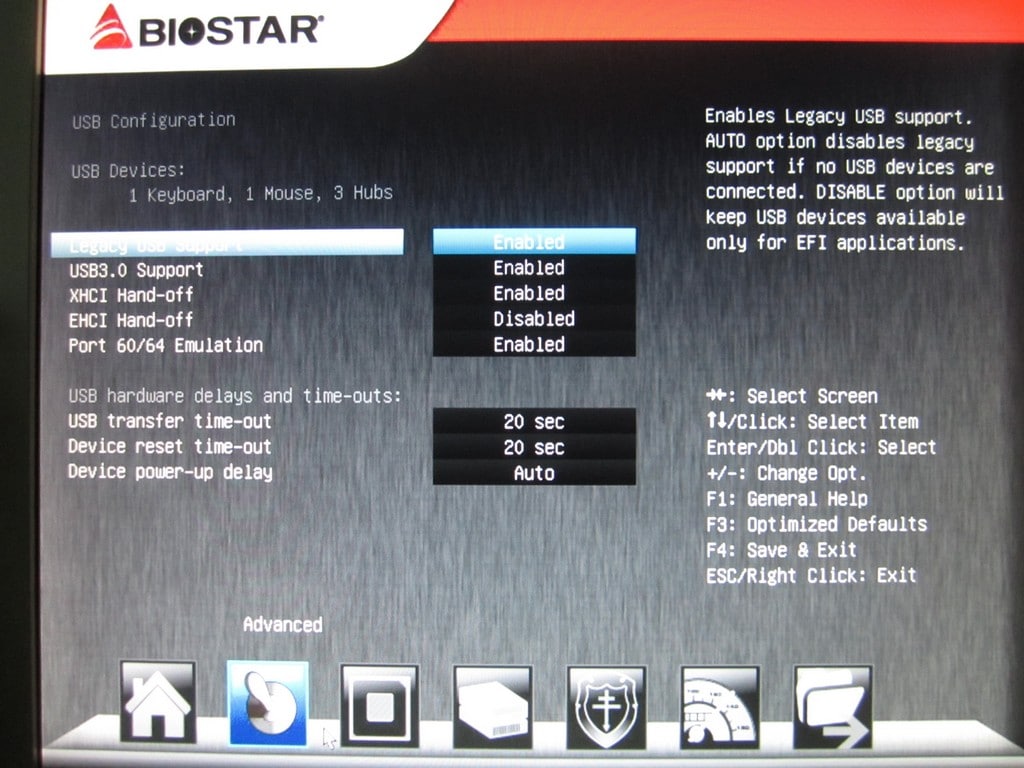
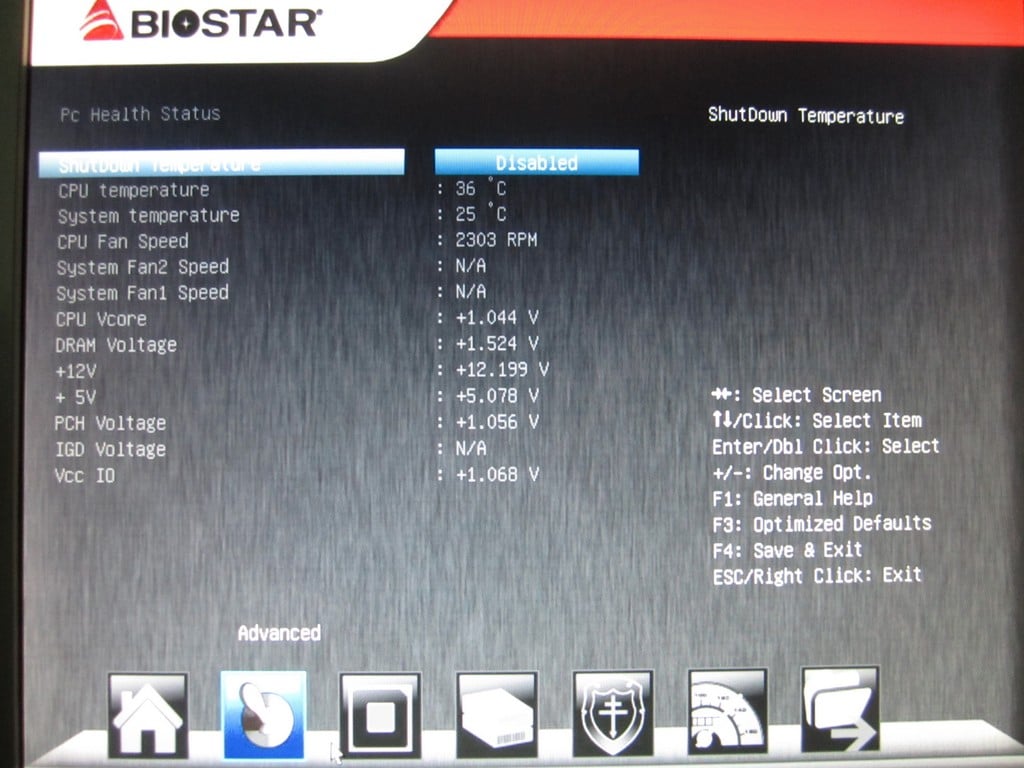
The Advanced section once again very much like standard BIOS houses all of the advanced board settings that control how the board acts and which devices on the board are active. Not just that but also it changes settings for the onboard devices such as SATA mode.


Click Image To Enlarge
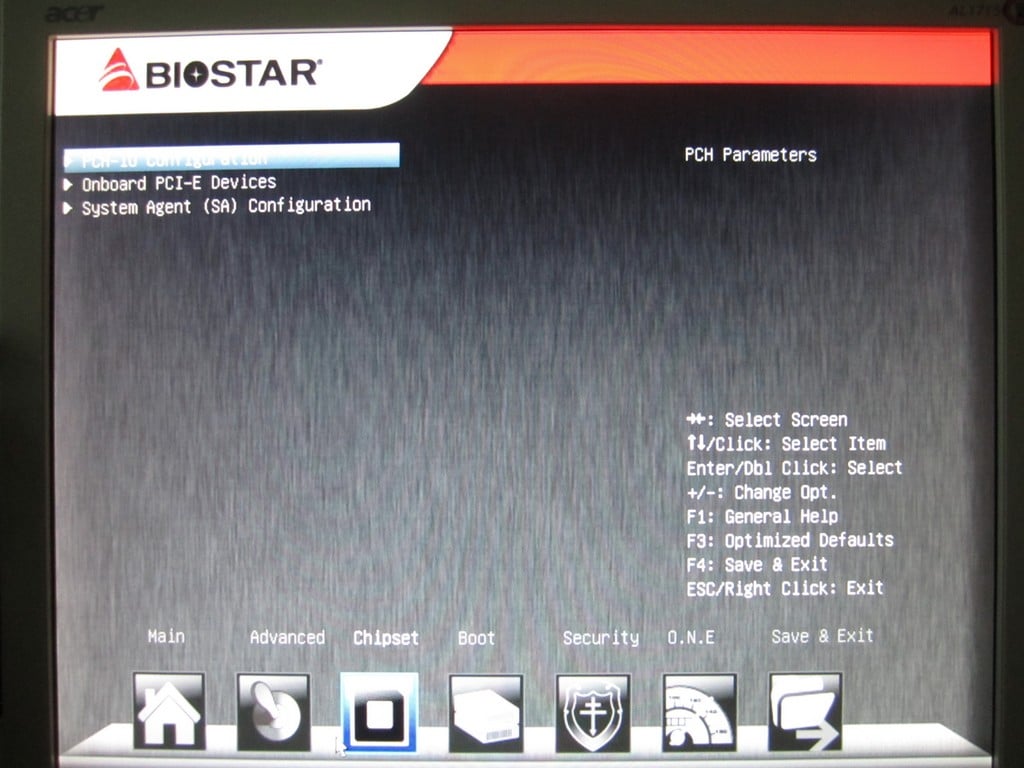
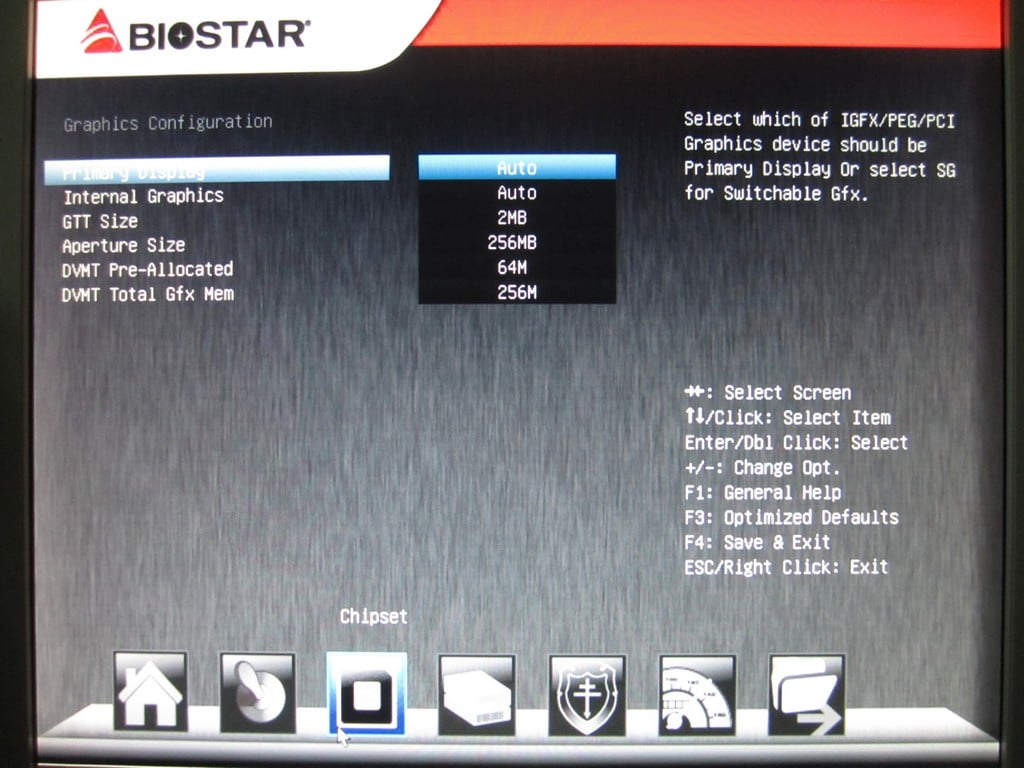
Here we see the Chipset section which is quite small and simply deals with chipset related components. Things like PCIe device settings, memory IO settings and advanced settings such as this. These settings are best left alone if you are simply installing the board in a gaming or home use rig as defaults will work fine for most settings in fact.

Click Image To Enlarge
The boot section is just that: a tiny section of a single page just to setup how the board boots and what boots first.
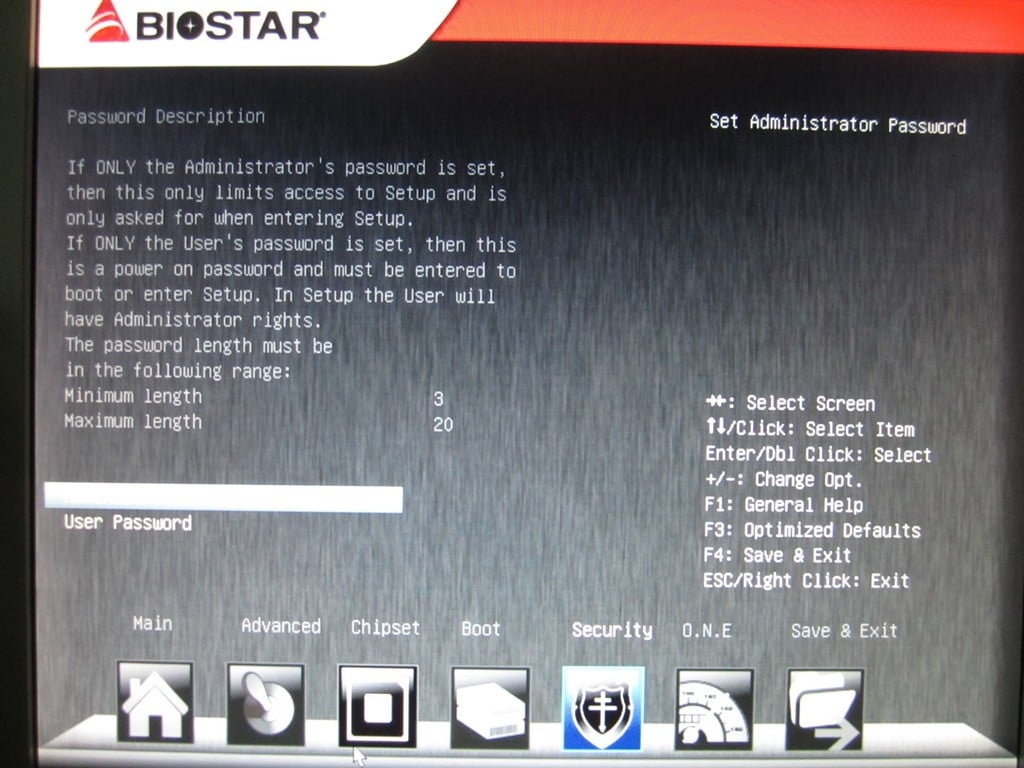
Click Image To Enlarge
Here we see the security section which is simply setting up BIOS passwords to secure the board in the case of someone trying to access it without your authorization.
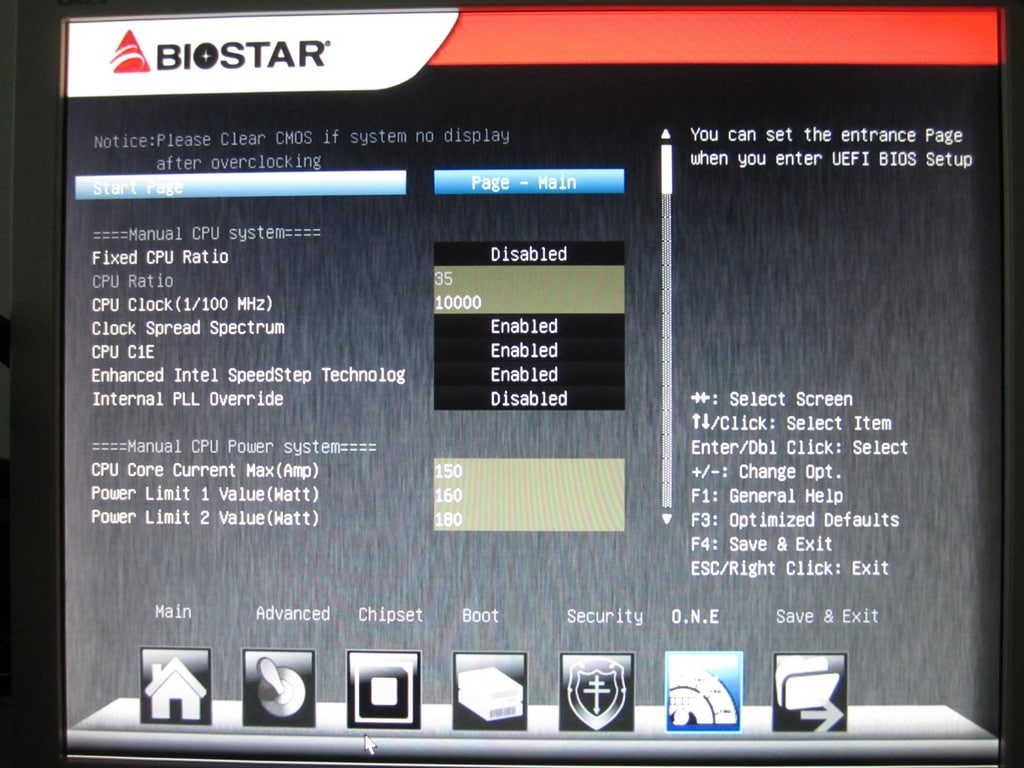

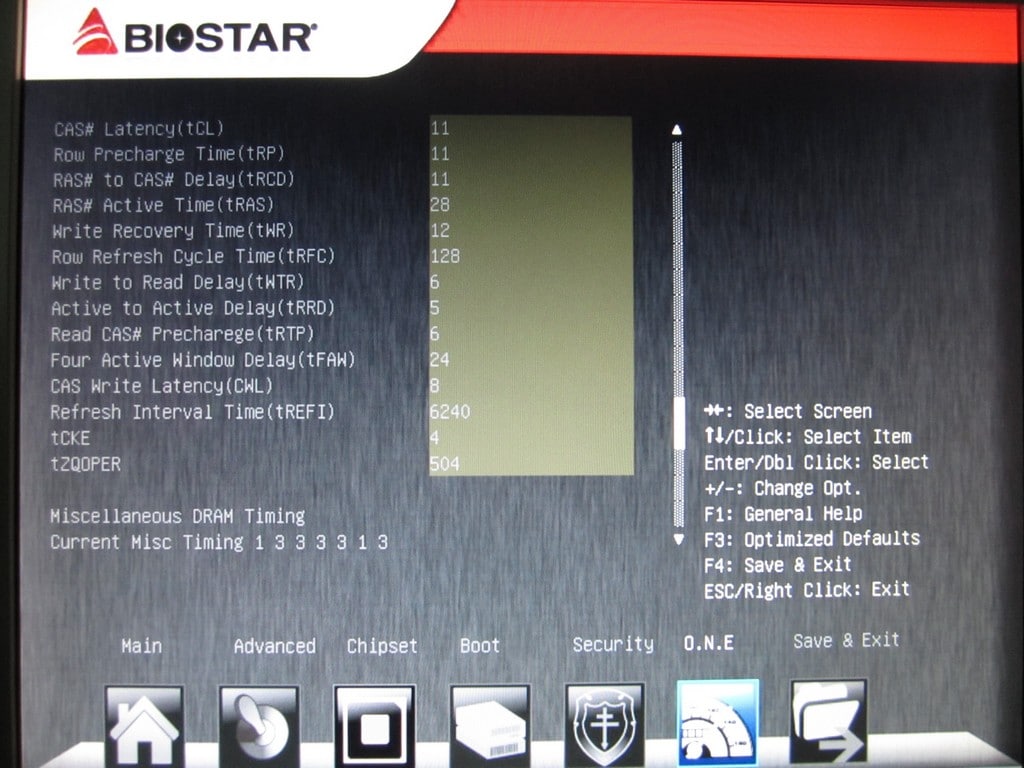
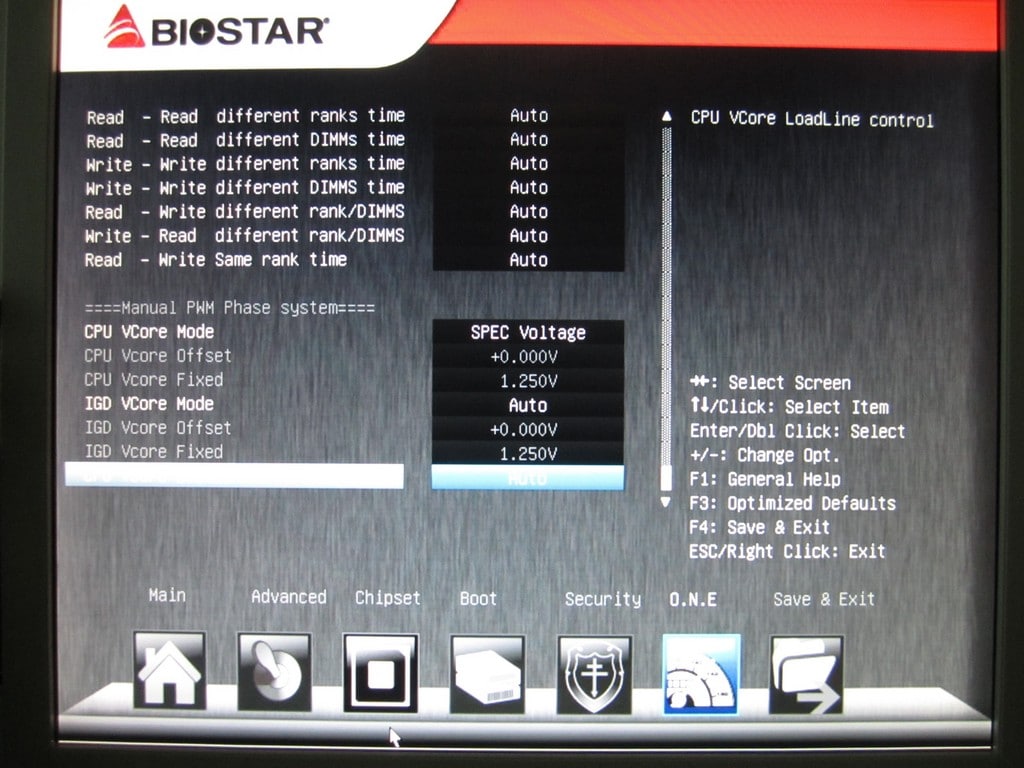

Click Image To Enlarge
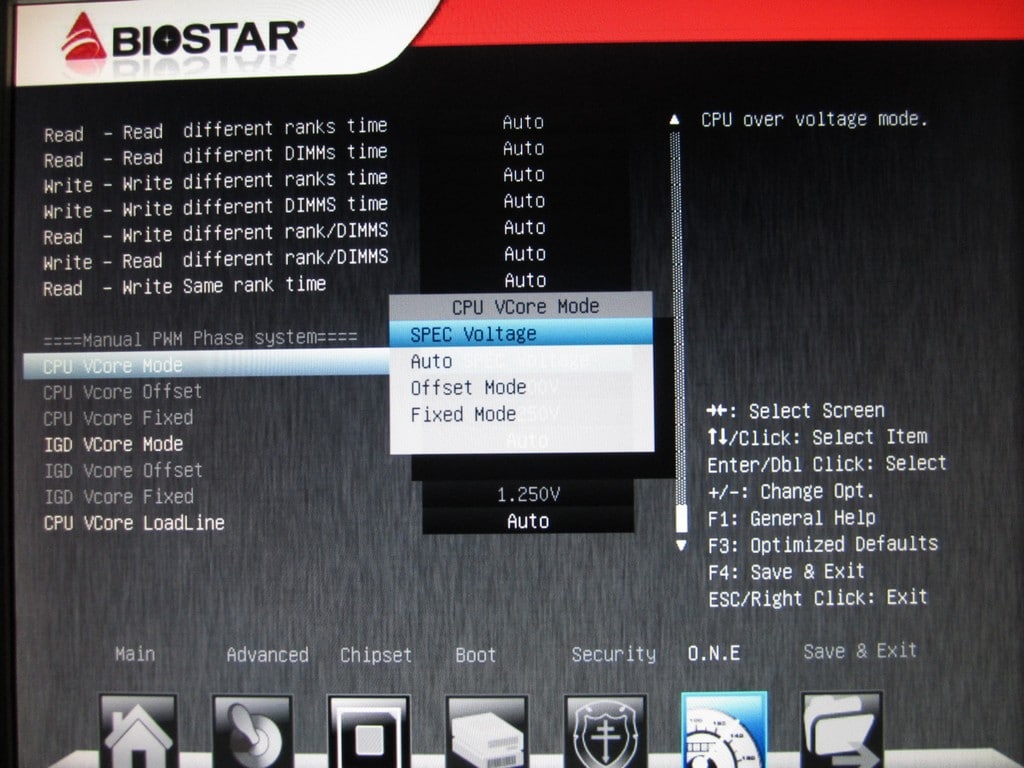
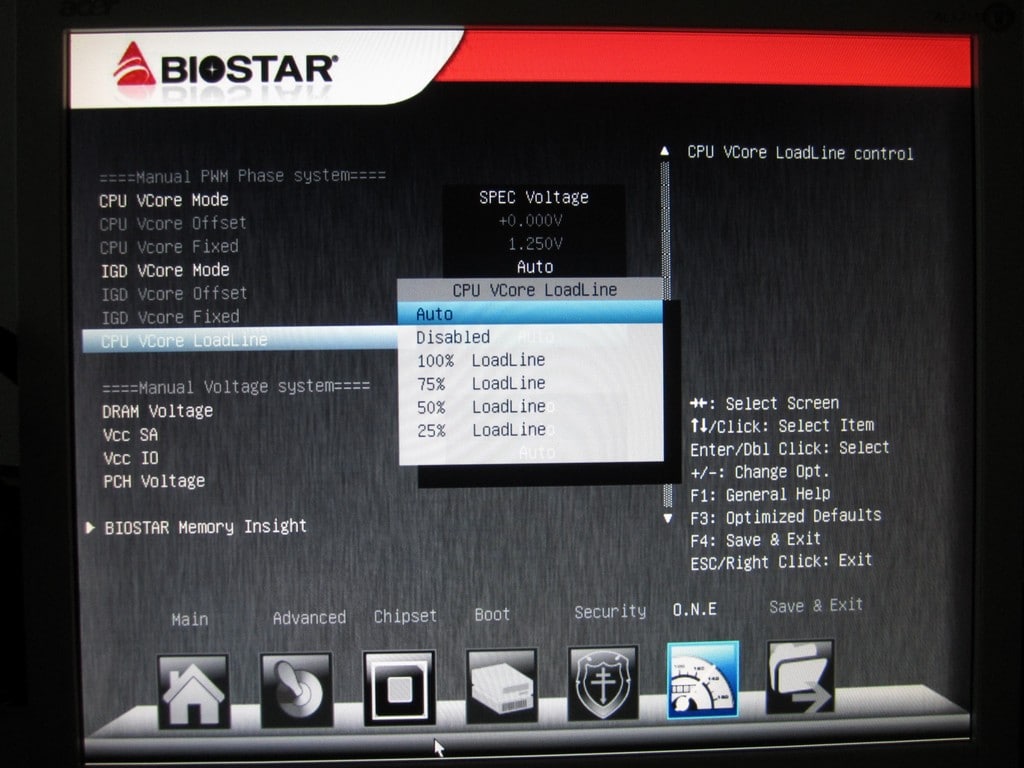
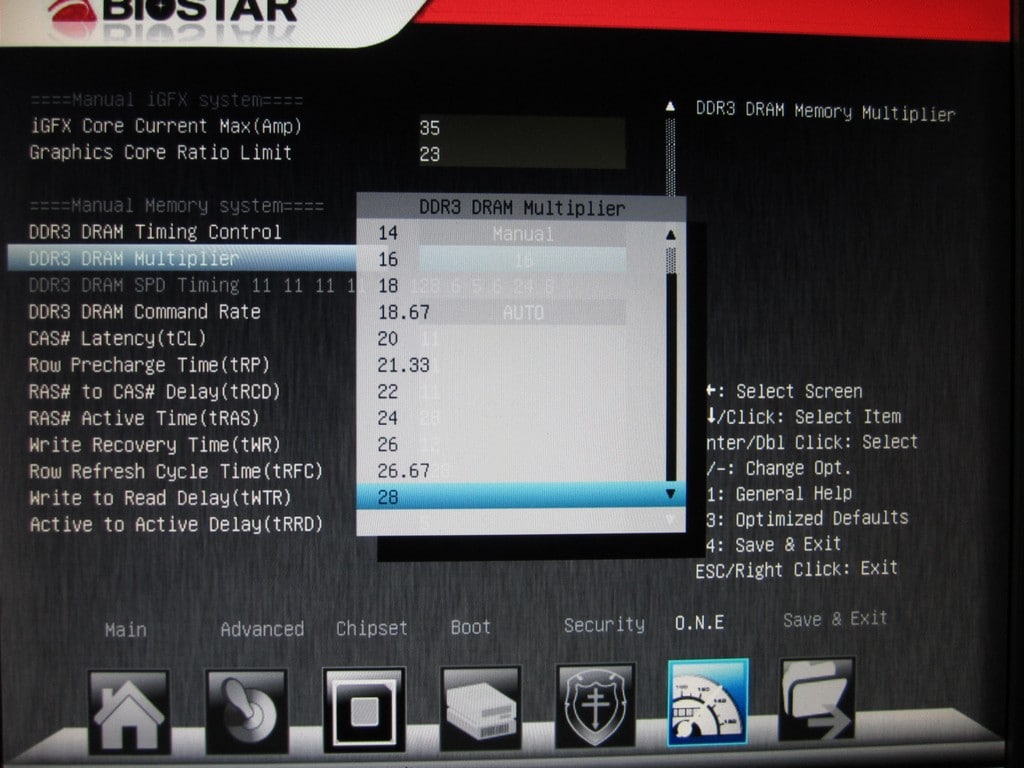
Lastly we come across the overclocking section. Quite honestly, the overclocking section could use some love. With a little refinement this board could do some amazing things but most of these settings are quite obscure or you have to be familiar with them to know what they do. Luckily we am very familiar with years of overclocking experience, but beginning users they would probably benefit from a quick guide to help educate what each setting does as some of them can get quite confusing and if set wrong you will never get stable when overclocking. We believe the board has some amazing overclocking capabilities, but they can only be used if you are familiar with the lingo and how it works. For a value board we think this could be a overclocking “diamond in the rough” kind of item coming in well below most other boards in the market.
Testing & Methodology
We’ve expanded our testing suite considerably since the X79 chipset release, and will continue to use the same methods for most of the motherboards and CPU’s we test. In the interests of thoroughness and accurate results, we run each test at least three times, and some tests more than that. We average the total of all the tests from each benchmark then report the average here.
The OS we use is Windows 7 Pro 64bit with all patches and updates applied. We also use the latest drivers available for the motherboard and any devices attached to the computer. We do not disable background tasks or tweak the OS or system in any way. We turn off drive indexing and daily defragging. We also turn off Prefetch and Superfetch. This is not an attempt to produce bigger benchmark numbers. Drive indexing and defragging can interfere with testing and produce confusing numbers. If a test were to be run while a drive was being indexed or defragged, and then the same test was later run when these processes were off, the two results would be contradictory and erroneous. As we cannot control when defragging and indexing occur precisely enough to guarantee that they won’t interfere with testing, we opt to disable the features entirely.
Prefetch tries to predict what users will load the next time they boot the machine by caching the relevant files and storing them for later use. We want to learn how the program runs without any of the files being cached, and we disable it so that each test run we do not have to clear Prefetch to get accurate numbers. Lastly we disable Superfetch. Superfetch loads often-used programs into the memory. It is one of the reasons that Windows occupies so much memory. Vista fills the memory in an attempt to predict what users will load. Having one test run with files cached, and another test run with the files un-cached would result in inaccurate numbers. Again, since we can’t control its timings so precisely, it we turn it off. Because these four features can potentially interfere with benchmarking, and and are out of our control, we disable them. We do not disable anything else.
We are revamping our testing method in order to better represent motherboard performance and offering to the consumer. Also we want to make it an easier read for you without miles of endless charts. We ask that you provide feedback in an effort to help us deliver better reviews for you.
Test Rig
| Test Rig | |
| Case | Thermaltake Level 10 GT |
| CPU | Intel Core i7-3770K/Intel Core i7-2600K |
| Motherboard | Biostar TZ77XE4 |
| Ram | 16GbpsB Patriot Viper Xtreme 2400MHz + |
| CPU Cooler | Swiftech H20-220 Edge |
| Hard Drive | Western Digital Velociraptor 300GB |
| SSD | Intel 510 series SATA III 120GB |
| Optical | ASUS BD-ROM |
| GPU | ASUS GTX680 Top/GTX 580/Intel HD 4000 |
| Additional Cards |
N/A |
| PSU | Thermaltake Toughpower Grand 1200W |
| Mouse | Tt eSPORTS Black gaming mouse |
| Keyboard | Tt eSPORTS Meka G1 mechanical gaming keyboard |
Test Suite
We will use the following applications to test the performance of the Motherboard and installed components.
Synthetic Benchmarks & Games
| Benchmarks |
|---|
| PCMark 7 |
| 3DMark 11 |
| Cinebench R11.5 |
| Unigine Heaven 3.0 |
| SuperPi |
| Metro 2033 |
| SiSoft Sandra 2011b |
| X264HD |
Overclocking

The Z77 platform is brand new but when clocking is very similar to what we have seen with the Z68 models we have tested previously. We have said it time and time again but it bears repeating, the BCLK of the present platforms is very limited so you will be lucky to get 107 MHz with relative stability for 24/7 operation. This means that unlocked or K Sku’s are about the only real answer for a good clock and the exceptional performance potential being unlocked. The 22nm CPU’s do have one oddity we have observed and that is heat output when overclocked. This has limited air/water clocks to around 5GHz depending upon cooling solution.
The Biostar BIOS is kind of a hassle and mish mash of settings. You really need to know what you’re doing to bend the board to your will. The board is more than capable if you put the time in to make it so, but with boards out there that make it easy to overclock you wonder why it is so diffcult on the TZ77XE4. All in all, our recommendation is that you take the time and learn before overclocking. The board easily reached our 4.6 benchmarking speed and we even eclipsed 4.8GHz with not too much work but from there it started to need some finessing and some setting tweaks at which point we drew the line as most users may not go that far with settings so we wanna keep it manageable for everyday users and not just overclocking nuts.
In order to best meet the middle ground of most users and their component capability we stuck with our 4.6GHz speed for the overclocked runs as this was easily obtainable on decent air cooling which means most users should be able to reproduce it without much issue.
Important note: Overclocking can cause component failure. Please exercise caution when attempting any level of overclock on system components.
Temperatures

The temperatures were recorded with RealTemp while running wPrime 1024 right before the end of the 5th run. The results were recorded carefully. After the results were recorded, we waited for 30 minutes before taking Idle temperature measurements. The results were as follows:
| CPU Temperatures | Temperature (Idle/Load) |
| Biostar TZ77XE4 OC (4.6GHz) | 31C/67C |
| Biostar TZ77XE4 | 26C/55C |
| Chipset Temperatures | Temperature (Idle/Load) |
| Biostar TZ77XE4 OC (4.6GHz) | 43C/51C |
| Biostar TZ77XE4 | 34C/46C |
The reason temps may look a little lower than seen elsewhere online is that We are using a custom liquid cooling loop compliments of Swiftech which helps us reach an area of much higher headroom for overclocking and performance testing.
Power Consumption

The power consumption was tested while running Wprime 1024 for a few minutes at stock settings. The results were recorded carefully with a Kill-A-Watt power consumption measuring tool at the wall. After the results were recorded, we waited for yet another few minutes minutes before taking Idle power consumption measurements.
| Configuration | Power Consumption (Idle/Load) |
| Biostar TZ77XE4 (4.6GHz) | 191W/398W |
| Biostar TZ77XE4 | 115W/305W |
The power consumption is not with GPU usage. This is with CPU/system loading but nothing graphically intensive in order to provide the most accurate results by not ramping up the GPU, which will pull significantly more power.
NOTE: A system using just the integrated GPU alone will likely pull much less power but a board like this is not likely to be used with an integrated GPU alone or at least most users will have a discreet GPU installed.
CPU/Performance Benchmarks
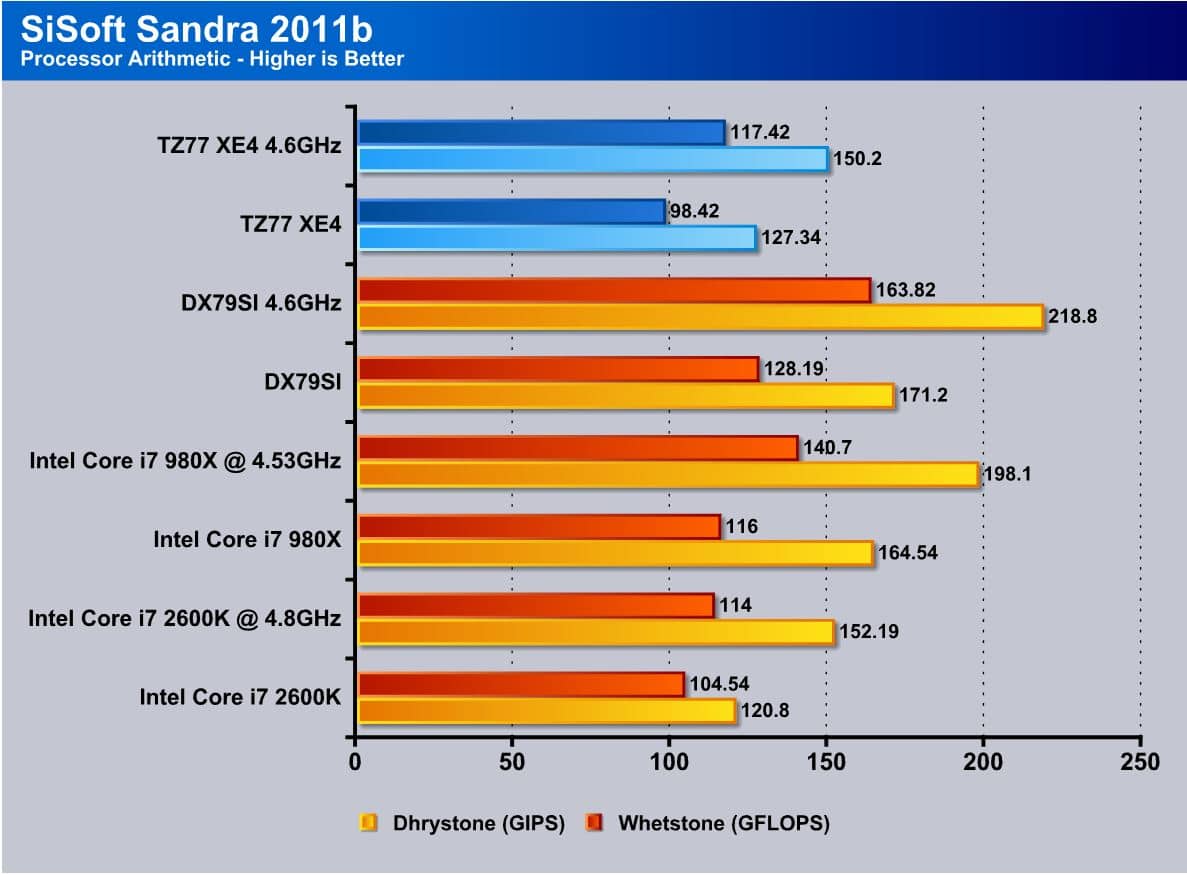
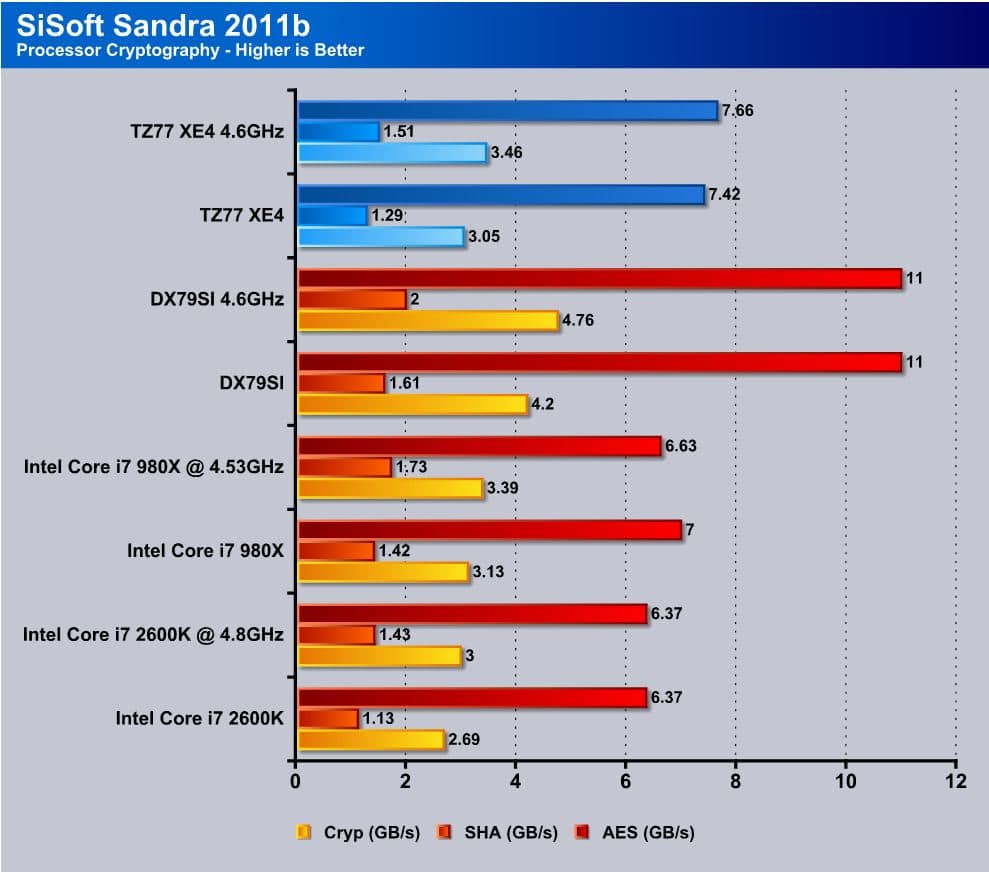
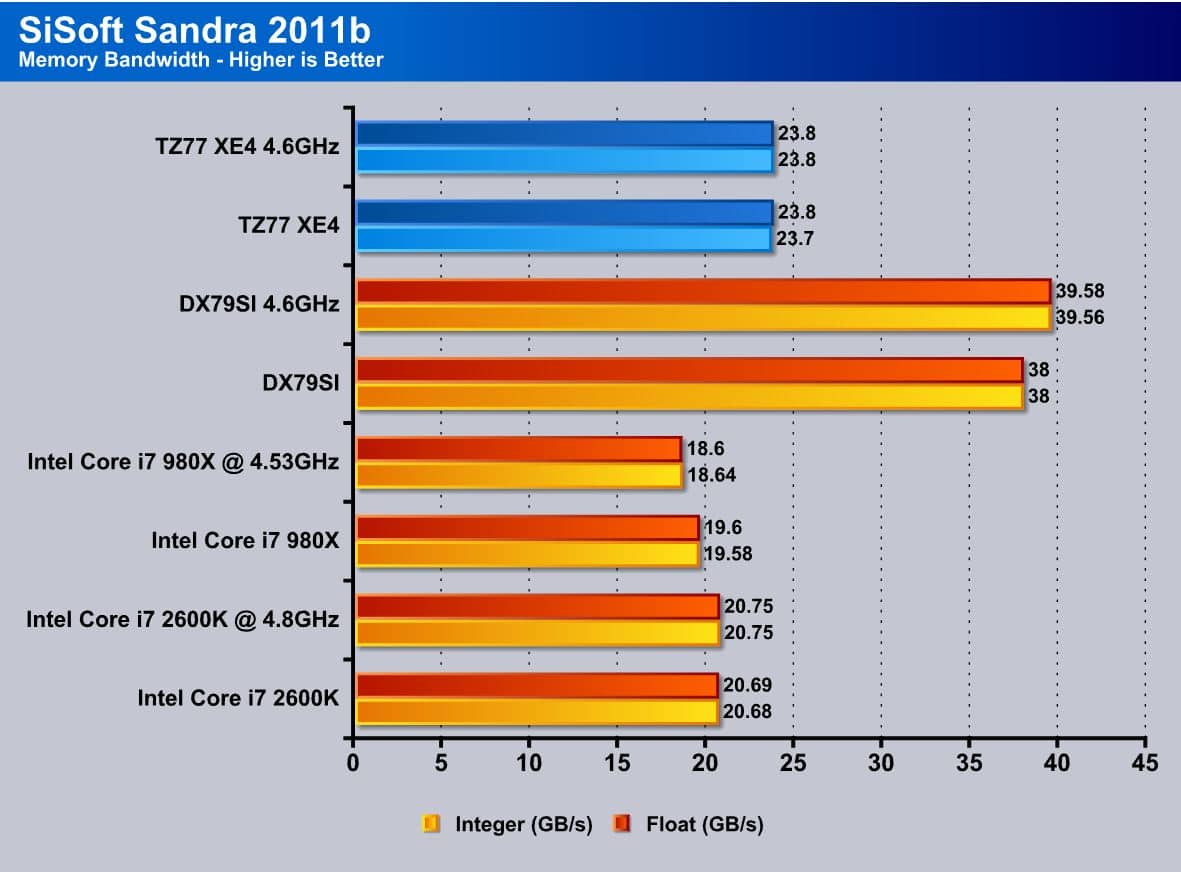
SiSoft sandra 2011

“SiSoftware Sandra (the System Analyzer, Diagnostic and Reporting Assistant) is an information & diagnostic utility. It should provide most of the information (including undocumented) you need to know about your hardware, software and other devices whether hardware or software. It works along the lines of other Windows utilities, however it tries to go beyond them and show you more of what’s really going on. Giving the user the ability to draw comparisons at both a high and low-level. You can get information about the CPU, chipset, video adapter, ports, printers, sound card, memory, network, Windows internals, AGP, PCI, PCI-X, PCI-E (PCI Express), database, USB, USB2, 1394/Firewire, etc.”
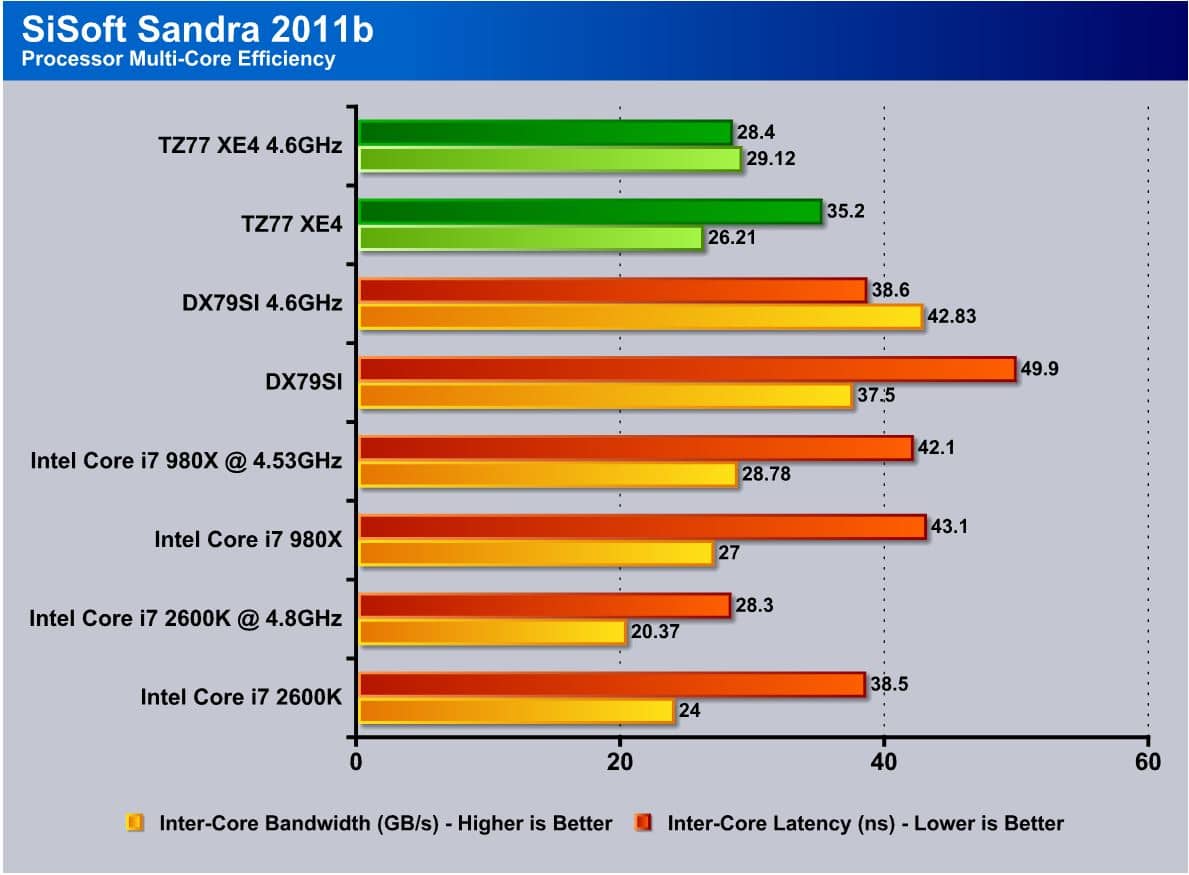

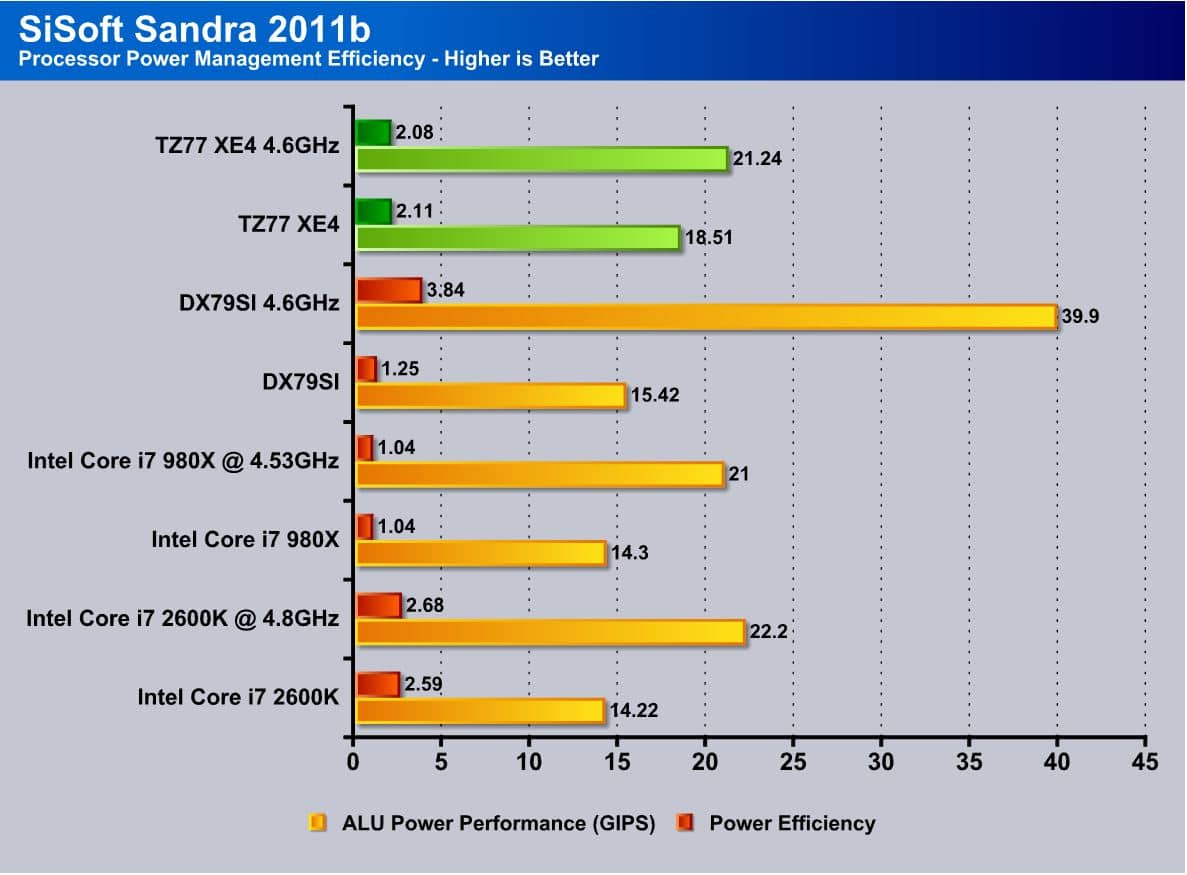
Click Image To Enlarge
SiSoft Sandra is a good representation of raw numbers and for the most part the Biostar bard did relatively well but it did show a small drop off in efficiency compared to some of the other boards we have tested to date but for a value board it held its own and is only a few percent at most off of the leaders.
SuperPi
SuperPi is a single threaded benchmark which measures efficiency and is heavily influenced by architectural changes as much as it is by clockspeeds.
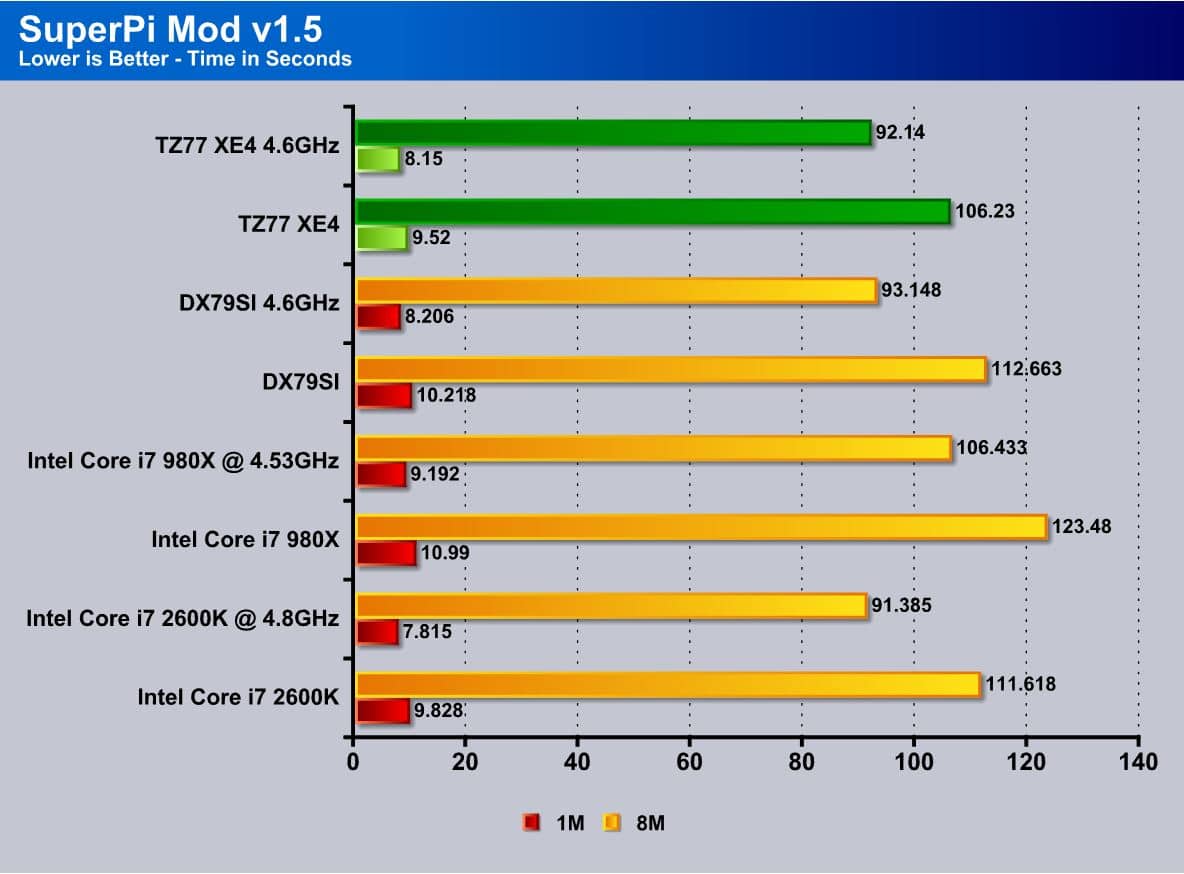
SuperPi is a great tester of efficiency and truth be told is very old but I will always use it as it gives a quick result thatj can easily be seen and is definitely comparable number to number. The Biostar board pulls some nice numbers here and right at the tails of some of the leaders again so some small tweaks and this board could really takeoff.
X264HD
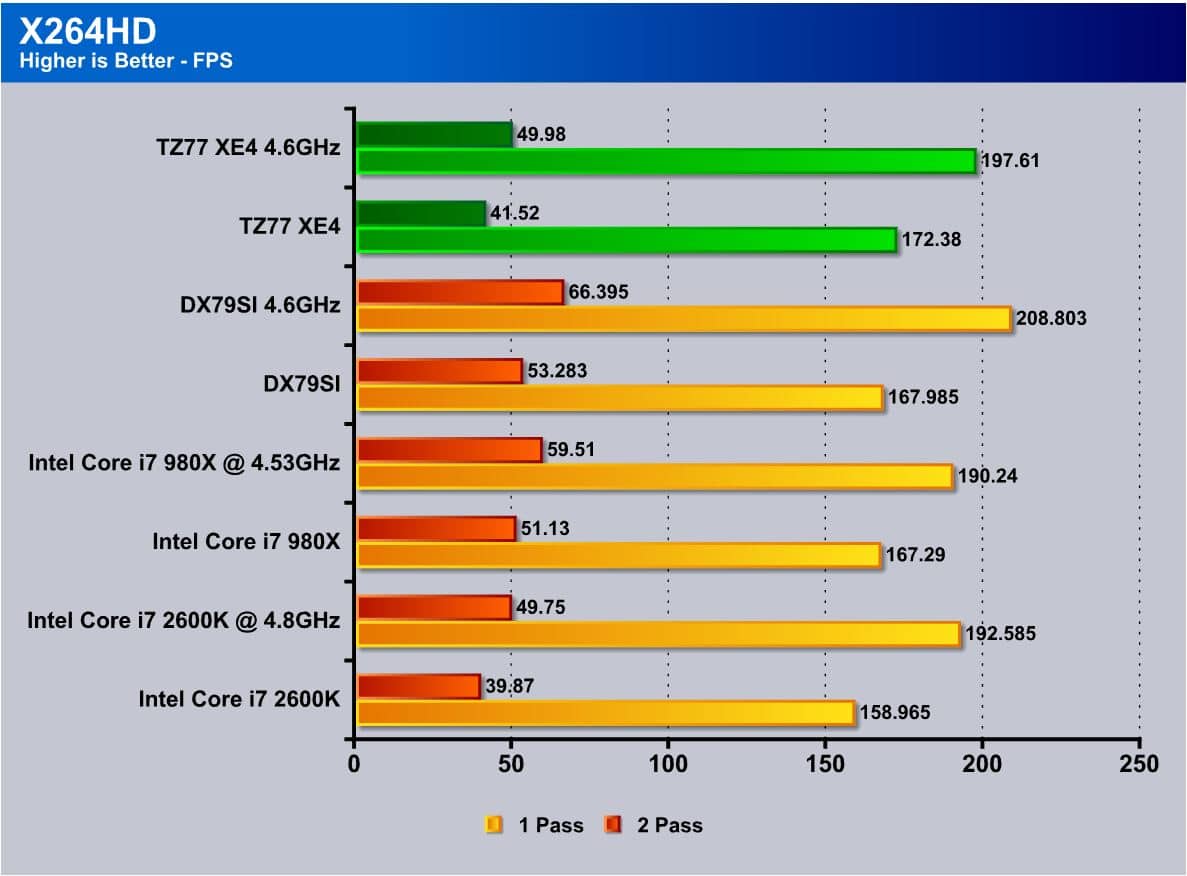
The X264 benchmark is all rendering all the time. It uses every thread of your CPU to render an HD file and therefore is easily repeatable and a good comparable benchmark for a real world task many people will use the system for. The Biostar board does rather well but definitely is a little behind the competition and it could be as simple as some board tuning needed via a irmware update to tighten up some board timings which could bring it right up to par with the competition.
Real world/Gaming Benchmarks
3DMARK 11
![]()
3DMark 11 is the newest in Futuremark’s suite of benchmarking utilities. Its a fully capable DirectX11 benchmark which also stresses and analyzes the system performance as a whole to simulate a heavy rendering environment such as a high end game or other app the end user may run. This benchmark was run with Performance settings 5 times and all runs were averaged for the result below.
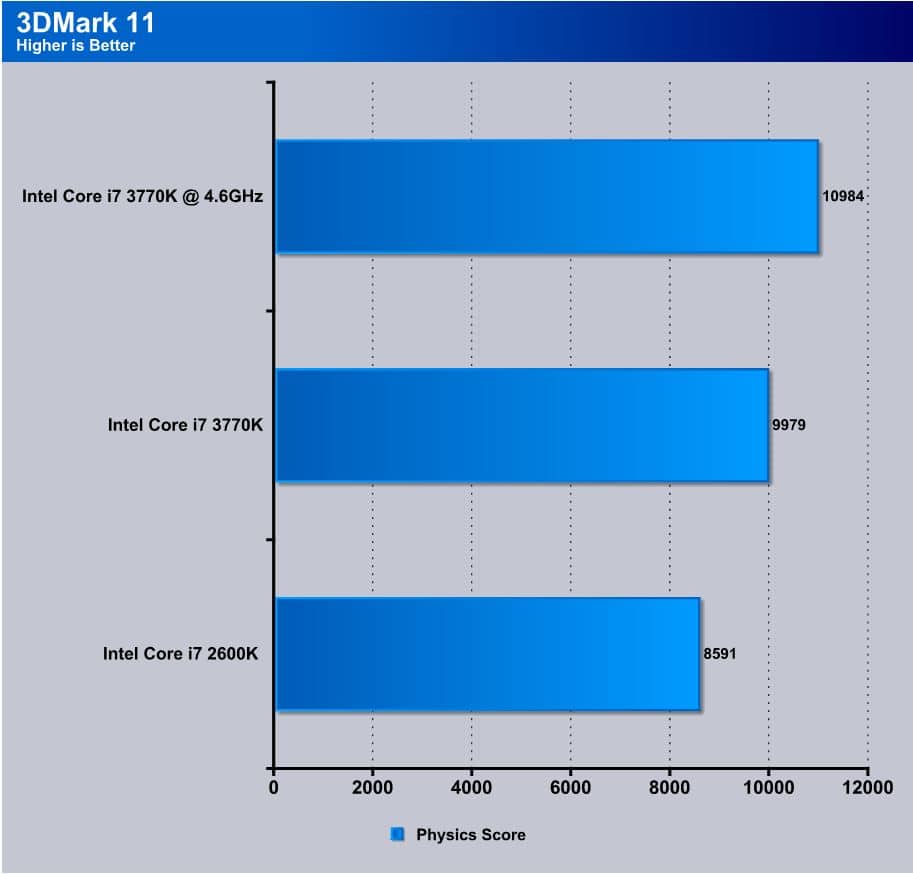
In 3DMark 11, we opted for the Physics score as this test is CPU based and relies on no graphics, so we just see the CPUs ability to render the preset Physics test. As we see the die shrink scales ahead by a decent amount especially when overclocked and this shows for gamers coming from the common 2600K this would be a rather decent upgrade.
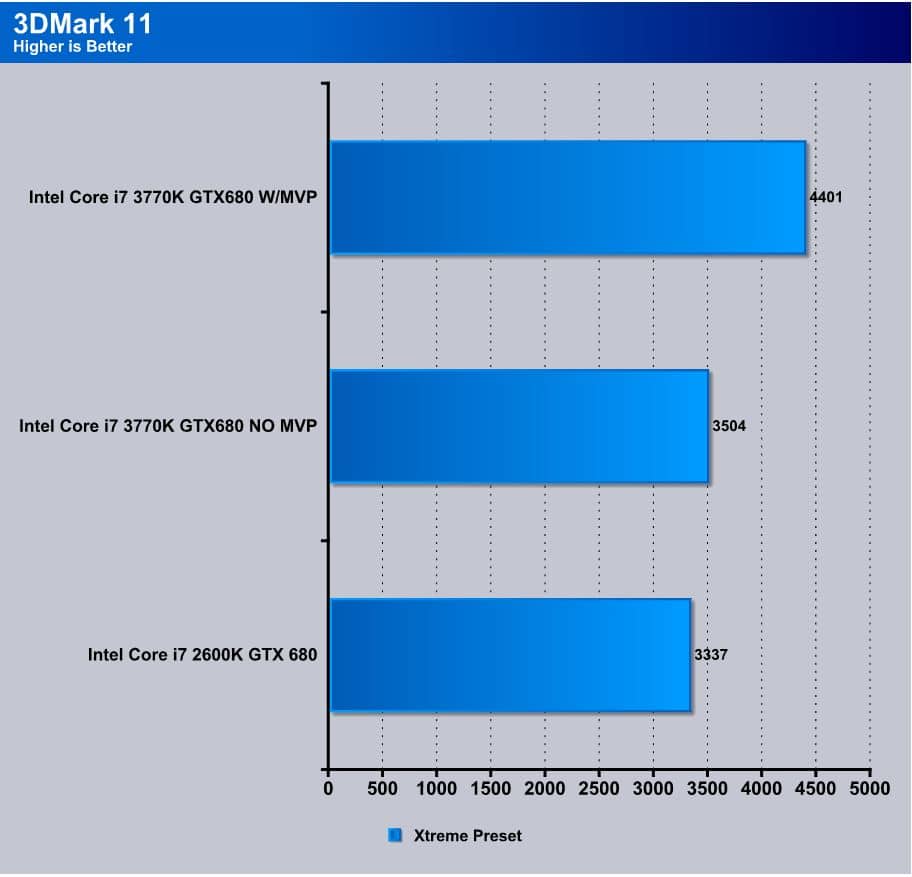
Here we look at how the system scores with a ASUS GTX680 installed in the system. now remember that the 2600K offers PCI-E 2.0 whereas the 3770K is PCI-E 3.0 enabled and therefore we do see a small jump in graphics performance when we run the Xtreme preset. But the real star of the show here is the LucidLogix MVP which really is the MVP of our testing with a huge gain by bolstering the GPU with the iGPU to increase performance. the Biostar board definitely shows similar performance to what we have netted from teh other boards previous which speaks well to its gaming capabilities.
Unigine Heaven 3.0

Unigine Heaven is a benchmark program based on Unigine Corp’s latest engine, Unigine. The engine features DirectX 11, Hardware tessellation, DirectCompute, and Shader Model 5.0. All of these new technologies combined with the ability to run each card through the same exact test means this benchmark should be in our arsenal for a long time.
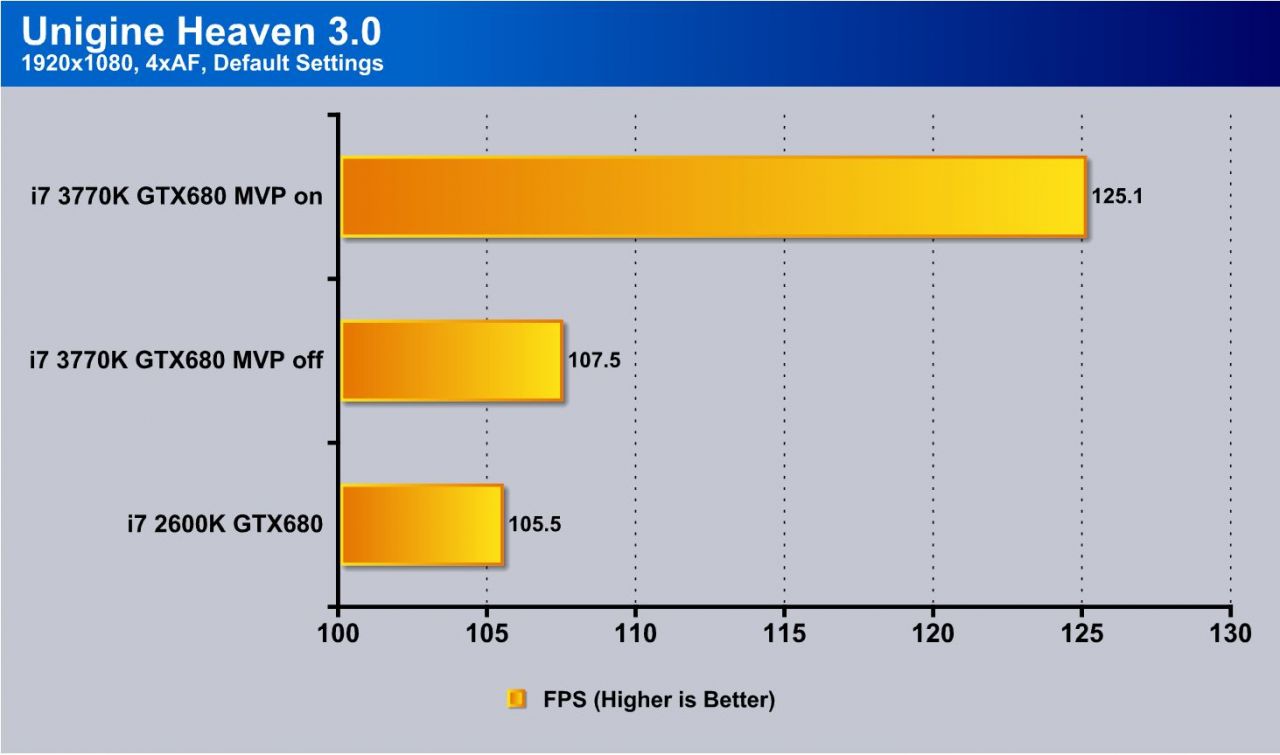
Here with heaven at 1080P once again we see a small bump going from PCI-E 2.0 to 3.0 but the big jump comes from the MVP technology.
Metro 2033
![]()
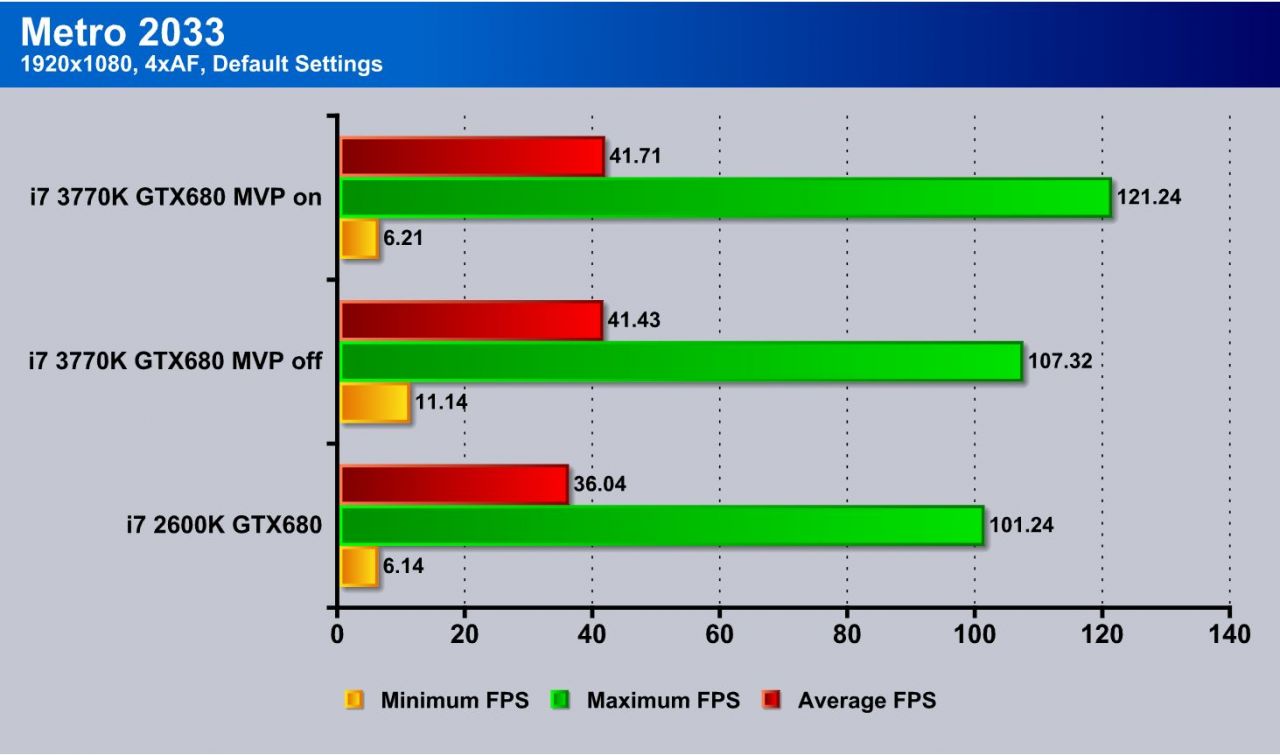
Metro 2033 is just pure hell on a GPU as with the GTX580 we found minimum framerates slowing to a complete crawl, though with the new GTX 680 that situation has been vastly improved. MVP once again gives a nice boost to the performance which could make the difference between smooth and choppy for the gamer who has a GPU just at the edge of playable and suddenly getting access to the MVP feature.
PCMark 7

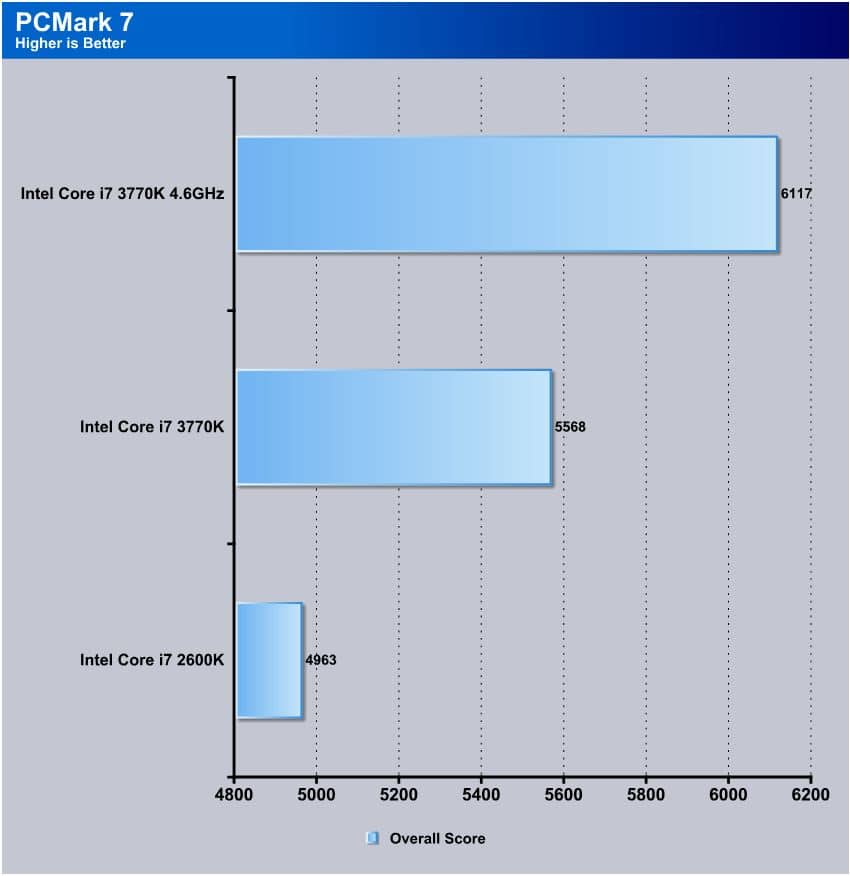
PCMark 7 is a simple but long running synthetic system benchmark, it is a good representation of what to expect from a system as it tests multiple facets of what will be done on a daily basis. Here we see that the 3770K clearly trounces the 2600K in every way possible and scales amazingly when overclocked. Budget board be damned it does very well for what it is.
CONCLUSION
We were very interested when receiving this board as it showed real promise with its insanely low price. The BIOS definitely could use some serious love to get something that resembles the true capability of the board and what it can do. The Biostar TZ77XE4 is definitely one a diamond in the rough
Many times we have seen excellent performing boards but the price just hurts, and there are so many frills added that we would never use. With this board, however, Biostar is on the right track with a no frills board that does what it needs to and rather well at a reasonable price point.
With some fine tuning to the board, timings, and firmware polishing, we feel this board could be a do not miss item, but as of now it is a great performer with some issues mixed in.
For anyone looking to jump into Z77 at a super low price while still staying ATX, the Biostar TZ77XE4 is a tough to beat contender as you can plug it in and game with some great performance. The board is basic, which can be either bad or good depending on your usage. It covers wired LAN, audio and multi GPU along with some incredible RAM performance capabilities all ready to just plugin at a great price.
| OUR VERDICT: Biostar TZ77XE4 | ||||||||||||||||||
|
||||||||||||||||||
| Summary: The Biostar TZ77XE4 is a solid board that just needs some refinement. Put the time in and it will run with the best. For its low price, it earns the Bjorn3D Value Award. |