
ASUS has released their the F2A85V-Pro for the socket FM2. The board retails at around $140, but is packed with features.
Introduction
With Trinity, AMD has launched a new chipset, the A85X, for the socket FM2. The A85X is able to support AMD 3-way CrossFireX, and LucidLogix Virtu MVP is also supported. The Trinity APUs support PCI Express 2.0 with 20 lanes that can be split into x16/x4 or x8/x8/x4 configurations. While the platform does not currently support PCI Express 3.0, it should not be a major issue since current GPUs are yet to saturate the PCI-E 2.0 bandwidth. Despite the fact that you can run multiple GPUs on the board, it will only support CrossFire and not SLI.
The ASUS F2A85V Pro is a top of the line board featuring the A85X chipset that is retailed at $140. The ASUS F2A85V Pro looks a lot like its predecessor, the F1A75-V Pro, with both boards featuring the same blue and black color scheme, dual-intelligent processor with Digi+VRAM, ASUS’s Auto-tuning, TurboV, AI Suite II, UEFI Bios, MemOK, and Anti-surge protection. Coming from the same lineage and design of many V Pro series from ASUS, the latest board from ASUS is packed with many updated technology that we have come to expect from the top of the line board.
The new F2A85V Pro is built with the third generation Dual Intelligent Processors (TPM and EPU) that delivers power efficiency and control over the APU, VRAM, and DRAM. The new DIGI+ has been updated to work better with ASUS AI Suite II where it provided a simple one-click solution in Windows for optimizing system performance. Among the new features are a digitalized 2 phase VDIMM and a built-in preset power profile for ease of overclocking. ASUS also enables power thermal control and real-time DRAM power control with the latest iteration. These are designed to provide the best overclocking potential. Another new feature that will help with overclocking is the T-Topology DRAM layout that replaces the standard daisy-chain design, which would help with 4 DIMM overclocking.

Among the performance improvements on the new F2A85-V Pro are the Network iControl that provides the ability to manage network traffic where priority can be assigned to foreground applications. Additionally, ASUS has made system optimization to reduce the POST time so that the PC can boot into the OS much faster. A new feature is the DirectKey where with a single press, the PC will boot into the BIOS Setup Screen (the button can also be configured to serve as a Power On/Off if it is disabled in the BIOS). We love this new addition since you no longer have to check the manual to see what button to press on your keyboard to enter the BIOS. We would love to see the button located on the rear I/O of the board as opposed to the inside.

Update: Asus has informed us that the company has a software utility in Windows (image above) where it it will allow the system to boot into the BIOS through DirectUEFI/DirectBIOS feature. No longer would you need to keep tapping that delete key at the right time during POST to enter the BIOS.
Remote GO! is also a new feature that is present on the new A85 board which is absent from the older A75 boards. This feature actually has been present in quite a few ASUS enthusiasts boards and it is now being trickled down to the mainstream models. The Remote Go! provides remote access to desktop so that you can control your PC while away or access files on the system. Additionally, it links your desktop, tablets, smartphones, and TV wireless together through an existing LAN cable and router setup. It lets you stream digital content from PC to any DLNA devices.
While the A85X chipset supports up to four USB 3.0, ASUS adds two more ports with the in house ASM1042 controller. ASUS has done some work to boost the USB 3.0 speed where the ASM1042 controller supports UASP or Turbo and the chipset ports can operate at Turbo mode. According to ASUS, USAP can increase the transfer speed up to 170%. Another new feature is the USB Charger+ where the ports are able to deliver three times more power so that you can charge your mobile devices, iPhones, Android phones, and tablets, etc faster. The USB Charger+ allows the PC to also charge any mobile device under all S state (Sleep, Hibernation, and Power Off).
The Fan Xpert also gets an upgrade to the second version. This new update allows support for fan specification detection, automatic tuning, and user adjustable fixed fan speed and fan responsiveness. The new edition also adds the ability to rename the fan header and even completely turns the fan speed off for quiet operation. Asus’s implementation of the fan control is not only excellent among the industry where it provides support for 3-pin and 4-pin fan control. The new version is also more tightly integrated with the AI Suite where not only that settings can be adjusted in the UEFI BIOS but also within the software utility
Besides these new features, the standard ASUS features such as MemOK!, EPU, TPU, TurboV, AI Suite II, GPU Boost, and Q-Design are here.
The ASUS F2A85-V Pro


Shipped in a pretty standard ASUS black box with white square dots, the F2A85-V Pro has the same package as other V-Pro board we have reviewed lately. On the front, we can see many marketing logos highlights various features of the board. The rear of the box has more information detailing the Dual Intelligent Processor 3, ASUS Remote GO!, Fan Xpert2, and Network Control, as well as a picture of the board with its ports.


The board is packaged in an antistatic bag placed on an upper cardboard compartment. Underneath are the included accessories. The F2A85-V Pro comes with a hard copy user guide, four SATA 6 Gbps cable, rear IO shield, and the Q Connect front panel header. The bundle is a bit scarce but that seems to be the norm lately with many $100 mainstream boards. Oddly enough, our review unit did not come with a driver disk. This maybe a slight oversight with our review sample. Luckily ASUS has always put the latest software bundle and the driver on their website and we recommend downloading the latest drivers off the manufacturer’s site. The included hard copy user guide is handy as we have seen some manufacturers actually skip it and we always appreciate a good well-written and detailed guide from ASUS, especially considering the array of features on the board.

The F2A85V-Pro is an ATX form factor board that sports a black and blue color scheme. All over the board, we can see white letters prominently highlights various features of the board such as the Display Port, USB Charge, DIGI+DRAM, GPU, Boost, etc. While the port/chipset labels are always present on any given motherboard, they appear to be much more prominently displayed on the black background with white letters. This is the first time that we noticed that all these letters are so big that it would be hard to miss them.

Over the CPU are the 8 phase digital PWM controlled by ASUS’s Dual Intelligent Processor III, the same PWM that is found on other ASUS high-end boards like the Z77. The two chips on the board, TurboV (TurboV Processing Unit) and the EPU (Energy Processing Unit) again provides the ability to optimize performance or energy saving depending on user’s own need. The new DIGI+ will provide precise control over the APU and the DRAM. ASUS provides two handy switches on the motherboard for those who want to turn on/off either one of them. Oddly enough, the EPU switch is located next to the CPU but the TPU switch is located way on the bottom of the board on the front panel IO header. When the switches are turned to the off state, it adheres to stock settings or settings defined by the UEFI or AI Suite II. When the EPU switch is turned on, it will undervolt the system hardware for lower power consumption and load temperature.
The area around the CPU has plenty of open space so that even if you plan to install large heatsink, there should not be much of an issue. To better assist cooling, ASUS, connected the PWM and the A85X chipset via a heatpipe that helps to direct heat away from the chipset and toward the rear of the board to be exhausted out of the case.

Moving down to the south of the CPU is where we find the four DIMM slots that are color coded for dual-channel memory. Up to 64GB of DDR3 memory can be installed. Trinity APU natively supports memory speed up to 1866 MHz but the board will support higher speed memory up to 2400 when it is overclocked.

The F2A85 lacks the Q-DIMM design that you found on some of more expensive board. Q-DIMM is something that we have come to appreciate when we review high-end boards since it makes the memory installation much simpler. It is unfortunate that ASUS decided to skip it here. ASUS seems to try to help out a little bit here where we can see from the image above that the two black DIMM retention lock is capable of pulling farther apart than the two blue DIMM slots. We presume the idea is to help making memory expansion much easier when adding more RAM to the two black slots.
Next to the DIMM slots is where we find the 24pin ATX power connector. To its right is the front panel USB 3.0 header. To its left is where we find the MemOK! button. MemOK! is a handy tool from ASUS where it will provide a fail-safe setting for the memory in the event that a system is unable to boot with a specific timing. When this happens, the system will reset the frequency parameters for the RAM so that it is able to boot. It also will help with memory compatibility as it can modify frequency, timings, and voltage.

Moving along the bottom right corner of the board and we see 7 SATA 6 Gbps ports where six of them are facing 90 degrees on the edge of the board and one port is facing up from the board. All seven ports are controlled by the AMD A85X chipset that supports RAID 0, 1, 5, 10, and JBOD. Above the SATA ports is where we find the chipset with a very beefy yet low profile heatsink. The little button next to the SATA port is the BIOS Flash Back, a very handy tool to have for overclockers as it allows you to flash BIOS without the need to enter the BIOS or Windows. All you have to do is insert the USB Flash drive to the designated USB port on the rear (for our board it is the second port under the eSATA) with the BIOS file and press the button for 3 seconds and the board will automatically flash its BIOS. This handy tool will work even without system posting (in the event of a corrupted ROM), and does not require the presence of APU, memory, or graphic cards.

Along the bottom edge of the board is where the usual front panel headers are located. Next to it is the DirectKey button and TPU switch. The location of these two switch is a bit awkward to use expecially the DirectKey button. Once the board is installed inside the chassis, it will located on the bottom with all of the cables and headers. We would prefer to see the button close to the top edge near the DIMM slot.
Moving along, we get four USB 2.0 headers allows up to 8 devices controlled by the A85X, Serial port header, a fan header, audio and the SPDIF out header
For expansion, we can see the board comes with two PCI-E x1 slot, three PCI-E x16 slots, and two PCI slots. The first (blue) PCI-E x16 slots will run x16 if no card is installed on the second PCI-E x16 slot (light blue). If there ifs a card installed, then both slots will run x8. For CrossFire, you should run the cards in these two slot. Notice that there is two slot space between the first and the second PCI-E x16 for triple slot cooler cards. The last PCI-E x16 will always run at x4. ASUS’s slot configuration means that if you install two dual slot video cards for CrossFire, you would still have one PCI-E x1,slot, one PCI slot, and the last PCI-E x4 slot available for expansion, a good mix of slots. It is a slightly better configuration than what is found on the Gigabyte’s F2A85X-UD4.
The board comes with total of five fan headers: one CPU fan and four chassis fan. All five fans are 4-pin design where they can be controlled with the XpertFan2 software included. Two headers are located just above the CPU socket (one for CPU fan), one headers is located just above the first PCI-E x1, one is next to the main ATX power connector, and the last one is on the bottom of the board. The fan headers are spaced out around the board so that they are easily accessible.
ASUS has implemented an array of LED across the board to indicate board’s status. There is LED for standby power, DRAM, EPU, and TPU. Additionally, since the board lacks a LED debug code readout, ASUS relies on their Q-LEDs system where LED lights will lights up red to indicate an issue. A red light will indicate if there is an issue with CPU, DRAM, graphics card, or boot device

Turning over to the rear of the board and we can see that the board comes with one PS2 mouse and keyboard port, two USB 2.0 ports, optical SPDIF port, one HDMI port, one DisplayPort port, one VGA port , one DVI port, four USB 3.0 ports, one eSATA port, one Gigabit Ethernet port, and the usual analog audio jacks. Looking at the manual and we can see that the two USB 3.0 next to the eSATA port is controlled by the chipset while the two next to the Ethernet port is controlled by the ASMedia. This would also be a good place to mention that the manual that is included with the board is excellent with plenty of details and information describing various functions and features of the board.
We liked ASUS’ placement of the two USB 2.0 ports next to the keyboard and mouse as these two ports are often going to be used for USB keyboard and mouse, which leaves the four USB 3.0 free for other devices to maximize the performance. The Ethernet controller is the ubiquitous Realtek 8111F and the audio is handled by the none than the standard Realtek ALCC 892. ASUS does try to make it unique with the software utility to allow users to control their network priority.
We are a bit sad to see the omission of WiFi and Bluetooth on the motherboard. While we understand the board is mid-range, we really like motherboard vendors that include these features as standard on their boards even for the mid-range market. We think average users will find them more useful than some crazy overclocking feature.
BIOS
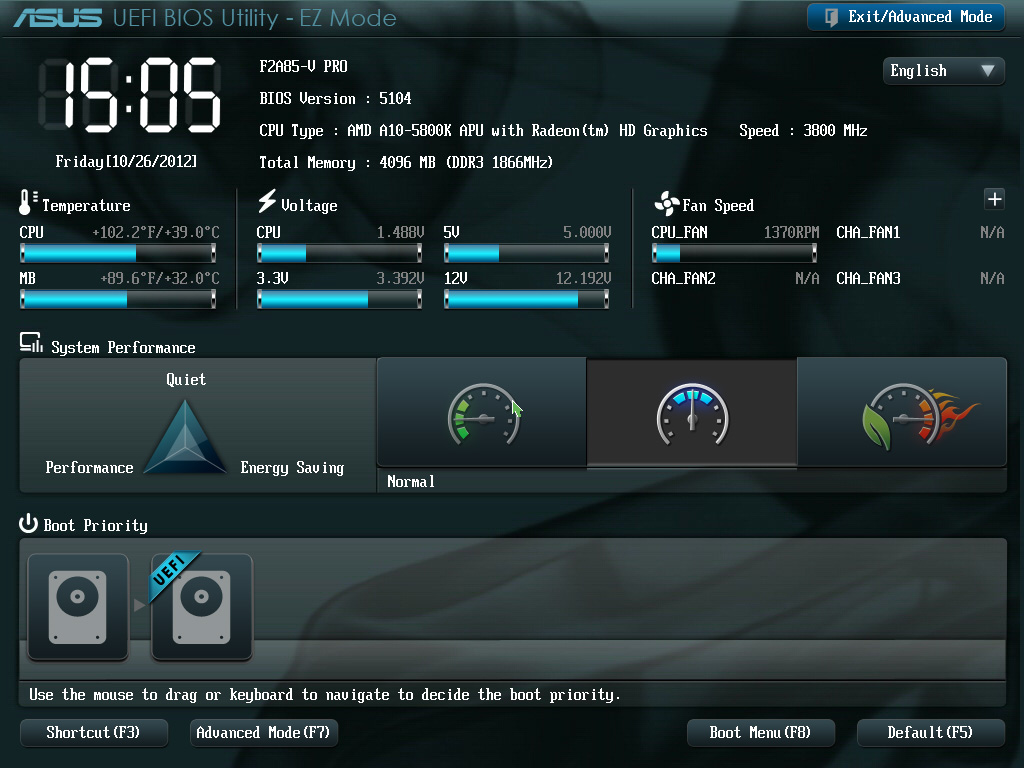
ASUS’ latest UEFI BIOS implementation has been one of our favorites. The interface is clean and simply to navigate and it does not have weird stuttering that we sometimes see from other board vendors. While it may not be as flashy as GIGABYTE’s 3D BIOS, it gets the job done and we appreciate its simplicity. The overall layout is very similar to what we have first encountered when we reviewed the P67 board from ASUS. We have the EZMode that shows a few commonly used setting and the Advanced Mode is where enthusiasts would go to tinker with their board.
Advanced Mode reveals an extensive list of options that should satisfy the enthusiast. In Advanced Mode, we can see the top has a set of tab serving as menus. Click on one of the tab will reveal additional options. The first screen that present us is the AI Tweaker. The settings here are pretty standard ASUS business where we have the commonly used setting listed on the top and more advanced settings listed on the bottom. The AI Overclock Tuner allows us to choose the type of overclocking we want: Auto (none), manual, or D.O.C.P. The inclusion of the D.O.C.P. allows AMD users to read the XMP memory profiles that are often included with RAM designed for Intel system.
If you are an avid overclocker, you should buy one of the K models with unlocked multiplier where overclocking should be as easy as raising the APU multiplier. Then you are most likely going to use the manual overclocking for your need. Here we have the option to adjust the board’s APU multiplier, the NB frequency, EPU Power saving mode, ad the GPU boost mode. The right side of the screen has a brief description on each option but if you need more detail information on what does each one can do and its adjustment, we highly suggest you read the manual included as it goes through each option in detail.
OC Tuner is a handy tool for those who are not particularly experienced with overclocking. If you enable it, the system will go through a quick test to find the optimal frequency for the CPU and memory. For users who want to have more control, they can always opt for the manual setting where the board has plenty of them. Not only that the CPU clockspeed can be adjusted but also the Advanced memory tuning can be achieved via the DRAM timing screen. We can see that the board offers two modes of voltage adjustments where users can either use offset mode or enter the value.
Under Advanced Menu is where we can adjust the CPU, SATA, USB, Northbridge, other onboard device, and the advanced power management (APM). We see the board’s SATA mode is default to AHCI. The board also has the ability to offer legacy USB support. ASUS also provides us the ability to disable any of the 14 USB ports on the board.
Monitor Menu offers a detailed view of the system components temperature, voltage and the fan speed. Here is where we are also able to fine-tune the fan settings. The BIOS Q-Fan control allows us to adjust the low limit for the fan speed. Users have the option to choose among the three presets or manually adjusting the settings. For more tuning, users can always use the included software in Windows.
Boot menu needs no explanation. As always ASUS offers the ability to save BIOS settings up to eight profiles. In addition, we always love the option to flash Bios with the EZ-flash utility. Here is also where we can change the DirectKey button from boot to BIOS to power on/off button.
Software

In the past, we’ve noticed that motherboard vendors often ship the board with a software bundle that often does not provide much more additional functionality. Usually, these softwares simply provide system information, or some trialware. Lately, motherboard vendors are taking more time developing in-house software that interacts more with the motherboard to provide more adjustments and settings. ASUS is one of the manufacturers that always stands out with the software utility with the AI Suite. The AI Suite II is an all-in-one software bundle that provides many unique features to the board. It includes AI Charger+, ASUS Update, DIGI+ Power Control, EP, Fan Xpert 2. We like that ASUS lets you select the software utility you wish to install as opposed to forcing you to install them all.

The overall interface of AI Suite II has not changed much since we first have come across. The new iteration includes a few additional options that offers a better control over the various options on the board. The first time the application is launched displays a strip with options for AutoTuning, Remote GO!, Tool, Monitor, Update, System Information, and Settings. When you click on one of the icons, you can see additional menu options. Tools is where we an find most of the advanced features.
We were never a big fan of the ASUS’s AI Suite in the past because it was buggy and often crashed or caused noticeable system lag. Sometimes simply launching the application suite or applying a setting caused the application to crash. However, with the latest edition, ASUS has improved significantly with the software. We did not experience a single crash during our testing period. In addition, the application launched quickly and does not bug down our system like what we had seen in the past. Applying a setting is also quickly.
TurboV EVO and EPU

TurboV EVO is where we get to overclock our system right inside the Windows. It provides the ability to do manual or automatic overclocking. With the Manual mode, we have the option to increase the CPU voltage, VDD NB voltage, DRAM voltage, SB voltage, APU voltage, GPU frequency, and APU multiplier/frequency. If you opt to use the automatic overcloking, the software provides two modes of overclocking: standard or extreme. The automatic overclocking is very simple to use for a novice who may not wish to tinker tons of settings and just want slight performance boost. When you choose either option, the PC will do a quick restart and find the optimal setting within about 1 minute.


The DIGI+ Power control offers the ability to adjust the load-line calibration. Here is where we can also bump the current to the CPU and DRAM and the CPU Power Phase and the Voltage. The EPU is shows the same radar chart that is seen in the BIOS where we have the option to choose different power saving mode depending on the noise-level, energy saving, and performance.
Fan Xpert 2


When comes to fan control, no one can beat ASUS. Each of the 5 fans can be adjusted independently and labelled with the Fan Xpert. When the the software is first launched, it will go through a detecting process to assess all of the attached fans RPM and power applied and generate a graph of fan % vs Temperature C. Users can then use the provided data to further fine-tune the fan speed.
Probe II


Probe II is a handy tool to have where it provides detail information about the system component voltage, temperature, fan speed. The neat feature with the Probe II is that you can set a threshhold where if a component fall outside of the given value, a pop-up windows will show n the taskbar to warn you. Quite useful when you are overclocking. It also provides a log as well so that you can review the stability of the system voltages and the temperature variation.
Remote GO!

Remote GO! let us stream contents from the PC to any DLNA capable device like TV. It also lets us configure Remote desktop and file transfers between the mobile device to the desktop.
AI Charge+ and USB Charge+


AI Charger+ will let us to charge our mobile device up to three times faster as it provides more power than the standard USB 2.0’S 500 mA. In order to take advantage of such feature, your mobile device must support Battery Charge (BC) 1.1 so be sure to check with your device maker first.
USB Charger+ allows the USB ports located at the rear of the board to charge the mobile device even when the PC is turned off.
USB 3.0 Boost

One of the most unique feature with the ASUS board is the support for the Turbo and UASP mode to boost the USB 3.0 transfer speed. To fully take the advantage of the board’s USB 3.0, it is necessary to install the AI Suite. With the USB 3.0 Boost, you would be able to run the USB 3.0 at higher transfer rate where the ASMedia would run UASP and the chipset USB 3.0 will run BOT protocol. The idea is simple when a compatible device is plugged in, the oftware will apply a driver over the standard driver for higher throughput. This is a neat feature and we have seen some nice improvements running USB 3.0 at USAP or BOT mode. Windows 8 will natively support UASP but if you have older OS, this would be a very handy tool to have.
Network iControl

Another new addition to the AI Suite is the Network iControl. The new software lets users to prioritize network so that you an have the certain active application like games takes priority over background applications. The software offers automatic network control or if you wish you can always opt for the manual setting.

System information needs no introduction as it gives us an overview of our hardware components.


really sexy motherboard! looks like AMD is all in for their FM2 line. very promising processors