
When it comes to picking a great gaming chassis, it’s not always about looks. Aesthetics can be a major part of your decision making, but there is a lot more to consider, including great air circulation, plenty of cable management holes, the absence of low quality parts, and features that other chassis may not offer. Check out what the Thermaltake Overseer RX-I can offer you.
Introduction
It is impossible to say which gaming chassis is the best. Everybody has their own preferences and this can definitely change their views on which case is the best. If you’re an extreme overclocking enthusiast with water cooling, the Silverstone Temjin TJ11 series, the new NZXT Switch 810 or Phantom 820 cases might be one of your choices due to its massive size and the possibility to install plenty of large radiators and water cooling parts that will cool your complete system. Conversely, some people need a more compact system due to space restrictions in their rooms, or would like a silent system due to either noisy equipment or specialty work like sound recording. The Thermaltake Overseer RX-I is a case that could be considered a combination of all the good features found on other chassis. While it is impossible to get everything correct to please everyone, the Thermaltake Overseer RX-I has plenty of features that makes it a great gaming chassis. It has plenty of cooling options, great cable management, plenty of Hard Drive/SSD or even 5.25″ drive bays, and other nice features like external 3.25″ drive bays, USB 3.0, water cooling options, and even a nice plexi glass on the side panel to show off your hardware.

The Thermaltake Overseer RX-I costs $129.99, which is a reasonable price for a Full Tower chassis with the features the Overseer RX-I comes with. But for a limited time Newegg is offering a $20 rebate, which brings down the price of the chassis to $109.99 which is a bit more justified for what this case offers. Read more to find out why.
Features
- Pulsating lighting effect.
- E-sports gaming style front bezel.
- USB 3.0 SuperSpeed via internal 20-pin connector.
- Top-mounted HDD docking station enables blazing fast file transfer and effortless hot-swap capability.
- Black coating makes stylish inside look.
- Bottom-placed PSU design for better and easier installation.
- Supports most advanced AMD & NVIDIA graphic cards up to 12.5″/32cm
Specifications
|
Feature/Specification |
Thermaltake Overseer RX-I |
|
Case Type
|
Full Tower
|
|
Material
|
SECC
|
|
Front Bezel Material
|
Combination of plastic and high air flow mesh
|
|
Color
|
Interior: Black
Exterior: Black |
|
Side Panel
|
Solid with Transparent Window
|
|
Motherboard Support
|
9.6” x 9.6” (Micro ATX)
12” x 9.6” (ATX) 12” x 13” (Extend ATX) |
|
Motherboard Tray
|
No
|
|
5.25″ Drive Bay
|
3
|
|
External 3.5″ Drive Bay
|
By using 5.25″ to 3.5″ Converter
|
|
Internal 3.5″ Drive Bay
|
5
|
|
Expansion Slots
|
8
|
|
Front I/O Ports
|
USB 3.0 x 2 (via internal header)
USB 2.0 x 2 eSATA connector x 1 Mic & Speaker (support AC’97 & HD Audio) |
|
Cooling System
|
– Front (intake) :
200 x 200 x 30 mm Blue LED (600~800 RPM, 12~14 dBA) – Rear (exhaust) : 120 x 120 x 25 mm TurboFan, 1000rpm, 16dBA – Top(exhaust) :
200 x 200 x 30 mm Blue LED fan x 1 (600~800rpm, 13~15dBA) 2 x 200 x 200 x 30 mm (optional) – Bottom(intake) :
120 x 120 x 25 mm x 1 (optional) – Side(intake) :
200 x 200 x 30 mm x 1 (optional) |
|
Liquid Cooling Capable
|
Yes
|
|
Liquid Cooling Embedded
|
No
|
|
Power Supply Supported
|
Standard ATX PSII Power Supply
|
|
Power Supply Included
|
No
|
|
Dimension(H*W*D)
|
535 x 220 x 580 mm
21.1 x 8.7 x 22.8 inch |
|
Net Weight
|
10.3 kg
22.7 lb |
|
Security Lock
|
For peripherals only
|
|
Application
|
Suitable for gaming, enthusiast, DIY and modding
|
|
Warranty
|
3 Years
|
Closer Look: External
Click Images to Enlarge
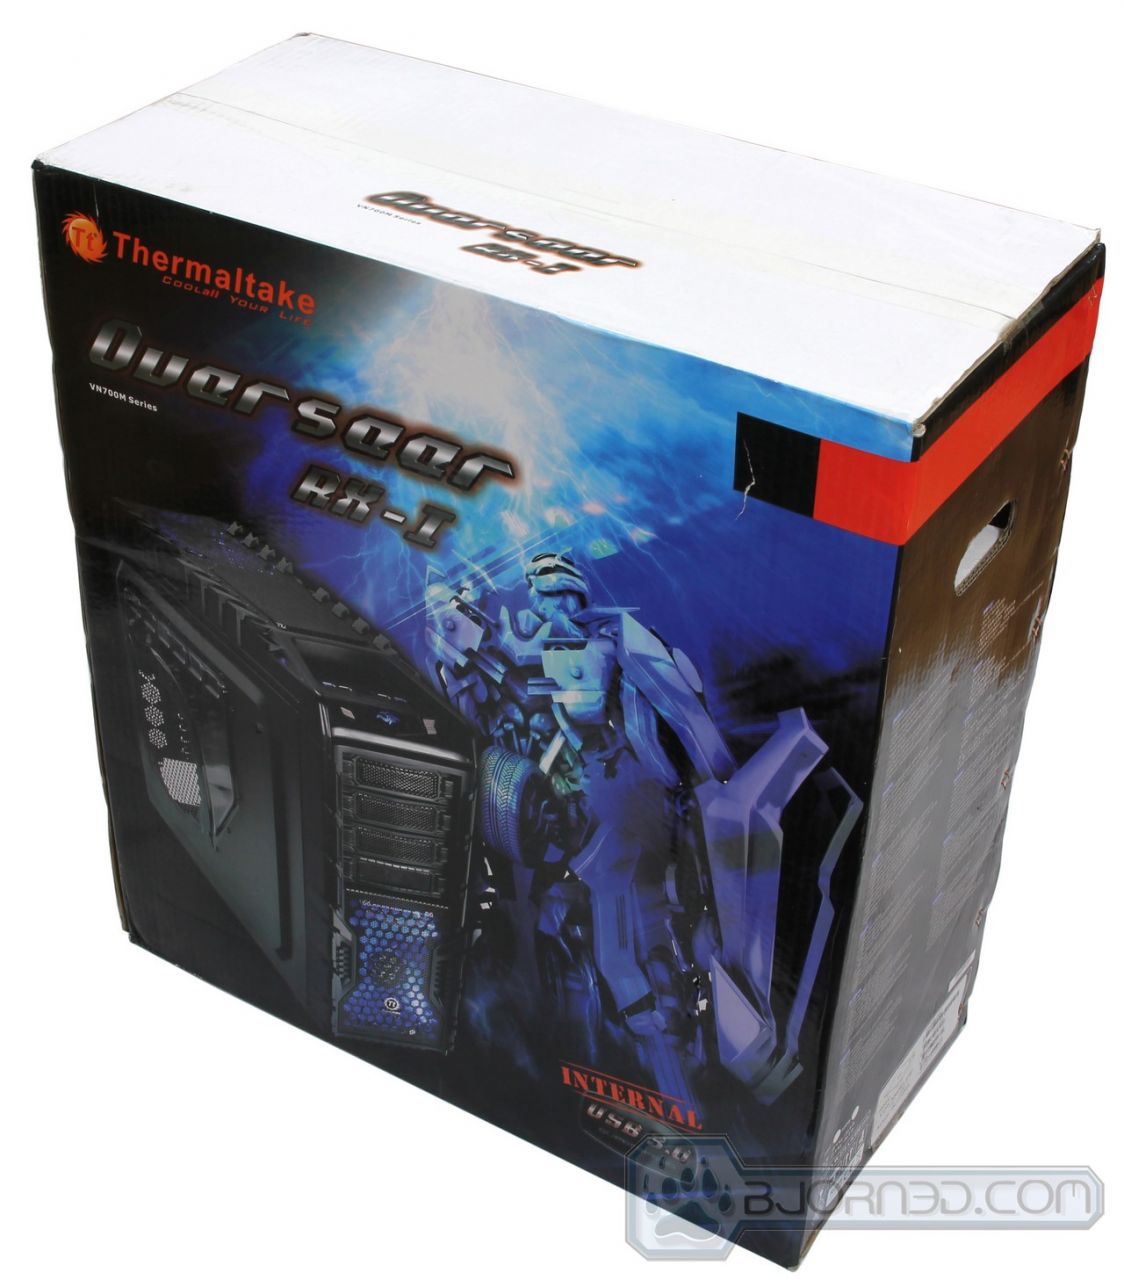
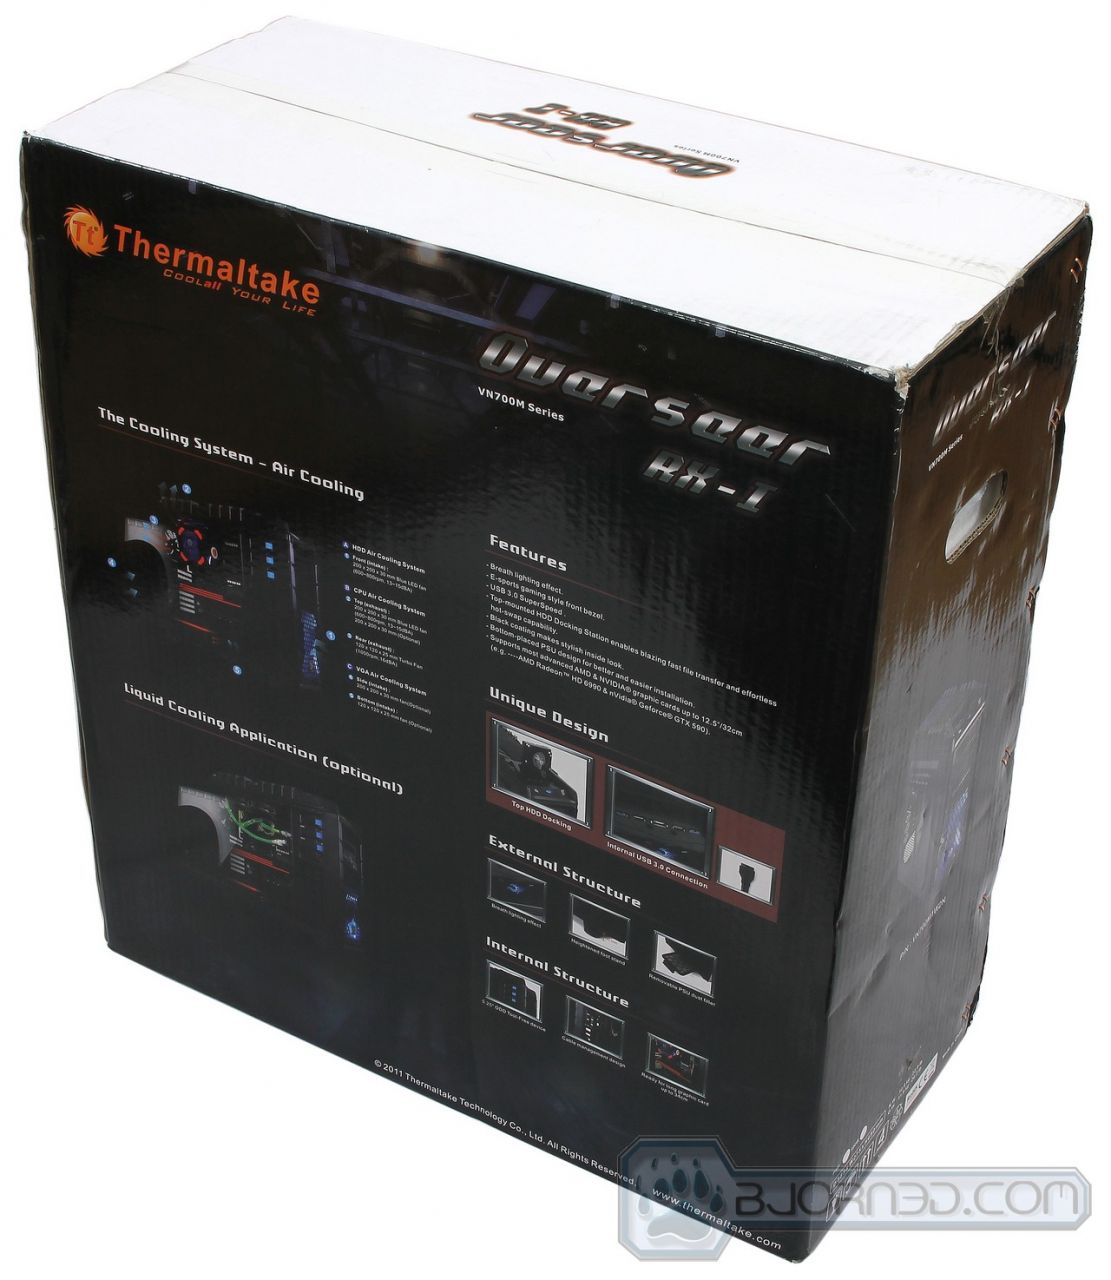
We have taken a look at a few Thermaltake chassis in the past, and they all come in a very sturdy cardboard box that requires quite a bit of banging to actually damage the product inside it. The Overseer RX-I is no exception. It comes in a fairly big blue and black themed chassis that resemble the LED fan colors with a Transformer type robot on it’s front with the Overseer RX-I. The back shows off some of the key features of the chassis, like the internal USB 3.0 connector, the fan filters, the tool-less drive installation, etc. The side of the packaging includes more specifications about the product.
Inside the box you will find the usual Styrofoam packaging that keeps the chassis from getting damaged during shipment. The RX-I is also covered in a plastic transparent back to prevent the Styrofoam from scratching the surface of the chassis. The Plexiglass window originally comes covered with a plastic transparent cover as well from both the inside and the outside to prevent scratches as well. It is recommended to remove these parts before starting up your system, but you can keep them on until you finish installing your hardware. So right off the bad, Thermaltake makes sure that your product arrives without any issues and that you would have great first impressions about their products.


Click Images to Enlarge
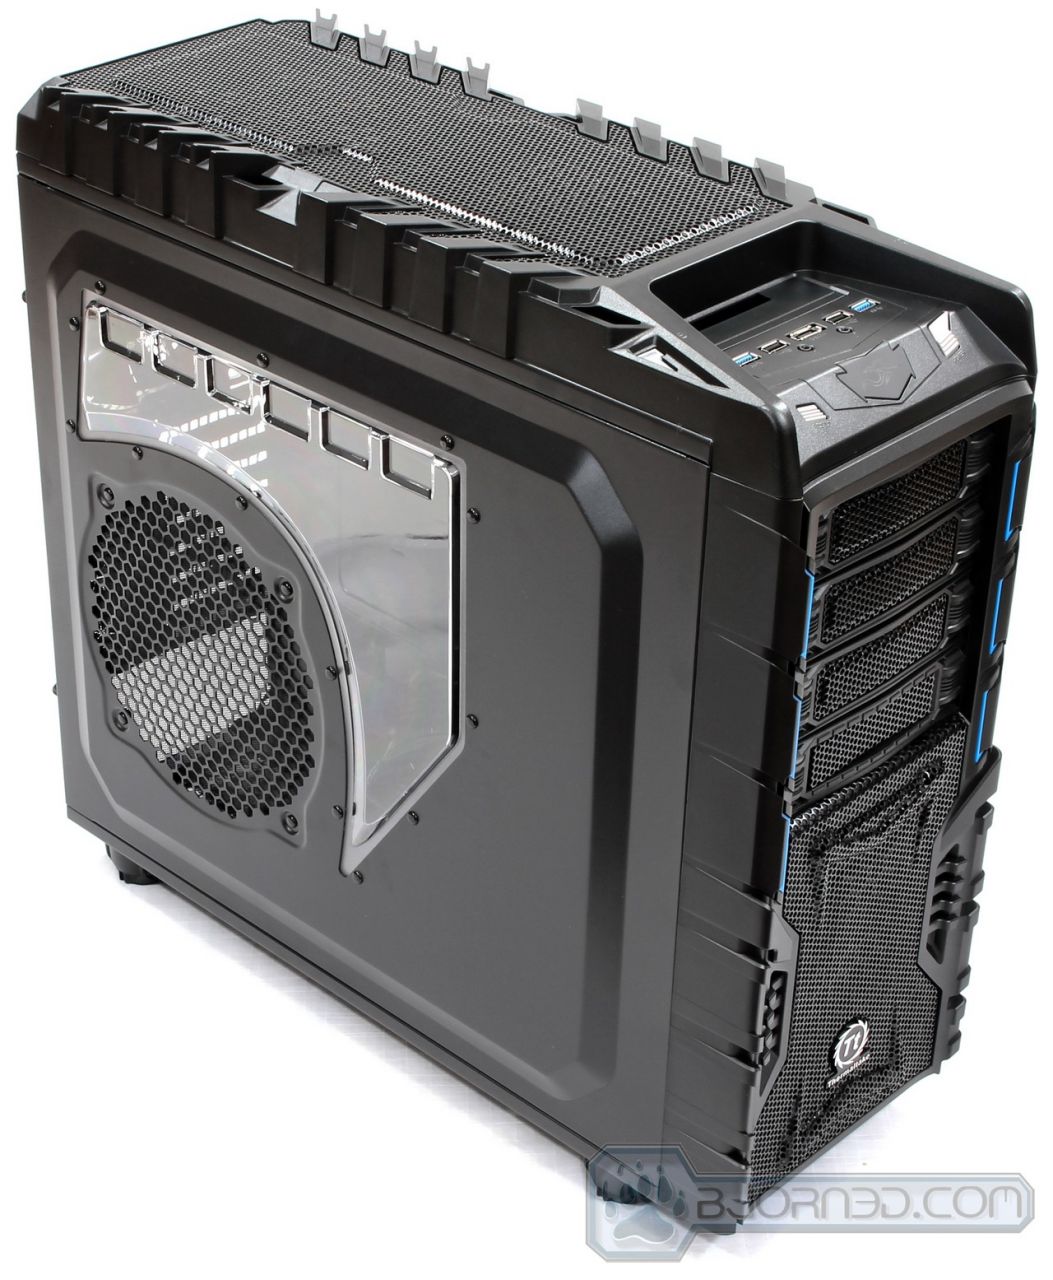
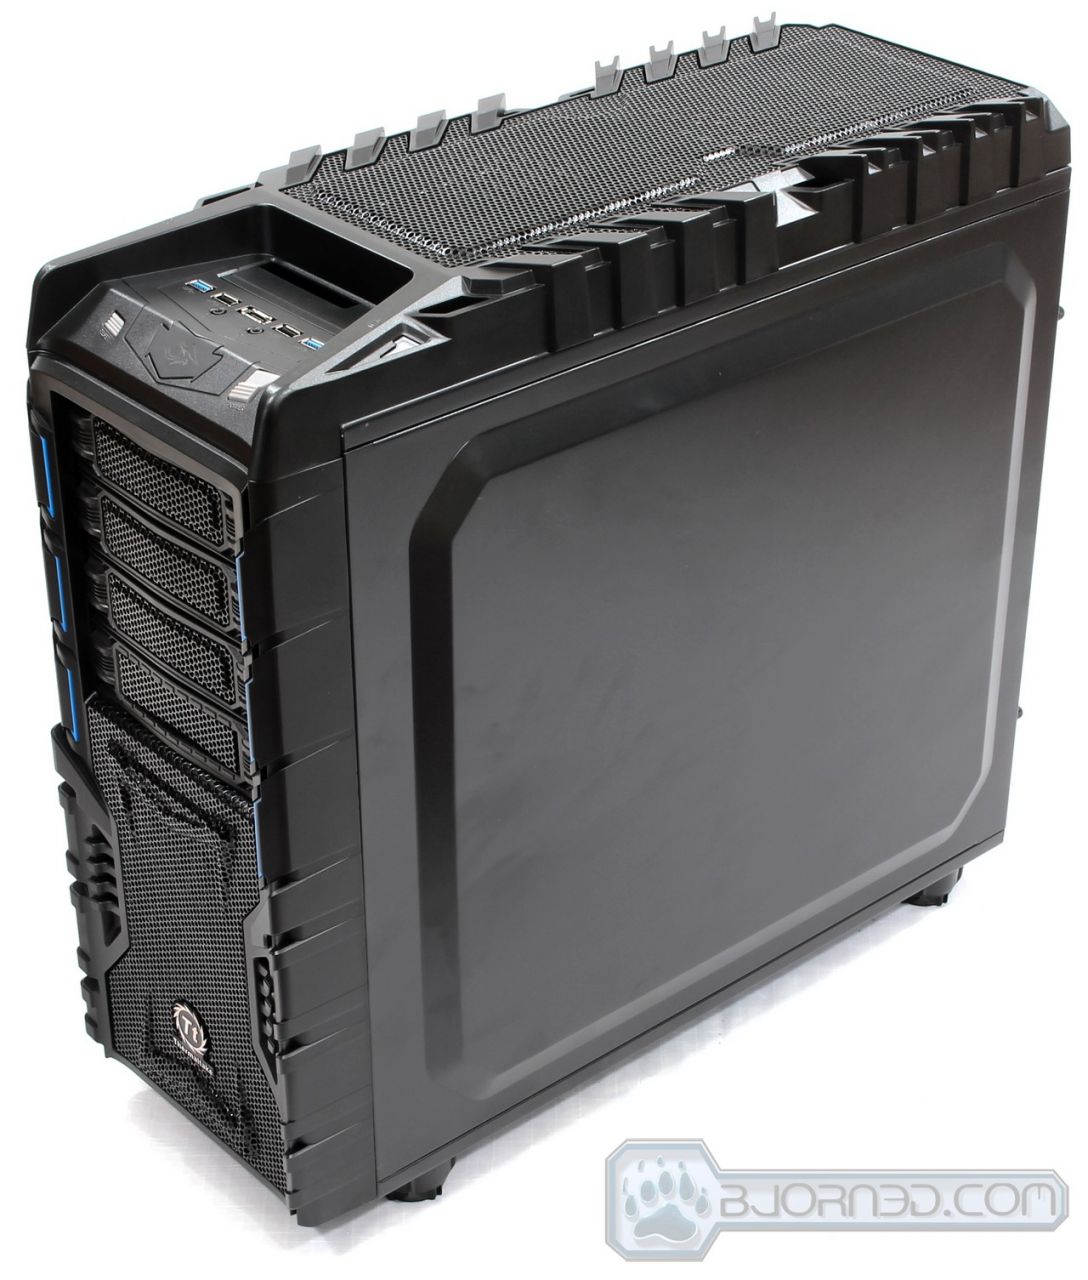
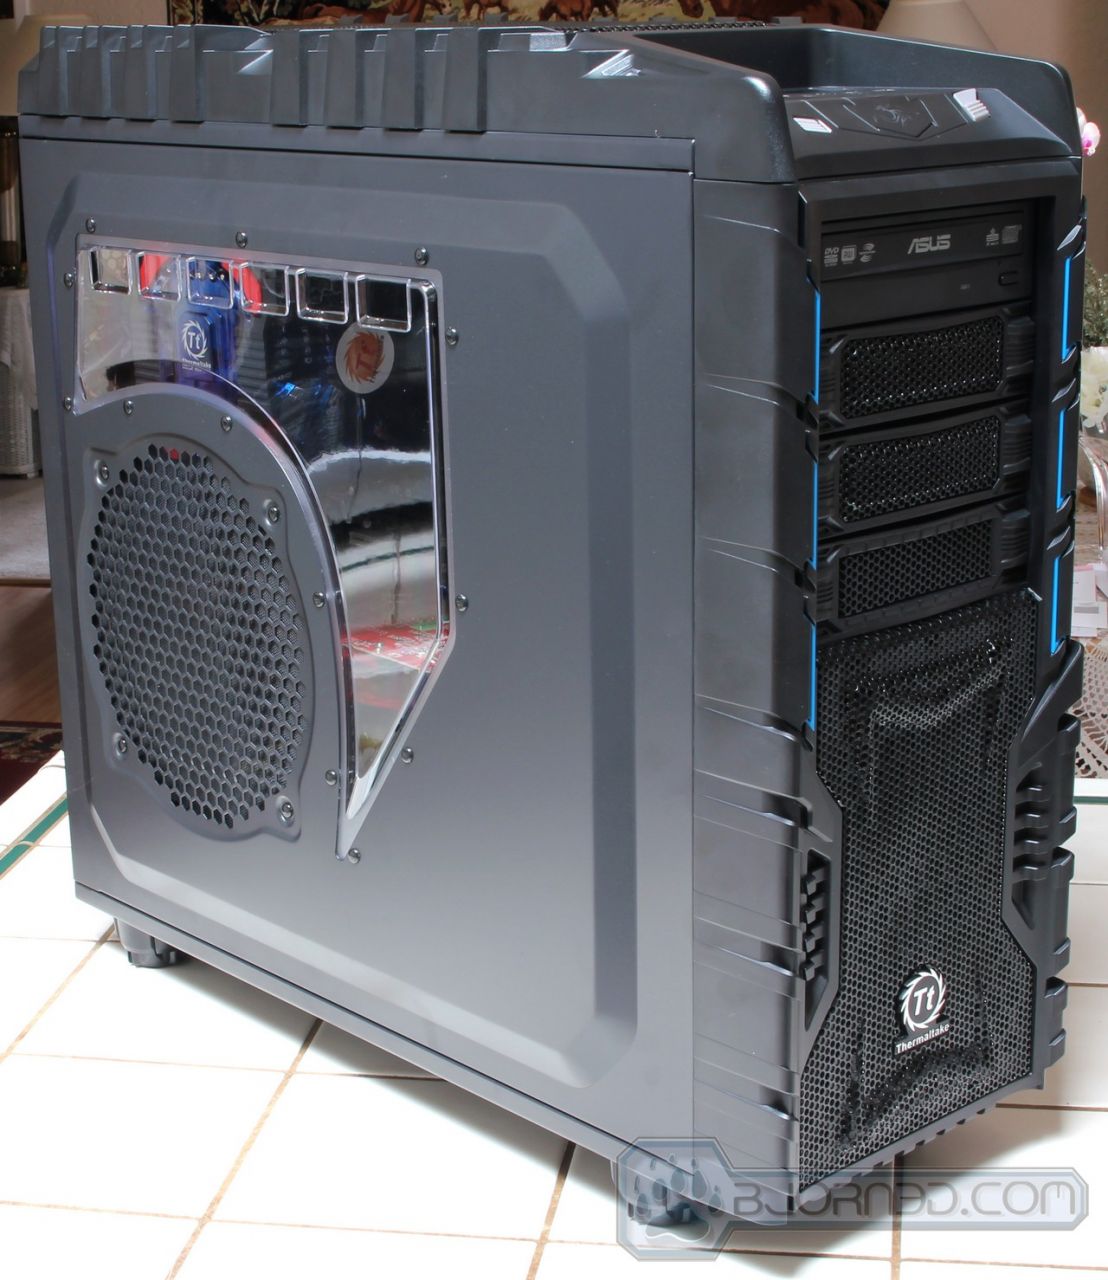
Let’s check out the actual chassis from all of its angles. This is where most of the design is happening and what most people will see when they look at your chassis. To be quite honest, we’ve never been a big fan of crazy designs, but the Overseer RX-I keeps the presentation of the chassis professional even though there are a lot of edges and curves on the edges of the front and top of the chassis. One side of the chassis is completely closed with no air circulation or windows. this is fine because this will prevent excess noise coming out of the system during heavy loads, especially if you have the chassis to the left of you. The right side of the Overseer RX-I has a upside down L shaped Plexiglass window that will provide a great view of the hardware installed in the chassis. The circular honey comb mesh cutout below the Plexiglass is one of the locations where Thermaltake allows you to install an additional 200mm x 200mm x 30mm fans to the side panel of your chassis. It’s a bummer this fan is not included, because having a fresh flow of cool air from the side of the chassis is important to keep the video cards, the CPU, and the motherboard cool within the chassis. In our opinion, Thermaltake left this fan be an additional option that the end-user can buy just to keep the cost of the chassis as low as possible. However, the chassis does come with a 200mm x 200mm x 30mm fan on the top, which makes it possible to remove this fan and mount it on the side panel to provide more air intake for the hardware inside your system. This would be referred to as the push-pull type setup. Though, do watch out, because the top screws can easily be stripped due to the fact that they are screwed in way too tight to keep the top fan from vibrating. By removing the top fan, this allows you to install All-in-One water cooling solutions, such as the Thermaltake Water 2.0 Performer, Pro, or Extreme. The Performer and Pro can be installed on the back 120mm fan as well, but this is just yet another option that is possible with this chassis, we’ll take a closer look at that on the pictures below.
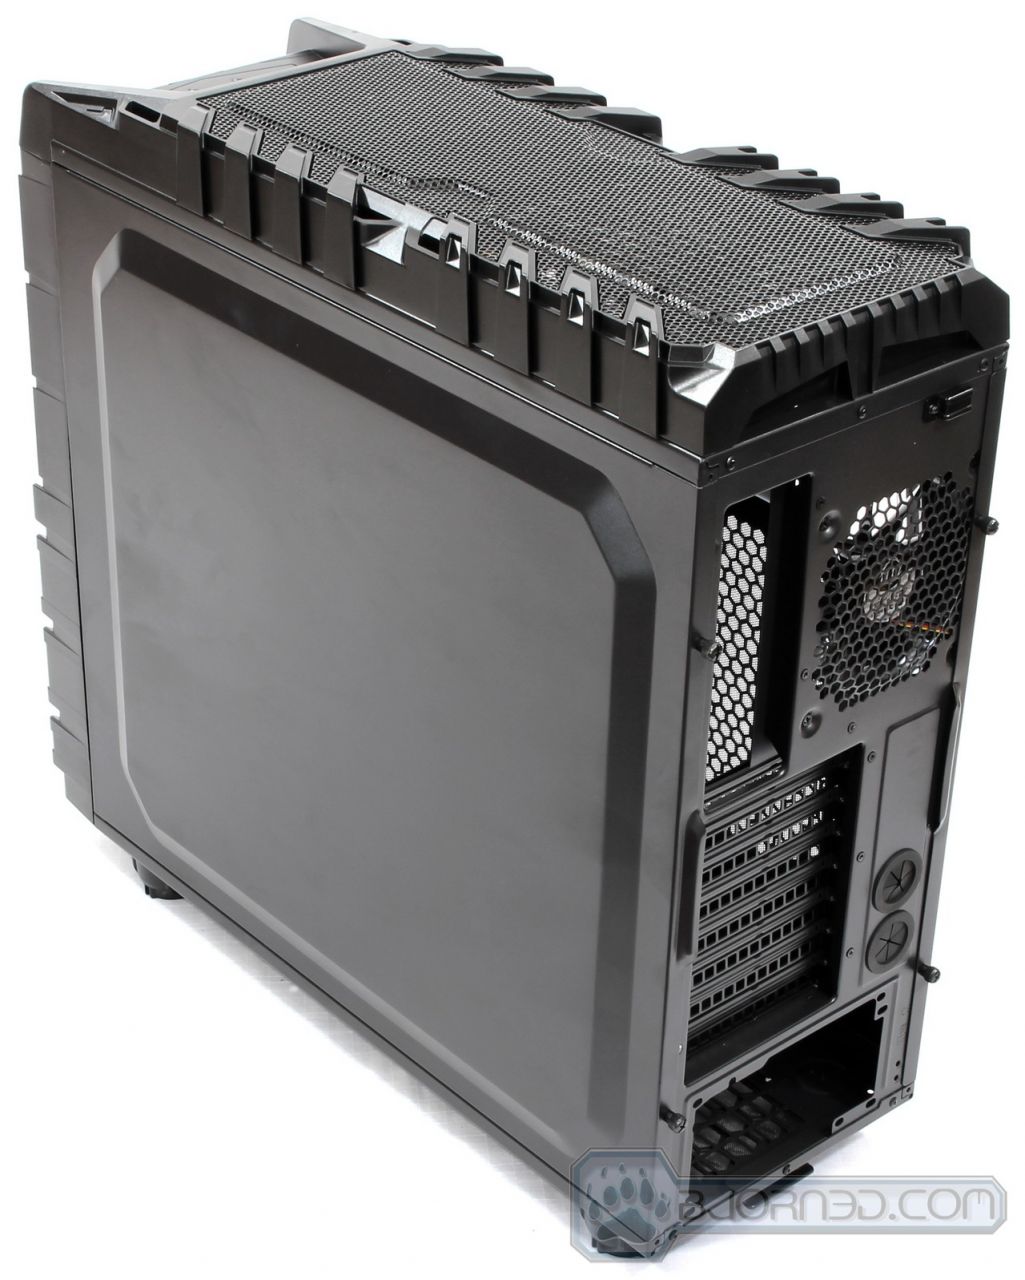
The rear photos of the Overseer RX-I give us a nice overview of what to expect from this chassis as far as expansion slot count, external water cooling, power supply placement, and rear fan size. We’ll take a closer look at these below as well.

Click Images to Enlarge
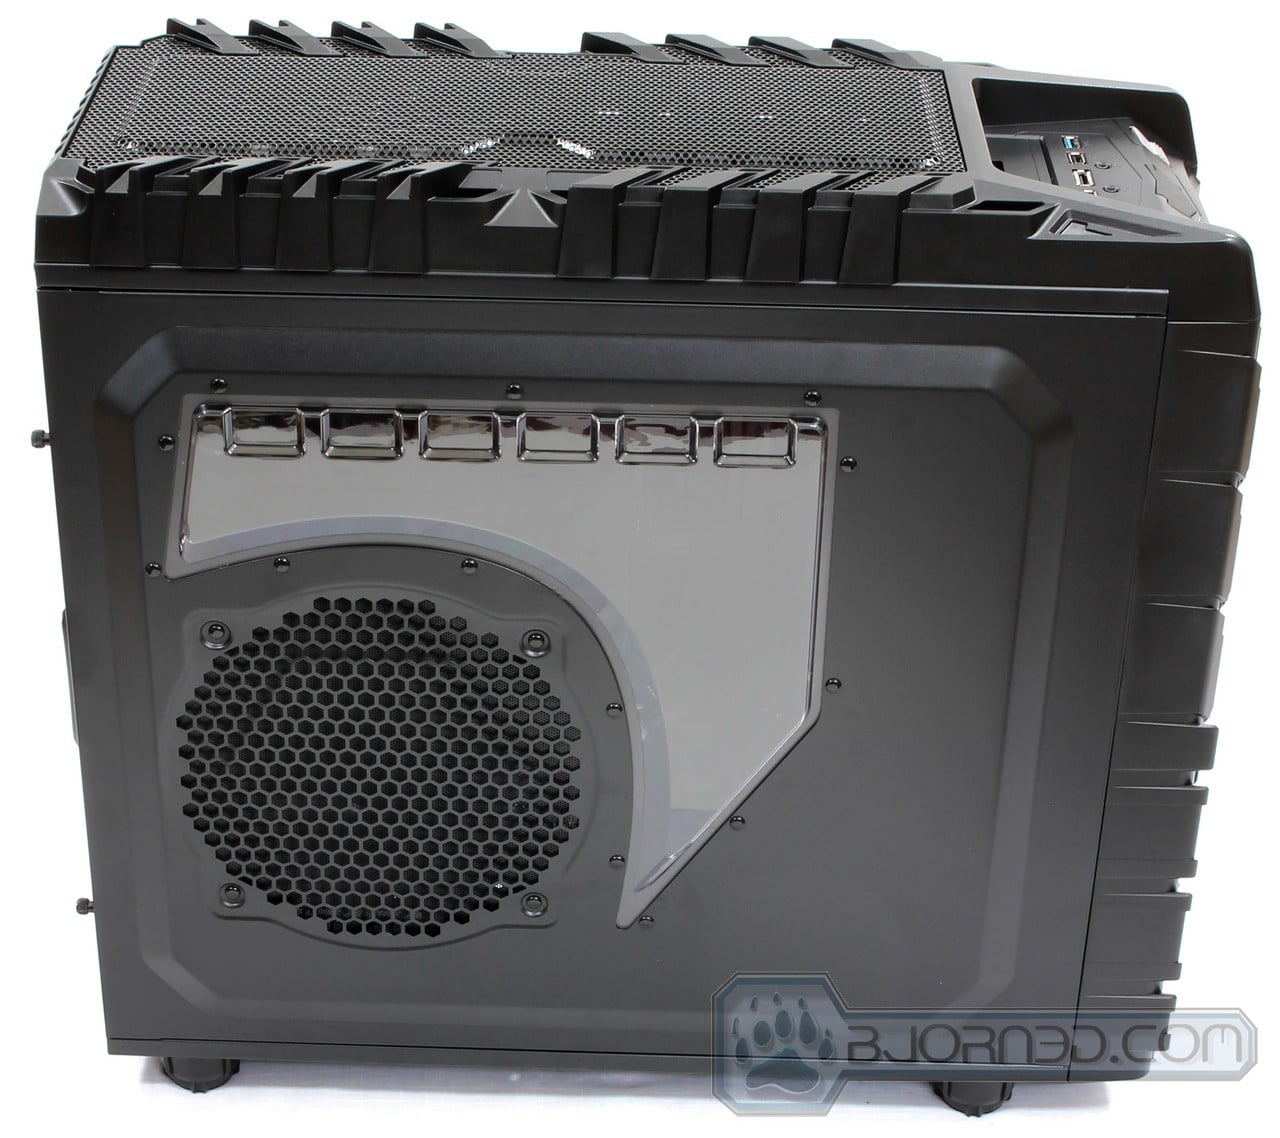
Both the right and left side panels come with a beveled and extruded design. This actually comes quite handy considering that an extruded side panel allows for more space for larger Air coolers while keeping that massive 200mm x 200mm x 30mm fan on the side panel. The right side panel’s extrusion helps with cable management. Many cases come with cable management holes, but unless you can really route your cables and make sure these cables don’t overlap too much, you’ll have a hard time closing your side panel. With the extrusion, there is extra space to route your cables, making it easy to snap back your right side panel even if you have a thick clutter of cables behind the motherboard tray. This is one excellent feature that we believe is essential in a well built chassis, and the Overseer RX-I has it.
While not quite visible, the Overseer RX-I comes with circular feet that have rubberized bottom. This will prevent vibrations caused by fans and other hardware within the system.

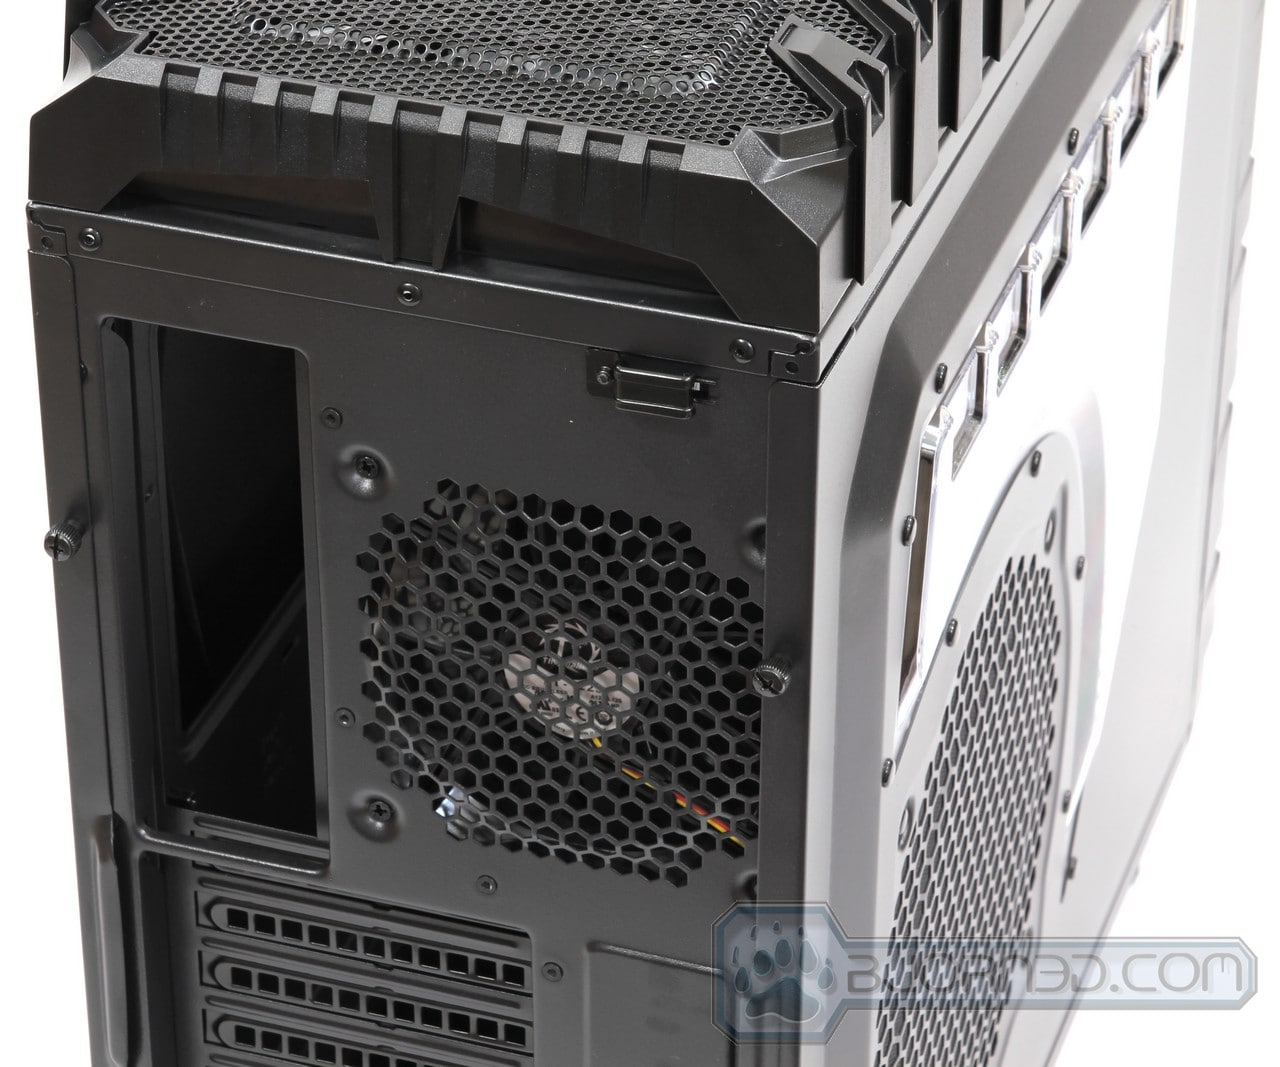
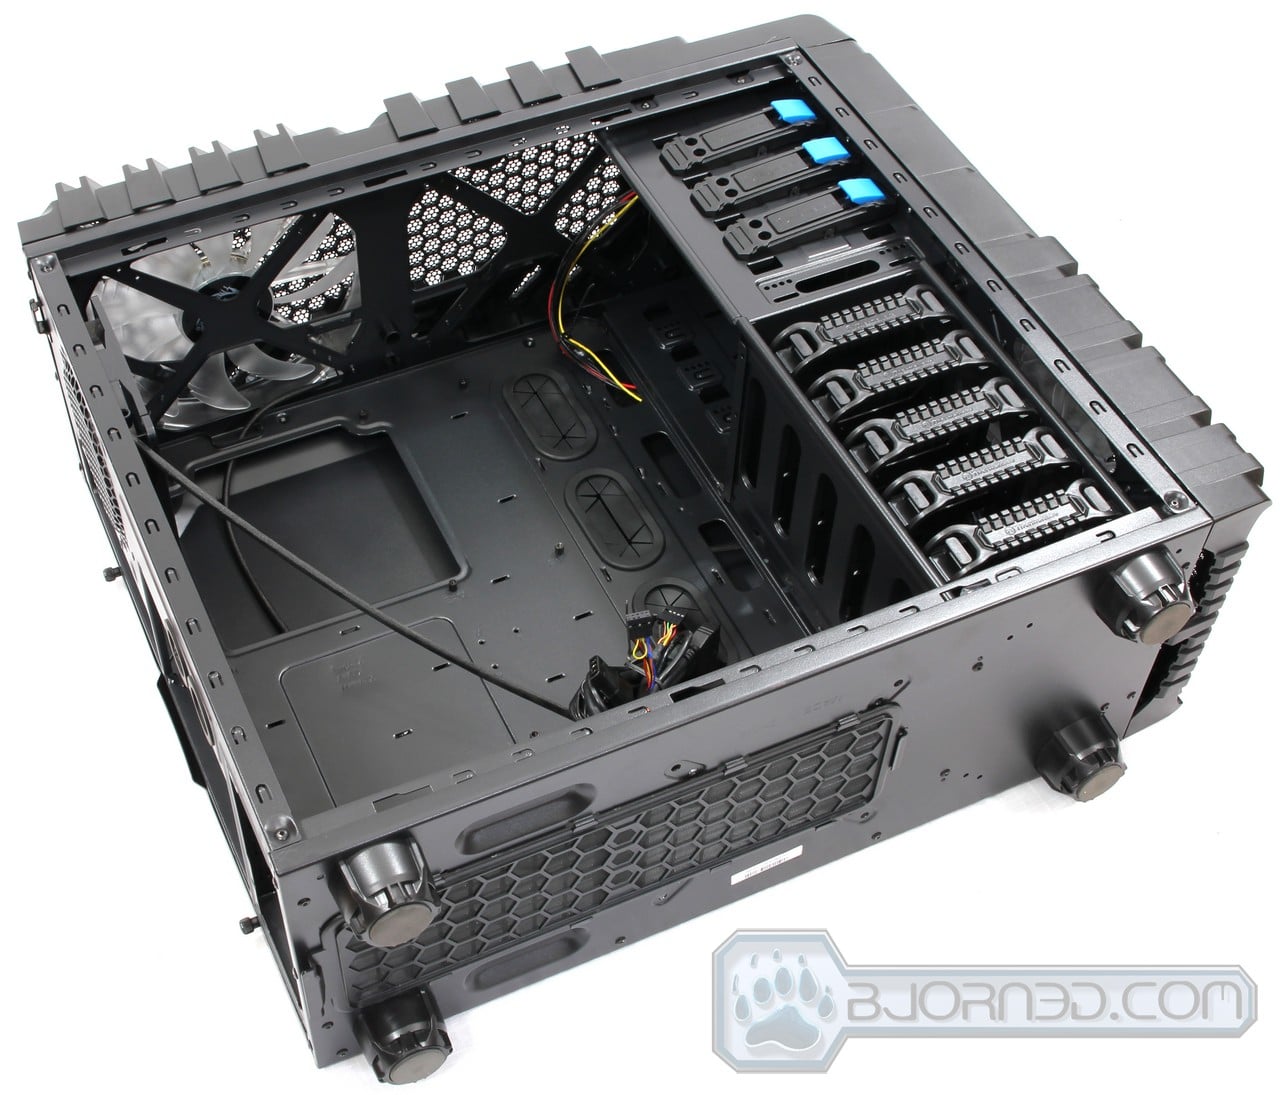
So as a recap, a quick overview of what we have talked about. #1 shows the front 200mm x 200mm x 30mm blue LED fan which cools down the hard drive compartment and provides more air to the hardware within the chassis. #2 shows the top 200mm x 200mm x 30mm blue LED fan that comes with the Overseer RX-I chassis. There is an additional 200mm fan location right next to the 200mm fan that is pre-installed for additional air intake or exhaust, but this location does not come preoccupied with a 200mm fan. If the fan is removed and perhaps placed to location labeled #4, then the the #2 location can be used for a CPU and/or GPU water cooling setup. It doesn’t have to be an all-in-one water cooling loop, it can be a 100% self built water cooling loop also. #3 shows the Plexiglass window, #5 shows an additional 120mm fan location where the user can install a 120mm fan. This location along with where the power supply is installed comes with a fan filter to prevent dust from getting inside the chassis. All the rest of the fan locations also come with fan filters.

Click Images to Enlarge
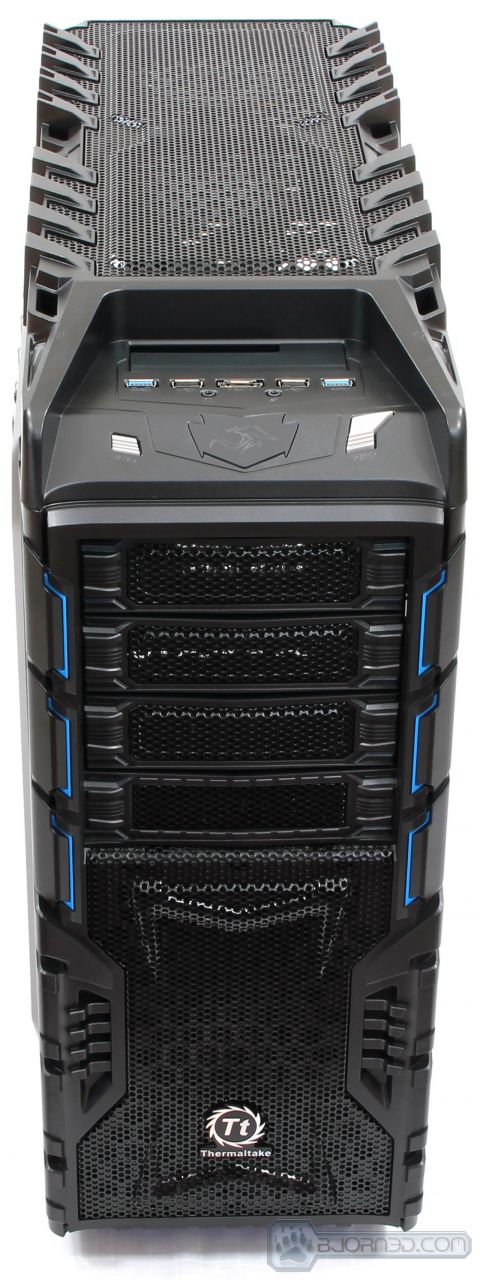
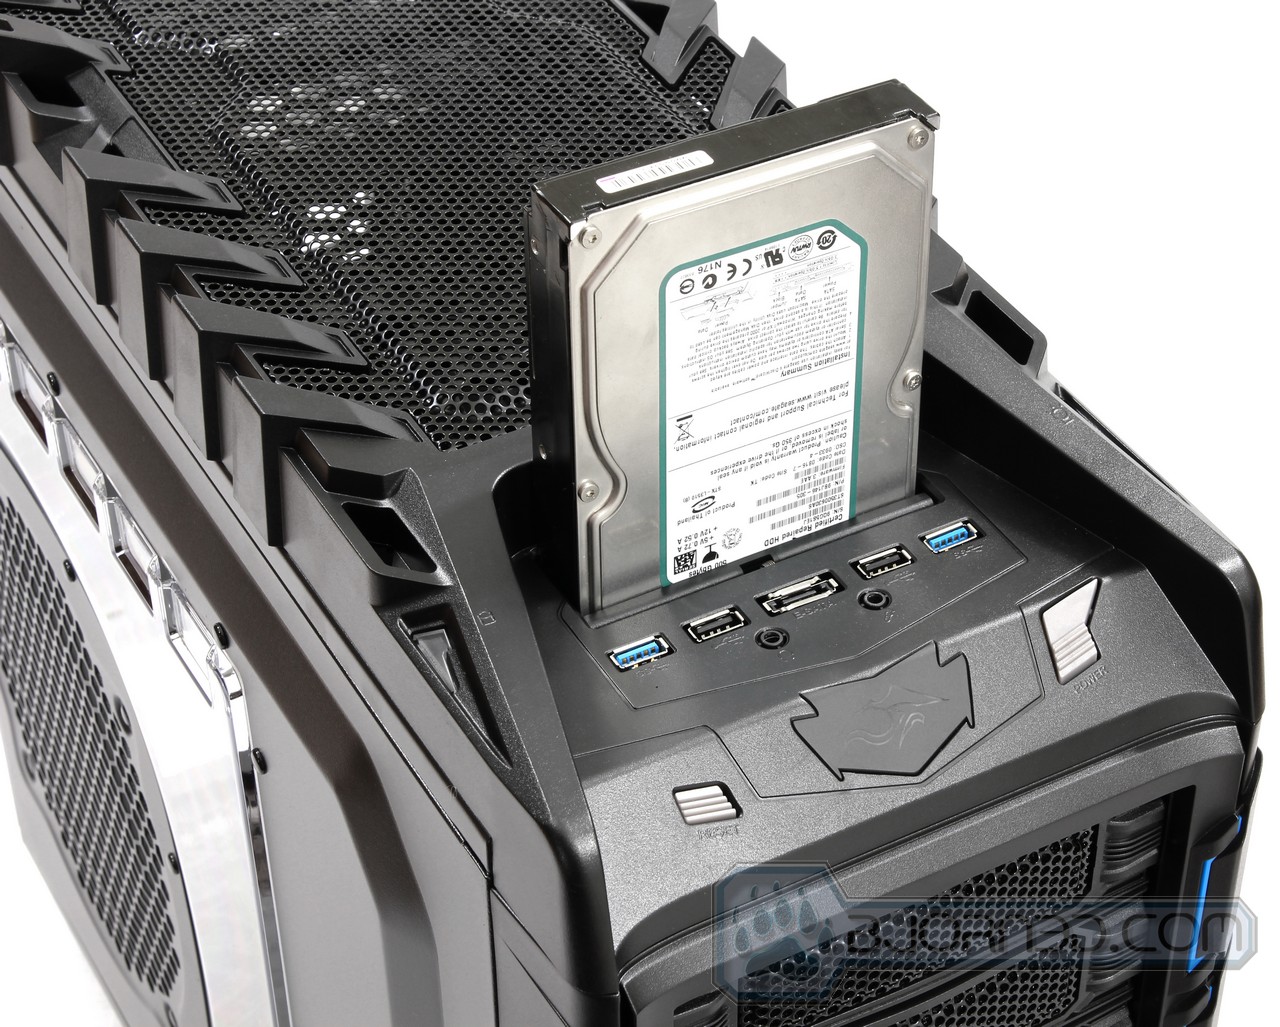
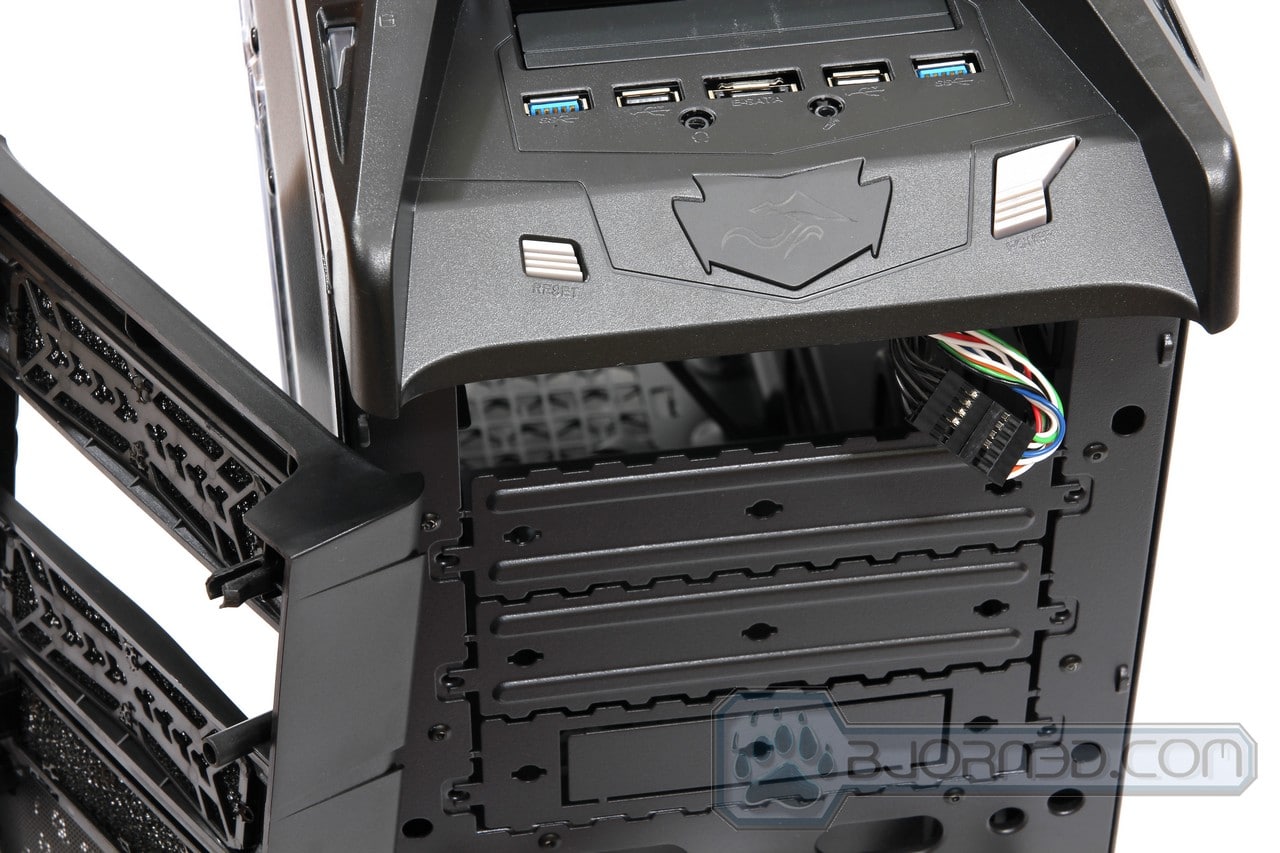
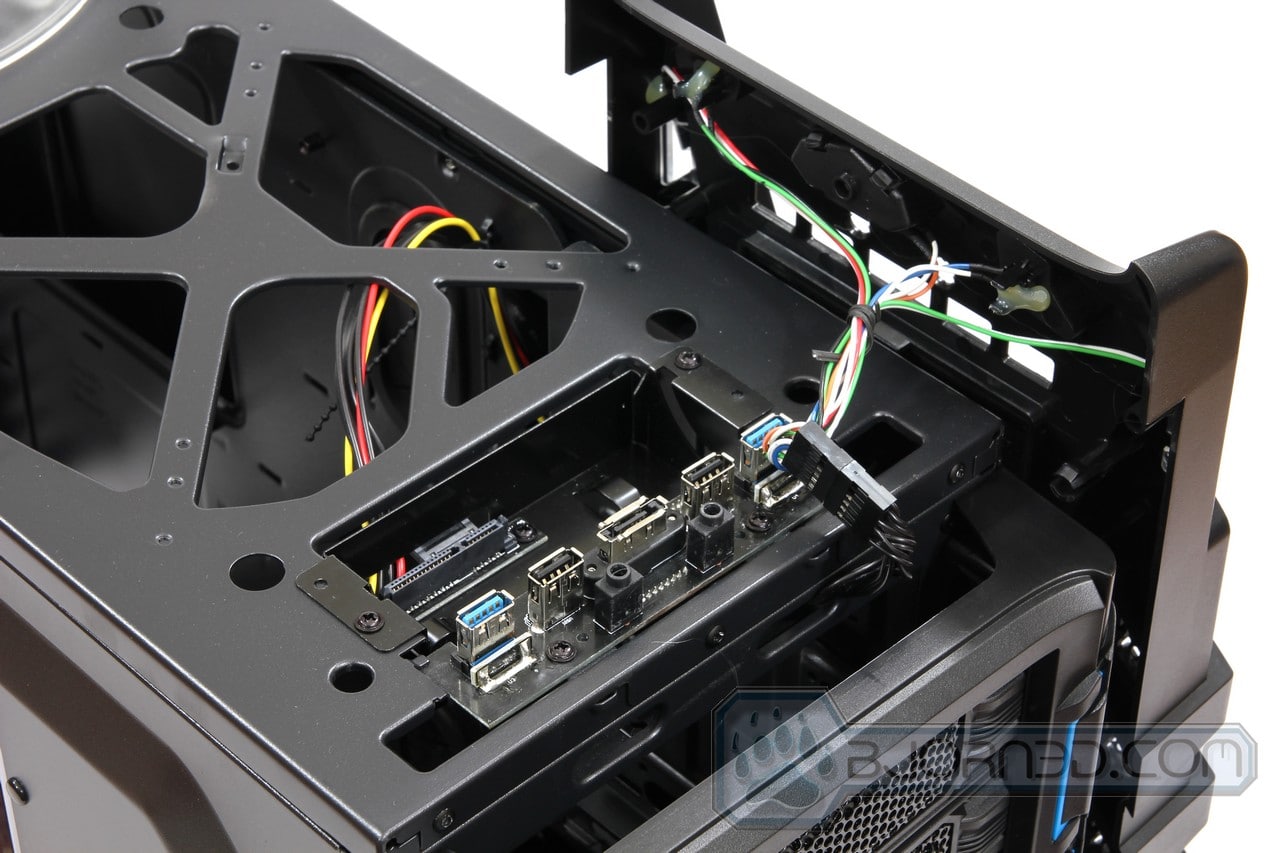
Moving on, a closer look at the top front of the Overseer RX-I, we are presented with a external 3.25″ drive bay. This drive bay also comes with a pre cut 2.5″ hole to allow for SSD installation also. This is a great way of keeping a backup of your files on a Hard Drive or SSD, if you do not plan on installing your hard drive or SSD in an external storage backup enclosure. The front also comes with two USB 3.0 connectors, which come with internal USB 3.0 connector, two USB 2.0 connectors, one eSATA connector, one headphone jack, and one microphone jack. The front emblem like design lights up when the system is running with the Overseer RX-I logo. Finally you have a Reset button on the left and a Power button on the right.
The 2nd image shows the 4x 5.25″ drive bays. As we will see later in this review, the bottom 5.25″ drive bay can be used as a 3.5″ drive bay.

Click Images to Enlarge
Removing the front panel is as simple as just pulling on it. No need to go inside the case and unlatch the sides to take the front off. This is great because installation of hardware and switching out fans becomes easy. The old way of doing it was just too much hassle. Once the front panel is off, we can see that the top 5.25″ drive bay cover has been automatically removed. This is designated for your DVD or Blu-Ray player, but you’re not limited to only that slot. The cable sticking out from the drive bay is the cable that connects top accessory ports. Those cables eventually get plugged into your motherboard so the top connectors would become usable.


Click Images to Enlarge
At the bottom, we can see the 200mm fan that was installed in the factory by default. The front fan runs at 600~800 RPM with a noise output of 12~14 dBA. This should be quite inaudible, however, sometimes the fan filter and the mesh can cause some noise of air movement even if the fan is completely quiet. Since this chassis does not come with a door in the front, there is no sound insulation that would prevent the air noise generated by fans. Taking the top cover of of the Overseer RX-I is just as simple as taking the front panel off. It’s just a matter of pulling on it the top panel hard enough, and the frame will eventually give. The nice thing is that these panels should not break even if they are taken off multiple times. Taking the top cover off reveals the top 200mm fan, which runs at the same speeds of 600~800 RPM, but has a 1 dB(A) higher noise output of 13~15 dB(A). This is how you would get access to the fan to remove it or to install other hardware.

Click Images to Enlarge
Now we can talk about the details of the back of the chassis. There are a total of 8 expansion slots. This can make it difficult to run 4-Way SLI or CrossFireX configurations in this chassis, unless the specific motherboard used supports such expansion slot configuration. 3-Way SLI or CrossFireX should not be a problem at all. There are two large 1/2″ water cooling loop grommets installed in the back allowing the user to install external water cooling loops even with the 1/2″ tubing. The Power Supply mounts on the bottom of the chassis, allowing the power supply to suck cool air in from the bottom of the chassis. Not to worry, as the bottom of the chassis comes with a fan filter that will prevent dust from being sucked in. It is a great possibility that little specs of dust still get through, however, its is 10X better than not having anything. The top of the chassis comes with a 120mm fan. The top fan filter doesn’t slide out like on the Cooler Master Storm Stryker or Storm Trooper chassis, which makes cleaning the filter harder, as it is attached to the top plastic cover. Removal of the top plastic cover might be necessary.
Closer Look: Internal
Click Images to Enlarge
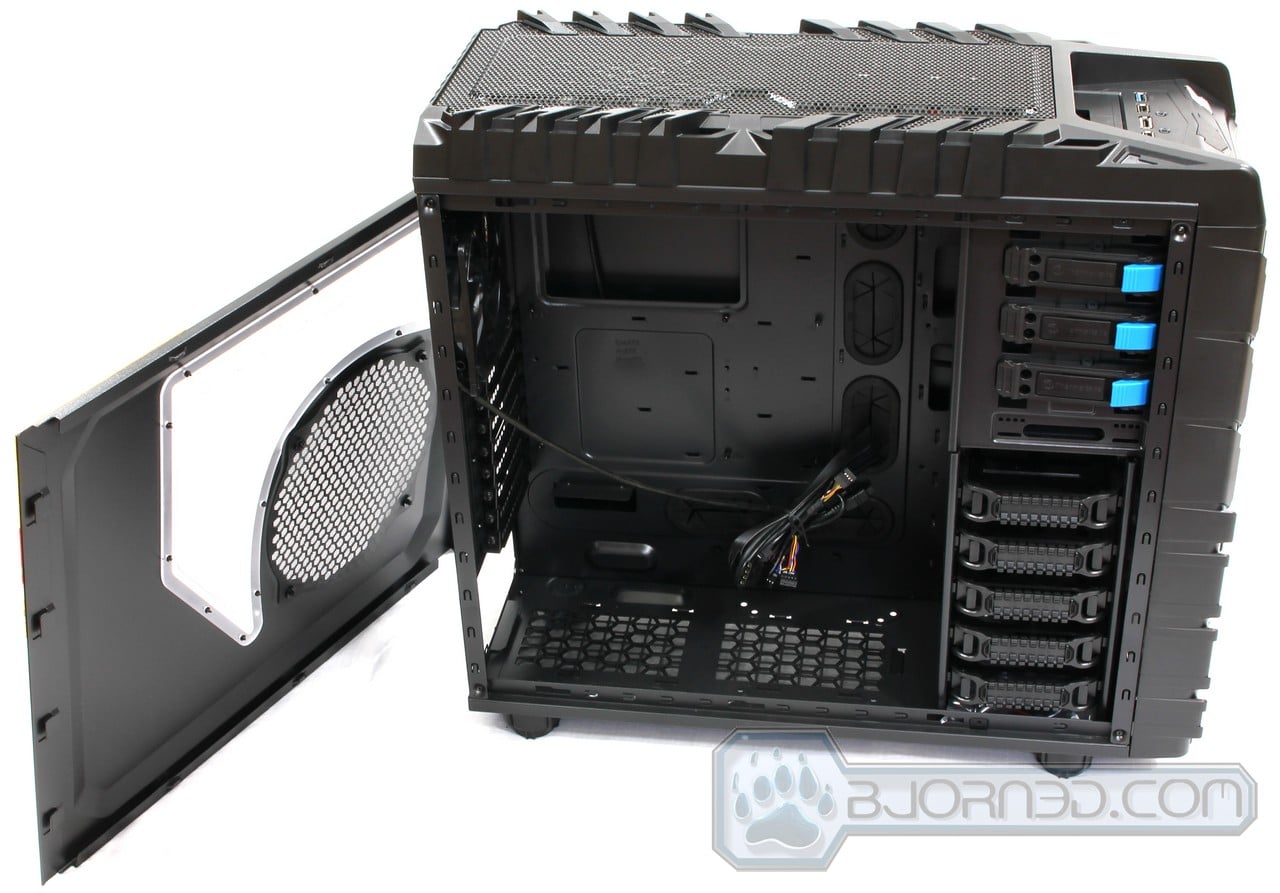
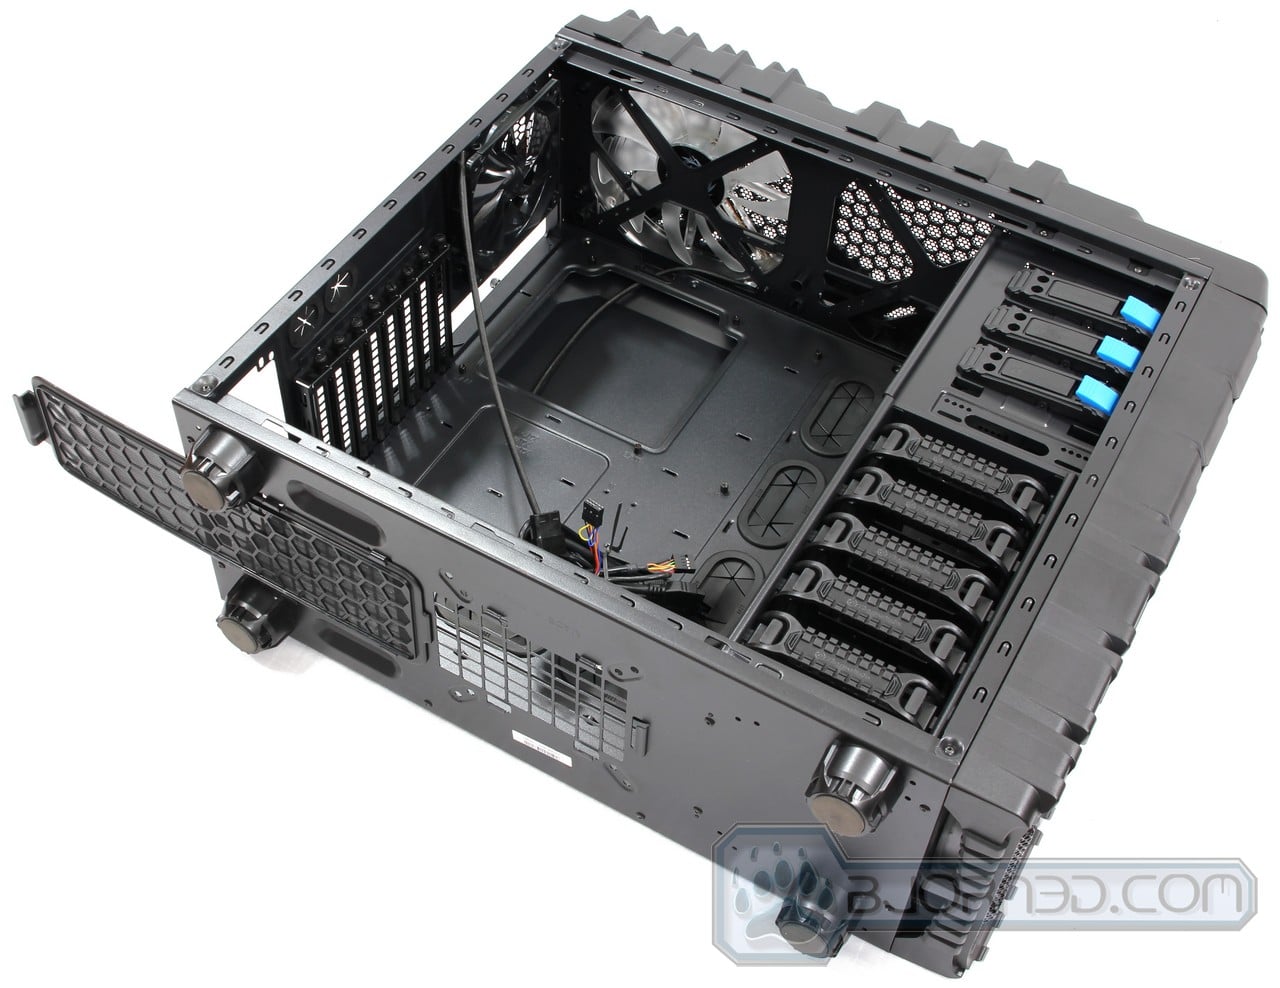
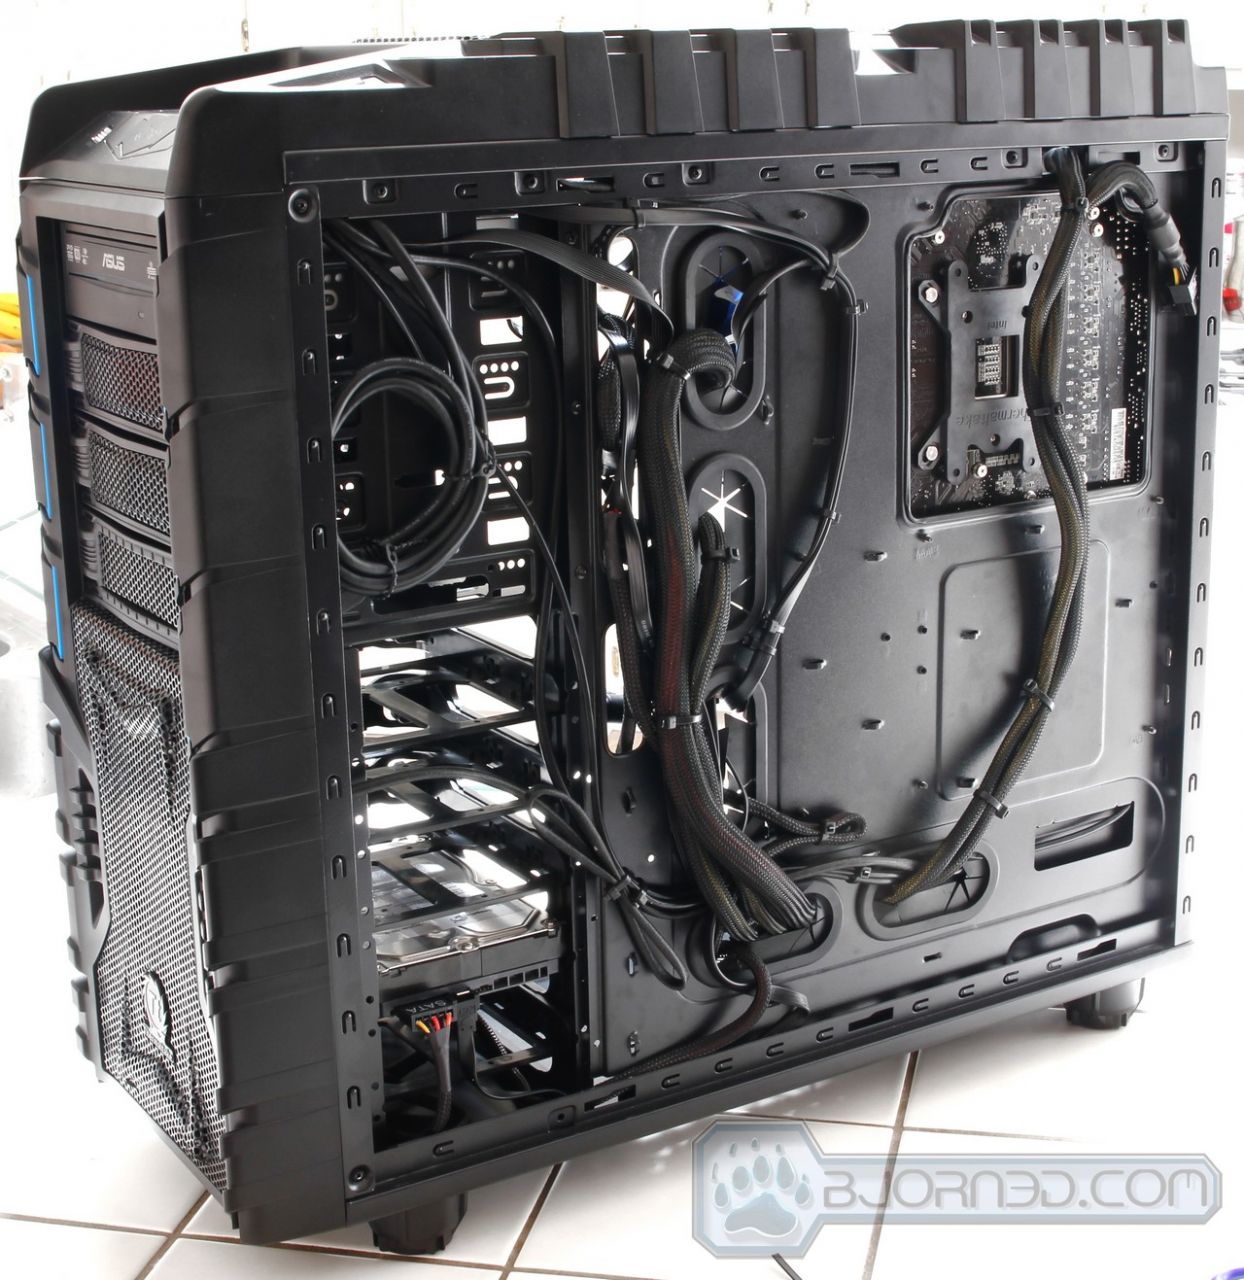
Opening up the Overseer RX-I is simple. It’s just a matter of unscrewing two thumb-screws at the back of the chassis on the sides and the side panel will slide right off. Once the chassis is open, we can see a bit more of what we talked about above. No fan on the left side panel, and no fans on the bottom. We can also see an optional fan spot on the top right corner. These are optional fan spots and will cost you extra if you’d like to install fans there. There are three massive rubberized cable management holes on the motherboard tray, making it possible to nicely tuck cables behind the motherboard tray. There are additional motherboard tray cable management holes on the bottom and on the top of the chassis. The top cable management hole is mainly designed for the 8-Pin CPU Power Connector from the PSU, and other fan cables or accessory cables. The bottom cable management holes are designed mainly for the bottom front panel connector cables that connect on the bottom of the motherboard. Finally the side cable management holes are designed for the 24-Pin Motherboard power connector, the SATA cables, fan cables, lots of power supply cables, and much more. These cable management holes are designed to tuck your cables out of the way to make sure you have good air circulation within your system. So even if it takes a few more hours to build your system it is essential to get the cable management right correctly the first time. This way you won’t have to bother with it in the future, and it will keep your system nice and clean looking even if you switch out hardware. We’ll have photos below showing exactly how it should be done. While we are not professional at it, it should be a great example for system builders. The motherboard tray also has a cutout around the CPU area of the motherboard. This allows for easy CPU Cooler installation, especially if the CPU needs a backplate. This became a standard on all the latest computer chassis.
Do keep in mind that if you’re planning on installing a radiator on the top, that you make sure that the radiator won’t be too thick to get in the way of the motherboard, otherwise you might run into compatibility issues with your hardware.

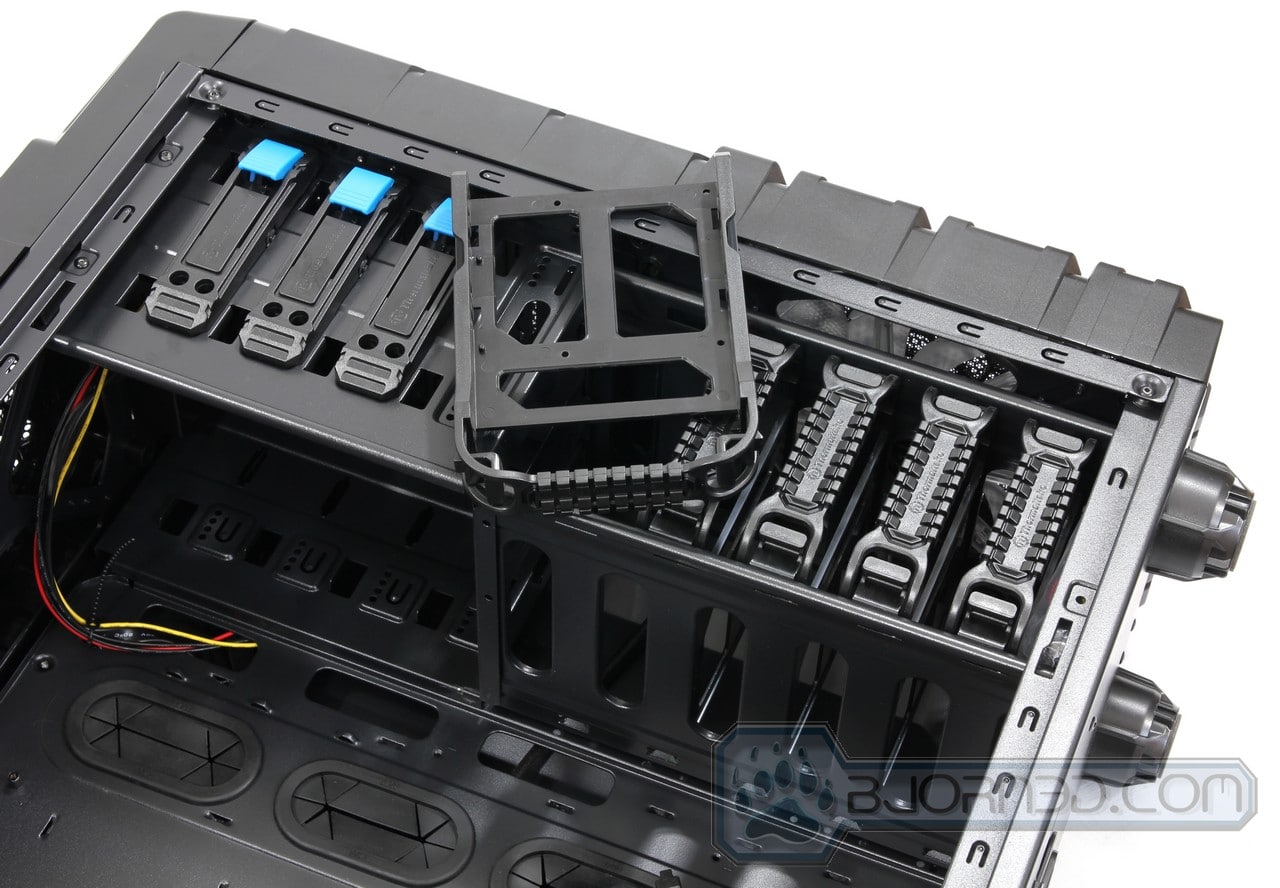
Here is a closer look at the drive bays available on the Overseer RX-I chassis. The three top slots are designated for 5.25″ drives, including a 4th one below the top three, which can also be used as a 3.5″ drive bay. Finally there are 5 other 3.5″ drive bays which can also be used as 2.5″ drive bays. Unfortunately only the top three 5.25″ drive bays are tool-less design, meaning that the other drive bays will require screws for proper installation.


Click Images to Enlarge
If we take a look at the bottom filter, we can see how easily it can be removed by just pulling on the little handle bar at the end. It slides right out and can be washed easily or cleaned with a vacuum cleaner. The hard drive cages easily slide out once you get a nice grip at the end and push in the little notches on the handle. A Hard Drive or SSD can easily be installed with the provided screws. The back of the chassis has the open area for the hard drive compartment, because this is where you will be required to connect your hard drive connectors and power leads. We can also see how the main case cables are already routed in the back through the cable management holes. These might have to be rerouted depending on which motherboard you are using.


Click Images to Enlarge
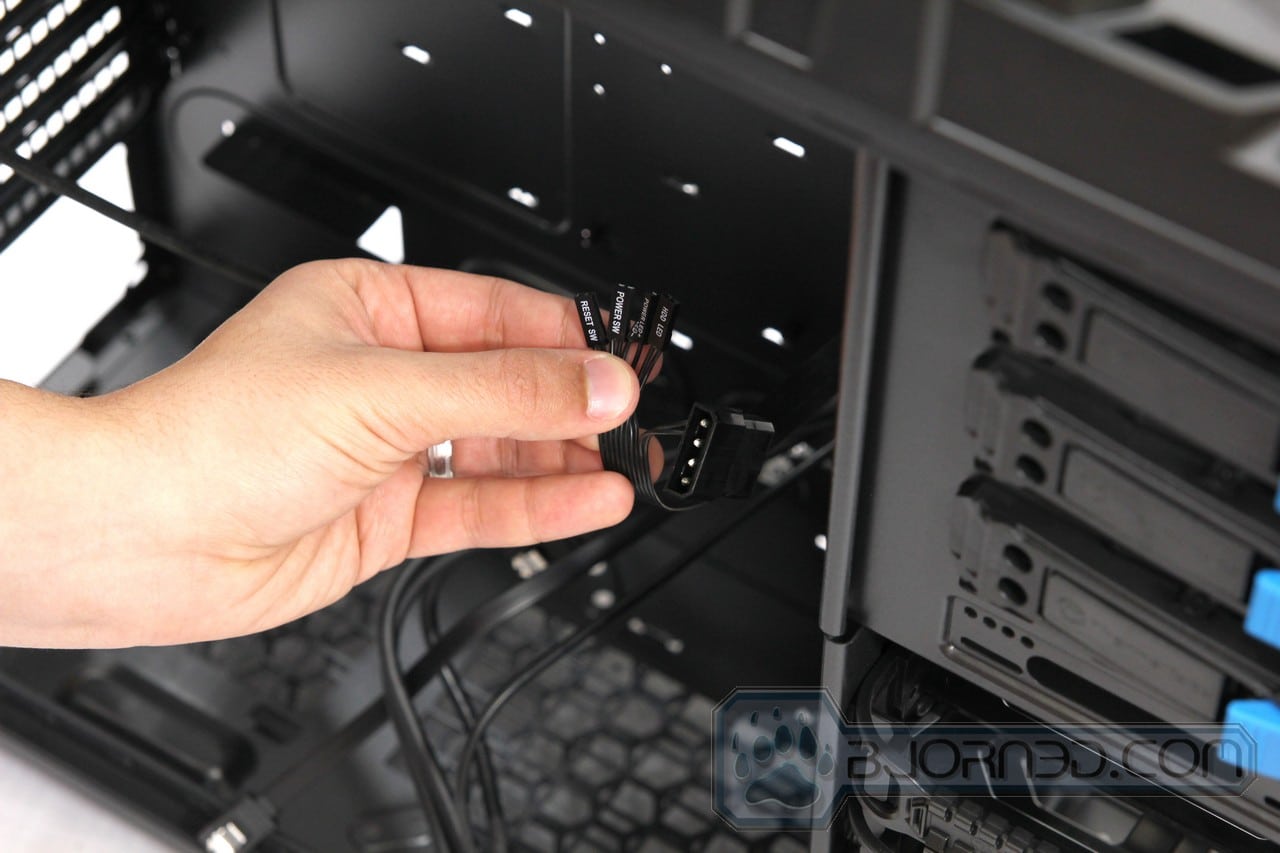
Here we take a look at the cables that come in the Overseer RX-I for the connectors within the chassis. The first image shows the main front panel connectors, including the USB 2.0 connector and the headphone and microphone jack connectors. The second image shows the main front panel buttons and LEDs, including Power Switch, Reset Switch, HDD LED, and Power LED cables. The final image is showing the eSATA cable, the external SATA 3.5″ drive bay connector and the USB 3.0 connector.
Click Images to Enlarge
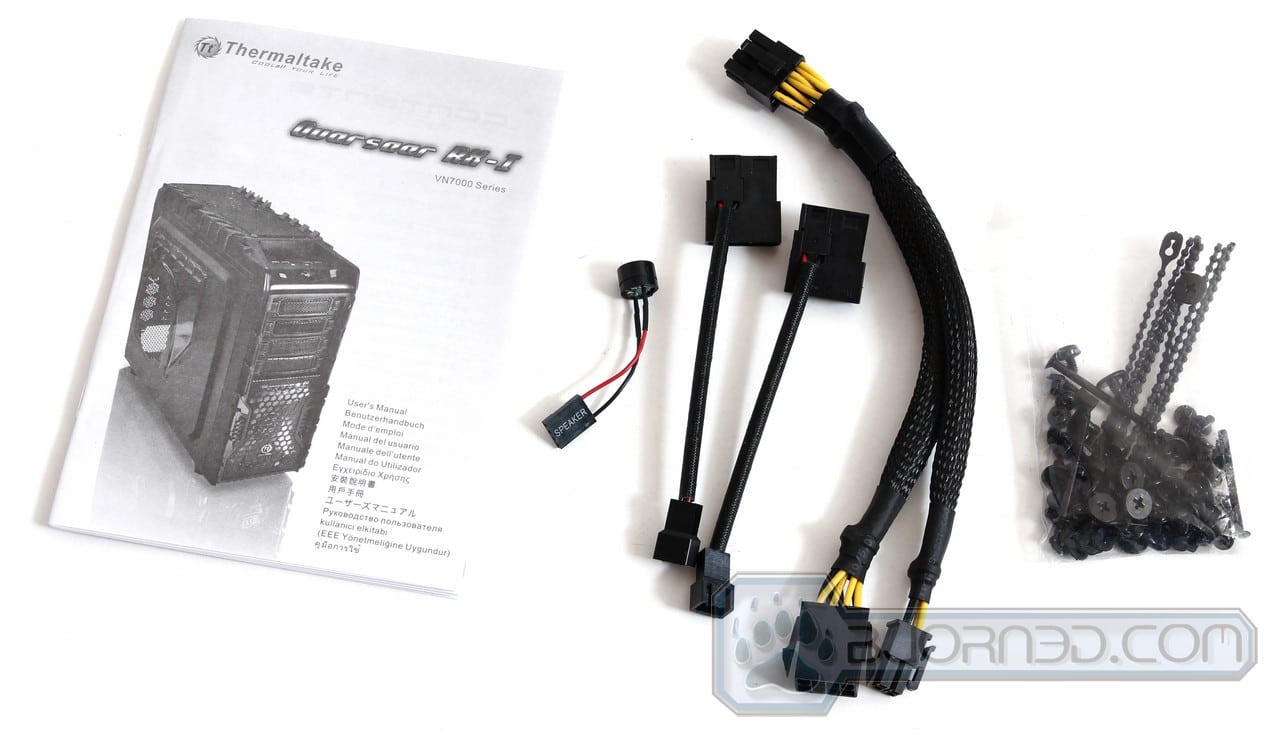
Some of the accessories that come with the Thermaltake Overseer RX-I includes a user’s manual, a Speaker for post or error reporting, two 3-pin fan header to Molex connector adapters, a 8-pin CPU extension cable or 4-pin CPU connector adapter, plenty of installation screws and cable management cable ties.
The System with Hardware Installed
Click Images to Enlarge
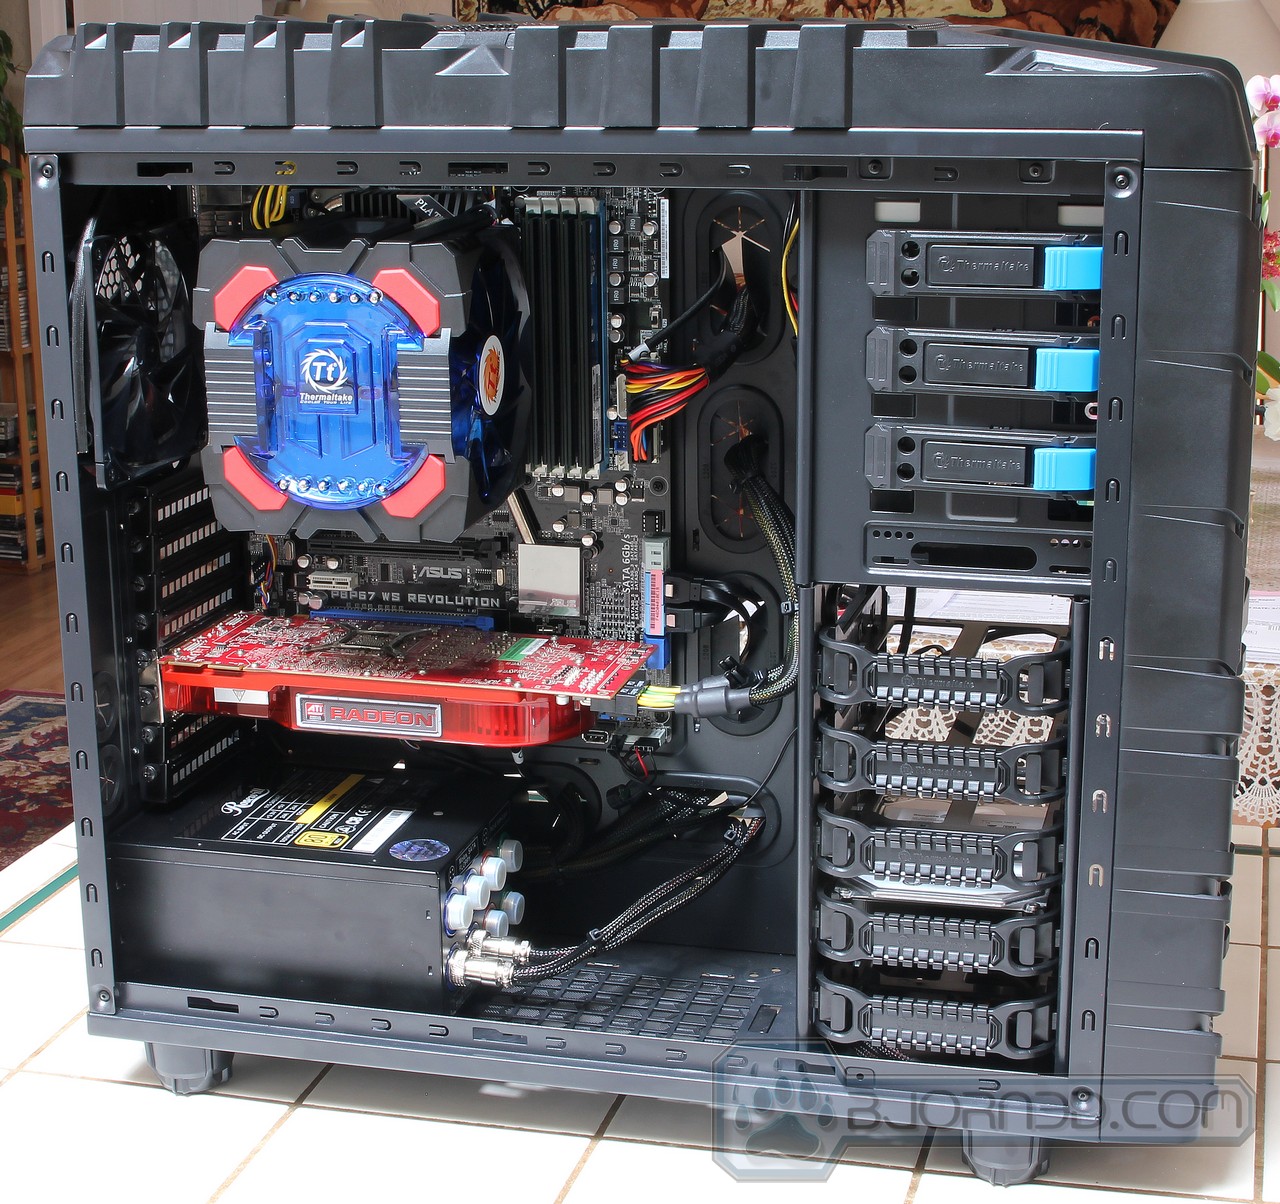
Here is our Sandy Bridge system running a Intel Core i7-2600K processor, and the ASUS P67 WS Revolution motherboard. We are using the Thermaltake Frio OCK CPU cooler to cool our processor and a 1300W power supply to power up the system. It might be an overkill but it allows us to upgrade the system with multiple video cards in the future without having to replace the power supply. Plus it serves us a good purpose of showing how large power supplies don’t have a problem fitting within the Overseer RX-I chassis. The back of the chassis shows the cable management we have done. We used zip ties to tie the cables to the motherboard tray, making it possible to easily close the case. The end result is a nice and clean system where cool air can circulate without any obstruction.
The tool-less 5.25″ drive bays are super easy to work with. once a DVD player is pushed in, it automatically snaps into place without having to readjust the position. It holds very tight, but additional screws can be installed to keep it in safe position. To remove the drive from the drive bay, all you have to do is push on the blue bar, and it will release the clips holding the drive in place.

Here is another photo of the Overseer RX-I that shows multiple high-end graphics cards installed in the chassis without any problems.
Testing methodology
Our testing methodology is rather simple for cases. We let the system idle for 30 minutes and we measure temperatures. Then we turn on OCCT to load the video cards and the processor to 100%. After 20 minutes of 100% load, we measure the overall temperatures. If there are multiple fan settings available, we test the lowest and highest fan settings.
Test Rig
| Test Rig | |
| Case | Thermaltake Overseer RX-I Edition |
| CPU |
Intel Core i7 2600K @ 4.4GHz
|
| Motherboard | ASUS P8P67 WS Revolution |
| Ram |
Patriot Gamer 2 16GB (4x4GB) DDR3-12800 1600MHz 9-9-9-24 Memory
|
| CPU Cooler | Thermaltake Frio OCK |
| Hard Drives |
1x Seagate Baracuda 1TB Hard Drive
|
| Optical | ASUS DVD-Burner |
| GPU |
AMD HD4870 Video Card
|
| PSU |
Rosewill Lightning-1300 1300W Modular PSU
|
| Mouse | Razer Imperator BF3 Edition |
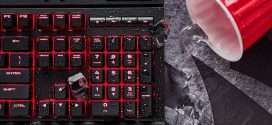
| Keyboard | Razer Blackwidow BF3 Edition Mechanical Keyboard |
Results
Temperatures
CPU Measured with CoreTemp and averaged all cores. GPU temperature measured with MSI Afterburner and averaged all GPUs. Motherboard temperature measured with Ai Suite II.
Here are the temperatures we got from our testing:
| Temperature | ||||
|---|---|---|---|---|
| Idle | Load | |||
| CPU | 33 C | 76 C | ||
| GPU | 45 C | 85 C | ||
| Motherboard | 32 C | 45 C | ||
| HDD | 27 C | 31 C | ||
The temperatures are quite good especially knowing that our processor was overclocked, and our GPU tends to run quite hot even in well ventilated systems. The fact that there is no side ventilation does add to the heat on the video card, but with the installation of an optional 200mm fan on the side panel would drastically help improve temperatures on the video card, CPU and motherboard.
Conclusion
The Thermaltake Overseer RX-I is a fantastic gamer’s chassis. While the design of the case did not blow us away, the Overseer RX-I does offer some nice features that can be appreciated, including: lots of cable management holes for routing your cables, tool-less installation for 5.25″ drives, fan filters, Internal USB 3.0 and extruded side panels for extra space within the chassis for cable management and coolers. However, the case does have it’s downsides as well, which included poor quality buttons, no fan included on the side panel or at the bottom of the chassis, and of course the fact that the front panel comes off way too easily, making it dangerous carrying around the chassis when holding it on the sides, because the front panel could easily snap off and you could drop your system.
Overall we’re very satisfied with the case, and we’d recommend it to any gamer. This case might not be for the enthusiasts, but it does come at a reasonable price of $129.99, or if you get lucky $109.99, which would make it a great affordable gaming chassis for an average gamer.
| Our Verdict: Thermaltake Overseer RX-I Case | ||||||||||||||||||
|
||||||||||||||||||
| Summary: The Thermaltake Overseer RX-I is a perfect gamer’s chassis that comes with lots of features, tool-less installation for 5.25″ drives, plenty of cooling potential and comes at a reasonable price. Therefore the Thermaltake Overseer RX-I receives Bjorn3D’s Silver Bear Award. |


Surprised it scores, not exactly low. But I would have thought it would have scored a little higher. Good review