ASUS GTX 780 DirectCU II OC
 ASUS with its top end DirectCU II cards always has its special spin and tweaks to the GPUs they create. and today we have the newest on the uber high end with the GTX 780 based model which comes packed with a full custom design, cooler and components to allow for top level performance.
The GK110 Kepler Architecture
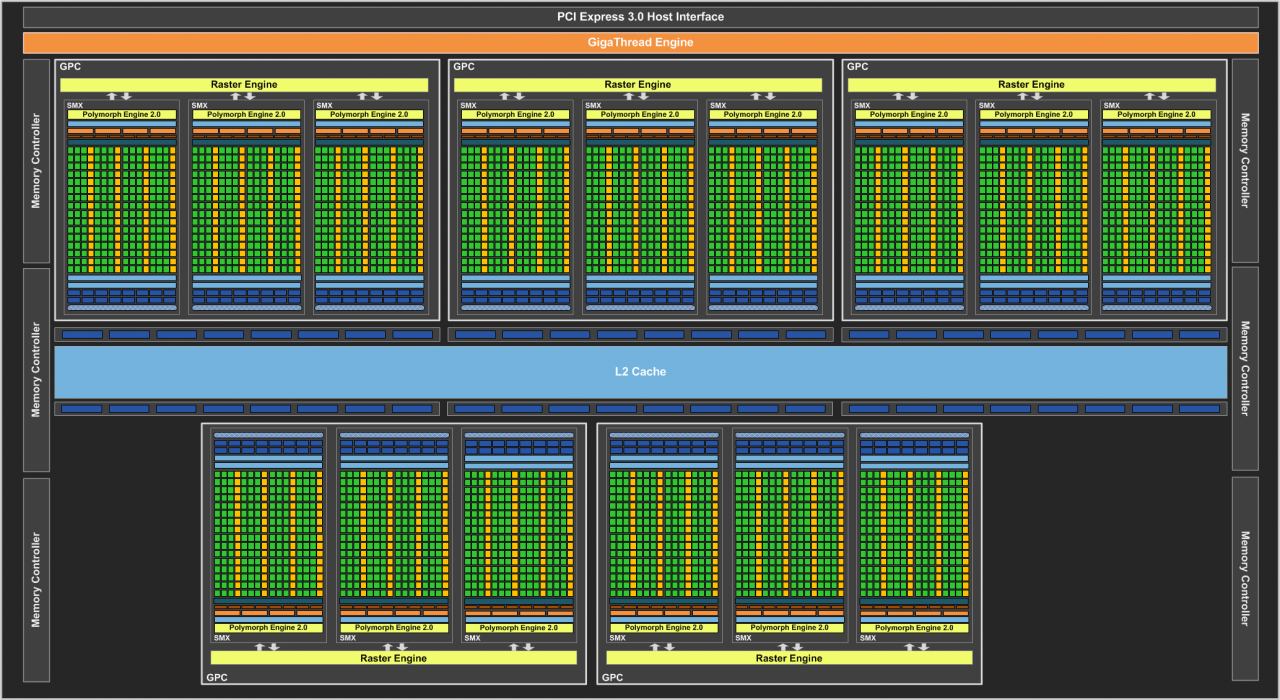
When it comes to the GPU the GK110 was originally employed on powerhouse server based processing systems designed for huge calculations and other ops where a GPU can provide huge performance. We first saw the GK110 as a consumer level part in the GTX TITAN, which was even still not the full GK110 you would see on a Tesla K20.
The GTX 780 sports GK110 that is just a little less than a TITAN as well; the TITAN will be the top end flagship single GPU card for the foreseeable future.
The GTX 780 from ASUS comes with a nice overclock but honestly it is a drop in the bucket to what I’m sure this card can actually do.
The ASUS GTX 780 DirectCU II OC comes to market at $669.99 directly from Newegg at the time of writing which is quite a surprise honestly since normally a DCII model card carries a price premium but there are quite a few models that are more expensive than this one. This means that from just the marketplace appearance this could be a definite value for those looking for a top end card, but lets take a look further as to what you get for this hefty price tag.
Top Features

Here you see a collaboration of the top performance features which make the DCII lineup the top cards when considering a GPU purchase.
New Aggressive Styling
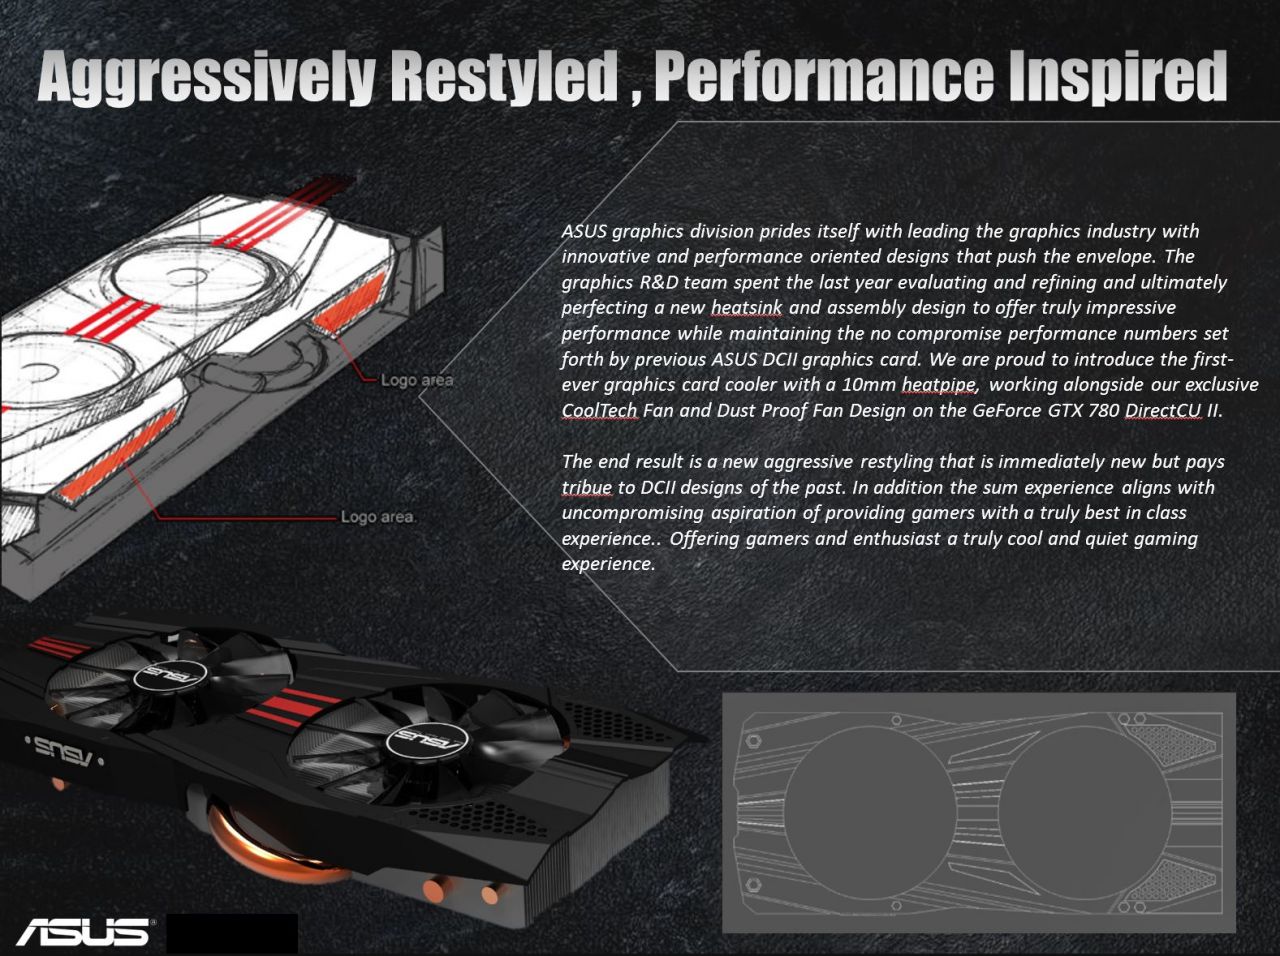
Here you can see how the design for the 780 goes from the initial artistic design to the finished product and how the emphasis while being on performance also always exudes a feeling of style when picking up a DirectCU model card.
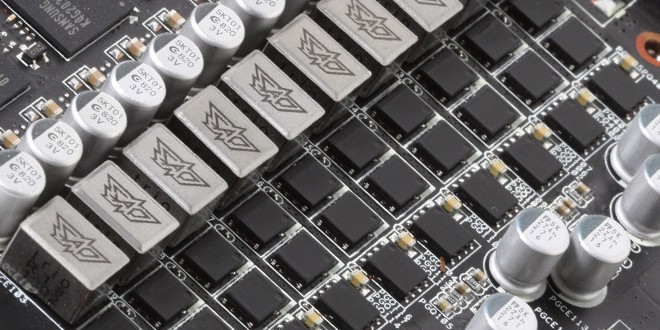
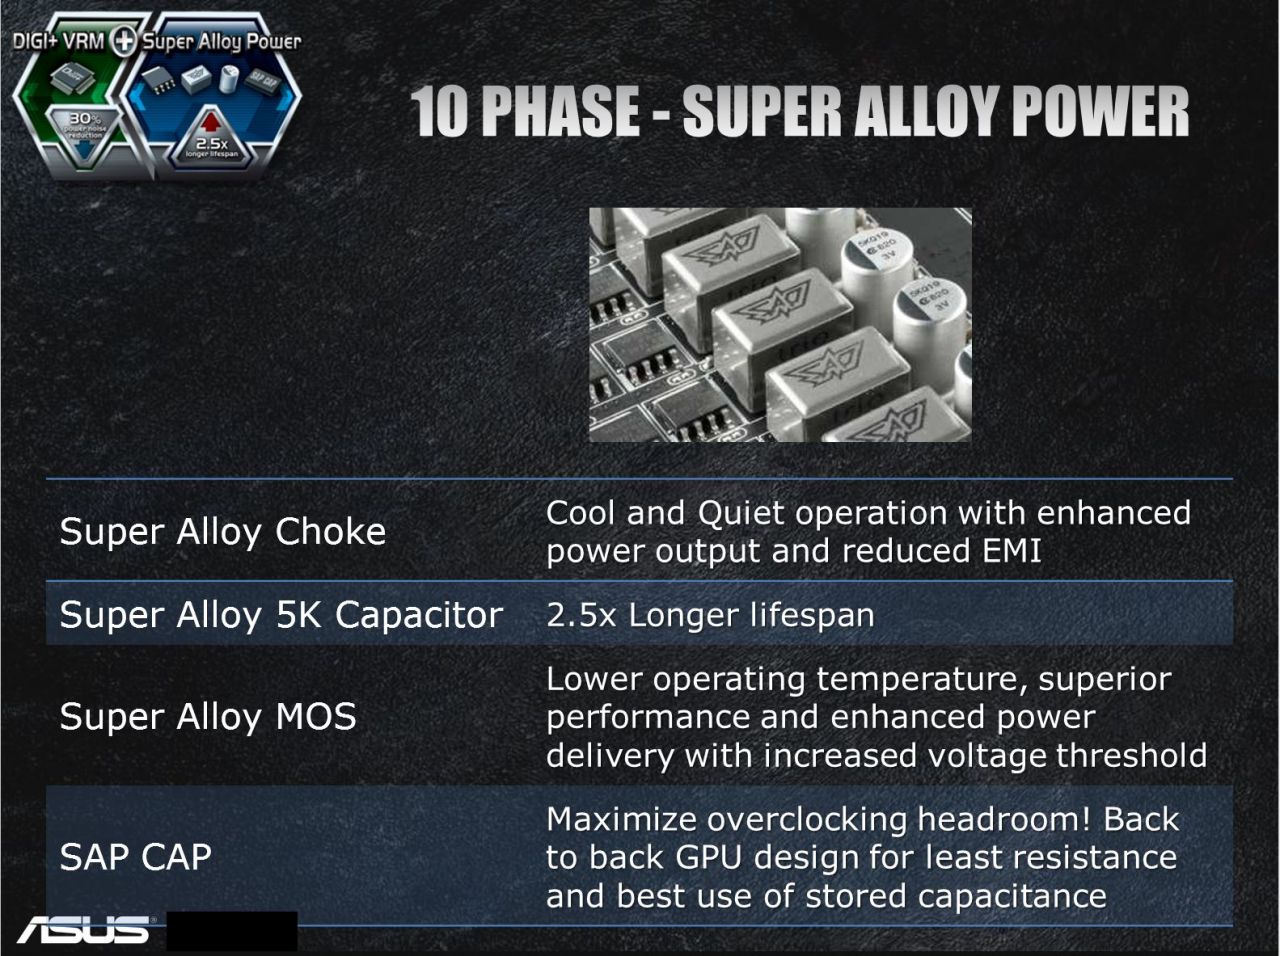
SAP (Super Alloy Power)

ASUS has great pride in the components they infuse into their graphics offerings, very much like the motherboards we have covered previously. ASUS has what’s called a SAP or Super Alloy Power, which covers the components in the very VRM we are discussing. The components are hand picked for quality and performance based around not only power delivery but efficiency as well. The components in the SAP solution are super durable for a rated lifespan of up to 2.5x what reference cards would offer.

Here we see the comparison of the reference model which has a 6 Phase VRM vs the DirectCU II OC model which employs the 8 Phase solution for enhanced power capability.
Here we see a short detailing of the SAP components and some short informational quips about how they help make for a better card. One thing here is that this is only the surface of what it is truly, as the SAP solution is a complete package of all of these components designed to work together giving not just higher power delivery than reference but also better voltage accuracy and efficiency through the digital voltage control and component selection and design.

Here is where you start to get some better detail of what each component is and what itt brings to the table so to speak. For instance the Inductors or Chokes as they are more widely known are selected for their ability to handle much higher power load while also maintaining much quieter operation as some hollow units or lower quality units you can get whats called inductor whine where when under varying loads you actually get anything from a buzz to a squeal from the unit.
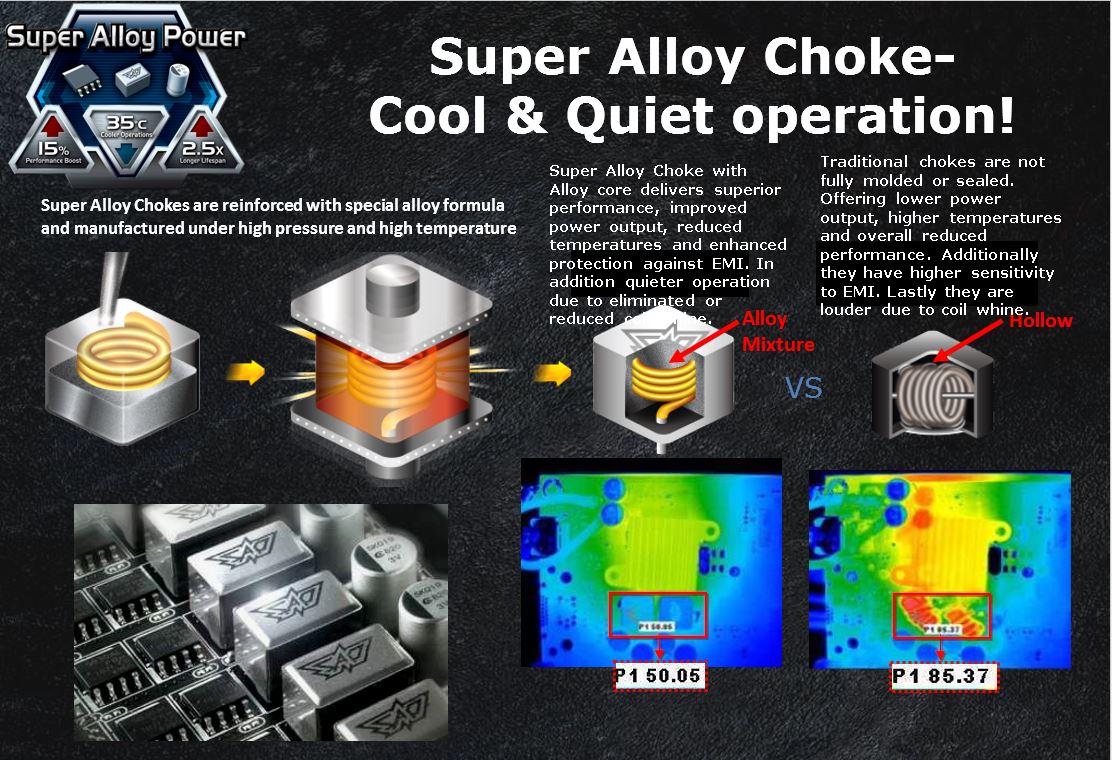
Here we have some good detailing directly from ASUS, showing the improvement of the SAP choke component and how it is superior to other designs implemented presently. Other model chokes can make a whine or screeching sound due to the coil vibration, something we’re sure many enthusiasts and overclockers have heard before. The ASUS design has a sealed/filled core to inhibit vibration, which means noise free operation under extreme loading conditions. Another thing to remember is movement makes heat and friction, so less movement will mean cooler running components.
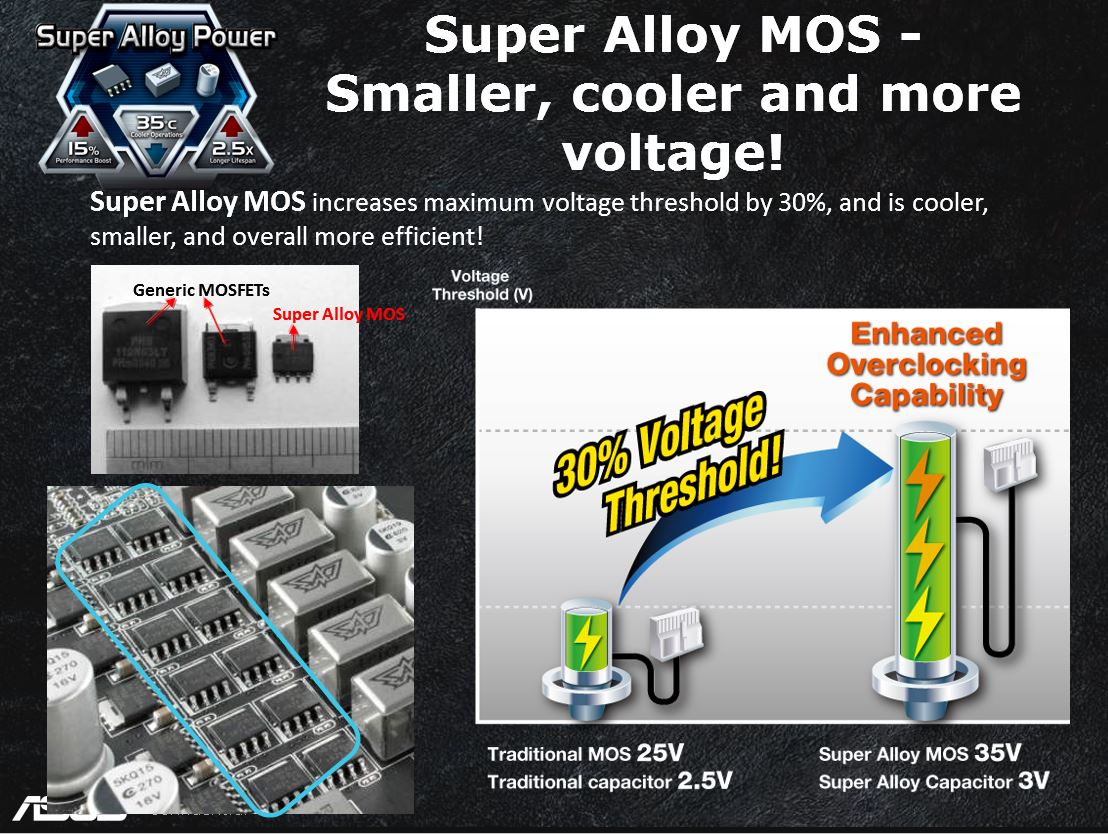
Here ASUS shows off its SAP selection for MOSFET components. These are designed to not only be more efficient but also have a higher power handling capability, which allows them to have extra head room for overclocking, should you really want to push the limit. Also note, the small package design of the SAP component as it is much smaller than the standard or generic MOSFET used on some standard or reference model cards. This allows for a larger VRM design to fit into a smaller space so that you can pack more punch without effecting the tight real estate within the chassis.
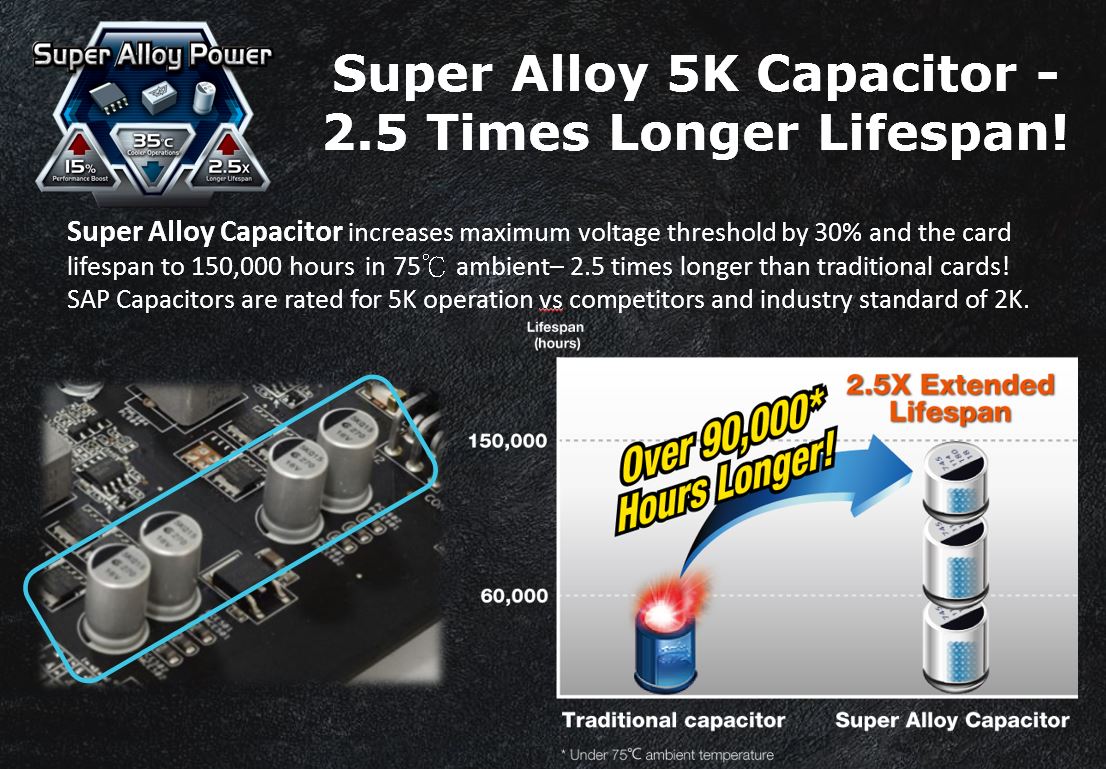
The SAP Solid state cap selection are Japanese units with a much higher MTBF than what you may see on other designs. These units are designed to have a very high expected lifetime, which allows users to rest assured that in their gaming rig with these components should have a nice happy life with a very low chance of failure for quite a long time (up to 2.5x as longer than competing components). For those of us that like to throttle our cards and really put the squeeze on them, this means we have the capability built in as the components are solid and reliable and ready to take a pounding.
DCII (Direct CU II)
![]()
ASUS DirectCU II coolers are the ASUS way of saying maximum cooling and plenty of quiet with one naming scheme. DirectCU II coolers are direct touch heatpipes to the GPU surface, ensuring the heat is wicked away from the GPU and up into the cooling fin array as quickly as possible. From there, the custom shrouded dual fans push air through the fins effectively but most important quietly to keep the GPU as cool as possible so hopefully it will never hit a temp to need a higher or noisier fan speed. The air pushing through the fin array also helps cool board components and the VRM as well, which is a nice little added bonus to this style cooler since we all know cooler components tend to run stronger, longer and with better efficiency.

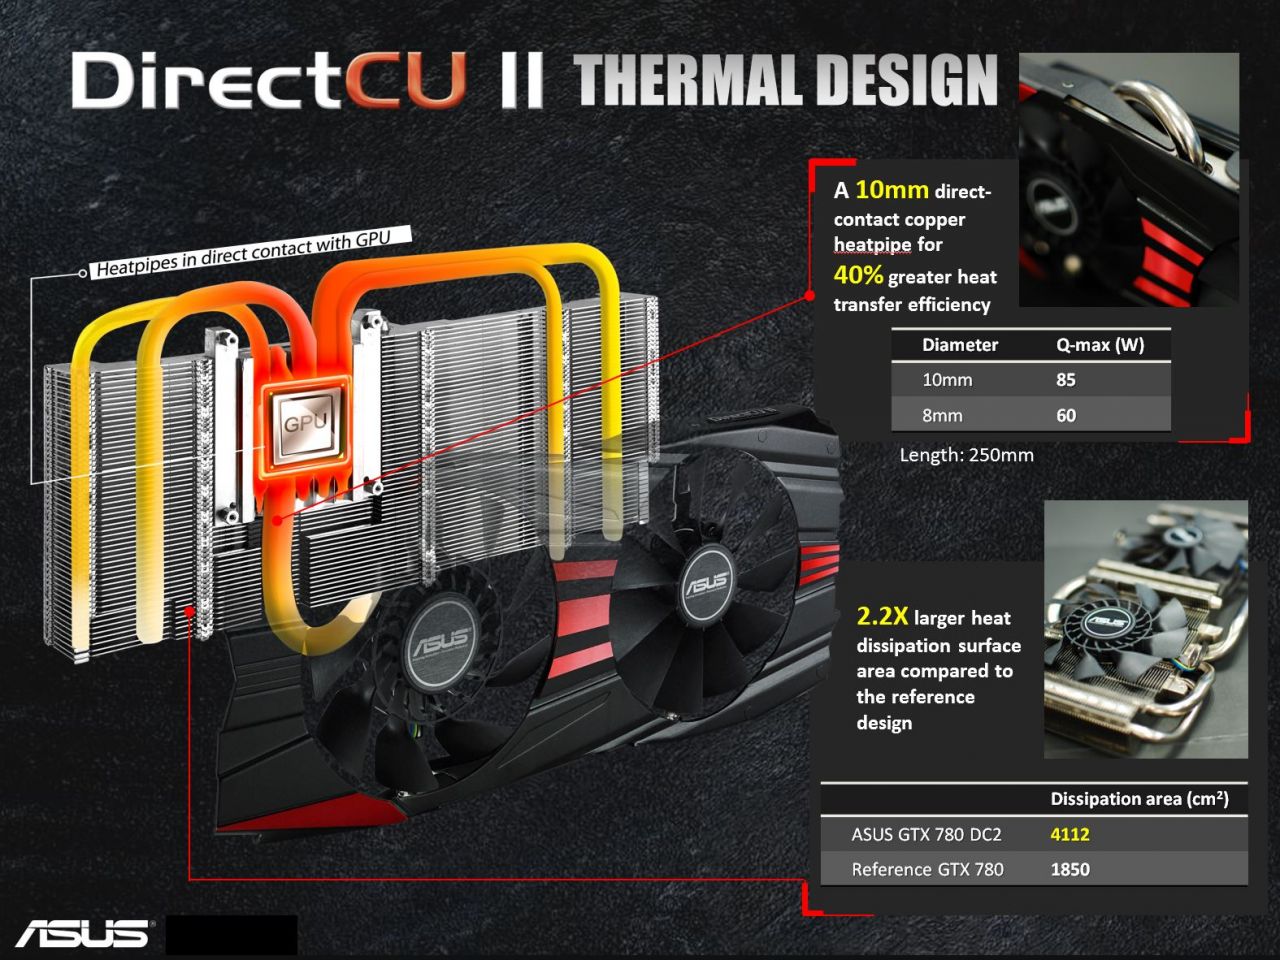
As you see above the heatpipes on this cooler come directly to the GPU and pull the heat to the large aluminum fin area where it can be dissipated to the outside air. One thing worth noting is that chassis airflow to some degree is needed to pull the air exhausted by this card out since it does exhaust most of its expelled heat into the chassis directly. Also do notice that on this card there is a special super large heatpipe coming up around the top at 10mm and this thing is massive and just goes to show how ASUS is trying to maximize the performance from an already proven cooler design.

Here you can see a stylized image courtesy of ASUS showing all of the layers that make up the DirectCU II cooling solution on the card. From the backplate to bracing to PCB to cooler and fans all of it was designed to work well with the others.
Dust proof Fan Technology
You would think that by now everyone would know that one of the number one killer of a fan is the dirt and dust it comes into contact with. Many fans simply are not sealed in such a way that it can keep dust out and in many cases they are not sealed at all, and you can see the sensitive winding area clearly exposed just by looking at the gap.
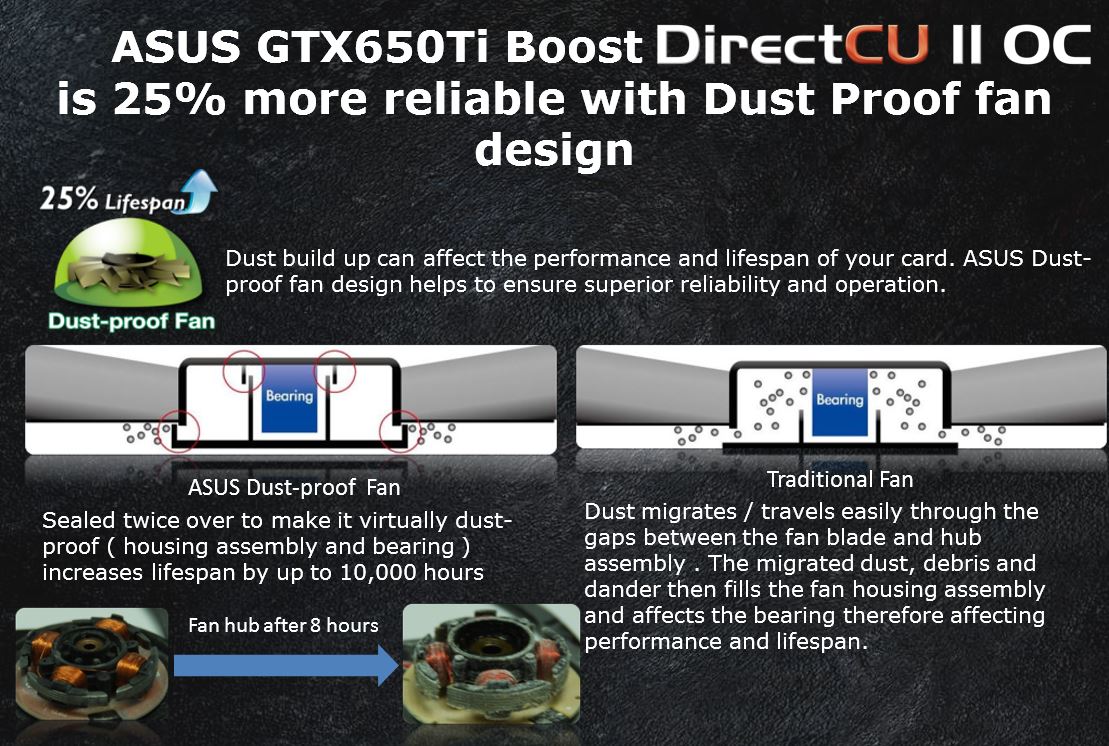
Here you can see that the ASUS solution is not just sealing the hub from dust but having 2 levels of sealing which means that over the lifespan of the cooler you can expect a much lower likelihood that you will get the grinding or simply the failing that you normally get from the unprotected fan as seen above.
We cannot count how many times we have had a perfectly good card or cooler just to have it become useless because the fan died.


Here is something pretty neat and I think ASUS deserves innovation points here is with the new Cooltech fan which from my internal discussions with them I have been told had been in development for over a year from working with it to real implementation of the unit. This fan is in essence a blower fan in the center like you have seen on reference Nvidia GPUs in the past up to present and the outer blades are flower shape blades so that you get not only the power of an axial fan but the blower as well. Thew blower fan shoots straight outward laterally while the flower blade fans tend to push air through it or down and in through the cooling grid. What this means is that now when the fan is sunk down into the cooling fin array you not only shoot air though the fins downward and onto the PCB and MOSFET components but you shoot air out laterally to utilize the cooling fin area next to the fan maximizing cooling potential.
I know some will ask why not use two of these fans so I asked ASUS and their answer was what I assumed already which is that dual blower fans will actually fight against each other as the lateral air will crash into each other and cause unnecessary noise and turbulence so therefor a single unit handles that cross-flow with a standard fan in the second position. As you can see from the ASUS supplied image with the “Rice Test” they test a standard curve bladed fan design vs the Cooltech and you can see the airflow power at same RPM and the results are excellent for the Cooltech model.
These are the kind of innovations I have come to expect from ASUS and to also clearly explain why it was done is what going the extra mile is all about.
GPU Tweak
![]()
ASUS offers its own software utility and its functionality has grown with generations just like the cards it supports. Of course the card can be overclocked but also voltages can be tweaked and within the GPU Tweak app, we can even launch the GPU info utility which is a full custom version of GPUz. This is a really cool feature and a benefit especially to benchmarkers, who we can definitely see using this card with some of the awesome tweaks we will discuss in the card overview.

There are many tools within the GPU Tweak menus some a little more hidden than others. First off directly form the GPU Tweak utility itself you can check for BIOS updates and even update from within the program. For anyone who’s ever updated a vBIOS before knows that having a tool that can do this in a mere few clicks is really handy.
The charts besides offering real time monitoring can also be setup to log thermals, voltages and clocks so that after benchmark or gaming runs you can see if there was any thermal issues or throttling that may have affected performance.
There is also a special ASUS skinned version of GPU-Z that can be accessed as seen above when pressing the “GPU Info” button.
PCI-E Power LEDs
One really cool feature is that there are status LED’s on each PCI-E connector and these help you recognize that power is actively being sent to each connector of the card. (Note: picture is for reference purposes only as the card reviewed today employs only a single PCIe connector and single red and green LEDs)
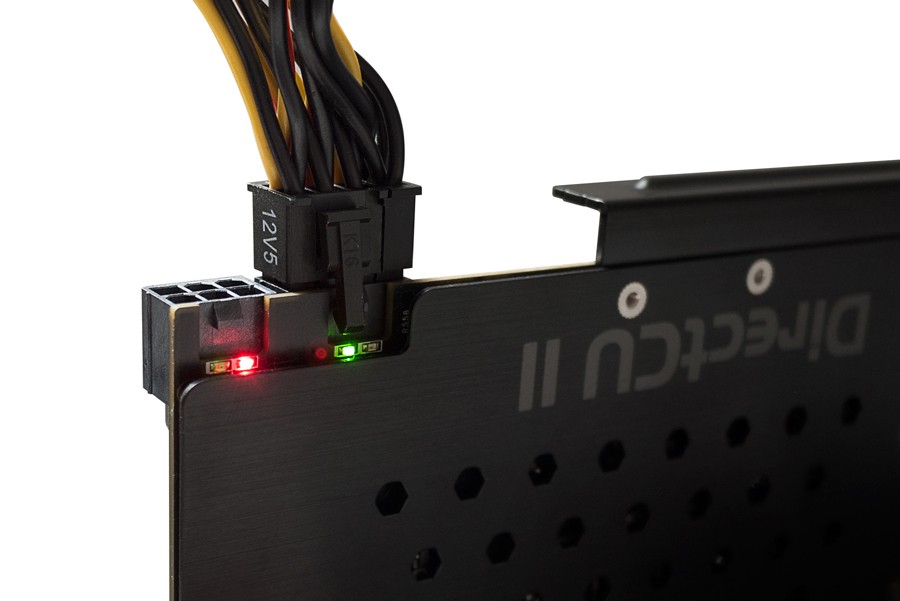
The dual greens seen above indicate everything is working well. However if the PCI-E cable is not active or is not installed at all, it will give you the red light which tells you something is wrong. We could definitely see some value in this when diagnosing multi card setups or even single card issues. A dead PCI-E power cable could cause you to pull your hair out without these kinds of indicators.
Existing Kepler features

GPU Boost 2.0 -Thermals
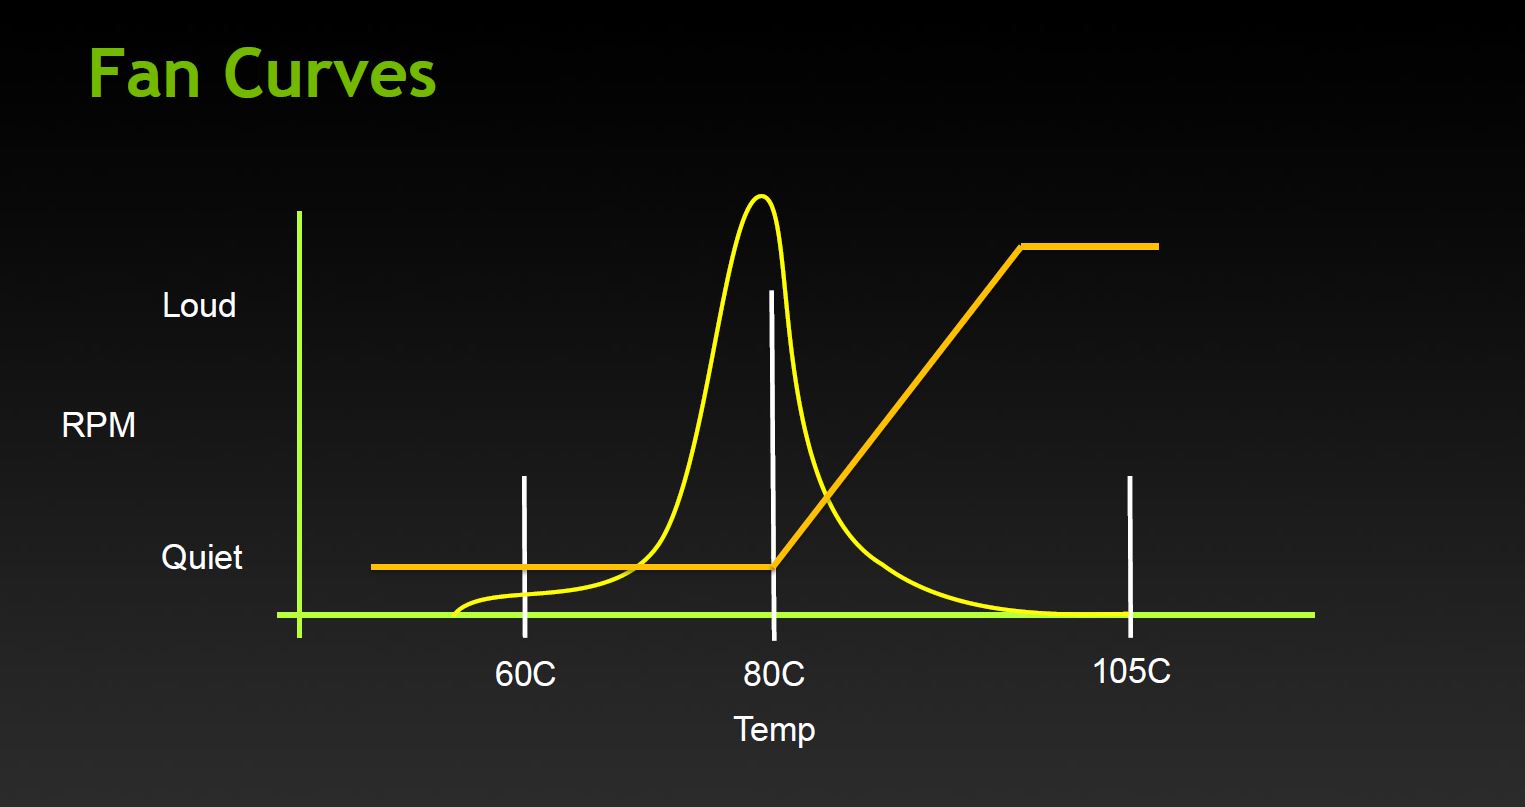
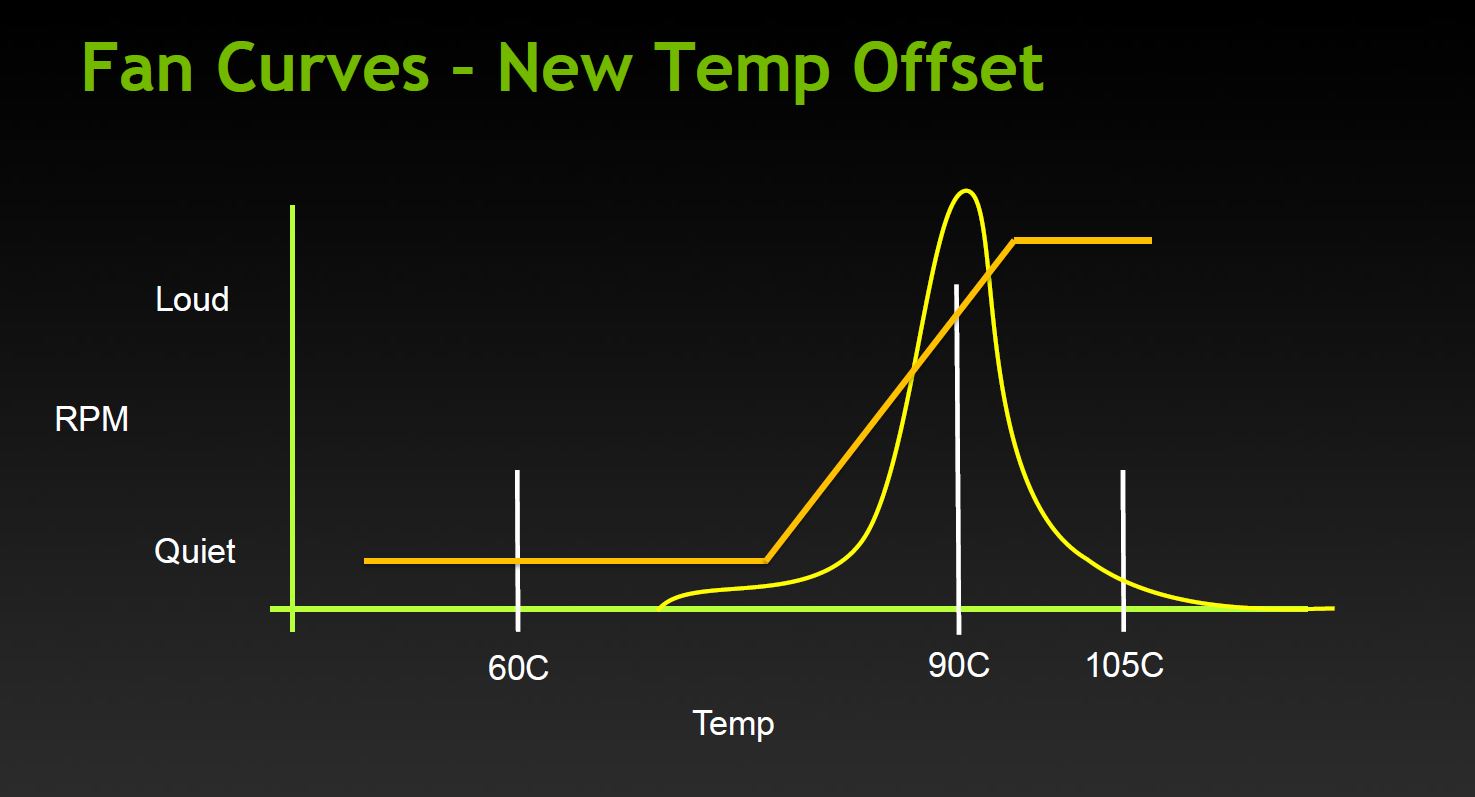


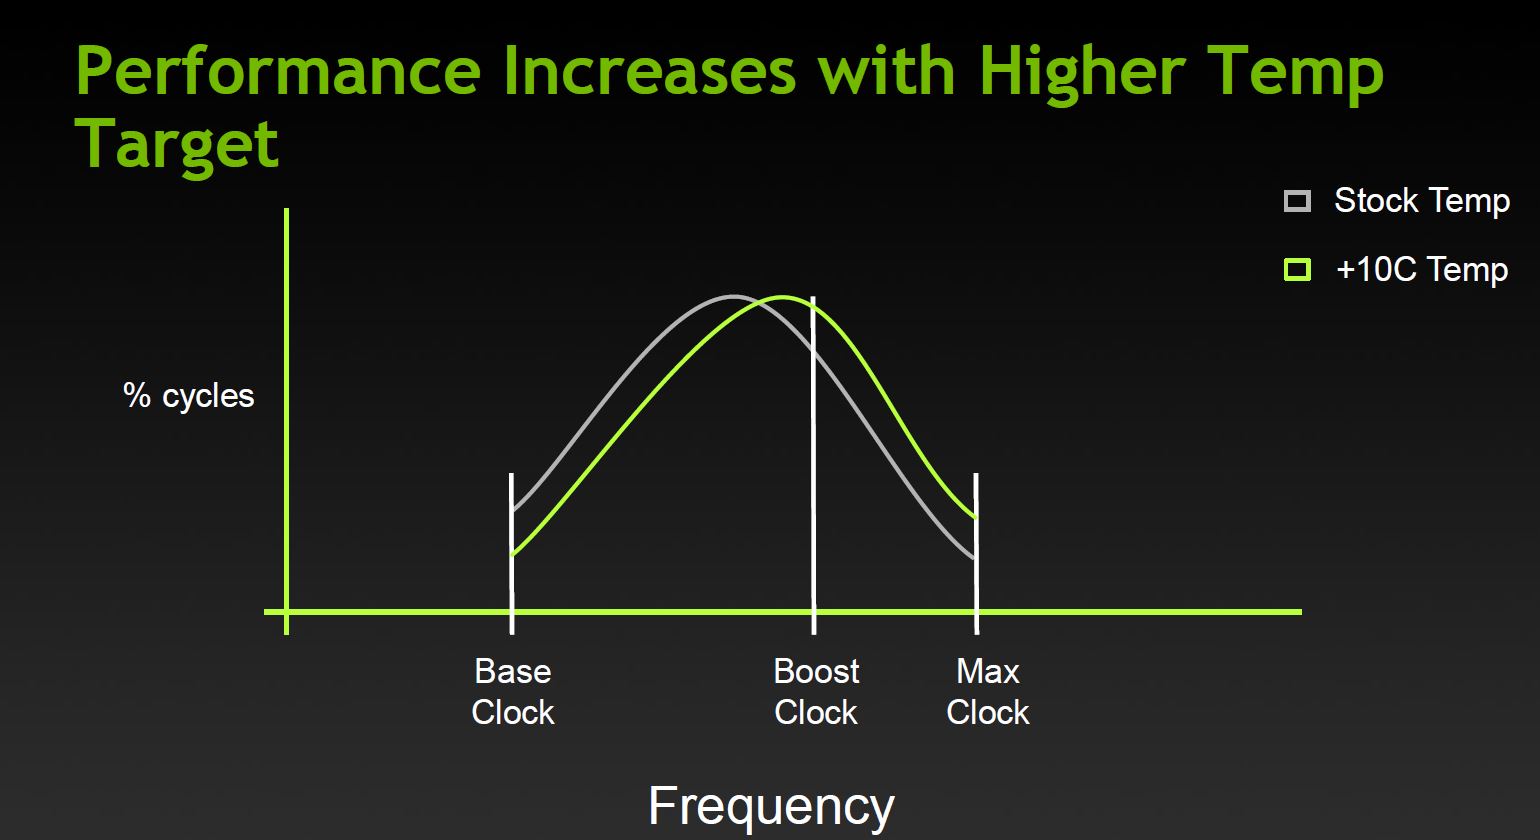
Just as we saw on the TITAN, and then the 780, the 700 series cards carry the new GPU Boost 2.0 which offers even more flexibility in overclocking and even more control over how your card runs. If you want it to only run at a max of a certain temp you simply set that in the thermal target of the EVGA precision utility and the card does the rest. However if you can live with some more heat there is potential for more performance by simply adjusting the frequency and thermal target up a little.
The GPU boosting function is controlled largely by the GPU temps, which by default means the GPU will boost volts and clocks up until the thermal target of 80 C is reached. What is nice about this is that the user can control the thermal target, so if you are fine with your card loading up to 90C, you can raise the target temp to allow for even more overclock and even voltage headroom.
GPU Boost 2.0 – Voltage
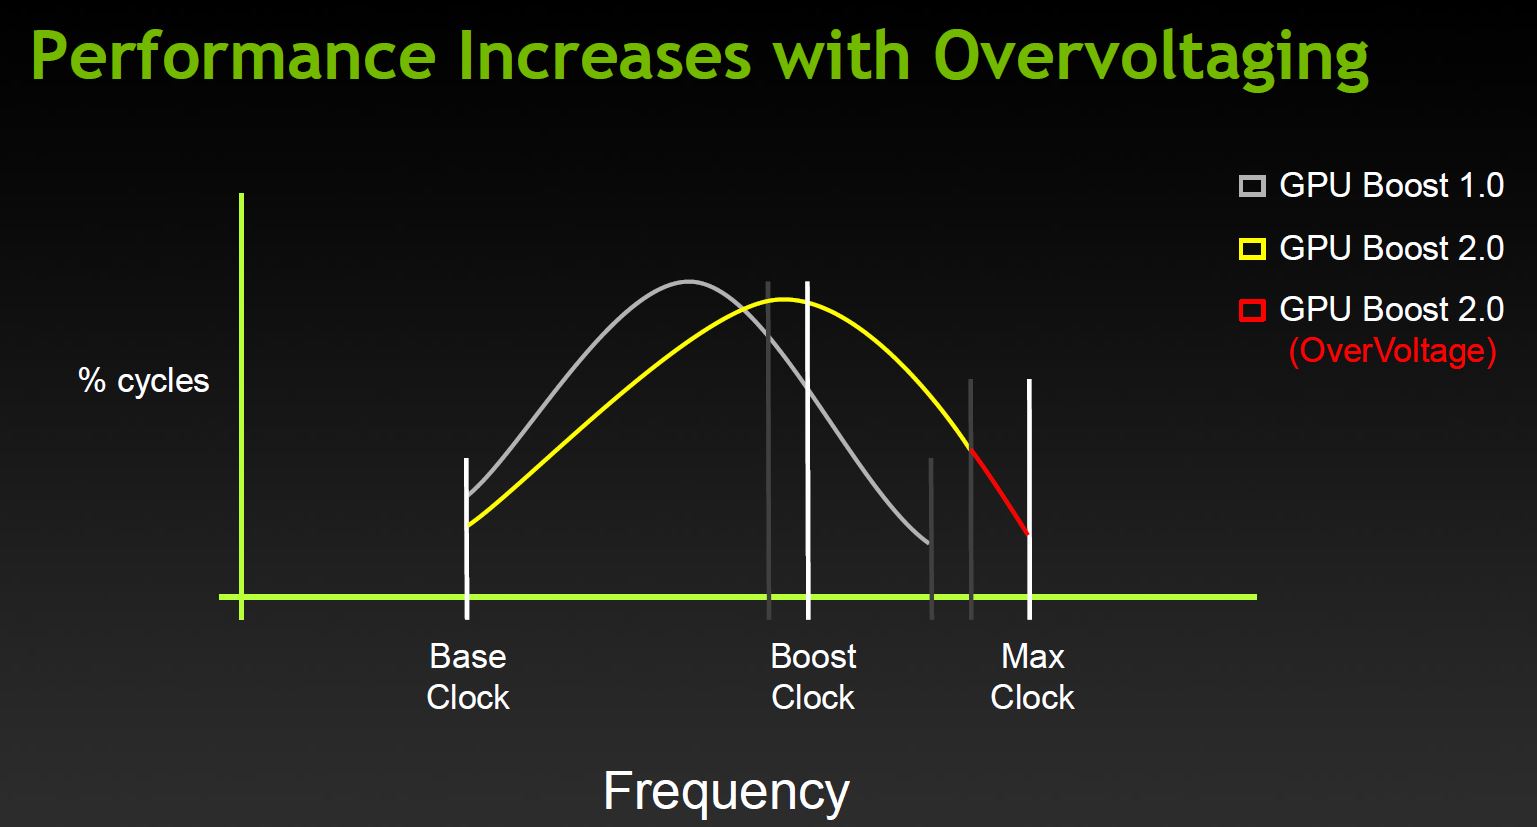
Nvidia has employed GPU boost for some time and in simple terms it allows the GPU to overclock itself in situations where there is extra thermal and voltage headroom to spare. This was quite a good feature, but clocks could in some cases be rather erratic and varied greatly depending upon operating environment. Nvidia introduced the newest iteration of the GPU boost feature in TITAN, including a new way to control your card. In the new version, boost clock and voltage levels are directly tied to GPU temps, and therefore voltages can be pushed higher than before. Previously, some GTX680 models did not have a lot of voltage control options. Nvidia corrected this oversight by opening up the GPU Boost 2.0 to enable higher overvoltage options. As you can see, you have the standard boost clock which can already go higher with the sliding scale of the thermal targets, and then you factor in the higher level overvoltage, leading to an amazing amount of headroom.
Nvidia Display Overclocking
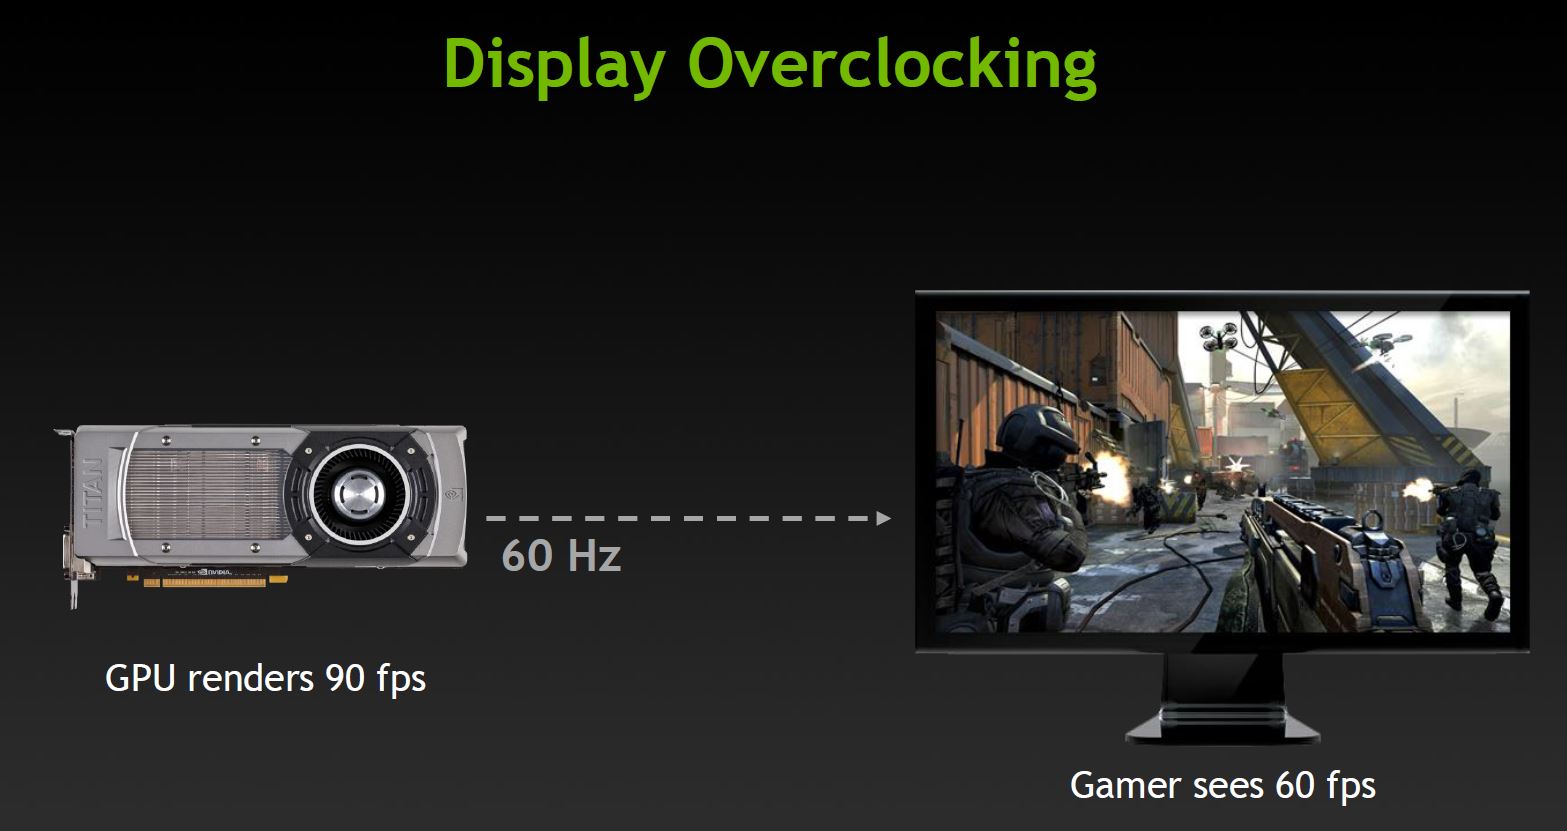
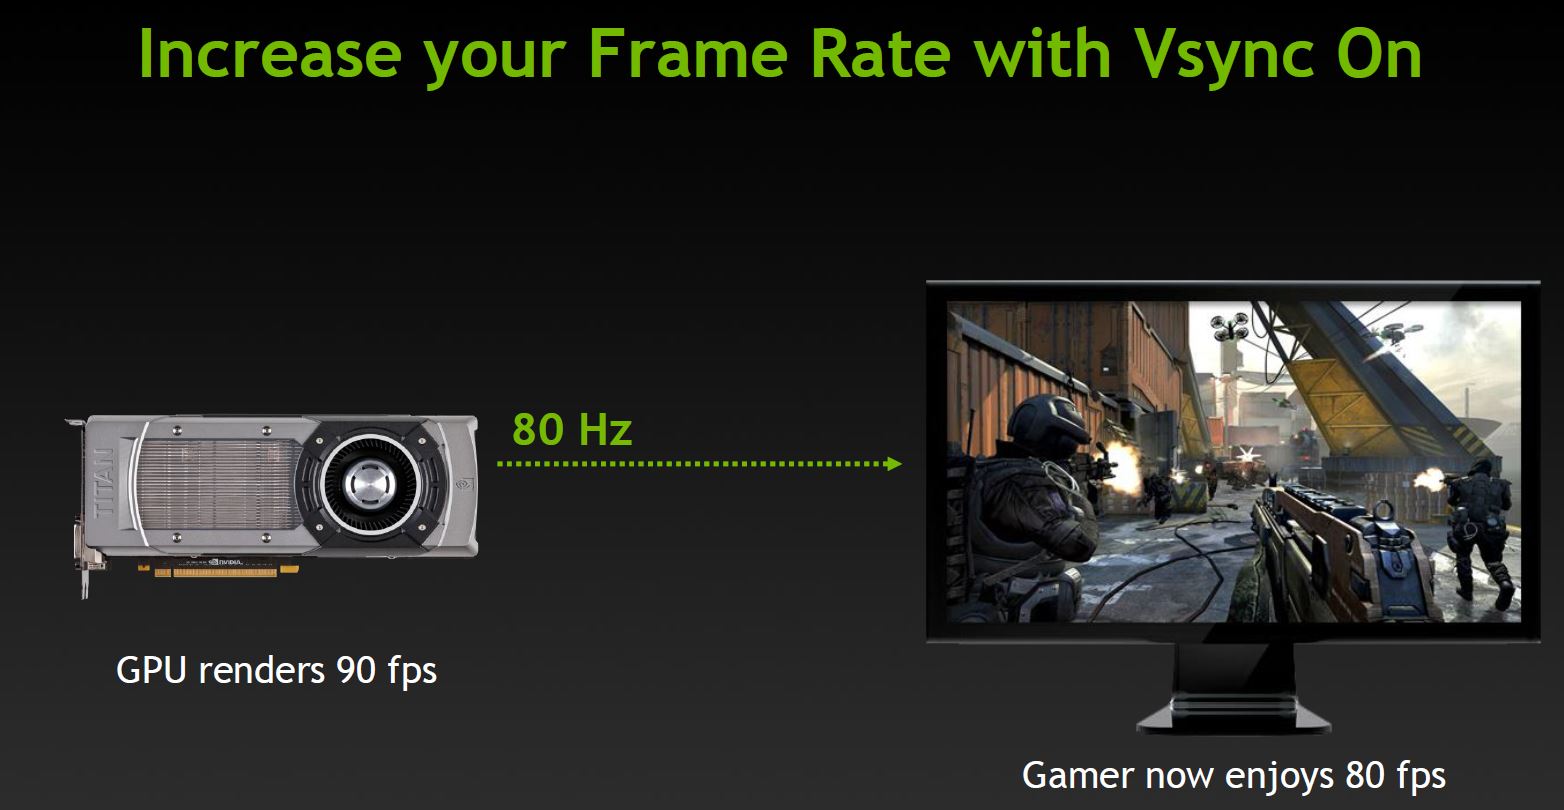
Another cool feature from Nvidia is the ability to overclock the display, which means you can push your display to higher refresh rates for even smoother performance from a display that normally may only be at 60Hz. One word of caution: not all displays will support the overclock, and there will likely be a limit as to how far they can be pushed so it will take a bit of trial and error to find where your display is happy at.
Video Encoding
Kepler features a dedicated H.264 video encoder called NVENC. Fermi’s video encoding was handled by the GPU’s array of CUDA cores. By having dedicated H.264 encoding circuitry, Kepler is able to reduce power consumption compared to Fermi. This is an important step for Nvidia as Intel’s Quick Sync has proven to be quite efficient at video encoding and the latest AMD HD 7000 Radeon cards also feature a new Video Codec Engine.
Nvidia lets the software manufacturers implement support for their new NVENC engine if they wish to. They can even choose to encode using both NVENC and CUDA in parallel. This is very similar to what AMD has done with the Video Codec Engine in Hybrid mode. By combining the dedicated engine with GPU, the NVENC should be much faster than CUDA and possibly even Quick Sync.
- Can encode full HD resolution (1080p) video up to 8x faster than real-time
- Support for H.264 Base, Main, and High Profile Level 4.1 (Blu-ray standard)
- Supports MVC (multiview Video Coding) for stereoscopic video
- Up to 4096×4096 encoding
According to NVIDIA, besides transcoding, NVENC will also be used in video editing, wireless display, and videoconferencing applications. NVIDIA has been working with the software manufacturers to provide the software support for NVENC. At launch, Cyberlink MediaExpresso will support NVENC, and Cyberlink PowerDirector and Arcsoft MediaConverter will also add support for NVENC later.
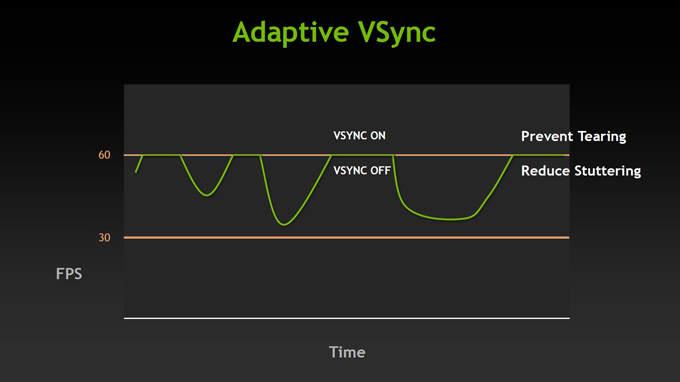
Adaptive VSync


Click on the Images to View a Larger Version
Improved Software Experience
Nvidia supplied us with some really cool software and also showed us some cool stuff that we can now show off to all of you!
GeForce Experience
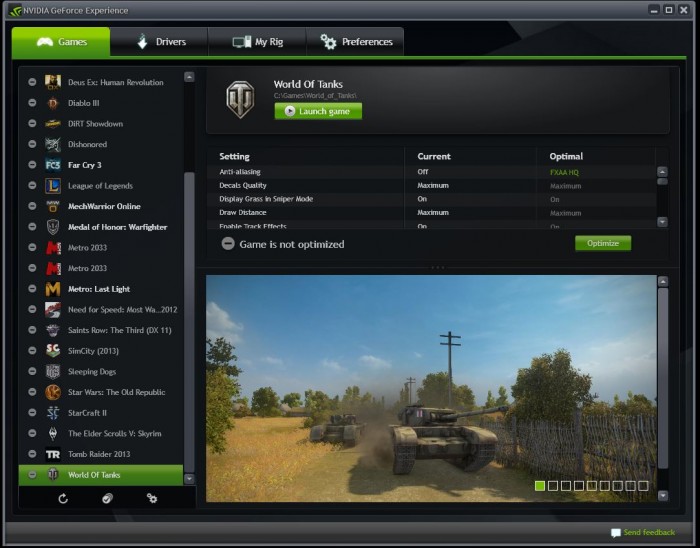

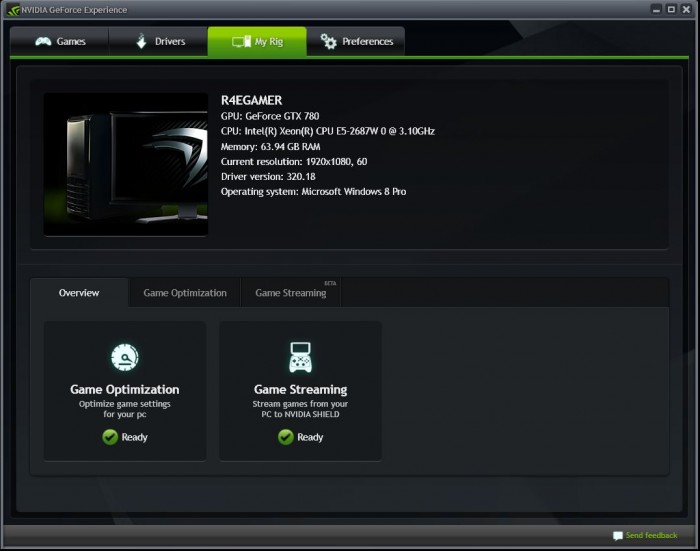

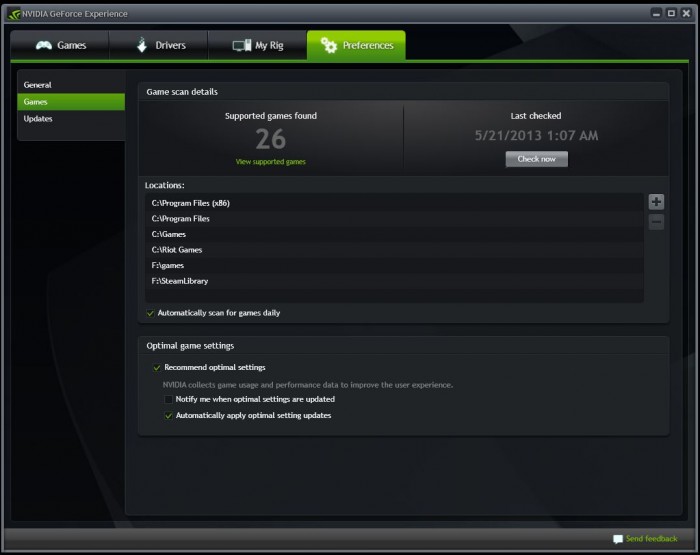

Here you can see the GeForce Experience program, which is actually a very cool free software for GeForce users. Once you install the program it will scan your system hardware and all installed games, and then optimize your game settings for the best experience.
This may not seem like much, but think of it this way: When you go in and just crank up the settings, are you really running the game the best that your system can? Most likely not. The GeForce Experience program is a better alternative to guessing which settings will provide a balance of performance and eye-candy. This automatically sets up your system to run well, so you don’t have to.
Do note that the GeForce Experience software has been out for BETA for some time, but as of now is moving into full user ready state.
GeForce Experience – Shadowplay

Many of us have used various different forms of recording software such as FRAPS to show our gameplay to the world. But anyone who has done this knows the limitations, as the files quickly get huge and can take up a lot of disk space very quickly.
Nvidia will be adding a feature to the GeForce Experience called ShadowPlay which is a game recording software but with a very special capability. It uses the NVENC native H.264 encoder on the Kepler based GPUs to encode the gameplay footage in real time so that the files are smaller right from the start and quality remains excellent.
The Shadowplay software is expected to be publicly available around summer 2013, so we figure a few months and we can give this thing a run.
Review Overview
Performance - 9.5
Value - 9.5
Quality - 10
Features - 9.5
Innovation - 9.5
9.6
The ASUS GTX 780 DCII OC is a top end card with plenty of attitude and aggressive style to wake up any gaming rig. For this it earns the Bjorn3D Golden Bear Award