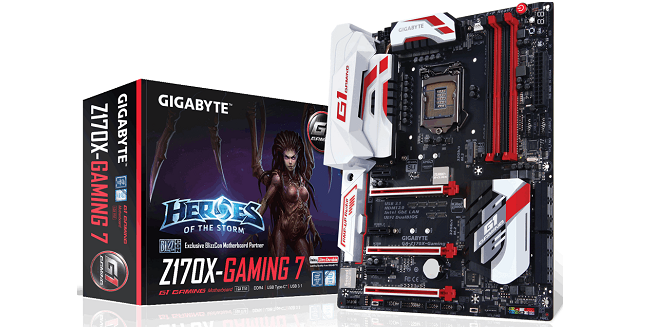
GIGABYTE Z170X Gaming 7
We just had the Gigabyte GA-Z170X-Gaming G1 flagship board on our test bench and the Gigabyte GA-Z170-Gaming 7 definitely shows it’s relationship with the Flagship Board. From a first glance it looks like the Gigabyte Z170X Gaming 7 didn’t get a PLX chip so graphics are going to be limited to a single cards at 16x, two cards will run at 8x 8x and you get 12 Digital power Phases on the CPU, one heatpipe on the heat sinks and no option to water cool the CPU area like the G! Flagship board.
Being a member of the G1 Gaming family the Gaming 7 still got a lot of enthusiast based hardware and the features on this board rival most boards unless you find one with the Rare PLX chip. The Gigabyte Z170X Gaming 7 was put forth as a more affordable offering of the G1 family but more affordable doesn’t mean GIGABYTE skimped on the extras or quality, they just had to step down a bit from the Monster Flagship we reviewed earlier in the month.
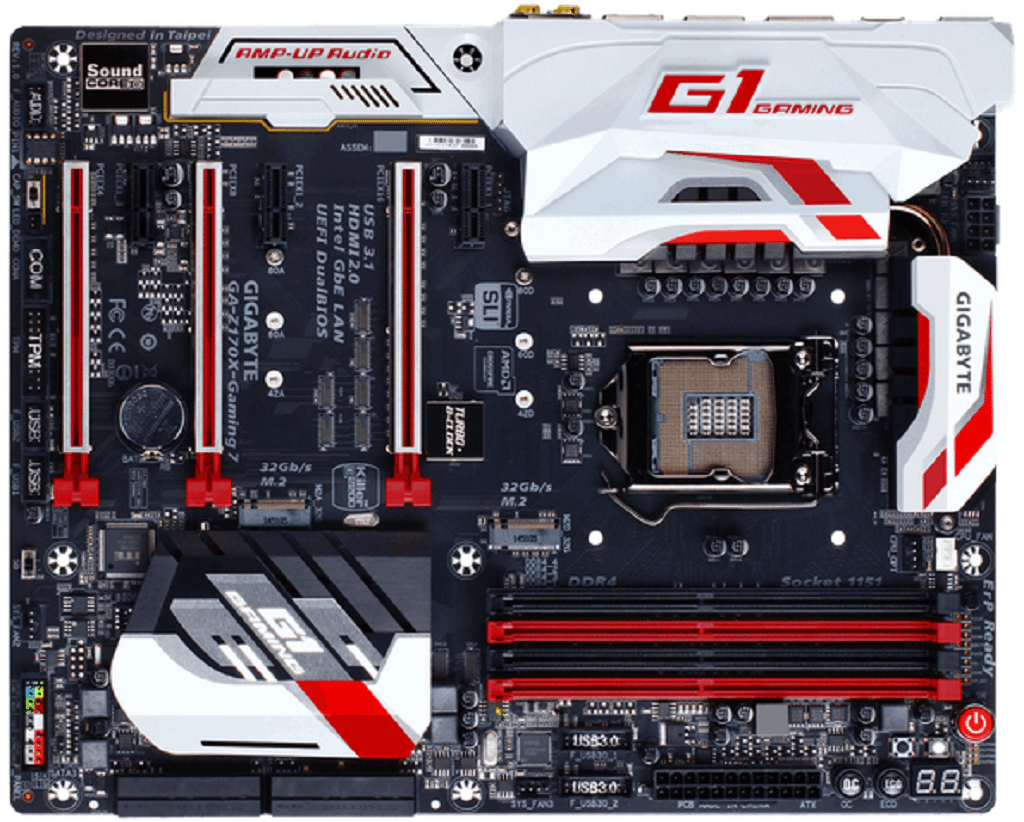
We prefer to get a picture of the board up before we get to far into the description of the board. The GIGABYTE G1 Z170X Gaming 7 is based on a black PCB with white and red accents. You can see the single heatpipe and slightly muted heatsink surrounding the 12 phase power circuitry. We’ll get a closer look a little later but notice the Power, Reset, Reset CMOS, Eco and OC buttons clustered in the bottom right hand corner. Those are a good indication that this board will be Geek Love at first boot.
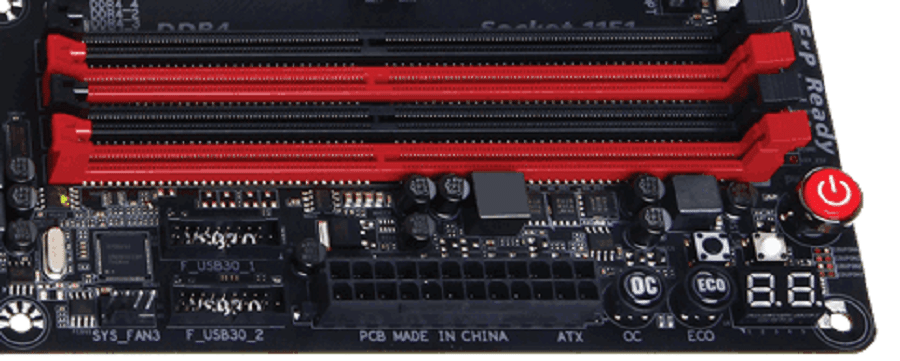
Getting a little closer to the 24 pin power connector area you get a good look at the red power button, white reset, black reset CMOS, Eco and OC Buttons. Gigabyte also put a post code block that we often call the double-digit debugger. Notice each memory channel gets its own power phase and each power phase serves two slots on the dual channel DDR4 memory slots. Then we see a 24 Pin PCI-E power connector, two USB 3.0 and a fan header.
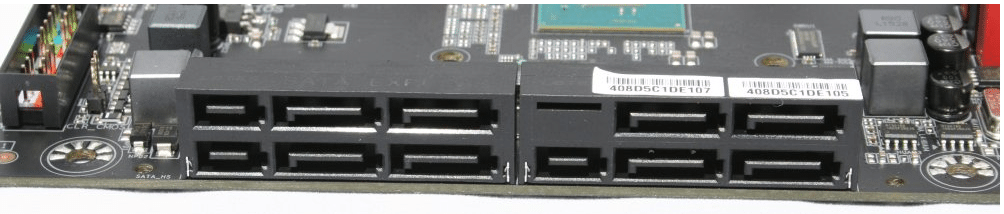
Unlike its big brother the Z170X Gaming 7 gets 8 sata ports and 6 invested in Sata Express while two additional ports are provided by an ASMedia (ports 6 / 7 top right) Chip.

Turning the corner from the Sata Express ports on the for right we have the front panel connectors 4 pin PWM connector a GB (Gain Boost audio either 2.5x or 6x amplification) Switch a couple of USB ports a TPM port and a com port. Wedged in there you also find a LED connector for the rear panel of the I / O plate and the upgradable Op-Amp amplifier.
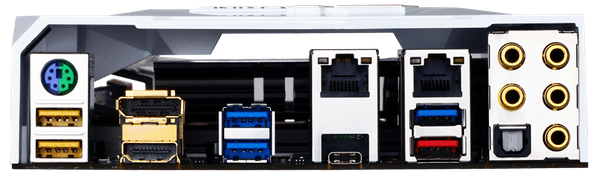
The Back I/O Panel left to right, a PS2 Keyboard / Mouse combo port, two yellow Dac Up USB 3.0 ports that have a dedicated (Discrete) power supply and much more voltage aware. Then the HDMI and Displayport On board Video for the Intel HD 530 IGP, two USB 3.0, a network port over the Type C USB 3.1 then a network port over a USB 3.0 and under it a Red USB Type A USB 3.1 then the Audio outputs but with a little gold plating on them and the Optical sound port.
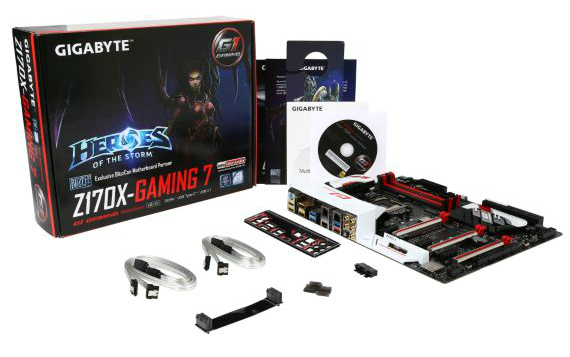
Here’s the lowdown on the bundle; Four Sata Cables, an SLI Bridge (Flexible), Dust covers for unused ports (3), Gigabyte front panel connector, Driver / Utility Disk, Manual, Quick Start Guide, and Heroes of the Storm Door hanger. We left the sweetest for the last, a LED I/O Panel.
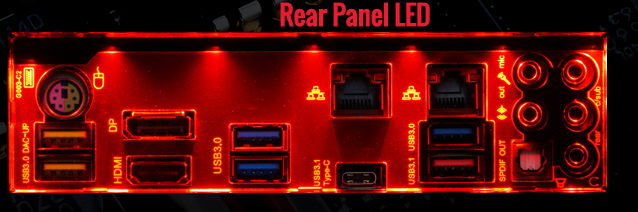
GIGABYTE addressed an ages old problem, the rear I/O panel Darkness problem. In their infinite wisdon GIGABYTE added a LED to the Rear I/O panel which both provides light and gives a little Bling to the rear of your gaming shrine.
Specifications & Features
| GIGABYTE Z170X Gaming 7 |
|||
| CPU |
(Please refer “CPU Support List” for more information.) |
||
| Chipset | Intel® Z170A Chipset |
||
| Memory |
(Please refer “Memory Support List” for more |
||
| Onboard Graphics |
|
||
| Audio |
|
||
| LAN |
|
||
| Expansion Slots |
|
||
| Multi-Graphics Technology |
Support for 3-Way/2-Way AMD CrossFire™ and 2-Way NVIDIA® SLI™ Technology |
||
| Storage Interface | Chipset:
ASMedia® ASM1061 chip:
|
||
| USB | Chipset:
Chipset+Renesas® USB 3.0 Hub:
Chipset+Intel® USB 3.1 Controller:
|
||
| Internal I/O Connectors |
|
||
| Back Panel Connectors |
|
||
| I/O Controller |
iTE® I/O Controller Chip |
||
| H/W Monitoring |
|
||
| BIOS |
|
||
| Unique Features |
|
||
| Form Factor | ATX Form Factor; 30.5cm x 24.4cm (12″ x 9.6″) |
||
A Specifications chart is fine and good but there are a few Specs and Features I would Like to cover more than just in a table.
Creative Sound Quad Core Processor
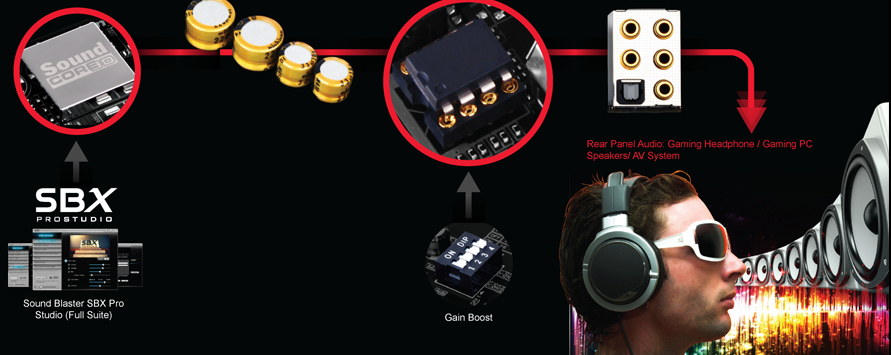
The audio GiGABYTE used is Creative Sound Quad Core Processor that helps take the Audio Load off the CPU. GIGABYTE thoughtfully used EMI shielding. Audio software is just about unparalleled with Creative SBX ProStudio Audio Suite the Creative Sound Blaster Core and the software provide an all-inclusive suite and at the very worst you need to add your fav music player. Op-AMPS (OPA2134 OP-AMP) is a GIGABYTE Exclusive and can be upgraded if the Amp doesn’t suit your needs. Fine Nichcion caps are included in the Audio setup. The Audio setup is separate from the rest of the boards electronics to produce the cleanest interference free sound possible. The Audio trace line is blinged up with programmable LED’s and you can select the color of your choice or effect you would like to use.
Creative SBX Pro Studio Audio Suite
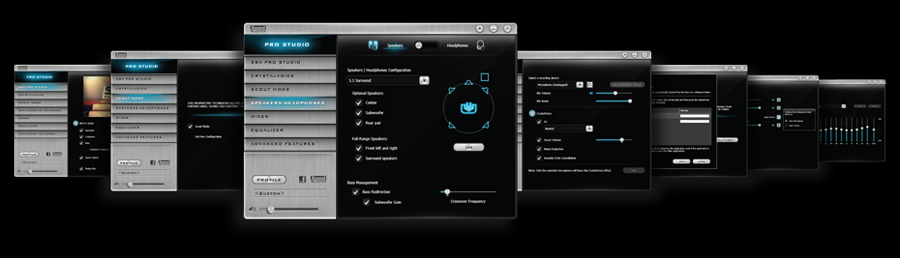
The SBX Pro Studio audio playback technology is capable of delivering a new level of audio immersion and control and is very much like a professional sound studio on your PC. To get the best use of the Suite there is a little learning curve but it can be used (for example) to draw out specific sound in your game like enemy footsteps approaching giving you an unheard of advantage. SBX Pro Studio can also be used to enhance your overall experience in music and sound recording.
GIGABYTE Exclusive: Upgradable OP-AMP
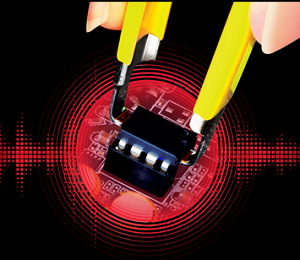 We touched on OP-AMP earlier and it’s a removable AMP setup and end users can select from a wide variety of additional Op Amps. You will need to use a chip pulling tool easily and inexpensively obtained online that allows you to lift each side of the chip simultaneously.
High End Audio Caps
 The GIGABYTE G1 Gaming motherboards all feature high-end NICHIcon Japanese Audio Capacitors. THe High Quality Fine Gold Nichicon audio capacitors are considered professional quality and deliver the highest level of sound resolution and expansion to create the most realistic and immersive sound experience possible for Pro Gamers (and us regular gamers).
Extreme Intel USB 3.1
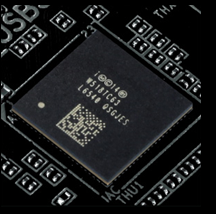 Of the outstanding features offered on the GIGABYTE G1 Gaming 7 the USB 3.1 is driven by an Intel USB 3.1 controller with 32Gb/s total bandwidth. Both type A and the reversible type C USB 3.1 ports are offered on the back panel (One each) Intel USB 3.1 is a 4 PCI-E lane chip using Gen 3 PCI-E lanes to provide 32Gb/s bandwidth and will deliver up to 10 Gb/s per USB 3.1 port. USB 3.1 offers double the bandwidth of the previous generation and backwards compatible with USB 3.0 and 2.0. Two flavors of connectors are driven by the chip a Type A which is the backwards compatible port and a Type C which is the reversible port and deemed “The future of USB connectivity”.
Industry Leading Ultra Durable PCI-E Metal Shielding
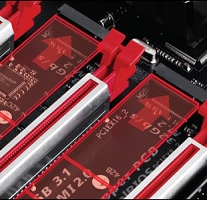 With GPU’s reaching the size of small passenger cars the GIGABYTE Z170X Gaming 7 features One Piece metal reinforcements on the PCI-E slots. The shielding of PCI-E slots is long overdue with some ginormous GPU’s reaching 29 and 30CM and weighing up to a couple of pounds or more. The One piece metal shielding offers 3.2x the snap off protection of unshielded PCI-E ports. We’ve never had a slot break but it would surly be a catastrophic event and placing a high-end GTX 980 Ti in an unprotected slot is a bit daunting.
Dual NIC Killer Ethernet E 2400
 For Gaming the GIGABYTE Z170X is well equipped with DUAL NIC Killer E2400 (Qualcom Atheros) and an Intel GBE NIC. This design is specifically aimed at the PC Gaming world and recent press decks from Intel has emphasized that gaming is the driving force behind a lot of the development of PC hardware. At Bjorn3D we have always known and been advocates of gaming level hardware in PC’s. If a PC can handle gaming chances are it can handle anything else you happen to need to use it for, gaming is one of the most demanding total system usage applications a PC will see. The NIC setup on the GIGABYTE Z170X Gaming & is set up so you can prioritize network gaming traffic. Now we realize that ideally your gaming shrine sets right on top your router and you only use a wired gaming connection. That’s just not real world and in a lot of cases gaming is a WI-Fi affair so how much use you get out of the high-end NIC’s depends on if the NIC connections sits close enough to your gaming shrine.
Turbo B-Clock
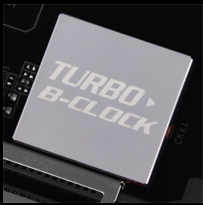 The Z170X chipset allows you to adjust BCLK without affecting your PCI-E and DMI so BCLK “Straps” are a thing of the past on the emerging SOC (System On Chip) design we’ve seen Intel moving to. Back in the LGA 775 day you could adjust BCLK 1MHz at a time on your E6400 Core2Duo, that feature is back on Skylake and the Z170 chipset. The net effect is you have a much finer (granular) control over your Ram and CPU clock speeds. Along with the BCLK surgery there are now 3 main lines that feed voltage to the CPU, Vcore, VCCIO and System Agent. Typically the Auto settings are enough according to the literature we’ve been supplied, but we find much more stable and responsive (OCing) system by starting VCCIO and System agent at 1.1v and moving it up as we reach extreme speeds. Even at UBER high Ram speeds (3600) you shouldn’t need more than 1.2v on VCCIO and System agent as most COU chips will handle 3600MHz at those voltages. The entire setup is more Overclocker friendly, less complicated and offers better exotic cooling OCing. To further enhance your BCLK fun GIGABYTE has added Turbo B-Clock which extends your B-Clock adjustments to 90 – 200. Non-K Series Intel 1151 chips can enjoy a larger OCing range, and the K series unlocked processor chips the Sky(Lakes) is the limit.
Sata-Express
 The Sata Express setup is a total of 8 ports with 6 invested in Sata Express and 2 additional ports provided by an ASMedia controller. The advantage of Sata Express is it uses PCI-E bandwidth to bypass the 6Gbps limit and Sata Express can garner up to 16GB/s. We are hoping to see Sata Express drives released soon so we can fill the plethora of Sata Express ports on the assorted boards we have. The downside is that even though Sata Express includes greater bandwidth it’s also using the current currency of speed and nibbling away at your PCI-E lanes. With Limited PCI-E lanes on Skylake you need to choose wisely what devices you allow to chow down on your PCI-E.
Dac Up
 The function a lot of people are least familiar with is DAC up USB ports, DAC UP ports use a discrete (separate) power line to get a cleaner USB signal when a device is attached to the Dac Up ports. The Dac Up ports on the GIGABYTE Z170X Gaming 7 are yellow and positioned below the Keyboard / Mouse PS2 port.
15 Micron Thick Gold Plated CPU Socket
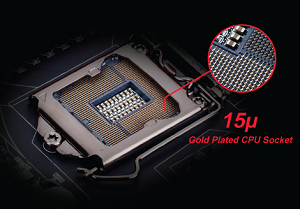 GIGABYTE went the extra (Golden) mile and put a 15 Micron thick coating of Gold on the CPU socket which will ensure a better corrosion free connection. The coating should deliver a longer more reliable lifespan for your CPU and Socket. There’s Gold in them there sockets and while GIGABYTE could have gone a different direction the additional TLC they gave the CPU socket just shows their commitment to quality and end-user longevity.
EasyTune
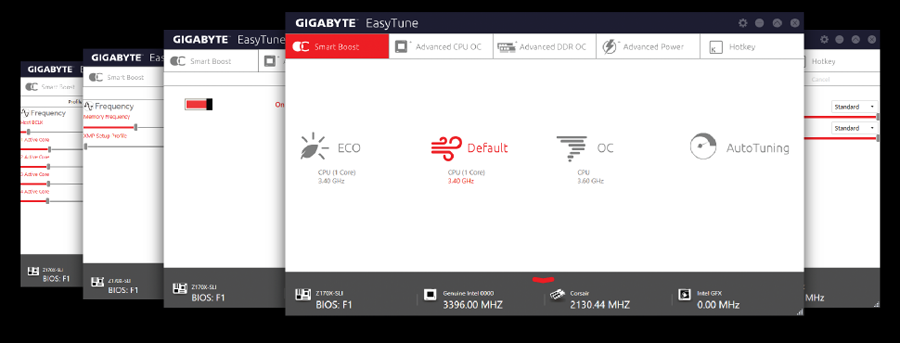
EasyTune is Gigabytes in Windows software Overclocker that has a plethora of features. You can one Click boost a mild OC, you can Auto Tune for a pretty decent Auto Overclock, and you can manually OC inside Windows GUI. Now bark at software OCers if you must but EasyTune is a good solid way to Software OC and if your a bit new to OCing you can record the settings and go into BIOS and manualy set the settings helping you get used to the new OCing setup on Skylake, We OC a multitude of hardware on a daily basis and EasyTune smoothed out the learning curve and put us on the Glory Trail to OCing Syylake fast.
Cloud Station
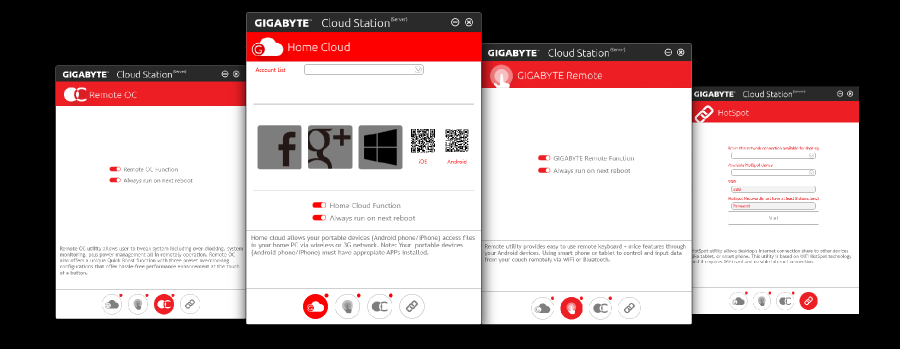
Cloud Station gives you the ability to turn your PC into a personal Cloud accessible from and WI-FI capable device. As well as Cloud capable capacity you can also share resources and control your PC from capable mobile devices. We realize Cloud Station has some interesting uses but a small inexpensive WI-FI hard drive is probably more of a go to solution than leaving your PC on 24/7.
Motherboards have gotten so feature rich that it is near impossible to cover them in their entirety so if you want to gander more at the Geek candy features surf on over to the GIGABYTE Z170X Gaming 7 page after you’ve perused the rest of the review.


Hey! Great Info. I just got one. Running on 360 Predator AIO.
You mention,
” We played with the cache speeds keeping them at 4.1 and setting them equal to the CPU speed. ”
Where on earth are you setting that in the BIOS? I can find nothing for cache speeds?!
Thanks for any clarification
I am wishing I had spent more and had gone with ASUS. Lots of weird power-related and graphics-related glitches with the Gaming 7. I think I finally solved the problem of the computer restarting itself every time I shut it down. Sometimes the machine turns itself off when it’s supposed to be in standby. I use the onboard graphics, and sometimes only one of my two monitors will display anything when coming out of standby, starting up, etc. You’d think getting basic power and display functions right would be important. Hopefully BIOS updates will solve some of these issue, but I’m not terribly optimistic about that happening.
The feature list is really nice, and I really wanted the native Thunderbolt support, but I wish I had chosen differently.
Excellent in depth review which made my mind up to by this motherboard over the Asus Hero motherboard… and yes I made the right decision… Excellent straight out of the box. The sound is exceptional with the Soundblaster 3d sound and the OP AMP feature. The intel based 3.1 USB controller also makes a difference. I have used a Samsung SM951 M.2 NVme SSD with is nothing short of incredible.
Looks are subjective but I liked the white and red theme. The metal shroud over the PCIE slots actually make a difference by keeping my Palit 1070 straight…no sag at all.
Overclocking was a breeze with 4.5 achieved without even trying… will go further later. Overall a well priced high spec z170x motherboard… I would recommend this to anyone who wants something a little different from Asus with a bit more value for the money..