Zalman’s new CNPS 9300 AT CPU cooler may have more fins than an aquarium, but will its slick design come together swimmingly to drown your heat problems?
INTRODUCTION
It’s tough to create a new fan and heatsink combo that stands out in the water-based world of high-end PC cooling. Modern fans still have a lot of huff and puff, but they are no match for new, silent radiators that completely immerse components in a low-temperature environment.
The beauty of the fan and heatsink is in its simplicity, and these easy-to-install solutions offer users a nice performance bump without a big commitment. There’s no doubt that water cooling is a formidable project. Chances are, if you haven’t already gotten your feet wet, you’re going to need a whole new case or some clever mods on the one you’ve got now. Taking the time to properly plan the whole thing out is enough to drive would-be overclockers back to their trusty fans and keep the air-based units blowing in from diverse manufacturers.
Although the market for these products is solid, true innovations are few and far between because no matter how clever CPU cooler designers get, there is always a fundamental return to the two principles of size and shape.
The Korean-based PC cooling veteran Zalman Tech gets pretty ambitious within this formula and brings tried and true concepts together with the appealing design of the CNPS-9300 AT.
About Zalman

Zalman Tech co., Ltd. was founded in 1999 and introduced to the computer industry the concept of “Noiseless computing.” In a world filled with noisy computers, “silent” cooling solutions were sought everywhere and contributed to Zalman’s rapid growth into the world’s leader of high performance, ultra quiet PC cooling solutions.
Zalman continues to lead in the industry through decisive R&D investments, peerless craftsmanship, intensive global marketing, and generous customer support.
Business diversification with innovation such as 2D/3D Convertible LCD Monitors, Heatpipe Cooled Power Supplies, Notebook Coolers, Surround Sound & Dual Stereo Headphones, and FPS GUN™ Gaming Interface holds true to Zalman’s promise to provide “Cool Innovations.”
SPECIFICATIONS
Here’s the spec breakdown on the Zalman CNPS-9300 AT:
| FHS | |
| Dimensions | 61.35(L) x 108(W) x 132.5(H) mm |
| Weight | 407g |
| Base Material | Pure Copper & Pure Aluminum |
| Dissipation Area | 2,583㎠ |
| FAN | |
| Bearing Type | Superflo |
| Speed | 1,500rpm ± 15 % ~ 2,400rpm ± 10 % |
| Noise Level | 20.0dBA ~ 30.0dBA ± 10% |
| Control Method | PWM Control, Auto Restart |
| Life Expectancy | 50,000 hours |

FEATURES
- Does not generate noise or vibration in Silent Mode.
- Compatible with all Intel Socket 775 based Single, Dual, and Quad Core CPUs, and all AMD Socket AM2+, AM2, 754, 939, 940 based Single, Dual, and Quad Core CPUs.
- 100% copper heatsink with aerodynamically optimized “tunnel” design for maximum cooling efficiency.
- Patented “Figure 8” heatpipe design for cooling performance of up to four heatpipes with the use of just two.
- Low-noise 92mm PWM fan for automatic control of the fan’s RPM according to the CPU’s temperature.
Let’s look at the CNPS-9300 up close and feel out its build quality.
FIRST IMPRESSIONS
The Box
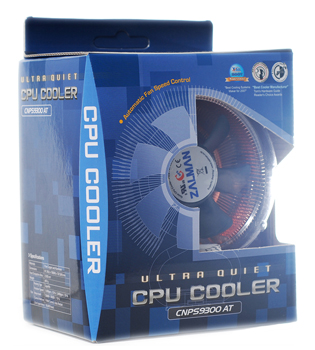
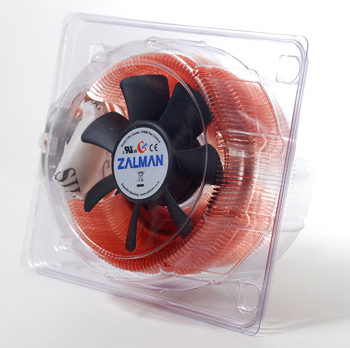
The packaging is pretty minimal but gets the unit from the manufacturer to your desktop without excess waste. Zalman runs the typical clamshell-in-cardboard box routine for the CNPS-9300 AT, calling out selling points on the back. It looks like they’ve got their CAD mockup printed on the front with a nifty cutout that displays the heatsink itself as if it’s an extension of the graphic.
The Bundle
In the box, Zalman includes:
- One (1) Large Marge CNPS 9300 AT Cooler
- One (1) Tube of Thermal Grease
- One (1) “Clip” (as they so 13371y refer to it in the product documentation)
- One (1) Lever for said “Clip”
- One (1) User’s Manual (written in English and Korean)
- Four (4) Clip Support Fixing Bolts
- One (1) Clip Support for Socket 775
- One (1) Backplate for Socket 775
- One (1) Clip (S-Type)
- Four (4) Bolts for Installing the Cooler
- One (1) Big Z Case Badge

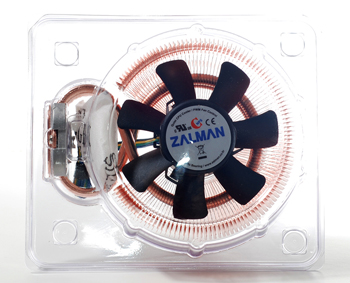
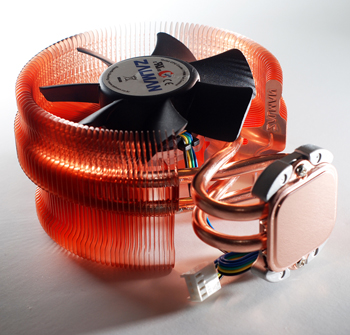
The CNPS-9300 AT
There is ample workmanship here. The heatsink quality is quite pleasing and if you rake your finger over the fins like you’re shuffling a deck of cards you’ll get a satisfying “Thrrrraaaaaanggg” that doesn’t feel flimsy. The single, 92mm Zalman fan be spinnin’ on quality “Superflo” bearings and the unit is heavy enough to raise a question about where the mounting support will come from.
(Oh. An under-the-motherboard support bracket. Cool. I was hoping it would be necessary to pull everything out of the case.)
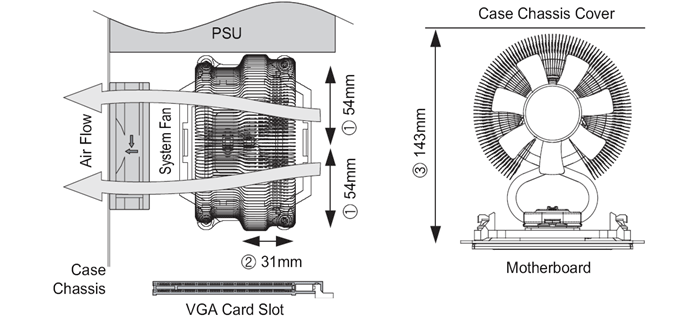
Below is a render of the cooler’s dimensions. It’s essentially a warning about accurately spec’ing out your motherboard to make sure you’ve got room for this beast – and you’d better do it, too. Between the headroom required by the fins and the footprint created by the support bracket, you’re going to need your ducks, and transistors, in a row.
One of my favorite things about the Zalman CNPS-9300 AT is its organic look, with heatpipes wrapping beneath the fins like shiny copper roots. The elevated design really gives it some case presence, and the entire cooler is very sculpturesque. Too bad you’ve gotta break the aesthetic flow of an otherwise nice looking piece with a giant plastic fan.
If you view the unit from the side, it’s got a tiered shape that serves to disperse heat while funneling air inward, down into the CPU. The entire heatsink is pure copper and pure aluminum, which makes for some right proper conduction.

INSTALLATION
Let’s get the installation requirements straight to make sure that you don’t have to back out after you get started, because that would just be embarassing. Here’s the Rules of Engagement on the Zalman CNPS-9300 AT:
- There must be no interfering components within a 54mm distance from the center of the PSU.
- There must be no interfering components within a 31mm distance from the center of the CPU.
- Your case cover must be distanced at least 143mm away from the motherboard.
- If your case is equipped with an air guide, you must remove the air guide ducts before installation.
- Using the silicon packet that comes with the heatsink to enliven your next cup of coffee with the sweet flavors of modern technology will probably make you die.
Out with the Old
Behold the Intel Q6600 stock heatsink in all its dusty and glorious mundanity. Notice how little vertical room it uses, and how little visual attention it’s getting. It doesn’t cool so well either.
After five minutes of twisting and turning its pushpins without success, I permanently removed Intel’s stock heatsink using an inadvisable snapping/yanking motion.

In with the New
First things first. You’re going to need to take your motherboard out of your case – and by out, I mean “unscrew it from your case’s pull out tray” – because the Zalman CNPS-9300 AT adds a baseplate to the back of your motherboard.
As you can see in the photos below, the ASUS P5W64 WS (hit the jump to read our Bjorn3D review) avoids conflict by giving you the option of turning the mounting unit any which way to accomodate potential problems up top. Make sure to check out component positioning on your own motherboard, because you don’t want to squish something when you screw the clip support down.


The manual is reasonably clear about procedure, assuming you’re looking at the photos. Bless your heart if you go by the writing alone, and I’ll see you at Newegg later buying a bunch of stuff to replace whatever you’ve broken. The Cliff’s Notes version is: no matter what processor you’re using, confirm that you’ve selected the right clip to bolt the heatsink down with your corresponding socket.
FYI: Intel 775 is going to use the screw-in clip – not the clip with the support piece. That little metal tab is for the AMD folks.
Below, we have the CNPS-9300 mounted and ready to rock. It’s a skyscraper compared to the Q6600 stock cooler and it completely rises above my work station’s enormous Northbridge heatsink, which should make certain users very happy. I’ve got this unit in an Ultra Products m998 case, which I also reviewed a ways back, so that the CPU duct has now gone the way of the buffalo.


On the next page we’ll hit the digital obstacle course.
TESTING
Test Setup and Methodology
| Test Platform | |
| Processor | Intel Q6600 Core 2 Quad 2.4GHz & 2.71GHz |
| CPU Cooler |
Intel Q6600 Stock
Test Item: Zalman CNPS-9300 AT
|
| Motherboard |
Asus P5W64 WS Pro | Rev 1 | BIOS 1101 |
| Memory |
4 x 1GB OCZ RPR-1066 DDR2 @ 5-5-5-15 |
| Drive(s) |
WDC WD2000JB-00GVA0 PATA
WDC WD5000AAKS-22YGA0 SATA
PIONEER DVD-RW DVR-107D PATA
|
| Graphics |
Asus GeForce 8800 GT TOP (175.16)
|
| Power Supply | Ultra X3 800-Watt Modular Power Supply |
| Case | Ultra m998 mid-ATX |
| Operating System | Vista Home Premium 64 Bit |
|
Monitors
|
Samsung Syncmaster 226bw
Honeywell Arius 2216
|
Comparisons were made between the Intel Q6600 Stock CPU Cooler and the Zalman CNPS-9300 AT in a real-world test environment. Test conditions follow:
- CPU temperatures were measured with Everest Ultimate Engineer Edition v4 at 2.4GHz and 2.71GHz.
- Idle temps were taken 24 hours after initial bootup.
- Load temperatures were measured an hour after stressing began.
- Stressing was achieved through a multi-step process and began with the Prime95 Torture Test on “Blend.” After 55 minutes, a cross-hard drive “Copy and Paste” was initialized using a 4GB DVD ISO. Adobe Flash CS3 and Adobe After Effects CS3 were run simultaneously for mock content production. The goal is to force all tasks to run at once, where they can be tabbed between regularly.
Results
|
Temperature Comparison Chart in Celsius
Lower Temperature Indicates Better Performance
|
|
Intel Q6600 Stock Cooler |
Zalman CNPS-9300 AT |
|
CPU – 50°C
|
CPU – 39°C
|
|
CPU – 79°C
|
CPU – 63°C
|
|
CPU – 55°C
|
CPU – 45°C
|
|
CPU – 84°C
|
CPU – 66°C
|
As predicted, the stock unit is stomped in the land of cooling, with as much as an 18 degree difference in CPU temp during the light overclock at load. Without the extensive setup needed to quantitatively measure sound output, careful listening is your best bet for noise testing.
It is safe to say that the Zalman CNPS-9300 AT is nowhere near silent, or ultra quiet, as its general volume is comparable to the Intel stock cooler at 2400 RPM.
CONCLUSION
There are plenty of users out there looking to lower their temps for as little cash as possible, and the Zalman CNPS-9300 AT can get beginning overclockers started for about $50 USD. Bjorn3D’s Victor Wu recently reviewed an innovative cooling solution from SilenX that utilizes two fans, and its ambitious design breathes new life into the air cooler market for about the same amount of money.
The Zalman CNPS-9300 cools very well with a single 92mm fan – and is leaps and bounds better than a stock cooler – but much of its appeal spawns from truly unique and head-turning aesthetics at the expense of ultra-low temperatures. A cooler is called a “cooler” for a reason, though, and a two fan solution will likely knock a few extra degrees off your best temperature at the cost of some good looks. As the Beastie Boys so aptly put it, you gotta ask yourself “whatcha, whatcha, whatcha want?”
Zalman’s build quality is top notch and installation is a breeze once you’ve freed your motherboard. The CNPS-9300 is an excellent reason to ditch that stock cooler if you’re looking for a pretty face without a huge overclock, or if you have a system who’s overclocking capability is limited by a certain component.
Consider it a wise investment in functional art, and make sure you’ve got ample space inside that case, along with a panoramic window to show it off.
Pros:
Cons
Final Score: 8 out of 10 and the Bjorn3D Seal of Approval


