Today we look at the Z68 version of Zotac’s ITX offerings. This one comes pre-loaded with a 1GB Nvidia GT430 onboard. Let’s see how it performs.
Introduction – Zotac Z68 ITX Wifi supreme

Zotac is well known to the DIY and enthusiast community for its mastery of the mini ITX form factor with its full array of miniature sized offerings. Zotac has been manufacturing these offerings for over 5 years now and by the looks of the Z68 lineup, they are going a step forward with features and functionality with these newest offerings. The Z68 lineup currently consists of the Z68 ITX Wifi which offers a single PCI-E x16 expansion slot and full size DDR3 DIMM Slots. There is also the model we are testing: the Z68 ITX Wifi Supreme, which carries a single PCI-E x4 slot and an integrated GT430 GPU along with SO-DIMM DDR3 slots and many more features which we will look into further in the following pages. One important thing to note is that the two Z68 ITX offerings meet two distinct purposes. While the one with the Z68 ITX Wifi will utilize standard DIMMs and allow for higher performance graphics, it should suit also a higher end/mid range small form factor gamer excellently. The model with the integrated GT430 we are testing today is more better suited for a HTPC with possible lower level gaming capabilities. Users must keep in mind that the GT430 is in no way suited for higher level gaming.

In this review we look into what makes this board so special, its target market, and most importantly its performance to see if its worth the $219.99 price tag.
Specifications
| Model | Z68ITX-B-E |
|---|---|
| Chipset | Intel Z68 Express |
| CPU Socket | LGA 1155 |
| Dimensions | 6.7in x 6.7in – 170mm x 170mm |
| Form Factor | Mini-ITX |
| Memory Size | Up to 16GB |
| Memory Slots | 2 x 240-pin SO-DIMM |
| Memory Type | DDR3 1333 |
| Onboard Audio | 1 x HD Audio Port (7.1-channel) 1 x Digital Optical S/PDIF output 1 x Front panel audio header |
| Onboard LAN | 10/100/1000Mbps Ethernet port |
| Onboard WLAN | 802.11n (300 Mb/s) WiFi |
| Onboard Video | NVIDIA® GeForce®GT 430 GPU w/ 1GB DDR3 |
| Package Contents | 4 x SATA cables 1 x DVI-to-VGA adapter 1 x I/O back plate 2 x WiFi antennas 1 x 4-pin power extension cable 1 x USB 3.0 header (full-size bracket) 1 x USB 3.0 low-profile bracket 1 x DVI-to-VGA adapter |
| PCI | 1 x PCI Express x4 (open-end) 1 x Mini PCI Express (occupied by WiFi module) |
| RAID | 0, 1, 0+1, 5 |
| SATA | 1 x mSATA 1 x eSATA 3.0 Gb/s 2 x SATA 3.0 Gb/s 2 x SATA 6.0 Gb/s |
| USB | 4 x USB 3.0 ports 4 x USB 2.0 ports |
| Video Ports | 2 x Dual-link DVI, 1 x DisplayPort, 1 x HDMI |
| Warranty | 1-Year Standard Warranty; 2-Year Extended Warranty |
Looking over these specs, this board looks to be more than capable for a home theater or even a small lower level gaming rig. Lets take a closer look at what this board is made of.
Overview of the Zotac Z68 ITX wifi supreme


Click Image to Enlarge
The complete motherboard packaging is smaller than most accessory packages that come with other model motherboards. The front of the box carries the necessary model naming along with the chipset logos and some key features such as the Z68 supported QuickSync and Smart Response technologies from Intel. Also listed is the Lucid Virtu support as well as the onboard Nvidia GeForce GT430 discrete graphics processor.
Moving to the rear of the packaging we see a much more detailed look into supported technologies and features that the board carries. some of the key features are as follows:
- Overclocking support via the Z68 Chipset to allow pushing K-series processors past their default
- Dual USB 3.0 ports on the IO and an onboard 20 pin header for up to 2 more ports
- PCI-Express x4 slot to support further Expandability such as raid cards or other controllers
- Onboard Realtek HD Audio (supporting up to 7.1 channel)
- Dual WiFi antenna to remove the necessity for running a network cable
- support for up to 4 independent displays simultaneously
- mini PCI-e/mSATA port on rear of the motherboard
- SATA 3.0/6G support (2 ports)
- GT430 onboard discrete GPU to enhance 3D acceleration


The packaging is so small that we figured it would be quite sparse with accessories. To our surprise there is quite a large accessory bundle for such a small package. Here is what will be found when opening the package
- IO Shield
- SATA cables
- 2x WiFi Antenna
- Users manual
- Quick install guide
- USB 3.0 IO bracket
- 4-Pin CPU ATX power cable
- Driver/installation disc
- DVI to VGA Adapter


Click Image to Enlarge
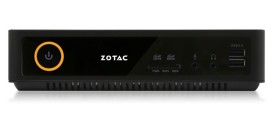
- 2x USB 3.0 ports
- Gigabit ethernet port
- 2x WiFi antenna ports
- Cmos clear button
- 2x USB 2.0 ports
- eSATA port
- Displayport (GT430)
- HDMI port (Intel GPU)
- 2x DVI ports (Top GT430 / Bottom Intel GPU)
- Realtek 7.1 Channel HD audio (includes optical SPDIF out)


Click Image to Enlarge

Click Image to Enlarge
Here we see the rear of the motherboard. Normally there would be nothing to note here except a backplate and possibly a few SMD’s and solder points ,but due to limited PCB space some components are located on this side as well. 4 IC’s of 1GB of VRAM are located on the rear side along with an mSATA port which can support an SSD.
A Closer Look at the Zotac Z68 ITX wifi supreme


Click Image to Enlarge
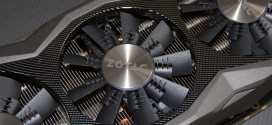
Here is the lower portion of the board which we see the PCI-e x4 slot along with the active cooling solution for the GT430 GPU and the Intel Z68 PCH chipset. We also notice if looking close to the left of the x4 slot in between the chipset cooler and IO ports we have a blue jumper which is used for manually clearing the CMOS in the case of a no post condition or other issues. Also directly next to that jumper we located the front panel audio header to allow connection of your chassis front panel audio jacks.
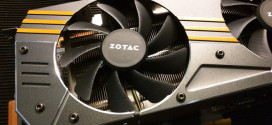
Taking a closer look in between the IO jacks and the chipset cooler we see the vertically mounted CMOS batter and also the Vertically mounted WiFi card. this kind of space optimization just goes to show how Zotac has become the considered leader in mini ITX boards as this shows extreme attention to detail to make sure that components are placed in such a way that massive feature sets can be outfitted onto a PCB where real estate is non existent and therefore creative solutions have to be found to fit all of these features with so little real estate available. Moving above these components we see the power circuit heatsink which is very small and raises concern if the overclocking potential may be hampered by this design. We will investigate if this affects performance in the coming tests.


Moving to the top edge of the board we find the SODIMM slots which support up to 16GB total which is great for expandability. Also we notice the 4-pin fan header next to the DIMM slots as well which can be used for a chassis fan to help circulation and ensure no issues or concerns about stagnant heat can cause a compoennt overheat issue since most mini ITX chassis can be quite cramped.
Next we get a close up look at the 24-Pin ATX power connector which ensures all of the components get adequate power to get the best performance. Once again following the idea of maximizing usage of the real estate availble all 4 of the onboard standard SATA ports are squeezed between the 24Pin ATX connector and the chipset heatsink, also we found the 4 pin fan connection for the chipset cooling and even a front panel USB 2.0 header and the front panel LED/Switches connection all squeezed into this small space. Below the 24-pin connection we also see the single removable BIOS chip which ensures that even in the event of a bad flash the chip can be removed and be replaced with a non corrupt chip.


Click Image to Enlarge

Click Image to Enlarge
BIOS
Main Page

Advanced settings


Click Image To Enlarge
Here is where things start to get interesting, this is where all of the tuning happens, including any overclocking. When moving to the Advanced menu we see many submenus. The first one, the X-Setting menu, is where all overclocking settings are held.
Once we enter the X-Setting we once again see some submenus again referencing CPU performance, GPU performance and memory tuning.
When entering the CPU performance screen we see exactly what options are available to overclock our installed Core i7-2600K CPU. The first thing we noticed in this menu is the adjustability is very light. There are multiple settings which relate to additional power and power limits for the turbo state. This also allows for adjustment of only the maximum turbo multiplier as well, so unlike other performance boards we cannot adjust turbo dependent upon core load or set a static multi for the CPU speed which means we rely on turbo throttling to engage the higher CPU frequency. The power limit settings will not allow the CPU to reach the multiplier we set in the BIOS if not tuned properly. With some BIOS optimizations and better BIOS options this board could be much easier to adjust and manage. Also we found within this menu the ability to adjust the BCLK which the board did accomplish with relative ease although it was not quite capable of the BCLK we have seen from some other boards we have tested it also was not far off by any means.


Click Image To Enlarge
When exiting the CPU Performance screen back into the X-Setting menu our next stop was the Graphics boost menu which allows adjustment of the Intel integrated GPU frequency along with adjustment of the power limits and the additional voltage that can be given to the GPU core.
Next we see the Memory configuration menu, which allows us to adjust not only the system memory frequency but the timings and subtimings for the SODIMM DDR3 memory installed on the motherboard.
After leaving the X-setting screen we move to the Hardware monitor screen which is where we can observe the temperatures, voltages and even fan speeds within this one screen. This is also where we can adjust the fan controls to better manage the noise/performance of the cooling fans in the system.


Click Image To Enlarge
Next we have the storage menu, which is where we can configure the operation mode for the PCH storage such as RAID, AHCI and IDE mode. We also can see the installed drives on this list and even adjust the hot swap capability on each port individually.
The CPU Configuration menu allows us to view the properties of the CPU and also adjust the Intel CPU features such as disabling or enabling standard features such as Virtualization, hyperthreading and even adjustment of power saving options.
As we move to the USB menu we see the many options to enable or disable USB 2.0 or 3.0 ports along with compatibility settings.


Click Image To Enlarge
The chipset controls allow for adjustment of such options like which display adapter is primary or first looked at for booting, memory configuration for the Intel GPU and even multi display options as well.
Next we have the onboard device options which allows disabling of onboard devices that may not be used in order to free unnecessary system resource loading.
Next we get into the boot settings menu which gives us control as to how the board handles bootup operations and what device it boots to as a primary.
Lastly we have the exit screen which allows saving of any changes, Booting to the EFI Shell, Overriding boot order to another device or even defaulting changes to allow a fresh start with the BIOS settings.
Overclocking

The P67 and Z68 chipset does not allow for a large amount of BCLK overclocking. Therefore, in order to achieve maximum performance, we chose a Core i7-2600K which has an unlocked multiplier to ensure the motherboard is not a limiting factor and the limit should be the CPU itself. One thing to note is the chip we have on hand is a very good sample, and walls at 55-56X multiplier; however this was with much higher than optimal voltage and should only be attempted with adequate cooling.
We started by just pushing the BCLK up some until we experienced a crash, which was at 104MHz. We then went back to stock BCLK and tried raising the multiplier just to see how well the board clocked without a lot of tweaking. Being a mini ITX board we did not expect a substantial overclock to be possible due to the basic and very stripped down nature of mini ITX boards. This board was able to establish full stability at 4.8GHz and even booted at 5GHz but temperatures were a bit too high along with higher voltage required, which put it outside of what we considered usable for 24/7 usage. With the limited BIOS settings and tweaking options available it was a little harder than some boards to get the overclock stable but once the settings were figured out the overclock was easily reproducible and could be setup rather quickly. One thing to note is that the 4.8GHz overclock may not be sustainable in a much smaller and crowded mini ITX chassis configuration as adequate cooling is required to sustain these sorts of clock speeds. This just goes to show what we have seen as more of a trend lately that now with the limitation being the CPU in the 1155-based configurations, pretty much all boards perform very close to each other, and the main distinguishing factors of a board are its features.
We were very surprised to see a mini ITX board pull off these sorts of overclocks and be rock stable which matches all of the full size counterparts we have reviewed lately as well, this also goes to show that Zotac knows what their doing when designing this board.
With sub-ambient cooling we could run some extended tests at much higher clock frequencies but for practicality and realistic expectations we kept the clock speeds at a much more manageable 4.8GHz for the extent of the testing.
Important note: Overclocking can cause component failure. Please exercise caution when attempting any level of overclock on system components.
Temperatures

The CPU temperatures were recorded with Realtemp while running Wprime 1024 right before the end of the 5th run. The results were recorded carefully. After the results were recorded, we waited for 30 minutes before taking Idle temperature measurements. The chipset temperatures were taken with a bead probe placed directly at the edge of the chipset die. The results were as follows:
| CPU Temperatures | Temperature (Idle/Load) |
| Zotac Z68 ITX WiFi Supreme (4.8GHz) | 35C/71C |
| Zotac Z68 ITX WiFi Supreme | 25C/54C |
| Chipset Temperatures | Temperature (Idle/Load) |
| Zotac Z68 ITX WiFi Supreme (4.8GHz) | 41C/56C |
| Zotac Z68 ITX WiFi Supreme | 39C/47C |
We found that the cooler for the chipset worked quite well with the included fan and for the most part was not even audible. as for the CPU cooling we used our liquid cooling loop to ensure that CPU cooling was not a limitation to the capabilities of the board. After running some stress tests we found that the VRM cooling which concerned us previously was not really anything to be concerned about as it handles the 4.8GHz clock without issue or even an ounce of stability problems.
Power Consumption

The power consumption was tested while running Wprime 1024 for a few minutes at stock settings. The results were recorded carefully with a Kill-A-Watt power consumption measuring tool at the wall. After the results were recorded, we waited for yet another few minutes minutes before taking Idle power consumption measurements.
The power consumption is not with GPU usage.
| Configuration | Power Consumption (Idle/Load) |
| Zotac Z68 ITX WiFi Supreme (4.8GHz) | 97W/162W |
| Zotac Z68 ITX WiFi Supreme | 68W/121W |
This is with CPU/system loading but nothing graphically intensive in order to provide the most accurate results by not ramping up the GPU, which will pull more power. We did notice that the mini ITX board did pull a bit less than previous boards we had tested but this is likely due to lower component counts along with being a GT430 onboard whereas the other tests were made with a GTX 580 GPU which even though it was not under load it still uses power to run and much more than the GT430.
Testing & Methodology

We’ve expanded our testing suite considerably since the Z68 chipset release, and will continue to use the same methods for most of the motherboards and CPU’s we test. In the interests of thoroughness and accurate results, we run each test at least three times, and some tests more than that. We average the total of all the tests from each benchmark then report the average here.
The OS we use is Windows 7 Pro 64bit with all patches and updates applied. We also use the latest drivers available for the motherboard and any devices attached to the computer. We do not disable background tasks or tweak the OS or system in any way. We turn off drive indexing and daily defragging. We also turn off Prefetch and Superfetch. This is not an attempt to produce bigger benchmark numbers. Drive indexing and defragging can interfere with testing and produce confusing numbers. If a test were to be run while a drive was being indexed or defragged, and then the same test was later run when these processes were off, the two results would be contradictory and erroneous. As we cannot control when defragging and indexing occur precisely enough to guarantee that they won’t interfere with testing, we opt to disable the features entirely.
Prefetch tries to predict what users will load the next time they boot the machine by caching the relevant files and storing them for later use. We want to learn how the program runs without any of the files being cached, and we disable it so that each test run we do not have to clear pre-fetch to get accurate numbers. Lastly we disable Superfetch. Superfetch loads often-used programs into the memory. It is one of the reasons that Windows occupies so much memory. Vista fills the memory in an attempt to predict what users will load. Having one test run with files cached, and another test run with the files un-cached would result in inaccurate numbers. Again, since we can’t control its timings so precisely, it we turn it off. Because these four features can potentially interfere with benchmarking, and and are out of our control, we disable them. We do not disable anything else.
Test Rig
| Test Rig | |
| Case | Thermaltake Level 10 GT |
| CPU |
Intel Core i7-2600K |
| Motherboard | Zotac Z68 ITX WiFi Supreme |
| Ram | 4GB (2x2GB) Kingston Value Ram SODIMM 1333 (9-9-9-24) |
| CPU Cooler |
Swiftech H20-220 Edge |
| Hard Drive | Western Digital Velociraptor 300GB |
| SSD |
Intel 510 series SATA III 120GB |
| Optical | ASUS BD-ROM |
| GPU |
GT430 1GB (integrated) |
| Case Fans |
Front (intake): 200 x 200 x 20 mm ColorShift Fan x 1 (600~800RPM, 13~15dBA) Rear (exhaust): 140 x 140 x 25 mm Turbo Fan (1000PRM, 16 dBA) Top (exhaust): 2x120mm fans mounted to Radiator for Swiftech H20-220 Edge kit Side (intake): 200 x 200 x 30 ColorShift Fan (600~800RPM), 13~15dBA) |
| Additional Cards |
N/A |
| PSU |
Thermaltake Toughpower Grand 1200W |
| Mouse | Tt eSPORTS Black gaming mouse |
| Keyboard | Tt eSPORTS Meka G1 mechanical gaming keyboard |
Test Suite
We will use the following applications to test the performance of the Motherboard. Benchmarks
| Benchmarks |
|---|
| PCMark Vantage |
| Cinebench R11.5 |
| 3DMark 11 |
| 3DMark Vantage |
| Wprime |
| SuperPi |
| Crysis Warhead |
| Just Cause 2 |
| SiSoft Sandra 2011 |
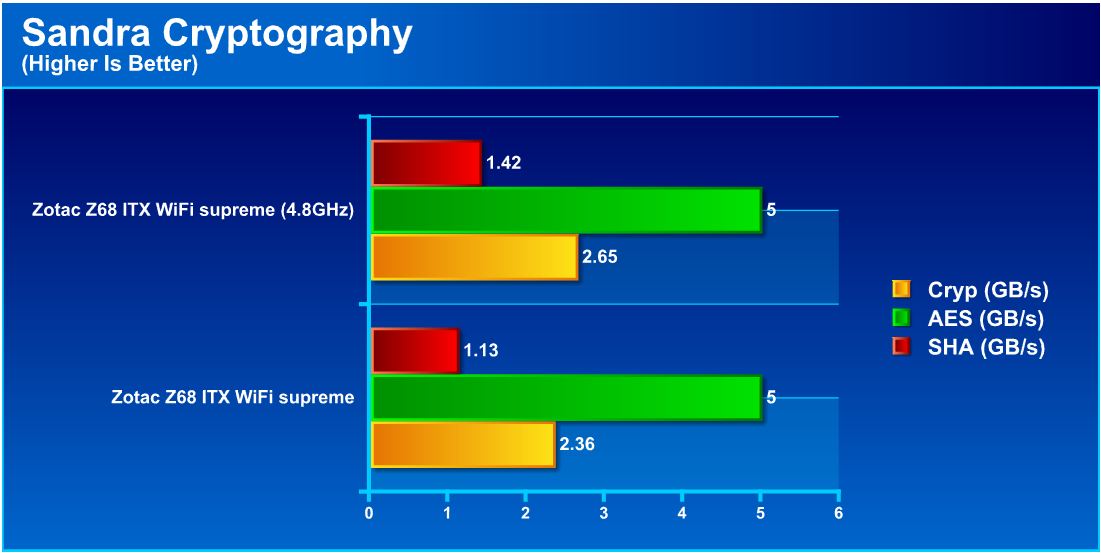
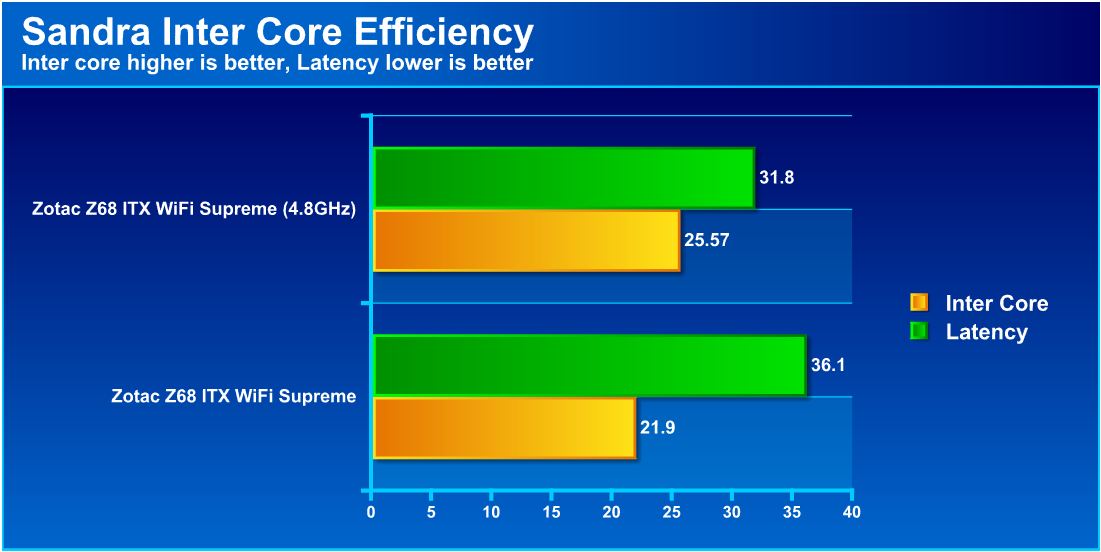
SiSoft sandra 2011

“SiSoftware Sandra (the System Analyzer, Diagnostic and Reporting Assistant) is an information & diagnostic utility. It should provide most of the information (including undocumented) you need to know about your hardware, software and other devices whether hardware or software. It works along the lines of other Windows utilities, however it tries to go beyond them and show you more of what’s really going on. Giving the user the ability to draw comparisons at both a high and low-level. You can get information about the CPU, chipset, video adapter, ports, printers, sound card, memory, network, Windows internals, AGP, PCI, PCI-X, PCIe (PCI Express), database, USB, USB2, 1394/Firewire, etc.”
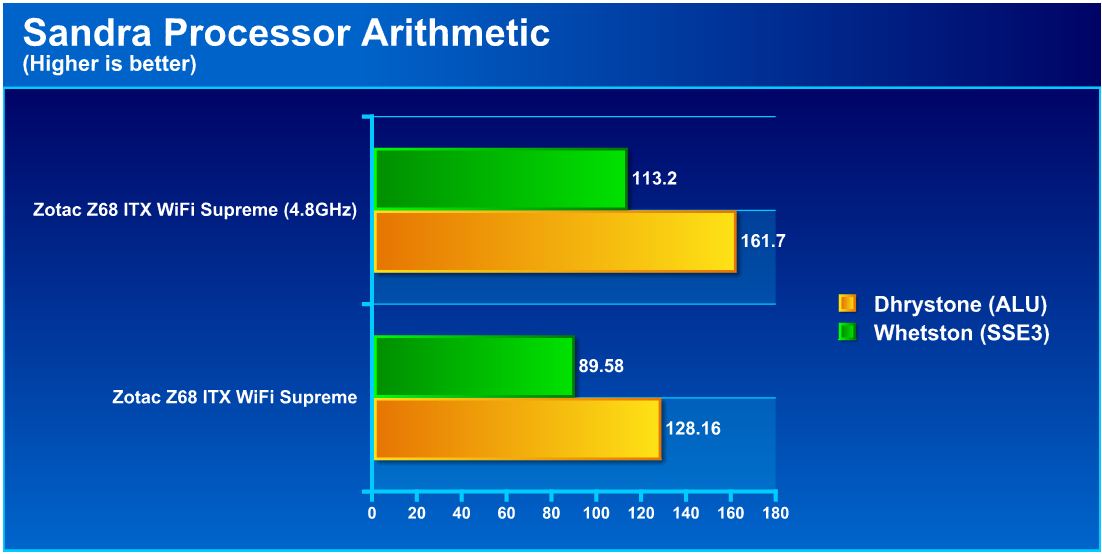

Here we see that the overclock makes for a huge increase in performance. The fact that this board performs close to enthusaist level boards really impressed us due to the basic nature and the fact that most people see mini ITX platforms as entry level. This board is in no way entry level and even offers some features that the more expensive big brothers do not offer.
PCMARK VANTAGE
PCMark Vantage is the latest system benchmark tool from Futuremark. The benchmark consists of tests such as application launches, file searches, web browsing, video playback, photo editing, and gaming.
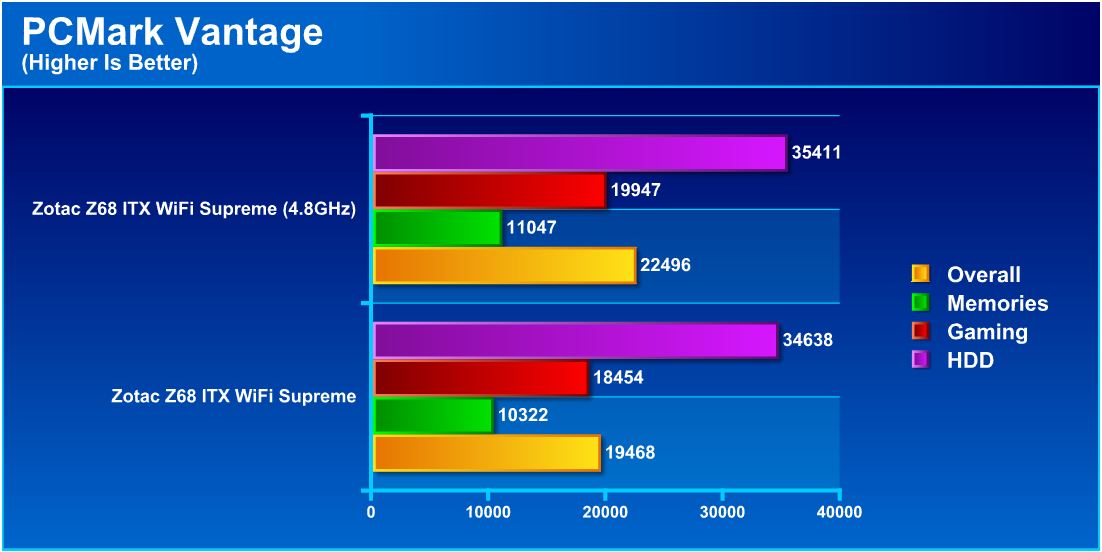
Here we see similar results again as each board we have tested. The Sandy Bridge platform overclocks very well and also can outperform the existing top end X58 6-core CPU’s in some cases, which means we get excellent value/performance for this platform. One thing is that being based on SODIMM’s means that memory choices are much more limited and this means that memory performance could hamper performance to an extent but from our testing so far that affect will be marginal. One thing to note is that while the gaming test shows an increase that is largely due to the CPU clockspeed increase, the graphics will still likely be the limiting factor with this system.
Wprime
Wprime is a processor heavy multithreaded benchmark which crunches numbers of a specific data set and gives the end user an output time which can then be used as a guage to compare system performance.
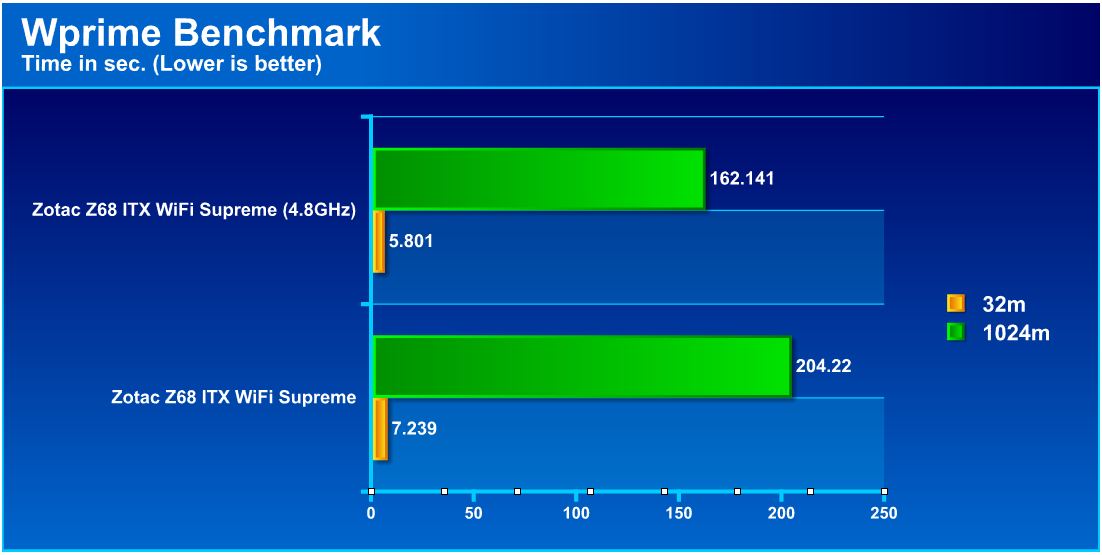
As we see once again that higher clockspeeds combined with multithreading allow for some very impressive results, cutting work time by almost 25% on the long duration test. This result would likely be better if we had gotten our hands on some higher speed DIMMs at the time of testing but there just were not many available to us at the time.
Superpi
SuperPi is a single threaded benchmark which measures efficiency and is heavily influenced by architectural changes as much as it is by clockspeeds.
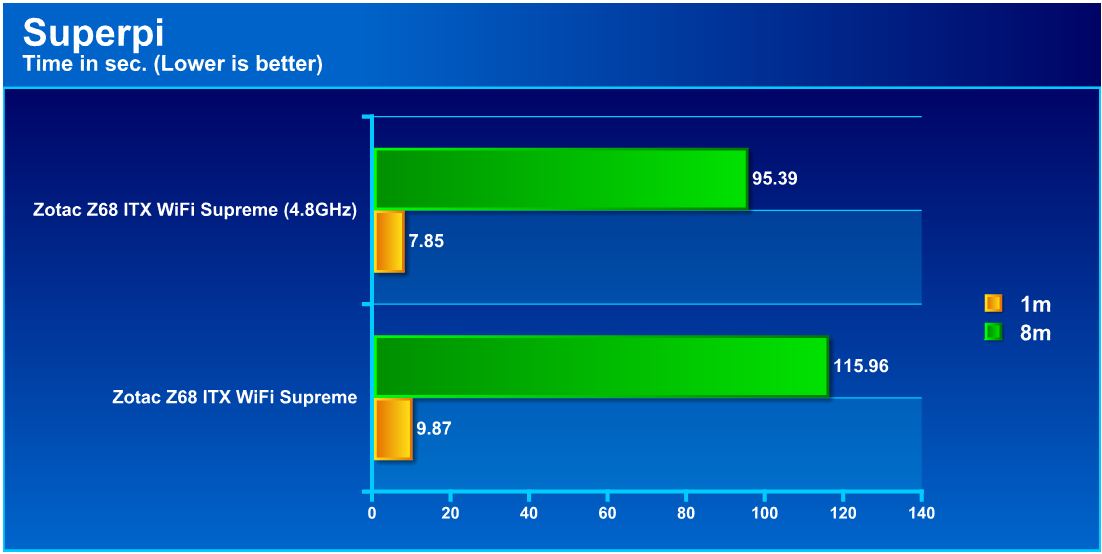
SuperPi is a much older benchmark, and some may argue its obsolescence, but with some newer processors scoring poorly in this test, it is always good to include it. This test does not factor in cores or threads, only raw frequency performance, and efficiency of the architecture. The Sandy Bridge architecture has an excellent increase in performance clock for clock versus previous architectures. We see that the increase in clockspeed does net a very decent performance improvement in this benchmark as well.
CINEBENCH R11.5
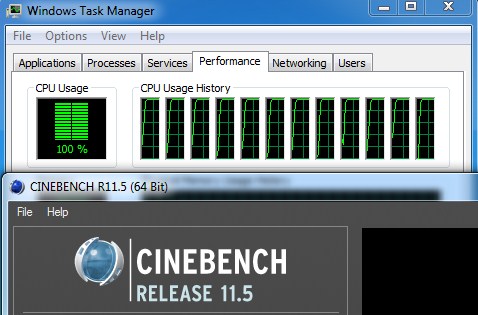
“CINEBENCH is a real-world test suite that assesses your computer’s performance capabilities. MAXON CINEBENCH is based on MAXON’s award-winning animation software, CINEMA 4D, which is used extensively by studios and production houses worldwide for 3D content creation. MAXON software has been used in blockbuster movies such as Spider-Man, Star Wars, The Chronicles of Narnia and many more. MAXON CINEBENCH runs several tests on your computer to measure the performance of the main processor and the graphics card under real world circumstances. The benchmark application makes use of up to 16 CPUs or CPU cores and is available for Windows (32-bit and 64-Bit) and Macintosh (PPC and Intel-based). The resulting values among different operating systems are 100% comparable and therefore very useful with regard to purchasing decision-making. It can also be used as a marketing tool for hardware vendors or simply to compare hardware among colleagues or friends.”

Cinebench 11.5 returned similar and impressive results on the multi-threaded CPU based testing. The OpenGL test did not gain much in the way of performance as this is likely bottlenecked by the GT430 GPU.
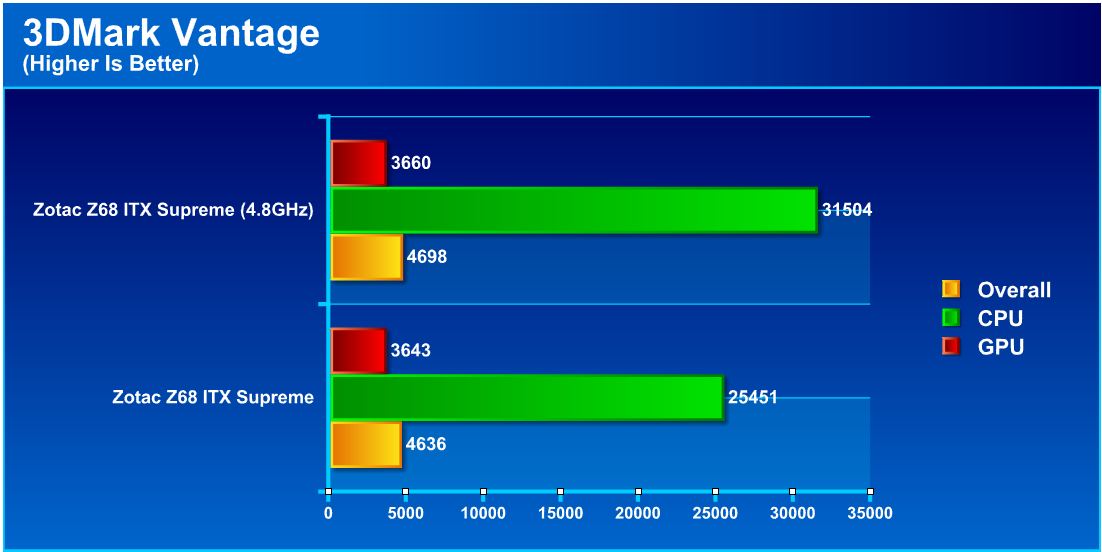
3DMARK VANTAGE

For complete information on 3DMark Vantage Please follow this Link:
www.futuremark.com/benchmarks/3dmarkvantage/features/
The newest video benchmark from the gang at Futuremark. This utility is still a synthetic benchmark, but one that more closely reflects real world gaming performance. While it is not a perfect replacement for actual game benchmarks, it has its uses. We tested our cards at the ‘Performance’ setting.
3DMARK 11
![]()
3DMark 11 is the newest in futuremark’s suite of benchmarking utilities. It’s a fully capable DirectX11 benchmark which also stresses and analyzes the system performance as a whole to simulate a heavy rendering environment such as a high end game or other app the end user may run. This benchmark was run with Performance settings 5 times and all runs were averaged for the result below.
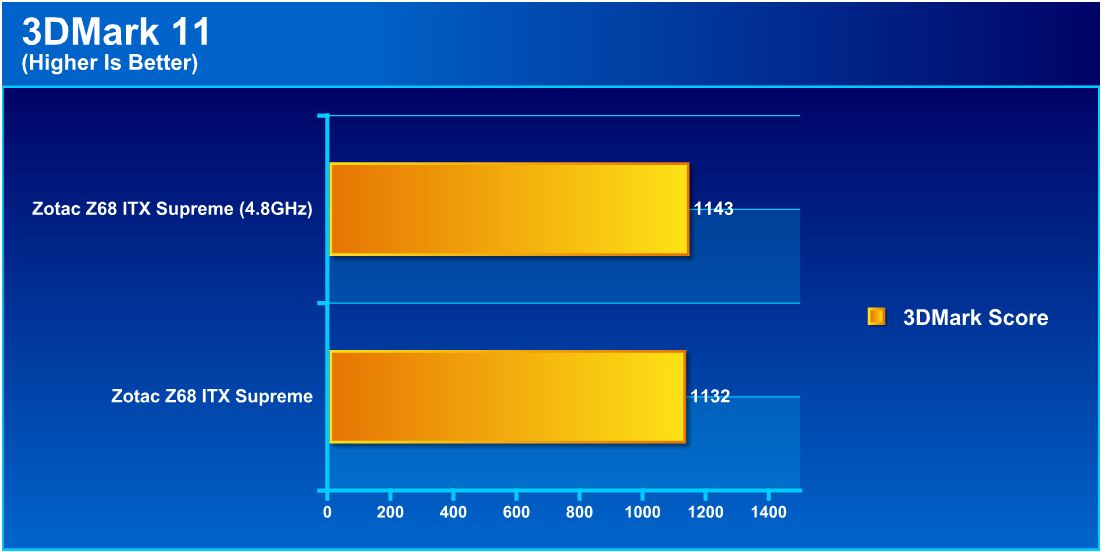
3DMark Vantage and 3DMark 11 both showed a very small increase in graphics performance, but the CPU performance is the only real gain due to the fact that the GT430 GPU is not bottlenecked by the 2600K at stock speeds. This goes to show while this board will play some games at lower settings it is more better suited for a more basic casual gamer/HTPC than it is a full on gaming rig due to the performance limitations of the GT430.
Crysis Warhead

Crysis Warhead is the much anticipated standalone expansion to Crysis, featuring an updated CryENGINE™ 2 with better optimization. It was one of the most anticipated titles of 2008.
We ran Warhead using gamer’s setting at resolution of 1920X1080 and DirectX 10. We tested 8x AA setting.
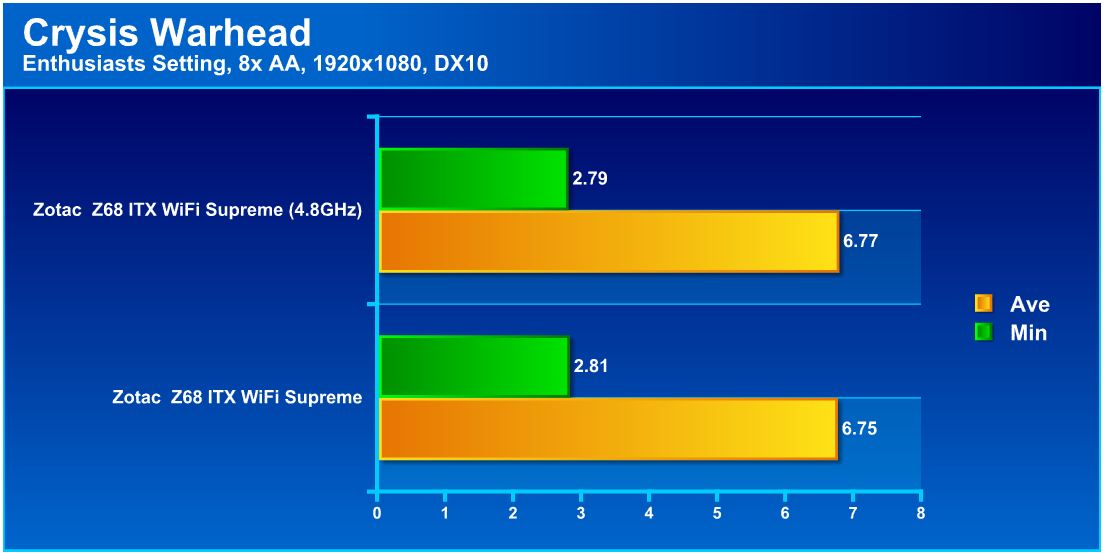
Here we see that like we figured, the GT430 is definitely not up to the task of heavy gaming. This does not harm our view of this product however, as it is not designed for gaming. We also tested with much lower settings to take the load from the GPU and show the true effect of CPU overclock on increasing the system bus, and the results are as follows.
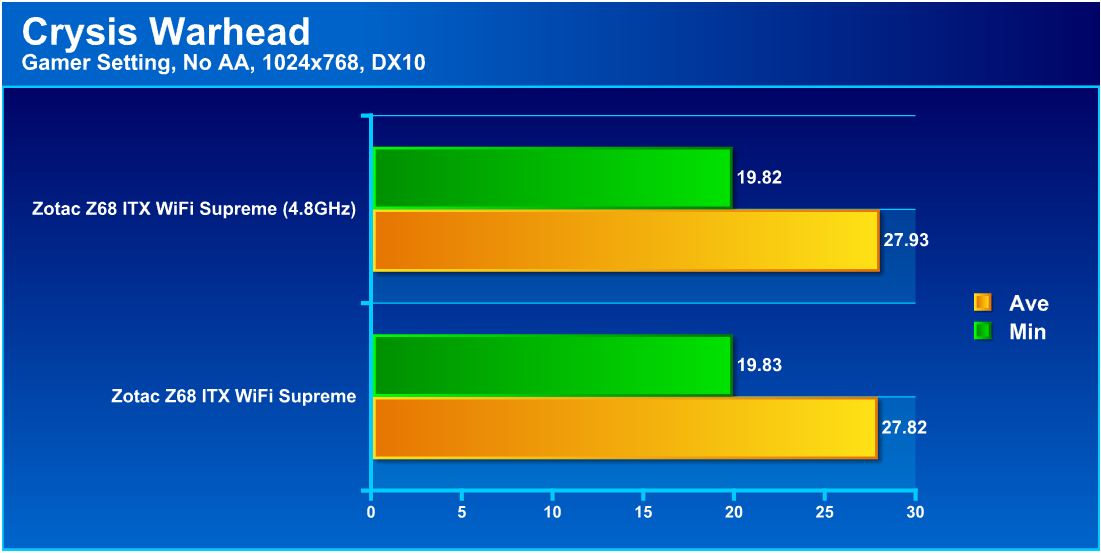
The scores are not necessarily surprising as the GT430 is not designed for higher end gaming. This does show that if all things considered the settings could be turned down to minimum to get a somewhat passable gaming experience, but any major graphically demanding title will likely struggle even on the lowest settings.
just cause 2

Just Cause 2 has been out for almost a year now, but instead of running lower resolution tests, we were also interested in checking out what to expect at higher resolutions where graphics performance might get in the way. This will give a great example to those people playing games at much higher resolutions.
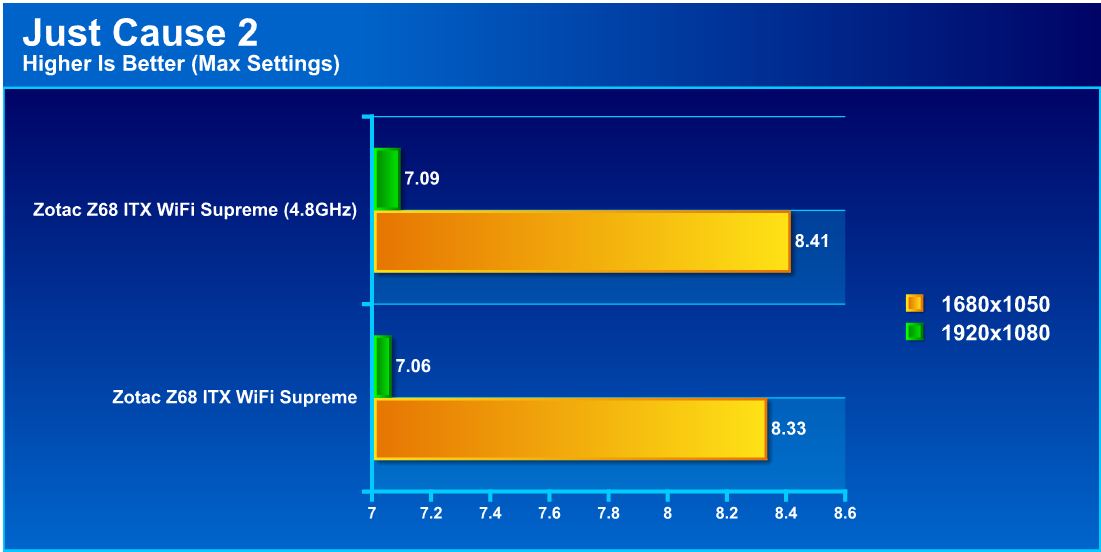
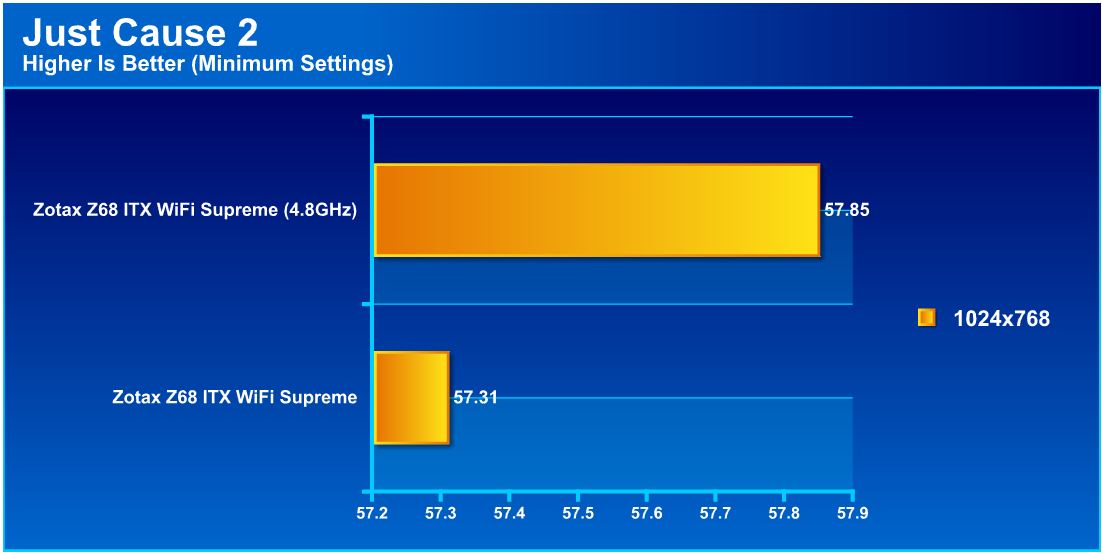
We decided to run the systems at both max settings and also at minimum settings, just to see how the games scale when the graphics are at a minimum to see if we can remove most of the load from the GPU to allow for a hopefully more playable scenario, and with minimum settings we did pull off very smooth gameplay however it was at the lowest graphic settings we could set it for. This is not necessarily a bad thing as we could at least play the game but it does go to show that this board is not the right tool for the job when it comes to higher end gaming. Zotac has another offering as mentioned before which has a PCI-E x16 slot that would be much better suited for a small form factor gaming build and if that board overclocks like this one than this Z68 ITX series could have the perfect offerings to serve both communities.
One thing we wanted to note is that besides testing we had run other lower demand games such as Starcraft II and they played very well with no major issues, but we had no way to get a consistent benchmark so we omitted them from the official results. We also were able to run many other games such as World of Tanks at much lower settings but they were playable as long as the lack of eye candy is not an issue.
CONCLUSION
The Z68 ITX WiFi Supreme is an excellent option with a laundry list of features that makes it hard to pass up. The model tested today is not necessarily angled around the gamer, its more suited for a HTPC build, though gamers should not despair because Zotac has them covered as well with the Z68 ITX WiFi model, which has a PCI-E x16 slot to allow for high end graphics and overclocking. Add to this the many features such as WiFi built in which means the system can be placed anywhere within signal range of the wireless source and it will be ready to run and even stream or play online.
We were blown away at how such a small and basic appearing board could perform with CPU bound tasks, and even with some light gaming from an onboard GPU. This is a great all in one board that should not be passed up, though users should keep in mind what the primary usage will be. For everyday or HTPC use, this would be a great board.
However, this board was not totally perfect: the most glaring problem is the BIOS. It almost seems like an afterthought on an otherwise impressive board. It has overclocking capabilities but to say they are poorly implemented would be an understatement. Once the settings were figured out it was rather easy to overclock but still, a better BIOS would have made this board a slam dunk instead of an excellent performer that just missed the mark with the BIOS. The board can definitely clock well but will likely be a source of confusion for any user who is not into tweaking or experimenting with settings to find the right combination.
Anyone looking to build an extremely powerful small form factor system should look at these models as the features and performance is amazing and the board layout itself is very good and amazing how many features have been fit onto such a small board.
| OUR VERDICT: Zotac Z68 ITX WiFi Supreme | ||||||||||||||||||
|
||||||||||||||||||
| Summary: The Zotac Z68 ITX WiFi supreme carries many useful features and if it weren’t for the lack of BIOS options, this board would be near perfect. For its performance and features it earns the Bjorn3D Silver Bear Award. |