With the latest X79 chipset and Intel’s latest Core i7 3960X 6-Core Extreme processor running on the SandyBridge-E architecture, you’ll be zipping through processing times in no time!
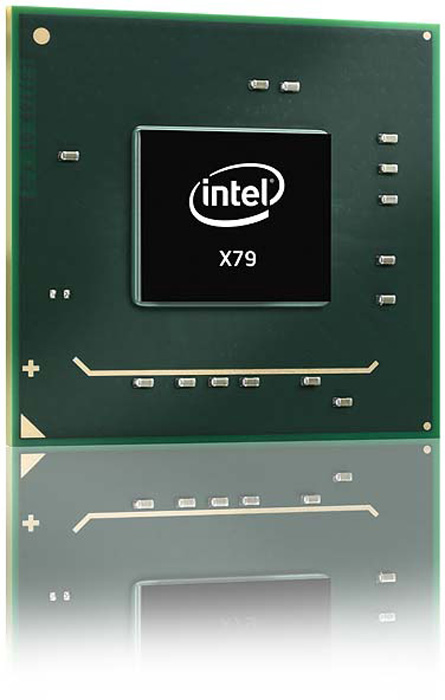
Intel’s new X79 Chipset
 It’s been some months since Intel has introduced a new chip into the market. The launch of Sandy Bridge this January introduced the first new architecture since Nehalem was introduced in 2008. Sandy Bridge was also the first new architecture on the 32nm manufacturing process, which was introduced by Intel in the die shrink, called Westmere.
Until late October, Intel’s Core i7-2600K was the best 4-core desktop CPU on the market. That all changed when Intel launched the 2700K to compete with AMD’s Bulldozer. The Intel Core i7 990x still remained Intel’s fastest 6-core processor till today.
However, the 2700K is not truly a new CPU. It is simply a 100MHz speed bump, with the same core count and TDP as the 2600K. It is not intended to power top-of-the-line systems. For that purpose, Intel is introducing their newest line of CPU’s: the Sandy Bridge Extreme, coupled with the performance X79 Chipset. The X79 Chipset is intended for the highest-end systems capable of easily handling high-definition video production, 3D applications, and similar multi-threaded workloads.
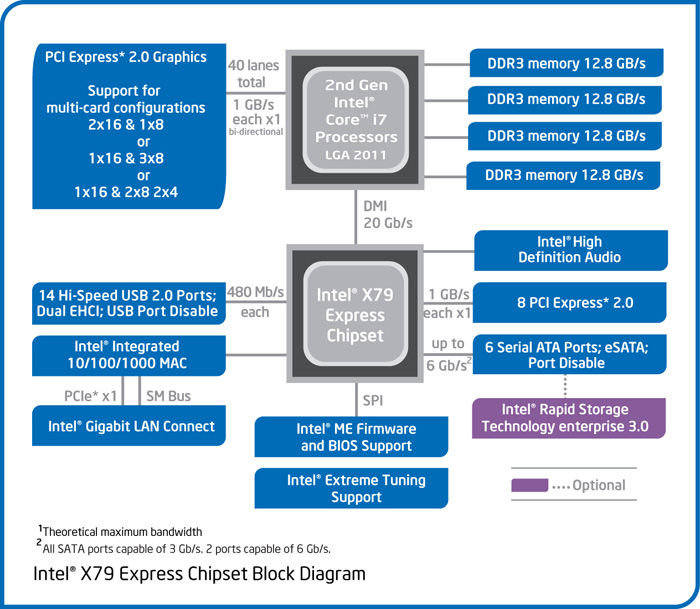
For this reason, the X79 chipset has support for the best hardware, and a lot of it. The Sandy Bridge-E system has support for a whopping 40 lanes of PCI-Express 2.0. It does not yet support the upcoming PCI-Express 3.0 technology, though Intel has said that future X79-based releases will. The 40 lanes can be electrically divided into an x16/x16/x8 configuration for a two or three card setup, or an x8/x8/x8/x8 for a four card setup. Either way, this chipset packs a lot of power.
Since the X79 chipset (codenamed Waimea Bay) is intended to be the successor to X58 (codenamed Tylersburg), it also has support for six SATA ports, two of which can perform at 6Gbps. X79 will also support up to 14 USB 2.0 ports, but disappointingly will not have native USB 3.0 support. Motherboard manufacturers will most likely use third-party chips for USB 3 and additional SATA 6Gbps support.
Since the Waimea Bay platform is aimed at gamers and overclocking enthusiasts who are eager to tweak their systems, X79 will support even more overclocking adjustments and performance tuning. The overclocking capabilities of the platform have been redesigned to include a second intermediate multiplier between the CPU multiplier and the BCLK frequency, which will apparently aid in overclocking. This is what allows the 4-core SB-E CPU to be partially unlocked. We will go more in depth on available CPU’s on the next page, but to provide a basic understanding of the available models, Intel will launch two fully unlocked 6-core CPU’s and one partially unlocked 4-core CPU.
The LGA2011 motherboard will be available for an MSRP of $280-300 (US). It will come with a 3 year limited warranty, and will not come with the cooler which must be bought separately.
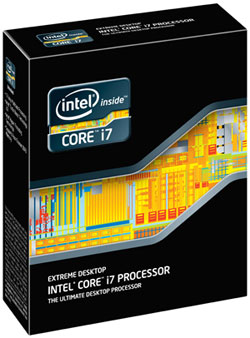
Intel Core i7-3960X Processor
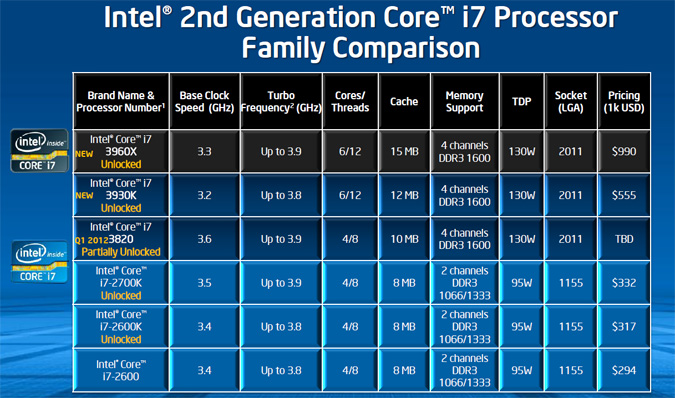
 The new Intel processor is a step ahead of the processors launched in January of this year. It is not a new architecture, though. In accordance with Intel’s tick-tock policy, every tick is a die-shrink, and every tock is a new architecture. The launch of the Sandy Bridge architecture represents the tock, and the Ivy Bridge die shrink represents the next tick. So where does Sandy Bridge-E fit into the picture? Sandy Bridge-E is neither a die shrink nor a new architecture–it is simply the highest echelon of the regular Sandy Bridge processors. The Sandy Bridge-E line will consist of two fully unlocked 6 core models (Core i7-3960X and 3930K), and one partially unlocked 4 core model (Core i7-3820).
Since the Core i7-3960X does not use a new architecture, we’ll give more specifics about this particular model, though we will talk a bit about other models available at the SB-E launch. The Core i7-3960X is the first 6 core CPU based on the Sandy Bridge microarchitecture, and is based on a 32nm manufacturing process. The 3960X has 6 cores instead of 4, and 12 threads instead of 8. The base clock for the 3960X is 3.3GHz, slightly lower than the 2600K’s 3.4 or previous Core i7 Gulftown architecture 980X at 3.33; however, the 3960X can turbo to 3.9GHz as compared to 3.8 on the 2600K, or 3.6 on the 980X. The 3960X also has a larger shared L3 Cache: 15MB as compared to the 2600K’s 8MB, and 980X’s 12MB. Additionally, the 3960X supports a whopping 4 channels of DDR3 at 1600MHz. The 2600K supports 2 channels of 1066/1333MHz, while the 980X only had 1066MHz support.

With all this extra power, however, there is a tradeoff: the new processor is a power-hungry beast. It has a TDP of 130W, much higher than the 2600K’s TDP of 95W. However, the SB-E line has the same TDP as almost all the Core i7-9xx series processors. Additionally, as we can see from the die layout above, the 3960X has no integrated graphics chip onboard. With such a high TDP, the power envelope for an additional graphics chip is just not available. Additionally, the graphics chip would raise the already-high price of the processor. Also, users who buy a $1000 processor will most likely not want to use an integrated graphics chip that can only perform up to the midrange level.
In addition to a higher TDP and a higher price, the Sandy Bridge-Extreme line will not be compatible with regular Sandy Bridge platform motherboards. We will go over this in more detail in the motherboard page, but the Sandy Bridge-E line will use the LGA 2011 socket, with 2011 pins instead of the 1155 found on the regular Sandy Bridge series. The extra pins are necessary because the two extra cores increase data flow in and out of the CPU. To accommodate for this, Intel has introduced a new socket with 856 extra pins (also future proof for next generation CPUs).

The new processor also has a turbo boost that can earn users up to 600MHz extra on a single core. When 5-6 cores are active and Turbo is enabled, the core speed on each core will rise about 300MHz. When only 1-2 cores are active and Turbo is enabled, the core speed will rise by up to 600MHz per core, resulting in a whopping 3.9GHz Max Turbo clock speed.
In addition to the higher core count and increased frequencies, the Core i7-3960X also carries over the AVX and AES instruction set architectures, introduced in the original Sandy Bridge processors. These architectures will boost processor performance in video transcoding and editing, and data encryption. The Sandy Bridge-E line with its X79 chipset will also support 40 PCI-Express lanes for extreme gaming.


Click Image to Enlarge

Here is the 3960X in all its glory. It is not a small processor, and with 2011 contacts it does have to be fairly large or else the contacts would have to be extremely small. Even with its current size if we take a look at the third picture, we have a direct comparison to a US quarter, and the CPU is just massive. If you are an AMD user, then you will not be too surprised by the size, as AMD’s CPUs have been fairly large as well.

Here we have a little demonstration of the Intel Core i7 3960X being installed in a LGA2011 socket. With its massive size, there needs to be a secure socket for the processor. Because of this, to get even pressure across the whole processor, Intel has developed a dual latch socket design. One of the latches holds down one side of the socket’s cover, while the other latch holds down the other side.


Finally, here we have a list of some of the main applications that are designed to support four or more processor threads, and some other applications that support the AVX instruction set, and are fully optimized for it. Applications related to video, photos, 3D rendering, or scientific tasks will see the most benefits with multi-core processors.
Intel DX79SI (Siler) Motherboard
| Specification | Intel DX79SI (Siler) Motherboard |
|
Form Factor
|
ATX (304.80 millimeters [12.00 inches] x 243.84 millimeters
[9.60 inches]) |
|
Processor
|
Support for Intel® Core™ i7 and Intel® Xeon® processors in the
LGA2011 package with: • Two PCI Express 3.0 x16 graphics interfaces (x16 electrical) • One PCI Express 3.0 x16 (x8 electrical) • Quad-channel memory interface |
|
Main Memory
|
Eight 240-pin DDR3 SDRAM Dual Inline Memory Module (DIMM) sockets arranged in four channels with support for the following: • DDR3 2400 MHz, DDR3 2133 MHz, DDR3 1866 MHz, DDR3 1600 MHz, DDR3 1333 MHz, and DDR3 1066 MHz DIMMs • ECC and non-ECC memory • 1 Gb, 2 Gb, and 4 Gb memory technology • XMP memory • 1.35 V low voltage memory (JEDEC standard) • Up to 64 GB of system memory using 4 Gb memory technology • Manual memory overclocking (voltage, clock, and ratio) |
|
Chipset
|
Intel® X79 Express Chipset consisting of the Intel® X79 Platform
Controller Hub (PCH) |
|
Graphics
|
Support for multiple PCI Express* graphics cards including linked cards
using Nvidia* SLI* technology and AMD* CrossFire X* technology |
|
Audio
|
• Independent multi-streaming 8-channel (7.1) audio and 2-channel audio subsystem, featuring:
― Intel® High Definition Audio interface ― RealTek* ALC892 codec • HD Audio front panel header • Onboard 3-pin S/PDIF output header and back panel optical S/PDIF output connector |
|
Expansion Capabilities
|
• Three PCI Express 3.0 x16 connectors (two x16 electrical and one x8 electrical)
• Two PCI Express 2.0 x1 connectors • One PCI* bus connector |
|
Legacy I/O Support
|
Nuvoton* Legacy I/O Controller that provides Consumer Infrared (CIR) support
|
|
Peripheral Interfaces
|
• Four USB 3.0 ports:
― Two ports routed to the back panel ― Two ports routed to an onboard connector • Fourteen USB 2.0 ports: ― Six ports routed to the back panel ― Eight ports routed to four onboard USB headers • Two IEEE 1394a ports: ― One port routed to the back panel ― One port routed to an IEEE 1394a header • Six Serial ATA (SATA) channels through the Intel X79 PCH: ― Two onboard 6.0 Gb/s SATA channels (blue connectors) ― Four onboard 3.0 Gb/s SATA channels (black connectors) |
|
LAN Support
|
Gigabit (10/100/1000 Mb/s) dual LAN subsystem using Intel® 82579L and Intel® 82574L Gigabit Ethernet Controllers
|
|
BIOS
|
• Intel® BIOS resident in an SPI Flash device
• Support for Advanced Configuration and Power Interface (ACPI), Plug and Play, and SMBIOS • Fast Boot • Support for advanced overclocking |
|
Power Management
|
• Support for the Advanced Configuration and Power Interface (ACPI) specification • Suspend to RAM (STR) • Wake on USB, PCI, PCI Express, LAN, CIR, and front panel • ENERGY STAR* capable |
|
Hardware Management
|
• Hardware monitoring and fan control through the Nuvoton I/O controller
• Voltage sense to detect out of range power supply voltages • Thermal sense to detect out of range thermal values • Four fan headers using PWM control • Four fan sense inputs used to monitor fan activity • Fan speed control using voltage control (4-pin fan headers for processor, front, rear, and auxiliary fans) with selectable support in the BIOS for 3-wire fans • Support for the Platform Environmental Control Interface (PECI) |


Intel has once again released an extreme motherboard along with their extreme processor line-up. In the end, we do expect Intel have their own extreme motherboard if they are the ones developing the X79 chipset platform, the new LGA 2011 socket, and Sandy Bridge-E CPU’s. As always, each of Intel’s high-end motherboards come with the Skull emblem, and the DX79SI Siler motherboard is no exception. The DX79SI comes in a fairly simple yet attractive box design. The architecture type box design looks very nice, along with the skull, and getting a peek at the motherboard before buying it also helps users decide on the motherboard they will be buying.


The box also comes with explanations to key features the motherboard has, including the 8 DIMM Quad-Channel Memory design, Bluetooth and Wi-Fi N support with the included module, Power Protection features to prevent system failures in case a power supply fails, easy overclocking profiles for gamers and enthusiasts, 3-Way SLI or CrossFireX Support and much more.


The board looks quite nice right out of the box. It is a standard ATX form factor motherboard, and the black and blue design is very eye-catching. The board seems to have a fairly nice component layout except for the main case connectors. We’ll go into more detail about that on the next page. It would have also been nice to see a 4-way SLI capable motherboard; however, there will be available motherboards from other manufacturers for that purpose. Even for users who do not run 4 graphics cards, having such a design has an advantage in terms of PCI-E slot layout. Having a motherboard that has 4 PCI-E x16 slots interspaced with x1 or PCI slots allows users to run up to three graphics cards, with a fourth x16 slot for hardware like sound cards. These setups are quite rare, though it is always nice to have the option to do that especially on a board that has 8 DIMM modules and is designed for extreme users.
With the hardware we are running, we expect to run three Full HD monitors while gaming at a 6040×1080 (Nvidia Custom) resolution in 3D. This motherboard is definitely capable of 2-Way SLI and an additional audio card, or just a simple 3-Way SLI system without the dedicated audio card. The Realtek Audio that comes with the motherboard is decent, but it will never compare to an actual audio card.


The rear of the motherboard with the I/O connectors is not too interesting. It has the necessary connectors for an average users including two USB 3.0 connectors, six USB 2.0 connectors, 2 RJ-45 LAN network connectors, a standard 7.1 audio connector, an IEEE 1394a Firewire port, and a “Back 2 BIOS” button which helps the user go back to the BIOS without having to push the Delete or F2 button when restarting.
There are additional peripheral connectors available, though these are only available internally and not for the rear I/O. There are additional two USB 3.0 ports, eight USB 2.0 ports, and an additional IEEE 1394a Firewire port.
On the previous page we saw the 3960X processor installed in the LGA2011 socket. With the processor out of the socket, we can see a total of 2011 pins. It’s truly beautiful to see so many pins in such a little area.


Here we have a straight-on view of the motherboard from the front and the back. We also have a naked view of the motherboard without the cooling solution. The block diagram below shows clearly how this motherboard functions. As a reminder, the Intel Core i7 3960X does support 40 lanes of PCI-E 2.0, and there is no PCI-E 3.0 support as of yet. Even without an NF200 chip, the board can still archive x16/x16/x8 PCI-E lane distribution. Though the board comes with PCI-E 3.0 switches, the 3960X CPU does not support PCI-E 3.0. Therefore we can only assume that the next processor available for LGA 2011 will support PCI-E 3.0.
This motherboard has the following expansion slots:
- PCI-E 3.0 x16
- PCI-E x1
- PCI-E 3.0 x16
- PCI
- PCI-E 3.0 x16 (8x)
- PCI-E x1


Click Image For a Larger One
Now let’s take a look at some of the accessories the buyer will receive with the DX79SI (Siler) motherboard. There is an included I/O Shiled plate, a thermal sensor that gets attached to the motherboard for real-time temperature monitoring, a 2-way and 3-way SLI bridge, and a mousepad with the skull emblem on it.
Intel DX79SI (Siler) Details

Here we have a detailed overview of the connectors and other components on the motherboard. The table on the right explains all the labeled components on the DX79SI motherboard. Since it’s laid out so nicely, we will not go into too much detail about each of the parts. We’ll highlight all the new goodies and interesting parts.
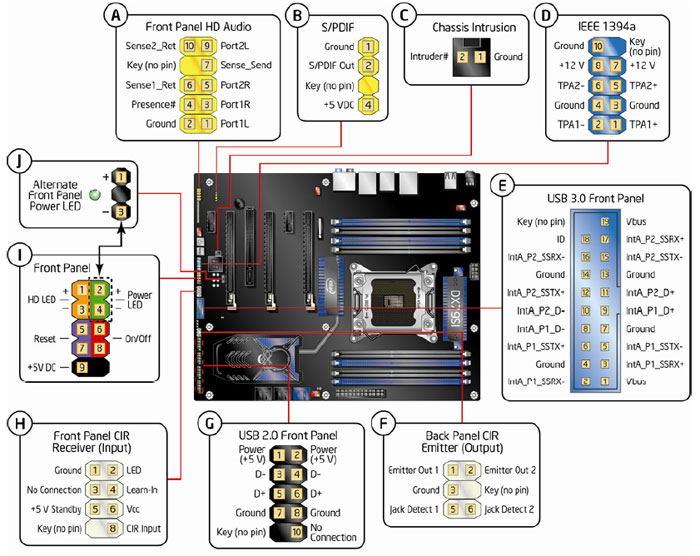
Here we have a closer look at the connectors available for things like USB 3.0, USB 2.0, Front Panel connectors, IEEE 1394a, HD audio, CIR receiver, Back Panel CIR Emitter, etc. The part that will be most useful is the Front Panel connector diagram, as it will be users’ only guide to connect all the front panel buttons to the motherboard correctly. There are no instructions or guides printed on the motherboard itself, so users will either have to refer to the manual or take a look at this image as a reference.


The board comes with the Realtek ALC892 chipset, which is not too interesting. This is what most motherboard manufacturers use on their motherboards. Some might use the Realtek ALC889 chipset, which has a better signal-to-noise ratio at 108dB. The ALC892 on the other hand has lower DACs (Digital-to-Analog Converter) with 95dB Signal-to-Noise Ratio, ADCs (Analog-to-Digital Converter) with 90dB Signal-to-Noise Ratio. The difference between the two Realtek chips should be minimal, but from what we’ve heard the ALC892 is better for 5.1 and 7.1 audio solutions, while the ALC889 is better for Stereo, though should still support surround audio.
Additionally, there are small system initialization / error LEDs towards the bottom of the motherboard. These LEDs display temperatures (green indicates OK; red indicates high temperatures), and also hardware initialization for all the main components that the system needs during POST. If anything fails, the LEDs will show which hardware failed to boot.
On the bottom, besides the USB 3.0 header for external USB 3.0 connectors are the power and reset switches. If we look closer to that area, we can also see a nice LED Debugger which will report error codes if there are any problems. Right next to the LED debugger, there are voltage metering points for overclockers, and the BIOS clearing jumper is located right next to the USB 3.0 connector. It is somewhat ridiculous that the front panel connectors are located right in the middle bottom portion of the motherboard. This is very inconvenient placement, as most case buttons nowadays are wired from the top of the front panel, instead of the bottom.
Right by the sexy skull heatsink, we can find four SATA II 3Gb/s slots (Black) and two SATA III 6Gb/s slots (Blue).


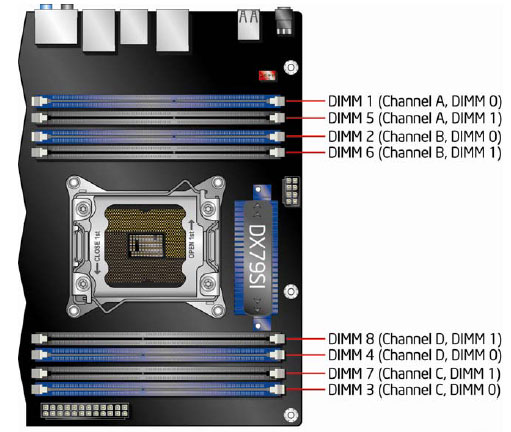
Further up the board we see 8 high-performance DDR3 memory module slots. They support up to DDR3-2400 MHZ specifications, and are quad-channel based. Some motherboards will only have 4 memory slots, though they will still be quad-channel. Most high-end motherboards, however, will come with 8 memory slots, just like the Intel DX79SI motherboard. Between the sets of 4 DIMM slots, we have the LGA2011 socket, which is currently compatible with the Sandy Bridge-E microarchitecture, though future BIOS updates could provide support for other microarchitectures that would provide PCI-E 3.0 support (the motherboard itself comes with PCI-E 3.0 switches).
The Intel Core i7 X79 SB-E architecture supports the following types of memory organization:
- Quad Channel (Interleaved) mode: Highest throughput for real world applications.
- Tri Channel (Interleaved) mode: When three DIMMs are installed in any DIMM location. Memory capacity must be the same.
- Dual Channel (Interleaved) mode: When two DIMMs are used. Memory capacity must be the same. If different speed is used on each memory modules, the slowest speed will be used across all modules.
- Single Channel (Asymmetric) mode: When single DIMM is used or when memory capacities are not equal. Slowest speed will be used for memory modules with different speed settings.
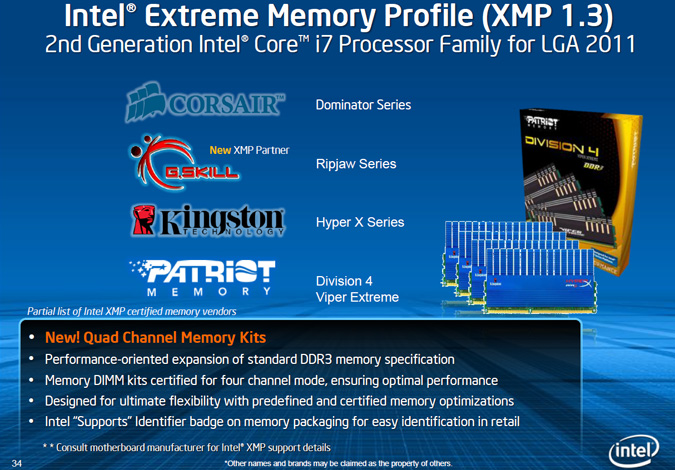
Intel is also releasing Intel Extreme Memory Profile (XMP 1.3) along with the X79 chipset. Some other Z68 motherboards like the ASRock Z68 Extreme7 Gen3 motherboard already support XMP 1.3. This profile is a new standard for DDR3-1866+ modules which allows XMP 1.3-compatible memory to automatically set the timing even more precisely than previous XMP 1.2 profiles.


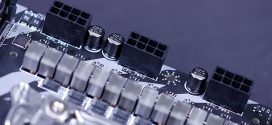
Here we’ve taken off the heatsinks from the motherboard to take a closer look at the voltage regulator module (VRM) design. By the CPU socket we can see an 8-phase power design and we can also see that besides the VRM chip towards the top, there are also Driver MOSFETs on this motherboard. Driver MOSFETs have become very popular over the past year. They get their name from having a Driver Integrated Circuit built right into an enclosure that holds both the MOSFETs and the Driver IC. To understand why this is done, one must understand that a standard traditional VRM consists of a Choke, Capacitors, MOSFETs and Driver ICs. So by combining the Driver ICs with the MOSFETs, mounting space is saved, and users gain higher power transfer and increased efficiency at higher switching frequencies. We can also see some hard thermal paste residue on the X79 chipset which we’ll take a closer look below.


Click Image For a Larger One
The X79 chipset looks different than than all the previous chipsets. There is nothing much to see on here so let’s take a look at what’s cooling the VRM and the chipset. The two heatsinks we see on the side are responsible for cooling the VRM and the X79 chipset. The larger one with the copper base is the chipset cooler. This cooler is a heatpipe based cooler and as we can see it spreads towards the middle of the motherboard to another heatsink where the heat is dissipated. The VRM heatsink on the other hand comes with a soft thermal strip which transfers heat from the Driver MOSFETs.
Intel RTS2011LC Liquid-Cooling System


Click Image For a Larger One
This is Intel’s RTS2011LC Liquid-Cooling solution, mainly designed for the LGA2011 Sandy Bridge-E platform, though it is also compatible with previous LGA1366, LGA1155, and LGA1156 sockets. Intel claims to gain up to 7 degrees better performance over their best tower-based air cooler. The RTS2011LC will not be bundled with the processors; instead, they will be available for purchase through channel distribution.


Click Image For a Larger One
The RTS2011LC is a fairly heavy water cooling unit, though definitely way lighter than a custom built water cooling loop, which comes with a powerful pump, thicker tubing, and a heavier copper base for the CPU. The RTS2011LC comes in roughly around 820g, but the weight should not be a problem if it is attached within the chassis. The radiator is 150mm, and a 120mm fan comes with the water cooling unit. The water block comes with a built-in pump and has a copper base for efficient heat transfer.


Click Image For a Larger One
All the necessary mounting tools are included with the water cooling solution, however the installation guide that came with the RTS2011LC was a joke. The instructions were bogus and were not helpful at all and made us ponder upon how to actually install the water block. After some common sense, we were able to easily install the complete water cooling setup into our chassis and onto our 3960X CPU. The 120mm fan that comes with the RTS2011LC is actually high-quality. The fan can run from anywhere between 800-2200 RPM and should generate between 21 dBA and 35 dBA of noise.
Other Air and Water cooling solutions for LGA2011
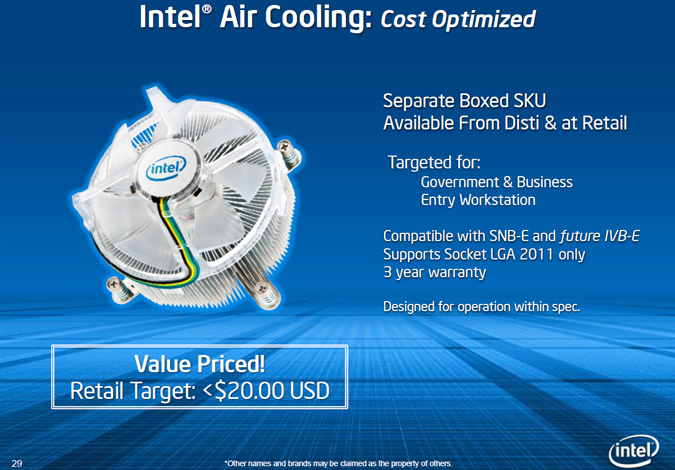
Other cooling options include Intel’s Stock air cooler which will cost about $20, but should be plenty to keep the processor from overheating during stock operations. When overclocking is needed, we recommend a third party high-end air cooling solution or Intel’s RTS2011LC liquid-cooling system.

Here we have some of the third party air cooling solutions that are available for purchase for the LGA2011 socket. Another great cooler not in the list is the Noctua NH-D14 tower cooler, which from our tests has performed way better than the Thermaltake Frio OCK on the LGA2011 socket.

Another great option is to go with a third party liquid cooling solution or build your own water cooling loop. A custom built water cooling loop with top-notch parts will always perform the best, however the Corsair H100 dual 120mm fan radiator should perform really nicely with the new Sandy Bridge-E processors.
Overclocking
With X58, (socket LGA1366) overclocking a Core i7 9xx Nehalem/Gulftown processor was an art in itself. Enthusiasts had lots of options to play around with making the system extremely tweakable when it came to overclocking. This included messing with BCLK, Multipliers, Memory Bandwidth, Timings, Main voltages and other system related voltages, and much more. The release of P67 (socket LGA1155) revolutionized overclocking. Instead of mainly relying on BCLK tweaking, which allowed for memory performance changes, the users were now mostly limited to just manipulating with the CPU Multiplier. This is nice for those that want to easily overclock their system with minimal tweaks, but it left the hardcore overclockers asking for more.
The X79 chipset seems to be somewhat a combination of the two platforms when it comes to overclocking. Since the new Sandy Bridge-E chips have the same architecture as previous Sandy Bridge CPU’s, overclockers still need to rely on multiplier-based overclocking. However, Intel has introduced a 2nd intermediate reference clock ratio multiplier, called the coarse ratio multiplier, that can play a big role during overclocking on the LGA2011 socket systems. The multiplier allows the user to raise the base clock frequency of the processor and its memory controller frequency, while leaving the I/O part of the architecture untouched.
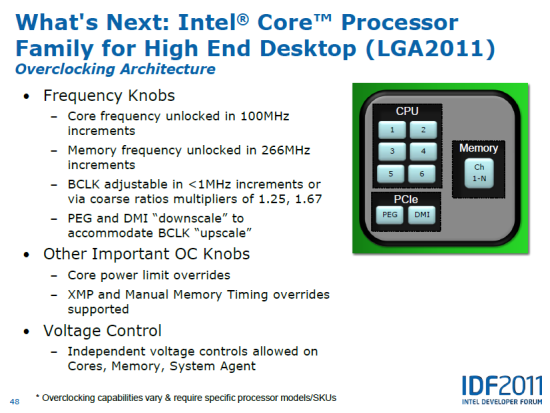
Overclockers are still stuck to the roughly 5% BCLK difference as on previous LGA1155 Sandy Bridge platforms, due to the PEG and DMI frequencies still being tied to the base clock frequency, however with the new coarse ratio multiplier, overclockers can apply 1.00x, 1.25x, or 1.67x multipliers to the other CPU Frequency determining settings for additional tweaking. This new multiplier is actually not located on the CPU at all. It is located right on the chipset, as the chipset is responsible for its operation.
So how does this all work? Here is a quick calculation:
Traditional Clockspeed Equivalency
[CPU Multiplier] x [Reference Clock] = [CPU Frequency]
ex1: [34x] x [100MHz] = [3400MHz]
ex2: [48x] x [100MHz] = [4800MHz]
Sandy Bridge-E Clockspeed Equivalency
[CPU Multiplier] x [Reference Clock Ratio] x [Reference Clock] = [CPU Frequency]
ex1: [33x] x [1.00x] x [100MHz] = [3300MHz]
ex2: [32x] x [1.25x] x [100MHz] = [4000MHz]
ex3: [24x] x [1.67x] x [100MHz] = [4008MHz]
Therefore, there is a lot of tweaking that can be done. Overclockers can manipulate with all three parts which will determine the overall CPU Frequency. The overclocking for memory modules will stay the same as on LGA1155. With a 266MHz increment the user will be able to set the speed on memory from DDR3-1067 all the way up to DDR3-2400. Do remember that the 3960X uses a memory controller which supports DDR3 1666MHz. Previous processors only supported up to DDR3 1067/1333MHz.

(Power Saving with Overclock)
The above picture shows how nicely the 3960X can downthrottle to 1200MHz when it is idle, even when the system is overclocked. Our power consumption graph will show the overall power consumption of the processor when the processor is idle and at 100% load.

(24/7 Safe 4.6GHz Overclock with Noctua NH-D14 CPU Air Cooler)
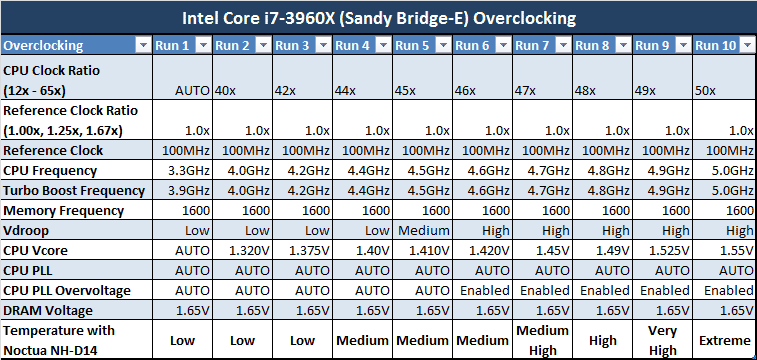
(Use table for reference only. Our settings might not be the settings that will work for you)
Here we have a basic overclocking table that we have successfully tested and been able to achieve 100% stability for at least an hour. Our 46x multiplier setting was tested for over 10 hours without any crashes. Do bear in mind that these overclocking results are done just on the 1.0x reference clock ratio. It is possible to achieve higher frequencies with lower CPU voltage and higher system agent voltage when the reference clock ratio is set to 1.25x or 1.67x.
- Low Temp: 25-60C
- Medium Temp: 60-70C
- Medium High Temp: 70-80C
- High Temp: 80C-85C
- Very High Temp: 85C-90C
- Extreme: 90C+
Also, bear in mind that a 1.55V CPU setting will be more if Vdroop is set to High. We do not recommend running the CPU higher than 1.45V for 24/7 use, as it leads to drastically shorter CPU lifespan.
Temperature

To test for temperatures, we ran Prime95’s Blend stress test for 30 minutes and we have recorded the results. Then we waited for another 30 minutes before we wrote down the idle temperatures.
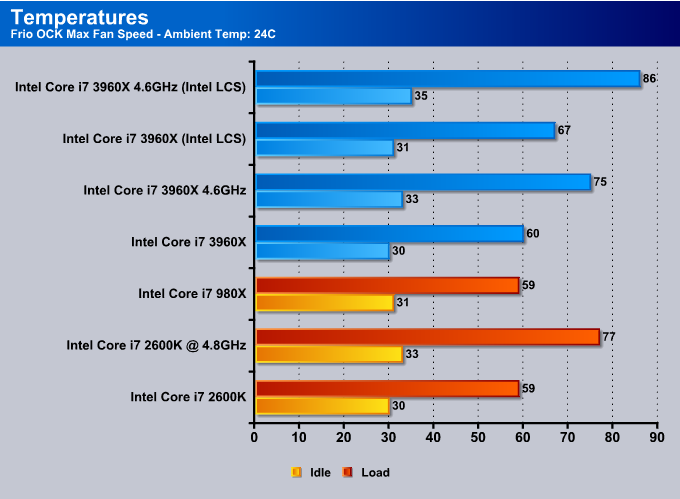
We have both the Intel liquid-cooling solution results as well as the Frio OCK Air cooler results above. Unless stated, we were using the Frio OCK at max fan speed settings in a ambient room temperature of 24C. To calculate delta temperatures, subtract ambient temperatures from total temperature to know how well each cooler performs at the same TDP.
The Core i7 3960X definitly runs much hotter than the previous 4-core Sandy Bridge architecture, but it is not surprising, as there are two additional cores that need to be cooled and the processor specification shows a 130W TDP, as compared to the 2600K’s the 95W TDP. The 980X only has stock temperatures as we were unable to use the Thermaltake Frio OCK to get stable temperatures at 4.53GHz. Notice that the 980X also has a 130W TDP, but its idle temperature is higher. This is most likely due to its worse power efficiency as the 980X’s Gulftown architecture cannot downclock itself as well as the 3960X on the Sandy Bridge-E architecture.
For users who are planning on getting the 3960X, the Intel RTS2011C Liquid-Cooling solution will be able to sustain overclocks to 4.6GHz or slightly higher, but remember that the temperatures will be in the 80+ C range and could easily pass 90C on hotter days. It is recommended to get a high-end air cooler or a custom built dual 120mm radiator water cooling solution if you are planning on going past 4.6GHz on the 3960X.
Power Consumption

For overall CPU power consumption, we have ran Prime 95’s Blend stress test. The highest number we saw on our wattage meter was recorded for maximum Watts used at by the CPU, while for idle we took the lowest wattage number after we shut down the application. Do remember that the wattages below do have additional hardware power consumption in it, including hard drives, SSDs, video cards, etc. System specs are available on our Testing & Methodology page. So we are more interested in the difference between each CPU instead of overall power consumption as the power consumption for a system running a low end video card, and a single SSD would be much lower than a system running two GTX 580s, and several storage devices. Each system used the same hardware, except for different motherboards due to socket and chipset types.

Just like with the temperatures, the power consumption shows the same exact pattern. With a higher TDP, we can expect much higher power consumption as well. We can see that even when the 3960X is overclocked at 4.6GHz, the idle power consumption only hits around 178 Watts with two GTX 580s, two hard drives, and an SSD. The load power consumption on the other hand is quite outrageous when it comes to overclocking. We managed to hit 402 Watts at full load at 4.6GHz, while the 2600K only got up to 264 Watts at 4.8GHz. That is a big gap between the two processors. The 980X got slightly lower power consumption at full load as it was also running at a lower clock speed, though its idle wattage was 12 Watts higher over the full load of a stock 2600K, and 52 Watts higher than the 3960X’s idle power consumption.
BIOS
Main


Click Image For a Larger One
Here we are at the Intel DX79SI BIOS. It’s nothing too special, it is the old traditional BIOS layout that we have been familiar with till the new Graphical GUI based UEFI BIOS’ were launched this year. Needless to say, this BIOS does support UEFI and has all the features you will need to run an enthusiast system. On the first page we have very basic processor options like the amount of cores that the processor should use, whether the user wants to enable Hyper-Threading Technology or just check the current system specifications.
Congifuration


Click Image For a Larger One
The Configuration tab allows us to change different settings, including On-Board Devices, Sata Devices, Event Log Settings, Video card options, Fan Controller Settings for real time monitoring and PWM fan control settings. and PCI/PCI-E Add-in Slot configuration. These are the areas where users will be able to set up Hard Drive options, IDE, RAID, or AHCI type storage, or the Enhanced Consumer IR, Audio, LAN and Firewire 1394 port settings, etc.


Click Image For a Larger One
Here we have a closer look at the fan controller settings and and how users can manually set up the fan duty cycle percentage according to their liking. Also, with Automatic settings the user can set up thresholds when the fan should spin up to a set duty cycle. Voltage warning notifiers can be set in the BIOS under the voltage settings in case there are some Power Supply issues and there is either too much voltage or not enough voltage being supplied to the system.
Performance


Click Image For a Larger One
This is where things get very interesting for overclockers. For overclockers that have not looked at the overclocking page in this review, we recommend taking a look at that first before coming here and trying to understand what each of the settings are. It’s very simple: there is an additional host clock multiplier which can be set to 1.00x, 1.25x, and 1.67x. This will help take overclocking one step further. Intel also made it very easy for less experienced users to overclock their system by setting the overclocking Assistant to either a 1.00x or 1.25x Profile. Once that is set, the motherboard has preset Processor Speed’s for overclocking which will also automatically set the voltages to run your system stably. Additional Vdroop changes might be necessary when using higher frequencies. Also, the user will have to manually set their DRAM clock speed and voltage to make sure their system will run 100% stable. If the user is running an XMP 1.3 compatible DRAM, they will be able to take advantage of the higher 1866+ MHz memory presets for up to 2400MHz.


Click Image For a Larger One
The user can also manually set up memory timings, CPU power settings, turbo options, multipliers, BCLK, etc. PLL Voltage Override is also available for users that will be overclocking their system past the 4.6GHz mark. Do remember though that with Internal PLL Voltage Override, it is impossible to come back from Windows 7 sleep mode. The CPU multiplier can also be changed from 12x all the way up to 65x.
Security, Power, Boot and Exit


Click Image For a Larger One
Finally, in the last four tabs, the user has the option to set up BIOS security features, like setting a password when the user wants to enter the BIOS. The Power tab allows the user to set up CPU power options and wake options. The Boot section has settings like enabling or disabling the Intel logo at system startup, and system booting optimizations if users just want to get to the OS as fast as its possible. The Boot Tab also gives the user options to set up booting priorities. In the Exit tab, the user can save their BIOS settings and also create BIOS profiles for easy Overclocking profiles or different BIOS setup profiles.
Testing & Methodology
We’ve expanded our testing suite considerably for the X79 chipset, and will continue to use the same methods for most of the motherboards and CPU’s we test. In the interests of thoroughness and accurate results, we run each test at least three times, and some tests more than that. We average the total of all the tests from each benchmark then report the average here. If we had any ambiguous results we left those out and ran the benchmark once again.
The OS we use is Windows 7 Pro 64bit with all patches and updates applied. We also use the latest drivers available for the motherboard and any devices attached to the computer. We do not disable background tasks or tweak the OS or system in any way. We turn off drive indexing and daily defragging. We also turn off Prefetch and Superfetch. This is not an attempt to produce bigger benchmark numbers. Drive indexing and defragging can interfere with testing and produce confusing numbers. If a test were to be run while a drive was being indexed or defragged, and then the same test was later run when these processes were off, the two results would be contradictory and erroneous. As we cannot control when defragging and indexing occur precisely enough to guarantee that they won’t interfere with testing, we opt to disable the features entirely.
Prefetch tries to predict what users will load the next time they boot the machine by caching the relevant files and storing them for later use. We want to learn how the program runs without any of the files being cached, and we disable it so that each test run we do not have to clear pre-fetch to get accurate numbers. Lastly we disable Superfetch. Superfetch loads often-used programs into the memory. It is one of the reasons that Windows occupies so much memory. Vista fills the memory in an attempt to predict what users will load. Having one test run with files cached, and another test run with the files un-cached would result in inaccurate numbers. Again, since we can’t control its timings so precisely, it we turn it off. Because these four features can potentially interfere with benchmarking, and and are out of our control, we disable them. We do not disable anything else.
Test Rig
| Test Rig | |
| Case | Cooler Master Storm Trooper |
| CPUs |
|
| Motherboards |
|
| Ram | Patriot Gamer 2 16GB (4x4GB) DDR3-12800 1600MHz 9-9-9-24 Memory |
| CPU Cooler |
|
| Hard Drives | 2x Western Digital RE3 1TB 7200RPM 3Gb/s Hard Drives |
| SSD | 1x Kingston HyperX 240GB SATA III 6Gb/s SSD |
| Optical | ASUS DVD-Burner |
| GPU | 2x Nvidia GeForce GTX580 Video Cards in 2-way SLI |
| PSU | Cooler Master Silent Pro Gold 1200W PSU |
| Mouse | Razer Imperator Battlefield 3 Edition |
| Keyboard | Razer Blackwidow Ultimate Battlefield 3 Edition |
Test Suite
We will use the following applications to test the performance of the X79 Chipset (Motherboard, Processor).
| Benchmarks |
|---|
| SuperPi Mod 1.5 |
| Wprime 1.55 |
| PCMark 7 |
| 3DMark 11 |
| 3DMark Vantage |
| Cinebench R10 |
| Cinebench R11.5 |
| SiSoft Sandra 2011b |
| HD Tune Pro |
| X264HD |
| Truecrypt 7.1 |
| Unigine Heaven 2.5 |
| Metro 2033 |
| Lost Planet 2 |
PCmark 7

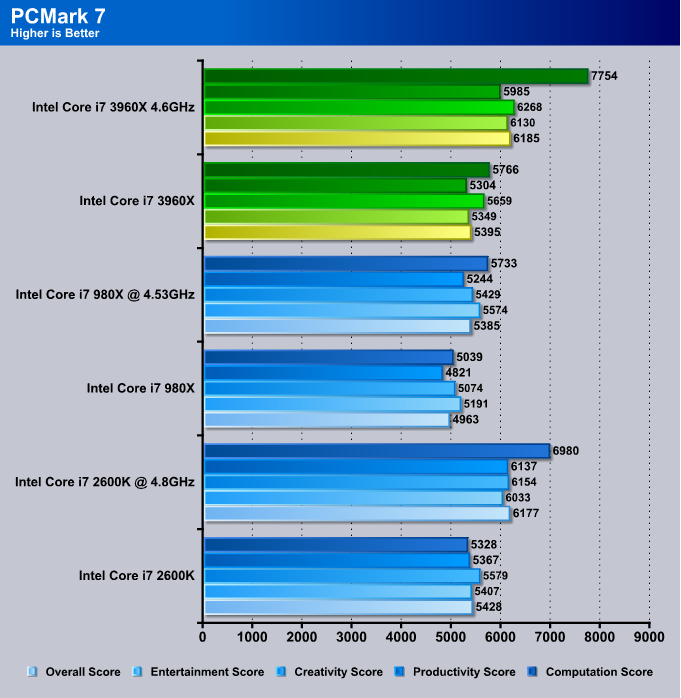
Let’s start by looking at PCMark 7. The Computation Score is the most CPU demanding test here and we can see that the i7 3960X is 8% faster than the Core i7 2600K and 15% faster than the previous performance king, the i7 980X. Other tests in the PCMark do not separate the i7 2600K and the i7 3960X much, as both processors Turbo up within 100MHz of each other, and not all of the cores are being utilized.
Looking at the performance improvement over the i7 980X, we can see that Intel has improved the performance by as much as 12%. This is very much what we have observed with the Sandy Bridge where the improvement on the instruction per clock has been increased where we can see that the i7 3960X is able to yield similar results compared to the i7 980X overclocked to 4.53GHz.
3DMark 11
![]()
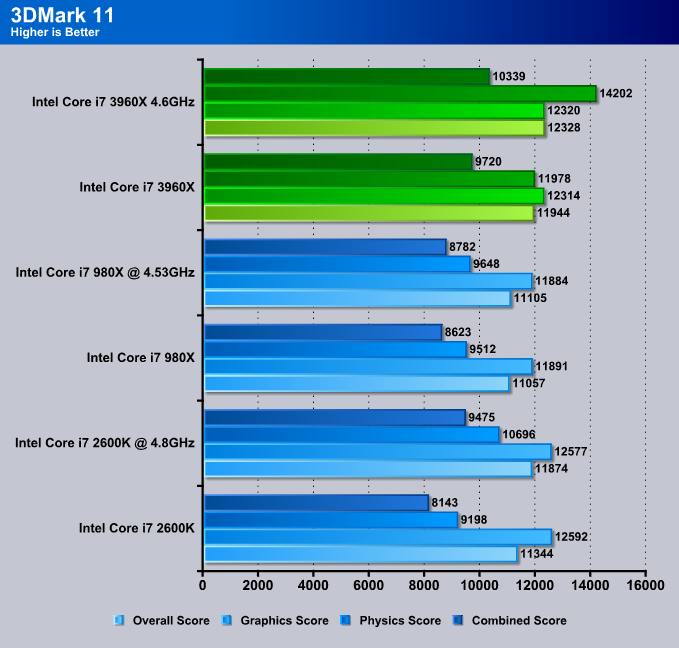
Looking at the Physics score in the 3DMark11, we can see how the extra cores comes in handy where the i7 3960X is 30% faster than i7 2600K and 26% faster than the i7 980X. We can also see a higher combined score when the processor and the GPU work together to render a scene with rigid bodies. The overall score also saw about an 800 point difference just from going from a 980X to a 3960X at stock settings.
3DMark Vantage
![]()
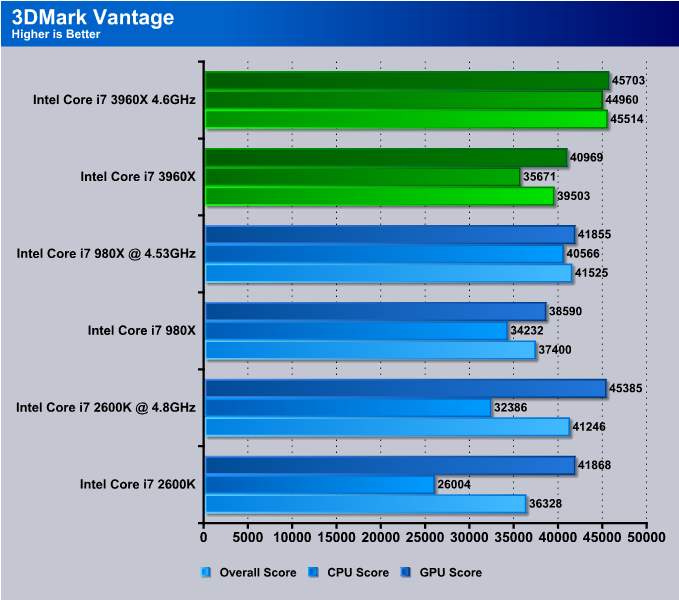
The CPU score in the 3DMark Vantage shows the i7 3960X to be 5% faster than the 980X and 37% faster than the 2600K. When the processors are overclocked, we saw an even bigger performance difference between each processor, while the 3960X took the crown in all areas of the benchmark.
SuperPi
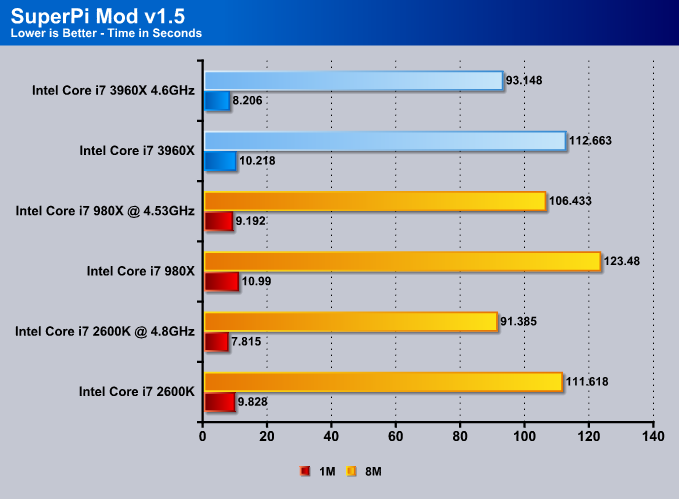
We see the i7 3960X is a tad slower here than the i7 2600K due to the lower overall stock clock speed. Compared against i7 980X, we do see 8% improvements. SuperPi Mod 1.5 takes advantage of single core calculation, and does not take the number of cores into consideration at all, which accounts for the results.
Wprime
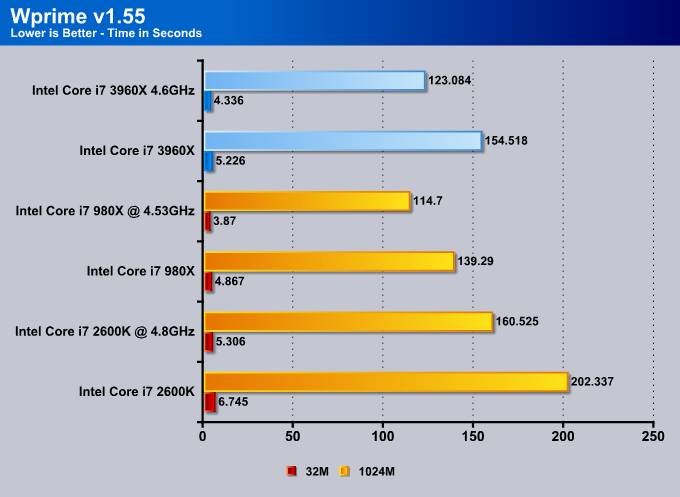
WPrime is multi-core aware and we see a huge improvement here. The i7 3960X at stock speed is faster than the i7 2600K but for some reason it falls behind the i7 980x. We have realized that our ASUS P9X79 Pro motherboard does perform slightly better than the Intel board. The reason behind the scores could be that the 980X ran on a board specifically designed for overclocking, the GIGABYTE X58A-OC motherboard.
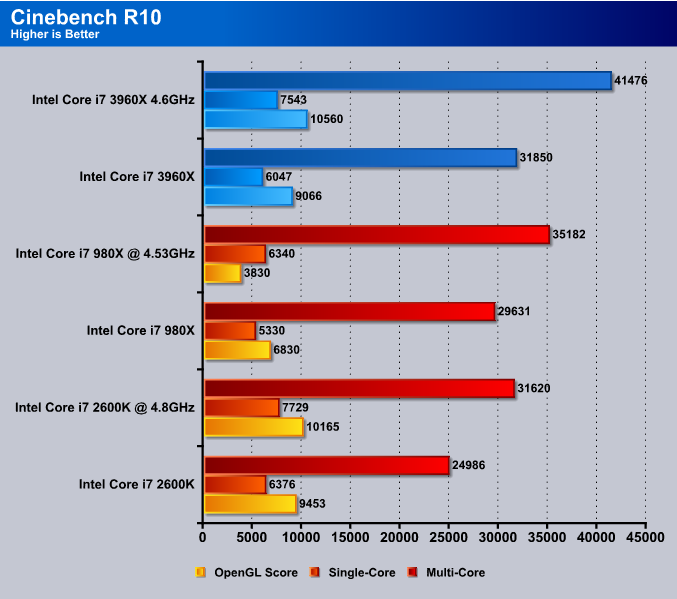
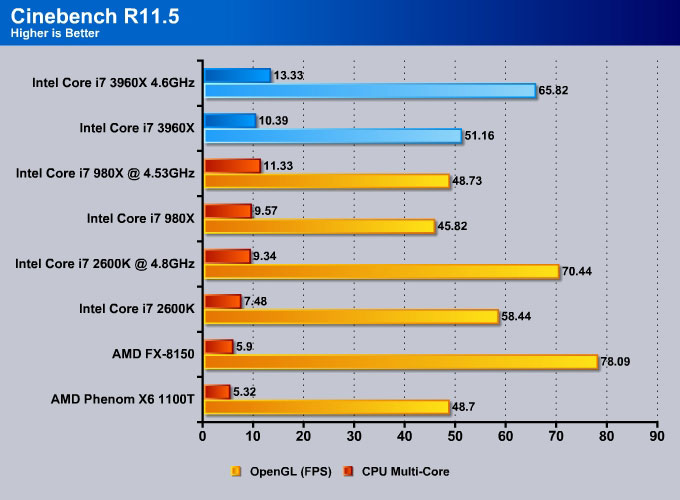
Cinebench R10 and R11.5

“CINEBENCH is a real-world test suite that assesses your computer’s performance capabilities. MAXON CINEBENCH is based on MAXON’s award-winning animation software, CINEMA 4D, which is used extensively by studios and production houses worldwide for 3D content creation. MAXON software has been used in blockbuster movies such as Spider-Man, Star Wars, The Chronicles of Narnia and many more. MAXON CINEBENCH runs several tests on your computer to measure the performance of the main processor and the graphics card under real world circumstances. The benchmark application makes use of up to 16 CPUs or CPU cores and is available for Windows (32-bit and 64-Bit) and Macintosh (PPC and Intel-based). The resulting values among different operating systems are 100% comparable and therefore very useful with regard to purchasing decision-making. It can also be used as a marketing tool for hardware vendors or simply to compare hardware among colleagues or friends.”
SiSoft Sandra 2011b

“SiSoftware Sandra (the System Analyzer, Diagnostic and Reporting Assistant) is an information & diagnostic utility. It should provide most of the information (including undocumented) you need to know about your hardware, software and other devices whether hardware or software. It works along the lines of other Windows utilities, however it tries to go beyond them and show you more of what’s really going on. Giving the user the ability to draw comparisons at both a high and low-level. You can get information about the CPU, chipset, video adapter, ports, printers, sound card, memory, network, Windows internals, AGP, PCI, PCI-X, PCIe (PCI Express), database, USB, USB2, 1394/Firewire, etc.”
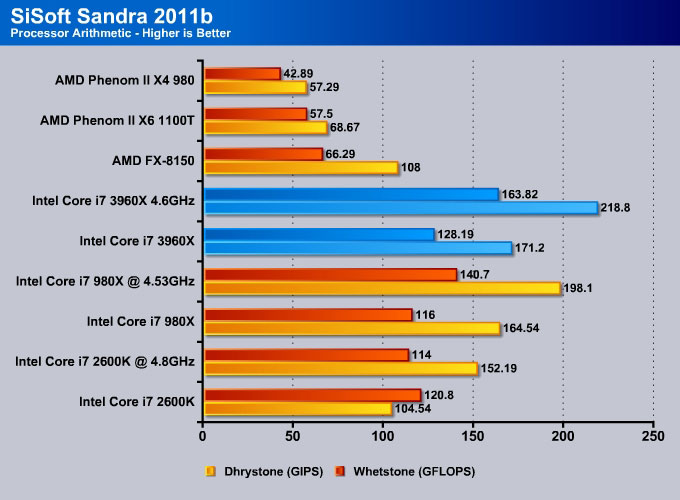
Both Dhrystone and Whetstone are multi-threaded, and test a processor’s floating point arithmetic. Here the 3960X processor dominates the benchmark with a 10% gain over the i7 980X.
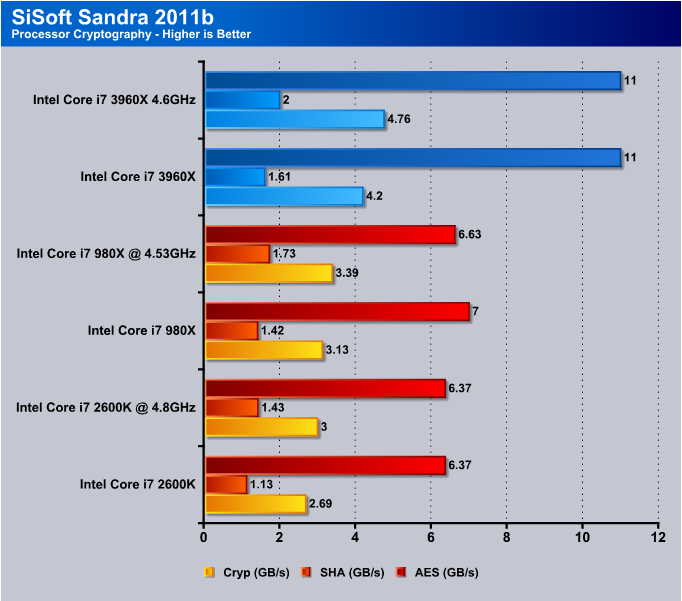
Sandra’s Cryptography measures a processor’s performance at handling AES encryption/decryption and SHA for signing. Intel processors have hardware accelerated support at AES encryption since Nehalem (i7 980X) and we can see that the i7 3960X gives us a 20% gain over the i7 980X despite running at a lower clockspeed of 3.3GHz vs 3.33GHz.
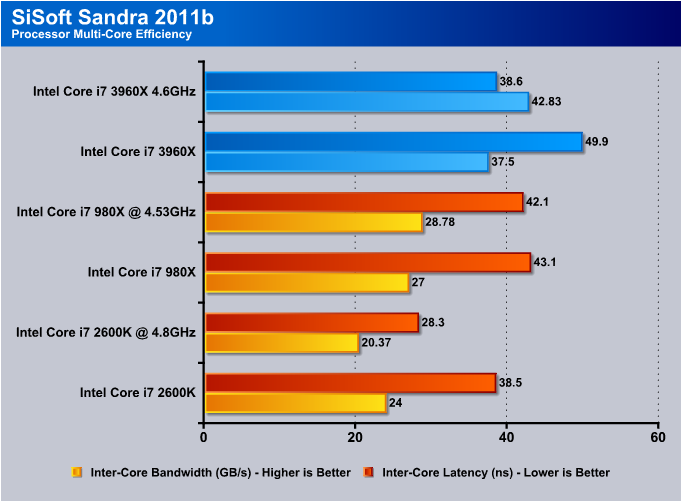
The performance we see here shows the performance of multiple cores working together. The higher the Inter-Core number, the better the performance. However, for latency, it is better to have a lower number, because latency is the amount of time it takes for the processor to send a block of data from one core to the other.
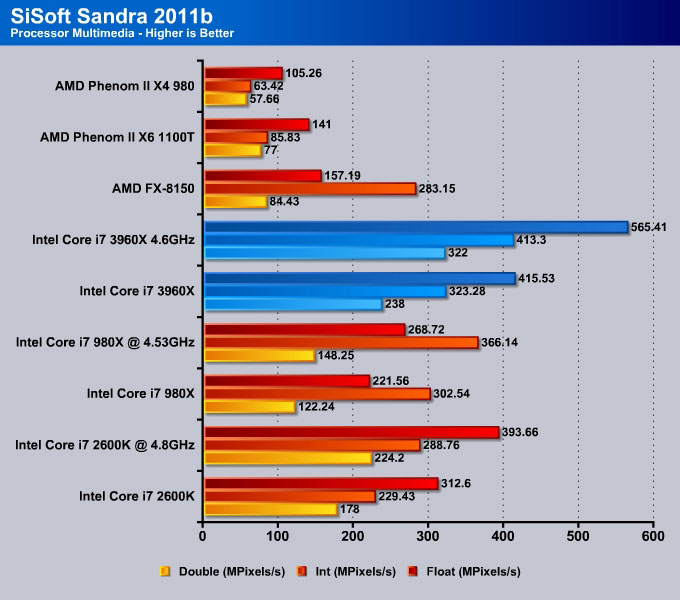
The Sandra Processor Multimedia test involves the generation of Mandelbrot Set fractals that are used to realistically describe and generate natural objects such as mountains or clouds. The 3960X processor at 4.6GHz completely slaughters the rest of the competition.
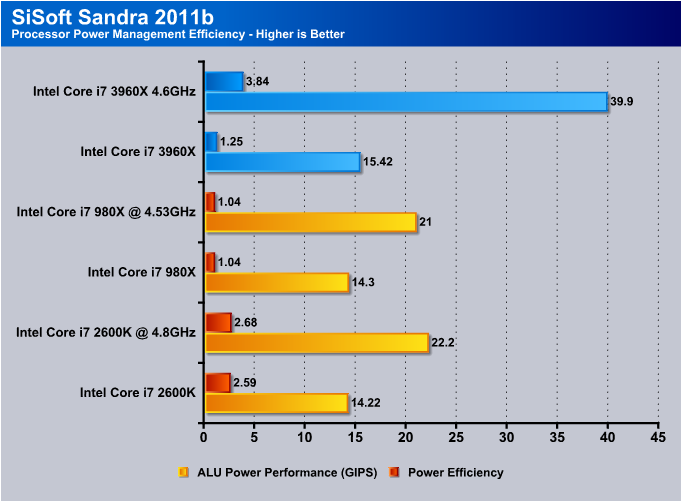
The ability of the processors to step-down in frequency and voltage at different workloads is measured here. The more a processor steps down in both frequency and voltage, the better the score at the specific workload. The test stops when the workload is too great for the processor even at 100% efficiency.
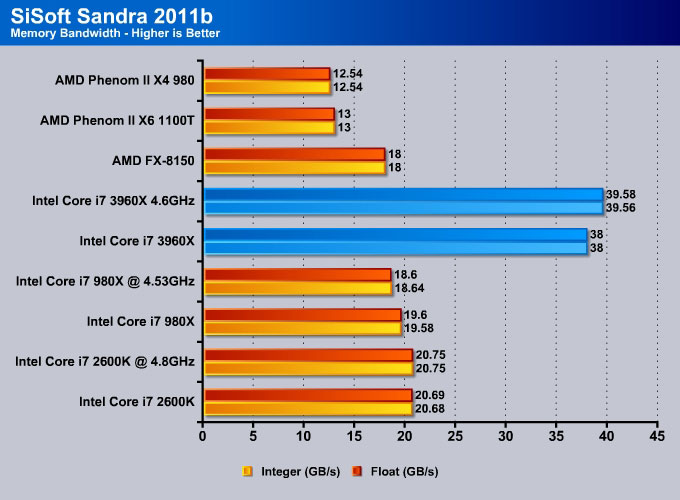
The latest i7 980X shows a significant memory bandwidth compare to the i7 980X. Intel has increased the memory support up to 1333MHz with Sandy Bridge and the latest six-core processor now supports quad-channel memory, one more than the i7 980X. We already know that Sandy Bridge processors have a very efficient memory controller, and the 3960X will have plenty of bandwidth.
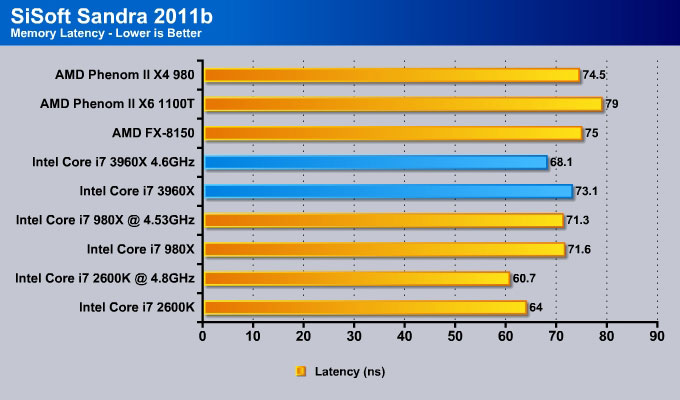
The memory latency takes a slightly hit where we see that the i7 2600K is 9ns faster than the i7 3960X. In fact, the latency is also a tad slower than the i7 980X.
HD Tune Pro

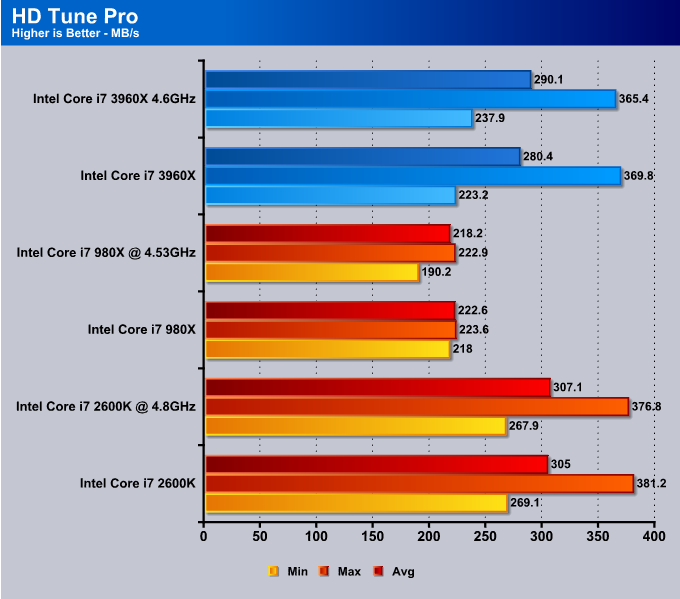
The latest X79 chipset has support for SATA 6 Gbps interface natively. We can see that the new chipset has a tad less bandwidth than the P67/Z68. Keep in mind that the difference can due to a motherboard difference or the chipset driver, so we would not worry too much on that difference.
X264HD

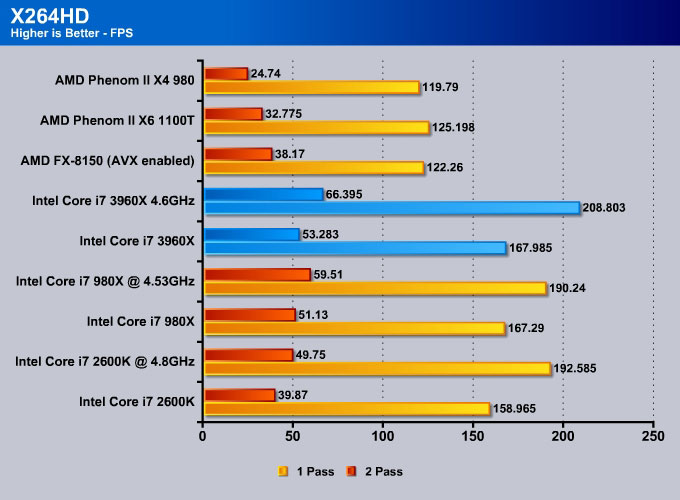
Transcoding has become more popular now and the latest Sandy Bridge processor adds support for AVX instruction for faster video transcoding. We can see that the i7 3960X is 3% faster than the i7 980X despite running at 100MHz slower. The extra cores are definitely helpful here, and we can see that the i7 3960X is about 33% than the i7 2600K and even at 4.8GHz, the i7 3960X is still 7% faster.
Truecrypt 7.1

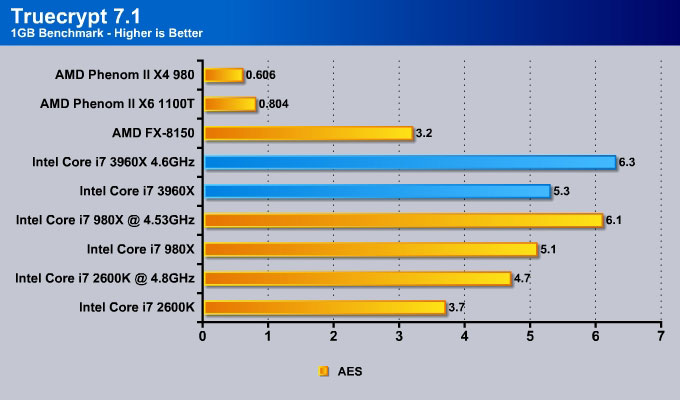
TrueCrypt is a real world application that gives a true performance of our latest processor. Here the i7 3960X is 3% faster than the i7 980X and 43% faster than the i7 2600K.
Unigine Heaven 2.5

Unigine Heaven is a benchmark program based on Unigine Corp’s latest engine, Unigine. The engine features DirectX 11, Hardware tessellation, DirectCompute, and Shader Model 5.0. All of these new technologies combined with the ability to run each card through the same exact test means this benchmark should be in our arsenal for a long time.
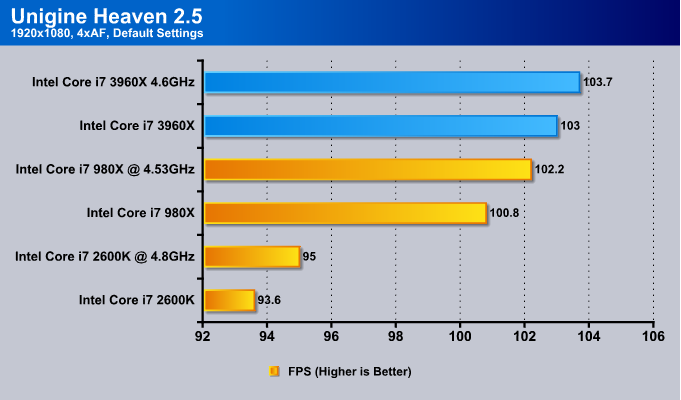
Unigine Heaven 2.5 seems to take full advantage of any processing power that it can find. As we can see the performance gradually increased as more performance was given to the application. From previous benchmarks we are quite certain that the Intel Core i7 3960X is a faster processor over the 980X, so it is not surprising that the 3960X takes first place in this benchmark as well.
Metro 2033
![]()

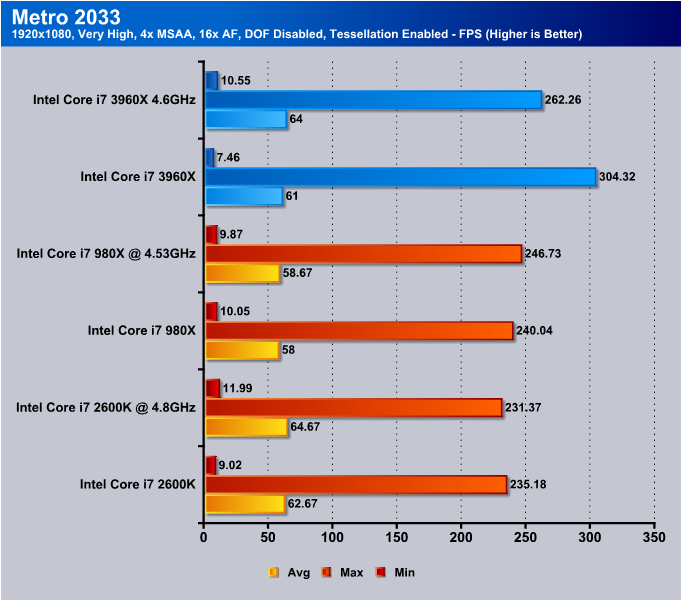
Metro 2033 is a very demanding game for graphics, though we wanted to see how additional cores on the 3960X can help with gaming performance. It turns out that Metro 2033 heavily relies on actual core speed instead of number of cores. This is why we can see higher scores for the 2600K. The Sandy Bridge platform performs way faster in graphics as well over the older Gulftown platform.
Lost Planet 2


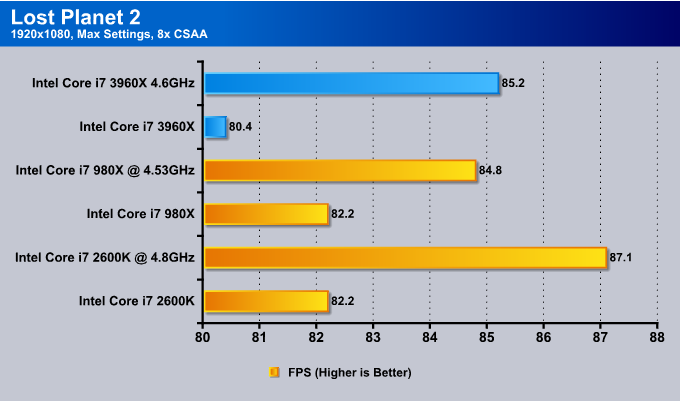
Lost Planet 2 seems to show the same performance as Metro 2033 showed. The The overall core clock speed matters the most in these games rather than actual core numbers. This brings us to the conclusion that it is better to invest your money in a 2700K processor, which has a higher stock core speed and can also overclock much higher and easier due to a lower TDP.
Other X79 Motherboards to Consider
ASUS P9X79 Pro
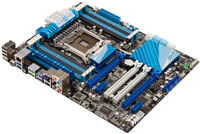 ASUS makes amazing boards for gamers and even mainstream workstations. The P9X79 Pro board is an excellent new offering by ASUS with a slot layout that offers many opportunities for expansion cards with all of the performance that the new LGA 2011 board and X79 chipset offers. With the inclusion of Bluetooth and USB 3.0 Boost along with 8 DIMM slots for maximum memory density this board has a design that will perform with the top players and should offer performance comparable to the top players. Our full review of this board will be published soon, so stay tuned.
ASUS Rampage IV Extreme
 The Rampage IV Extreme is nothing short of an engineering marvel. Many of these features provide much greater performance for the hardcore gamer and the extreme overclocker alike. It includes “GPU Hotwire” which allows for voltage modification via the motherboard connected wires. Another first would be the “OC Key” which allows adjustment via GUI overlay directly on the same display as the benchmarking system. GPU/DIMM POST allows for immediate diagnosis and recognition of installed and detected hardware while the lane simulation allows for optimization of installed card layout to best optimize performance. Stay tuned for the full review, coming soon at Bjorn3D.
GIGABYTE X79-UD5
 While not quite to the level of the UD7, The X79-UD5 looks to be a great performance/Value option for the enthusiasts platform, including a bundled BT 4.0/WiFi card which offers the best in connectivity and a slot layout optimized for adequate airflow to a 3 way SLI or crossfire configuration. Including the back panel overclock and BIOS switch there are many features that will enhance the user experience for any enthusiast or gamer with this one. Offering 8 DIMM slots, this model will offer much like some of the others maximum density for the best usage of the triple channel memory controller and the extreme performance it offers. Look to Bjorn3D for the full overview of this board and its unique features coming soon.
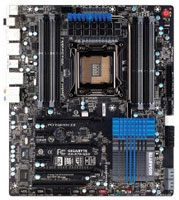
GIGABYTE X79-UD7
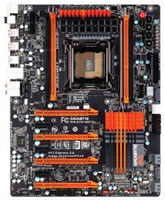 GIGABYTE is at it again with the new X79-UD7. Previously the UD7 was the top desktop board with awesome performance, but for top overclocking potential there was the X58A-OC board. On the X79-UD7, GIGABYTE combined the overclocking capability of the OC series boards with the awesome layout and features found on the top line UD7 board. This board boasts such features as full 4-Way SLI compatibility, Strong VRM to ensure steady overclocking, and an OC station at the top right of the board that is sure to be a delight to anyone. This board looks to be a contender as a great performance offering with the inclusion of the all new UEFI interface and 3DBIOS, which we will cover in the full review.
GIGABYTE G1.Assassin 2
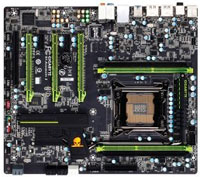
The G1.Assasin 2 is exactly what what we come to expect from the G1.Killer series boards. With an enthusiasts slot layout, Killer NPU, and Creative audio, this board is designed to provide the best gaming experience. The heatsink designs carry on the weaponized appearance, and do a great job of keeping components cool. All in all this looks to be an impressive offering with some value added components, and if the price is right, could be an excellent value for gamers.
MSI X79A-GD65(8D)
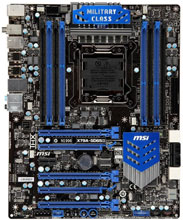 The MSI team has been busy working on the new LGA 2011 platform, and it shows in one of the top of the line offerings: the X79A-GD65 8D. The 8D signifies the 8 DIMM slots which are offered for maximum memory density in quad channel mode. This board comes to market showing many features including Military class components which should hold up to any situation. This board should have no problem showing a nice long life in a gaming or overclocking rig. This board is built to run with onboard overclocking controls and a whole slew of features to enhance the user’s experience. We will be showing all this board has to offer and how it performs compared to the rest of the pack and what does MSI offer that will make it worth your hard earned cash. Stay tuned as Bjorn 3D will be bringing you this and more coming soon!
MSI Big Bang XPower II
 The MSI Big Bang Xpower II is a board we have only seen some basics on but have not gotten much in depth information about. While we know it is all PCI-E slots like its predecessor the X58 based Big Bang motherboard. As soon as we get more info and possibly a unit for evaluation we will be sure to bring a full review for our readers.
EVGA Dual-Processor X79 Motherboard (SR-3)
 Successor to the popular dual socket SR-2 by EVGA, the newly pictured SR-3 looks ready to break some records. Specifics on the board are not known at this time, but rumors include dual chipsets to allow dual unlocked processors, or even the new server chipset which poses some limitations but allows for the dual processors to communicate with each other. With this and the new 8-core/16-thread Xeon processors, there is definite chances for huge performance for an insane overclocking rig or possibly even an off the wall workstation.
There are many other motherboards available from ASUS, GIGABYTE, MSI, and other manufacturers such as AsRock, ECS, Foxcon, and Biostar. This is just a list to give you an idea on what to look out for when buying your next X79 chipset motherboard. There are about 27 different motherboard models available at launch, and more to will be released in the near future.
Our Final Thoughts
 The X79 Chipset is definitely something we have been waiting for all year. With the combination of the new Sandy Bridge-E CPU’s, which use the original Sandy Bridge architecture, the new 6-core processors with quad-channel memory support can definitely outperform even Gulftown based CPUs. X58 used to be the chipset for overclockers with the Nehalem/Gulftown processors. P67 and Z68 are awesome platforms running the Sandy Bridge architecture for mainstream high-end users trying to push as much out of their gaming systems as possible with easy high overclocking potential. However, X79 is a combination of both X58 and P67, the next enthusiast overclocking platform that will take benchmark world records and overall user experience to the next level.
The Sandy Bridge-E microarchitecture that the Intel Core i7 3960X uses went through a lot of development to come to this level. 6 cores and 12 threads make it possible to boost rendering times in heavily multi-threaded applications like video editing software, compositing software, audio editing, 3D animation, modeling and rendering, photo editing, and much more. Some of the really exciting advancements we enjoyed experimenting with included the upgrade to the internal memory controller. With quad-channel DDR3-1600 MHz compatibility, the performance is doubled over the Intel Gulftown Extreme processors’ microarchitecture that used triple-channel memory support at DDR3-1066 MHz. We saw the results in SiSoft Sandra’s Memory Bandwidth benchmarks. Next, the new 40 PCI-E 2.0 lanes make it possible to get full 3 to 4-Way SLI or CrossFireX support as long as the motherboard supports such a configuration. The Intel DX79SI (Siler) motherboard we examined in this review supports up to 3-way SLI without any necessary third party chip like the Nvidia NF200 . We also noticed a clear performance improvement in applications simulating physics and 3D rendering. This is due to the the larger L3 cache size of 15MB over the 12MB cache on the 980X, or the 8MB cache on the 2600K. Finally, another nice improvement to Sandy Bridge-E architecture over the Nehalem and Gulftown architectures is the new AVX and AES instruction sets. Many applications–such as Cakewalk Sonar–are AVX optimized, which cuts down calculation times drastically as Cakewalk takes advantage of the AVX instruction set.
Of course we cannot forget about the overclockers. We started off saying that the new X79 chipset and the combination of the Core i7 3960X, 3930K processors would allow users to tweak their systems for best possible performance. With the new X79 chipset a new Reference Core Ratio is added, which is completely independent from the processor and actually is located right on the chipset itself. With the new 1.00x, 1.25x, and 1.67x ratios, the user can tweak the overall CPU frequency, as the overall core frequency will now not only rely on the CPU Multiplier and the Reference Clock, but also on the Reference Clock Ratio. With some tweaking we were able to achieve 5GHz on the ASUS P9X79 Pro motherboard, and we could get as high as 4.7GHz on the Intel DX79SI (Siler) motherboard. Remember however that the DX79SI does come with Overclocking presets which makes it extremely easily for an unexperienced user to overclock their system without knowing anything too technical.
The new 6-core Sandy Bridge-E processors put AMD’s 8-core Bulldozer to shame. We do have to remember though that AMD’s processors cost several hundred dollars less, and are targeted to users whose budgets are tighter. The Intel Core i7 3960X isn’t cheap: it has an MSRP of $990, while the 3930K will be around $555. The Intel DX79SI motherboard will be in the $280-$300 range, and there will be no coolers bundled with the processors, so we would either recommend Intel’s RTS2100C liquid cooling solution, or some third party high-end tower air cooler or water cooling solution.
Our overall conclusion is that if you are planning on playing video games, or just doing basic web browsing, document work or basic multimedia, we recommend the 2500K, 2600K, or 2700K Sandy Bridge processor. For gaming core speed seems to be a big factor in video games over actual core count. If you are working with heavily multi-threaded applications that require lot of processing power from the CPU, we highly recommend the 3930K if you cannot spend the extra $440 on a 3960X processor.