MSI’s newest X79 offering attempts to take on the top dogs in the X79 family. See how well it does.
Introduction: msi X79a-gd65 (8D)
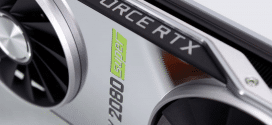
 The X79 Chipset has launched, and now comes the feverish pace of getting a look at each model out there and what makes them special. Today we have the X79-GD65 (8D) from MSI. This board is the top of MSI’s Intel-compatible lineup. It is capable of 3 way SLI, 8 DIMM population, and with its military class components, is sure to please even the most demanding user if going by specs alone. However, we do not go by specs alone; we also go by how well it walks the gauntlet of benchmarks we put it through. Follow along as we dig deeper into the top dog from the MSI stable and see what exactly we get for our money.
In this review we will look at the features and differences that separate the X79A-GD65 (8D) from the competition and do the features and performance merit the present $299.99 price tag.
Features Overview
 |
Military Class IIIMSI mainboards maintains the commitment to product stability and reliability by introducing Military Class III components! In addition to the use of Hi-c CAP, SFC, and Solid CAP, MSI now incorporates DrMOS II, the next-generation DrMOS that provides an integrated Double Thermal Protection to maximize the lifespan of components. All Military Class III components have passed MIL-STD-810G certification, making MSI’s Military Class III components synonymous with premium quality and ultimate stability.
|
|
 |
World’s 1st PCI Express Gen 3 mainboard brandWith ultra-high 32GB/s transfer bandwidth, PCI Express Gen 3 provides a 2X faster transfer rate than the previous generation, this delivers amazing capabilities for true next generation extreme gaming. |
|
 |
World’s 1st UEFI and software graphical user interfaceMSI ClickBIOS II provides a consistent user interface both in the UEFI BIOS and in Windows, it provides the most convenient way for users to control system settings and supports touchscreen control. Benefits:
|
|
 |
NVIDIA SLISLI technology allows using multiple Nvidia graphics cards in a single computer system with a mainboard equipped with an nForce SLI MCP. Users need an a mainboard with two PCI-Express 16x graphics slots and two matching GeForce graphics cards which are “SLI Ready”. Most NVIDIA’s PCI-Express graphics cards starting from the 6600 GPU can enjoy the benefits of SLI. |
|
 |
THX TruStudio PROTHX is a trade mark of a high-end audio/visual reproduction standard for movies, home theaters, computer speakers and other audio devices. THX Certified Audio products are designed to let users experience movies & videos as live show. The true sound effect can make high definition video more powerful. Features |
|
 |
AMD CrossFireXAMD CrossFireX™ is the ultimate multi-GPU performance gaming platform. Enabling game-dominatig power, AMD CrossFireX technology enables two or more discrete graphics processors to work together to improve graphics performance. AMD CrossFireX technology allows you to expand your system’s graphics capabilities. It allows you the ability to scale your system’s graphics horsepower as you need it, supporting up to four AMD Radeon™ HD graphics cards, making it the most scalable gaming platform ever. With an AMD CrossFireX gaming technology, the traditional graphics limitation exists no more, allowing you to enjoy higher performance as well as visual experience. |
|
 |
SATA 6Gb/s
Features |
|
 |
Super ChargerMobile consumer appliances are getting more and more attention in current day fast moving life style, with smart phones and tablets almost becoming a fashion accessory. However, many ordinary personal computers cannot charge some of these devices, making it difficult to stay connected. The MSI Super Charger is a Windows resident program capable of revising the power supply mode of your USB port to become more powerful. Once your phone or tablet is connected to your USB port, the Super Charger sends a signal to initiate its charging circuit, making it a really smart and convenient charging solution for mobile computing needs. Features |
|
 |
M-FlashCompared to common mainboard which need extra BIOS chips, MSI’s M-Flash has a double advantage which doesn’t need extra components and secondly, all your BIOS data will be saved in the USB drive. The stored data does not only have backup and upgrade function, moreover it can also be seen as a portable BIOS chip which is actually able to boot up your PC. Features |
|
 |
APS (Active Phase Switching)Active Phase Switching, APS, technology is an intelligent design that helps to save energy on MSI’s mainboards. The underlying idea is to switch |
|
 |
USB 3.0Compared to the 480Mbps provided by traditional USB 2.0, the all-new USB 3.0’s 5Gb/s offers 10 times the transfer bandwidth, so transferring a Blu-ray movie takes less than one minute. Features |
|
 |
Lossless 24-bit/192KHz HD Audio
|
|
 |
Winki 3Winki 3 is a free Linux-based O/S which is based on the Linux core. With an ultra-fast booting speed and a multi-language interface, the built-in Winki 3 provides an easy-to-use internet environment that includes the most popular functions such as internet surfing, web mail, instant messaging, picture browsing, and more. It’s the most practical way to be online in the shortest time. Features |
|
 |
USB SafeguardUSB Safeguard can prevent mainboards and USB devices from being damaged by short-circuit and ESD (Electro-Static Discharge) with Anti-ESD chips built-into the mainboards. Additionally, the safeguard can protect against such dangers multiple times, and greatly improves product lifespan. Features |
|
 |
Live Update 5
Features |
|
 |
Instant OC• Instant MB info monitor |
|
 |
3TB+ Infinity3TB+ Infinity is not only breaking through the limit of traditional BIOS, but also enhancing the utilization of hard drives efficiently. In addition to supporting the latest 3TB hard drives, MSI 3TB+ Infinity technology can use the 3TB hard drive as boot disk when installing a 64-bit operating system. Compared to competitors, MSI 3TB+ Infinity is an industry-leading technology which substantially presents an advantage of development and application in the future. Features |


 SATA 6Gb/s provides double the bandwidth of traditional SATA 3Gb/s, and increases the data transfer rate between your mainboard and internal storage devices, such as 7200RPM HDDs, 10000RPM HDDs and SSDs. It’s also the current trend for upcoming high-speed internal storage devices to to break the existing bottleneck of a PC’s performance.
 off the power supply as soon as no electricity is needed, and when the system needs more resources again, APS will automatically adjust electricity supply accordingly. APS will automatically detect your processor’s loading at any given time and save energy accordingly. This is only possible by means of a very advanced power controlling technology. Other than software-based solutions, APS technology stands out from MSI’s own research. The specially developed IC chip can operate automatically depending on the demands of the power supply, which is to reduce the total power usage.
 Onboard PC audio gets better! MSI is the first to implement the most high-end HD Audio codecs available. Don’t be fooled by other inferior audio solutions onboard (sometimes you can’t even find the driver!) Only MSI offers the Loss-less 24-bit/192KHz HD Audio function with an incredible 109 SNR dB value to provide the most clear & vivid HD audio quality and support 7.1 channels surround sound playback with a 2-channel independent stereo output (multiple streaming) through the front panel 3.5 inch phone jack.
 MSI Live Update 5 is a powerful and useful application for updating the latest BIOS and Drivers, saving you time and lowers the risk of updating. End-users can install and run the Live Update 5 software on their computers with the companion CD or downloading the app from the MSI website.
Specifications
|
• Supports 2nd Generation Intel® Core i7 processors in LGA2011 package. |

![]() Chipset
Chipset
• Intel® X79 Chipset
![]() Main Memory
Main Memory
• Supports eight unbuffered DIMM of 1.5 Volt DDR3 1066/1333/1600/1800*/2133*/2400* (OC) DRAM, 128GB Max
– Supports Quad channel mode
![]() Slots
Slots
• 3 PCI Express gen3 x16 slots
– PCI_E1 & PCI_E4 support up to PCIE x16 speed
– PCI_E6 supports up to PCIE x8 speed
• 2 PCI Express gen2 x16 slots
– PCI_E2 & PCI_E5 support up to PCIE x1 speed
• 1 PCIE x1 slot
![]() On-Board SATA
On-Board SATA
• SATAII controller integrated in Intel® X79 chipset
– Up to 3Gb/s transfer speed.
– Supports four SATAII ports (SATA3~6) by X79
• SATAIII controller integrated in Intel® X79 chipset
– Up to 6Gb/s transfer speed.
– Supports two SATAIII ports (SATA1~2) by X79
• SATAIII controller integrated in ASMedia® ASM 1061 chipset
– Up to 6Gb/s transfer speed.
– Supports two SATAIII ports (SATA7~8)
• RAID
– SATA1~2 ports support Intel Rapid Storage Technology enterprise (AHCI / RAID 0/1) by Intel X79
– SATA3~6 ports support Intel Rapid Storage Technology enterprise (AHCI / RAID 0/1/5/10) by Intel X79
![]() USB 3.0
USB 3.0
• 1 USB 3.0 internal connector by NEC® D720200
• 2 USB 3.0 rear I/O ports by NEC® D720200
![]() Audio
Audio
• Chipset integrated by Realtek® ALC892
– Flexible 8-channel audio with jack sensing
– Compliant with Azalia 1.0 Spec
– Meet Microsoft Vista Premium spec
![]() LAN
LAN
• Supports one PCI Express LAN 10/100/1000 Fast Ethernet by Intel 82579.
![]() IEEE1394 / FireWire
IEEE1394 / FireWire
• VIA® VT6315N chipset
– Supports up to two 1394 ports. (Rear panel x1, pinheader x1)
– Transfer rate is up to 400Mbps.
![]() Internal I/O Connectors
Internal I/O Connectors
– ATX 24-Pin power connector
– 8-pin ATX 12V power connector
– 4-PIN Power connector
– CPU x 1 / System x 4 FAN connectors
– Front panel audio connector
– Front panel connector
– 1 x chasis intrusion connector
– 2 x USB 2.0 connectors
– 1 x USB 3.0 connectors
– 4 x Serial ATAII connectors
– 4 x Serial ATAIII connectors
– 1 x IEEE1394 connector
– 1 x Clear CMOS jumper
– 1 x Power button
– 1 x OC Genie button
– 2 x Direct OC buttons
– 1 x Multi BIOS switch
– 1 x Voice Genie connector
– 1 x MultiConnect Panel connector
![]() Back Panel I/O Ports
Back Panel I/O Ports
– 1 x PS/2 Mouse/Keyboard port
– 1 x Clear CMOS button
– 1 x Coaxial SPDIF port
– 1 x Optical SPDIF port
– 1 x IEEE1394 port
– 1 x RJ45 LAN Jack
– 8 x USB 2.0 ports
– 2 x USB 3.0 ports
– 1 x 6 in 1 audio jack
![]() BIOS
BIOS
• The mainboard BIOS provides “Plug & Play” BIOS which detects the peripheral devices and expansion cards of the board automatically.
• The mainboard provides a Desktop Management Interface(DMI) function which records your mainboard specifications.
![]() Dimension
Dimension
• 30.5cm(L) x 24.4cm(W) ATX Form Factor
![]() Mounting
Mounting
• 9 mounting holes.
Features Explained
Military Class II
MSI has a continuing trend that we have seen before. The Military Class II is a feature which is strictly component-based. These select components make up the board as a whole, and ‘military class’ means they meet the strictest performance requirements and some of the roughest durability conditions known to man.
Super Charger
The Super Charger Feature is increases the utility of USB 3.0 ports over the older USB 2.0 standard. As USB-charged devices have become commonplace now, the higher power provided by USB 3.0 ports is a handy tool.
The MSI Super Charger feature allows for faster and stronger charging of devices, which means that the user will spend less time charging and more time using their mobile devices. This is accomplished via a software which revises the way the power is delivered to the USB port for optimized charging conditions which will allow for a better and faster charging experience.
Winki 3
Winki 3 is a very light and very fast Linux distro which allows quick boot and access for the user if they do not need the full functionality of Windows.
This feature may not seem like much on the surface but with the imaging software that is integrated, it could be a lifesaver in the event of a boot fault in Windows. Users can boot into Winki 3 and just image the drive and save data without formatting and losing everything due to the OS not booting. This still seems a little far fetched as far as real world usability goes but the feature can definitely be useful if the situation presents itself as we never really notice how important our data is until we lose it.
Click Bios II
MSI’s Click BIOS II is a very clean looking integration of a GUI UEFI interface. In addition, MSI worked very hard to make the interface of their Windows-based application very similar to that of the BIOS.

This is not really a new feature as we have seen this previously in various implementations, but the way it was designed and styled to closely mirror the actual UEFI BIOS is well done. It is a great and smooth interface so that the user does not need to learn 2 different modes.
Overview of the X79A-GD65 (8D)


MSI is definitely pushing the point with their Military Class III components. The front of the box sports a huge seal supporting the Military Class III claim, referring to key components on the board which are certified to meet military spec. That being said, military spec is not a gimmick, it is torture tested to conditions we could only begin to imagine, and the components on this motherboard are designed to withstand such situations. It is hard to quantify how much this improves the board’s performance or lifespan, but these components will most probably be able to withstand even the most rigorous gaming session.
The rear of the box has the standard marketing info for the product and its features. The features list on this board is extensive as there are many great items that can be listed on this board such as component selection, charging features, PWM strength, Gen 3 PCI-E Support, OC Genie II and more. As we open the package we get our first look at all of the accessories but to our surprise they were covered up by a large fold out pamphlet. This is MSI’s Intel X79 Overclocking Guide. This instantly peaked our interest, but we will look at this more in depth later in the review. The MSI board comes with a very rich accessory bundle:
- I/O shield
- USB 3.0 front panel
- Quick connect front panel connectors
- SATA cables
- eSATA cable
- eSATA backpanel and power cable
- Installation Disc
- Multiple manuals and installation Guides
- Military Spec III certificate
- Click Bios II Quick Guide
- Intel X79 Overclocking Guide
As we can see this is quite a spread, and the X79 overclocking guide really does break down some of the settings and what to realistically expect from the platform as we start overclocking. We will look further into this guide in just a little bit.


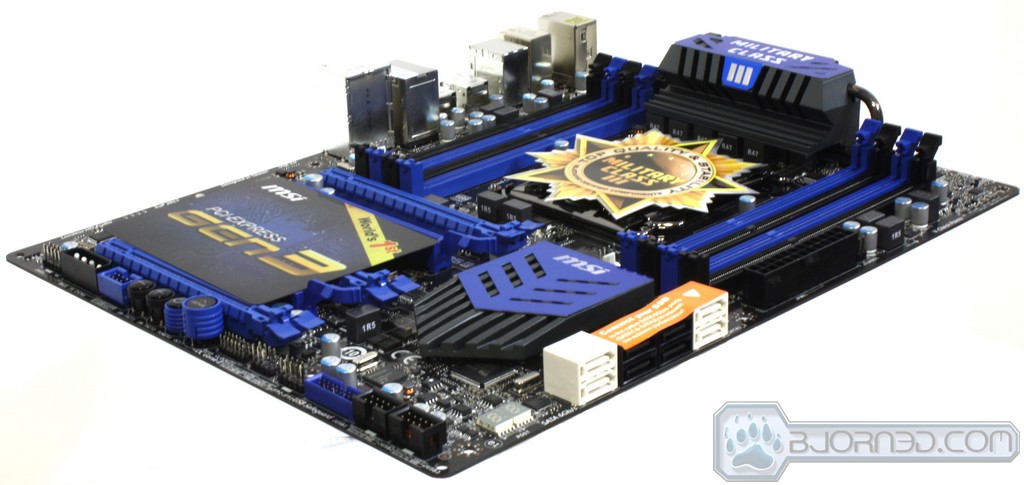
a closer look at the X79A-GD65 (8D)


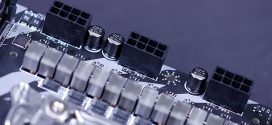
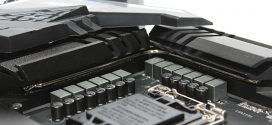
Here we delve deeper into what makes this board tick, and firstly we look at the SATA offering as the board carries the standard dual SATA 6Gbps ports and the 4 SATA 3Gbps ports, all coming directly from the native X79 chipset. As seen by the sticker, MSI marks the native ports for maximum SATA III performance. Also there are 2 more SATA III ports supported by an ASmedia ASM 1061 controller which further enhance the storage possibilities for this board. Next we move to the lower control center section of the board where we see the interface for the user along with some of the IO plugs available. Firstly we have the Power button along with the OC Genie button and to the left of those there are a plus and minus press button as well which help with adjustments on the fly. Also to the left of these buttons is a 4 pin Molex connector which is used to supply supplemental power to the board to ensure 3 card action will not be hampered by a lack of power.
Moving into the slots we were met by the bold sticker affixed which proudly boasts support for PCI-E Gen 3. This makes the board future-proof, though it is useless at this moment, since there are no PCI-E Gen 3 video cards out. Next we take our standard look at the lower board edge just to give an idea of component placements and clearances for cables. If routing below the graphics card is necessary, there is quite a bit of clearance for cables. Also next to the molex we spied a blue 1394a connector. Users should be careful not to confuse this for a USB 3 header.


Here we take a look at the heatsinks which are beefy and should be more than enough to evacuate any heat this beast produces in quick fashion. One thing to note is that MSI chose to omit a heatpipe connecting the chipset sink to the VRM heatsink. This should not be an issue as the X79 chipset is designed with a very high thermal threshold, but we will monitor this under stress to see if this will be an issue under extended usage. The VRM heatsink has an internal heatpipe to ensure thermal transfer from the base to the upper portion of the heatsink which should allow better heat dissipation than just relying on the heatsink to have heat travel up the material and be dispersed among the ambient chassis airflow.


Here we get a look at the I/O panel, which has a very decent offering of connections to ensure connectivity for new and legacy devices. the I/O layout is as follows:
- Dual purpose keyboard/mouse PS2 port
- 8x USB 2.0 ports
- CMOS reset switch
- Optical and coaxial S/PDIF connections
- Firewire port
- 2x USB 3.0 ports
- Gigabit Intel LAN port
- 8 channel HD Audio via Realtek ALC 892
The board still has support for the legacy PS2 port. Though this may seem unnecessary, in rare instances of extreme benchmarking, the USB ports can stop functioning; the PS2 port would allow for system control in this instance. Next we look at the upper edge where there is a single 8-pin ATX CPU power connection which should be sufficient. This is still a little surprising as other manufacturers’ boards have supplemental power to ensure more than adequate power delivery in any overclocking situation. Also we see the retention method for the VRM heatsinks which is a very sturdy spring loaded nut to help keep adequate pressure on the VRM without putting too much pressure, which can cause solder cracks or even component damage. Lastly we get a nice look at the CPU socket itself along with surrounding components which we notice have no components very high which should ensure proper clearance for pretty much any cooling solution to be fit without many if any issues at all. One thing to note is that with any X79 board we have seen there may be memory clearance issues with taller modules as the slots are placed on both sides of the socket in close proximity to reduce trace length and increase performance but at the same time increases possible placement issues.


UEFI BIOS Overview


Click Image To Enlarge
Moving into the main sections we start with the “Settings” menu, which is where a bulk of the general system settings are held. Clicking into the “System Status” gives us a rundown of system drives and memory along with BIOS version and the date/time setting. Next we take a peek into the “Advanced” settings which is where we find all of the integrated peripherals and other device settings including USB, Power Management and more.


Click Image To Enlarge
Next we see the PCI-E setting which has an option to enable or disable Gen 3 mode (this comes disabled by default), but did have the ability to enable it so we are eager to test this with a PCI-E Gen 3 card. When looking at the integrated peripherals we also find the SATA options. There are also options to set up the SATA 6Gbps ports provided by the add-in controller.


Click Image To Enlarge
Lastly rounding out the standard settings we find some power management settings to ensure that when running a desktop system, we can fully control the board and even maybe save some power in the process.


Click Image To Enlarge
Now we come to the real meat and potatoes of the BIOS: the overclocking section. This board has no shortage, as we see a full long list of settings and a few helpful utilities. Here we see that there is no lack of voltage options to tweak the board, and the voltage is set up in such a way that even individual DIMM channels can be controlled independently. One thing to note is that voltages must be selected, and try as we might, we could not actually type in the voltage we wanted. While this is not a huge deal it seems like a small but useful feature that was merely overlooked and we hope in a future BIOS release this can be implemented.


Click Image To Enlarge
Here are a few of the utilities we mentioned before: Memory-Z reads SPD and XMP information; the OC profiles section allows us to save our favorite or bench settings to a profile, and different profiles can be saved.


Click Image To Enlarge
Here we get a closer look of the Memory-Z feature. We also see the wealth of information provided as it shows the memory vendor and model along with the present running state. If the XMP link below is clicked it will show the XMP profile information which is the reset high performance profile that can be enabled for easy worry free single click performance memory tuning.


Click Image To Enlarge
As we reach the end of our BIOS options we see the hard drive image utility, which can make an image of the OS drive in the event that a failure disallows the computer to boot into the OS. This is a very helpful utility and we could see some of its functionality being very handy especially in the benchmarking environment where an OS can be corrupted at the drop of a hat.
Testing & Methodology

We’ve expanded our testing suite considerably since the X79 chipset release, and will continue to use the same methods for most of the motherboards and CPU’s we test. In the interests of thoroughness and accurate results, we run each test at least three times, and some tests more than that. We average the total of all the tests from each benchmark then report the average here.
The OS we use is Windows 7 Pro 64bit with all patches and updates applied. We also use the latest drivers available for the motherboard and any devices attached to the computer. We do not disable background tasks or tweak the OS or system in any way. We turn off drive indexing and daily defragging. We also turn off Prefetch and Superfetch. This is not an attempt to produce bigger benchmark numbers. Drive indexing and defragging can interfere with testing and produce confusing numbers. If a test were to be run while a drive was being indexed or defragged, and then the same test was later run when these processes were off, the two results would be contradictory and erroneous. As we cannot control when defragging and indexing occur precisely enough to guarantee that they won’t interfere with testing, we opt to disable the features entirely.
Prefetch tries to predict what users will load the next time they boot the machine by caching the relevant files and storing them for later use. We want to learn how the program runs without any of the files being cached, and we disable it so that each test run we do not have to clear pre-fetch to get accurate numbers. Lastly we disable Superfetch. Superfetch loads often-used programs into the memory. It is one of the reasons that Windows occupies so much memory. Vista fills the memory in an attempt to predict what users will load. Having one test run with files cached, and another test run with the files un-cached would result in inaccurate numbers. Again, since we can’t control its timings so precisely, it we turn it off. Because these four features can potentially interfere with benchmarking, and and are out of our control, we disable them. We do not disable anything else.
Test Rig
| Test Rig | |
| Case | Thermaltake Level 10 GT |
| CPU | Intel Core i7-3960X |
| Motherboard | MSI X79-GD65 (8D) |
| Ram | 16GB Gskill RipJaws Z 4x4GB (9-11-10-27) |
| CPU Cooler | Swiftech H20-220 Edge |
| Hard Drive | Western Digital Velociraptor 300GB |
| SSD | Intel 510 series SATA III 120GB |
| Optical | ASUS BD-ROM |
| GPU | SLI 2x GTX 580 |
| Case Fans | Front (intake): 200 x 200 x 20 mm ColorShift Fan x 1 (600~800RPM, 13~15dBA)
Rear (exhaust): 140 x 140 x 25 mm Turbo Fan (1000PRM, 16 dBA) Top (exhaust): 200 x 200 x 30 mm ColorShift Fan (600~800RPM, 13~15dBA) Side (intake): 200 x 200 x 30 ColorShift Fan (600~800RPM), 13~15dBA) |
| Additional Cards |
N/A |
| PSU | Thermaltake Toughpower Grand 1200W |
| Mouse | Thermaltake esports Black gaming mouse |
| Keyboard | Thermaltake Meka G1 mechanical gaming keyboard |
Test Suite
We will use the following applications to test the performance of the Motherboard. Benchmarks
| Benchmarks |
|---|
| PCMark 7 |
| Heaven benchmark 2.5 |
| Cinebench R10 |
| Cinebench R11.5 |
| 3DMark 11 |
| 3DMark Vantage |
| Wprime |
| SuperPi |
| Metro 2033 |
| Lost Planet 2 |
| SiSoft Sandra 2011b |
| HDTune Pro |
| X264HD |
| TrueCrypt 7.1 |
Overclocking

The X79 platform is unlike the P67/Z68 offering in way of BCLK overclocking. The default is the same at 100MHz but when it comes to overclocking the X79 has a divider that separates the CPU base clock from the rest of the board frequencies to keep from becoming unstable as the BCLK goes significantly higher.
The MSI X79A-GD65 (8D) overclocked rather easily with a minimal amount of tweaking which tells us that even an amateur overclocker could jump into overclocking the X79 platform with minimal trouble and have some serious fun with a 1+ GHz overclock with about 5-10 minutes of tuning.
The overclock for the benchmarks is 4.6GHz to ensure matchup between all of the boards we test. Setting this board for 4.6GHz with the 3960X CPU was as easy as setting the multiplier to 46X and raising the CPU voltage and slowly adjusting it downward until it is unstable and then we tune it up a little until it can run all benchmarks and stability tests without issue.
With our initial setting of 1.42Vcore, it was 100% stable for all tests and exhibited no signs of issue no matter the load we put on it. Also of note is that the voltage needed for this overclock was slightly less than both the UD7 and the Rampage board.
Important note: Overclocking can cause component failure. Please exercise caution when attempting any level of overclock on system components.
Temperatures

The temperatures were recorded with Realtemp while running Wprime 1024 right before the end of the 5th run. The results were recorded carefully. After the results were recorded, we waited for 30 minutes before taking Idle temperature measurements. The results were as follows:
| CPU Temperatures | Temperature (Idle/Load) |
| X79A-GD65 (8D) OC (4.6GHz) | 33C/62C |
| X79A-GD65 (8D) | 28C/52C |
| Chipset Temperatures | Temperature (Idle/Load) |
| X79A-GD65 (8D) OC (4.6GHz) | 34C/53C |
| X79A-GD65 (8D) | 31C/44C |
We used the Swiftech H20-220 Edge kit kept the 3960X in check no matter the load placed on it as seen above.
Power Consumption

The power consumption was tested while running Wprime 1024 for a few minutes at stock settings. The results were recorded carefully with a Kill-A-Watt power consumption measuring tool at the wall. After the results were recorded, we waited for yet another few minutes minutes before taking Idle power consumption measurements.
| Configuration | Power Consumption (Idle/Load) |
| X79A-GD65 (8D) (4.6GHz) | 204W/417W |
| X79A-GD65 (8D) | 161W/342W |
The power consumption is not with GPU usage. This is with CPU/system loading but nothing graphically intensive in order to provide the most accurate results by not ramping up the GPU, which will pull significantly more power.
Wprime
Wprime is a processor heavy multithreaded benchmark at which it crunches numbers of a specific data set and gives the end user an output time which can then be used as a gauge to compare system performance.
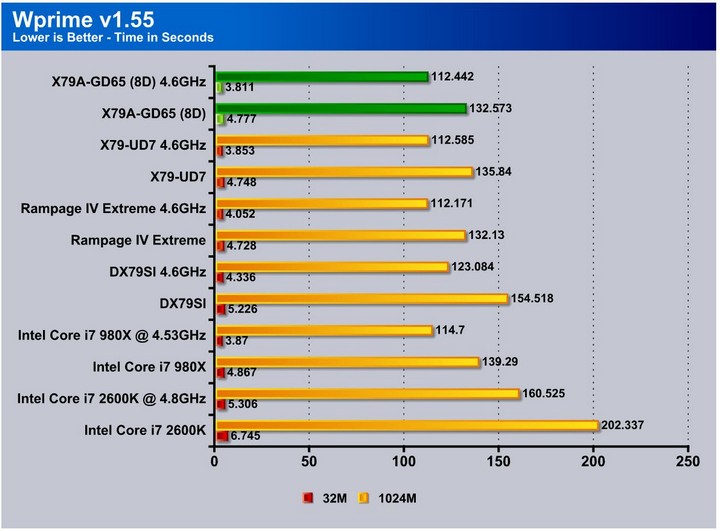
Here we see that the MSI board takes a step ahead of the Gigabyte version, and is only slightly behind the ASUS board–not a bad result considering the board is $150 dollars less than the Rampage.
Superpi
SuperPi is a single threaded benchmark which measures efficiency and is heavily influenced by architectural changes as much as it is by clockspeeds.
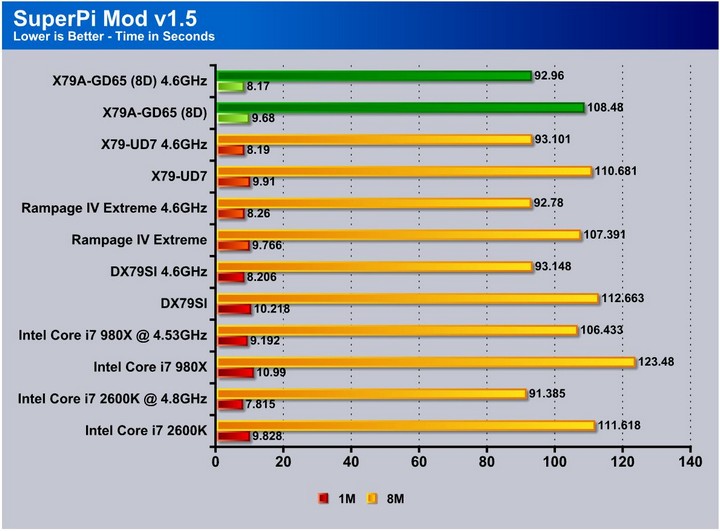
SuperPi being an older benchmark is still used for the fact that it is a great gauge for efficiency especially the longer tests such as 8M-32M. The MSI has the strongest showing of all X79 boards we’ve tested in the 1M, and is very close to the Rampage in the 8M.
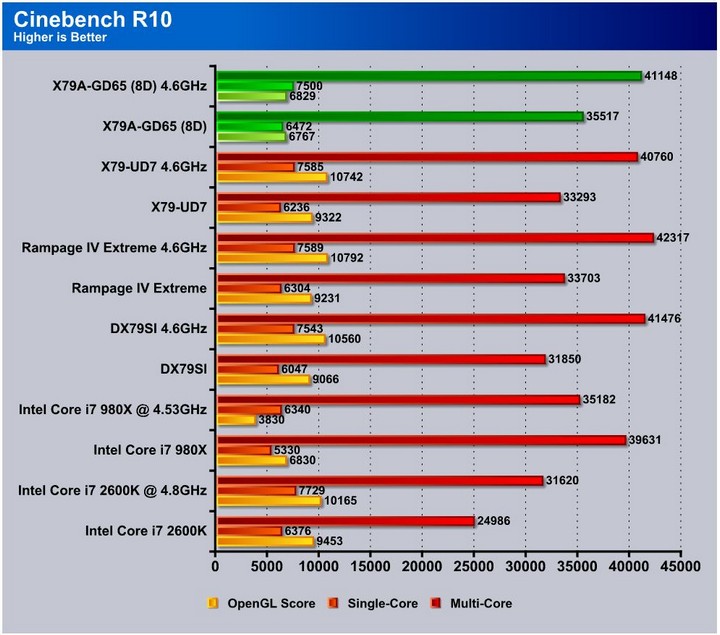
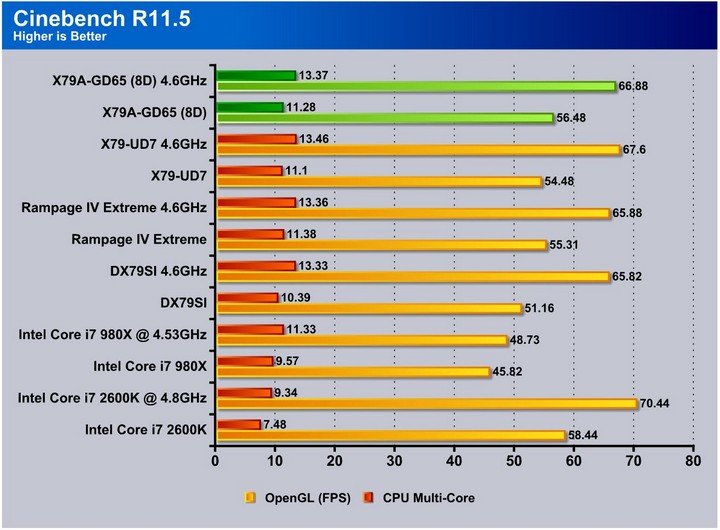
Cinebench R10 and R11.5

“CINEBENCH is a real-world test suite that assesses your computer’s performance capabilities. MAXON CINEBENCH is based on MAXON’s award-winning animation software, CINEMA 4D, which is used extensively by studios and production houses worldwide for 3D content creation. MAXON software has been used in blockbuster movies such as Spider-Man, Star Wars, The Chronicles of Narnia and many more. MAXON CINEBENCH runs several tests on your computer to measure the performance of the main processor and the graphics card under real world circumstances. The benchmark application makes use of up to 16 CPUs or CPU cores and is available for Windows (32-bit and 64-Bit) and Macintosh (PPC and Intel-based). The resulting values among different operating systems are 100% comparable and therefore very useful with regard to purchasing decision-making. It can also be used as a marketing tool for hardware vendors or simply to compare hardware among colleagues or friends.”
SiSoft sandra 2011

“SiSoftware Sandra (the System Analyzer, Diagnostic and Reporting Assistant) is an information & diagnostic utility. It should provide most of the information (including undocumented) you need to know about your hardware, software and other devices whether hardware or software. It works along the lines of other Windows utilities, however it tries to go beyond them and show you more of what’s really going on. Giving the user the ability to draw comparisons at both a high and low-level. You can get information about the CPU, chipset, video adapter, ports, printers, sound card, memory, network, Windows internals, AGP, PCI, PCI-X, PCIe (PCI Express), database, USB, USB2, 1394/Firewire, etc.”
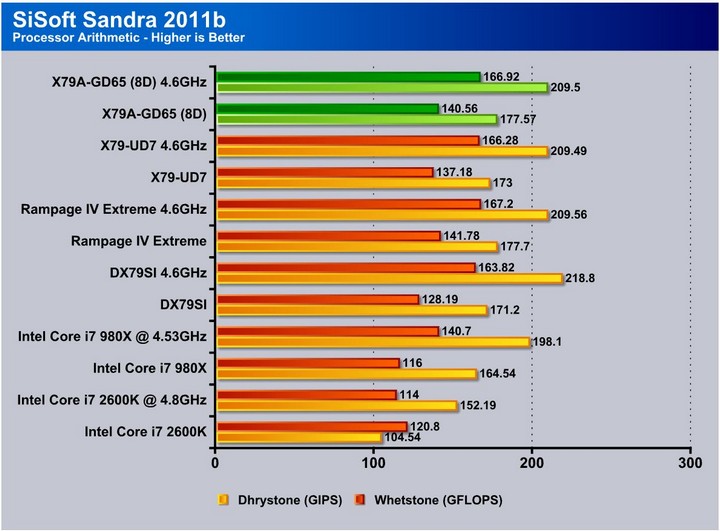

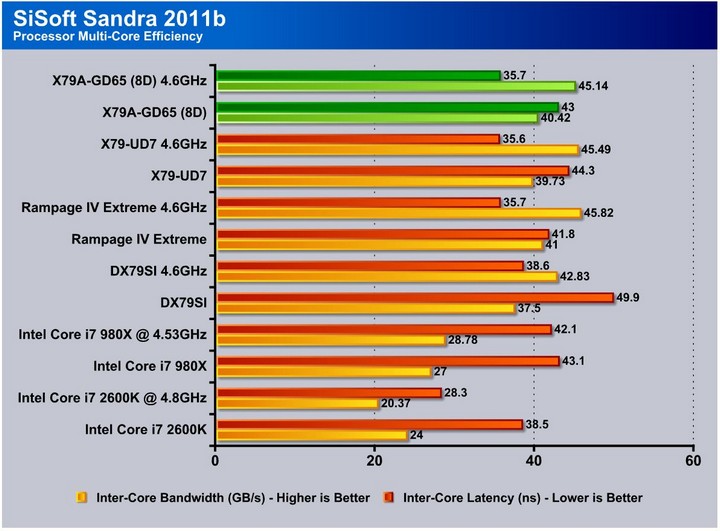
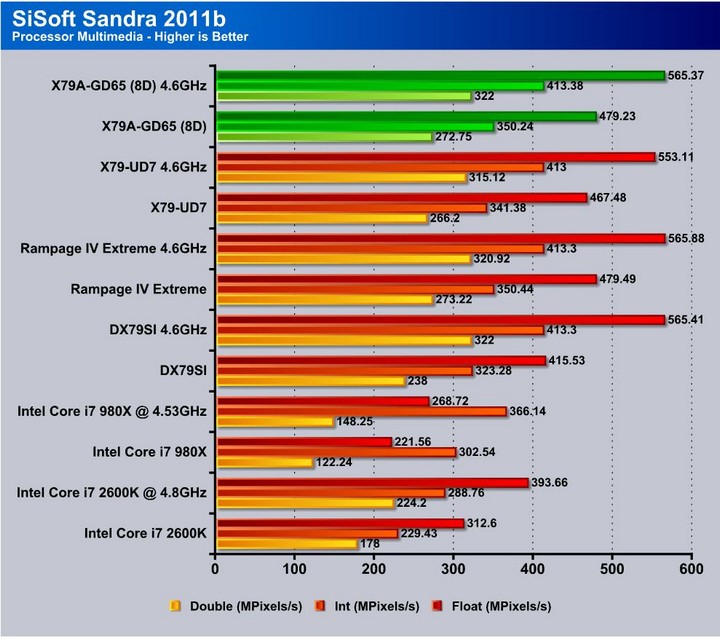
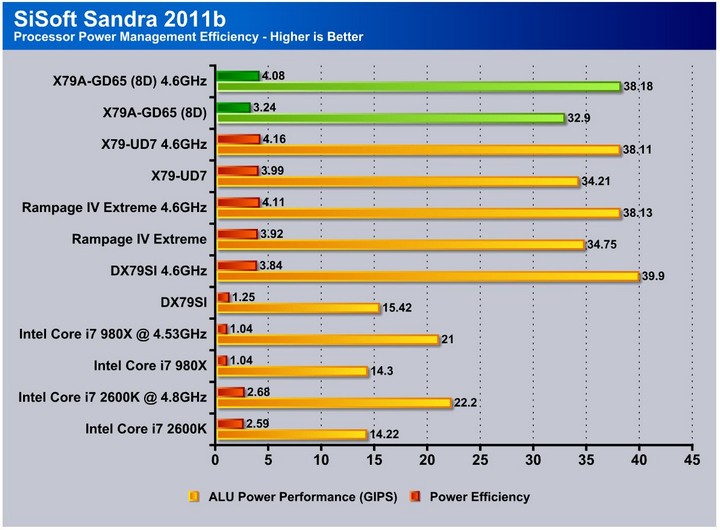
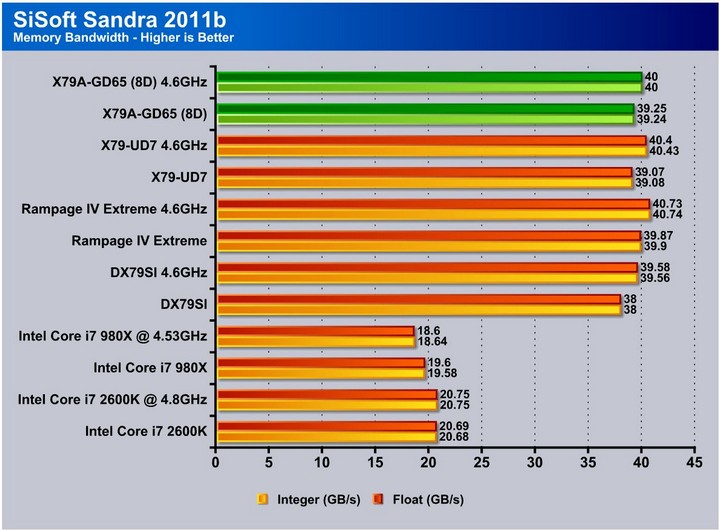
Here with the Sandra tests, we see excellent representations of the raw power from the LGA 2011 platform which is a huge jump over previous generation platforms. While the Rampage holds the top spot, it is not a far lead as the score difference is marginal at best.
PCmark 7

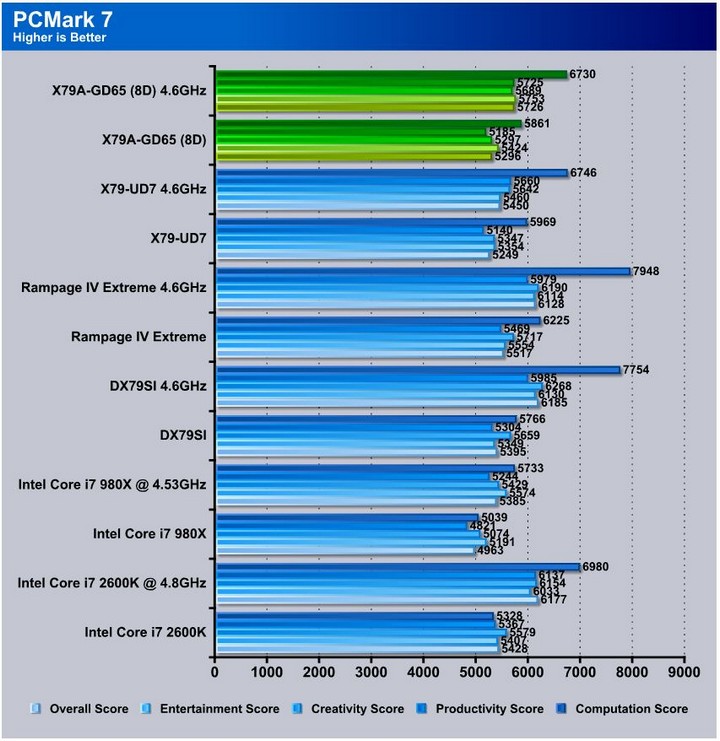
PCMark 7 is a complete system benchmark, and so needs to be taken for what it is which is a synthetic benchmark. While it is a good representation of system performance, it is not a 100% accurate representation of normal system usage. In this test the computation score for the Rampage is hugely above both the GD65 and the UD7, which is a good sign of a strong or very efficient board.
X264HD
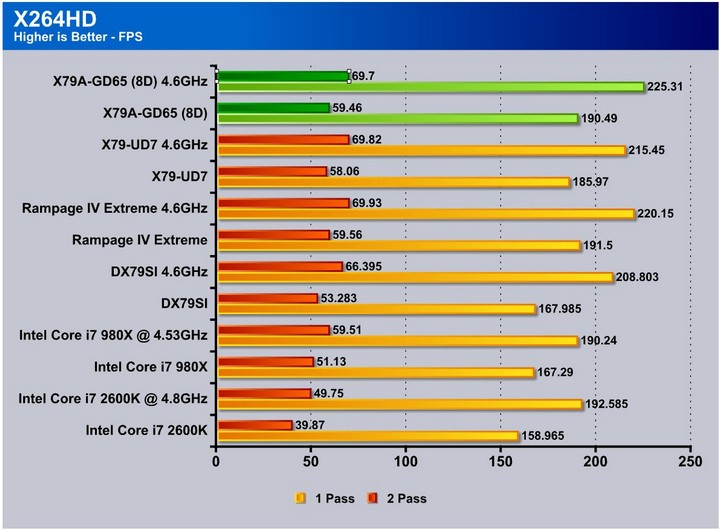
The x264HD benchmark tests the CPU’s ability to efficiently encode a small video clip into an H.264 video file. This is a great way of benchmarking a system/CPU configuration as it is very consistent and precise, which means any performance increase will easily be seen in the results.
Truecrypt 7.1
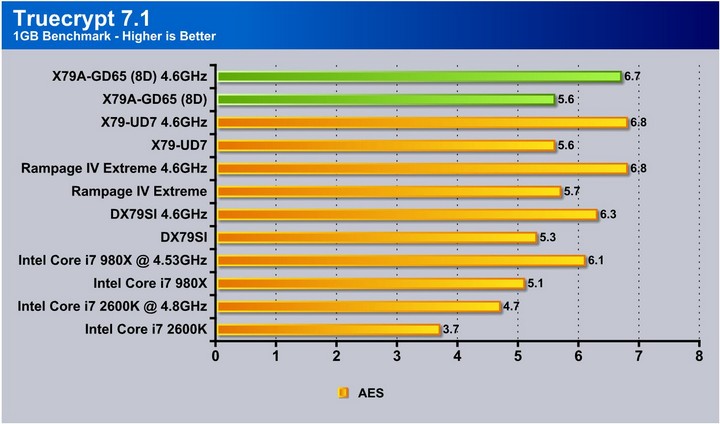
The Truecrypt benchmark test the encryption ability of the configuration, which much like the Sandra benchmark, gives a good idea as to the amount of work can be done. It also shows what kind of gains will be seen from any tuning made to the system.
HDTune pro
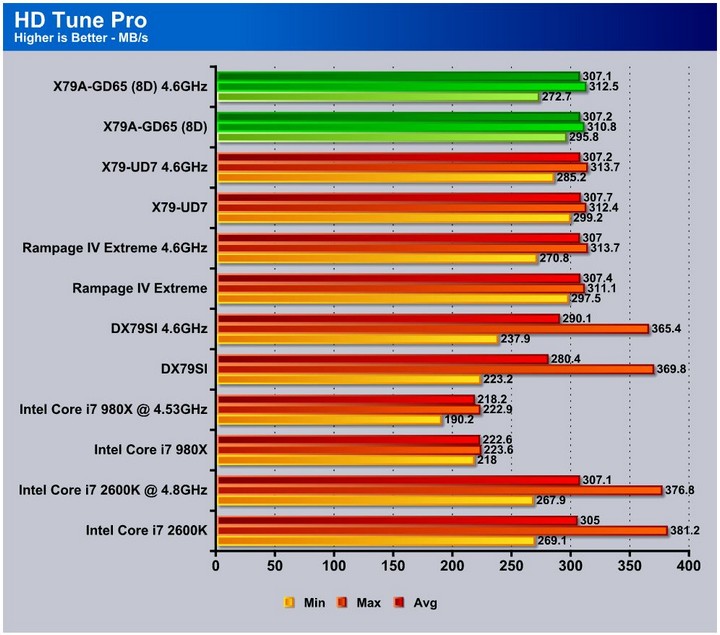
The HDTune tests were similar from board to board, as the same model SSD was used and not close to reaching the limit of the SATA III ports.
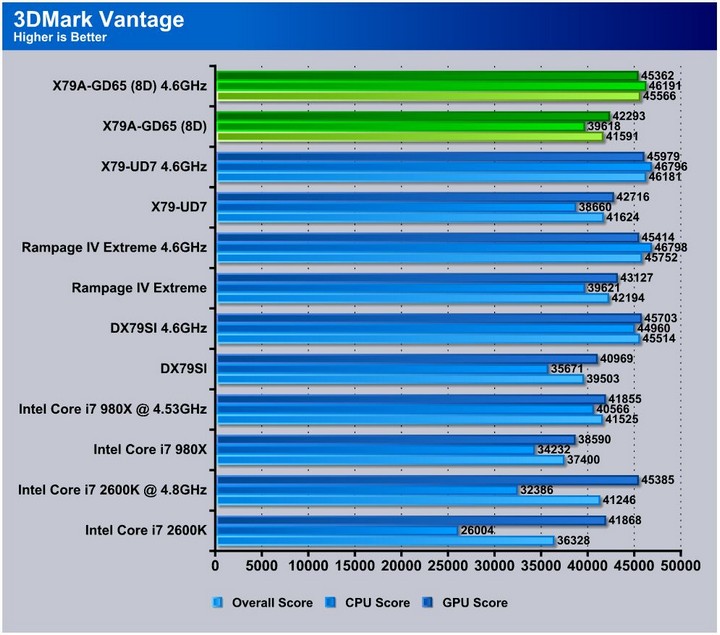
3DMARK VANTAGE

For complete information on 3DMark Vantage Please follow this Link:
www.futuremark.com/benchmarks/3dmarkvantage/features/
The newest video benchmark from the gang at Futuremark. This utility is still a synthetic benchmark, but one that more closely reflects real world gaming performance. While it is not a perfect replacement for actual game benchmarks, it has its uses. We tested our cards at the ‘Performance’ setting.
3DMARK 11
![]()
3DMark 11 is the newest in futuremark’s suite of benchmarking utilities. Its a fully capable DirectX11 benchmark which also stresses and analyzes the system performance as a whole to simulate a heavy rendering environment such as a high end game or other app the end user may run. This benchmark was run with Performance settings 5 times and all runs were averaged for the result below.
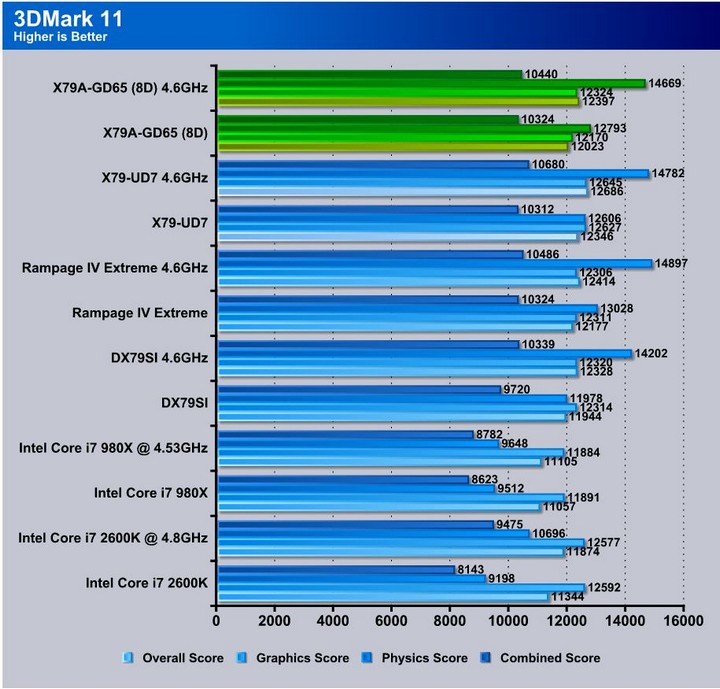
3DMark Vantage and 3DMark 11 are both 3D benchmarks, and so do not see a huge boost from the increase in CPU speed, and while the X79 platform is very efficient all of the boards are very similar in results. In gaming situations it is likely that any of these boards will be more than capable.
Unigine Heaven 2.5

Unigine Heaven is a benchmark program based on Unigine Corp’s latest engine, Unigine. The engine features DirectX 11, Hardware tessellation, DirectCompute, and Shader Model 5.0. All of these new technologies combined with the ability to run each card through the same exact test means this benchmark should be in our arsenal for a long time.
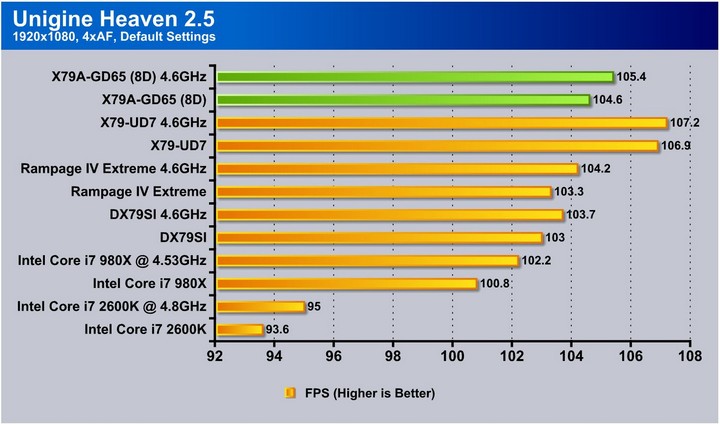
Unigine Heaven 2.5 saw a huge increase as we saw before in the UD7 which shows that boards bias in tuning toward 3D performance. Surprisingly, the GD65 beats out the Rampage as well to take a middle spot between the two.
Metro 2033
![]()
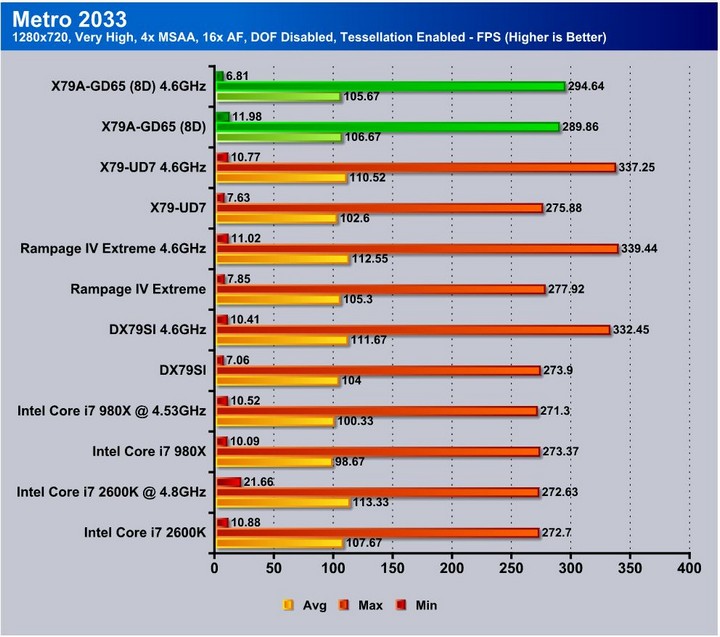
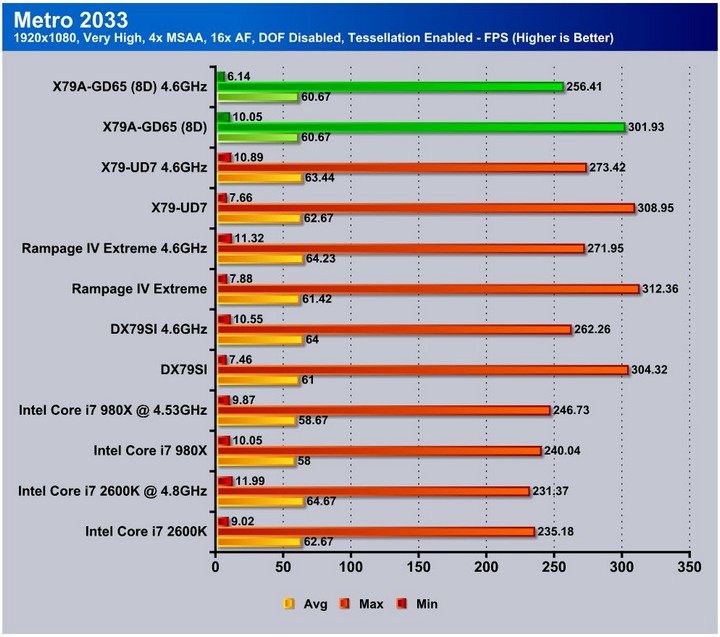
Metro 2033 is a very demanding game for graphics. With the X79 chipset we see similar activity as before but one strange thing we noted is that the overclocked runs actually showed lower FPS, which was strange.
Lost Planet 2

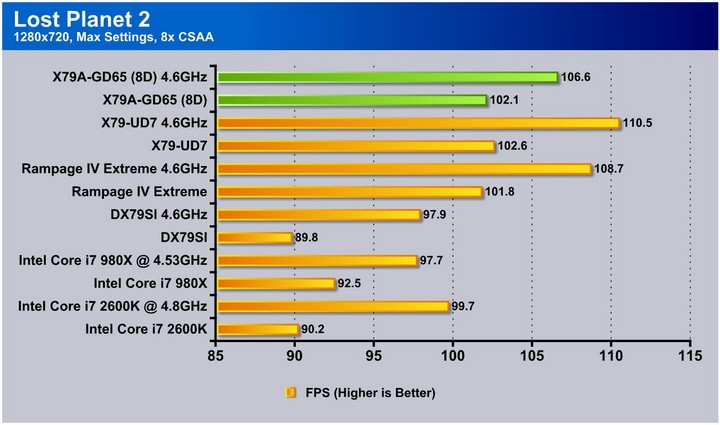

Lost Planet 2 shows a similar to previously noted strong graphics performance result from the UD7 taking a strong lead while the Rampage and GD65 hang back slightly, fighting it out for second place. Battling it out with the Rampage is not a bad place to be, as that means the GD65 is among good company and a very capable performer.
CONCLUSION
When testing the MSI X79A-GD65 (8D) we figured it would be a nice board, but didn’t have strong hopes for it to run with the much higher priced overclocking-based boards. We were (pleasantly) surprised. The GD65 surpassed the best OC boards in a few cases, which is saying a lot for a board that is much lower cost than the others in the comparison.
Having the ability to run 8 DIMMs gives an excellent opportunity to run very high amounts of higher speed memory without needing higher density modules which could suffer in performance. Whether this is helpful is more subjective, depending upon the usage. It is not as simple as cramming in as much memory as we can fit.
The overclocking on the GD65 is quite easy, and did not require a huge amount of fine tuning to get stable. This is great as the Gigabyte X79-UD7 required much more tuning to achieve near the stability that took only a few minutes on the Rampage and the GD65.
The GD65 is capable of 3-Way SLI and CrossFire, which is honestly more than enough for most users as the amount of users running 4-way SLI is not very high. The GD65 should suit pretty much any gaming build put in front of it.
If building the ultimate gamer, video editor or even photoshop speed demon, the GD65 is worth the consideration, as it is a very cost-efficient board packed with performance.
| OUR VERDICT: MSI X79A-GD65 (8D) | ||||||||||||||||||
|
||||||||||||||||||
| Summary: The MSI X79A-GD65 (8D) keeps up with the bigger more expensive players and it performs excellently with an awesome price saving. For excellent performance at a great value, it earns the Bjorn3D Golden Bear Award. |