Today we will be taking a look at the Biostar TPower X79: the first high-end offering from a company that traditionally focuses on lower-end budget hardware.
Introduction – Biostar TPower X79
![]() The X79 Chipset has definitely shown its power and the variety of boards has been constantly growing. As a matter of fact, boards have been piling up here at Bjorn3D!
The X79 Chipset has definitely shown its power and the variety of boards has been constantly growing. As a matter of fact, boards have been piling up here at Bjorn3D!
Today, we have an entry from a pretty unlikely contestant for the enthusiasts market: the TPower X79 from Biostar. The reason we say unlikely is because Biostar has been more known for its lower cost basic-model motherboards, but the TPower line has had pretty impressive performance from boards with a very low cost. This board carrying the TPower name has a very reasonable price. At $229.99, this board is in the Sandy Bridge LGA 1155 board price range. The top end and only offering at this time from Biostar, we hope the TPower X79 can perform well, as this would push other manufacturers to be competitive. Since it is an enthusiast’s board with the X79 chipset, we know that the TPower X79 comes with native support for PCI-E 3.0 along with quad channel memory support and multi GPU performance that should make for some excellent performance. Anyone who is familiar with the TPower models knows their history, with boards such as the TPower i45 that held some of the top performance records in FSB overclocking. We have high hopes for the TPower X79.
In this review we will look at the Biostar TPower X79 and what features it does or does not carry, that will help us tell you if this board is worth the $229.99 price tag it carries presently.
| Exclusive Features | |
|
THX TruStudio PRO THX TruStudio Pro is specially designed to bring the same great audio experience found in live performances, films, and recording studios – to the PC. THX TruStudio Pro provides the latest groundbreaking technologies that are products of years of collective experience and research by Creative and THX. Together, these technologies deliver the fullest audio experience for music, movies and games, while remaining true to the source and intention of the artists who created it. |
|
|
USB 3.0 Experience Fastest data transfers at 5 Gbps with USB 3.0–the new latest connectivity standard. Built to connect easily with next-generation components and peripherals, USB 3.0 transfers data 10X faster and backward compatible with previous USB 2.0 components. |
|
|
9 Phase Power Design 9 phase power design enables the best delivery of power to supercharge your system, giving extreme users unparalleled overclocking ability and the lowest temperatures to reach maximum performance levels. |
|
|
100% Solid Caps With armor-plated Biostar Technology, all capacitors are placed with 100% solid capacitors that have a lasting life cycle, durability and stability for crucial components. |
|
|
BIO-Remote 2 BIO-Remote2 Technology is featuring users a better Home Theater environment. Users who own either Android mobile or Apple goods are able to access and control your PC remotely; At this moment, you’re smart device became a intelligent and functional remote controller; more than that, BIO-Remote2 also includes both function of mouse pad and power point presentation mode. |
|
|
Charger Booster Charger booster is the best and efficient charger solution for apple devices such as iPad, iPhone. Basically, Charger booster Technology is able to boost the charging time to be more efficiency and faster once any apple goods connecting to our Motherboard. With charger booster technology, you are able to charge your apple devices up to 42 %
faster. |
|
|
Puro Tone – 110dB Excellent multi channel surround sound audio backed by a proprietary converter that which is able to achieve a 110dB noise ratio (SNR) playback quality. This means that users will enjoy a better audio experience with lower levels of noise and hiss when enjoying the latest HD content. |
|
|
2 oz Copper PCB 2 ounces of copper for both the Power and Ground layers, delivering a dramatically lower system temperature, improved energy efficiency and enhanced stability for overclocking. |
|
|
8 layer PCB Industrial standard, high quality 8 layers PCB design for maximum stability and life cycle. |
|
|
Dual 8-pin EPS connectors Dual 8-pin EPS 12v+ connectors offer maximum power resources for your daily computing. |
|
| Chipset-CPU Features | |
|
Intel X79 chipset The Intel® X79 Express chipset continues to push innovation with capabilities designed to deliver quality, performance and headroom. The combination of the Intel® X79 Express chipset and 2nd generation Intel® Core™ i7 processor family on the LGA 2011 socket delivers the highest desktop performance. |
|
|
Intel® 2nd Generation Core™ i7 Processor The Intel® Core™ i7 processor family for the LGA-2011 socket is the next generation of 64-bit, multi-core desktop processor built on 32-nanometer process technology. Based on the low-power/high performance Intel® Core™ i7 processor microarchitecture, the processor enables higher performance, easier validation, and improved x-y footprint. |
|
|
256bit Quad channel DDR3-2133 Maximize performance with quad-channel memory support up to 2133 MHz frequency. |
|
|
3 way SLI Support The powerful 3 way SLI enhances image quality settings, maximize screen resolution, and tilt the scales in your favor with up to a 2.8X performance hike over a single-card rig with support for three GeForce GPUs. |
|
|
4 way CrossFireX Support 4 way CrossFireX allows up to four GPUs to be used in a single computer to improve graphics performance. |
|
|
PCI-E Gen 3.0 Ready PCI-E 3.0 is the next evolution of the ubiquitous and general-purpose PCI Express I/O standard. At 8GT/s bit rate, the interconnect performance bandwidth is doubled over PCI-E 2.0, while preserving compatibility with software and mechanical interfaces. |
|
|
SATA 6Gb/s SATAIII 6Gbps provides a higher bandwidth to retrieve and transfer HD media. With this super speed data transfer, SATAIII allows an incredible data boost which is 2x faster than the SATA 3G. |
|
|
eSATA One or Two external SATA 3Gb/s ports connectivity with minimal host overhead and host to device latency. |
|
| BIOS-Software Features | |
|
BullGuard Internet Security (90 days FREE trial) BullGuard Internet Security comes with the broadest line-up of internet security features on the market, including: a cutting-edge dual Antivirus engine, Online Backup for your precious files, PC Tune Up to speed up your system, a Game Mode for a seamless gaming experience, Parental Control, Firewall, Safe Browsing and many more. Make the most of your digital life with Bullguard! |
|
|
UEFI BIOS Unified Extensible Firmware Interface (UEFI) is a brand new framework that provides a revolutionary interface. It is a modern clear and easy-to-use graphical user interface. The UEFI comes with a colorful easy-understand icons leads users into the setup layer directly. |
|
|
BIO-Flasher Update BIOS effortlessly from a USB flash disk before entering the OS. |
|
|
BIO-ReLife BIO-ReLife Technology lets you recover crashed BIOS data from a USB flash pen driver that stores new BIOS file. This practical BIOS utility can restore your system and recover from a BIOS crash situation. |
|
|
T-Overclocker T-overclocker presents a simple Windows-based system performance enhancement and utility management. It features several powerful yet easy to use tools such as overclocking for system performance enhancement, CPU and memory special enhancement, a smart-fan control for managing fan speed control of both CPU cooling fan, north-bridge chipset cooling fan, PC health for monitoring system status, and pre-set OC modes for easy OC. |
|
| Other Features | |
|
Rapid Switch 2 Engineered by BIOSTAR, the exquisite onboard switches allow you to easily shut down and restart your system. |
|
|
Rapid Debug 3 Rapid Debug3 posts critical POST code information in a digital LED display. When system malfunction occurs, it auto-detects the device’s failure and translates the error codes on the digital LED. It also shows the CPU temperature on the same screen. |
|
Specifications
| Chipset |
|
| CPU SUPPORT |
|
| MEMORY |
|
| EXPANSION SLOT |
|
| STORAGE |
|
| USB |
|
| GbE |
|
| MULTI GRAPHICS |
|
| CODEC |
|
| REAR I/O |
|
| INTERNAL I/O |
|
| DIMENSION |
|
| OS SUPPORT |
|
| ACCESSORIES |
|
| FEATURES |
|
Overview of the TPower x79


The packaging of the TPower X79 is very reminiscent of previous GIGABYTE designs with the pearlescent coating which cause a sparkle (or in our case a glare). All in all, it’s a nice looking package, which offers enough information and detail to whet our appetite to test the board. It also avoids one graphic that is all too common nowadays–having huge cartoon characters or creatures that add no informational value to the packaging. Moving to the rear, we see many a graphic resembling an iPod with icons, each signifying special features and selling points to give you an idea of why we would buy this board.
Looking at the included accessories, we see a decent showing but not some of the extras we see with the other higher priced offerings, although not really necessary so if it helps save us some money we wont complain. In the accessories we find:
- SATA Cables
- SLI Connector
- CrossFireX Connector
- I/O Shield
- User Manual
- Installation disc
We’re not too fond of the mustard-yellow SATA cables, though they get the job done.


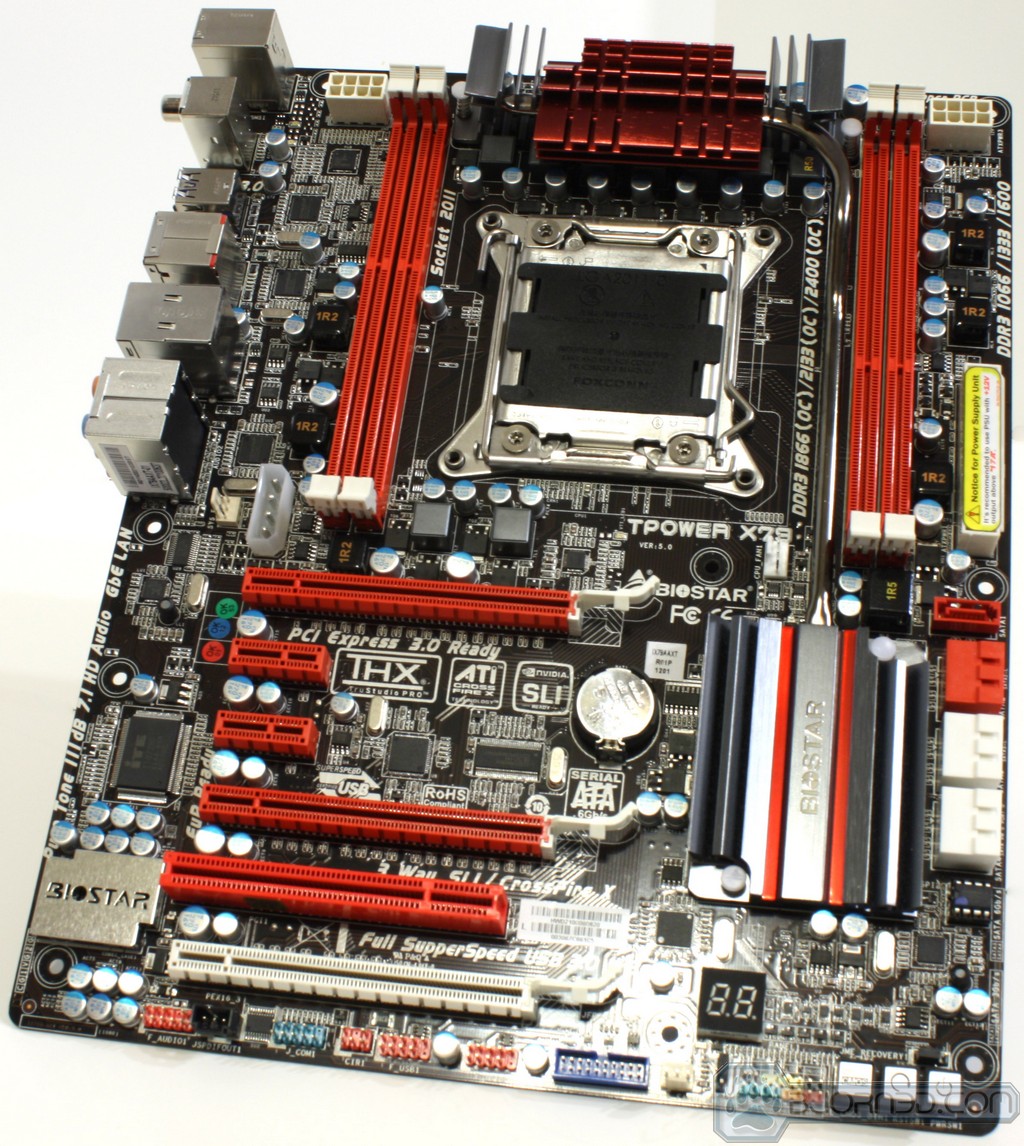
Click Image For a Larger One
Here we see the lower half of the board which shows the slot layout which with a dual card configuration will allow triple slot spacing for the larger cards available now days or even more important allowing an extra slot for the dual slot reference models which allow extra air to be pulled into the cooling fan since the cards are not sandwiched together. Looking at the Power circuit area around the socket and everything looks rather well placed and in good order with the exception that the cooler is held on with plastic pushpins which we never like to see as they usually do not provide adequate pressure to allow proper thermal transfer from the power components to the heatsink. In this case we were pleasantly surprised to find that the plastic push pins had fairly strong springs and were providing a very high contact pressure so they were not a bad application although screws are always preferred.


- 2x USB 2.0
- PS2 Keyboard port
- Coaxial S/PDIF ports
- 6x USB 3.0
- eSATA port (From PCH)
- Gigabit LAN port
- 8 Channel HD Audio


A Closer Look at the TPower X79


We started the closer look by snapping a few shots with the macro lens which we started with the cooler since it actually is a cool looking cooler. It is an anodized aluminum fin array with a heatpipe to help transfer heat away from the critical components to be dissipated by the large chunk of heatsink.


Moving to the board components we focused in on a few key areas such as the SATA port configuration, which for the most part are all laid flat to avoid interference with larger graphics cards. The one that stands straight up from the board is up above the slot ever so slightly as to avoid card fitment issues. Moving further down we see the bottom placed control switches on the PCB edge so that usage of the buttons should be easy unless a triple card configuration is installed, at which point a longer card could cause issues using the buttons. At the lower edge we see the USB 3.0 front panel header in its prominent blue color and the backlit audio shield with the Biostar logo stamped out. At this time we are not sure as to whether stamping the name out on the shield will affect its shielding performance.


BIOS Overview
Extreme Tweaker


Click Image To Enlarge
Biostar has a nicely laid out UEFI offering. Next up is the Advanced page where many of the advanced BIOS options are stored, this includes most of the in depth board level settings that are not or are loosely related to overclockability.


Click Image To Enlarge
Here we have the chipset settings which gives us control over many of the items that the PCH controls including PCI-E Lan speed, generation specs, and even one strange setting we found was a altitude setting. We honestly are not sure exactly what this does but it did not help our overclocking effort no matter the setting.


Click Image To Enlarge
Here we Have the boot and security settings which basically let the user control which disc will be the primary boot device, and the security setting just like has been for years allows setting of a BIOS password to protect your system from intrusion.


Click Image To Enlarge
Here we have the overclocking area, and for a value board it has a pretty decent layout and plenty of options to help us on our overclocking quest. One thing that would be nice is a Vdroop control option to allow compensation of the inherent Vdroop that we see when pushing the clockspeeds up.

Click Image To Enlarge
Lastly we have the exit screen which are the normal save and exit changes along with other exit options for the BIOS.
Testing & Methodology

We’ve expanded our testing suite considerably since the X79 chipset release, and will continue to use the same methods for most of the motherboards and CPU’s we test. In the interests of thoroughness and accurate results, we run each test at least three times, and some tests more than that. We average the total of all the tests from each benchmark then report the average here.
The OS we use is Windows 7 Pro 64bit with all patches and updates applied. We also use the latest drivers available for the motherboard and any devices attached to the computer. We do not disable background tasks or tweak the OS or system in any way. We turn off drive indexing and daily defragging. We also turn off Prefetch and Superfetch. This is not an attempt to produce bigger benchmark numbers. Drive indexing and defragging can interfere with testing and produce confusing numbers. If a test were to be run while a drive was being indexed or defragged, and then the same test was later run when these processes were off, the two results would be contradictory and erroneous. As we cannot control when defragging and indexing occur precisely enough to guarantee that they won’t interfere with testing, we opt to disable the features entirely.
Prefetch tries to predict what users will load the next time they boot the machine by caching the relevant files and storing them for later use. We want to learn how the program runs without any of the files being cached, and we disable it so that each test run we do not have to clear pre-fetch to get accurate numbers. Lastly we disable Superfetch. Superfetch loads often-used programs into the memory. It is one of the reasons that Windows occupies so much memory. Vista fills the memory in an attempt to predict what users will load. Having one test run with files cached, and another test run with the files un-cached would result in inaccurate numbers. Again, since we can’t control its timings so precisely, it we turn it off. Because these four features can potentially interfere with benchmarking, and and are out of our control, we disable them. We do not disable anything else.
Test Rig
| Test Rig | |
| Case | Thermaltake Level 10 GT |
| CPU |
Intel Core i7-3960X |
| Motherboard | Biostar TPower X79 |
| Ram | 16GB Gskill RipJaws Z 4x4GB (9-11-10-27) |
| CPU Cooler |
Swiftech H20-220 Edge |
| Hard Drive | Western Digital Velociraptor 300GB |
| SSD |
Intel 510 series SATA III 120GB |
| Optical | ASUS BD-ROM |
| GPU |
SLI 2x GTX 580 |
| Case Fans |
Front (intake): 200 x 200 x 20 mm ColorShift Fan x 1 (600~800RPM, 13~15dBA) Rear (exhaust): 140 x 140 x 25 mm Turbo Fan (1000PRM, 16 dBA) Top (exhaust): 200 x 200 x 30 mm ColorShift Fan (600~800RPM, 13~15dBA) Side (intake): 200 x 200 x 30 ColorShift Fan (600~800RPM), 13~15dBA) |
| Additional Cards |
N/A |
| PSU |
Thermaltake Toughpower Grand 1200W |
| Mouse | Thermaltake esports Black gaming mouse |
| Keyboard | Thermaltake Meka G1 mechanical gaming keyboard |
Test Suite
We will use the following applications to test the performance of the Motherboard. Benchmarks
| Benchmarks |
|---|
| PCMark 7 |
| Unigine Heaven 2.5 |
| Cinebench R10 |
| Cinebench R11.5 |
| 3DMark 11 |
| 3DMark Vantage |
| Wprime |
| SuperPi |
| Metro 2033 |
| Lost Planet 2 |
| SiSoft Sandra 2011b |
| HDTune Pro |
| X264HD |
| TrueCrypt 7.1 |
Overclocking

The X79 platform is unlike the P67/Z68 offering in way of BCLK overclocking. The default is the same at 100MHz but when it comes to overclocking the X79 has a divider that separates the CPU base clock from the rest of the board frequencies to keep from becoming unstable as the BCLK goes significantly higher.
We got the TPower to 4.6GHz quite simply, but upon pushing further we got to 4.8 GHz, and was fully stable but any further caused instability. We do believe that with a little more mature BIOS, we could get further but as of now were looking at about 4.8GHz as a realistic stable max for us on this board. This is not a bad result as it is actually similar to what we achieved on our previous MSI X79A-GD65 (8D), which is much more expensive.
We would like to take a moment to note that while this board could not generate results at the same level of the Rampage IV Extreme, but the performance difference between the two boards is 2-300MHz, while the price difference is almost double.
Important note: Overclocking can cause component failure. Please exercise caution when attempting any level of overclock on system components.
Temperatures

The temperatures were recorded with Realtemp while running Wprime 1024 right before the end of the 5th run. The results were recorded carefully. After the results were recorded, we waited for 30 minutes before taking Idle temperature measurements. The results were as follows:
| CPU Temperatures | Temperature (Idle/Load) |
| TPower X79 OC (4.6GHz) | 34C/66C |
| TPower X79 | 28C/52C |
| Chipset Temperatures | Temperature (Idle/Load) |
| TPower X79 OC (4.6GHz) | 39C/54C |
| TPower X79 | 34C/45C |
We were lucky as Swiftech sent us mounting for the Edge 220 kit which allowed socket 2011 mounting to give us some headroom when overclocked..
Power Consumption

The power consumption was tested while running Wprime 1024 for a few minutes at stock settings. The results were recorded carefully with a Kill-A-Watt power consumption measuring tool at the wall. After the results were recorded, we waited for yet another few minutes minutes before taking Idle power consumption measurements.
| Configuration | Power Consumption (Idle/Load) |
| TPower X79 (4.6GHz) | 194W/443W |
| TPower X79 | 168W/331W |
The power consumption is not with GPU usage. This is with CPU/system loading but nothing graphically intensive in order to provide the most accurate results by not ramping up the GPU, which will pull significantly more power.
Wprime
Wprime is a processor heavy multithreaded benchmark at which it crunches numbers of a specific data set and gives the end user an output time which can then be used as a gauge to compare system performance.
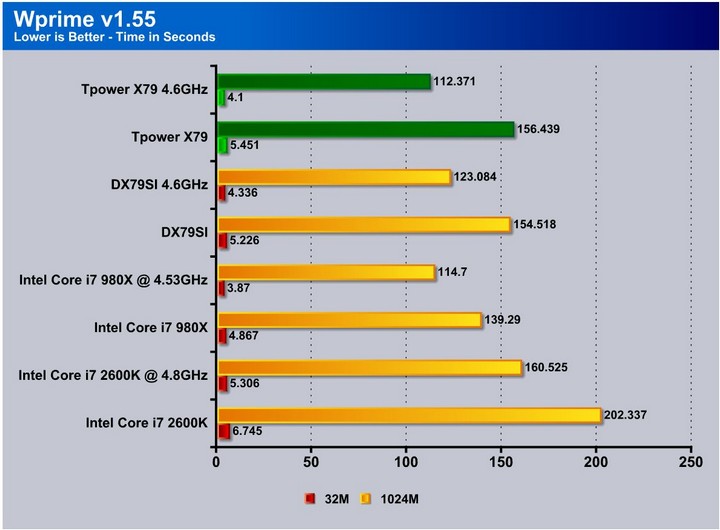
Here we see that the TPower X79 does not do so well at stock, but it does great at overclocked speeds. This is because the turbo was not activated, even though it was enabled in the BIOS. We tried every setting combination we could think of but the default speed turbo performance just was not there; luckily, when overclocked, the performance was excellent.
Superpi
SuperPi is a single threaded benchmark which measures efficiency and is heavily influenced by architectural changes as much as it is by clockspeeds.
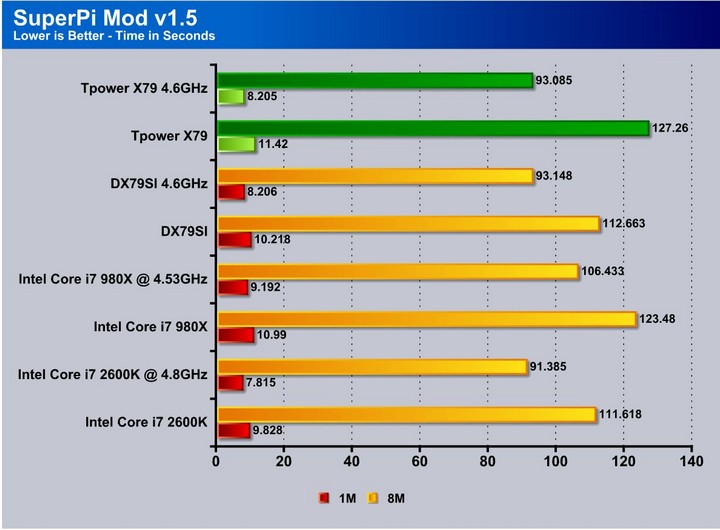
SuperPi is a much older benchmark, and some may argue its obsolescence, but with some newer processors scoring poorly in this test, it is always good to include it. The TPower once again showed the loss of performance from not having turbo mode functional but with overclocks, the performance was excellent.
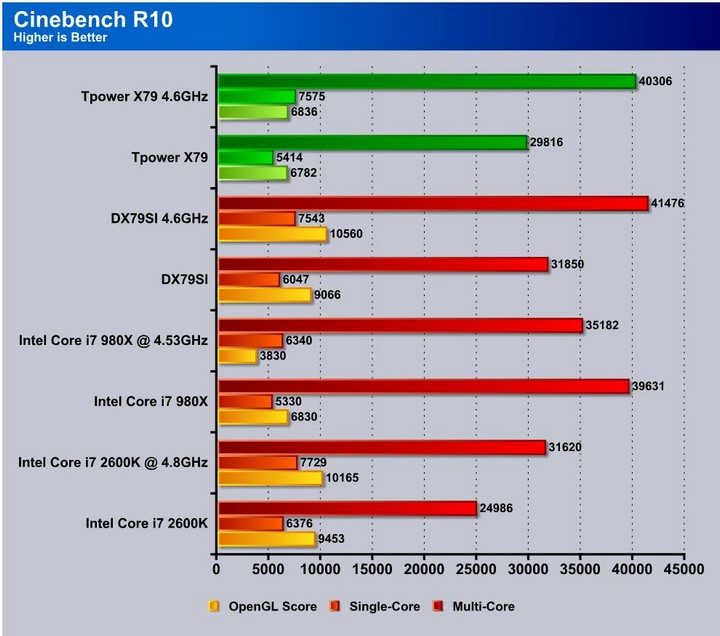
Cinebench R10 and R11.5

“CINEBENCH is a real-world test suite that assesses your computer’s performance capabilities. MAXON CINEBENCH is based on MAXON’s award-winning animation software, CINEMA 4D, which is used extensively by studios and production houses worldwide for 3D content creation. MAXON software has been used in blockbuster movies such as Spider-Man, Star Wars, The Chronicles of Narnia and many more. MAXON CINEBENCH runs several tests on your computer to measure the performance of the main processor and the graphics card under real world circumstances. The benchmark application makes use of up to 16 CPUs or CPU cores and is available for Windows (32-bit and 64-Bit) and Macintosh (PPC and Intel-based). The resulting values among different operating systems are 100% comparable and therefore very useful with regard to purchasing decision-making. It can also be used as a marketing tool for hardware vendors or simply to compare hardware among colleagues or friends.”

SiSoft sandra 2011

“SiSoftware Sandra (the System Analyzer, Diagnostic and Reporting Assistant) is an information & diagnostic utility. It should provide most of the information (including undocumented) you need to know about your hardware, software and other devices whether hardware or software. It works along the lines of other Windows utilities, however it tries to go beyond them and show you more of what’s really going on. Giving the user the ability to draw comparisons at both a high and low-level. You can get information about the CPU, chipset, video adapter, ports, printers, sound card, memory, network, Windows internals, AGP, PCI, PCI-X, PCIe (PCI Express), database, USB, USB2, 1394/Firewire, etc.”
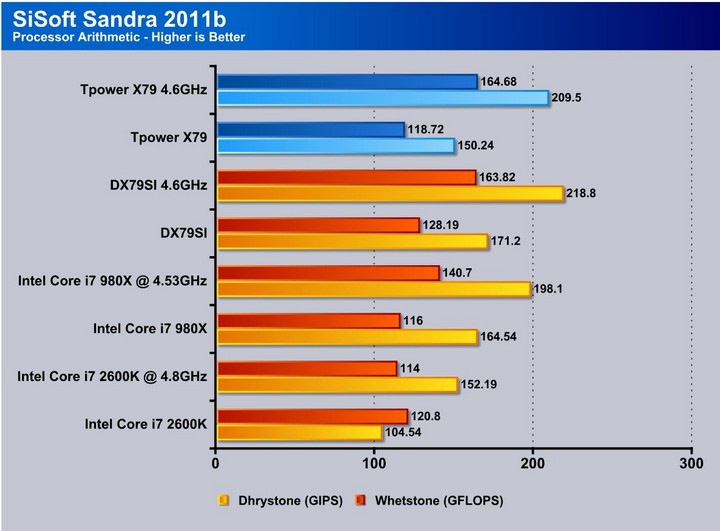
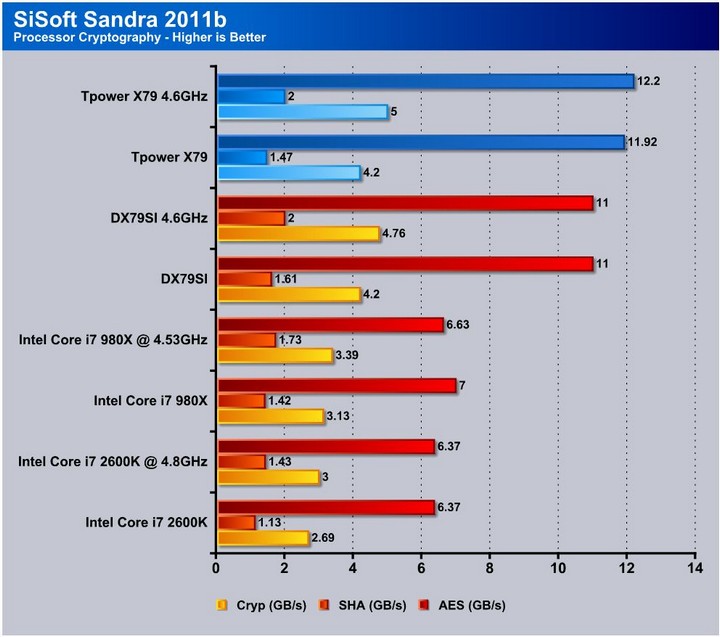
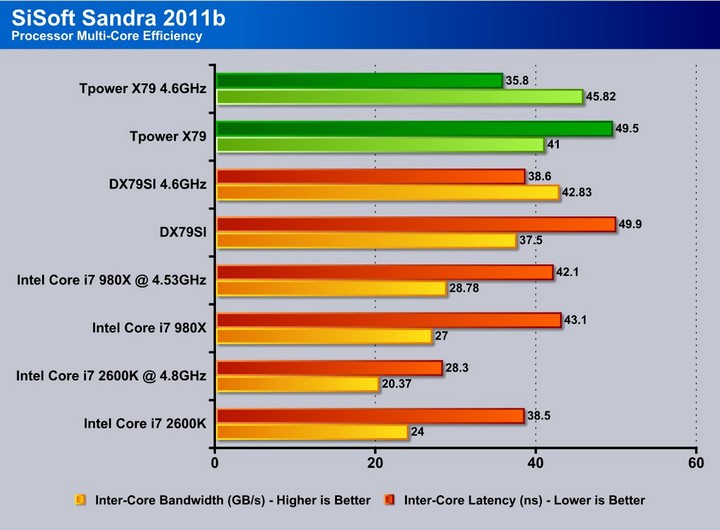
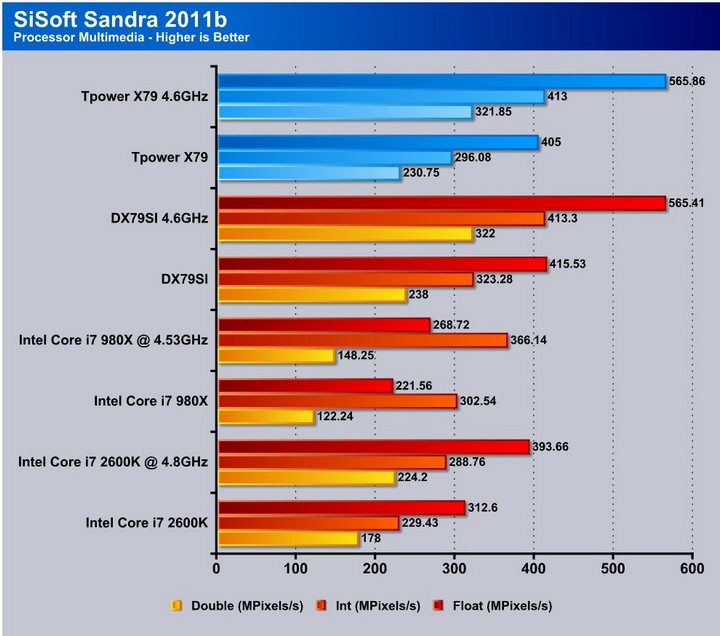
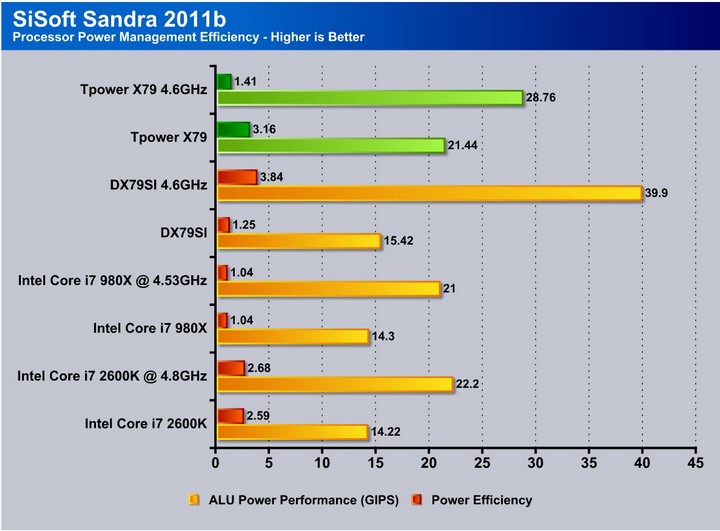
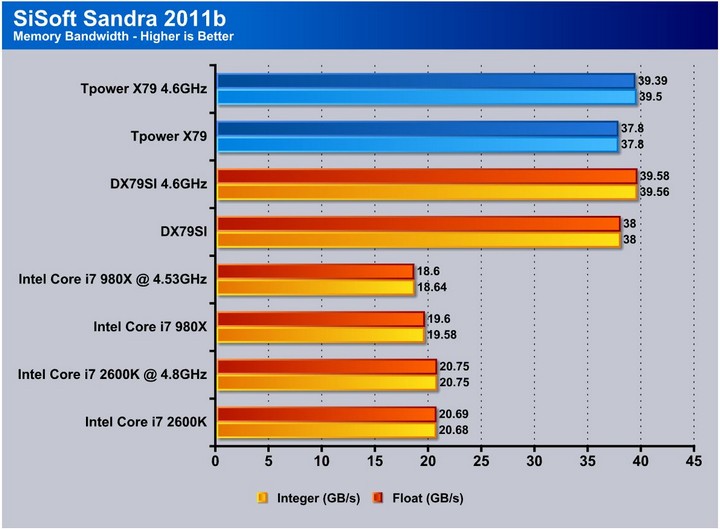
Here we see that SiSoft Sandra shows a flip-flop between the DX79SI and the TPower, but the fact that the TPower does lose to the Intel board in some cases shows that improvements are necessary, especially since the results are lower than most boards we’ve tested.
PCmark 7

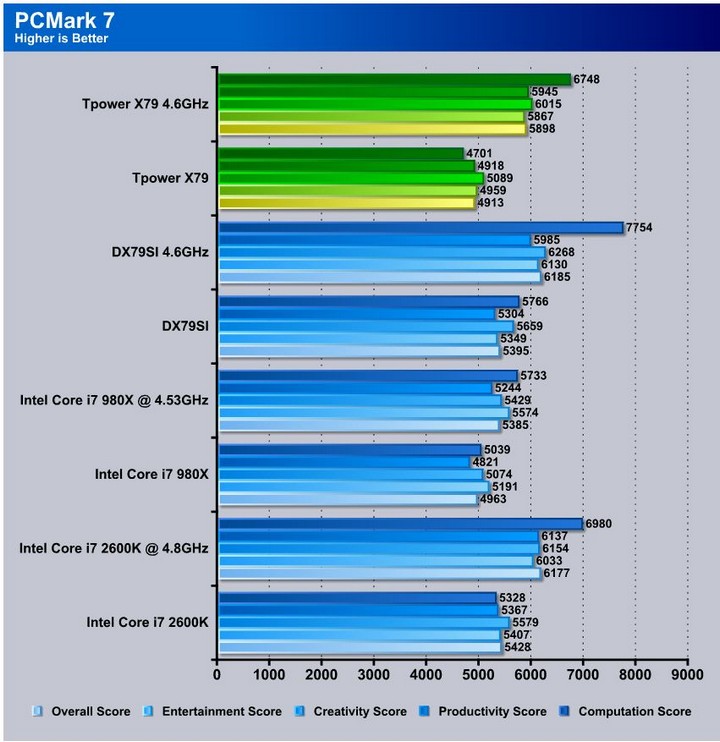
PCMark 7 is a real world synthetic benchmark. While it does try to accurately represent real world workloads it is still a synthetic benchmark. The benchmark once again shows the TPower’s inefficiencies and that it needs some work or improvement to get up to the level of the other boards that are currently available.
X264HD
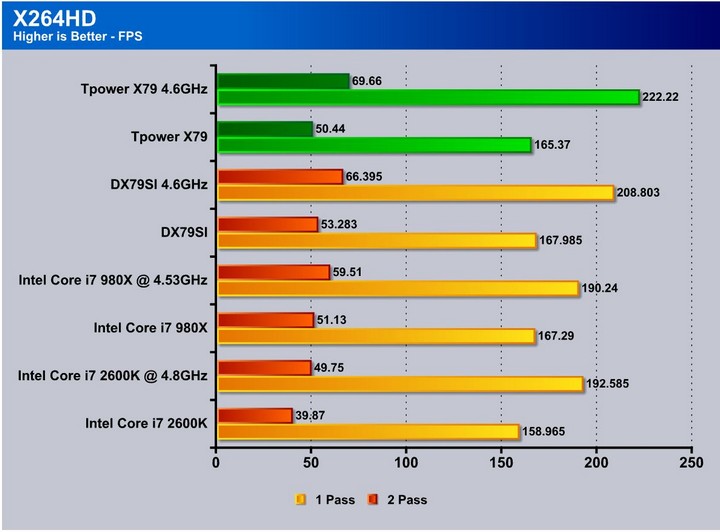
The X264HD benchmark tests the encoding capabilities of the CPU to encode a short HD video clip. Here we see that the 3960X’s performance once again is nothing short of stellar. Paired with the Tpower it shows a decent gain over the DX79SI board and shows that the TPower can be quite efficient at some tasks regardless of the shortcomings.
Truecrypt 7.1
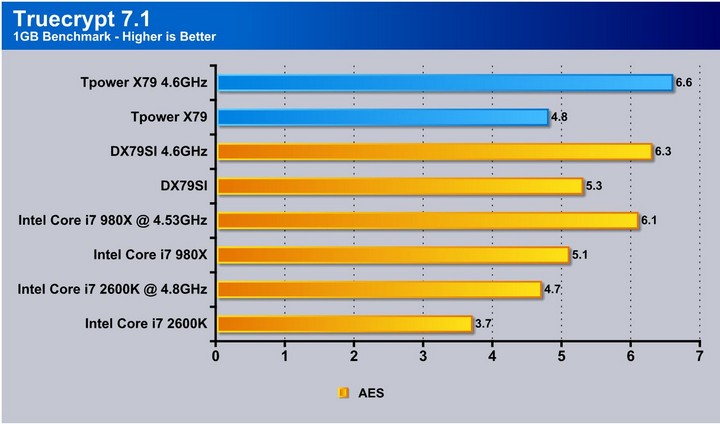
The Truecrypt benchmark surprised us with yet another positive result for the TPower. Though it still is not beating the other boards we have tested, it is now pulling some better performance than the DX79SI.
HDTune pro
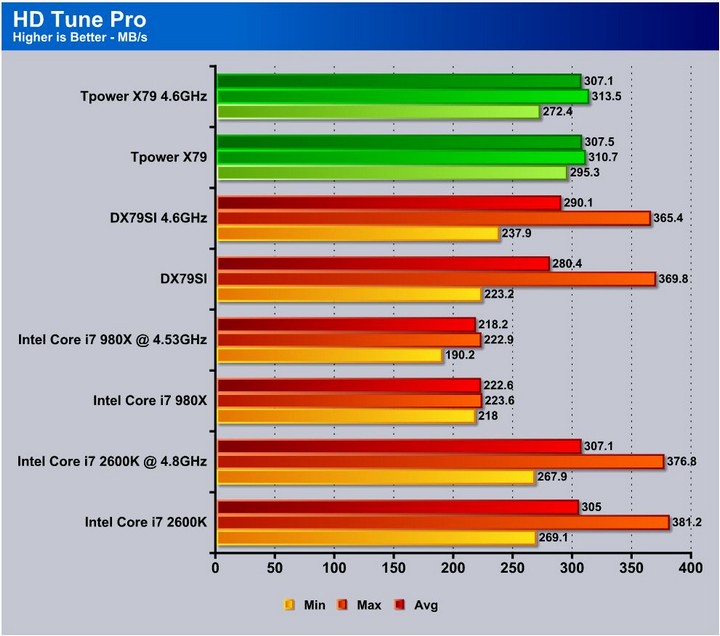
The HDTune tests are skewed in comparison to the DX79SI result as the SSD used for that boards results was a different model which had failed before we tested this board, and therefore for the time being we had to substitute an Intel 510 model.
3DMARK VANTAGE

For complete information on 3DMark Vantage Please follow this Link:
www.futuremark.com/benchmarks/3dmarkvantage/features/
The newest video benchmark from the gang at Futuremark. This utility is still a synthetic benchmark, but one that more closely reflects real world gaming performance. While it is not a perfect replacement for actual game benchmarks, it has its uses. We tested our cards at the ‘Performance’ setting.

3DMARK 11
![]()
3DMark 11 is the newest in futuremark’s suite of benchmarking utilities. Its a fully capable DirectX11 benchmark which also stresses and analyzes the system performance as a whole to simulate a heavy rendering environment such as a high end game or other app the end user may run. This benchmark was run with Performance settings 5 times and all runs were averaged for the result below.
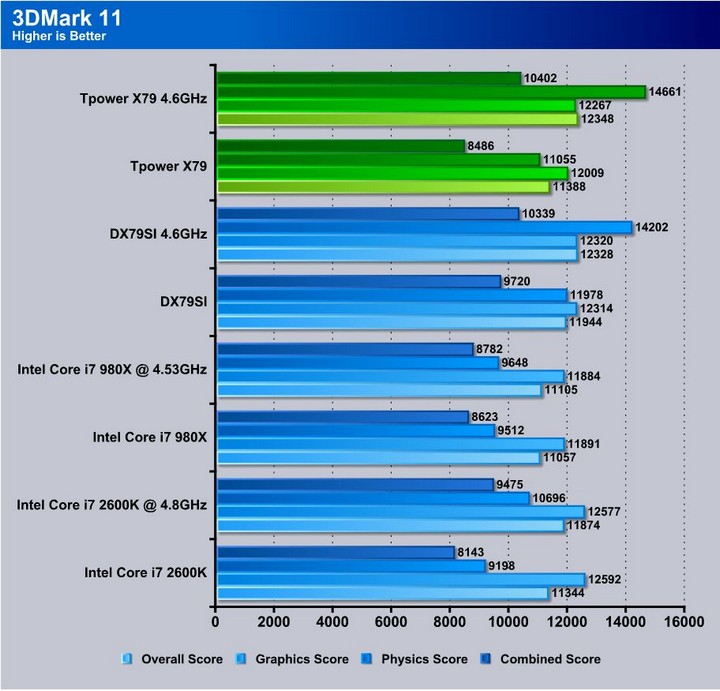
3DMark Vantage and 3DMark 11 show lower results from the TPower on the stock clocked testing due to the lower frequency as the TPower had issues with turbo function and therefore ran at a 3300MHz frequency instead of the higher turbo speed.
Unigine Heaven 2.5

Unigine Heaven is a benchmark program based on Unigine Corp’s latest engine, Unigine. The engine features DirectX 11, Hardware tessellation, DirectCompute, and Shader Model 5.0. All of these new technologies combined with the ability to run each card through the same exact test means this benchmark should be in our arsenal for a long time.
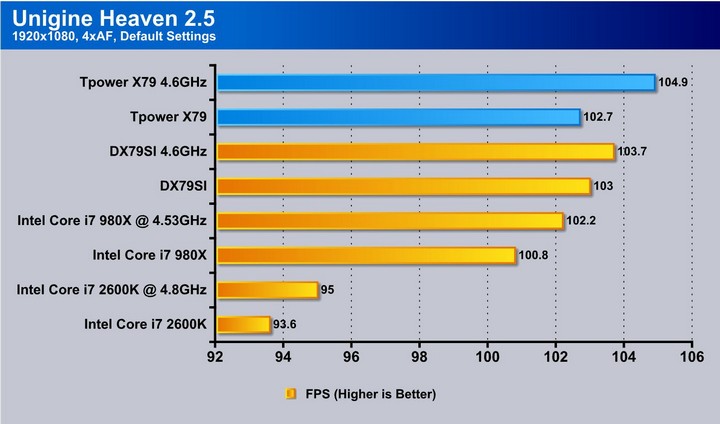
Unigine Heaven 2.5 definitely can see the increase in performance as performance scales with the frequency increases. The TPower once again shows lower results at the stock speed, while it jumps above the DX79SI easily at overclock speeds.
Metro 2033
![]()
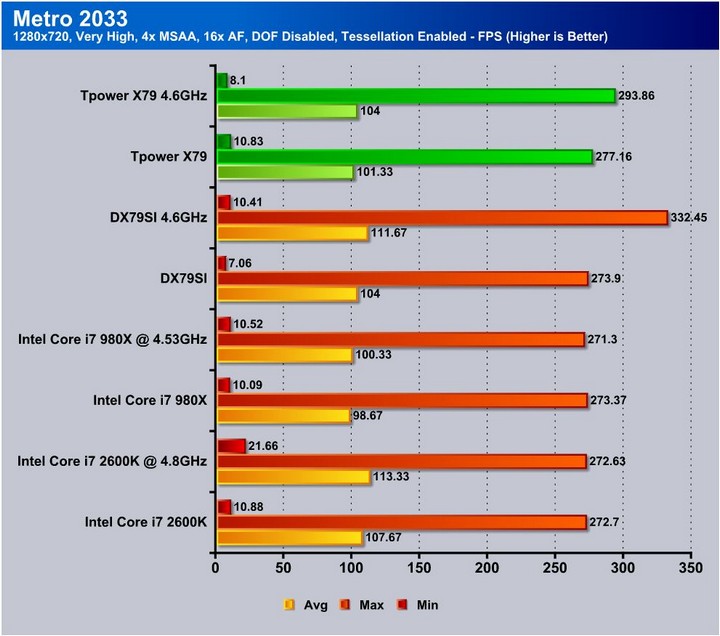
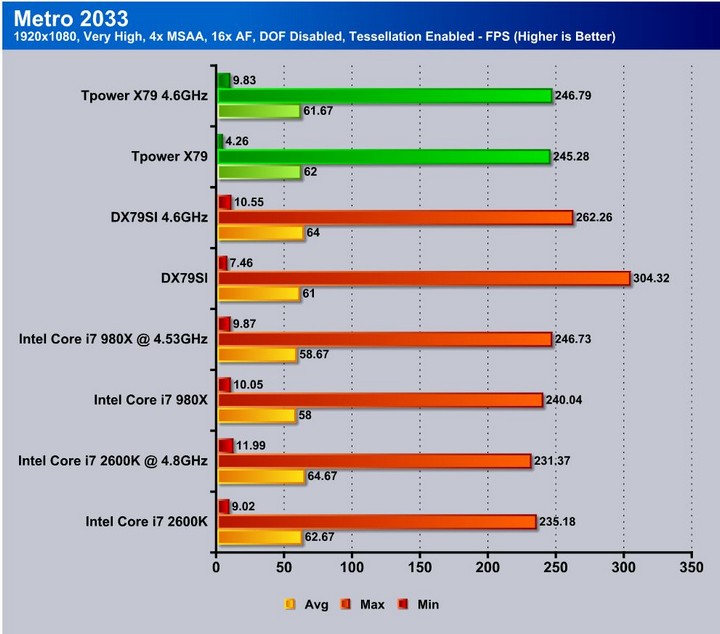
Metro 2033 is a very demanding game for graphics. We were very surprised to see this game rely more on clock frequency than overall core efficiency but the Sandy Bridge and Sandy Bridge-E models have similar efficiency, The DX79SI shows higher performance pretty much across the board for the efficiency similar to the previous testing results.
Lost Planet 2


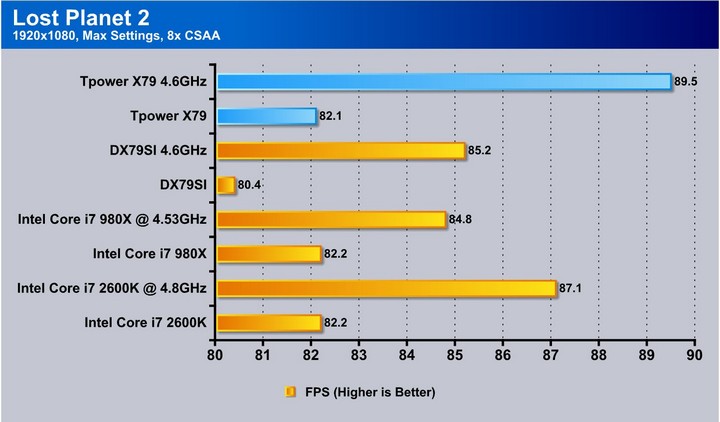
Lost Planet 2 shows a definite improvement for the TPower over most of the other platforms at stock and even more at overclocked settings. This goes to show that as of now the TPower is a mixed bag, but largely missing some efficiency that could just be a result of an immature bios and can easily be improved with future updates.
CONCLUSION
When we received the TPower we had mixed feelings, as we have had some good experience with previous TPower boards, but knowing that the bulk of Biostar’s attention is paid to low cost models or OEM style boards leaves us a little uneasy as to their focus or attention to the enthusiast cause and community.
After testing we still have mixed feelings as the TPower showed results sometimes beating other boards while other times trailing, which tells us this could have been tested a bit more by Biostar in order to help improve the efficiency before ever making it to our hands. However this is not all bad by any means as the overclock was similar to boards in excess of 100 dollars more than the TPower. The Turbo not functioning properly was a pretty big let down but it has been reported to Biostar so that it can be corrected, and were sure will not really be an issue by the time users get them in their hands.
The board comes with everything needed to set it up, a more than capable CPU power circuit and plenty of extras to give some excellent performance without extra cost adding fluff that may not be needed. At a price of $229.99 we really think this board is one heck of a value and can perform amazing given the tuning time to get it up to speed, which took us about 10-20 minutes. The TPower is not the most powerful or efficient board on the market but at its price it is hard to go wrong for a performance gaming system that–with some BIOS improvements–could even make an amazing budget overclocking entry.
| OUR VERDICT: Biostar TPower X79 | ||||||||||||||||||
|
||||||||||||||||||
| Summary: The Biostar TPower X79 comes at a excellent price but also has a few bugs. We expect it to be an excellent performer with a slightly more mature BIOS. For its amazingly low price, it earns the Bjorn3D Best Bang For The Buck Award. |