INTRODUCTION
Earlier this year Cooler Master released their MasterLiquid Pro 120 and 240 models of AIO liquid cooling solutions. Cooler Master has stated that they have user that want to push their systems to the next level in mind with the MasterLiquid Pro series. Utilizing their holistic approach to controlling the heat generated by a system, dubbed “FlowOp Technology”, along with a dual chamber design on the pump and waterblock, Cooler Master has broght a few new tricks to the game of aftermarket cooling. To follow up the 120 and 240 models, Cooler Master is now releasing the MasterLiquid Pro 140 and 280 models, with 140mm and 280mm radiators, respectively. Can this new design of the Cooler Master MasterLiquid Pro 140 live up to the performance needs of enthusiast consumers? Let’s find out.
STANDOUT FEATURES
The major feature of the MasterLiquid Pro 140 that we want to point out is FlowOp Technology, which is actually a grouping of features wrapped into one package. Cooler Master touts FlowOp as a rethinking of liquid cooling fundamentals, and is key in bringing a balance of performance and reliability to the MasterLiquid Pro 140 unit.
FlowOp Technology – Cooler Master has grouped a set of features together into a bundle which they dub “FlowOp Technology”. This group of features is build with the goal of performing better than previous models, while lasting longer and requiring zero maintenance. The following sub-group of features makes up the FlowOp system:
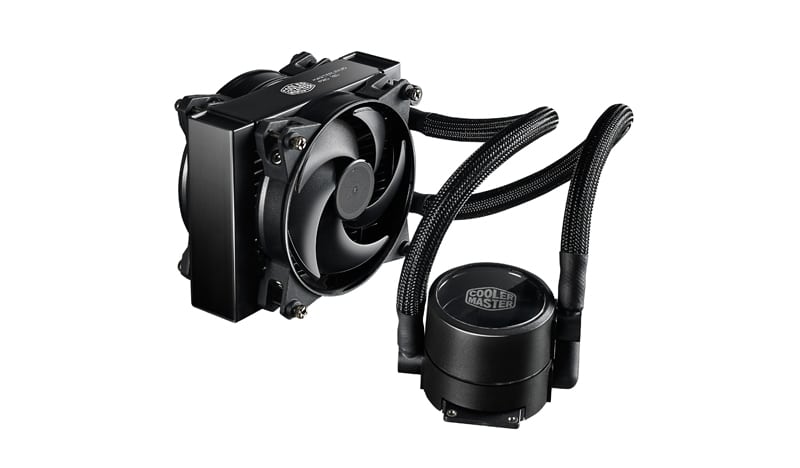
- Exclusive Pump with UltraFine Microchannels – Cooler Master has separated the pump and waterblock combination into two separate chambers to provide a thermal boundary between the hot liquid on the bottom of the unit, and the cool liquid up top where all of the mechanical components are housed. By separating these functions, the pump is always pushing cool liquid from the radiator down to the waterblock, so that no warm liquid comes into contact with it. Since the pump and associated components are not sitting in a bath of warm liquid, their lifetimes are extended.
- Braided Sleeve Tubing – The previous models of the MasterLiquid Pro series featured ribbed rubber tubing found on more budget-oriented AIO liquid coolers. Cooler Master has listened to their community and upgraded the entire MasterLiquid Pro series to braided sleeved tubing. Not only does this tubing keep cables from kinking, it looks better as well.
- Square Fin Design Radiator – Cooler Master has taken fin design to a whole new level with their square fin design. Instead of a small contact area between traditional fins and the liquid channel, the square fin design allows for a greater fin surface are to make contact with the channel, resulting in more heat absorption. This square design also allows for inreased air flow, which in return results in the ability to use a quieter fan to move are through the radiator.
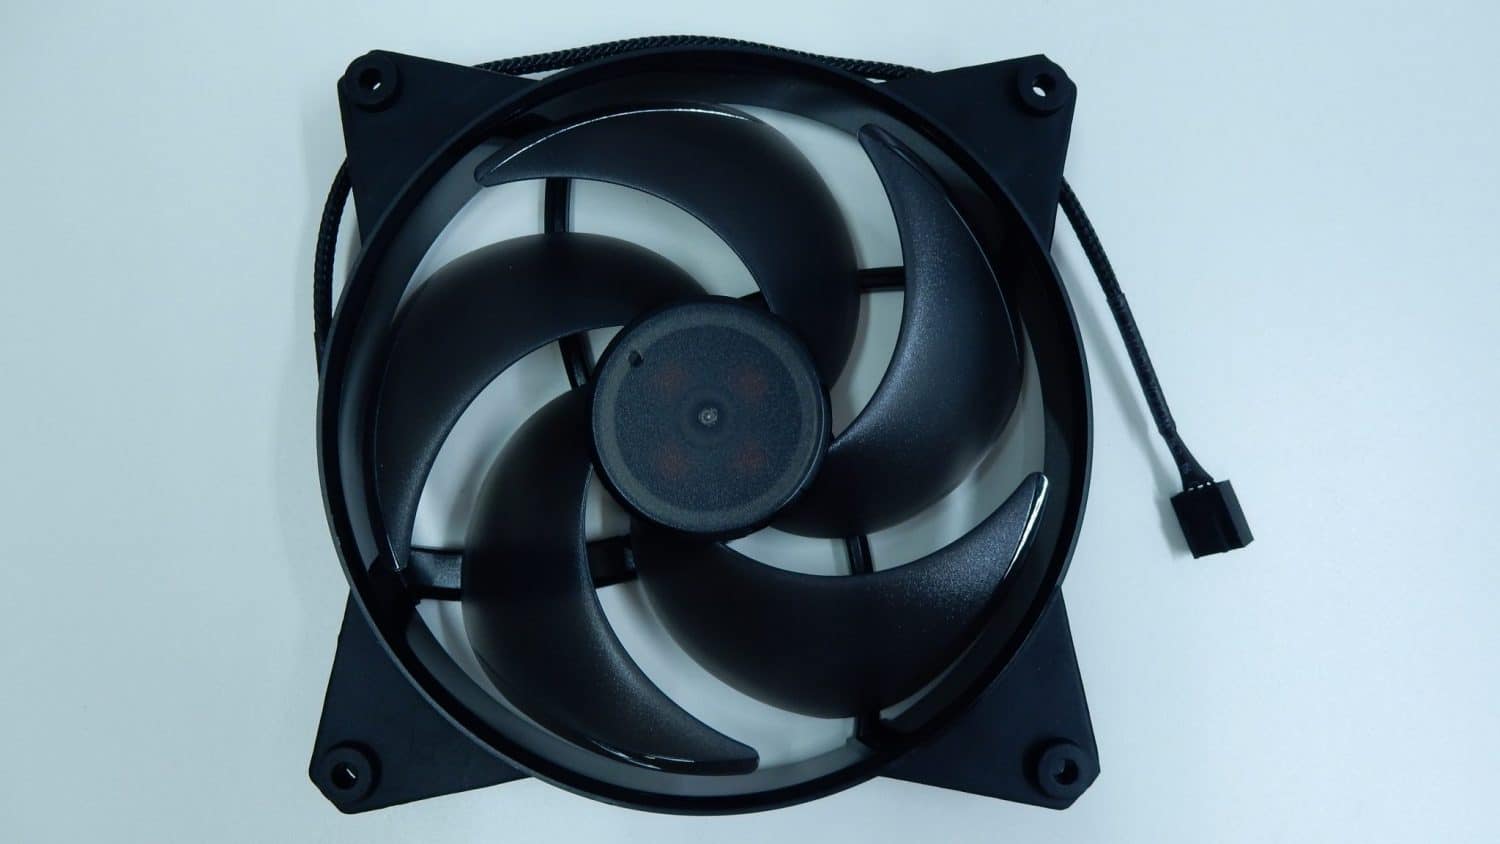
- MasterFan Balance – Cooler Master has included two 140mm MasterFan Pro 140 Air Pressure fans to provide airflow through the radiator in a push-pull configuration. The MasterFan Pro fans feature rubber mounting points for reduced vibration and rattle noise, and have a built-in 3-way speed selecter to allow for customization of performance.
SPECIFICATIONS
| Model | MLY-D14M-A22MB-R1 | |
| CPU Socket | Intel LGA 2011-v3 / 2011 / 1151 / 1150 / 1155 / 1156 / 1366 / 775 socket
AMD AM3+ / AM3 / AM2+ / AM2 / FM2+ / FM2 / FM1 socket |
|
| Radiator | Dimension (L x W x H) | 171 x 138 x 27 mm (6.7 x 5.4 x 1.1″) |
| Material | Aluminum | |
| Fan | Dimension | 140 x 140 x 25 mm (5.5 x 5.5 x 1″) |
| Fan Speed | 650 ~ 2000RPM (PWM) ± 10% | |
| Air Flow | 64.21 CFM (Max) | |
| Air Pressure | 3.15 mmH2O (Max) | |
| Noise Level | 6 ~ 30 dBA (Max) | |
| MTTF | 490,000 Hours | |
| L-10 Life | 70,000 Hours | |
| Rated Voltage | 12 VDC | |
| Connector | 4-Pin | |
| Pump | Noise Level | < 12 dBA (Max) |
| MTTF | 175,000 Hours | |
| L-10 Life | 50,000 Hours | |
| Rated Voltage | 12 VDC | |
| EAN Code | 4719512052624 | |
| UPC Code | 884102028731 | |
CLOSER LOOK

PACKAGING
The retail box for the MasterLiquid Pro 140 is quite nice. Cooler Master went with a matte black base and various product images on the side panels. The bottom of the box includes small snippets directing users to Cooler Master’s website for more information regarding the product within. This choice seemed a bit odd to us, as most manufacturers take this opportunity to show off additional features and specifications of the product within. Once inside the box, the MasterLiquid 140 was kept in place with custom cardboard boxes and frames. Another internal box was home to all of the installation hardware, as well as product documentation.
PUMP/BLOCK/RESERVOIR
The dual chamber design found here is a bit misleading at first glance. Cooler Master chose to place a transparent window on the top of the pump, which is engraved with the Cooler Master logo, and illuminated from below by a blue LED. This window would have been a great way of showing off the liquid within the system, but the open area beneath the window does not function as a reservoir, and there is no liquid within this compartment. While this does not have an affect on cooling performance, Cooler Master could have used this area to show off the internals of the system. A little less height would have been needed if the windowed compartment was removed, but again, there is no performance hit here.
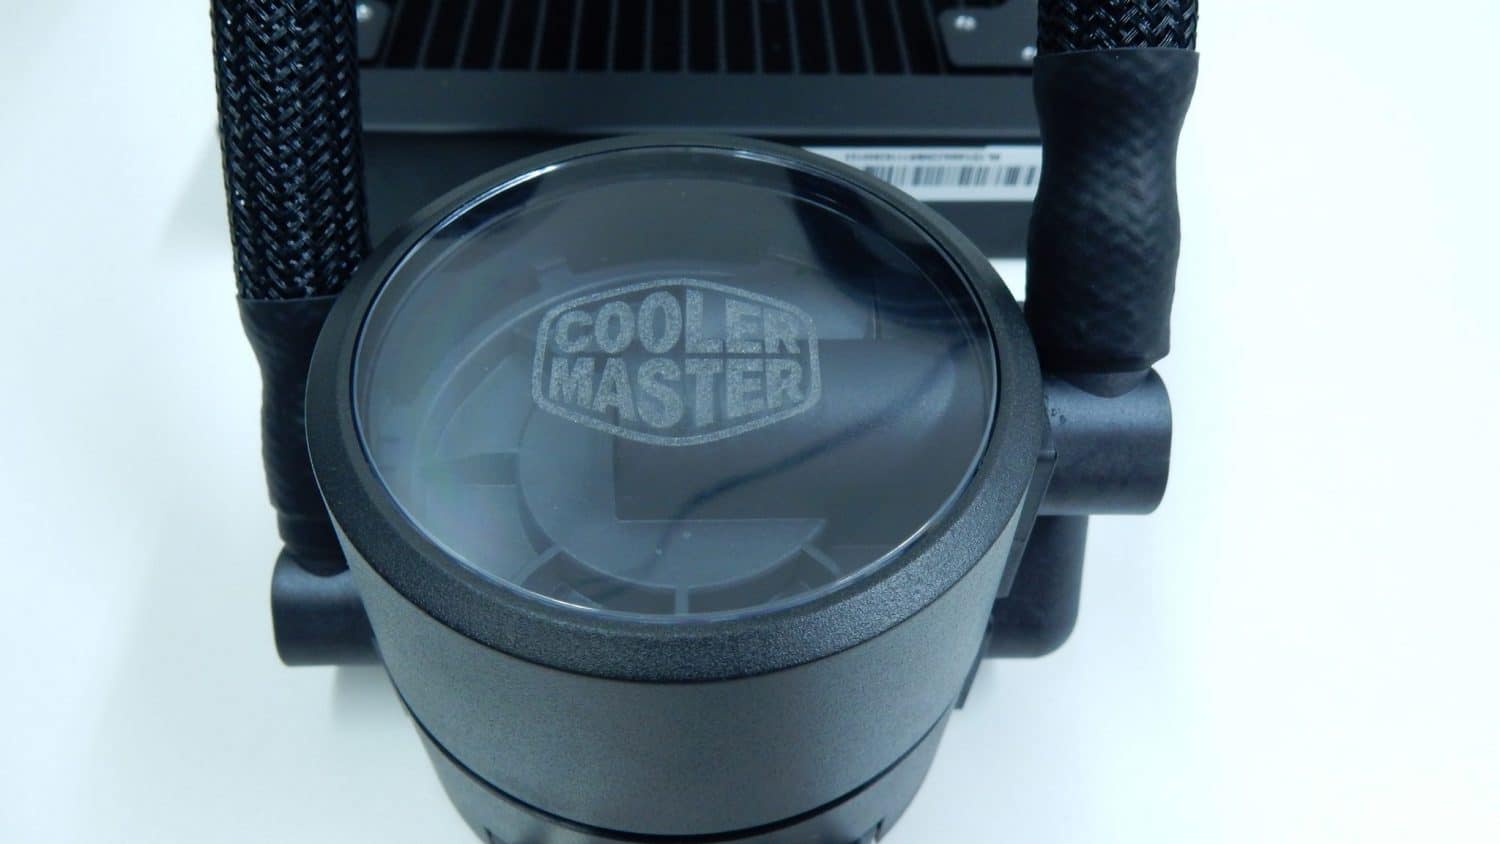
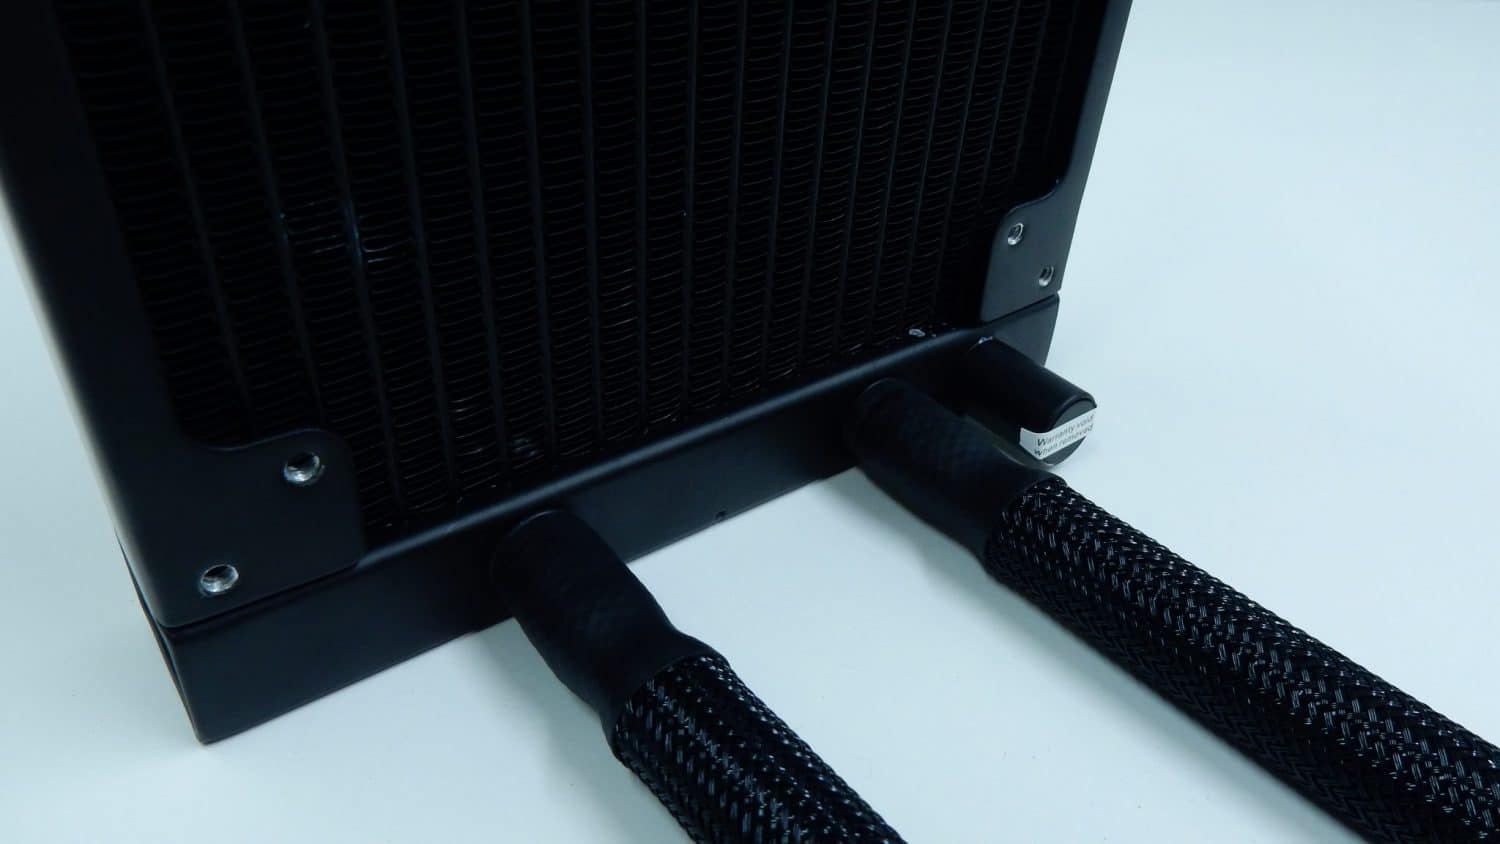
Each side of the pump has a single braided tube running to the radiator unit. Both connections swivel with relative ease to allow for the unit to mount in various locations in a system without cables being bent or kinked. The right side of the pump is home to a molded plastic channel that allows cool liquid to flow from the upper portion of the pump down to the waterblock area. This external piping give the unit a neat look, but moving this channel inside the unit would have allowed for a bit more rotation to be had on the right tube.

The top and bottom edges of the pump are outfitted with mounting brackets for the inlcuded AMD and Intel hardware. Pump connectivity is achieved by a removable six-pin connector that connects to the motherboard’s CPU PWM fan header. It is curious that the pump-side connector allows for six pins, but only four leads are present on the associated cable.

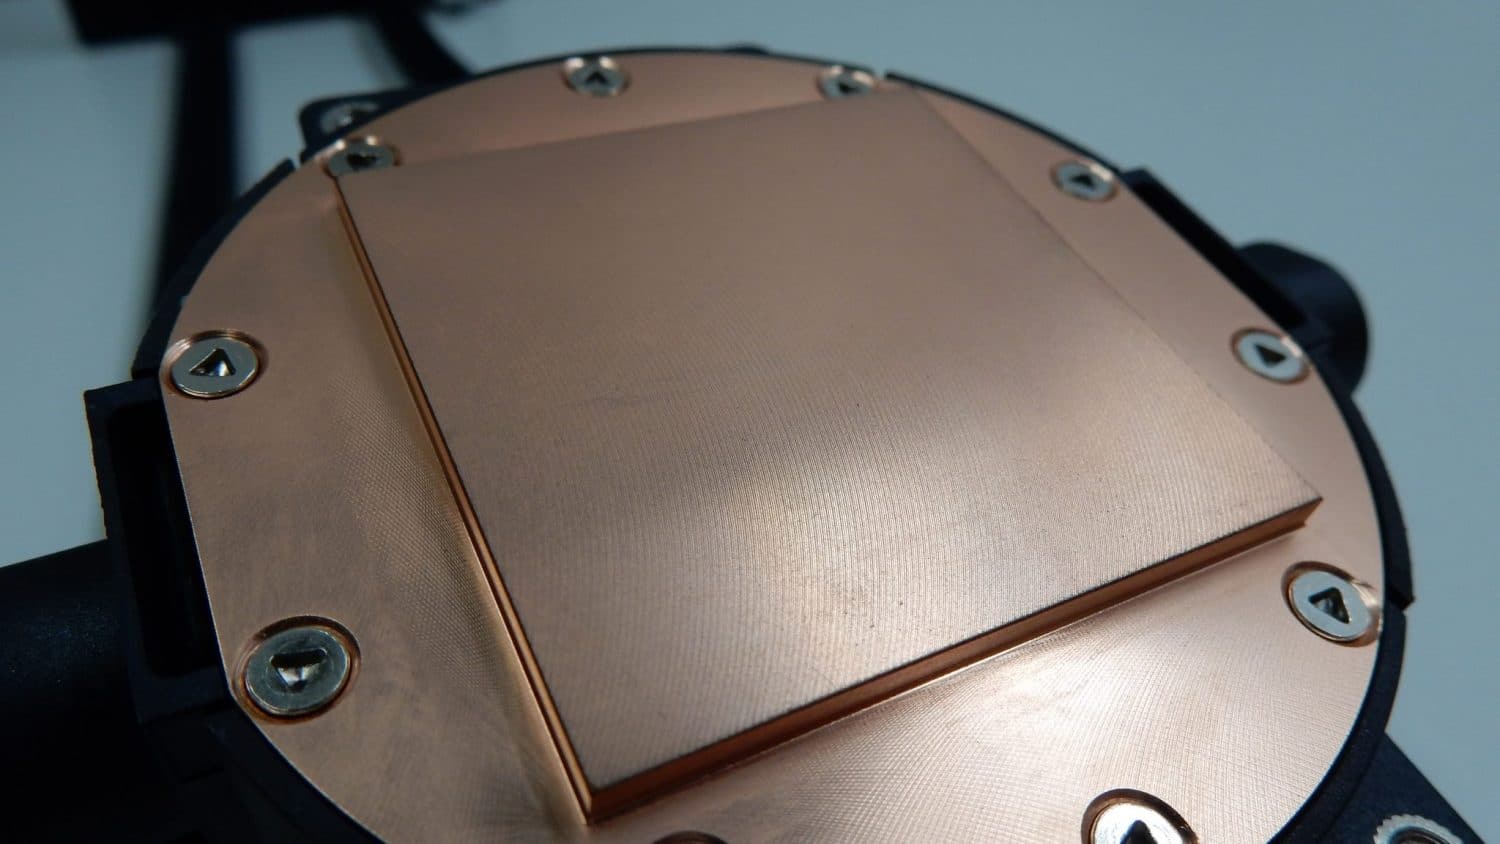
Taking a look at the bottom of the waterblock gives us a good view of the surface coming in contact with the CPU. Held on by 10 screws with a triangular head pattern, this copper block showed a bit more texture than we would have liked to have seen. We preffer a smoother surface for our CPU coolers, but we have seen much worse. The internal design of the MasterLiquid Pro 140’s waterblock is designed with Cooler Master’s UltraFine Microchannel+ design, offering a claimed 679% increase in surface area compared to competitor’s designs. The use of this new design offers a 40% improvement in heat dissipation over Cooler Master’s previous models. The microchannel design allows the pump to spray liquid directly at the center of the waterblock, keeping cool liquid moving across the block at all times.

RADIATOR
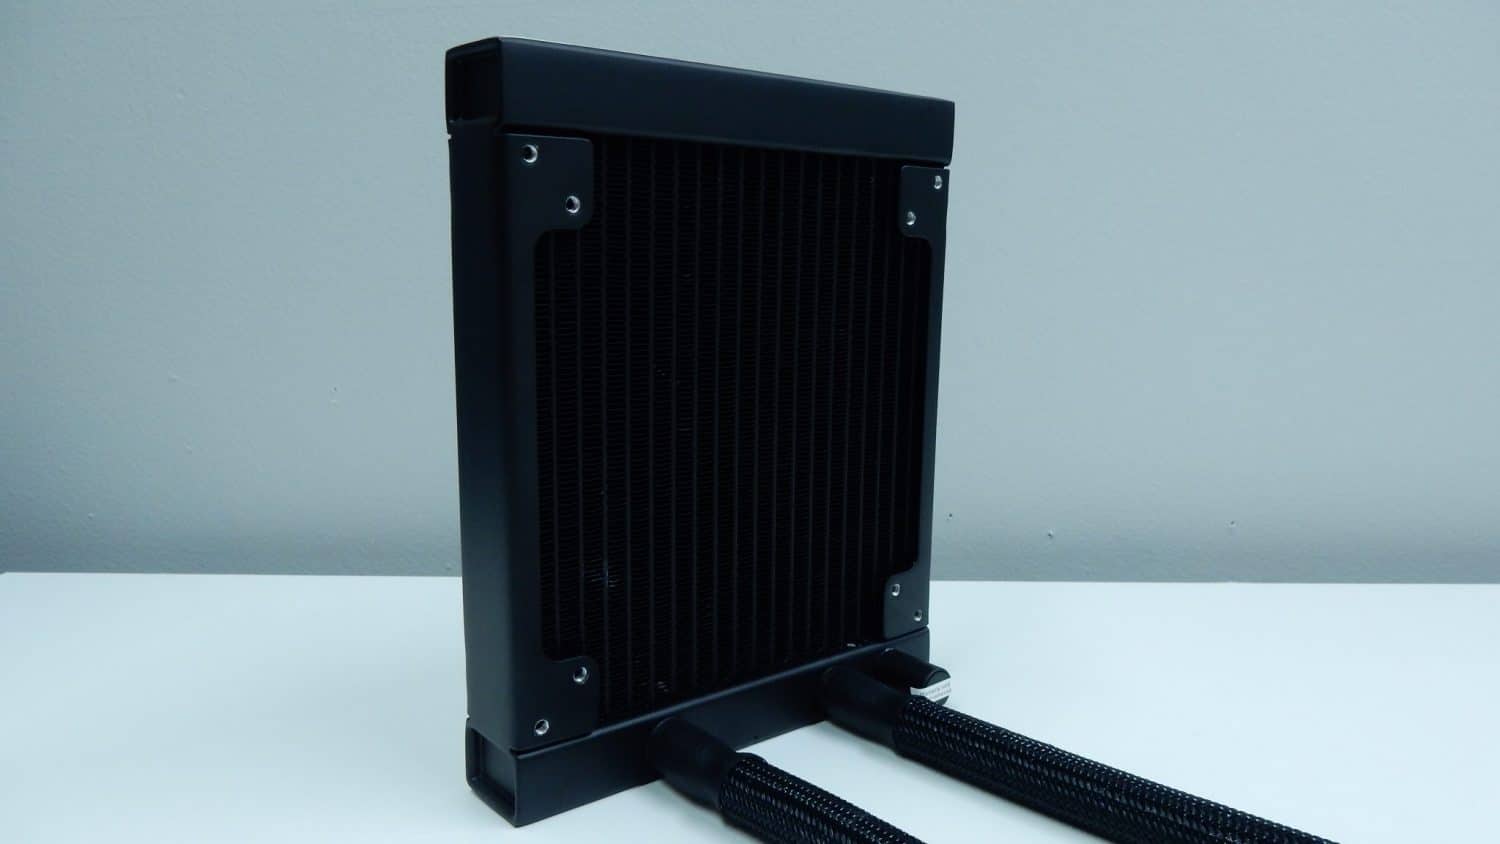
The MasterLiquid Pro 140 features a single 140mm radiator with Cooler Master’s square fin design for increased heat transfer and optimized airflow. The thickness of the radiator is 27mm, which is a bit on the thin side, but when you consider that the 140 model is designed to have two fans installed, it makes a bit more sense from an installation and fit perspective. The build of the radiator is quite sturdy, and this can most likely be chocked up to the thick gauge material used for the frame of the unit. The radiator material is aluminum, a common feature on most modern radiators. A nice matte finish paint coat has been applied, and one side of the radiator frame features a Cooler Master logo and product title. The frame of the radiator is outfitted for use with both 120mm and 140mm fans, a nice feature that allows for a greater amount of customization when it comes to fan choice.

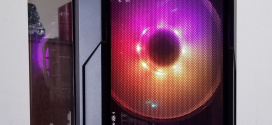
As mentioned before, Cooler Master has utilized a square fin design on the radiator, and it is easy to see just how much more surface area the fins have with the liquid channels compared to a traditional radiator design.
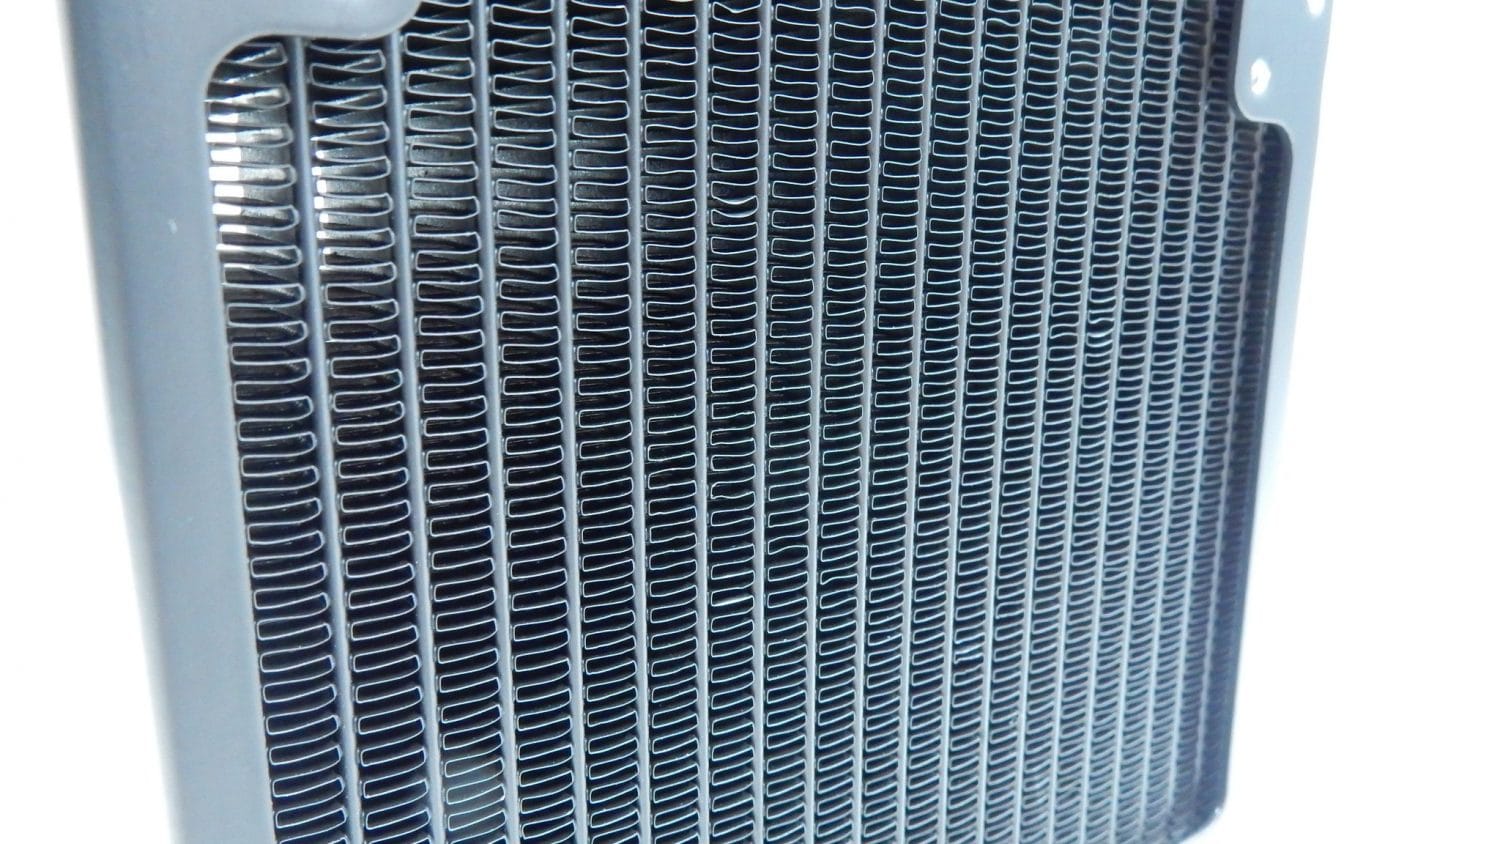
We have provided an image from Cooler Master here that helps to illustrate the advantages of the square fin design.

The two braided sleeve tubes connect to the radiator via hidden hidden means, as heat shrink tubing has been applied to keep things nice and neat. Next to the two hose connections is a factory-sealed port used to refill the unit, though removing the seal and opening it up will void the included 5 year warranty.
FANS
Along with the new sizes for the MasterLiquid Pro line come Cooler Master’s new MasterFan Pro 140 AP fans. Inspired by helicoper blades, the air pressure model of MasterFan moves air over a shorter distance, but with more force; great for radiator duty. The body of the MasterFans are quite simple; just a circular frame around the fan blades, and four heavy duty rubber mounting brackets secured to the frame with robust screws that seem like they are a bit overkill for the job. The back side of the fan offers a simple three position DIP switch that determines what mode the fan is operating in: Silence, Quiet, and Performance.
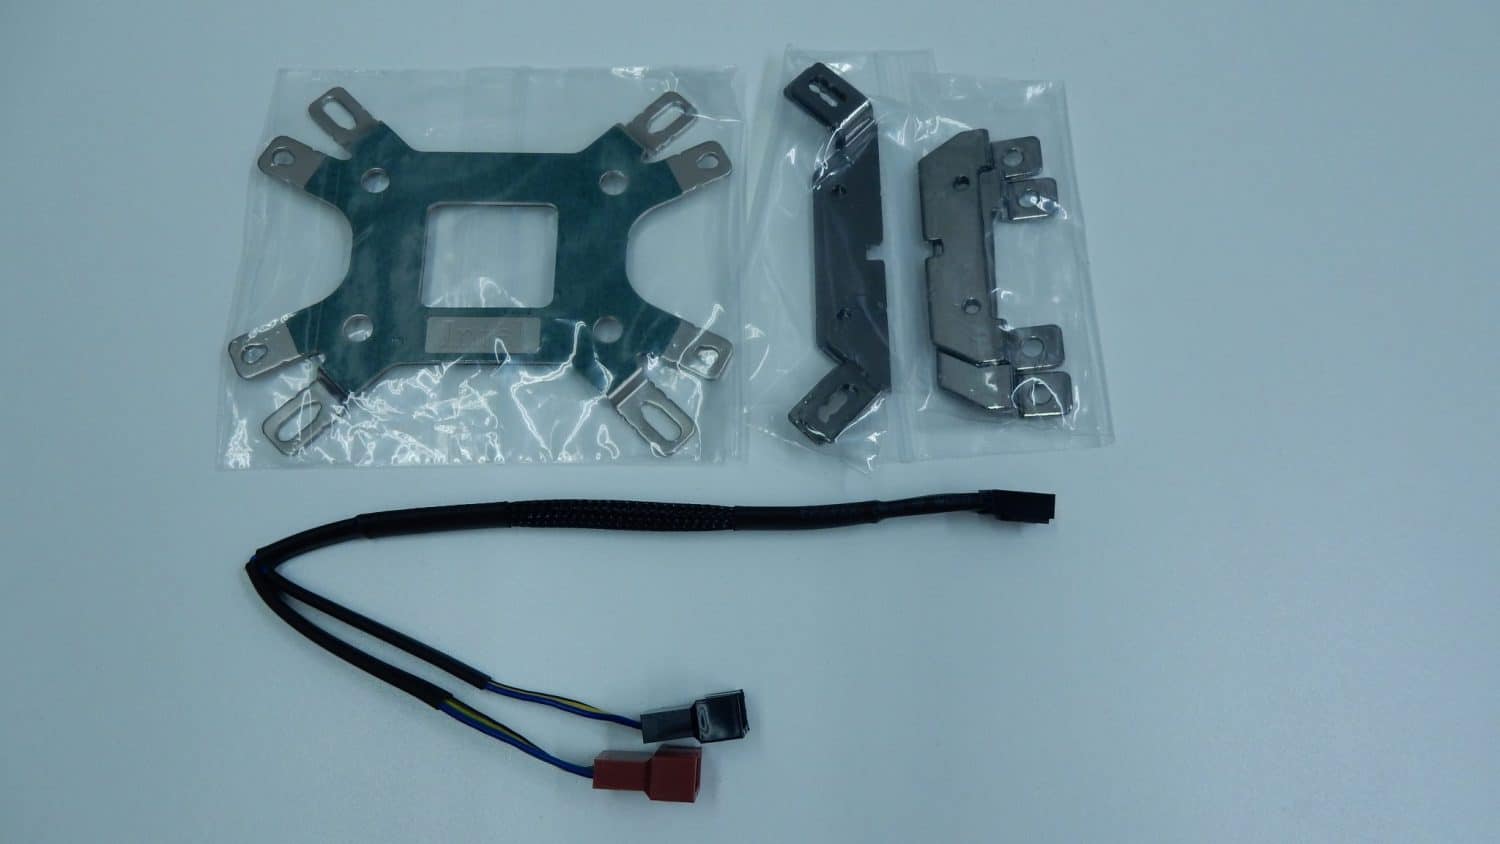
ACCESSORIES
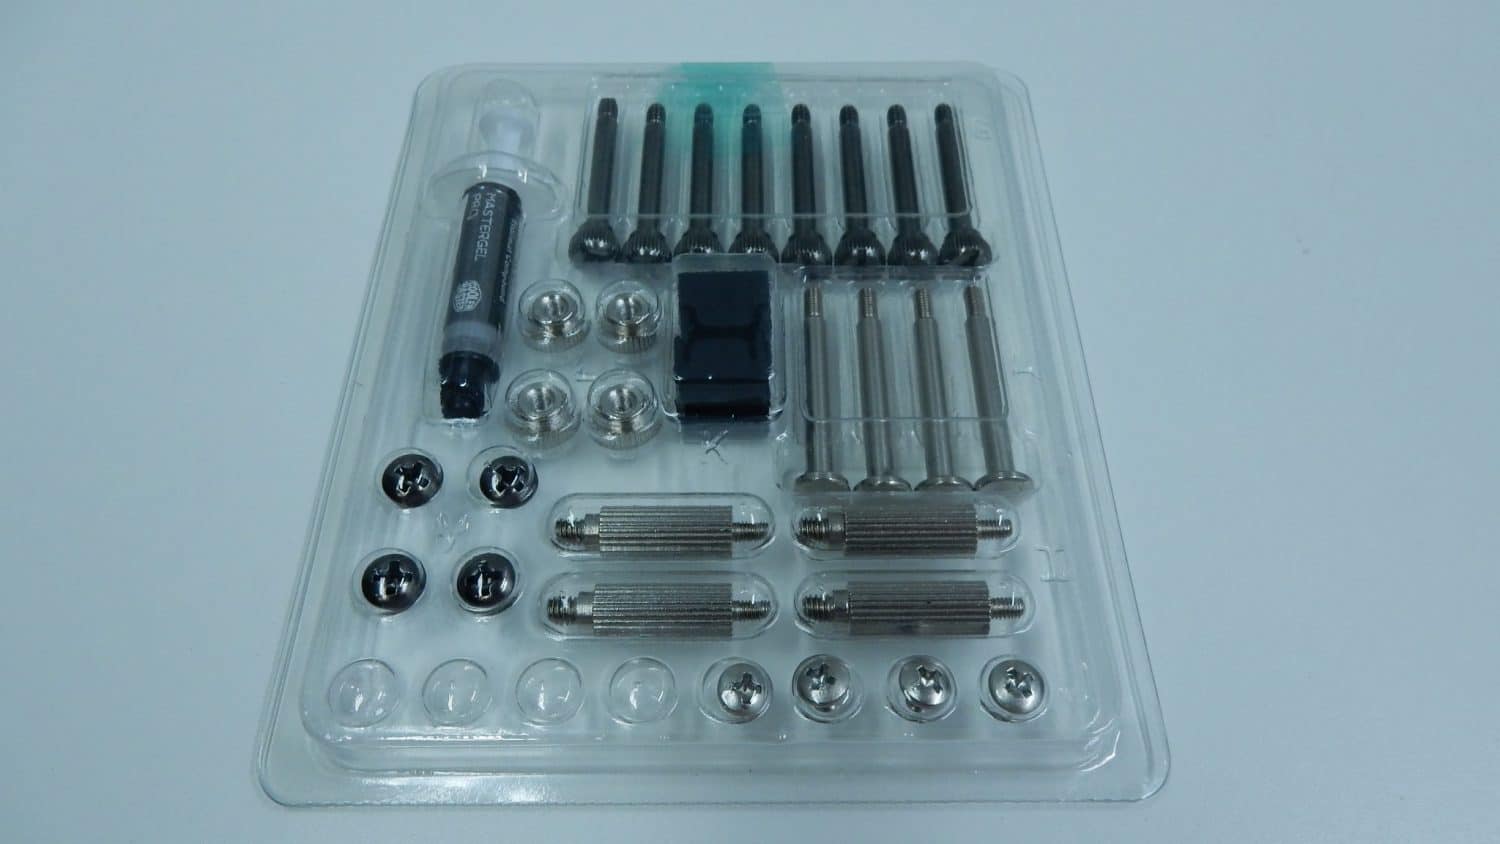
Both AMD and Intel mounting hardware is included with the MasterLiquid Pro 140, offering compatibility with nearly every current platform. Custom mounting brackets are attached to the pump which then mounts to the mounting bracket on the motherboard. All of the screws, nuts, pins, and thermal paste come packed in a nicely labeled clam shell case for easy organization and identification. Two rubber mounting pads are included in the kit, and are placed between the radiator and fans to keep vibrations to a minimum. They also serve to create a nice seal between the radiator and fans, keeping air flowing through the radiator fins instead of between the two parts.
SYSTEM SETUP AND INSTALLATION
| Test Setup | |
| Case | Anidees AI8 |
| CPU | Intel Core i7 4790K |
| Motherboard | ASUS Z97M-PLUS |
| Ram | G.Skill Ares DDR3 1866, 16GB |
| CPU Coolers |
|
| Storage Drives |
|
| GPU | ASUS GTX970-MOC-4GD5 |
| PSU | SilverStone SST-ST55F-G |
Installation of the MasterLiquid Pro 140 is very straightforward, especially if you have installed a water cooling kit before. The MasterLiquid Pro 140 is designed to be used in a dual-fan, push-pull configuration, and that is exactly how we set it up. The rubber mounting pads for the fans are quite flimsy and take a bit of effort to line up, but once in place, they provide a great barrier against vibration and airflow leaks. The included fan screws are of very high quality, and they really look nice when everything is put together. The included mounting hardware for the pump fit perfectly, and once the rear bracket was secured to the motherboard, and the thermal paste applied to the CPU, we were able to line up the pump and waterblock with the protruding pins and tighten the included nuts in an alternating corner pattern. Power for the pump was provided by the motherboard’s four-pin CPU header. We connected the included Y-splitter to each of the fans, and then to a four-pin PWM header. It is also worth noting that only one fan is connected to all four leads on the Y-splitter, but this is standard, as only one fan needs to be reporting speed back to the system.
As with all water cooling configuration, AIO or custom, it is recommended that you run the loop for an extended period before providing power to the rest of the system to check for loops. Once powered on, the pump lit up with blue light, thanks to the embedded LED lighting. After our leak check was complete, it was off to the races to test out the performance of the MasterLiquid Pro 140.
TESTING AND PERFORMANCE
Since the MasterLiquid Pro 140’s fans feature manual switches (one of which is inaccessible when mounted to the radiator), we opted for the Silence setting, which is then further controlled by the PWM header on the motherboard. While finding the sweet spot for your setup may take some tweaking and adjusting to get just the right balance of cooling performance and noise output, once you find that spot you can set it and forget it. We really like that these are PWM fans, but the inclusion of a manual switch on the fan itself really adds a second layer of complexity when it comes to getting just the right cooling to noise ratio.
By using the Intel Extreme Tuning Utility, we were able to put the CPU under a load while keeping an eye on the vitals of the processor. Our testing method consists of achieving a steady idle temperature for each cooling method, and then putting a load on the CPU for 30 minutes using the built-in stress test in the Intel app.
Stock Clock Performance
Idle
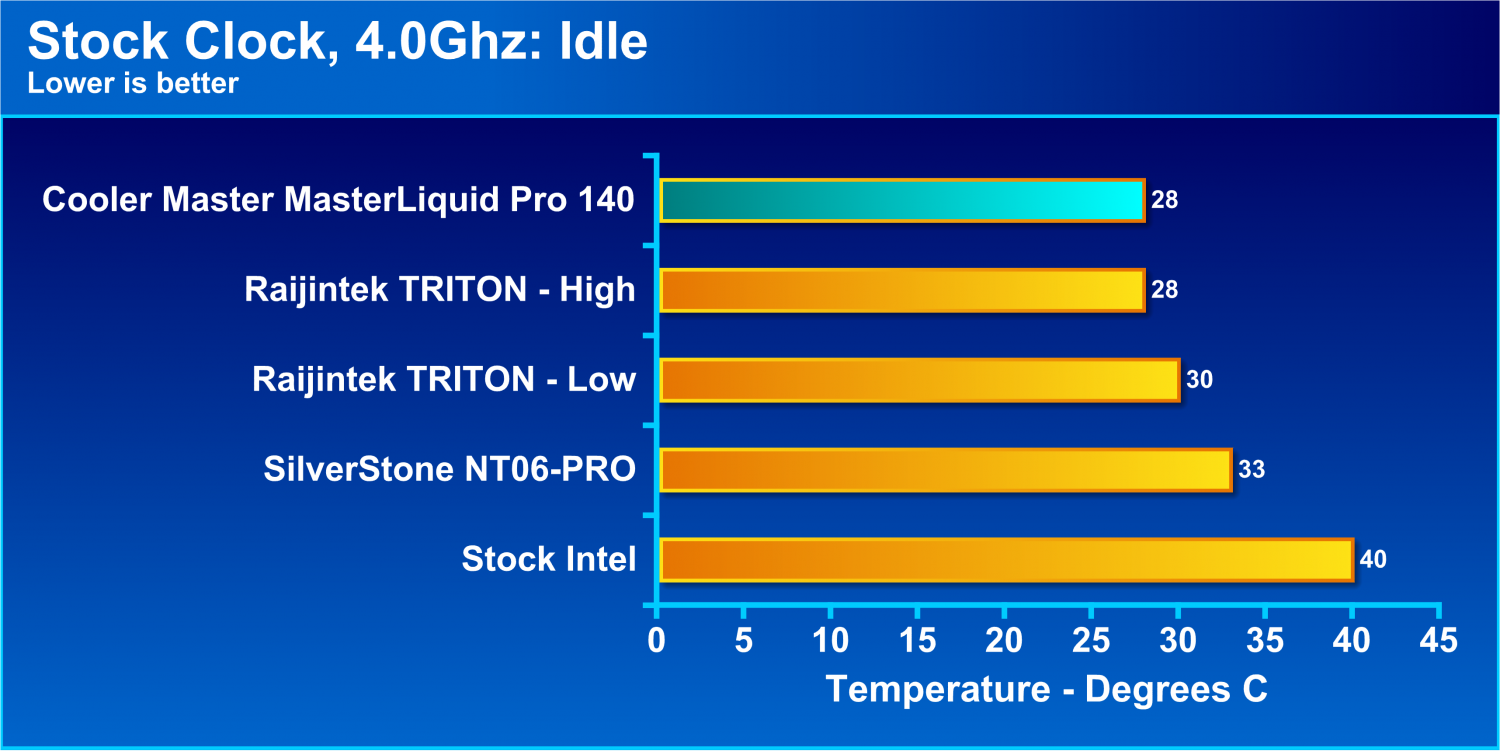
While idling at stock speeds, the MasterLiquid Pro 140 comes into the lead, tied with the Raijintek TRITON, which is a 240mm radiator configuration. That is a great testament to the cooling potential of this AIO kit. Overall, there isn’t much to be seen here, as temperatures are well within acceptable variance at idle, the only outlier being the stock Intel cooler.
Load
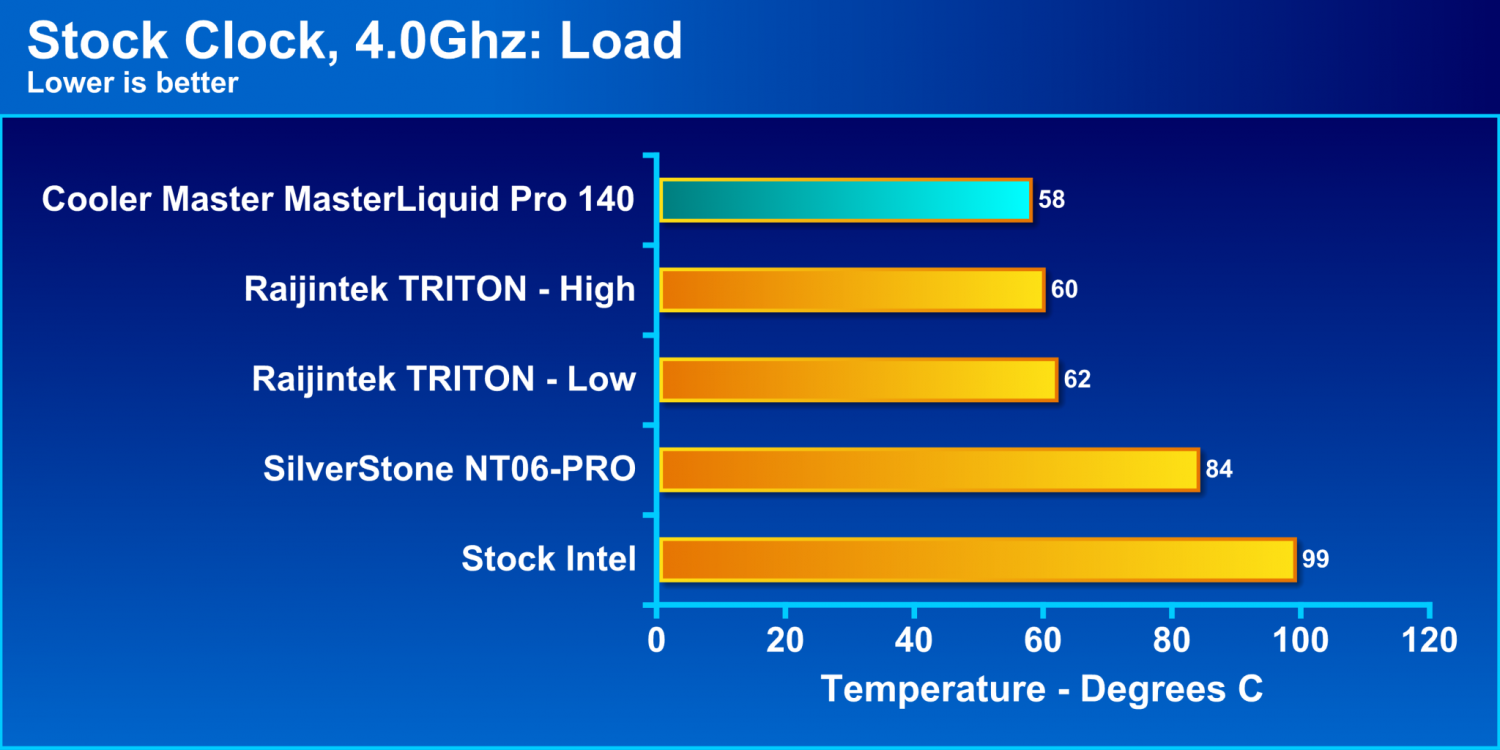
The performance gap between liquid and air cooling solutions really becomes evident once a load is placed on the CPU. The MasterLiquid Pro 140 is again the victor at stock speeds, but this time under a load. Again, the slight difference in temperatures between the liquid coolers in the group is so small that other factors such as additional features and price would probably play a larger role in purchasing decisions.
Sound levels of the TRITON kit with the fans on high were nearly unbearable, but at lower speeds it is much more tolerable. This is a distinction that must be taken into consideration when looking at the above chart. While under a load, the Cooler Master MasterLiquid Pro 140 was able to cool more efficiently, and just as quietly or quieter than, a system with a 240mm radiator solution.
Overclocked Performance
Idle
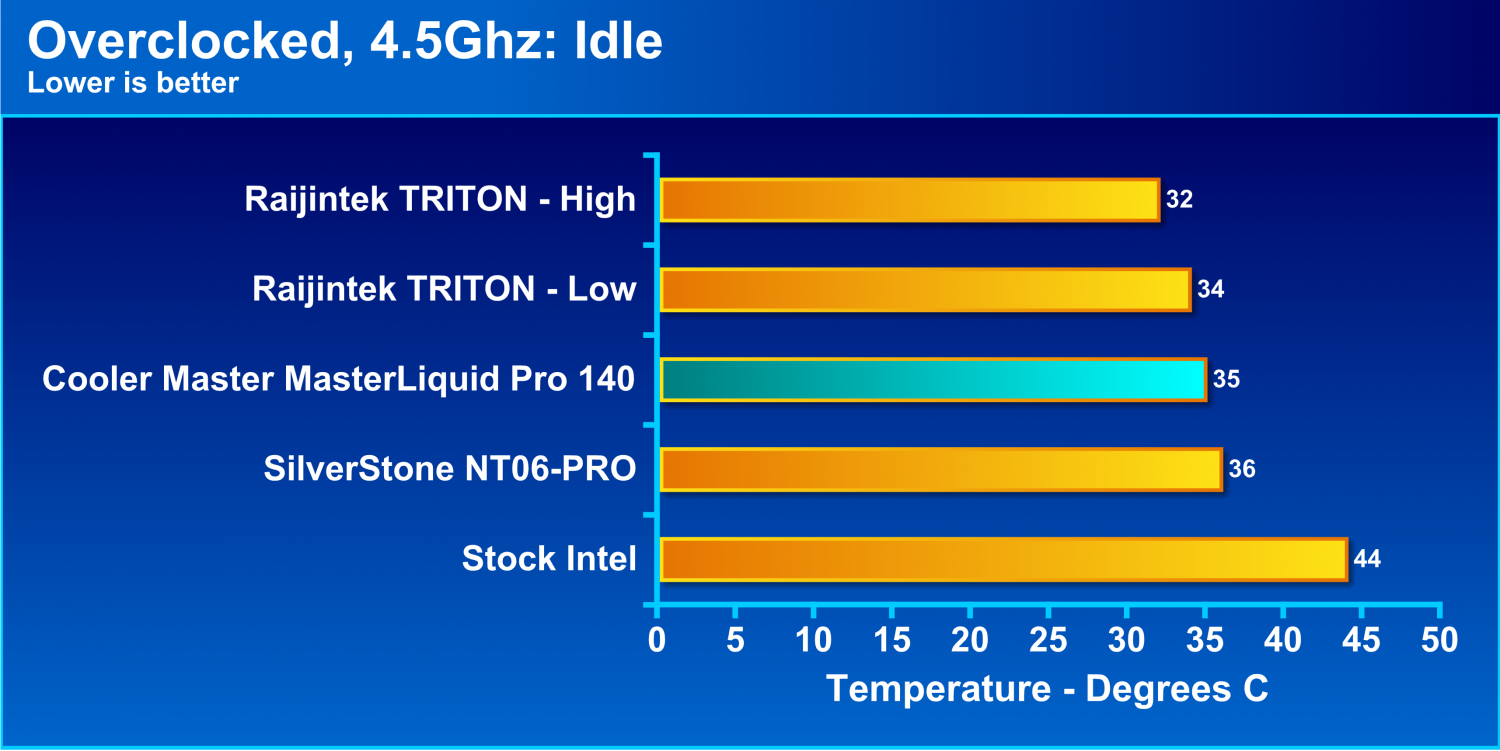
Once we ramped up the speed of our CPU to 4.5Ghz, we went back to Intel’s Extreme Tuning Utility once again to see what kind of temperatures we were up against. Nothing of note is found in the way of idle temperatures, as all of the coolers tested provide adequate cooling for our CPU. Our custom coolers are all within a few degrees of each other, with the stock cooler being a bit warmer. And while the MasterLiquid Pro 140 was in the middle of the pack while idling and overclocked, the temperature differences are negligible.
Load

The pinacle of our testing, overclocked and under a load, brings forth a bit more of a temperature difference in the coolers. While the MasterLiquid Pro 140 was able to hold its own and take the lead when under a load a stock speeds, that changed once the CPU was overclocked. A single 140mm radiator, even with two fans in a push-pull configuration, is not enough to take the lead. On the other hand, the small temperature difference of four degrees is certainly acceptable when we factor in the noise output compared to the leader.
NOISE OUTPUT
Speaking of noise output, our testing of the Cooler Master MasterLiquid Pro 140 resulted in a reading of 32 Db from one foot away from our test bed. Cranking the fans up to a higher RPM, while providing slightly better performance, was simply unbearable. We recommend users find a happy medium between cooling performance and sound output when tweaking their systems, as this should provide adequate cooling, while still keeping the noise level in check. As with all situations, each system will vary, so finding the right ratio of performance to noise will be up to users.
CONCLUSION

Jumping in head first into the realm of liquid cooling can be intimidating to say the least. There are all sorts of options to choose from when it comes to prebuilt and custom kits, tubing types and sizes, radiator sizes, waterblock designs and cooling liquids. Cooler Master knows this and their MasterLiquid Pro line of AIO kits is here to alleviate some of the pain associated with making the move to liquid cooling.
Cooler Master has brought together a group of great watercooling features into what they call FlowOp Technology. This group of features is designed to bring improved performance and reliability to users en masse. By separating the pump from the waterblock in the combination unit and controlling the flow of water from the radiator, into the pump, and down onto the waterblock, Cooler Master claims a 40% performance increase and two times the expected lifespan of their previous models. Blue LED lighting illuminates the Cooler Master name on the top of the pump window, but we would have loved to have seen this extra space used as a reservoir for the kit.
Square fins on the 140mm radiator are designed to increase the surface area between the fins and hot water channel, resulting in better heat transfer. Another result of the square fins is a larger air channel for airflow through the radiator, something that two included 140mm MasterFan Pro AP are tasked with. These fans feature PWM controls, as well as DIP switches on the fans themselves.
Installation of the kit was a breeze, and the mounting components were top notch. All of the screws and nuts were very solid and heavy, and the screws that hold the fans in place look great with their tool-less design.
Since this is a 140mm kit, some compatibility issues may arise with some current and many previous generation cases. 140mm fans have just recently started to make headway in a world dominated by 120mm fans, which have been the de facto standard for years after taking the crown from the 80mm variety. While the radiator does offer both 120mm and 140mm mounting holes, we recommend taking a very close look at this kit and your case before making a purchase.
None of this matters though if the MasterLiquid Pro 140 can’t keep a CPU cool. Thankfully, that is not the case here, as the MasterLiquid Pro 140 performed very well in both stock and overclocked settings, even beating out a 240mm radiator solution at stock speeds. Even under a load, the MasterLiquid Pro 140 only slightly trailed the larger radiator unit. Compared to air cooling, this kit is a winner.
We think Cooler Master is really onto something with their FlowOp Technology concept, as it takes the basic fundamentals of good liquid cooling and bundles them together to provide a great AIO kit. Coming in with an MSRP of $119.99, the Cooler Master MasterLiquid Pro 140 provides great performance, excellent looks, and low noise output. We think this unit is one work taking a look at, and award it the Bjorn3D Silver Bear Award.

| Cooler Master MasterLiquid Pro 140 Pros | Cooler Master MasterLiquid Pro 140 Cons |
|
|