INTRODUCTION
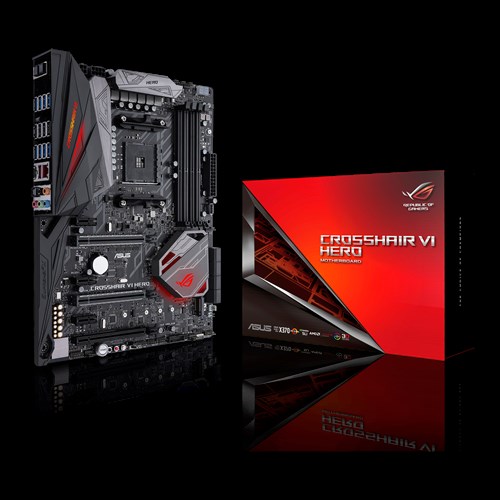
AMD’s Ryzen platform was one of the most highly anticipated launches in recent years, with everyone from industry insiders and media, to overclocking champions and gamers just waiting to see how these new multi-core processors performed. And while there have been some ups and downs along the way, many consider Ryzen to be a success. And while much of the hype and scrutiny surrounding this launch was aimed at AMD, many motherboard and peripheral vendors were also on the hook to deliver quality components to pair up with these new CPUs. ASUS is no stranger to us here at Bjorn3D, and they were kind enough to supply their flagship Ryzen motherboard, the ROG Crosshair VI Hero, for review. Seen by many as one of the premier motherboards available at launch, the ASUS ROG Crosshair VI Hero experienced demands not often seen. With ours in hand, lets take a look at this feature-packed motherboard.
STANDOUT FEATURES
As with all products, there are a few standout features on the Crosshair VI Hero that we would like to cover. Without standout features to differentiate one product from another, we would live in a pretty boring world. Lets take a look at a few things that make the ASUS ROG Crosshair VI Hero stand out from the crowd.
ROG Water-Cooling Zone – ASUS has set aside a small section of the motherboard as a “Water-Cooling Zone” to allow for a bit more insight into rigs sporting a liquid-cooling setup. Three headers to measure flow rate, as well as input and output temperatures offer monitoring via ROG’s Fan Xpert 4 utility.
Aura Sync RGB LED – The Crosshair VI Hero integrates two RGB LED zones split between the IO cover and chipset heatsink. Two additional 4-pin RGB headers can be paired up with standard 12V RGB strips to allow for expanded lighting options. All of this lighting can be configured via the Aura application, which offers multiple lighting options like Static, Rainbow, Comet, and more.
SupremeFX – Not to be left out, the audio portion of the Crosshair VI Hero is top-notch. The SupremeFX S1220 CODEC provides 120dB SNR stereo playback and 113dB SNR recording. The SupremeFX S1220 give access to 10DAC channels, simultaneous 7.1-channel playback, independent 2.0-channel playback, and multiple-stream stereo to front-panel outputs. AN ESS Sabre Hi-Fi ES9023P DAC give great front-panel output, and a Texas Instruments RC4580 amp provides high gain with little distortion. Paired up with this impressive list of hardware is Sonic Studio III, an audio effects application that allows you to route your audio just how you want.
3D Printing Friendly – ASUS realizes that 3D printing is here to stay, and has provided dedicated 3D mounts that allow 3D printed components to be added to the Crosshair VI Hero. Items like cable covers and fan mounts, among other things, can be attached to the provided mount points for nearly limitless customization.
AM3 and AM4 Cooler Compatible – Many cooling vendors were not ready for the release of Ryzen, which utilized a new AM4 mounting layout compared to the existing AM3 design found on previous AMD motherboards. This resulted in the need for either a custom adapter supplied by the cooler manufacturer, or the purchase of a new cooler designed to be compatible with AM4. Thankfully the Crosshair VI Hero provides special mounting holes that are compatible with both AM3 and AM4 coolers.
SPECIFICATIONS
CPU
- AMD AM4 Socket for AMD Ryzen™/7th Generation A-series/Athlon™ Processors
Supports AM4 Socket 14 nm CPU
Supports CPU up to 8 cores
* Refer to www.asus.com for CPU support list
Chipset
- AMD X370
Memory
- AMD Ryzen™ Processors
4 x DIMM, Max. 64GB, DDR4 3200(O.C.)/2666/2400/2133 MHz Non-ECC, Un-buffered Memory * - AMD 7th Generation A-series/Athlon™ Processors
4 x DIMM, Max. 64GB, DDR4 2400/2133 MHz Non-ECC, Un-buffered Memory *
Dual Channel Memory Architecture
** Refer to www.asus.com for the Memory QVL (Qualified Vendors Lists).
Multi-GPU Support
- Supports NVIDIA® 2-Way SLI™ Technology *3
Supports AMD CrossFireX™ Technology
Expansion Slots
- AMD Ryzen™ Processors
2 x PCIe 3.0/2.0 x16 (x16 or dual x8) - AMD 7th Generation A-series/Athlon™ Processors
1 x PCIe 3.0/2.0 x16 (x8 mode) - AMD X370 chipset
1 x PCIe 2.0 x16 (max at x4 mode) *1
3 x PCIe 2.0 x1
Storage
- AMD Ryzen™ Processors :
1 x M.2 Socket 3, with M key, type 2242/2260/2280/22110 storage devices support (SATA & PCIE 3.0 x 4 mode) - AMD 7th Generation A-series/Athlon™ Processors :
1 x M.2 Socket 3, with M key, type 2242/2260/2280/22110 storage devices support (SATA mode) - AMD X370 chipset :
8 x SATA 6Gb/s port(s),
Support Raid 0, 1, 10
LAN
- Intel® I211-AT, 1 x Gigabit LAN Controller(s)
Anti-surge LANGuard
ROG GameFirst IV
Audio
- ROG SupremeFX 8-Channel High Definition Audio CODEC S1220
– Impedance sense for front and rear headphone outputs
– Supports : Jack-detection, Multi-streaming, Front Panel Jack-retasking
– High quality 120 dB SNR stereo playback output and 113 dB SNR recording input
– SupremeFX Shielding Technology
– ESS® ES9023P
– Supports up to 32-Bit/192kHz playback *2 - Audio Feature :
– Gold-plated jacks
– Optical S/PDIF out port(s) at back panel
– Sonic Radar III
– Sonic Studio III
USB Ports
- AMD Ryzen™/7th Generation A-series/Athlon™ Processors :
4 x USB 3.1 Gen 1 port(s) (4 at back panel, blue) - AMD X370 chipset :
1 x USB 3.1 front panel connector port(s) - AMD X370 chipset :
6 x USB 3.1 Gen 1 port(s) (4 at back panel, blue, 2 at mid-board) - AMD X370 chipset :
6 x USB 2.0 port(s) (4 at back panel, black, 2 at mid-board) - ASMedia® USB 3.1 controller :
2 x USB 3.1 Gen 2 port(s) (2 at back panel, black+red, Type-A + USB Type-CTM)
ROG Exclusive Features
- Clear CMOS button
- ROG RAMCache II
- ROG CPU-Z
- ROG CloneDrive
- Slow Mode
- Overwolf
- ReTry Button
- Safe Boot Button
- Start Button
- Reset Button
- LN2 Mode
- GameFirst IV
- ROG Aura
– Aura Lighting Control
– Aura RGB Strip Headers - Extreme Engine Digi+ :
– MicroFine Alloy Chokes
– NexFET™ Power Block MOSFET
– 10K Black Metallic Capacitors - Mem TweakIt
- KeyBot II
– One-click Overclocking
– DirectKey
– ClrCMOS
– Power On - UEFI BIOS features :
– O.C. Profile
– Tweakers’ Paradise
– ROG SSD Secure Erase
– Graphic Card Information Preview - ROG RAMDisk
- Extreme Tweaker
- Loadline Calibration
- BIOS Flashback
Special Features
- ASUS Dual Intelligent Processors 5-Way Optimization by Dual Intelligent Processors 5 :
– 5-Way Optimization tuning key perfectly consolidates TPU, EPU, DIGI+ VRM, Fan Expert 4, and Turbo App - TPU
– Fan Xpert 4 featuring Fan Auto Tuning function and multiple thermistors - Gamer’s Guardian:
– SafeSlot - ASUS Exclusive Features :
– AI Suite 3 - ASUS EZ DIY :
– ASUS CrashFree BIOS 3
– ASUS EZ Flash 3 - ASUS Q-Design :
– ASUS Q-Shield
– ASUS Q-Code
– ASUS Q-LED (CPU, DRAM, VGA, Boot Device LED)
– ASUS Q-DIMM
– ASUS Q-Connector
Back I/O Ports
- 1 x LAN (RJ45) port(s)
1 x USB 3.1 Gen 2 (black)Type-CTM
1 x USB 3.1 Gen 2 (red)Type-A
8 x USB 3.1 Gen 1 (blue)
4 x USB 2.0 (one port can be switched to USB BIOS Flashback)
1 x Optical S/PDIF out
1 x Clear CMOS button(s)
1 x USB BIOS Flashback Button(s)
5 x Gold-plated audio jacks
1 x M.2 Wi-Fi Slot
Internal I/O Ports
- 2 x RGB Header(s)
1 x USB 3.1 Gen 1 connector(s) support(s) additional 2 USB 3.1 Gen 1 port(s)
1 x USB 2.0 connector(s) support(s) additional 2 USB 2.0 port(s)
1 x M.2 Socket 3 with M key, type 2242/2260/2280/22110 storage devices support
1 x TPM header
8 x SATA 6Gb/s connector(s)
1 x CPU Fan connector(s)
1 x CPU OPT Fan connector(s)
3 x Chassis Fan connector(s)
1 x W_PUMP+ connector
1 x AIO_PUMP connector
1 x 8-pin EATX 12 V Power connector
1 x 4-pin EATX 12 V_1 Power connector(s)
1 x 24-pin EATX Power connector(s)
1 x Front panel audio connector(s) (AAFP)
1 x Slow Mode switch(es)
1 x Thermal sensor connector(s)
1 x Reset button(s)
1 x LN2 Mode jumper(s)
1 x ROG extension (ROG_EXT) header(s)
1 x Safe Boot button
1 x ReTry button
1 x System panel connector
2 x 3D Mount screw port(s)
1 x W_IN header
1 x W_OUT header
1 x W_FLOW header
1 x Start button
1 x USB 3.1 Gen 2 front panel connector
Accessories
- User’s manual
ASUS Q-Shield
4 x SATA 6Gb/s cable(s)
1 x M.2 Screw Package
1 x Supporting DVD
1 x SLI HB BRIDGE(2-WAY-M)
1 x ROG big sticker
1 x Q-Connector
1 x 10-in-1 ROG cable label
1 x Extension Cable for RGB strips (80 cm)
1 x 3D printing mount package
1 x ROG coaster(s)
BIOS
- 128 Mb Flash ROM, UEFI AMI BIOS, PnP, WfM2.0, SM BIOS 3.0, ACPI 6.1, Multi-language BIOS,
ASUS EZ Flash 3, CrashFree BIOS 3, F11 EZ Tuning Wizard, F6 Qfan Control, F3 My Favorites, Last Modified log,
F12 PrintScreen and ASUS DRAM SPD (Serial Presence Detect) memory information
Manageability
- WfM 2.0, WOL by PME, PXE
Support Disc
- Drivers
AURA
ROG GameFirst IV*3
ROG RAMDisk
ROG RAMCache II
ROG CPU-Z
ROG Mem TweakIt
ROG Keybot II
Sonic Studio III
Sonic Radar III
Overwolf
CloneDrive
Kaspersky® Anti-Virus
DAEMON Tools Software
Winzip
ASUS WebStorage
ASUS Utilities
Operating System
-
Windows® 10 64-bit
Form Factor
- ATX Form Factor
12 inch x 9.6 inch ( 30.5 cm x 24.4 cm )
Notes
- *1 PCIeX4_3 slot shares bandwidth with PCIeX1_1, PCIeX1_2 and PCIeX1_3.
*2 Due to limitations in HDA bandwidth, 32-Bit/192kHz is not supported for 8-Channel audio.
*3 Due to CPU limitation, NVIDIA® 2-Way SLI™ Technology is not supported for AMD 7th Gen A-series/Athlon™ Processors.
CLOSER LOOK
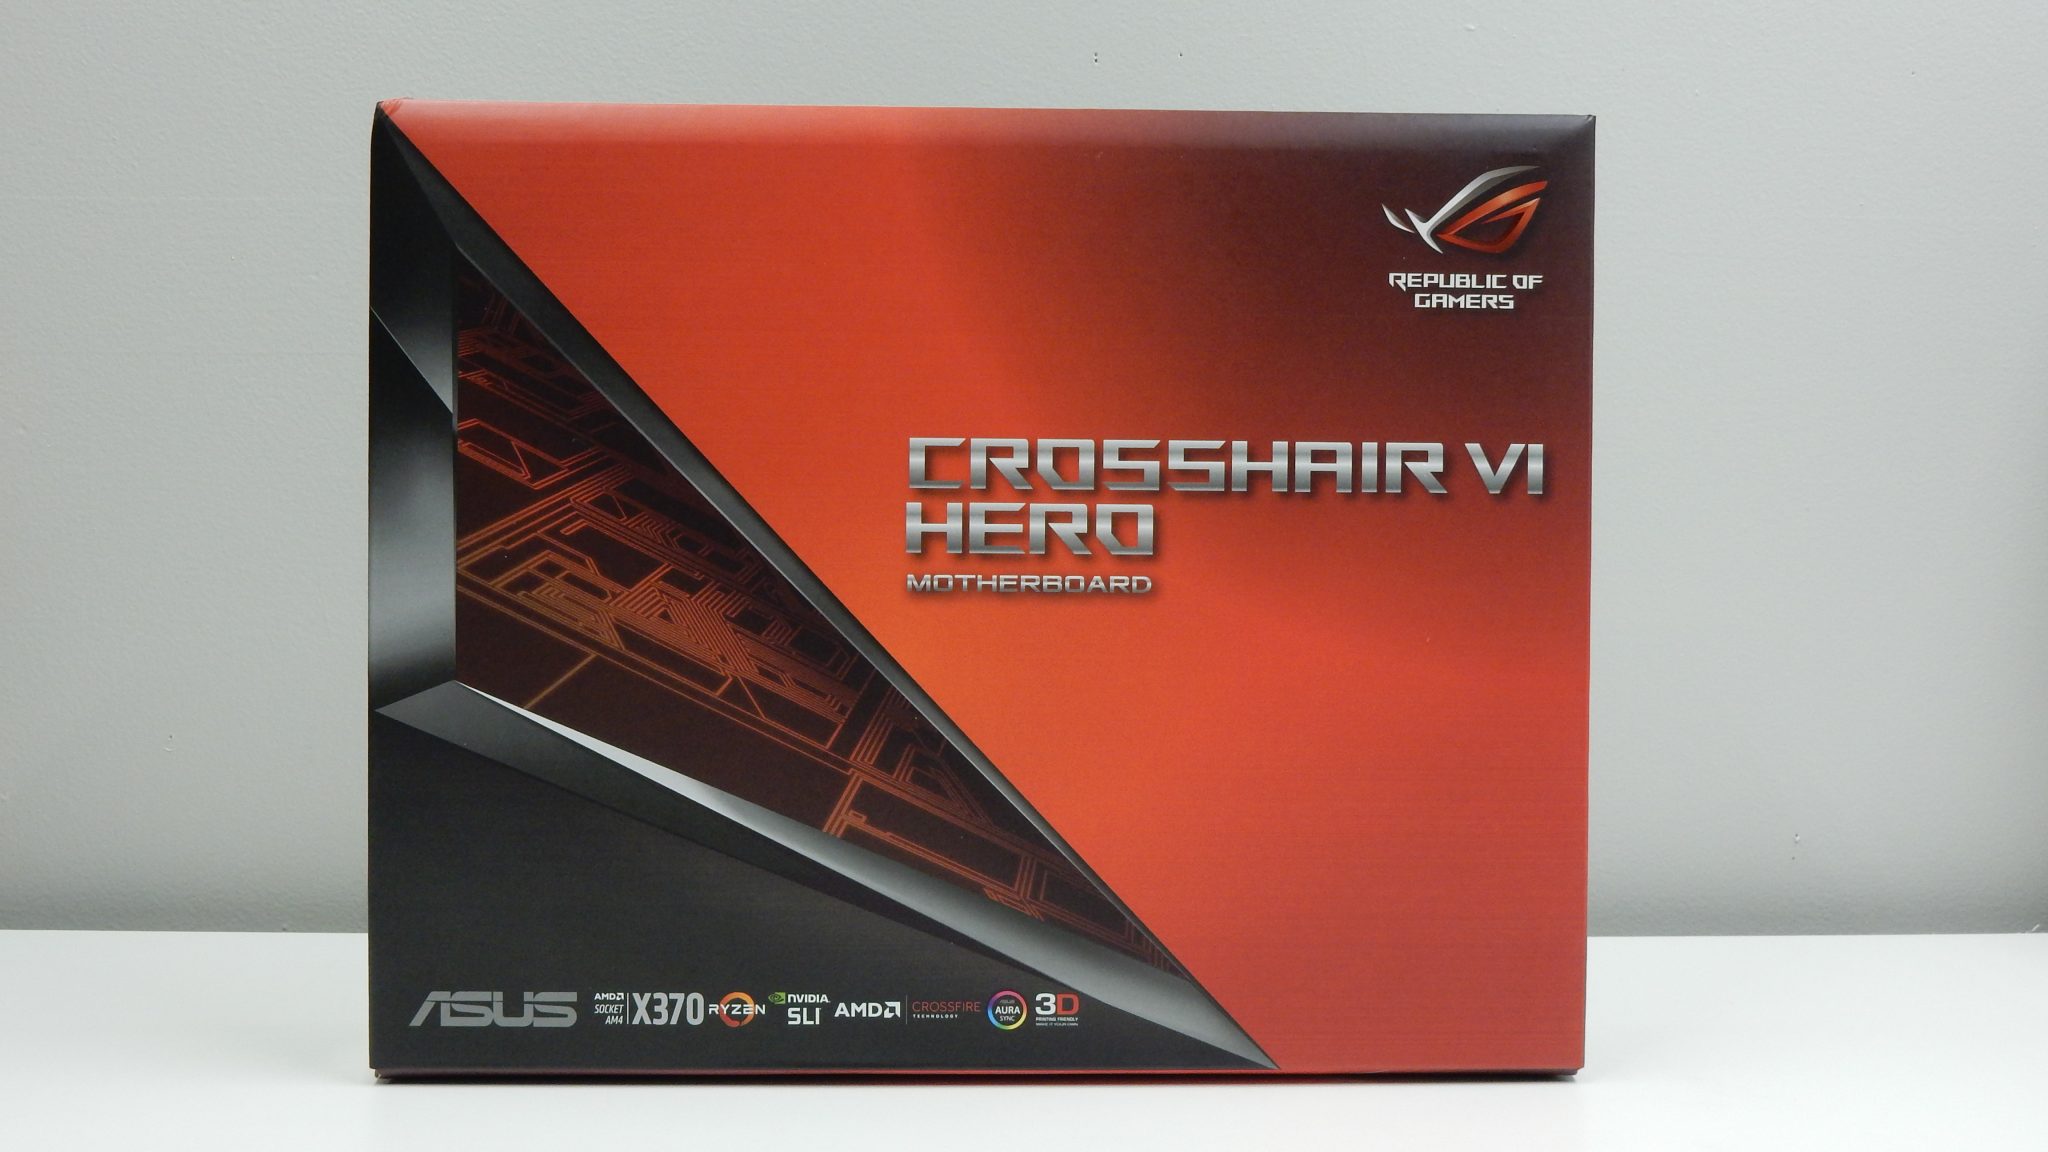
Packaging
ASUS’ ROG packaging consists of a black and red color scheme, and not much detail is given on the front of the box. There is the name of the board inside, and a few other markers indicating the chipset, SLI and Crossfire support, as well as AURA Sync and 3D print friendliness.
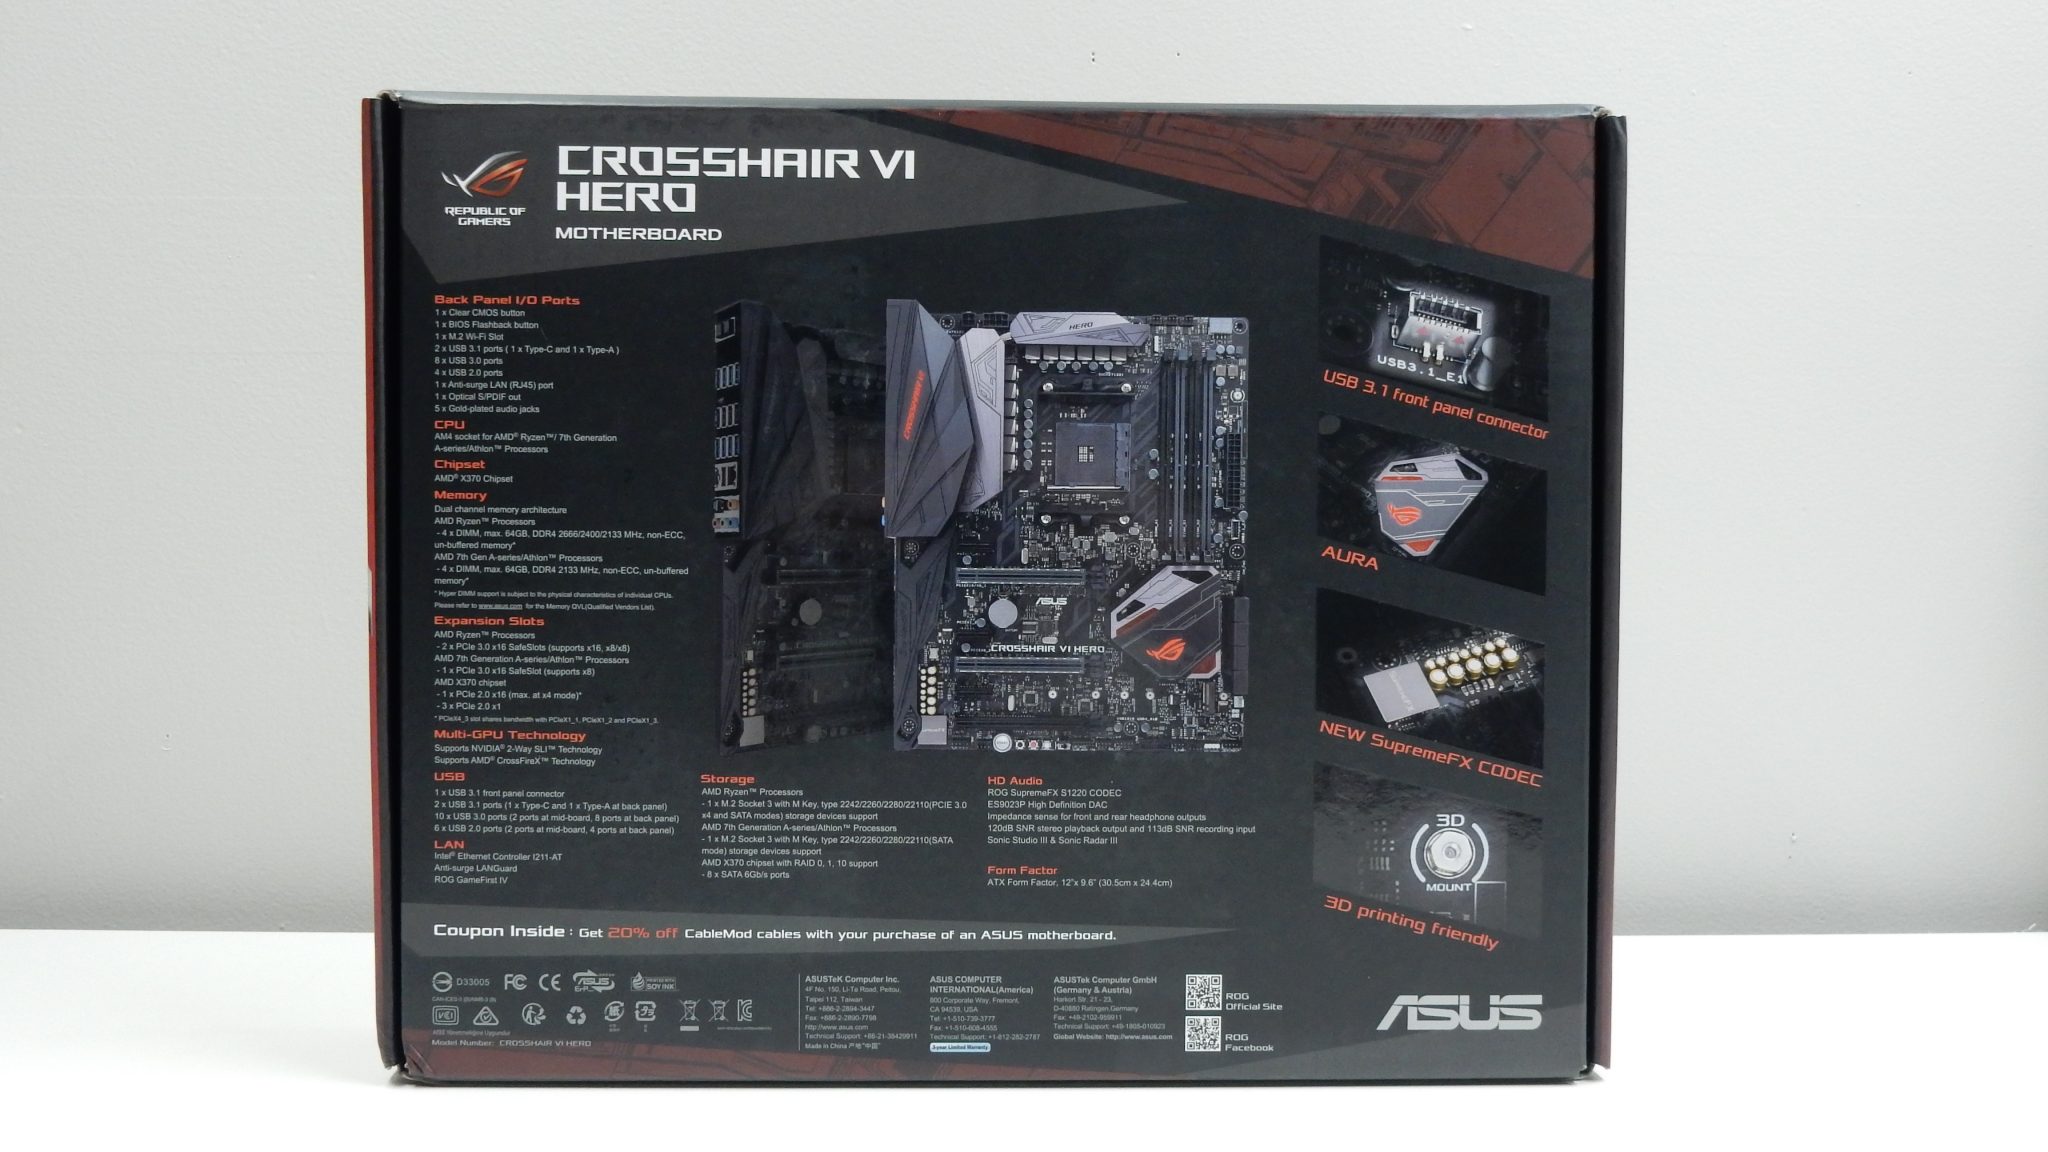
The back of the package provides much more information regarding the motherboard inside. Most of the specifications listed above are shown here, and a top-down view of the motherboard gives a good look at what can be found inside. Many of the standout features that we touched on are also highlighted with individual close-up images.
Once opened up, we find the motherboard beneath a transparent molded-plastic tray. This tray keeps things in place while giving a nice look at the motherboard. No anti-static bag surrounds the motherboard, so be sure to handle with care when removing from the box.
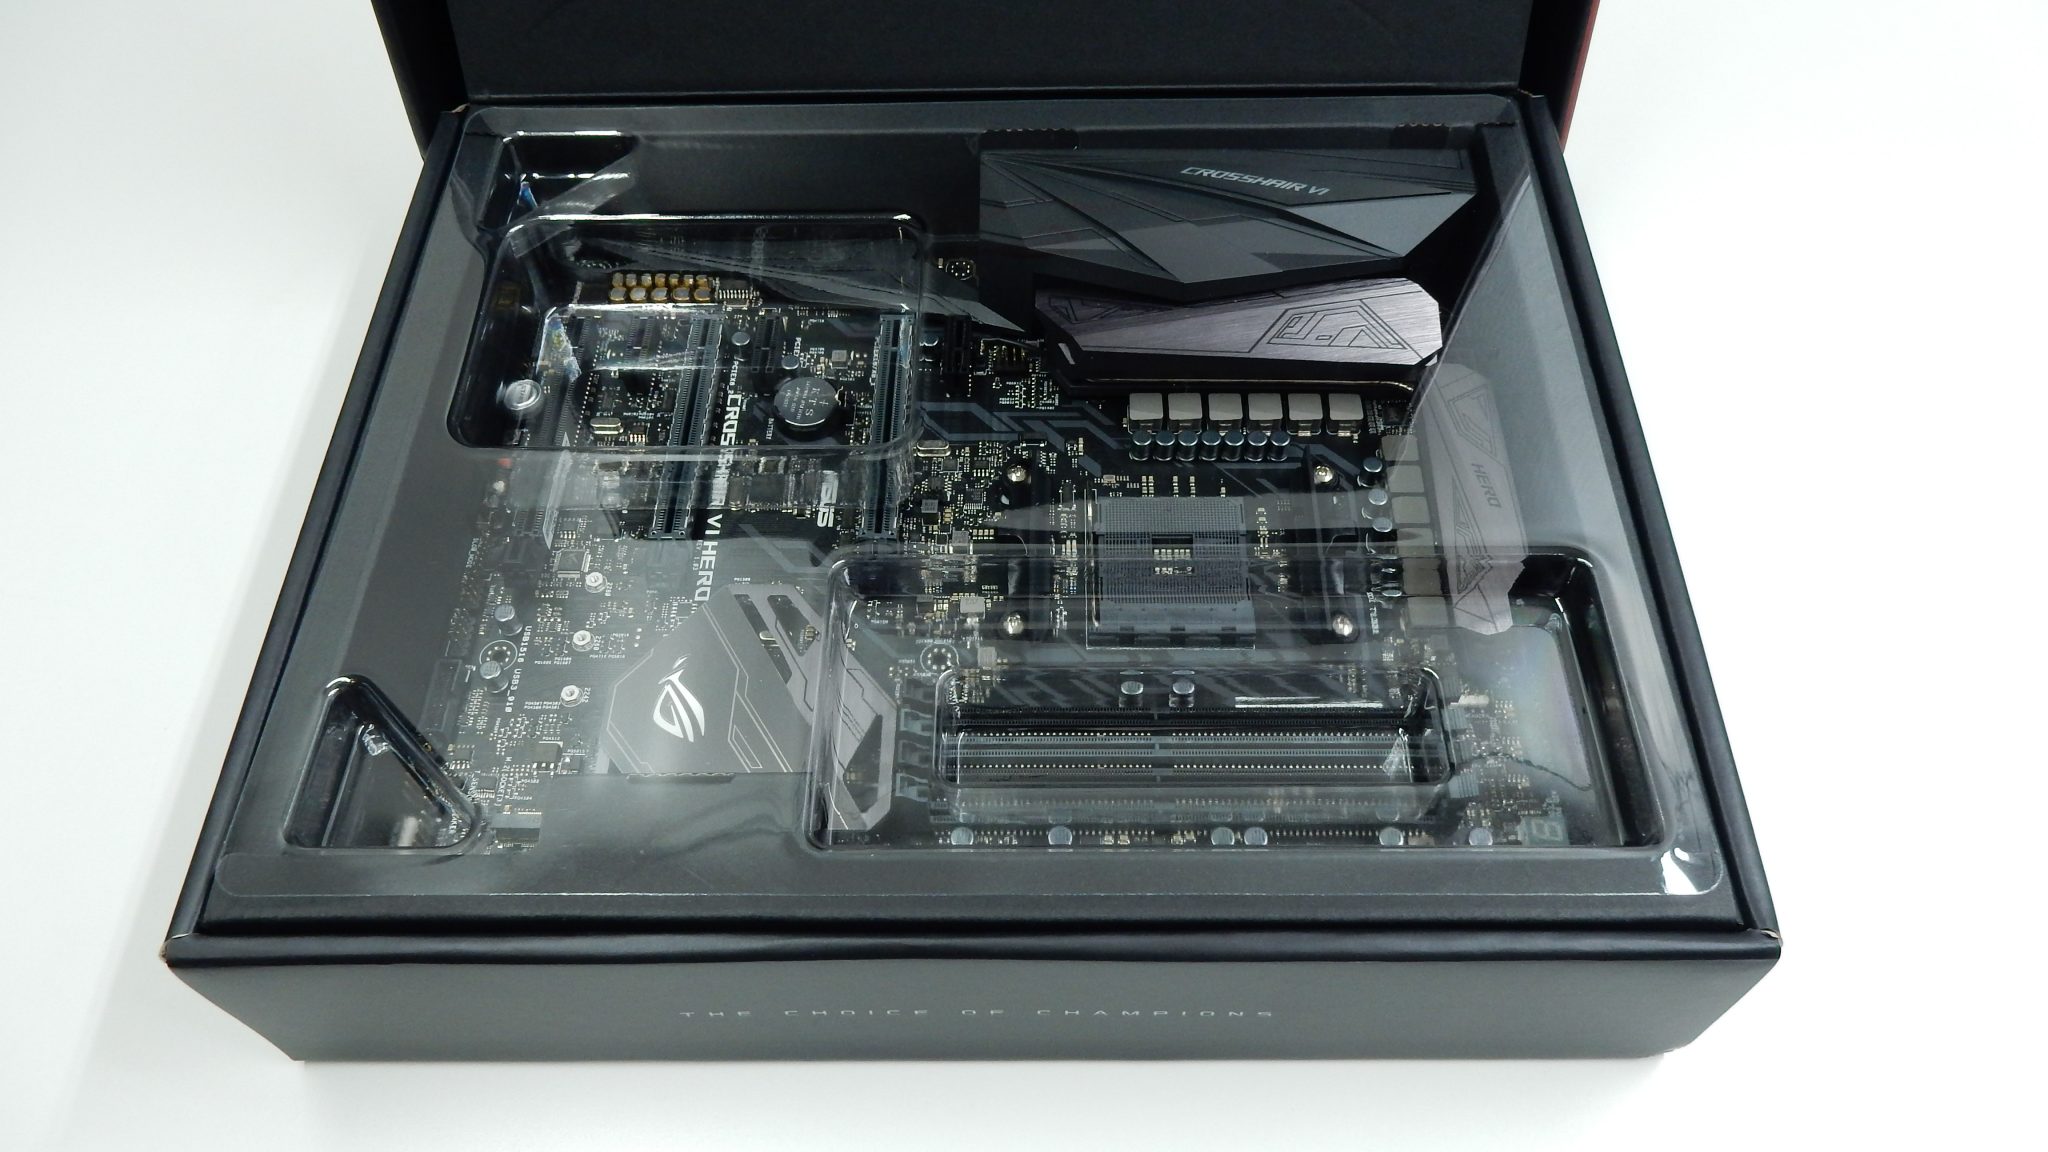
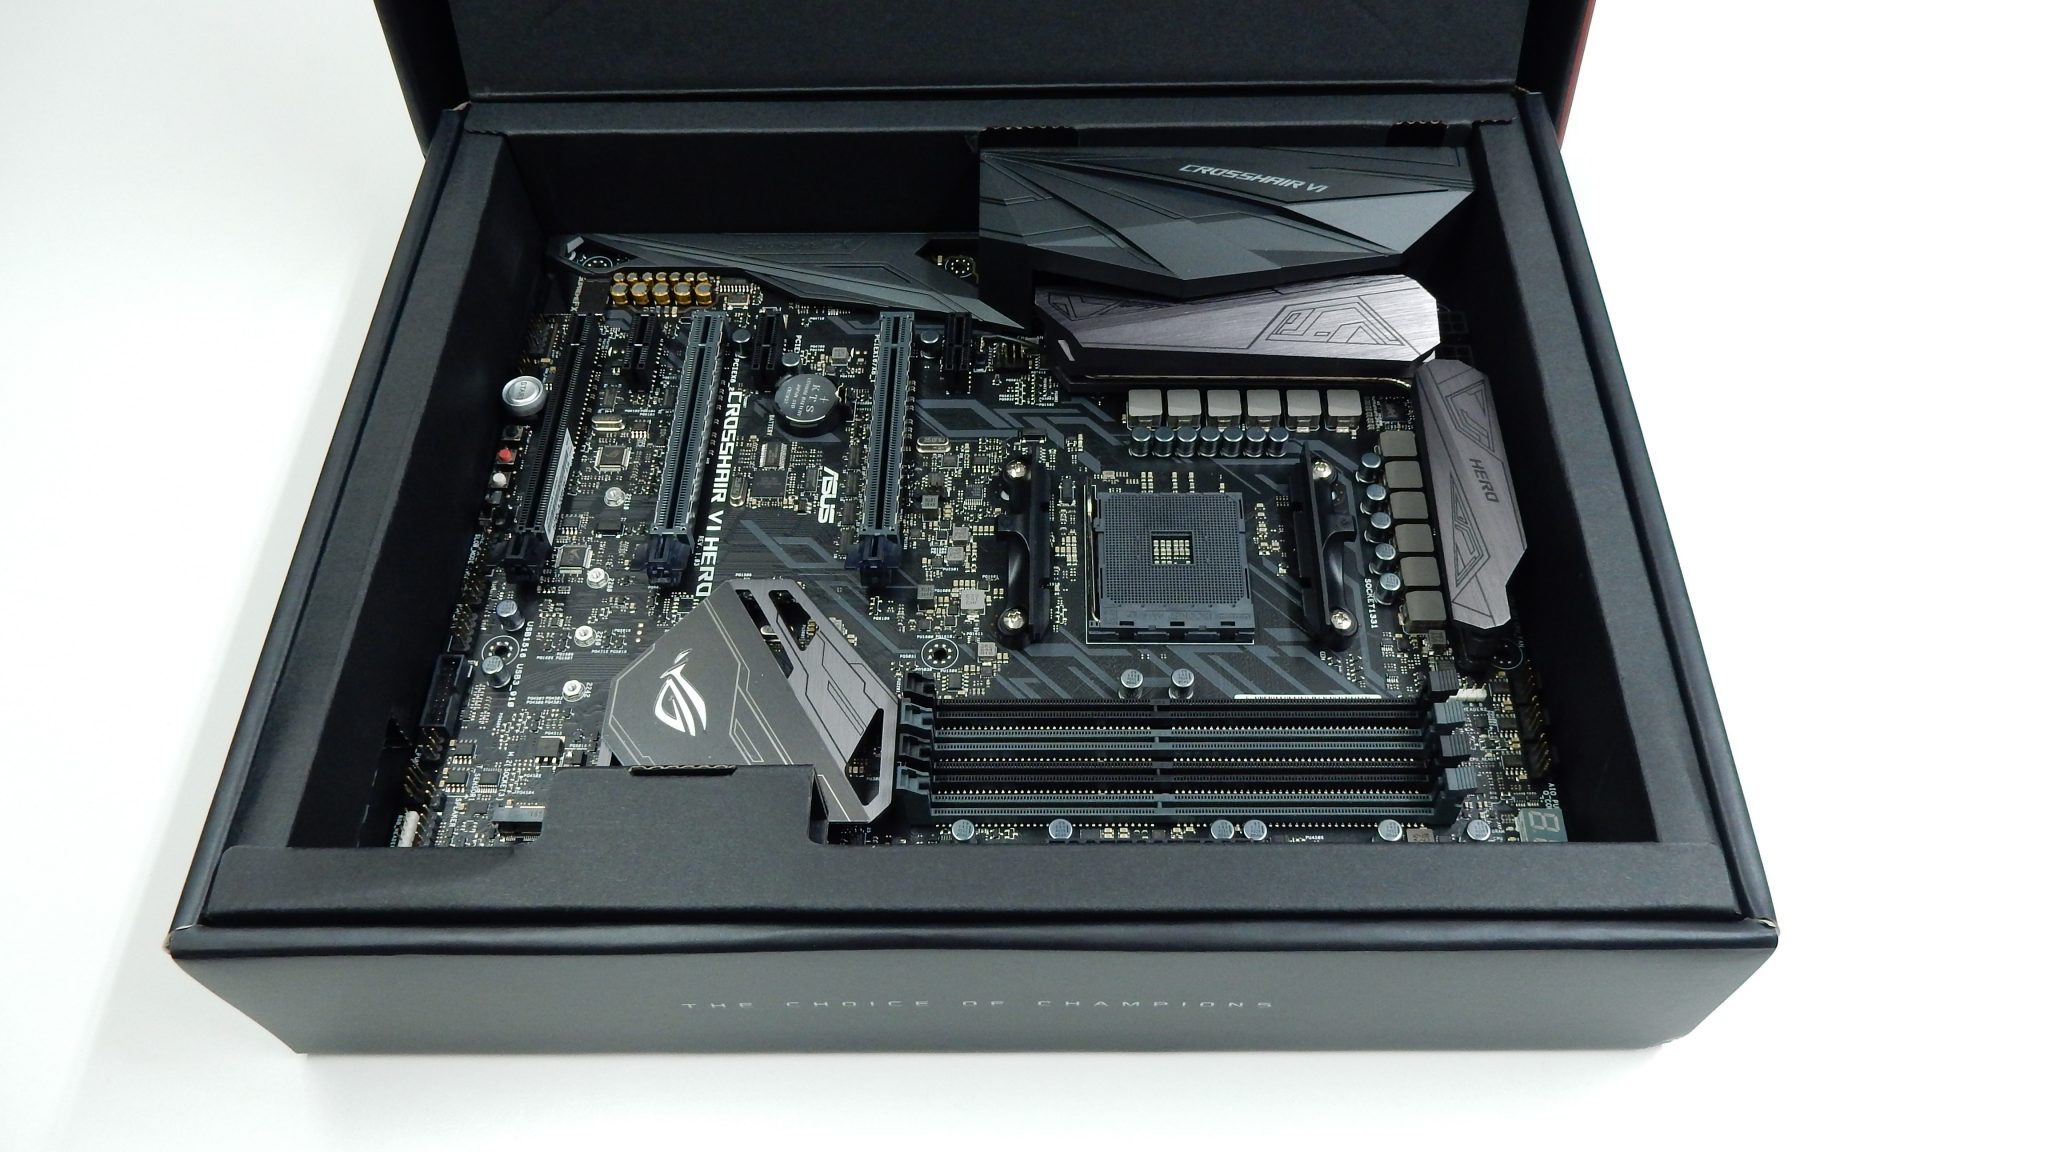
Crosshair VI Hero
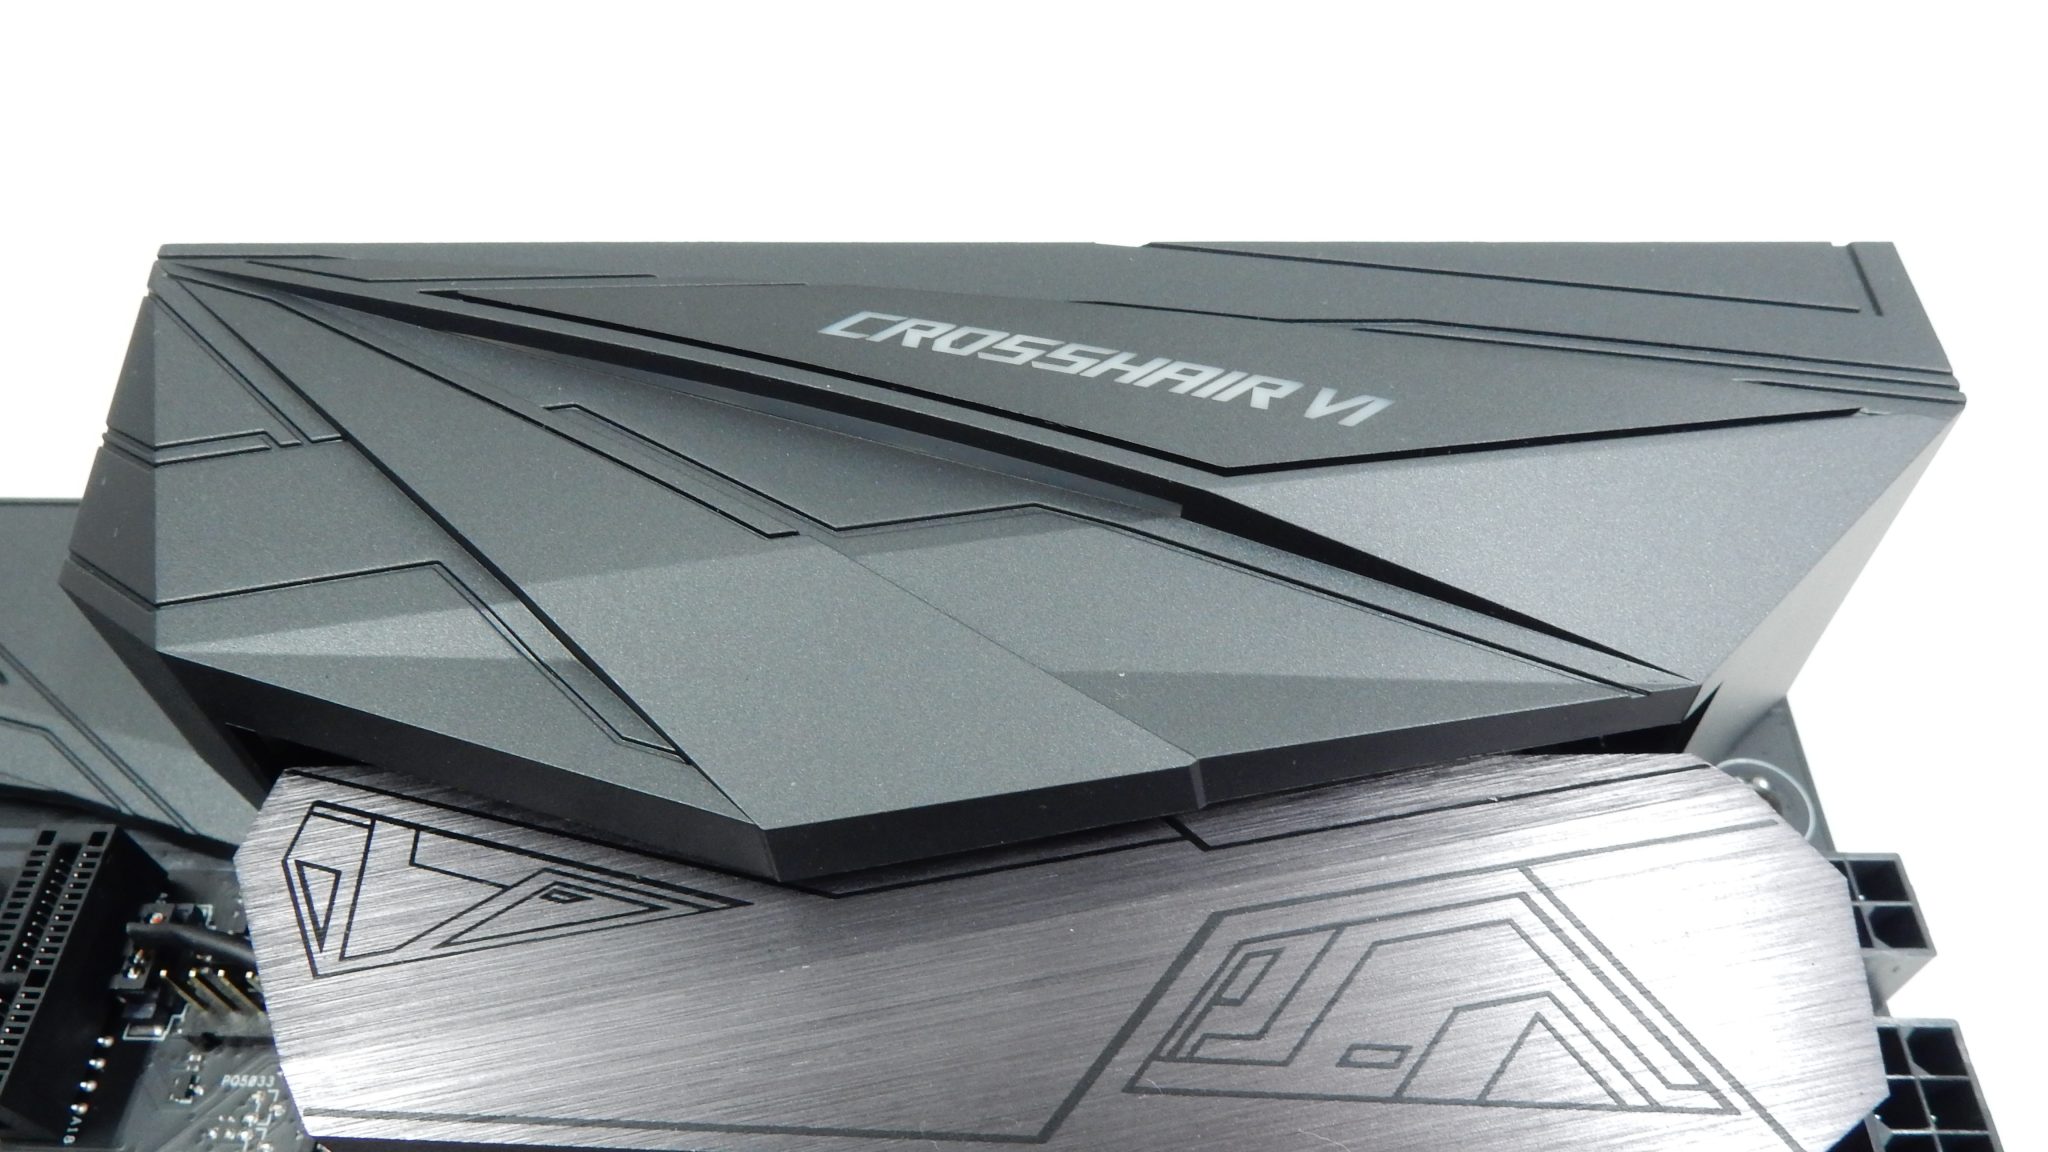
Our closer look at the Crosshair VI Hero will provide us with a complete tour of the motherboard, zooming in here and there to get a better look at certain features. The overall design of the Crosshair VI Hero aligns with the rest of ASUS’ current ROG motherboards, with multiple angular design markings found on not just the PCB itself, but the heatsinks and shrouds. With a mostly black and gray color scheme, the two integrated RGB LED lighting zones, beneath both the “CROSSHAIR VI” on the I/O shroud and the chipset heatsink, offer users the ability to customize the accent colors of the board via the AURA application.
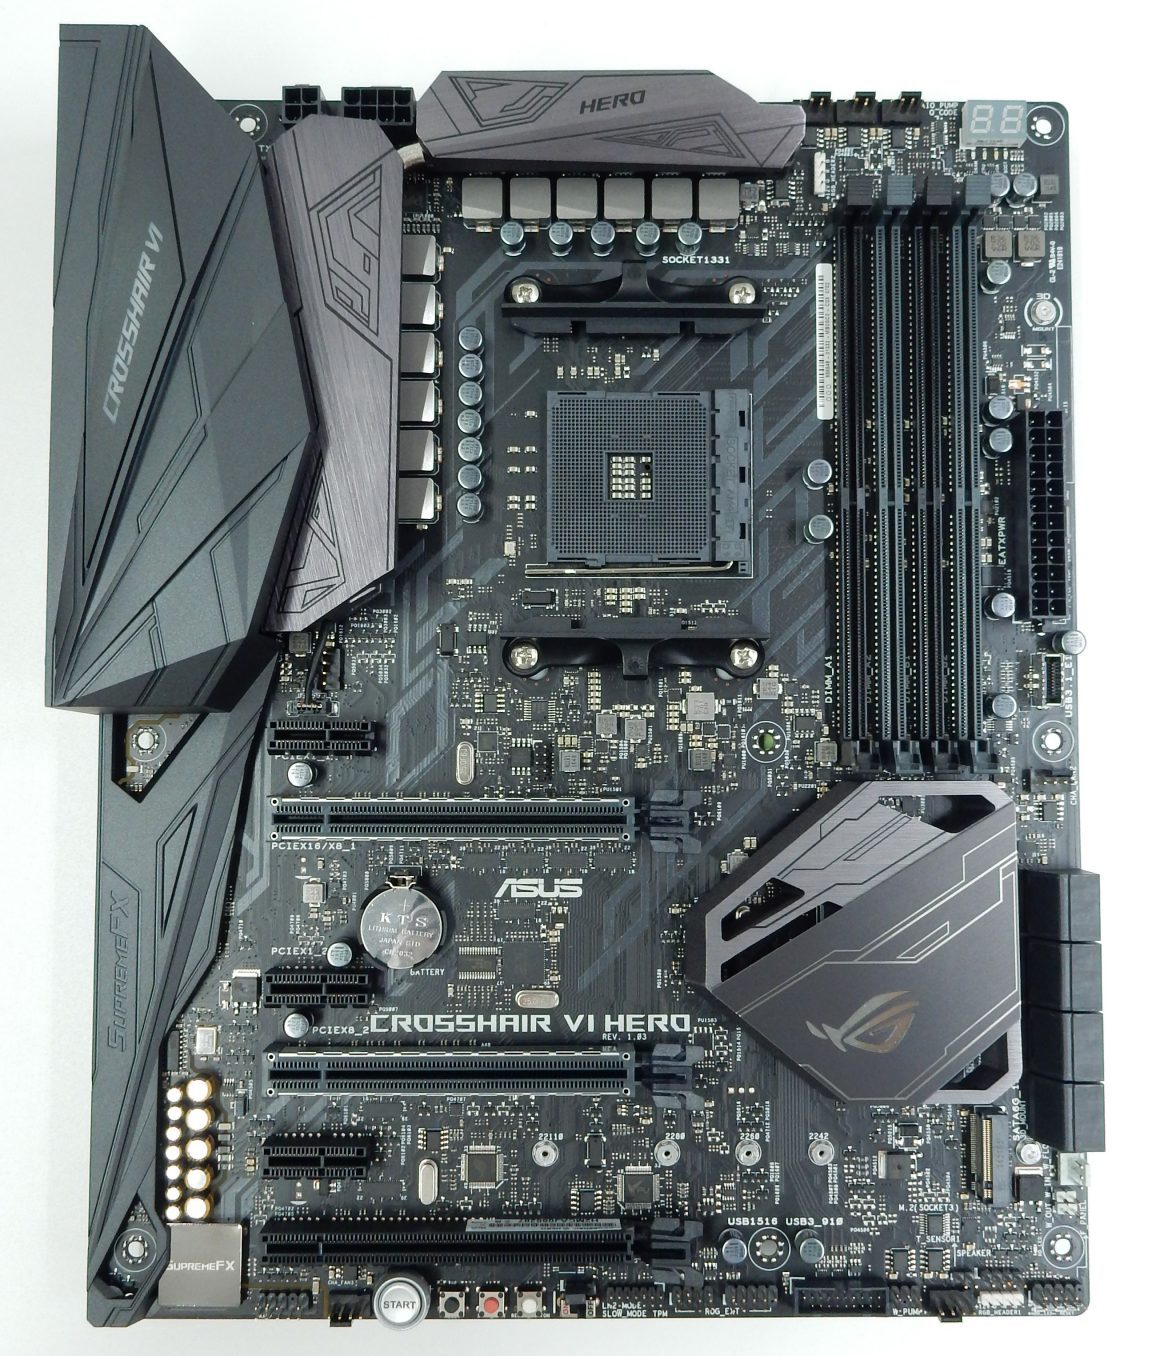
Starting at the bottom left corner of the motherboard we are presented with a chrome SupremeFX processor and header for front-panel audio connections. We will focus on the audio portion of this motherboard later on. Moving to the right brings us to the one of three PWM chassis fan headers, along with an on-board “START” button used to power on the system, an on-board “RESET” button, an on-board “SAFE_BOOT” button used to boot into a safe BIOS configuration at any time, and a button labeled “RETRY_BUTTON” which is used to retry the boot sequence with the previously configured settings. A switch labeled “SLOW_MODE” is next to these buttons and is used to control decrease the CPU frequency and stabilize a system when doing extreme overclocking using LN2.

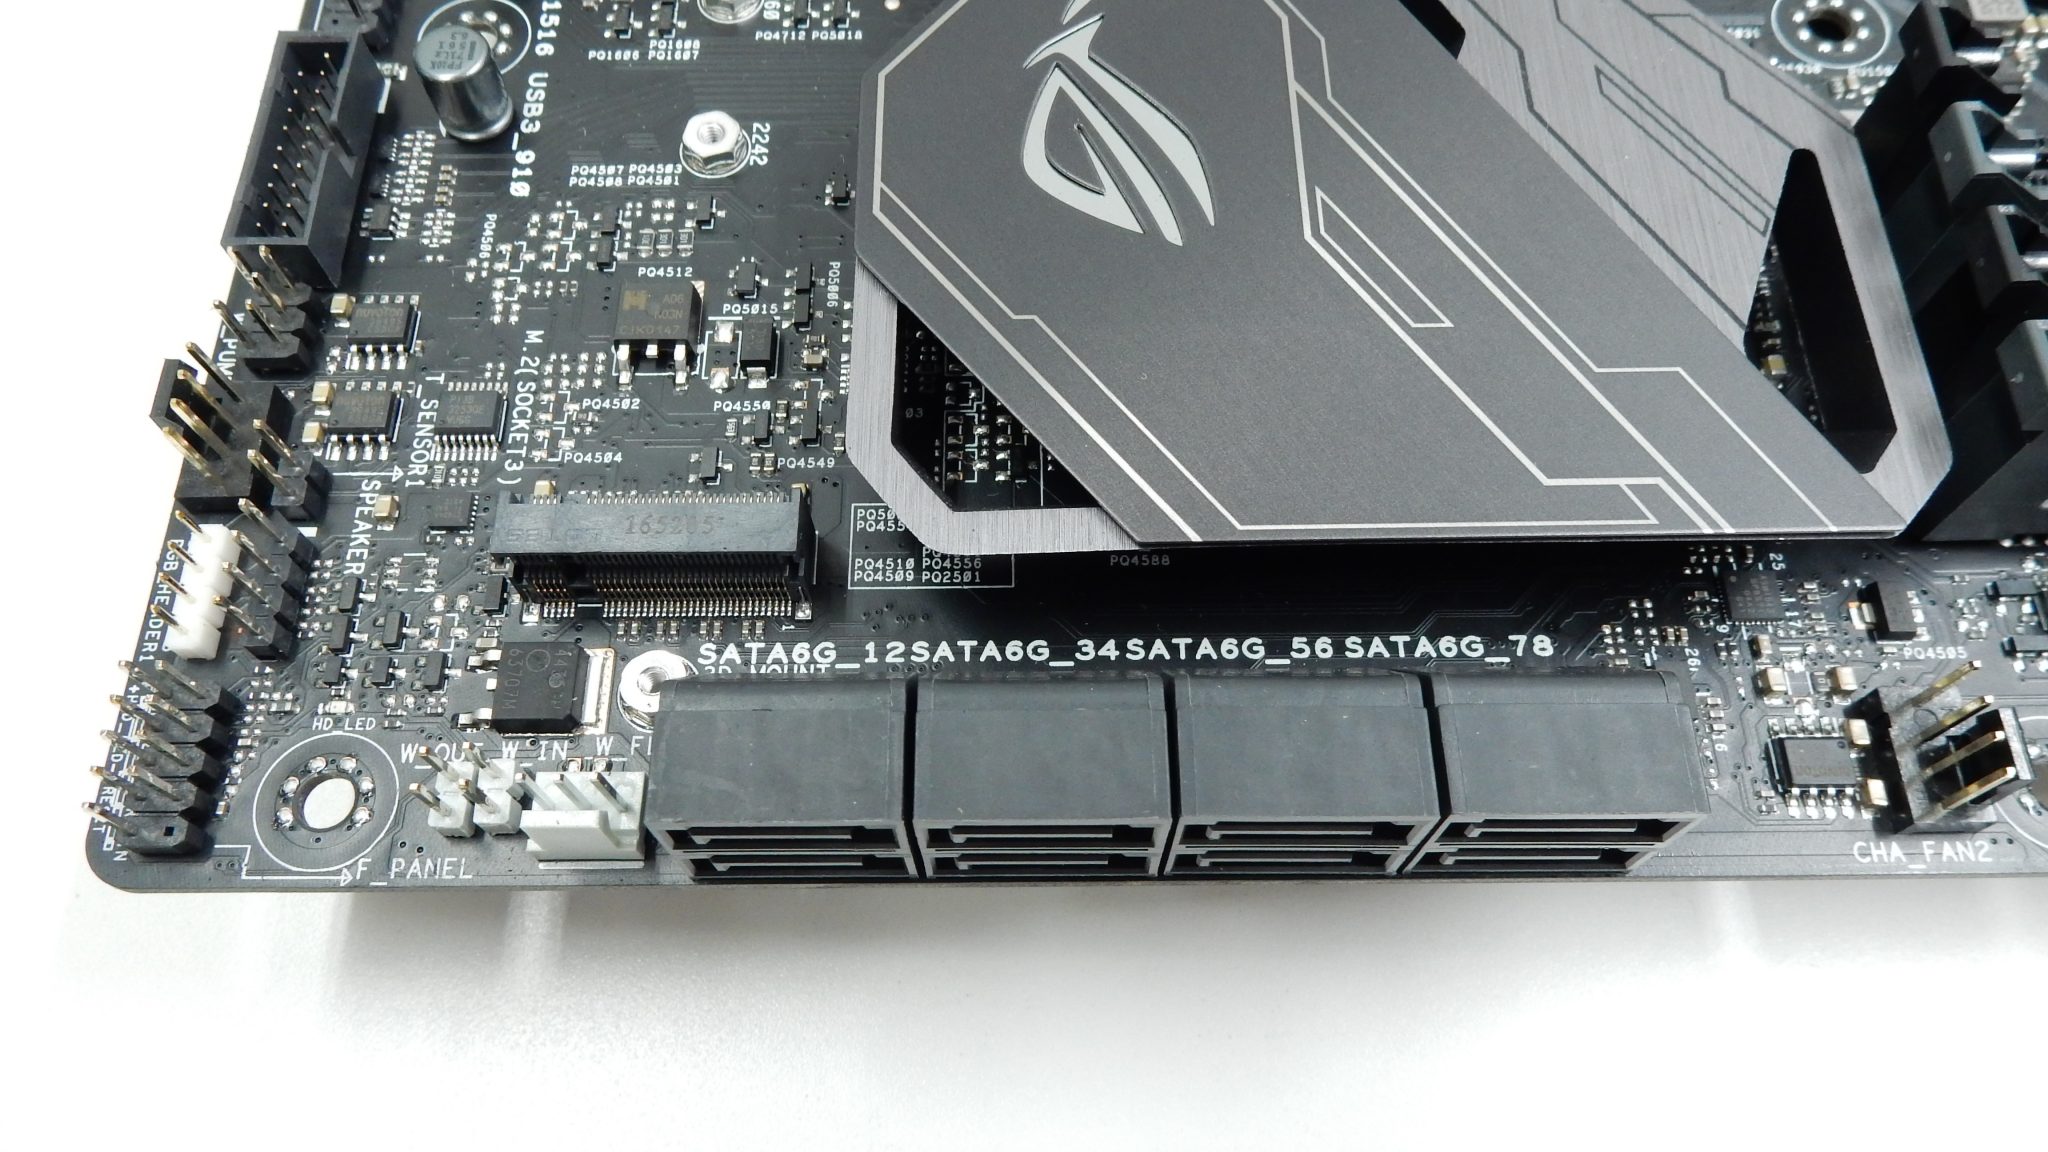
In the bottom right edge of the Crosshair VI Hero we find a TPM Header, ROG Extension header used for connecting an OC Panel I/II, a USB 2.0 header, and a USB 3.0 connector. Next up is a 4-pin PWM header labeled “W_PUMP”, which is capable of providing up to 3A of current and 36W for a dedicated water pump. Just above the W_PUMP header is a 2-pin header labeled “T_SENSOR1” which allows you to monitor temperatures via a thermistor cable. Left of the water pump header is the bottom RGB header for use with most standard 4-pin 12V 5050 RGB strips. Above that is the seldom used speaker header. All the way in the corner resides the front-panel connectors for Power and Reset buttons, HDD LED and Power LED. Just above these headers is the single M.2 slot, capable of housing SSDs up to 110mm in length, in both SATA and PCIe formats.
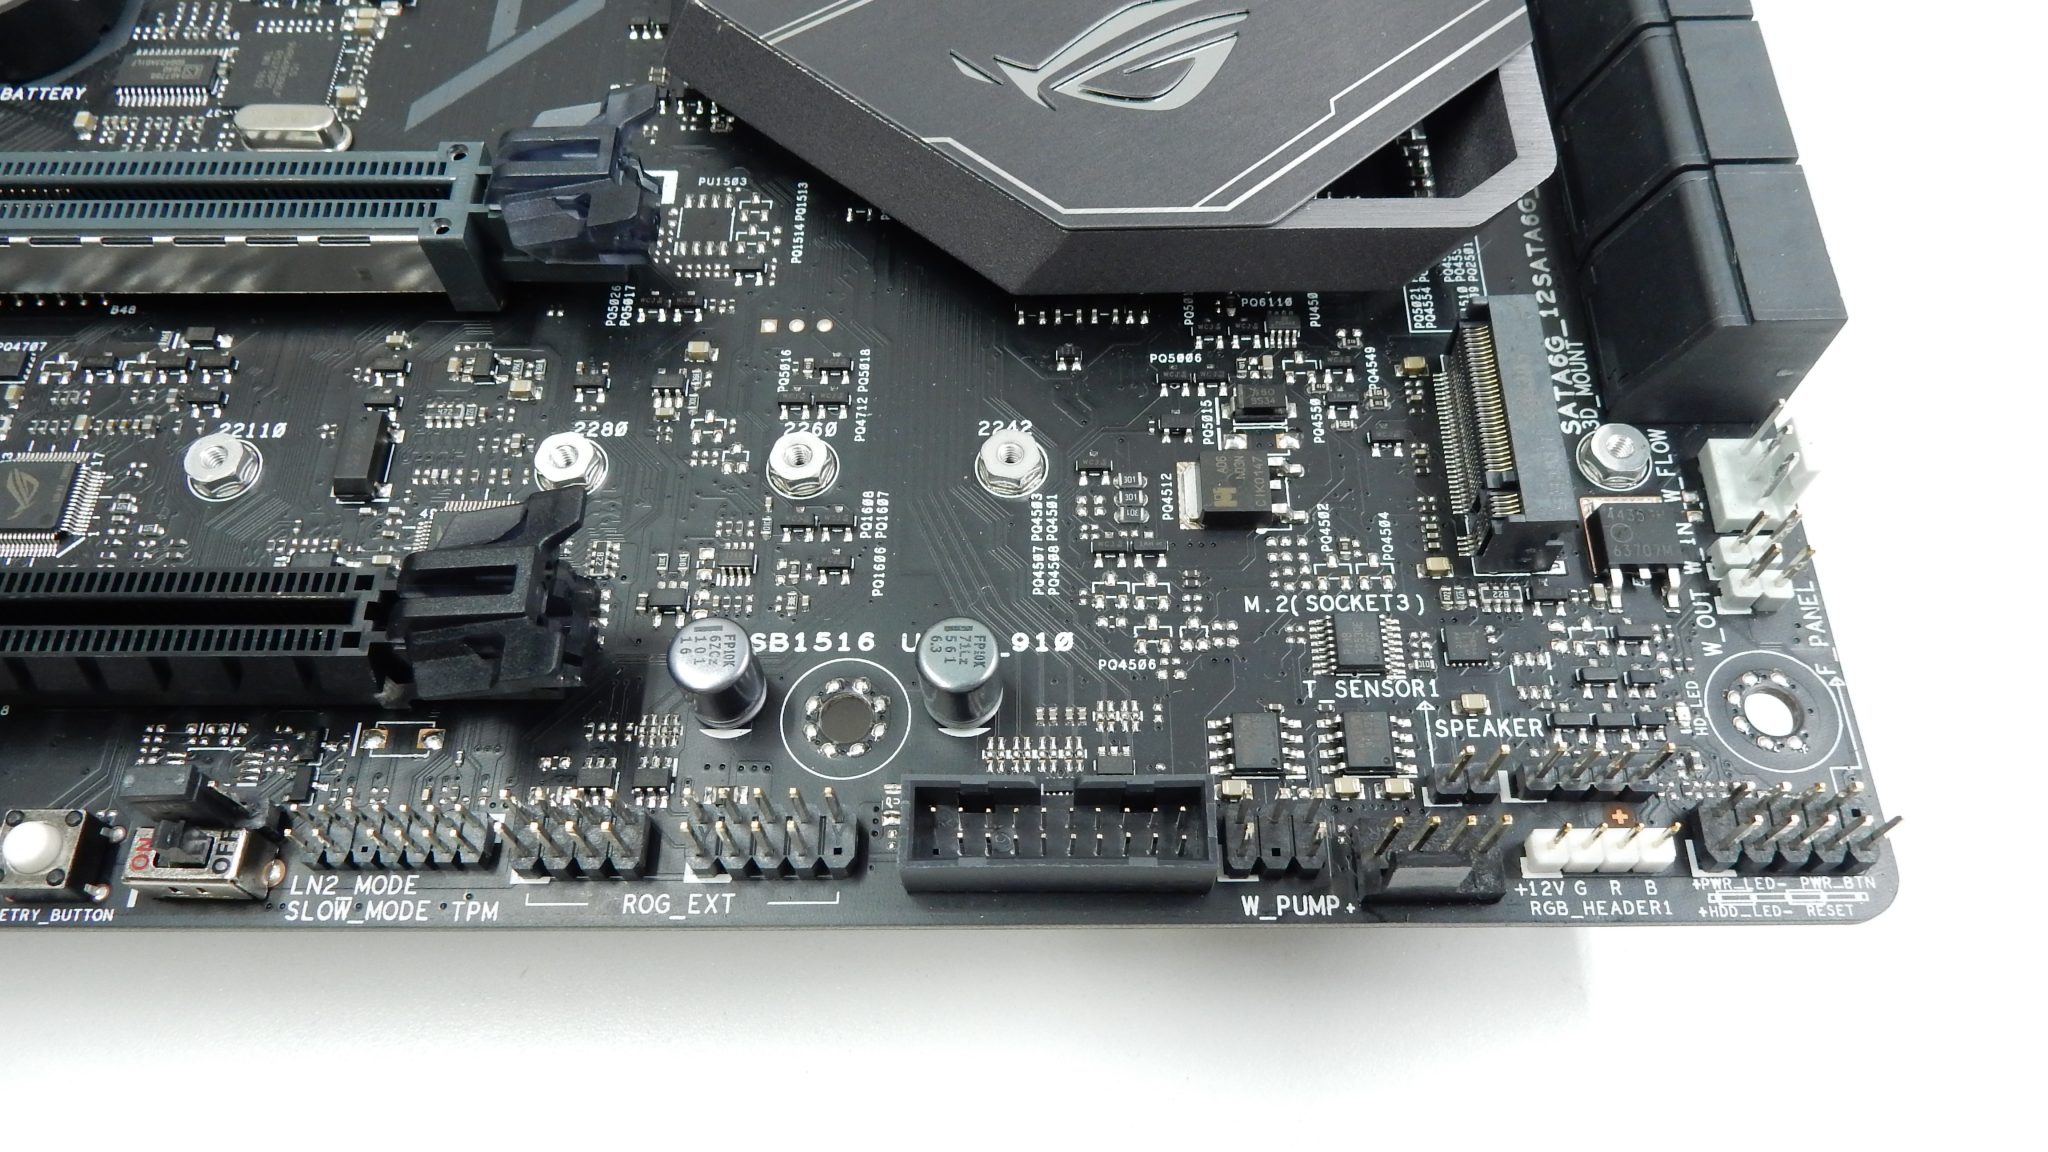
Making our way along the right side of the motherboard, starting in the bottom right we have the grouping of “Water-Cooling Zone” headers we mentioned in our Standout Features section above. The header labeled “W_OUT” can be configured to measure water temperature flowing out of your radiator, while the “W_IN” header can measure the temperature of water coming into the radiator. The “W_FLOW” header is used to measure flow rate within the system. Just above the Water-Cooling Zone is one of two 3D mount points for securing 3D-printed items to the motherboard. Right next to the Water-Cooling Zone is a grouping of eight SATA III 6.0Gbps ports, and another 4-pin PWM fan header.
Moving up the side of the board we come across the USB 3.1 front panel connector. We have yet to take a look first-hand at a case that can utilize this feature, but we are glad to have it available on the Crosshair VI Hero. Next up the line is the 24-pin ATX power connector. Right next to the ATX connector is a set of seven ProbeIt monitoring points that can be monitored with a multimeter to detect the system’s current voltage and OC settings. Up a bit further is the other 3D mount point.

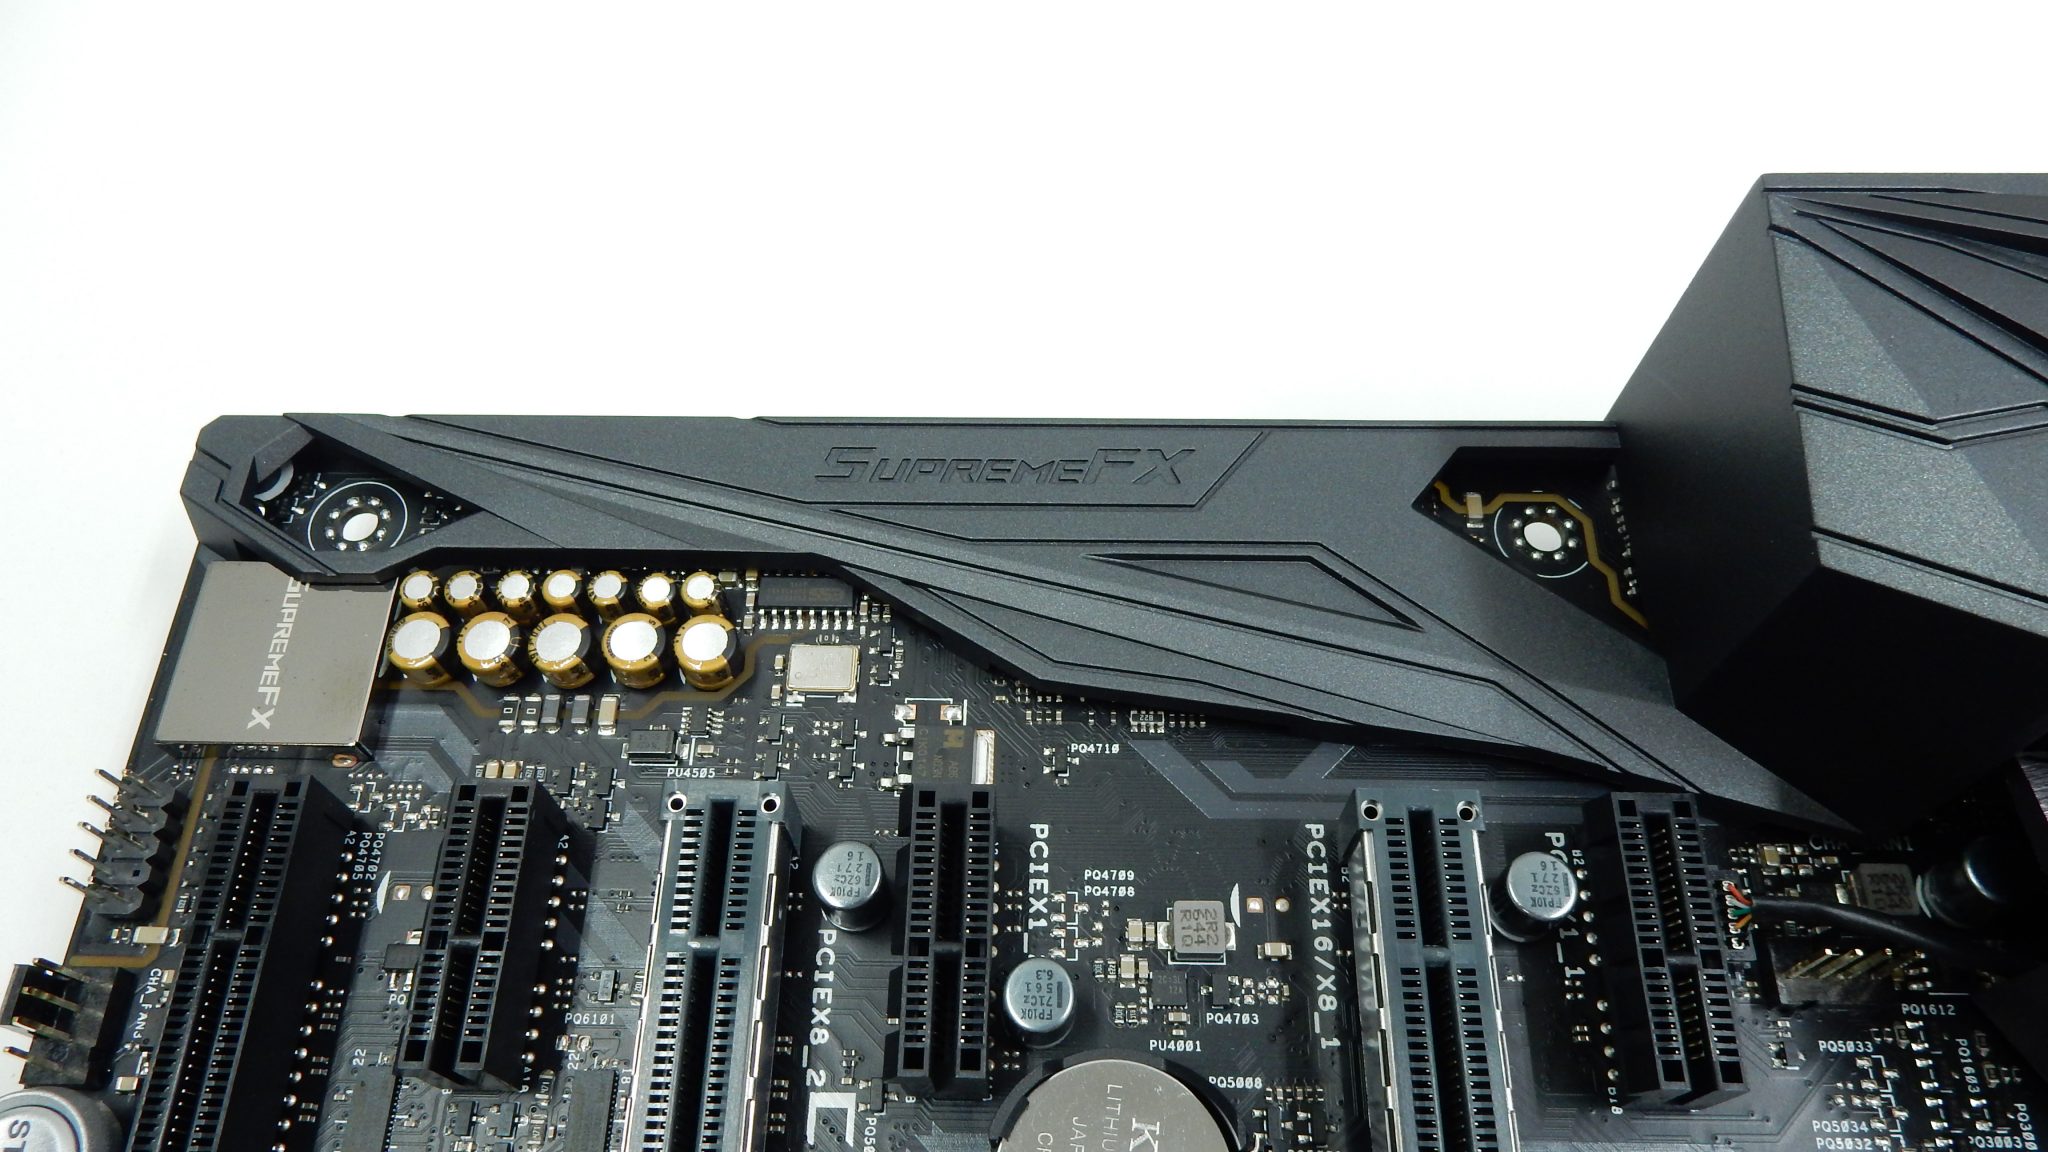
Taking a look at the left side, and starting at the bottom left, we are introduced to the SupremeFX audio portion of the motherboard. A plastic I/O shield covers most of the audio portion, grouped together are the S1220, an ESS Sabre Hi-Fi ES9023P DAC for great digital to analog clarity, and a Texas Instruments RC4580 buffer for low distortion. As with many high-end boards, the audio circuitry is electronically isolated from the rest of the components for interference-free operation.
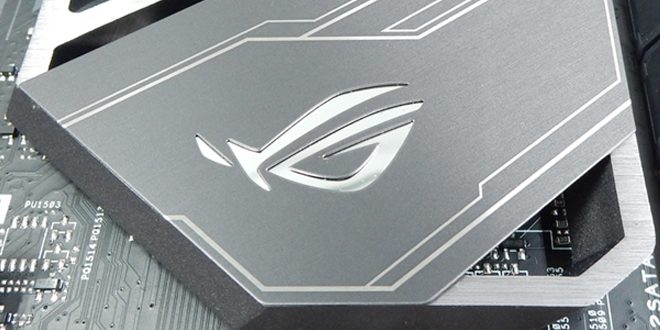
Taking up the rest of the left side of the motherboard is the remainder of the plastic I/O cover. The angular design looks very nice and isn’t overly flashy. A “CROSSHAIR VI” nameplate accents the top of this panel, and is one of two locations on the Crosshair VI Hero that feature customizable RGB LED lighting.
Along the top of the motherboard we find both a 4-pin and an 8-pin EATX 12V plug. While only the use of the 8-pin is required, using the additional 4-pin connector is useful in overclocking situations.

The top right corner of the motherboard is home to the CPU, CPU_OPT, and AIO pump 4-pin PWM headers, each supplying up to 1A of current and 12W of power. And while the fan headers are controlled by the Q-Fan application, both of the motherboard’s pump headers are set to full speed by default. Just below the CPU fan header is the second 4-pin 12V RGB header. We really like the placement of these headers, as they offer multiple cable routing options for different case layouts and cable management options. Next to the three headers is a two-digit Q-Code LED display, used for providing diagnostic codes during boot and system operation. Just below the Q-Code display are four LED indicators that illuminate at certain points of the boot process to help display the point of the process the system is in. These lights signify DRAM, CPU, VGA, and Boot status.

Moving to the interior portion of the motherboard gives us a look at the hefty cooling solution ASUS came up with to keep the 12-phase NexFET MOSFETs cool. The 12-phase solution is broken down into an 8+4 configuration, with eight for the CPU’s main core voltage, and the remaining four dedicated to the CPU’s SOC voltage. The remainder of the all-digital power delivery system is comprised of MicroFine alloy chokes for higher efficiency and more stable power at high currents, 10K black metallic Japanese-made capacitors, and a Digi+ PWM controller.
Additionally the AM4 socket is still based on a PGA design, so taking care when inserting the CPU is very important. The Crosshair VI Hero comes with pre-mounted heatsink brackets for stock AMD cooling solutions, but these can easily be removed to accommodate custom CPU coolers.

Below the CPU socket area are three PCIe 3.0 slots. The first can operate in x16 or x8 mode, while the second slot is destined to be an x8 slot, and the bottom slot is an x4 slot. Of note is the metal reinforcement placed on the top two PCIe 3.0 slots to ensure additional retention and shearing resistance strength. Three additional PCIe 2.0 x1 slots are available as well.
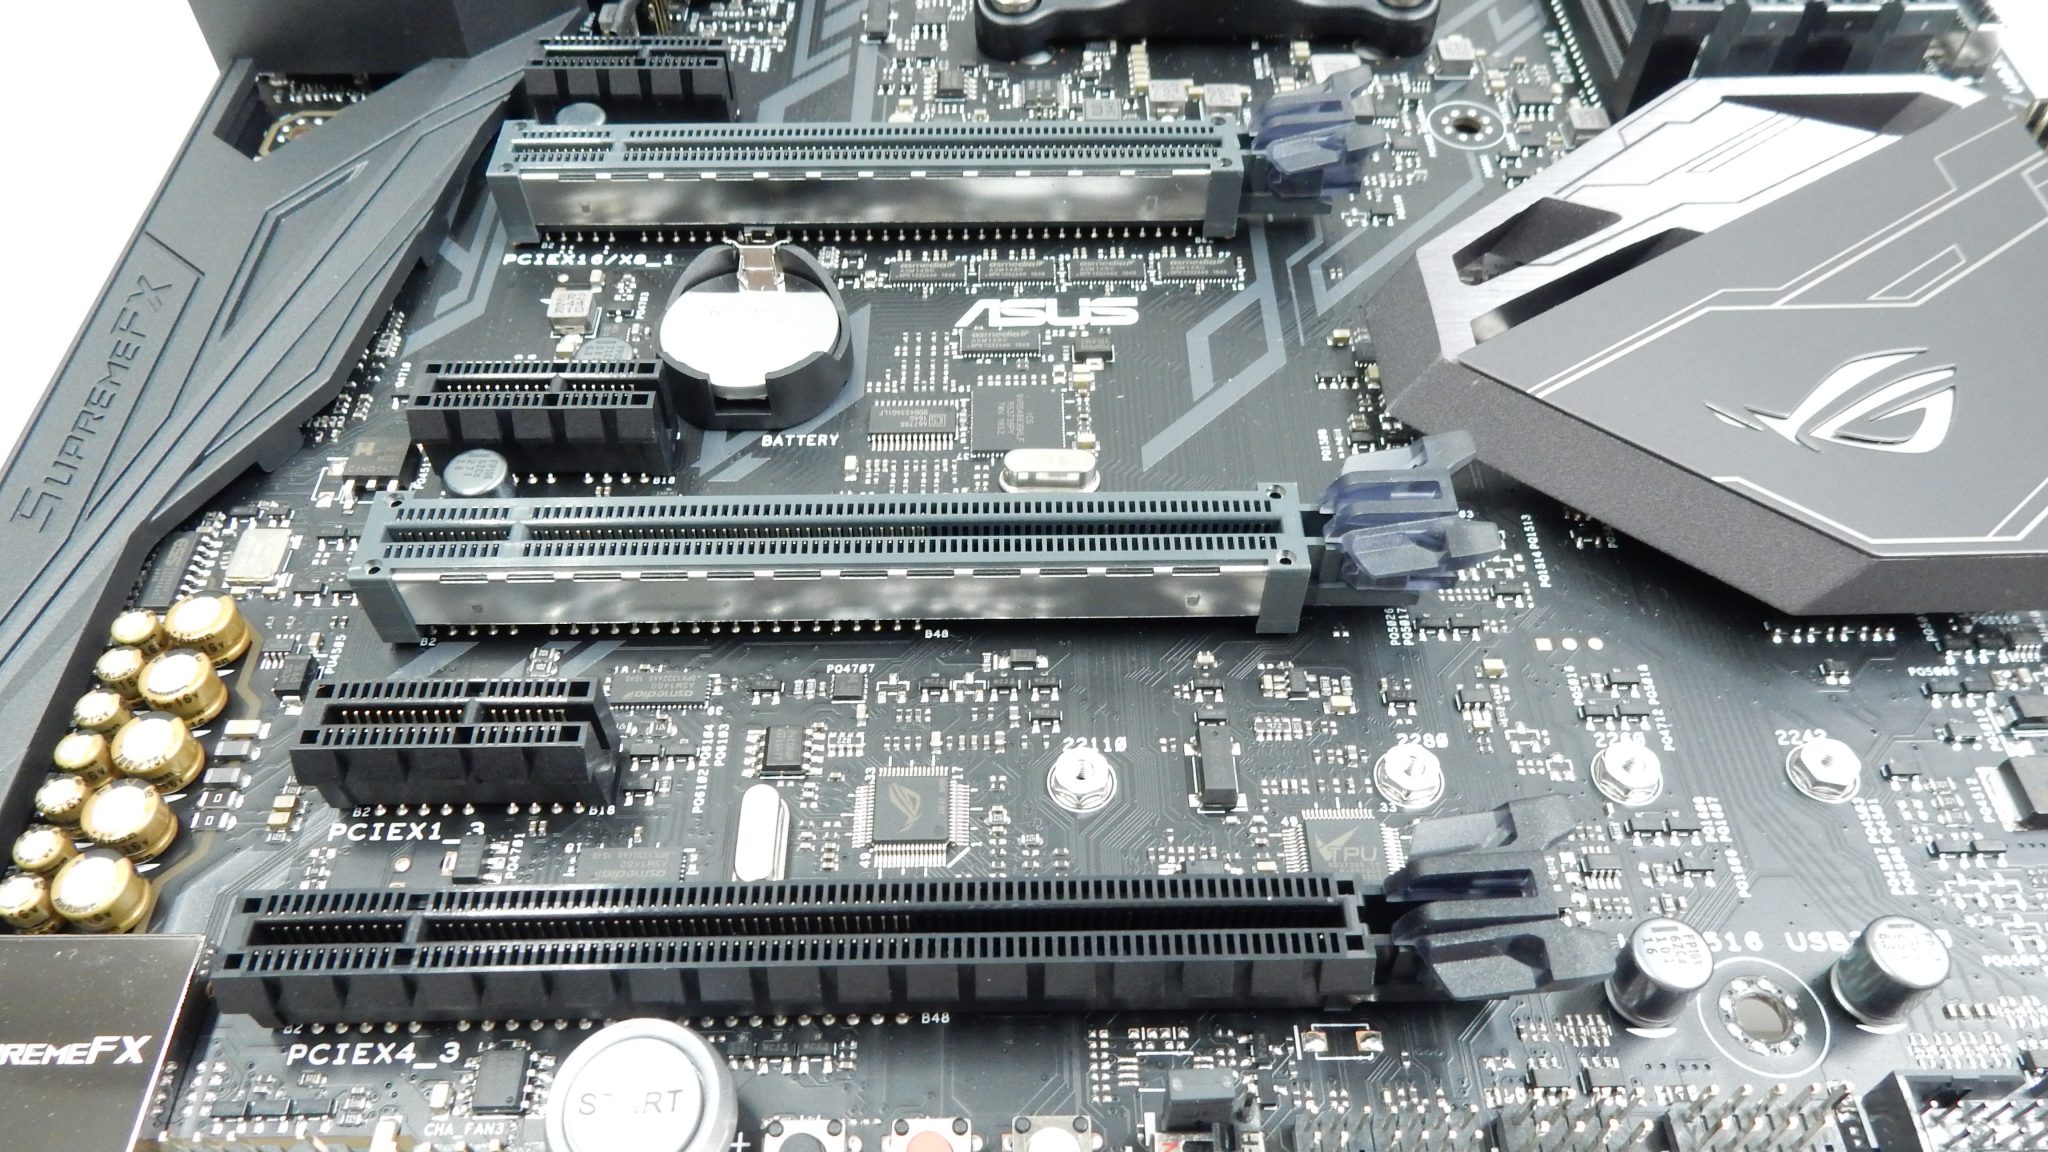
To the right of the PCIe slots is the X370 chipset heatsink, featuring the ASUS ROG logo along with the same angular design pattern found across the Crosshair VI Hero. This heatsink is home to the second grouping of integrated RGB LED lights on the motherboard, all of which can be configured using the ASUS AURA application.
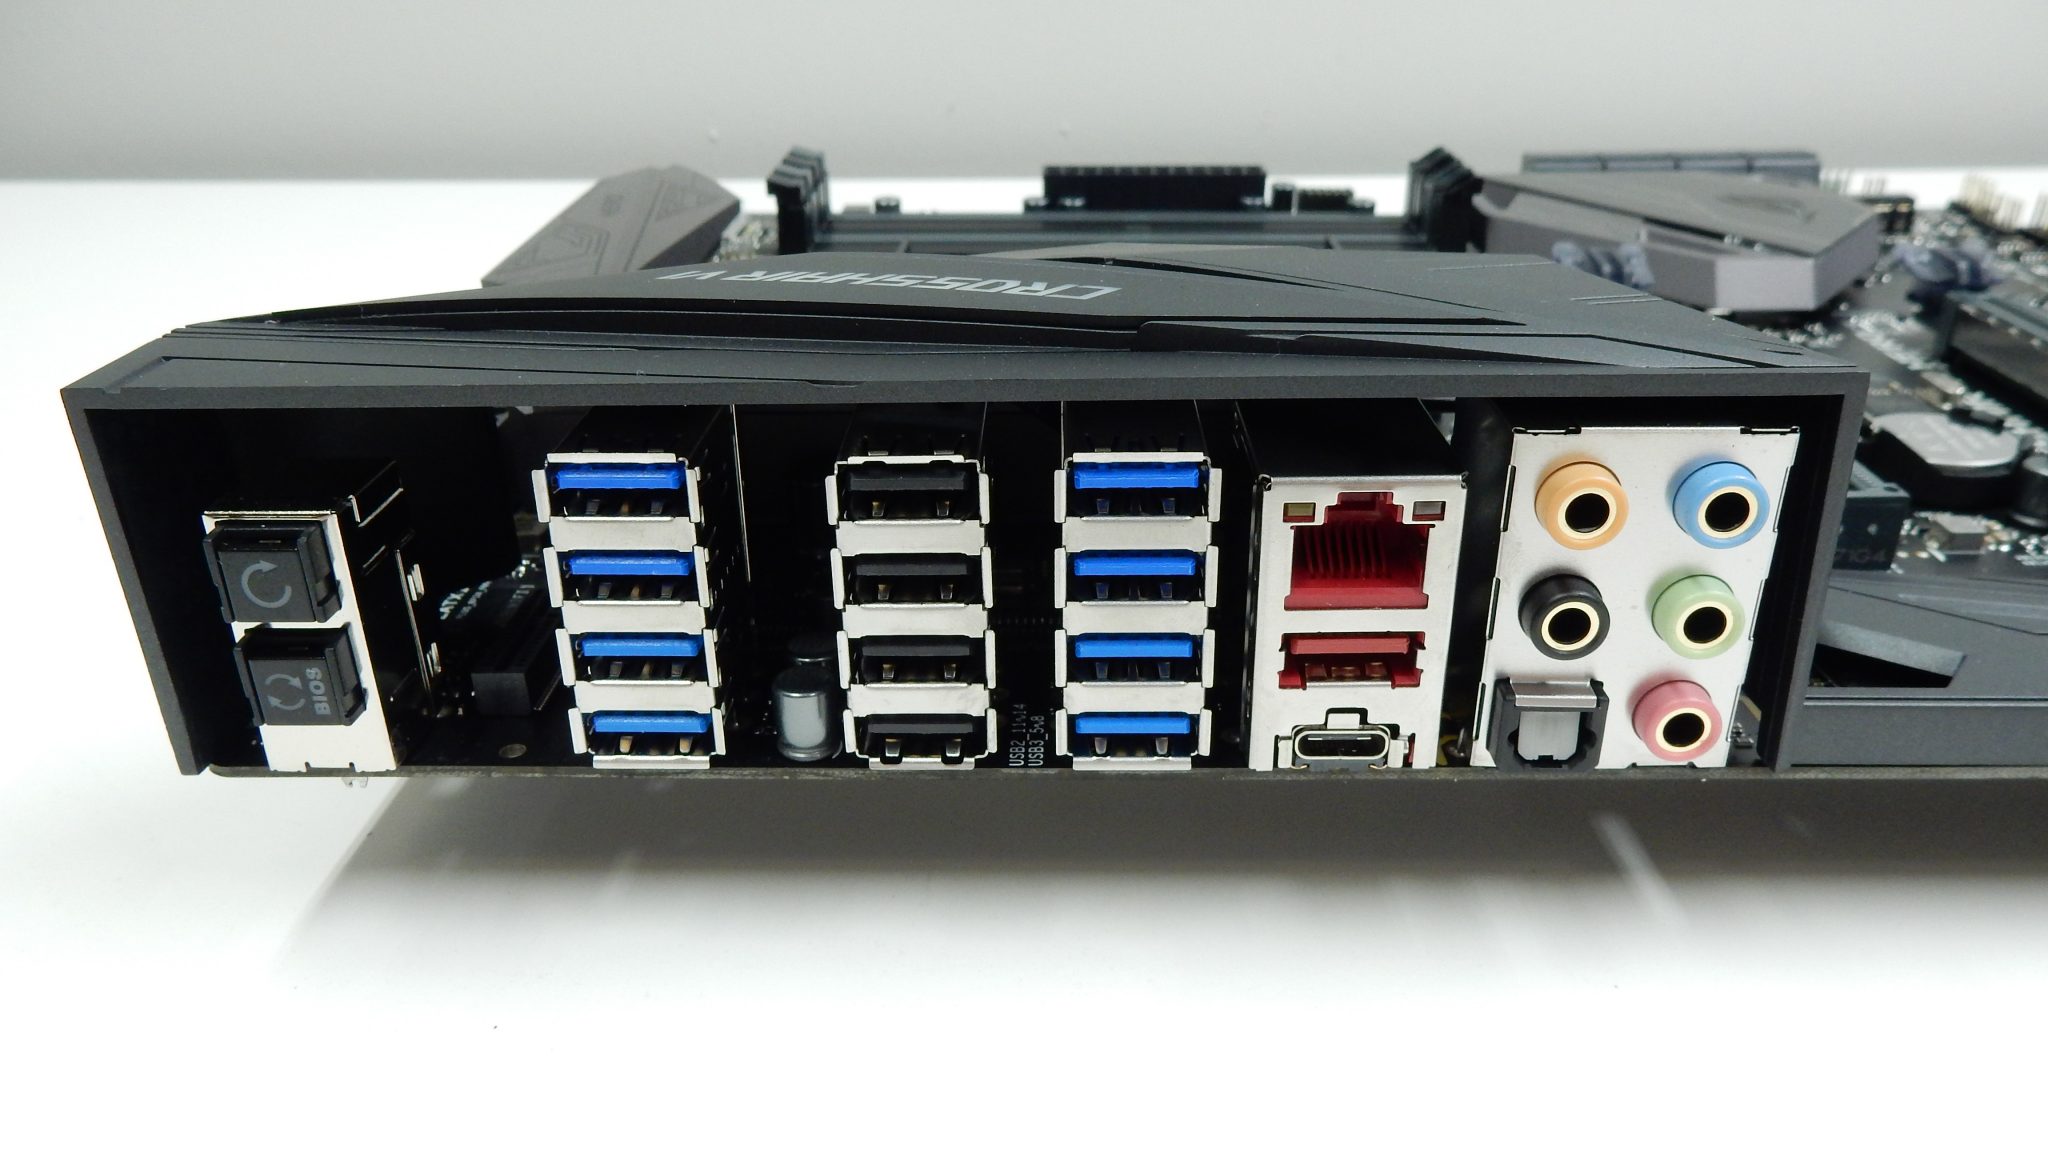
Moving to the I/O portion of the Crosshair VI Hero gives us a view that stopped us in our tracks the first time we took a peek. Starting from the left we have a Clear CMOS button used to clear the BIOS when the system hangs due to overclocking. Just below is the USB BIOS Flashback button that is used to update the system BIOS without entering the BIOS itself or updating from the OS. You can simply install a USB drive in the designated USB BIOS Flashback port, hold the button for three seconds, and then the BIOS is automatically updated.
Moving to the right we find a space for an optional M.2 E-Key slot for adding Wi-Fi to the board. Next up is a set of four USB 3.0 ports, a set of four USB 2.0 ports, and another set of four USB 3.0 ports. Next to these towers of USB connectivity is an RJ-45 port powered by the Intel I211-AT Ethernet controller, which is protected by LANGuard for additional surge tolerances. Below the Ethernet port is a Type-A USB 3.1 port and a Type-C USB 3.1 port, both of which support transfer speeds of up to 10 Gbps. We just want to reiterate that there are 14(!) USB ports on the back of the Crosshair VI Hero. That’s crazy.
Rounding out the I/O section are the analog audio ports connected to the SupremeFX audio system, as well as an optical S/PDIF output port.
Accessories
Included with the ASUS ROG Crosshair VI Hero is a plethora of accessories not only for the motherboard itself, but for your setup as well. A standard User Guide and driver disk are included, as well as four SATA 6Gbps cables, an SLI HB bridge, and an 80cm extension cable for RGB strips. A nicely padded I/O shield is also provided, along with a Q-Connector for easy front panel connections, a ROG coaster, ROG cable labels, ROG sticker sheet, and finally an M.1 screw package and 3D printing mount screw package.

SYSTEM SETUP AND INSTALLATION
| Test Setup | |
| Case | Anidees AI5S Window |
| CPU | AMD Ryzen 7 1800X |
| Motherboard | ASUS Crosshair VI Hero |
| RAM | Kingston HyperX Savage DDR4-2666, 16GB (2 x 8GB) |
| CPU Cooler | Cooler Master Hyper 212 EVO |
| Storage Drives |
|
| GPU | PowerColor RX 580 Red Devil 8GB |
| PSU | EVGA SuperNOVA 650 G3 |
Our test rig for this review is quite new, as we are just now starting to take a look at new components within the AMD ecosphere. One item of note is that our RAM speed was limited to 2400MHz with timings of CL15-15-15 with our HyperX Savage kit. By default, our system was utilizing the 2133MHz JEDEC that all DDR4 memory runs at out of the box. However, with a little tweaking of the BIOS, we were able to manually adjust our speeds to 2400MHz, as 2666MHz would not successfully boot under any combination of speeds, timings or voltages. This is not a limitation of the memory kit, but of the small pool of certified memory for the Ryzen platform. We are working with multiple RAM vendors to secure memory kits certified for the Ryzen platform for future reviews, and will update any performance differences to this review once we have these kits in house and tested.
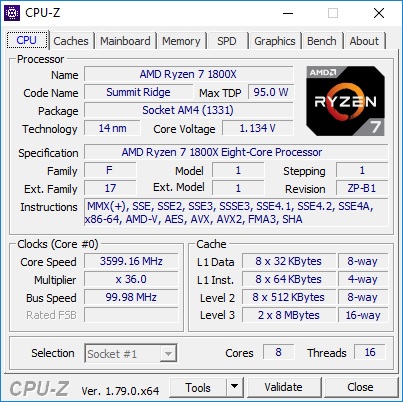
Here we have a quick look at CPU-Z, showing the stock operating speeds of our Ryzen 7 1800X installed in the Crosshair VI Hero.
After a bit of work in the BIOS we were able to find a stable RAM speed of 2400MHz when paired up with both the stock 3.6GHz and our overclocked speeds below.
OVERCLOCKING
Overclocking our Ryzen 7 1800X was frustrating, yet simple at the same time. We tested countless BCLK, Multiplier and Voltage settings to get the highest stable speed possible, with little luck. Thankfully, ASUS provides a few pre-configured overclocking profiles within the AI Tweaker section of the BIOS. Our most stable results came from using the “4GHz OC Profile” option. A quick F10 to apply and save the current settings, and then a quick reboot provided us with a stable 4GHz clockspeed.
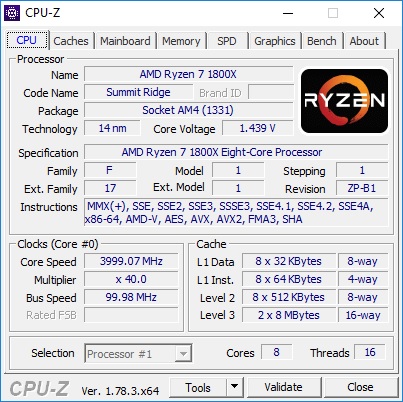
And there we have it, our Ryzen 7 1800X running at 4GHz (3999.07, technically), and as you can see, the Core Voltage increased a bit to 1.439 V. Our memory speeds and timings remained the same in this overclocked configuration, with a speed of 2400MHz with CL15-15-15 timings.
TESTING AND PERFORMANCE
SiSoft Sandra 2016
“While each benchmark measures the performance of a specific device (CPU, Memory, (GP)GPU, Storage, etc.), there is a real need for a benchmark to evaluate the overall computer performance: this new benchmark is a weighted average of the individual scores of the existing benchmarks:
- Native CPU Arithmetic, Cryptographic, Multi-Media (SIMD), Financial and Scientific: measures native processing performance using the very latest instruction sets (AVX512*, AVX2/FMA, AVX, SSE2)
- .Net/Java Arithmetic: measures software virtual machine performance (e.g. for .Net WPF/Silverlight/Modern applications)
- Memory and Cache Bandwidth and Latency: measures memory and caches performance
- File System/Storage Bandwidth and I/O: measures storage performance
- GP (General Processing) / HC (Heterogonous Compute) (GPU/APU) Arithmetic, Cryptographic, Financial, Scientific: measures (GP)GPU/APU processing performance
- GP (General Processing) / HC (Heterogonous Compute) (GPU/APU) Memory Bandwidth and Latency: measures (GP)GPU/APU memory performance”
CPU Arithmetic
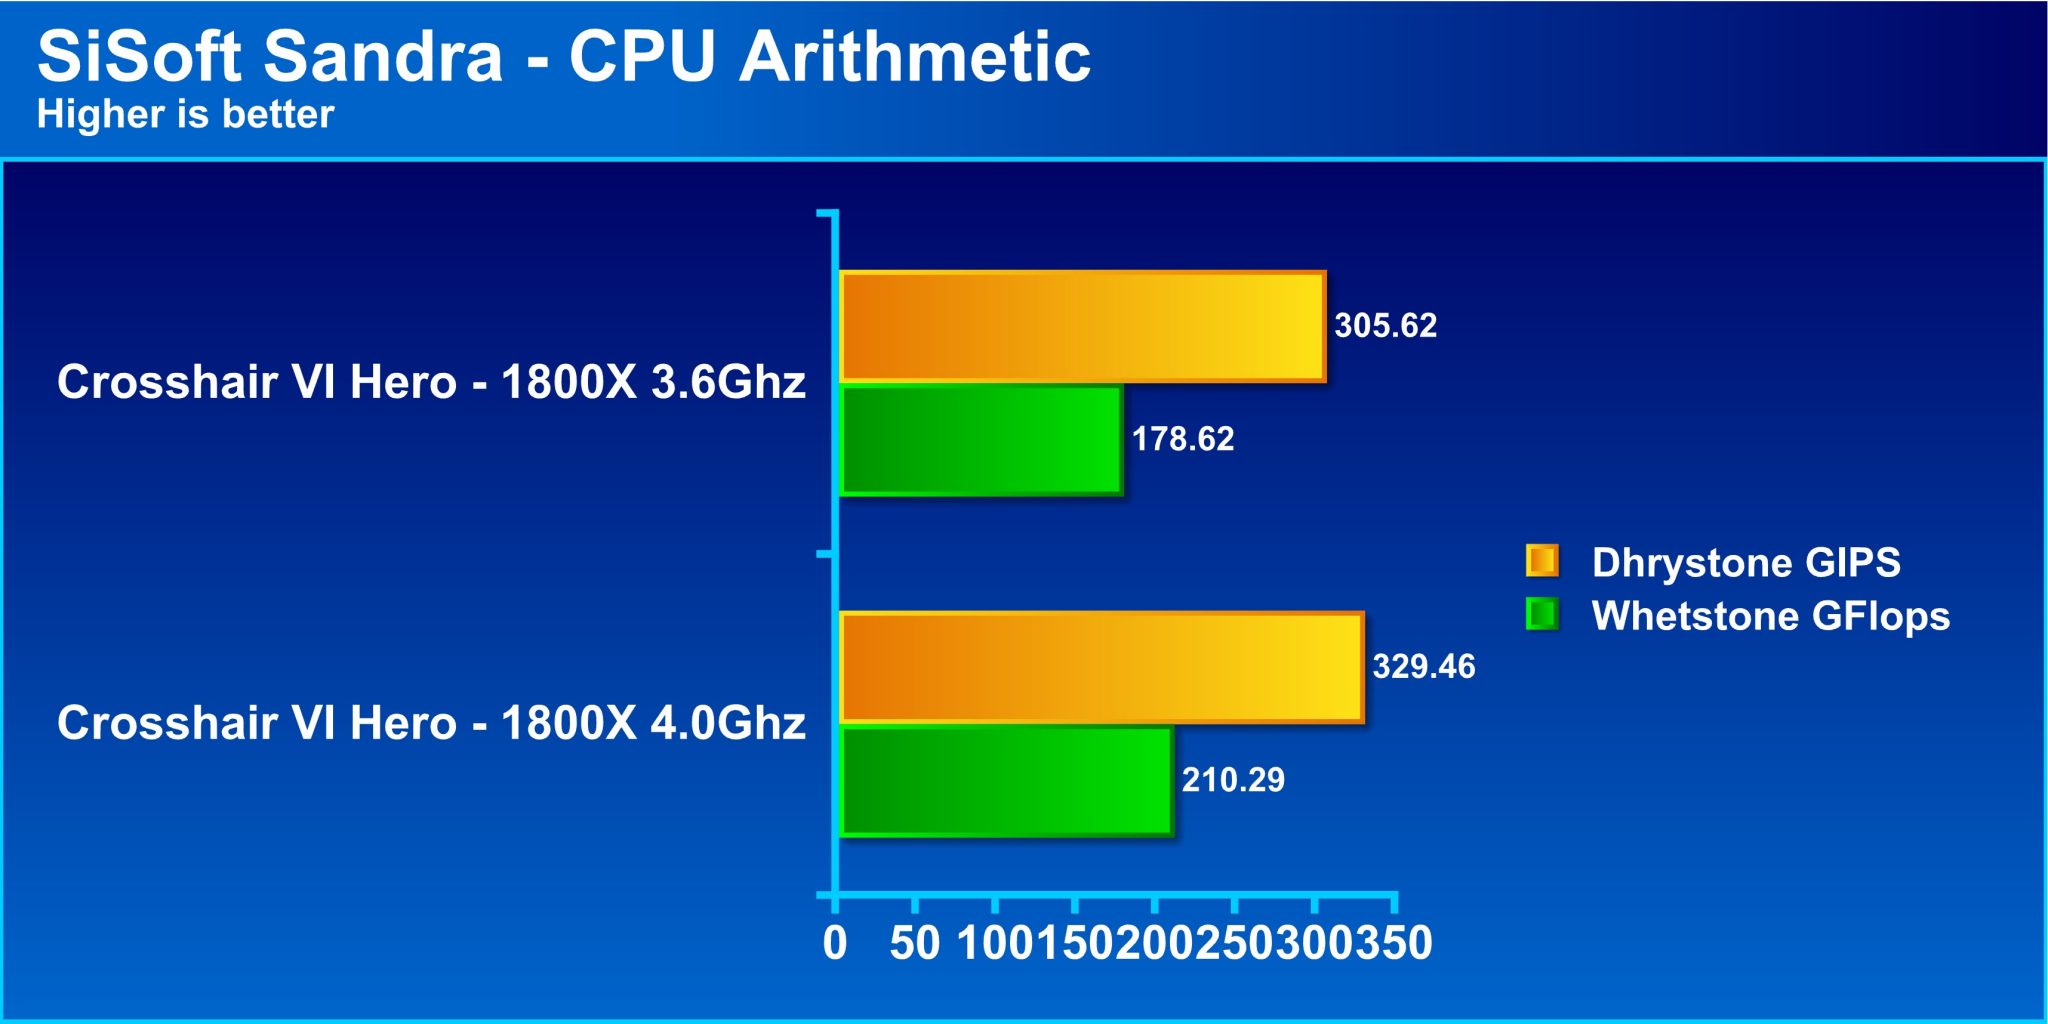
The CPU Arithmetic benchmark is designed to measure just how fast a CPU can process data. In our results, the overclocked 1800X outpaced the stock speeds by 8% in the Dhrystone test, and 16% in Whetstone. With a good cooling solution, the increased clock speeds we were able to obtain with the Crosshair VI Hero may start to make sense to run full time.
Memory Bandwidth
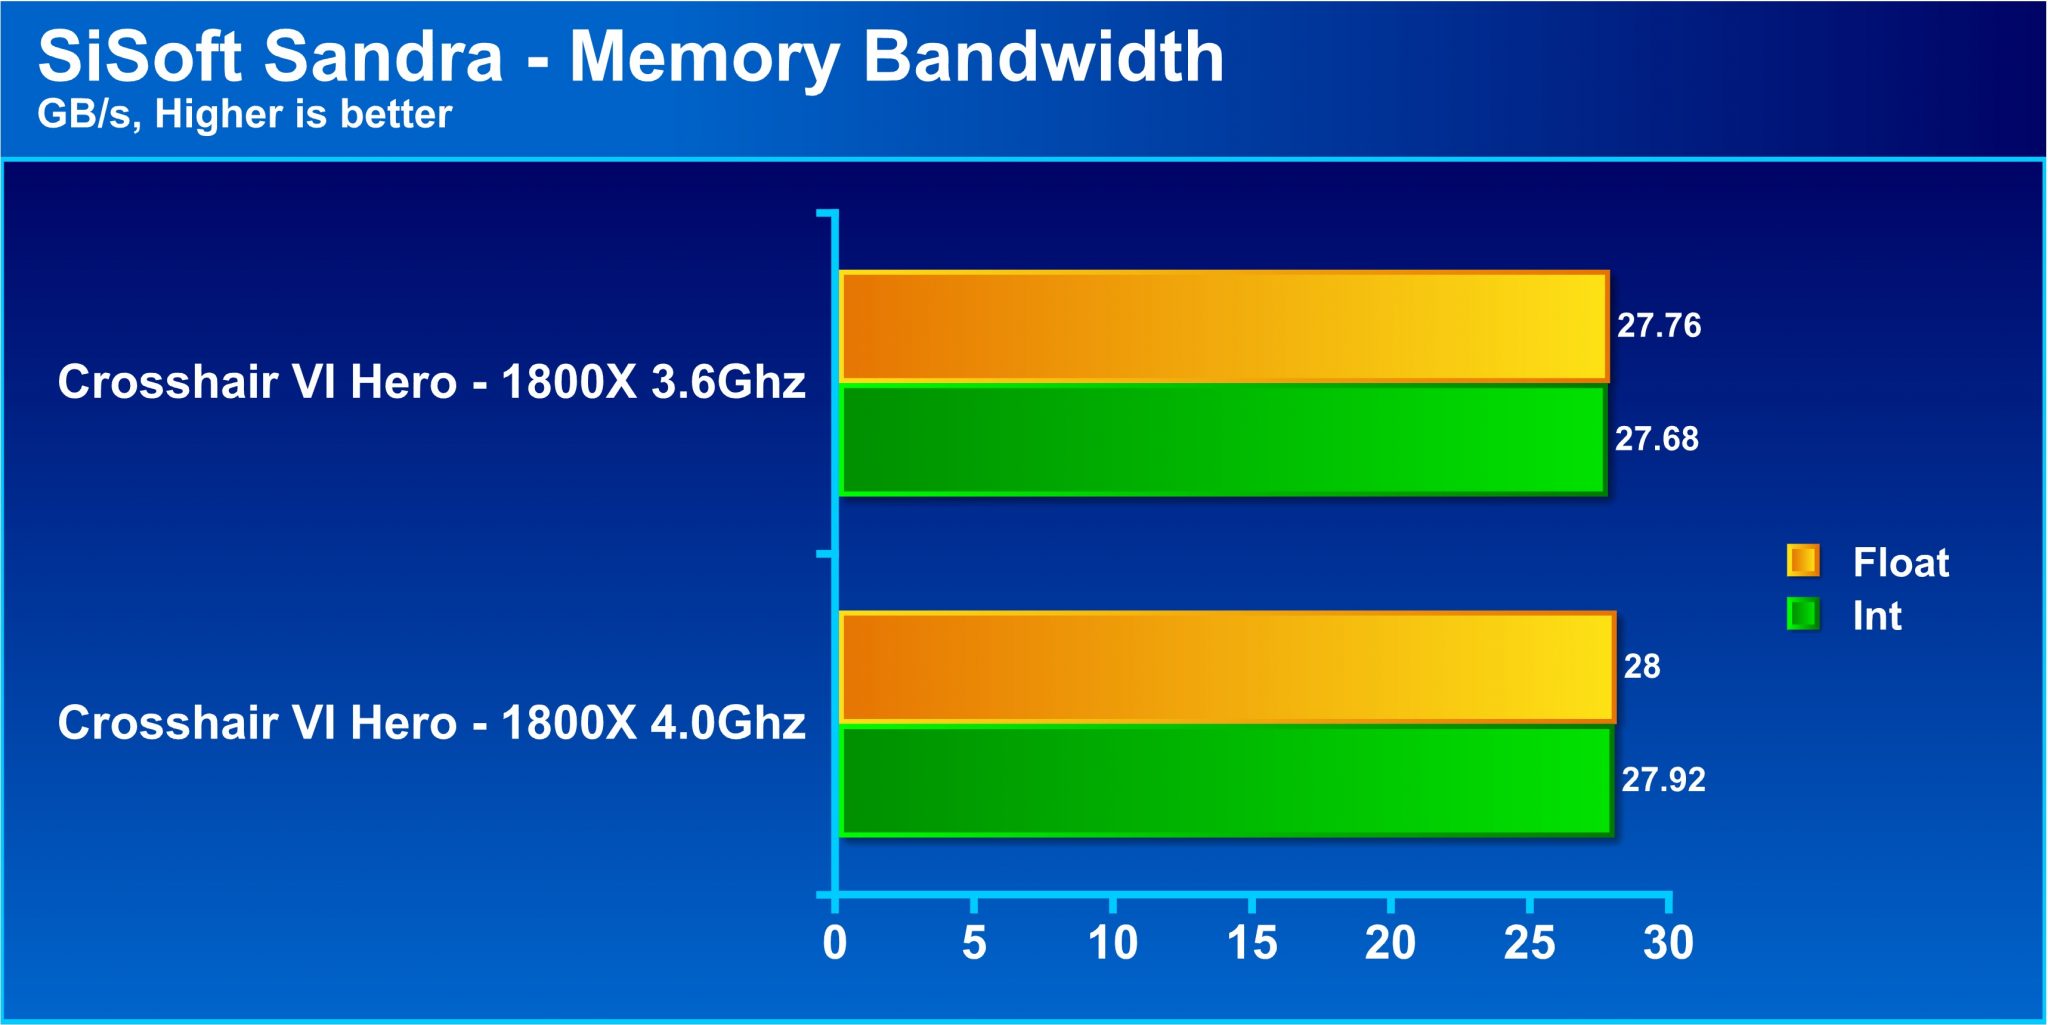
Here we see nearly identical results at both stock and overclocked SPU speeds in our Memory Bandwidth testing, which we fully expected. Since our RAM timings and speeds were the same for both CPU settings, the differences between the two are small enough to be well within the margin of error we would expect to see.
Cinebench R15
“CINEBENCH is a real-world cross platform test suite that evaluates your computer’s performance capabilities. CINEBENCH is based on MAXON’s award-winning animation software Cinema 4D, which is used extensively by studios and production houses worldwide for 3D content creation. MAXON software has been used in blockbuster movies such as Iron Man 3, Oblivion, Life of Pi or Prometheus and many more. CINEBENCH is the perfect tool to compare CPU and graphics performance across various systems and platforms (Windows and OS X). And best of all: It’s completely free.
Main Processor Performance
The test scenario uses all of your system’s processing power to render a photorealistic 3D scene (from the viral “No Keyframes” animation by AixSponza).
This scene makes use of various algorithms to stress all available processor cores. In fact, CINEBENCH can measure systems with up to 256 processor threads.
This test scene contains approximately 2,000 objects which in turn contain more than 300,000 polygons in total, and uses sharp and blurred reflections, area lights, shadows, procedural shaders, antialiasing, and much more. The result is displayed in points (pts). The higher the number, the faster your processor.”
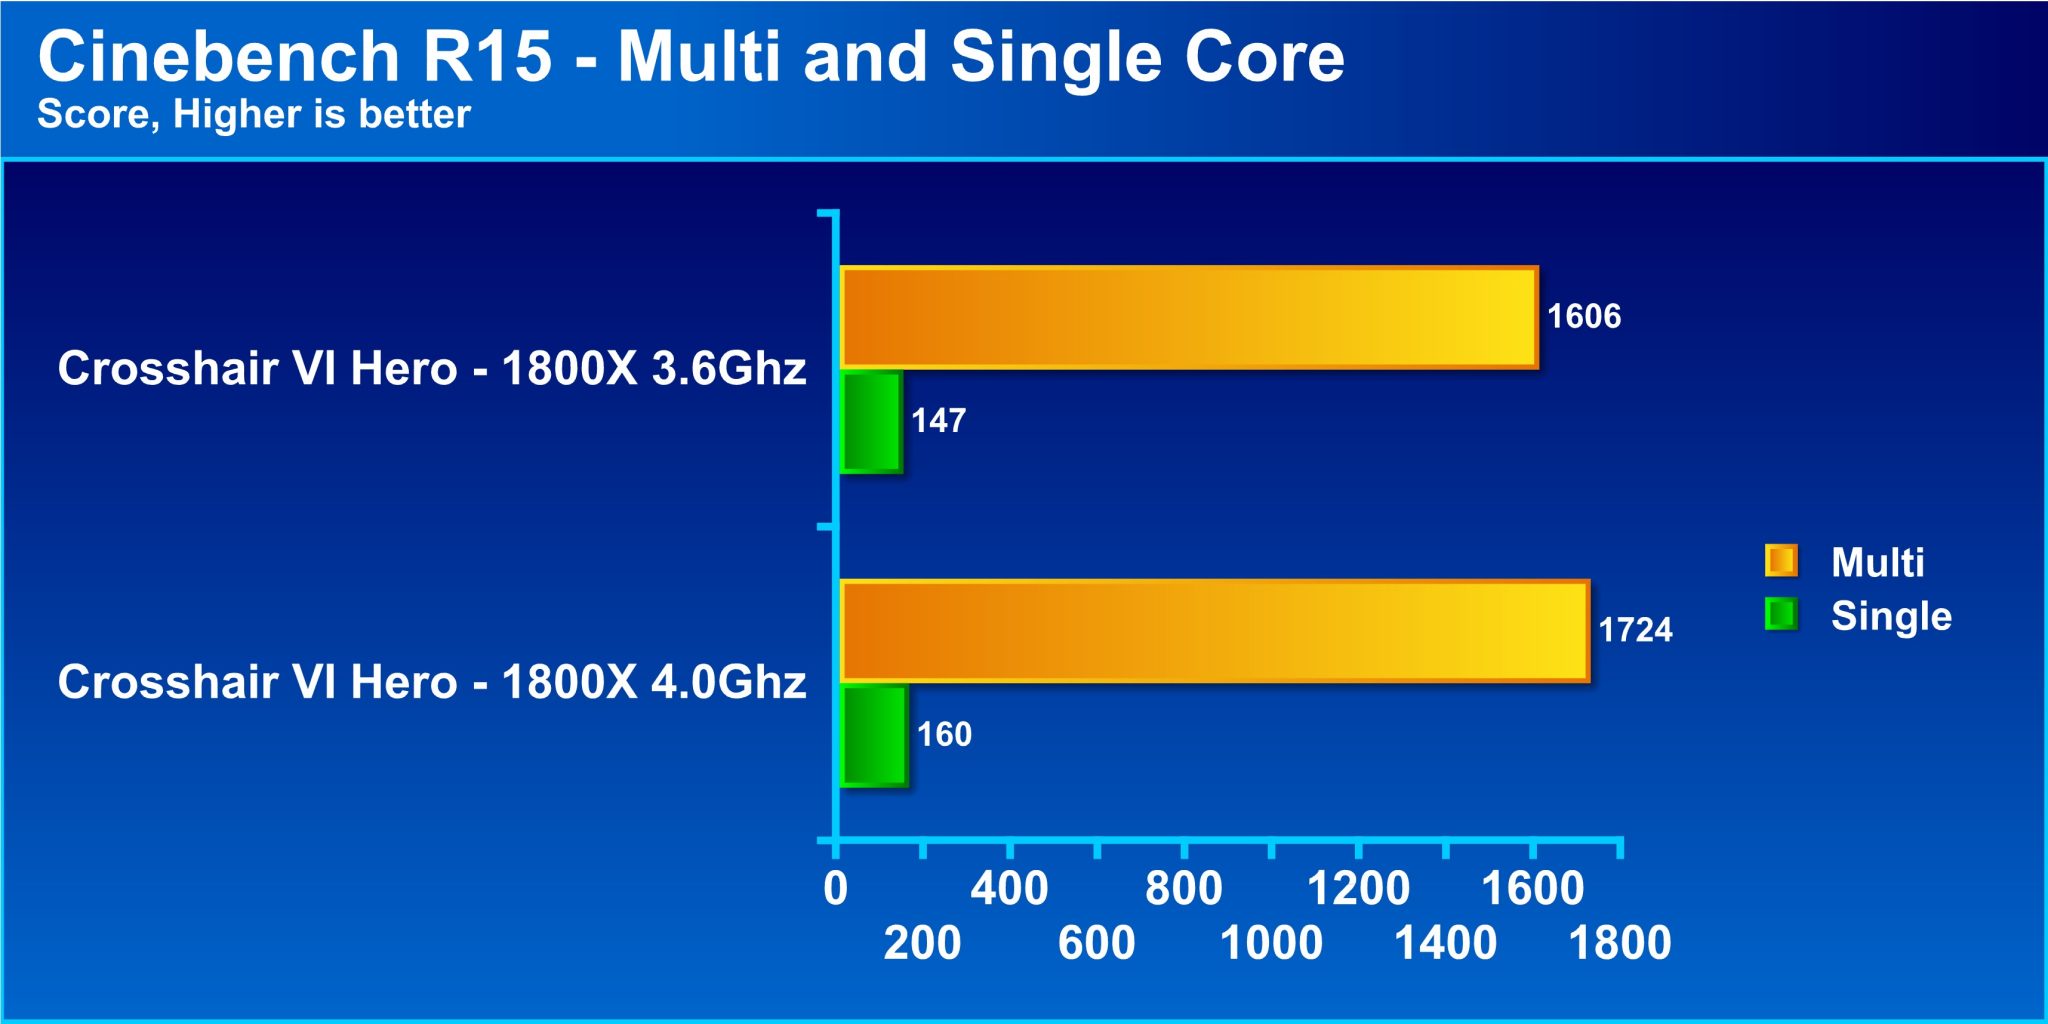
Cinebench R15 offers the ability to test the performance of a CPU, in both single and multi-core settings, while rendering a realistic 3D scene. The faster the CPU, the better the score, and we see the overclocked results of the multi-threaded test giving a 7% performance boost, while the single-threaded results show an increase of 8%.
PCMark 8 – Windows Performance
“PCMark 8 combines performance benchmarking with battery life measurement and includes tests based on popular Adobe and Microsoft applications. Find the devices that offer the perfect combination of efficiency and performance for your needs.
Home Test
The PCMark 8 Home benchmark includes workloads that reflect common tasks for a typical home user. These workloads have low computational requirements making PCMark 8 Home suitable for testing the performance of low-cost tablets, notebooks and desktops. Home includes workloads for web browsing, writing, gaming, photo editing, and video chat. The results are combined to give a PCMark 8 Home score for your system.
Creative Test
The PCMark 8 Creative benchmark includes workloads typical of enthusiasts and professionals who work with media and entertainment content. With more demanding requirements than the Home benchmark, this benchmark is suitable for mid-range computer systems. PCMark 8 Creative includes web browsing, photo editing, video editing, group video chat, media transcoding, and gaming workloads.
Work Test
The PCMark 8 Work benchmark test measures your system’s ability to perform basic office work tasks, such as writing documents, browsing websites, creating spreadsheets and using video chat. The Work benchmark is suitable for measuring the performance of typical office PC systems that lack media capabilities. The results from each workload are combined to give an overall PCMark 8 Work score for your system.”
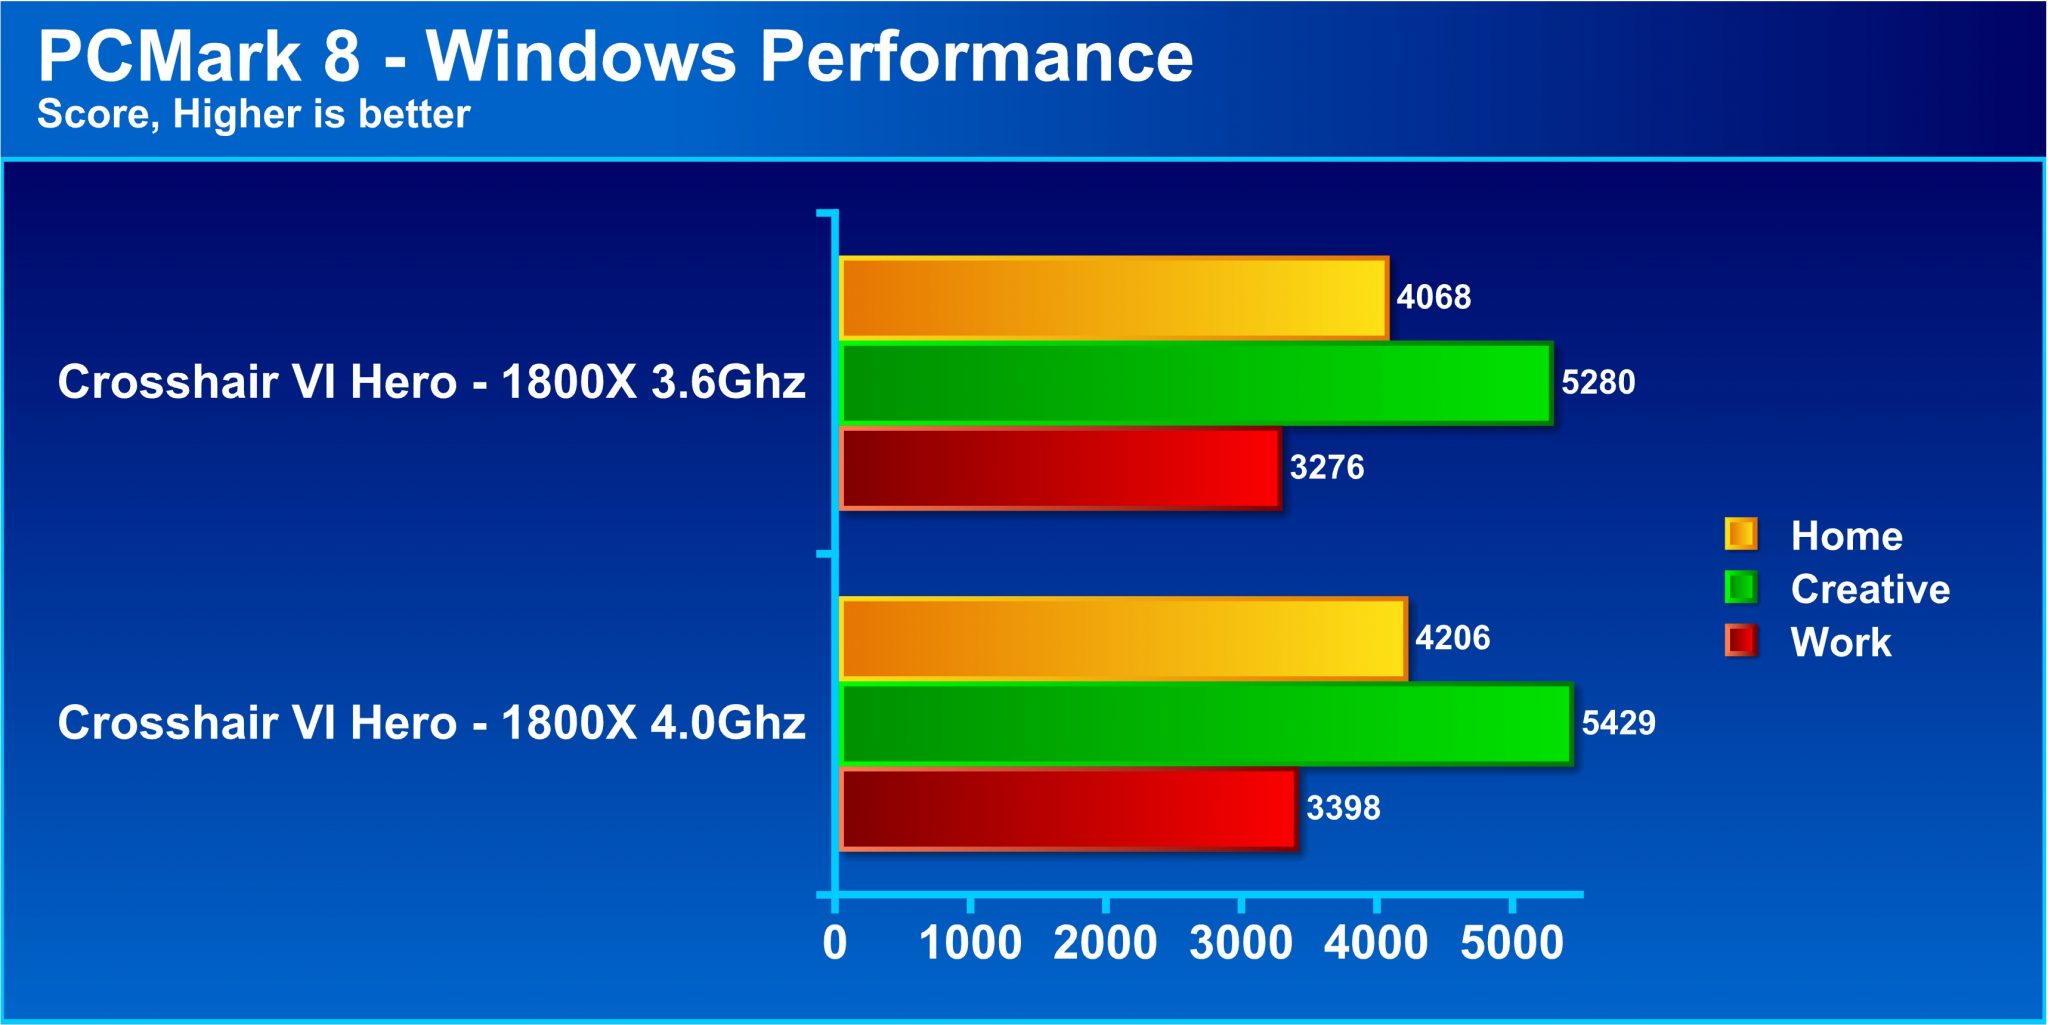
The three workloads we tested with, Home, Creative, and Work, provide a realistic benchmarking environment for typical use cases. As expected, the overclocking achieved on the Crosshair VI Hero netted us an increase of 4% performance overall.
SuperPi
“Super PI is a single threaded benchmark that calculates pi to a specific number of digits. It uses the Gauss-Legendre algorithm and is a Windows port of a program used by Yasumasa Kanada in 1995 to compute pi to 232 digits.
Threading
Super PI is a single threaded benchmark ideal for testing pure, single threaded x86 floating point performance and while most of the computing market has shifted towards multithreaded applications and more modern instruction sets, Super PI still remains quite indicative of CPU capability in specific applications such as computer gaming.”

Even though our Ryzen 7 1800X is an 8-core, 16-threaded CPU with the ability to multitask like champ, many applications are still developed with a single thread in mind. This is where SuperPi comes into play, measuring the performance of a single thread on our CPU. Faster speeds are better here, and when calculating Pi to 1M digits, the stock clocked 1800X is nearly one second slower than the overclocked result. When expanding the calculation to 8M digits, the amount of time difference is increased by nine seconds between the two speeds. This is where faster clock speeds can really make some ground in single-threaded crunching of numbers. While our results here are in the realm of seconds, larger workloads can shave minutes and possibly hours off of a work load.
wPrime
“wPrime uses a recursive call of Newton’s method for estimating functions, with f(x)=x2-k, where k is the number we’re sqrting, until Sgn(f(x)/f'(x)) does not equal that of the previous iteration, starting with an estimation of k/2. It then uses an iterative calling of the estimation method a set amount of times to increase the accuracy of the results. It then confirms that n(k)2=k to ensure the calculation was correct. It repeats this for all numbers from 1 to the requested maximum.
Threading
Our aim was to make a perfectly threaded benchmark, such that it would consistently use 100% of the CPU while in use. This is achieved by using CPUz to detect the CPU count and use exactly that many processing threads to avoid any performance losses due to multiple threads running on any single physical thread. Each thread is designed to do 1/n of the work, where n is the number of threads. For example, if you’re calculating 16 roots on 4 CPU’s, each CPU will calculate 4 roots. Some might argue that this style of threading is unrealistic in real-time performance, but in fact is quite indicative of performance in several real world tasks such as F@H which allows you to run several instances of the work at any one time.”
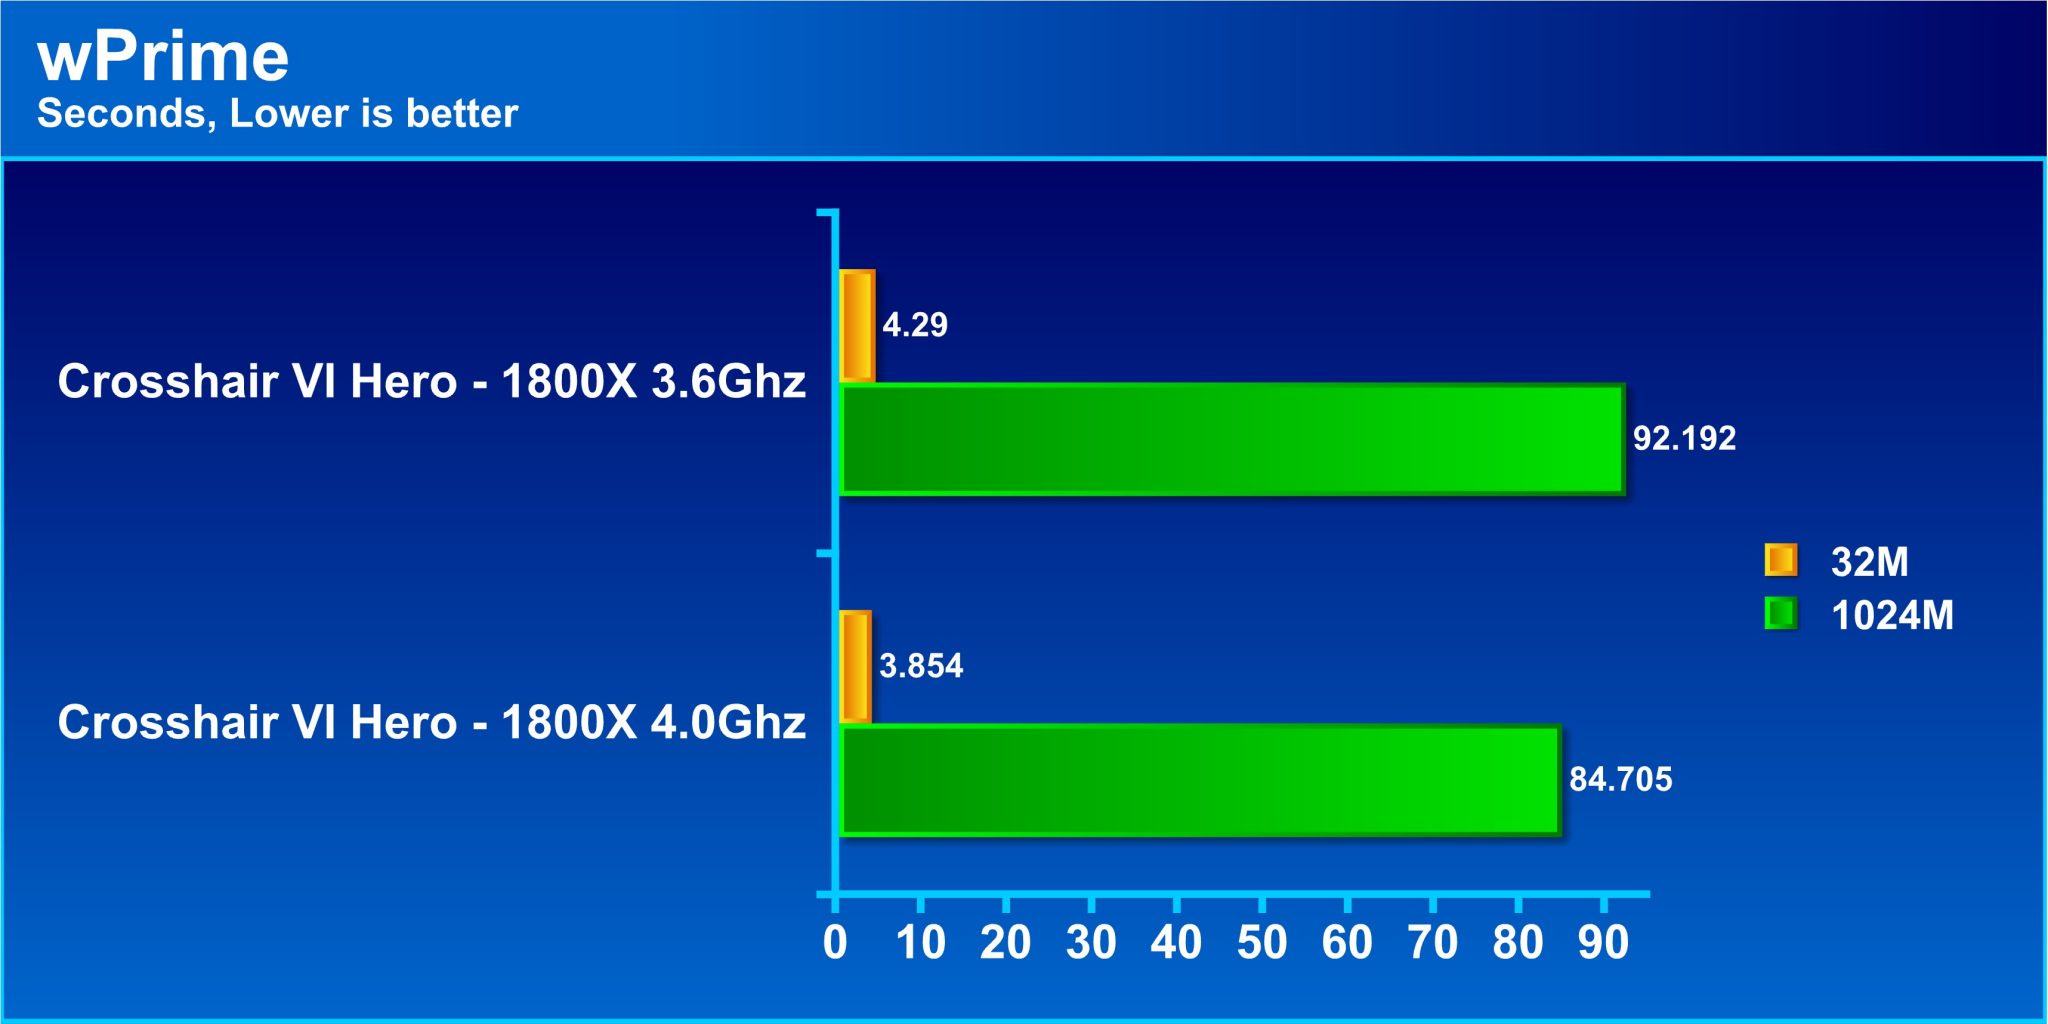
Switching over to wPrime, we get a look at how the CPU performs in a multi-threaded benchmark that takes full advantage of the power available. Again, lower times to achieve the calculation are better. Results are again not surprising, as the overclocked Ryzen 7 1800X out performs its stock speed settings.
Geekbench 4
“Geekbench 4 measures your system’s power and tells you whether your computer is ready to roar. How strong is your mobile device or desktop computer? How will it perform when push comes to crunch? These are the questions that Geekbench can answer.
CPU Benchmark
Each CPU workload models a real-world task or application, ensuring meaningful results. These tests are complex, avoiding simple problems with straightforward memory-access patterns, and push the limits of your system.”

Rounding out our testing is Geekbench 4, which provides both single and multi-threaded results, and offers the ability to easily compare results online with other users. Once again our overclocked results outshine the stock clocks of the Ryzen 7 1800X. The single-threaded results show an increase of 8% and multi-threaded increased by 6%, thanks to the overclock obtained on the Crosshair VI Hero.
CONCLUSION
As we get more and more familiar with the Ryzen lines of CPUs, the Ryzen 7 and Ryzen 5 which are available now, and the upcoming Ryzen 3 series, we will be exposed to more and more AM4 motherboards. And while there are multiple chipsets available for Ryzen like the B350 and A320, the X370 found on the ASUS ROG Crosshair VI Hero provides an “Enthusiast” level of performance and features.
From 14 rear-mounted USB ports to the PCIe 3.0 x4 capable M.2 slot and DDR4 support, the ASUS ROG Crosshair VI Hero really gives AMD fans a truly current platform to build upon. Many of these features were out of reach for AMD fans wanting a system that could keep up with an Intel counterpart, and the Crosshair VI Hero is a great foundation to start from. Support for both 2-way SLI and CrossFire ensures gamers can get the most performance out of their single or dual videocard setups.
We paired our motherboard review sample with AMD’s currently top-of-the-line CPU, the Ryzen 7 1800X, and found both stock and overclocked results to be very impressive. And while we were unable to get our DDR4 2666MHz memory running at advertised speeds, we were able to work past the 2133MHz JEDEC speeds and operate at 2400MHz. As AMD works to improve their firmware offerings, we will circle back to see how the Crosshair VI Hero performs with faster RAM.
Aesthetically, the ASUS ROG Crosshair VI Hero is top-notch, in our opinion. The black and gray base color scheme provides a nice canvas to customize via both on-board and optionally connected RGB lighting. And when it comes to cooling, the availability of both AM3 and AM4 mounting options can help keep build costs down by allowing users to migrate a cooler from an old build to a Ryzen build.
ASUS has really offered up exactly what consumers expected from a top-tier AM4 motherboard with the ROG Crosshair VI Hero. And while there were a few issue we ran into during our review, namely the RAM compatibility, we were very impressed with the board’s features and performance. There isn’t much else you could ask for from a first generation motherboard on the Ryzen architecture.
At the end of the day, the ASUS ROG Crosshair VI Hero is a top-notch contender for a platform that had a lot of hype coming up to its release. The Ryzen platform is still expanding, with the Ryzen 3 CPU line set to release later this year, and the ASUS ROG Crosshair VI Hero will help provide PC enthusiasts with a true enthusiast-level alternative to an Intel system. The current retail price for the ASUS ROG Crosshair VI Hero is just over $250USD on Amazon, which for some users may be a bit expensive. However, we think this is a fair prince when we consider just how much this motherboard provides. All things considered, we are proud to award the ASUS ROG Crosshair VI Hero the Bjorn3D Golden Bear Award.

| ASUS ROG Crosshair VI Hero Pros | ASUS ROG Crosshair VI Hero Cons |
|
|


I can overlook the non red/black theme for ROG boards. I can not overlook the price though. It has a lot of great features like the 3.1 gen 1 and gen 2. Asus boards seem to have USB 3 issues where you have too unplug/re-plug the connectors for mouse or keyboard. I would really like to switch to AMD’s side of the fence and play around with 8 cores. The problem is the memory issue and that rumor has it that this board is bricking it itself from overclocks even with latest bios/uefi flashes. Now with 16c/32t coming out and a x399 mobo on the way. I wonder if motherboard makers will get it right for ryzen memory releases. I dont want to buy a motherboard and be left in the dust by the people that made it.
great board with some great features..but the bios support from amd and asus is dreadful
I own this board. The so called “rumor” that this board is bricking itself has not been true since some boards died with the initial bios. That the bios support is “dreadful” is also untrue. Elmor and Raja of Asus have been very helpful to end users, not only in getting access to beta bios versions ahead of official release, but in giving helpful advice and solutions.
I run at 3.95 GHz with a Ryzen 1700, and 3466 MHz memory frequency at 14-14-14-14-34-1T timings. If you want good user experience information on the C6H, just check out the overclock.net thread for this board – http://www.overclock.net/t/1624603/rog-crosshair-vi-overclocking-thread
Good too know. Thanks for the info. The price is still extreme for mid tier.
I have also read that this board does not support DTS surround sound after a certain update and that it’s using ASM1142 for 3.1 usb that makes have 20 percent slower than other board makers in the x370 line.
I bought this board and it works very well. The cpu OC is another matter though. I can’t keep it from blue screening at anything over 3.4GHz. 1403 BIOS. Going to try 9920 or 1501 soon.
At some point I needed to check whether my laptop supports a RAM upgrade. That’s
when I discovered https://znayka.com.ua.
I couldn’t find step-by-step guidance on most websites. Many sources were confusing.
On this site I found clear explanations about RAM compatibility, along with illustrations that made everything much easier to understand.
It’s worth visiting this platform if you want reliable information about laptops and hardware upgrades.